check engine FIAT TALENTO 2016 2.G Owner's Manual
[x] Cancel search | Manufacturer: FIAT, Model Year: 2016, Model line: TALENTO, Model: FIAT TALENTO 2016 2.GPages: 232, PDF Size: 5.01 MB
Page 129 of 232
Irregular operation
When the system detects an
operational irregularity, the dedicated
message appears on the display and
the warning lights
andturn
on. In this case, the ESC and traction
control system are deactivated. Contact
a Fiat Dealership.
PBA (Panic Brake
Assist) SYSTEM
This is a complementary system to the
ABS that lets you reduce the vehicle's
braking distance.
Operating principle
The system detects an emergency
braking situation. In such cases, the
power brake immediately creates the
maximum braking, causing the ABS
system to also intervene.
ABS intervention lasts until the brake
pedal is released.
Hazard warning lights on
Depending on the versions, these lights
can go on when you slow down
abruptly.
Anticipated braking
Depending on the versions, when you
quickly release the accelerator, the
system anticipates braking so as to
diminish the braking distance.
When using Cruise Control:
if you are using the accelerator pedal,
with you release it, the system can
activate;
if you are not using the accelerator
pedal, the system will not activate.
Irregular operation
When the system detects an
operational irregularity, the message to
that effect will appear on the instrument
panel with the alarm light
going
on.
Contact a Fiat Dealership.
TSA (Trailer Stability
Assist) DRIVING
ASSISTANCE WITH A
TRAILER
This system helps you maintain control
of the vehicle in case you are using a
trailer. It detects the swinging motion of
the trailer in certain driving conditions.
Operating conditions
The two system must be authorised
by the Fiat Dealership;
the wiring has to be approved by a
Fiat Dealership;
the trailer has to be connected to the
vehicle.
Operating principle
The function stabilises the vehicle by:
asymmetrical front wheel braking to
reduce swinging caused by the trailer;
four wheel braking and a limitation in
engine torque to reduce the vehicle
speed until the swinging stops.The warning light
flashes on the
instrument panel to inform you of the
situation.
TRACTION PLUS (GRIP
CONTROL)
136)
22)
Where the vehicle is provided with one,
road grip check ensures easier control
of the vehicle in conditions where grip is
reduced (crumbly terrain).
"Road" mode
When the vehicle is started, the
appropriate message appears on the
display screen. The indicator light
on the instrument panel is off. This
position guarantees optimal use in
normal road conditions (dry, wet
roadbed, light snow, etc.).
The "Road" mode uses the traction
control system functions.
"Traction +" Mode
Press button 1 fig. 201: the warning
light
on the instrument panel turns
on along with the dedicated message.
127
Page 131 of 232
TPMS – Tyre
Pressure
Monitoring System
(For versions/markets where provided)
Tyre pressure loss warning
This system warns the driver of any
pressure loss in one or more of the
tyres.
Operating principle
Each wheel (except the spare) has a
built-in sensor in the inflation valve that
measures tyre pressure at regular
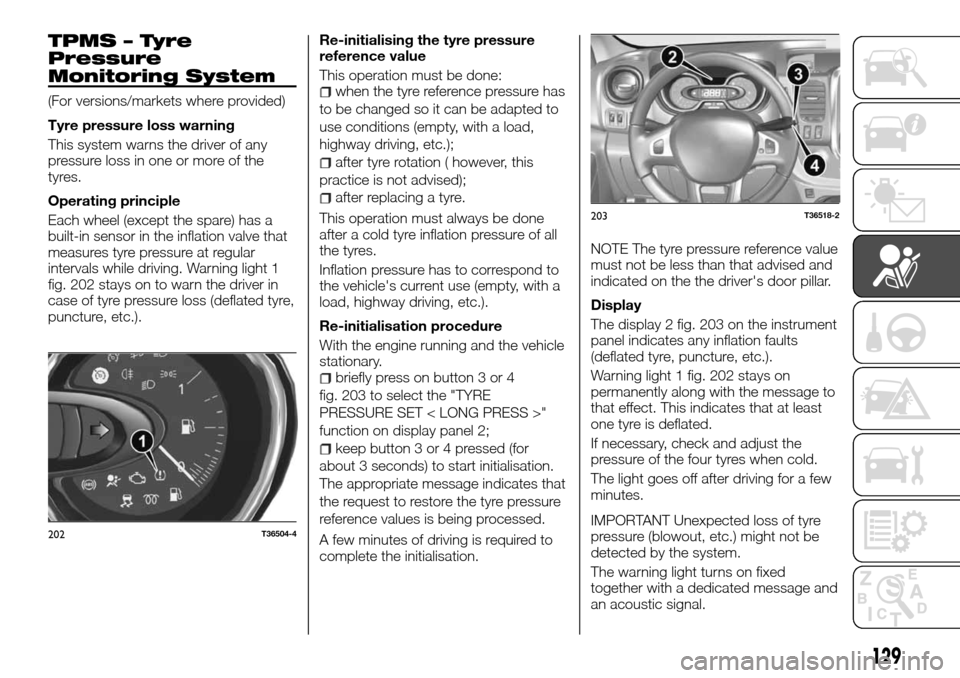
intervals while driving. Warning light 1
fig. 202 stays on to warn the driver in
case of tyre pressure loss (deflated tyre,
puncture, etc.).Re-initialising the tyre pressure
reference value
This operation must be done:when the tyre reference pressure has
to be changed so it can be adapted to
use conditions (empty, with a load,
highway driving, etc.);
after tyre rotation ( however, this
practice is not advised);
after replacing a tyre.
This operation must always be done
after a cold tyre inflation pressure of all
the tyres.
Inflation pressure has to correspond to
the vehicle's current use (empty, with a
load, highway driving, etc.).
Re-initialisation procedure
With the engine running and the vehicle
stationary.
briefly press on button 3 or 4
fig. 203 to select the "TYRE
PRESSURE SET < LONG PRESS >"
function on display panel 2;
keep button 3 or 4 pressed (for
about 3 seconds) to start initialisation.
The appropriate message indicates that
the request to restore the tyre pressure
reference values is being processed.
A few minutes of driving is required to
complete the initialisation.NOTE The tyre pressure reference value
must not be less than that advised and
indicated on the the driver's door pillar.
Display
The display 2 fig. 203 on the instrument
panel indicates any inflation faults
(deflated tyre, puncture, etc.).
Warning light 1 fig. 202 stays on
permanently along with the message to
that effect. This indicates that at least
one tyre is deflated.
If necessary, check and adjust the
pressure of the four tyres when cold.
The light goes off after driving for a few
minutes.
IMPORTANT Unexpected loss of tyre
pressure (blowout, etc.) might not be
detected by the system.
The warning light turns on fixed
together with a dedicated message and
an acoustic signal.
202T36504-4
203T36518-2
129
Page 137 of 232
PARKING THE
VEHICLE
145) 146)
26) 27) 28)
Proceed as follows when parking and
leaving the vehicle:
engage a gear (1st gear if facing
uphill or reverse if facing downhill) and
leave the wheels turned;
stop the engine and engage the
handbrake;
always remove the ignition key.
Block the wheels with a wedge or a
stone if the vehicle is parked on a steep
slope.
IMPORTANTNEVERleave the vehicle
with the gear in neutral.
HANDBRAKE
To engage the handbrake, pull the lever
up and check that the vehicle is
immobilised properly. The
warning
light will come on in the instrument
panel.
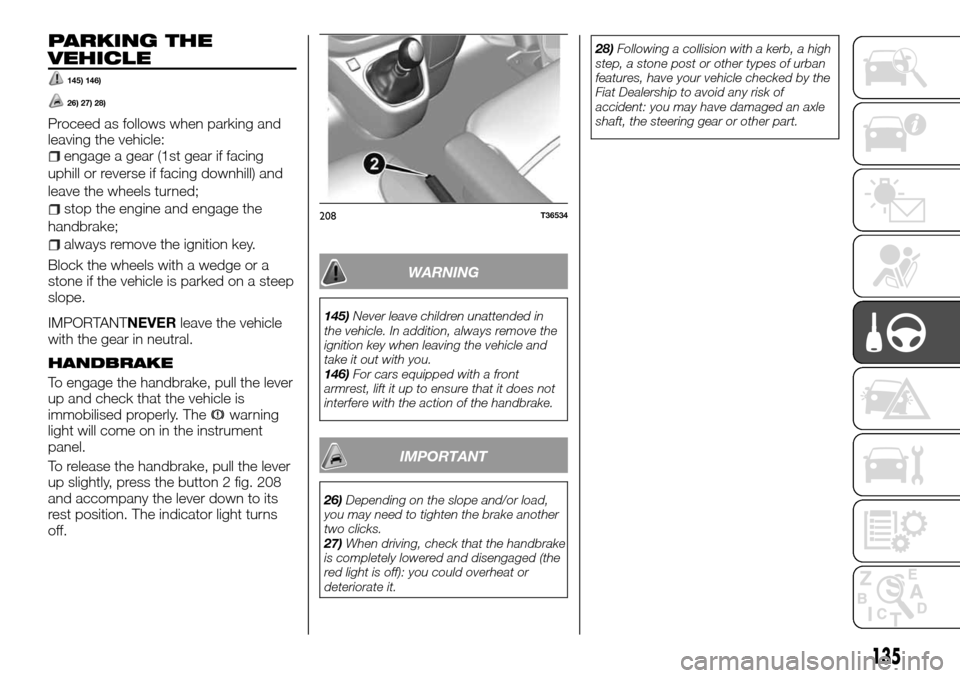
To release the handbrake, pull the lever
up slightly, press the button 2 fig. 208
and accompany the lever down to its
rest position. The indicator light turns
off.
WARNING
145)Never leave children unattended in
the vehicle. In addition, always remove the
ignition key when leaving the vehicle and
take it out with you.
146)For cars equipped with a front
armrest, lift it up to ensure that it does not
interfere with the action of the handbrake.
IMPORTANT
26)Depending on the slope and/or load,
you may need to tighten the brake another
two clicks.
27)When driving, check that the handbrake
is completely lowered and disengaged (the
red light is off): you could overheat or
deteriorate it.28)Following a collision with a kerb, a high
step, a stone post or other types of urban
features, have your vehicle checked by the
Fiat Dealership to avoid any risk of
accident: you may have damaged an axle
shaft, the steering gear or other part.
208T36534
135
Page 160 of 232
JUMP STARTING
173) 174) 175) 176) 177)
39)
WARNING
173)Check that the wires A and B are not
touching and that the positive cable A does
not touch any metal component of the
vehicle providing the current. You risk injury
and/or damage to the vehicle.
174)Before opening the bonnet, make
sure that the engine is off and that the
ignition key is in the "S" (Stop) position.
Follow the indications on the plate
underneath the bonnet.
175)Do not get too close to the radiator
cooling fan: the electric fan may start;
danger of injury. Scarves, ties and other
loose clothing might be pulled by moving
parts.
176)Remove any metal objects (e.g. rings,
watches, bracelets), that might cause an
accidental electrical contact and cause
serious injury.
177)The batteries contain acid that can
burn skin or eyes. Batteries produce
hydrogen, which is easily flammable and
explosive. Therefore, keep away flames or
devices which may cause sparks.
IMPORTANT
39)Never use a fast battery-charger to
start the engine as this could damage the
electronic systems of your vehicle,
particularly the ignition and engine fuel
supply control units.
260T36708
261T36629
158
IN AN EMERGENCY
Starting the engine that supplies
electrical power and keeping it at
medium speed.
To start, if you use the battery from
another vehicle, you need to have the
right cables (large size) from a Fiat
Dealership or, if you already have them,
make sure they are in perfect condition.
The two batteries have to have nominal
identical voltage: 12 Volt The battery
that supplies the power has to have a
capacity (amperes/hour, Ah) that is at
least identical to the dead battery.
Make sure that there is no contact
between the two vehicles (risk of short
circuit at the moment the positive poles
are in contact) and that the dead
battery is well connected. Disengage
the starter device.Depending on the versions, unhook the
battery guard.
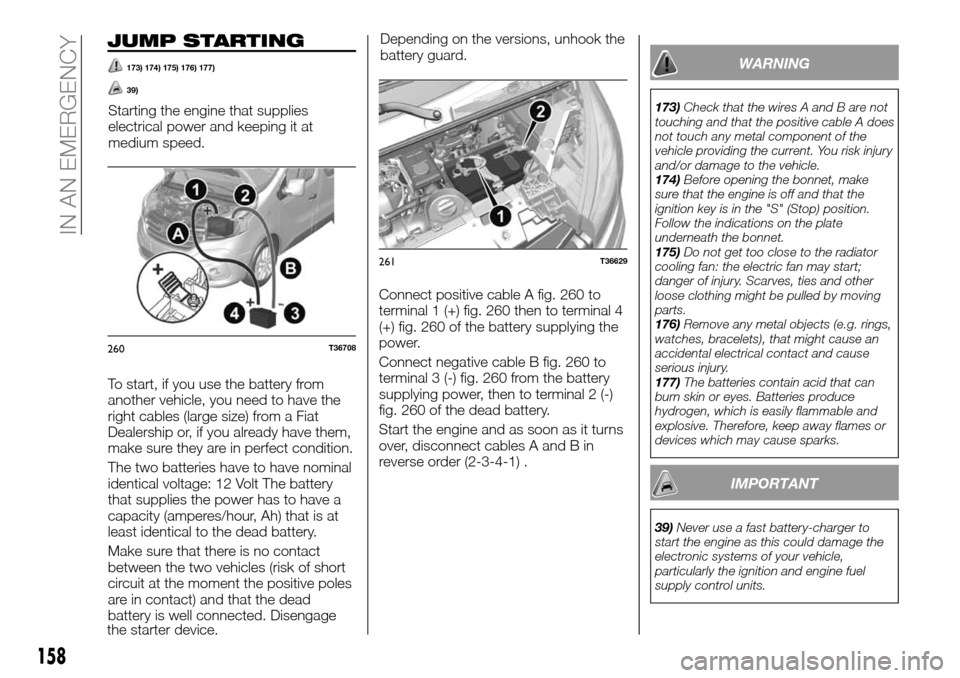
Connect positive cable A fig. 260 to
terminal 1 (+) fig. 260 then to terminal 4
(+) fig. 260 of the battery supplying the
power.
Connect negative cable B fig. 260 to
terminal 3 (-) fig. 260 from the battery
supplying power, then to terminal 2 (-)
fig. 260 of the dead battery.
Start the engine and as soon as it turns
over, disconnect cables A and B in
reverse order (2-3-4-1) .
Page 161 of 232
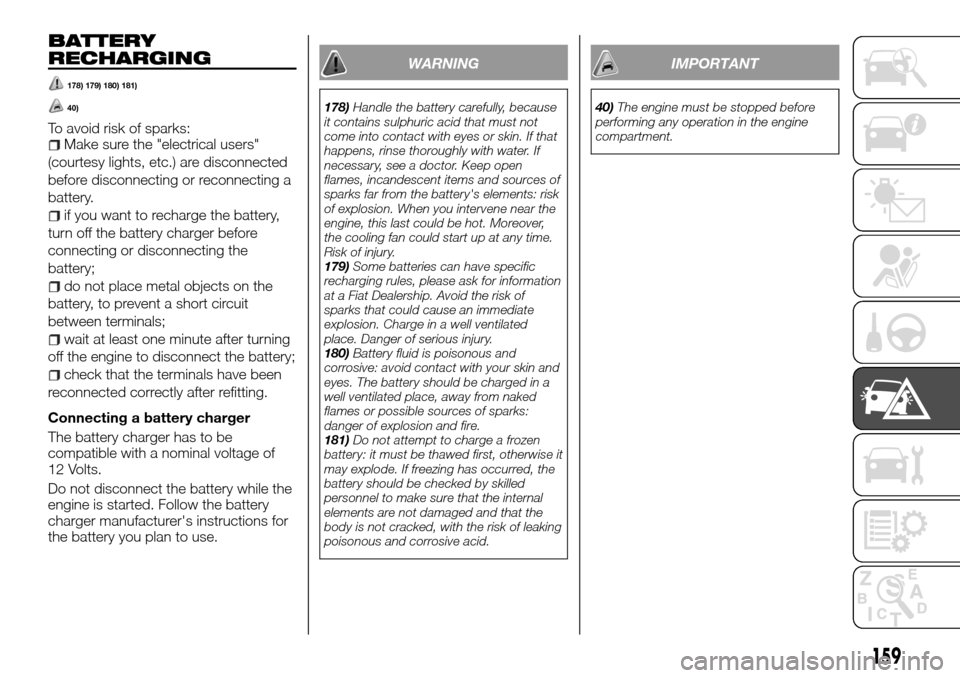
BATTERY
RECHARGING
178) 179) 180) 181)
40)
To avoid risk of sparks:Make sure the "electrical users"
(courtesy lights, etc.) are disconnected
before disconnecting or reconnecting a
battery.
if you want to recharge the battery,
turn off the battery charger before
connecting or disconnecting the
battery;
do not place metal objects on the
battery, to prevent a short circuit
between terminals;
wait at least one minute after turning
off the engine to disconnect the battery;
check that the terminals have been
reconnected correctly after refitting.
Connecting a battery charger
The battery charger has to be
compatible with a nominal voltage of
12 Volts.
Do not disconnect the battery while the
engine is started. Follow the battery
charger manufacturer's instructions for
the battery you plan to use.
WARNING
178)Handle the battery carefully, because
it contains sulphuric acid that must not
come into contact with eyes or skin. If that
happens, rinse thoroughly with water. If
necessary, see a doctor. Keep open
flames, incandescent items and sources of
sparks far from the battery's elements: risk
of explosion. When you intervene near the
engine, this last could be hot. Moreover,
the cooling fan could start up at any time.
Risk of injury.
179)Some batteries can have specific
recharging rules, please ask for information
at a Fiat Dealership. Avoid the risk of
sparks that could cause an immediate
explosion. Charge in a well ventilated
place. Danger of serious injury.
180)Battery fluid is poisonous and
corrosive: avoid contact with your skin and
eyes. The battery should be charged in a
well ventilated place, away from naked
flames or possible sources of sparks:
danger of explosion and fire.
181)Do not attempt to charge a frozen
battery: it must be thawed first, otherwise it
may explode. If freezing has occurred, the
battery should be checked by skilled
personnel to make sure that the internal
elements are not damaged and that the
body is not cracked, with the risk of leaking
poisonous and corrosive acid.
IMPORTANT
40)The engine must be stopped before
performing any operation in the engine
compartment.
159
Page 166 of 232
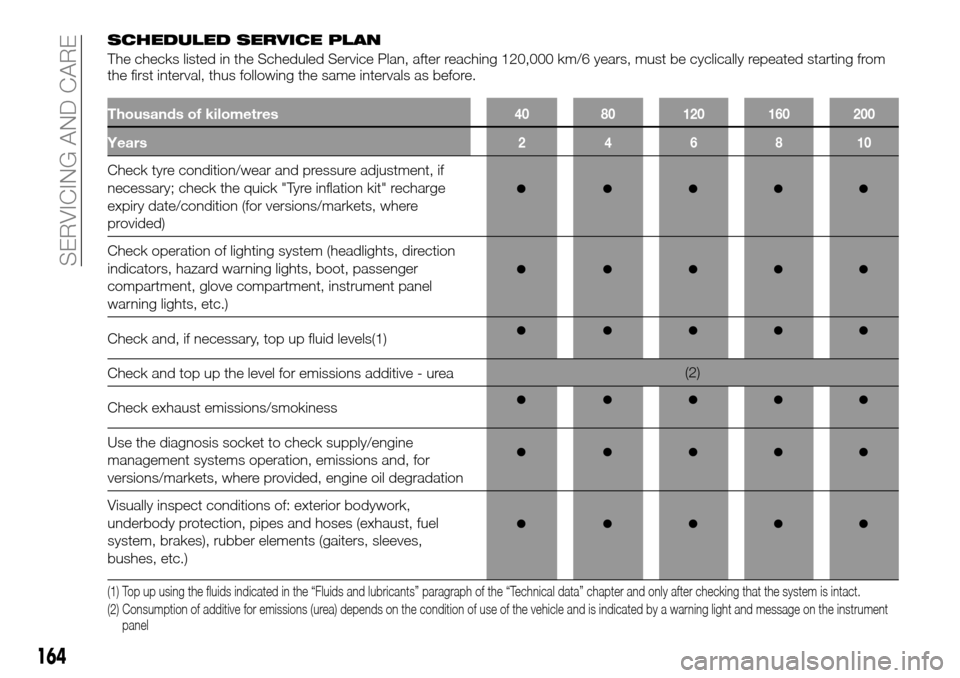
SCHEDULED SERVICE PLAN
The checks listed in the Scheduled Service Plan, after reaching 120,000 km/6 years, must be cyclically repeated starting from
the first interval, thus following the same intervals as before.
Thousands of kilometres40 80 120 160 200
Years246810
Check tyre condition/wear and pressure adjustment, if
necessary; check the quick "Tyre inflation kit" recharge
expiry date/condition (for versions/markets, where
provided)
Check operation of lighting system (headlights, direction
indicators, hazard warning lights, boot, passenger
compartment, glove compartment, instrument panel
warning lights, etc.)
Check and, if necessary, top up fluid levels(1)
Check and top up the level for emissions additive - urea(2)
Check exhaust emissions/smokiness
Use the diagnosis socket to check supply/engine
management systems operation, emissions and, for
versions/markets, where provided, engine oil degradation
Visually inspect conditions of: exterior bodywork,
underbody protection, pipes and hoses (exhaust, fuel
system, brakes), rubber elements (gaiters, sleeves,
bushes, etc.)
(1) Top up using the fluids indicated in the “Fluids and lubricants” paragraph of the “Technical data” chapter and only after checking that the system is intact.
(2) Consumption of additive for emissions (urea) depends on the condition of use of the vehicle and is indicated by a warning light and message on the instrument
panel
164
SERVICING AND CARE
Page 167 of 232
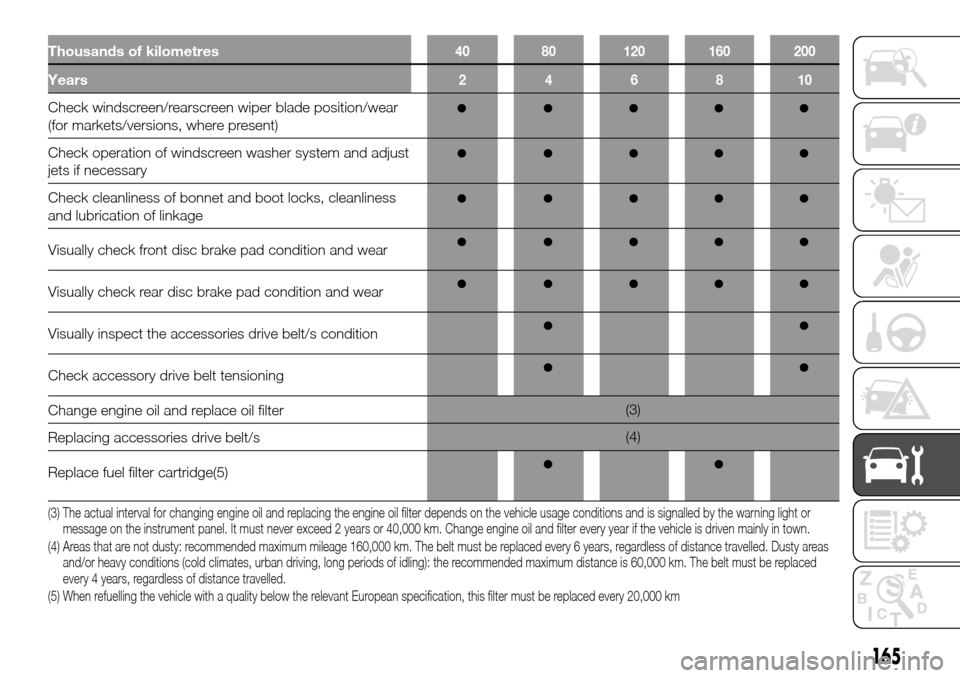
Thousands of kilometres40 80 120 160 200
Years246810
Check windscreen/rearscreen wiper blade position/wear
(for markets/versions, where present)
Check operation of windscreen washer system and adjust
jets if necessary
Check cleanliness of bonnet and boot locks, cleanliness
and lubrication of linkage
Visually check front disc brake pad condition and wear
Visually check rear disc brake pad condition and wear
Visually inspect the accessories drive belt/s condition
Check accessory drive belt tensioning
Change engine oil and replace oil filter(3)
Replacing accessories drive belt/s(4)
Replace fuel filter cartridge(5)
(3) The actual interval for changing engine oil and replacing the engine oil filter depends on the vehicle usage conditions and is signalled by the warning light or
message on the instrument panel. It must never exceed 2 years or 40,000 km. Change engine oil and filter every year if the vehicle is driven mainly in town.
(4) Areas that are not dusty: recommended maximum mileage 160,000 km. The belt must be replaced every 6 years, regardless of distance travelled. Dustyareas
and/or heavy conditions (cold climates, urban driving, long periods of idling): the recommended maximum distance is 60,000 km. The belt must be replaced
every 4 years, regardless of distance travelled.
(5) When refuelling the vehicle with a quality below the relevant European specification, this filter must be replaced every 20,000 km
165
Page 170 of 232
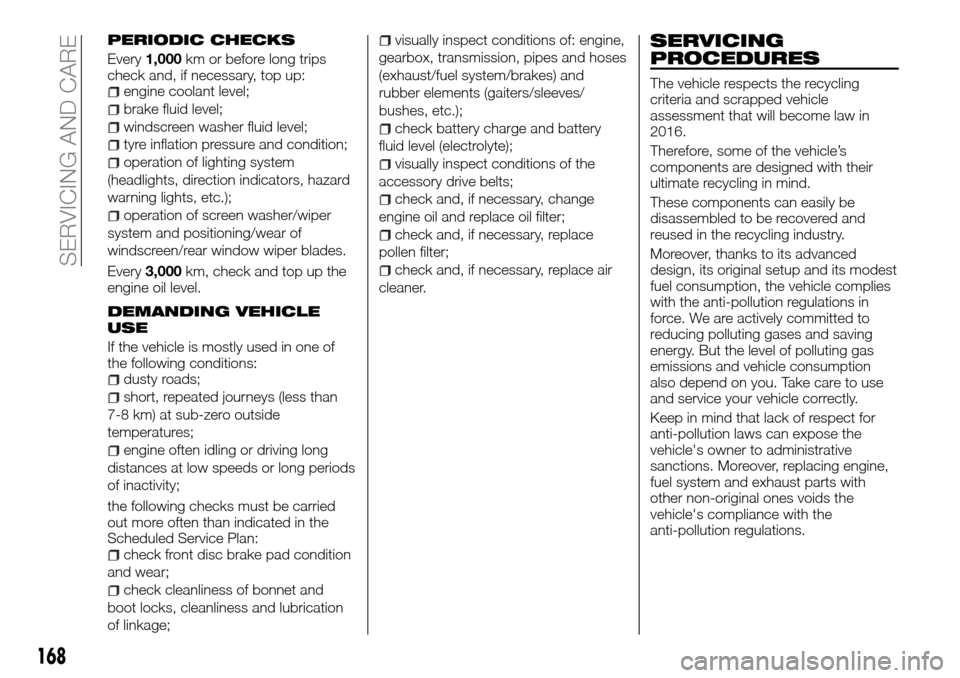
PERIODIC CHECKS
Every1,000km or before long trips
check and, if necessary, top up:
engine coolant level;
brake fluid level;
windscreen washer fluid level;
tyre inflation pressure and condition;
operation of lighting system
(headlights, direction indicators, hazard
warning lights, etc.);
operation of screen washer/wiper
system and positioning/wear of
windscreen/rear window wiper blades.
Every3,000km, check and top up the
engine oil level.
DEMANDING VEHICLE
USE
If the vehicle is mostly used in one of
the following conditions:
dusty roads;
short, repeated journeys (less than
7-8 km) at sub-zero outside
temperatures;
engine often idling or driving long
distances at low speeds or long periods
of inactivity;
the following checks must be carried
out more often than indicated in the
Scheduled Service Plan:
check front disc brake pad condition
and wear;
check cleanliness of bonnet and
boot locks, cleanliness and lubrication
of linkage;
visually inspect conditions of: engine,
gearbox, transmission, pipes and hoses
(exhaust/fuel system/brakes) and
rubber elements (gaiters/sleeves/
bushes, etc.);
check battery charge and battery
fluid level (electrolyte);
visually inspect conditions of the
accessory drive belts;
check and, if necessary, change
engine oil and replace oil filter;
check and, if necessary, replace
pollen filter;
check and, if necessary, replace air
cleaner.
SERVICING
PROCEDURES
The vehicle respects the recycling
criteria and scrapped vehicle
assessment that will become law in
2016.
Therefore, some of the vehicle’s
components are designed with their
ultimate recycling in mind.
These components can easily be
disassembled to be recovered and
reused in the recycling industry.
Moreover, thanks to its advanced
design, its original setup and its modest
fuel consumption, the vehicle complies
with the anti-pollution regulations in
force. We are actively committed to
reducing polluting gases and saving
energy. But the level of polluting gas
emissions and vehicle consumption
also depend on you. Take care to use
and service your vehicle correctly.
Keep in mind that lack of respect for
anti-pollution laws can expose the
vehicle's owner to administrative
sanctions. Moreover, replacing engine,
fuel system and exhaust parts with
other non-original ones voids the
vehicle's compliance with the
anti-pollution regulations.
168
SERVICING AND CARE
Page 171 of 232
vehicle’s guarantee to be maintained
are available here.
ENGINE REGISTRATION
The air filter, oil filter: a dirty cartridge
reduces performance. You need to
replace it.
Minimum: no adjustment is needed.
CHECKING LEVELS
ENGINE OIL
An engine normally consumes oil to
lubricate it and cool the moving parts,
and it is normal to have to top up the
lubricating circuit between two oil
changes.
However, if the oil consumption is more
than 0.5 litres every 1000 km after the
run-in period, you need to contact a
Fiat Dealership.
IMPORTANT Periodically check the oil
level and in any case before long trips,
otherwise you risk damaging the
engine.
187) 185) 186) 188) 189) 190) 191) 192) 193)
44) 45) 46) 47)
5)
Oil level check
The oil level should be checked with the
vehicle on a flat surface and the engine
stopped and cold.
To know the oil level exactly and to
make sure it has not exceeded the
maximum level (risk of damaging the
engine), you need to use the dipstick.The instrument panel display only
warns you when the level is at
minimum.
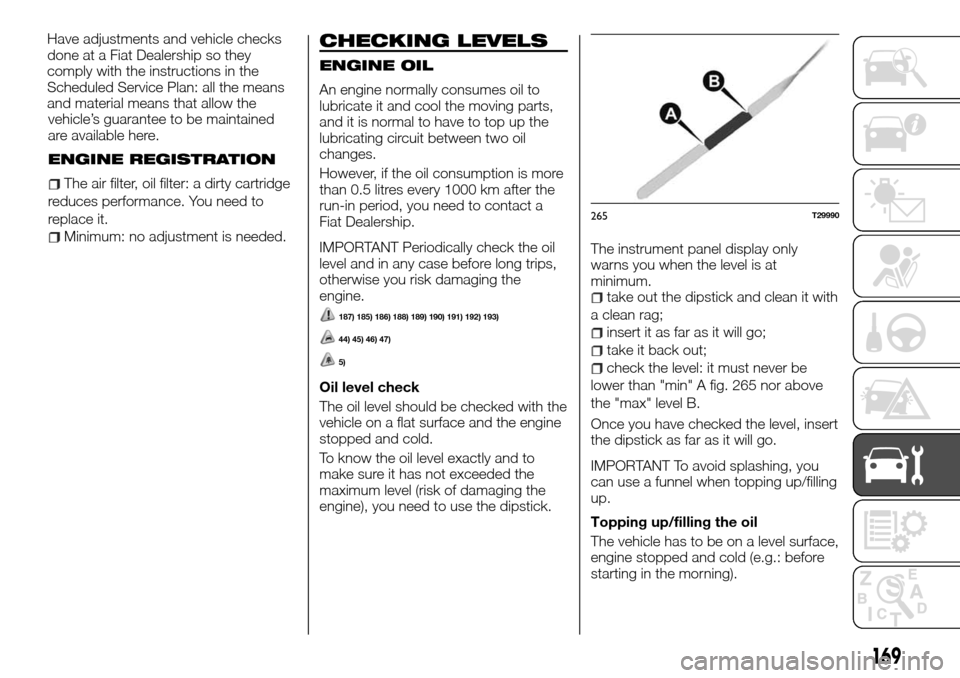
take out the dipstick and clean it with
a clean rag;
insert it as far as it will go;
take it back out;
check the level: it must never be
lower than "min" A fig. 265 nor above
the "max" level B.
Once you have checked the level, insert
the dipstick as far as it will go.
IMPORTANT To avoid splashing, you
can use a funnel when topping up/filling
up.
Topping up/filling the oil
The vehicle has to be on a level surface,
engine stopped and cold (e.g.: before
starting in the morning).
265T29990
169
Have adjustments and vehicle checks
done at a Fiat Dealership so they
comply with the instructions in the
Scheduled Service Plan: all the means
and material means that allow the
Page 172 of 232
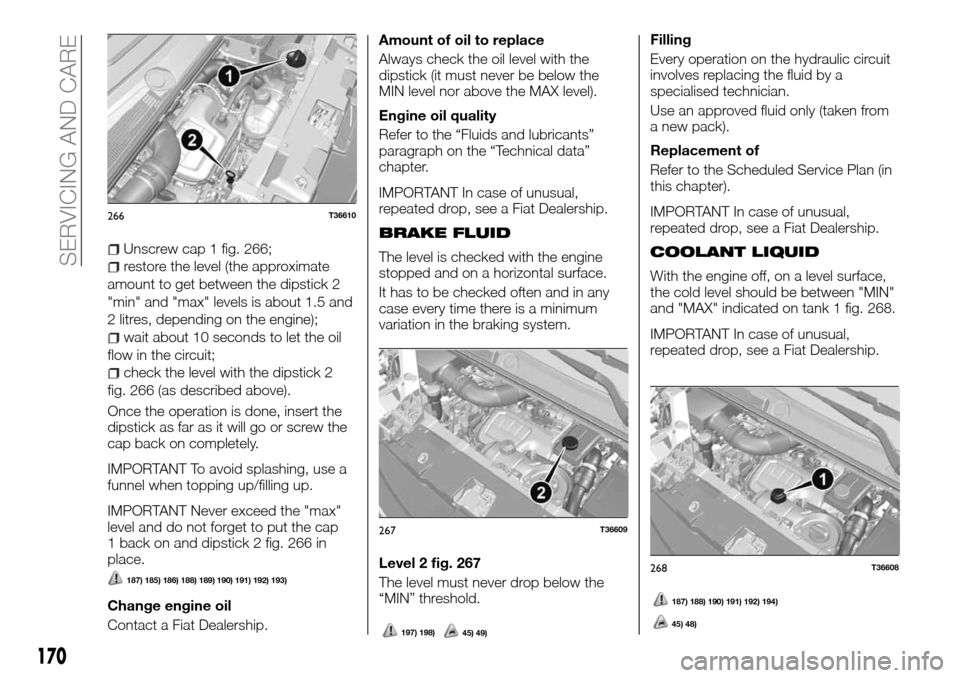
Unscrew cap 1 fig. 266;
restore the level (the approximate
amount to get between the dipstick 2
"min" and "max" levels is about 1.5 and
2 litres, depending on the engine);
wait about 10 seconds to let the oil
flow in the circuit;
check the level with the dipstick 2
fig. 266 (as described above).
Once the operation is done, insert the
dipstick as far as it will go or screw the
cap back on completely.
IMPORTANT To avoid splashing, use a
funnel when topping up/filling up.
IMPORTANT Never exceed the "max"
level and do not forget to put the cap
1 back on and dipstick 2 fig. 266 in
place.
187) 185) 186) 188) 189) 190) 191) 192) 193)
Change engine oil
Contact a Fiat Dealership.Amount of oil to replace
Always check the oil level with the
dipstick (it must never be below the
MIN level nor above the MAX level).
Engine oil quality
Refer to the “Fluids and lubricants”
paragraph on the “Technical data”
chapter.
IMPORTANT In case of unusual,
repeated drop, see a Fiat Dealership.
BRAKE FLUID
The level is checked with the engine
stopped and on a horizontal surface.
It has to be checked often and in any
case every time there is a minimum
variation in the braking system.
Level 2 fig. 267
The level must never drop below the
“MIN” threshold.
197) 198)45) 49)
Filling
Every operation on the hydraulic circuit
involves replacing the fluid by a
specialised technician.
Use an approved fluid only (taken from
a new pack).
Replacement of
Refer to the Scheduled Service Plan (in
this chapter).
IMPORTANT In case of unusual,
repeated drop, see a Fiat Dealership.
COOLANT LIQUID
With the engine off, on a level surface,
the cold level should be between "MIN"
and "MAX" indicated on tank 1 fig. 268.
IMPORTANT In case of unusual,
repeated drop, see a Fiat Dealership.
266T36610
267T36609
268T36608
170
SERVICING AND CARE
187) 188) 190) 191) 192) 194)
45) 48)