bulb FIAT TALENTO 2017 Owner handbook (in English)
[x] Cancel search | Manufacturer: FIAT, Model Year: 2017, Model line: TALENTO, Model: FIAT TALENTO 2017Pages: 228, PDF Size: 4.47 MB
Page 11 of 228
GRAPHICAL INDEX
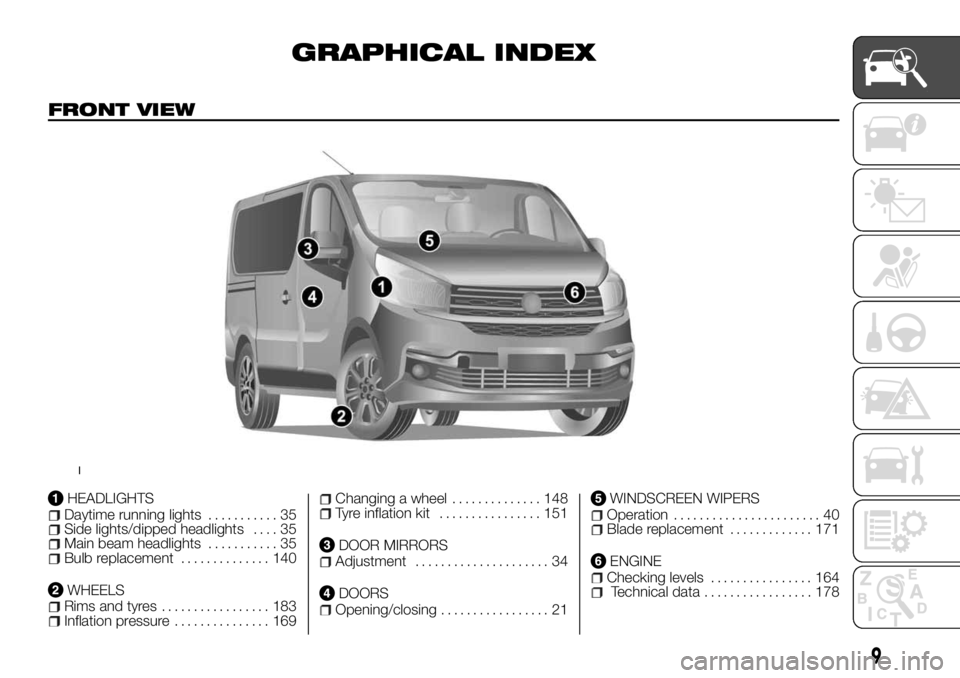
FRONT VIEW
HEADLIGHTSDaytime running lights........... 35Side lights/dipped headlights.... 35Main beam headlights........... 35Bulb replacement.............. 140
WHEELSRims and tyres................. 183Inflation pressure............... 169
Changing a wheel.............. 148Tyre inflation kit................ 151
DOOR MIRRORSAdjustment..................... 34
DOORSOpening/closing................. 21
WINDSCREEN WIPERSOperation....................... 40Blade replacement............. 171
ENGINEChecking levels................ 164Technical data................. 178
1
9
Page 12 of 228
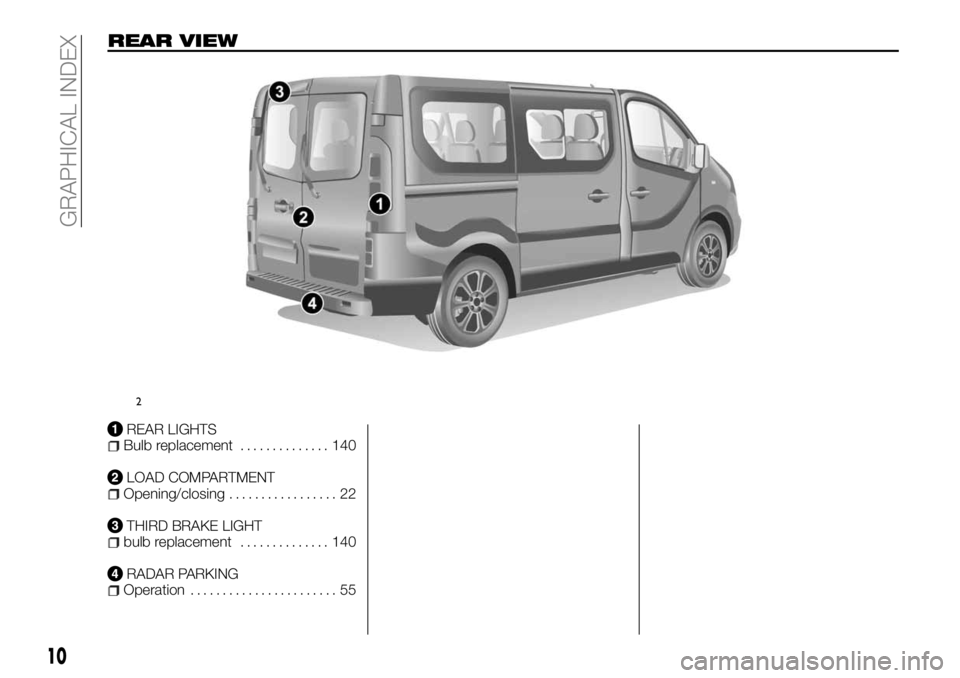
REAR VIEW
REAR LIGHTSBulb replacement.............. 140
LOAD COMPARTMENTOpening/closing................. 22
THIRD BRAKE LIGHTbulb replacement.............. 140
RADAR PARKINGOperation....................... 55
2
10
GRAPHICAL INDEX
Page 139 of 228
IN AN EMERGENCY
A punctured tyre or a burnt-out bulb?
At times, a problem may interfere with
our journey.
The pages on emergencies can help
you to deal with critical situations
independently and with calm.
In an emergency we recommend that
you call the toll free phone number
found in the Warranty Booklet.
It is also possible to call the national or
international universal freephone
number to search for the nearest Fiat
Dealership.HAZARD WARNING LIGHTS.....139
REPLACING AN INTERNAL BULB .139
REPLACING AN EXTERNAL BULB .140
PASSENGER COMPARTMENT
FUSES...................144
IN THE EVENT OF A PUNCTURE . .148
CHANGING A WHEEL.........148
TYRE INFLATION KIT..........151
JUMP STARTING............153
BATTERY RECHARGING.......154
TOWING THE VEHICLE........155
137
Page 140 of 228

HAZARD WARNING
LIGHTS
CONTROL
Press button 2 fig. 223. This
simultaneously activates the four
flashing arrows and those on the side. It
must be used only in case of danger to
warn other drivers that you have had to
stop in an unusual or prohibited place
or in special driving or traffic conditions.
Depending on the trim, in case you
stop abruptly, the emergency lights can
go on automatically. You can turn them
off by pressing the button 2
fig. 223 once.
REPLACING AN
INTERNAL BULB
152) 153) 154) 155)
Courtesy lights
Remove the lens from the courtesy light
concerned (1 fig. 224, 2 and 3 fig. 225,
6 and 7 fig. 226 ) using a screwdriver.
Pull the bulb downwards to remove
from its housing.
Type of bulb: W6W
Replace the bulb and reposition the
press-fit lens.
Vehicles with reading light
Type of bulb 2 fig. 227: pin type, 10W
Type of reading light bulb 3 fig. 227:
W5W
223T36520
224T36566
225T36567
226T36631
227T38811
138
IN AN EMERGENCY
Page 141 of 228
Glove compartment light
Remove the lens using a screwdriver.
Pull the bulb 4 fig. 228 to remove from
its housing.
Types of bulbs: W5W
Replace the bulb and reposition the
press-fit lens.
Boot light
Remove the lens using a screwdriver.
Pull the bulb 5 fig. 229 to remove from
its housing.
Types of bulbs: W5WReplace the bulb and reposition the
press-fit lens.
WARNING
152)Modifications or repairs to the electric
system that are not carried out properly or
do not take the system technical
specifications into account can cause
malfunctions leading to the risk of fire.
153)Halogen bulbs contain pressurised
gas, in the case of breakage they may
burst causing glass fragments to be
projected outwards.
154)Only replace bulbs when the engine is
off. Also ensure that the engine is cold, to
prevent the risk of burns.
155)The bulbs are under pressure and
could explode when being replaced. Risk
of injury.
REPLACING AN
EXTERNAL BULB
156) 157) 158) 159) 160)
29)
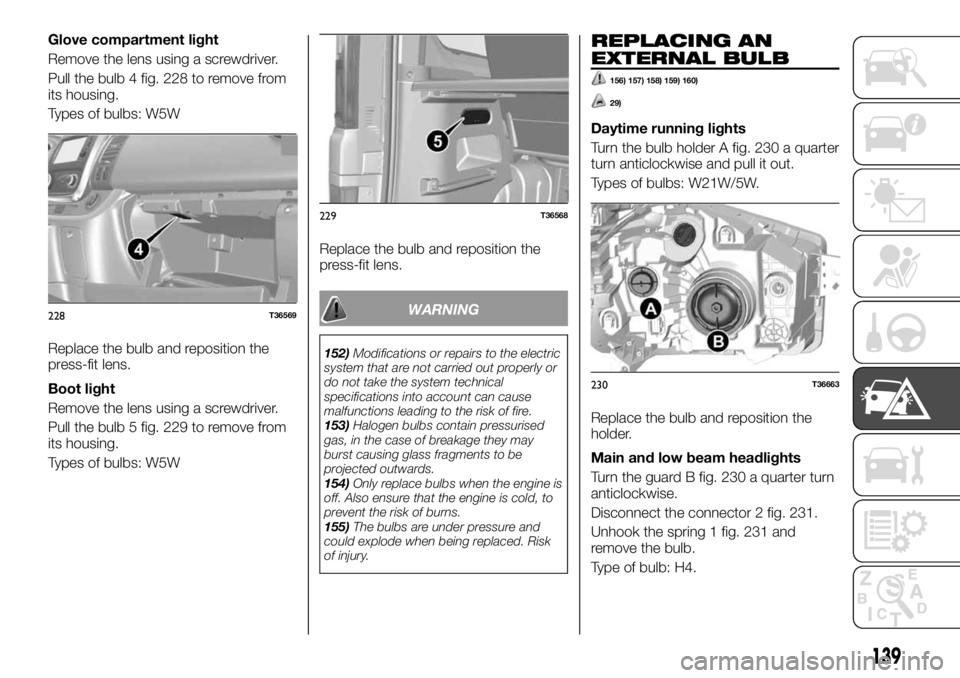
Daytime running lights
Turn the bulb holder A fig. 230 a quarter
turn anticlockwise and pull it out.
Types of bulbs: W21W/5W.
Replace the bulb and reposition the
holder.
Main and low beam headlights
Turn the guard B fig. 230 a quarter turn
anticlockwise.
Disconnect the connector 2 fig. 231.
Unhook the spring 1 fig. 231 and
remove the bulb.
Type of bulb: H4.
228T36569
229T36568
230T36663
139
Page 142 of 228
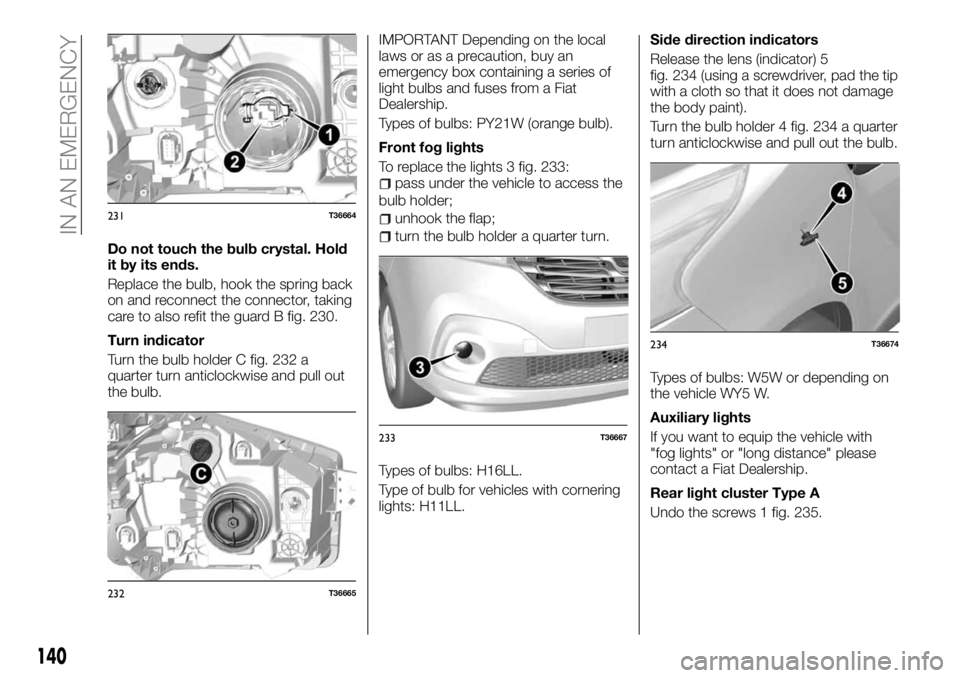
Do not touch the bulb crystal. Hold
it by its ends.
Replace the bulb, hook the spring back
on and reconnect the connector, taking
care to also refit the guard B fig. 230.
Turn indicator
Turn the bulb holder C fig. 232 a
quarter turn anticlockwise and pull out
the bulb.IMPORTANT Depending on the local
laws or as a precaution, buy an
emergency box containing a series of
light bulbs and fuses from a Fiat
Dealership.
Types of bulbs: PY21W (orange bulb).
Front fog lights
To replace the lights 3 fig. 233:
pass under the vehicle to access the
bulb holder;
unhook the flap;
turn the bulb holder a quarter turn.
Types of bulbs: H16LL.
Type of bulb for vehicles with cornering
lights: H11LL.Side direction indicators
Release the lens (indicator) 5
fig. 234 (using a screwdriver, pad the tip
with a cloth so that it does not damage
the body paint).
Turn the bulb holder 4 fig. 234 a quarter
turn anticlockwise and pull out the bulb.
Types of bulbs: W5W or depending on
the vehicle WY5 W.
Auxiliary lights
If you want to equip the vehicle with
"fog lights" or "long distance" please
contact a Fiat Dealership.
Rear light cluster Type A
Undo the screws 1 fig. 235.
231T36664
232T36665
233T36667
234T36674
140
IN AN EMERGENCY
Page 143 of 228
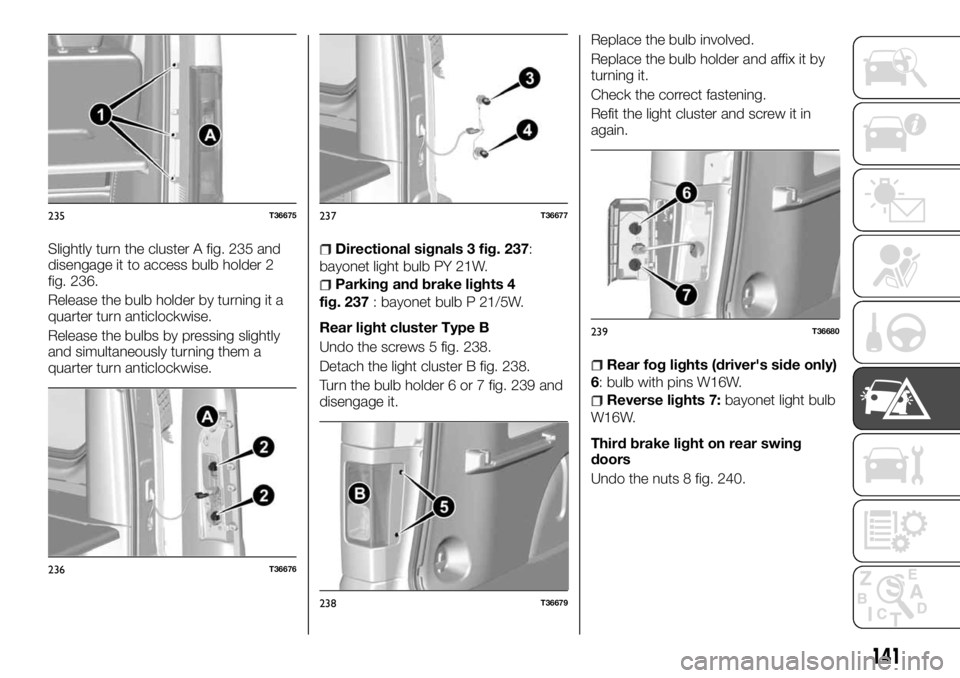
Slightly turn the cluster A fig. 235 and
disengage it to access bulb holder 2
fig. 236.
Release the bulb holder by turning it a
quarter turn anticlockwise.
Release the bulbs by pressing slightly
and simultaneously turning them a
quarter turn anticlockwise.Directional signals 3 fig. 237:
bayonet light bulb PY 21W.
Parking and brake lights 4
fig. 237: bayonet bulb P 21/5W.
Rear light cluster Type B
Undo the screws 5 fig. 238.
Detach the light cluster B fig. 238.
Turn the bulb holder 6 or 7 fig. 239 and
disengage it.Replace the bulb involved.
Replace the bulb holder and affix it by
turning it.
Check the correct fastening.
Refit the light cluster and screw it in
again.
Rear fog lights (driver's side only)
6: bulb with pins W16W.
Reverse lights 7:bayonet light bulb
W16W.
Third brake light on rear swing
doors
Undo the nuts 8 fig. 240.
235T36675
236T36676
237T36677
238T36679
239T36680
141
Page 144 of 228
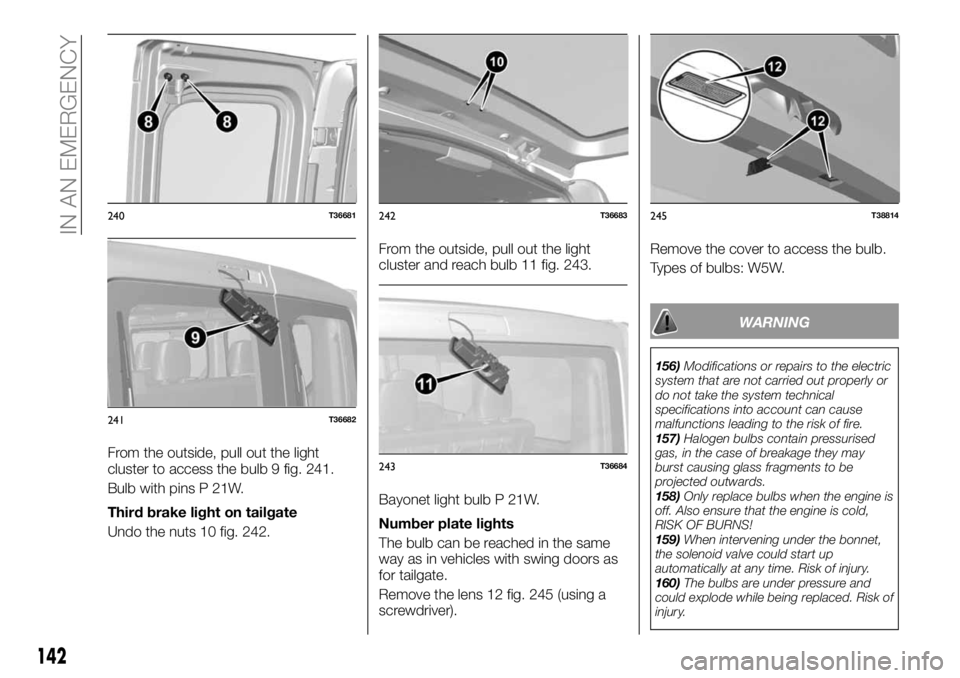
From the outside, pull out the light
cluster to access the bulb 9 fig. 241.
Bulb with pins P 21W.
Third brake light on tailgate
Undo the nuts 10 fig. 242.From the outside, pull out the light
cluster and reach bulb 11 fig. 243.
Bayonet light bulb P 21W.
Number plate lights
The bulb can be reached in the same
way as in vehicles with swing doors as
for tailgate.
Remove the lens 12 fig. 245 (using a
screwdriver).Remove the cover to access the bulb.
Types of bulbs: W5W.
WARNING
156)Modifications or repairs to the electric
system that are not carried out properly or
do not take the system technical
specifications into account can cause
malfunctions leading to the risk of fire.
157)Halogen bulbs contain pressurised
gas, in the case of breakage they may
burst causing glass fragments to be
projected outwards.
158)Only replace bulbs when the engine is
off. Also ensure that the engine is cold,
RISK OF BURNS!
159)When intervening under the bonnet,
the solenoid valve could start up
automatically at any time. Risk of injury.
160)The bulbs are under pressure and
could explode while being replaced. Risk of
injury.
240T36681
241T36682
242T36683
243T36684
245T38814
142
IN AN EMERGENCY
Page 145 of 228
IMPORTANT
29)Halogen bulbs must be handled
holding the metallic part only. Touching the
transparent part of the bulb with your
fingers may reduce the intensity of the
emitted light and even reduce the lifespan
of the bulb. In the event of accidental
contact, wipe the bulb with a cloth
moistened with alcohol and let the bulb dry.
PASSENGER
COMPARTMENT
FUSES
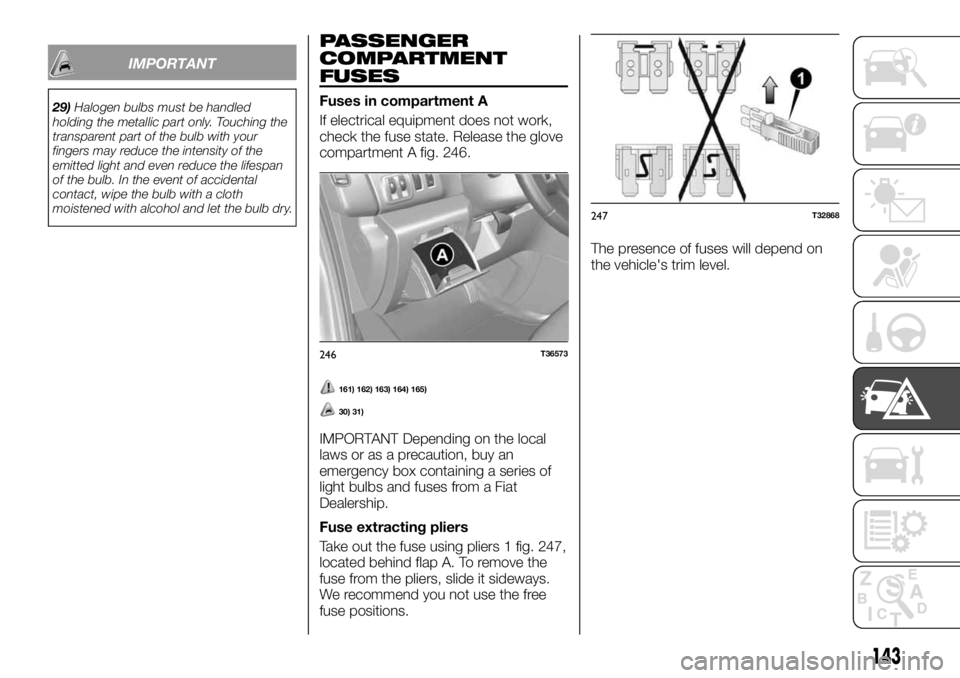
Fuses in compartment A
If electrical equipment does not work,
check the fuse state. Release the glove
compartment A fig. 246.
161) 162) 163) 164) 165)
30) 31)
IMPORTANT Depending on the local
laws or as a precaution, buy an
emergency box containing a series of
light bulbs and fuses from a Fiat
Dealership.
Fuse extracting pliers
Take out the fuse using pliers 1 fig. 247,
located behind flap A. To remove the
fuse from the pliers, slide it sideways.
We recommend you not use the free
fuse positions.The presence of fuses will depend on
the vehicle's trim level.
246T36573
247T32868
143
Page 218 of 228
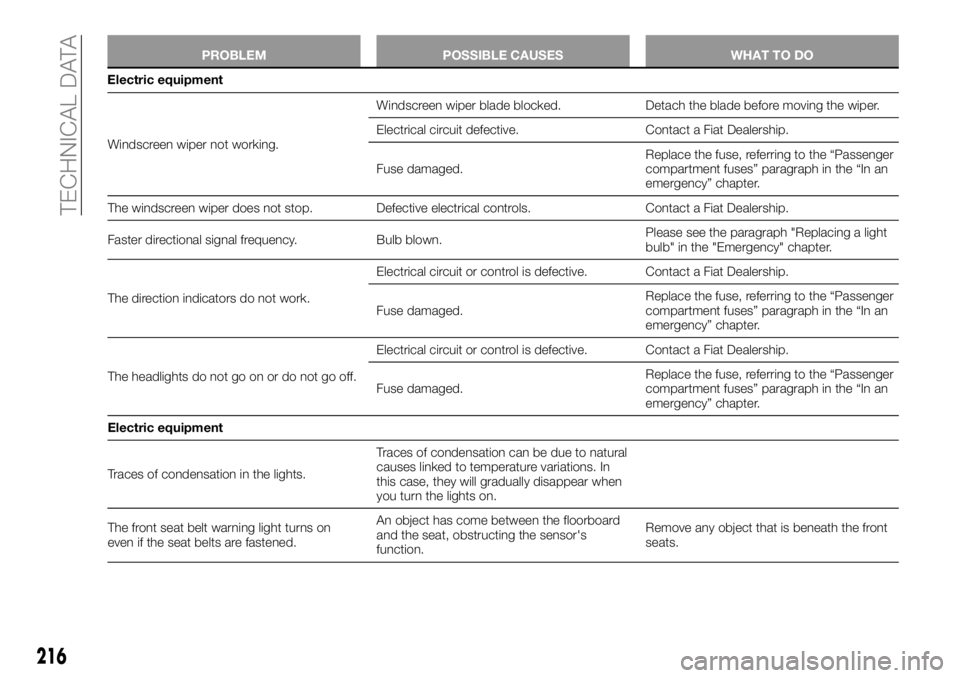
PROBLEM POSSIBLE CAUSES WHAT TO DO
Windscreen wiper not working.Windscreen wiper blade blocked. Detach the blade before moving the wiper.
Electrical circuit defective. Contact a Fiat Dealership.
Fuse damaged.Replace the fuse, referring to the “Passenger
compartment fuses” paragraph in the “In an
emergency” chapter.
The windscreen wiper does not stop. Defective electrical controls. Contact a Fiat Dealership.
Faster directional signal frequency. Bulb blown.Please see the paragraph "Replacing a light
bulb" in the "Emergency" chapter.
The direction indicators do not work.Electrical circuit or control is defective. Contact a Fiat Dealership.
Fuse damaged.Replace the fuse, referring to the “Passenger
compartment fuses” paragraph in the “In an
emergency” chapter.
The headlights do not go on or do not go off.Electrical circuit or control is defective. Contact a Fiat Dealership.
Fuse damaged.Replace the fuse, referring to the “Passenger
compartment fuses” paragraph in the “In an
emergency” chapter.
Electric equipment
Traces of condensation in the lights.Traces of condensation can be due to natural
causes linked to temperature variations. In
this case, they will gradually disappear when
you turn the lights on.
The front seat belt warning light turns on
even if the seat belts are fastened.An object has come between the floorboard
and the seat, obstructing the sensor's
function.Remove any object that is beneath the front
seats.
216
TECHNICAL DATA
Electric equipment