change time FIAT TALENTO 2017 Owner handbook (in English)
[x] Cancel search | Manufacturer: FIAT, Model Year: 2017, Model line: TALENTO, Model: FIAT TALENTO 2017Pages: 228, PDF Size: 4.47 MB
Page 2 of 228

We really know your vehicle because we invented,
designed and built it: we really know every single detail. At Fiat Professional Service authorised workshops you can find technicians directly trained by us, offering quality and pr\
ofessionalism for all service operations.
Fiat Professional workshops are always close to you for the regular serv\
icing operations, season checks and practical recommendations by our experts.
With Fiat Professional Genuine Parts you keep the reliability, comfort a\
nd performance features of your new vehicle unchanged in time: that's why you bought it for.
Always ask for Genuine Parts for the components used on our vehicles; we\
recommend them because they come from our steady commitment in research and development of highly innovative t\
echnologies. For all these reasons: rely on Genuine Parts,
because they are the only ones designed by Fiat Professional for your ve\
hicle.
WHY CHOOSING GENUINE PARTS
SAFETY: BRAKING
SYSTEMENVIRONMENT: PARTICULATE FILTERS,
CLIMATE CONTROL SYSTEM MAINTENANCECOMFORT:
SUSPENSION AND WINDSCREEN WIPERSPERFORMANCE:
SPARK PLUGS, INJECTORS AND BATTERIESLINEACCESSORI:
ROOF RACK BARS, WHEEL RIMS
COP TALENTO LUM GB.qxp 29/04/16 12:11 Pagina 2
Page 6 of 228
WARNINGS AND PRECAUTIONS
While reading this Owner Handbook you will find a series ofWARNINGSto prevent procedures that could damage your
vehicle.
There are alsoPRECAUTIONSthat must be carefully followed to prevent incorrect use of the components of the vehicle,
which could cause accidents or injuries.
Therefore allWARNINGSandPRECAUTIONSmust always be carefully followed.
WARNINGSandPRECAUTIONSare recalled in the text with the following symbols:
personal safety;
vehicle integrity;
environmental protection.
NOTE These symbols, when necessary, are indicated besides the title or at the end of the line and are followed by a number.
That number recalls the corresponding warning at the end of the relevant section.
IMPORTANT
This Owner Handbook describes all Fiat Talento versions. Options, equipment dedicated to specific markets or
versions are not explicitly indicated in the text: as a consequence, you should only consider the information which
is related to the trim level, engine and version that you have purchased. Any content introduced throughout the
production of the model, outside the explicit request of options at the time of purchase, will be identified with the
wording (for versions/markets, where provided).
All data contained in this publication are intended to help you use your vehicle in the best possible way. FCA Italy
S.p.A. aims at a constant improvement of the vehicles produced. For this reason it reserves the right to make
changes to the model described for technical and/or commercial reasons.
For further information, contact a Fiat Dealership.
SYMBOLS
Some vehicle components have coloured labels whose symbols indicate precautions to be observed when using this
component. Under the bonnet there is also a label that summarises all the symbols.
4
Page 41 of 228
WINDSCREEN /
REAR WINDOW
WIPERS
WINDSCREEN WIPER /
WASHER
37) 38) 39)
5) 6) 7)
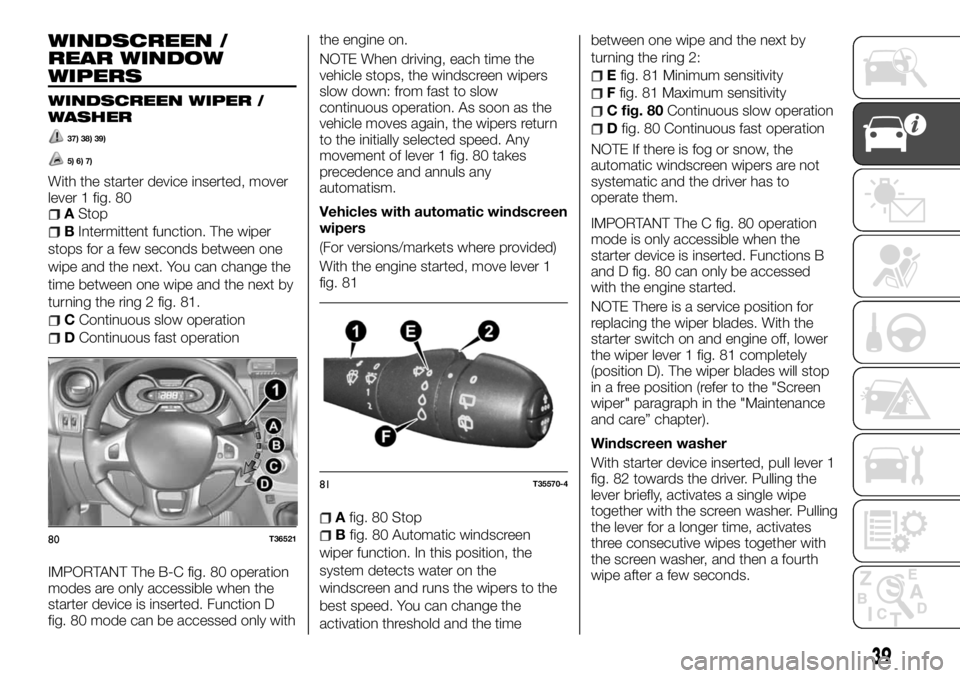
With the starter device inserted, mover
lever 1 fig. 80
AStop
BIntermittent function. The wiper
stops for a few seconds between one
wipe and the next. You can change the
time between one wipe and the next by
turning the ring 2 fig. 81.
CContinuous slow operation
DContinuous fast operation
IMPORTANT The B-C fig. 80 operation
modes are only accessible when the
starter device is inserted. Function D
fig. 80 mode can be accessed only withthe engine on.
NOTE When driving, each time the
vehicle stops, the windscreen wipers
slow down: from fast to slow
continuous operation. As soon as the
vehicle moves again, the wipers return
to the initially selected speed. Any
movement of lever 1 fig. 80 takes
precedence and annuls any
automatism.
Vehicles with automatic windscreen
wipers
(For versions/markets where provided)
With the engine started, move lever 1
fig. 81
Afig. 80 Stop
Bfig. 80 Automatic windscreen
wiper function. In this position, the
system detects water on the
windscreen and runs the wipers to the
best speed. You can change the
activation threshold and the timebetween one wipe and the next by
turning the ring 2:
Efig. 81 Minimum sensitivity
Ffig. 81 Maximum sensitivity
C fig. 80Continuous slow operation
Dfig. 80 Continuous fast operation
NOTE If there is fog or snow, the
automatic windscreen wipers are not
systematic and the driver has to
operate them.
IMPORTANT The C fig. 80 operation
mode is only accessible when the
starter device is inserted. Functions B
and D fig. 80 can only be accessed
with the engine started.
NOTE There is a service position for
replacing the wiper blades. With the
starter switch on and engine off, lower
the wiper lever 1 fig. 81 completely
(position D). The wiper blades will stop
in a free position (refer to the "Screen
wiper" paragraph in the "Maintenance
and care” chapter).
Windscreen washer
With starter device inserted, pull lever 1
fig. 82 towards the driver. Pulling the
lever briefly, activates a single wipe
together with the screen washer. Pulling
the lever for a longer time, activates
three consecutive wipes together with
the screen washer, and then a fourth
wipe after a few seconds.
80T36521
81T35570-4
39
Page 55 of 228
Internal air recirculation
This function is managed automatically,
but you can also enable it manually. It
can be forced on by button 7 fig. 94,
which is highlighted by the button’s led
turning on
IMPORTANT In any case,
de-misting/defrosting takes priority over
air recycling.
Note:
during recycling, the air in the
passenger compartment is recycled
without introducing outside air;
air recirculation lets you isolate the
interior from outside influences (driving
in a polluted area, e.g.);
to get the desired internal passenger
compartment temperature more
quickly.
Manual use: Press button 7
fig. 94 and the integrated warning light
will go on.
Prolonged use of the recirculation
function can create unpleasant odours
and mist up the windows as the air is
not changed.
We advise you to return to automatic
mode by pressing button 7 fig. 94 again
as soon as air recirculation is no longer
needed.
Press button 7 fig. 94 again to
deactivate the this function.System deactivation
Turn control 6 fig. 94 to the OFF
position to deactivate the system. To
turn it on again, turn control 6
fig. 94 again to adjust the fan speed, or
press button 1 fig. 94.
ADDITIONAL CLIMATE
CONTROL
(For versions/markets where provided)
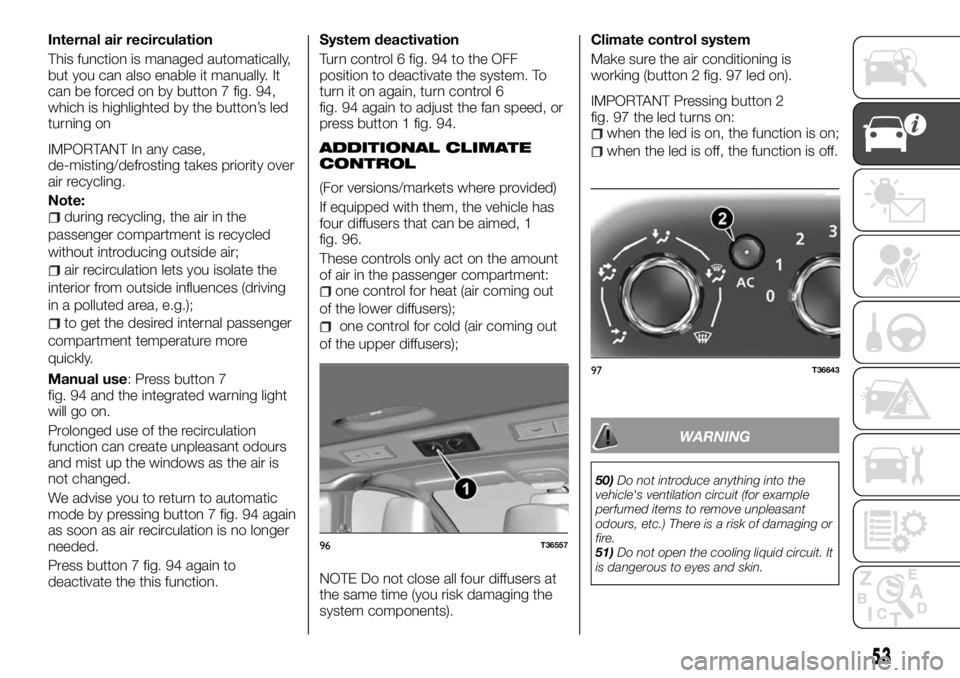
If equipped with them, the vehicle has
four diffusers that can be aimed, 1
fig. 96.
These controls only act on the amount
of air in the passenger compartment:
one control for heat (air coming out
of the lower diffusers);
one control for cold (air coming out
of the upper diffusers);
NOTE Do not close all four diffusers at
the same time (you risk damaging the
system components).Climate control system
Make sure the air conditioning is
working (button 2 fig. 97 led on).
IMPORTANT Pressing button 2
fig. 97 the led turns on:
when the led is on, the function is on;
when the led is off, the function is off.
WARNING
50)Do not introduce anything into the
vehicle's ventilation circuit (for example
perfumed items to remove unpleasant
odours, etc.) There is a risk of damaging or
fire.
51)Do not open the cooling liquid circuit. It
is dangerous to eyes and skin.
96T36557
97T36643
53
Page 86 of 228
CONTROL PANEL
AND ON-BOARD
INSTRUMENTS
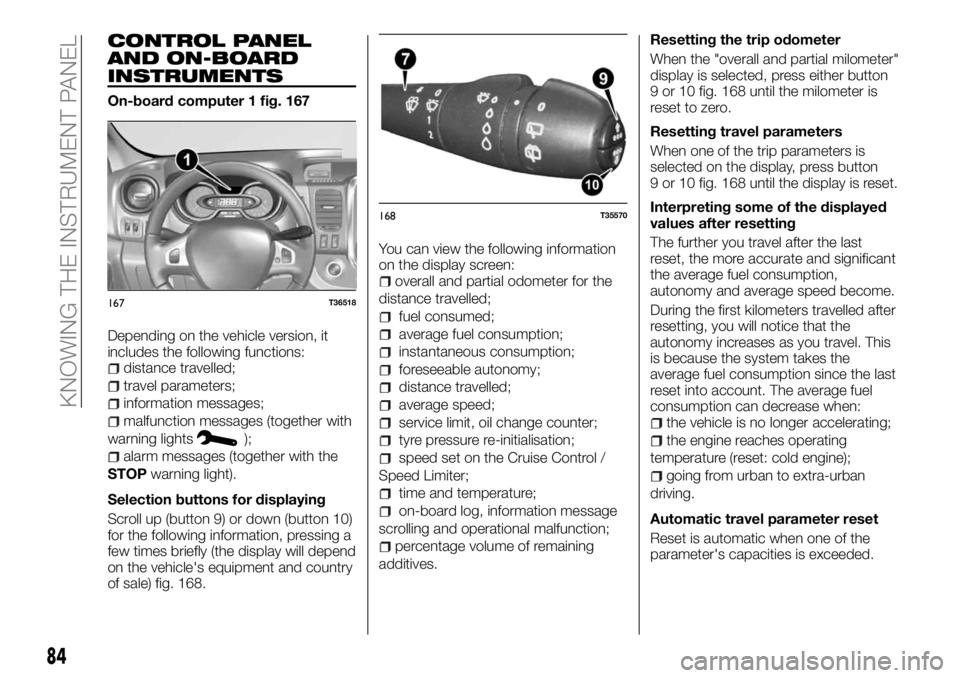
On-board computer 1 fig. 167
Depending on the vehicle version, it
includes the following functions:
distance travelled;
travel parameters;
information messages;
malfunction messages (together with
warning lights
);
alarm messages (together with the
STOPwarning light).
Selection buttons for displaying
Scroll up (button 9) or down (button 10)
for the following information, pressing a
few times briefly (the display will depend
on the vehicle's equipment and country
of sale) fig. 168.You can view the following information
on the display screen:
overall and partial odometer for the
distance travelled;
fuel consumed;
average fuel consumption;
instantaneous consumption;
foreseeable autonomy;
distance travelled;
average speed;
service limit, oil change counter;
tyre pressure re-initialisation;
speed set on the Cruise Control /
Speed Limiter;
time and temperature;
on-board log, information message
scrolling and operational malfunction;
percentage volume of remaining
additives.Resetting the trip odometer
When the "overall and partial milometer"
display is selected, press either button
9 or 10 fig. 168 until the milometer is
reset to zero.
Resetting travel parameters
When one of the trip parameters is
selected on the display, press button
9 or 10 fig. 168 until the display is reset.
Interpreting some of the displayed
values after resetting
The further you travel after the last
reset, the more accurate and significant
the average fuel consumption,
autonomy and average speed become.
During the first kilometers travelled after
resetting, you will notice that the
autonomy increases as you travel. This
is because the system takes the
average fuel consumption since the last
reset into account. The average fuel
consumption can decrease when:
the vehicle is no longer accelerating;
the engine reaches operating
temperature (reset: cold engine);
going from urban to extra-urban
driving.
Automatic travel parameter reset
Reset is automatic when one of the
parameter's capacities is exceeded.
167T36518
168T35570
84
KNOWING THE INSTRUMENT PANEL
Page 89 of 228
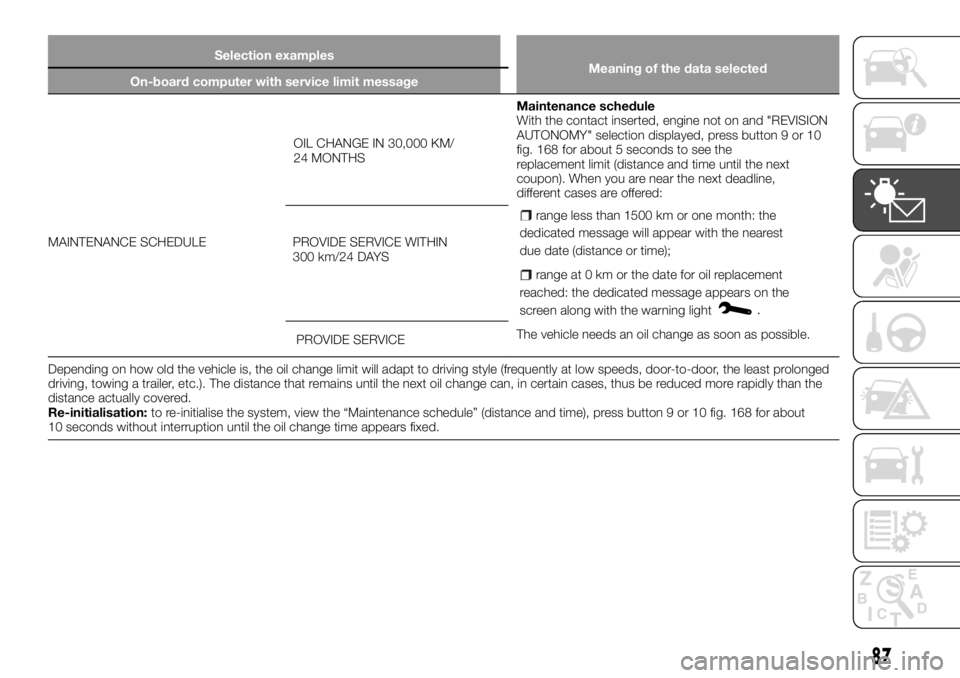
Selection examples
Meaning of the data selected
On-board computer with service limit message
MAINTENANCE SCHEDULEOIL CHANGE IN 30,000 KM/
24 MONTHSMaintenance schedule
With the contact inserted, engine not on and "REVISION
AUTONOMY" selection displayed, press button 9 or 10
fig. 168 for about 5 seconds to see the
replacement limit (distance and time until the next
coupon). When you are near the next deadline,
different cases are offered:
range less than 1500 km or one month: the
dedicated message will appear with the nearest
due date (distance or time);
range at 0 km or the date for oil replacement
reached: the dedicated message appears on the
screen along with the warning light
.
The vehicle needs an oil change as soon as possible. PROVIDE SERVICE WITHIN
300 km/24 DAYS
PROVIDE SERVICE
Depending on how old the vehicle is, the oil change limit will adapt to driving style (frequently at low speeds, door-to-door, the least prolonged
driving, towing a trailer, etc.). The distance that remains until the next oil change can, in certain cases, thus be reduced more rapidly than the
distance actually covered.
Re-initialisation:to re-initialise the system, view the “Maintenance schedule” (distance and time), press button 9 or 10 fig. 168 for about
10 seconds without interruption until the oil change time appears fixed.
87
Page 132 of 228
USING THE
GEARBOX
144)
25)
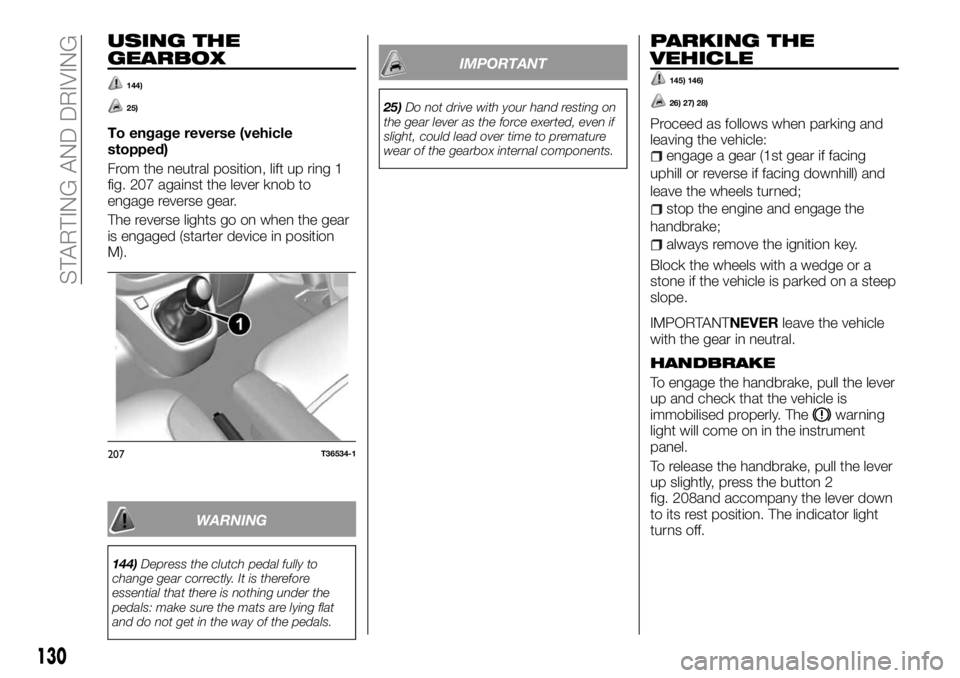
To engage reverse (vehicle
stopped)
From the neutral position, lift up ring 1
fig. 207 against the lever knob to
engage reverse gear.
The reverse lights go on when the gear
is engaged (starter device in position
M).
WARNING
144)Depress the clutch pedal fully to
change gear correctly. It is therefore
essential that there is nothing under the
pedals: make sure the mats are lying flat
and do not get in the way of the pedals.
IMPORTANT
25)Do not drive with your hand resting on
the gear lever as the force exerted, even if
slight, could lead over time to premature
wear of the gearbox internal components.
PARKING THE
VEHICLE
145) 146)
26) 27) 28)
Proceed as follows when parking and
leaving the vehicle:
engage a gear (1st gear if facing
uphill or reverse if facing downhill) and
leave the wheels turned;
stop the engine and engage the
handbrake;
always remove the ignition key.
Block the wheels with a wedge or a
stone if the vehicle is parked on a steep
slope.
IMPORTANTNEVERleave the vehicle
with the gear in neutral.
HANDBRAKE
To engage the handbrake, pull the lever
up and check that the vehicle is
immobilised properly. The
warning
light will come on in the instrument
panel.
To release the handbrake, pull the lever
up slightly, press the button 2
fig. 208and accompany the lever down
to its rest position. The indicator light
turns off.
207T36534-1
130
STARTING AND DRIVING
Page 137 of 228
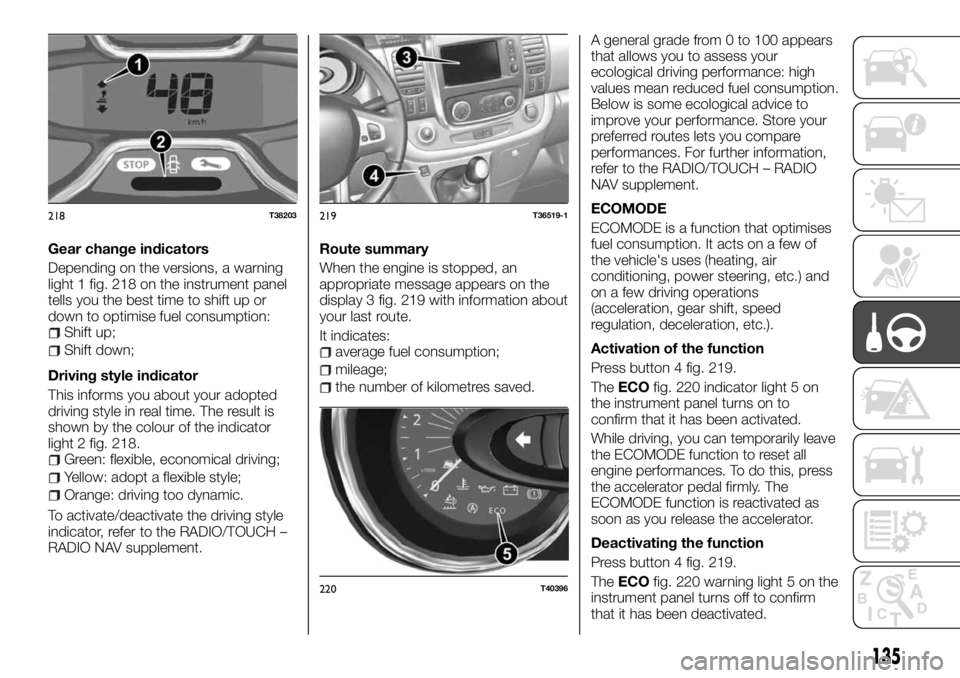
Gear change indicators
Depending on the versions, a warning
light 1 fig. 218 on the instrument panel
tells you the best time to shift up or
down to optimise fuel consumption:
Shift up;
Shift down;
Driving style indicator
This informs you about your adopted
driving style in real time. The result is
shown by the colour of the indicator
light 2 fig. 218.
Green: flexible, economical driving;
Yellow: adopt a flexible style;
Orange: driving too dynamic.
To activate/deactivate the driving style
indicator, refer to the RADIO/TOUCH –
RADIO NAV supplement.Route summary
When the engine is stopped, an
appropriate message appears on the
display 3 fig. 219 with information about
your last route.
It indicates:
average fuel consumption;
mileage;
the number of kilometres saved.A general grade from 0 to 100 appears
that allows you to assess your
ecological driving performance: high
values mean reduced fuel consumption.
Below is some ecological advice to
improve your performance. Store your
preferred routes lets you compare
performances. For further information,
refer to the RADIO/TOUCH – RADIO
NAV supplement.
ECOMODE
ECOMODE is a function that optimises
fuel consumption. It acts on a few of
the vehicle's uses (heating, air
conditioning, power steering, etc.) and
on a few driving operations
(acceleration, gear shift, speed
regulation, deceleration, etc.).
Activation of the function
Press button 4 fig. 219.
TheECOfig. 220 indicator light 5 on
the instrument panel turns on to
confirm that it has been activated.
While driving, you can temporarily leave
the ECOMODE function to reset all
engine performances. To do this, press
the accelerator pedal firmly. The
ECOMODE function is reactivated as
soon as you release the accelerator.
Deactivating the function
Press button 4 fig. 219.
TheECOfig. 220 warning light 5 on the
instrument panel turns off to confirm
that it has been deactivated.
218T38203219T36519-1
220T40396
135
Page 166 of 228
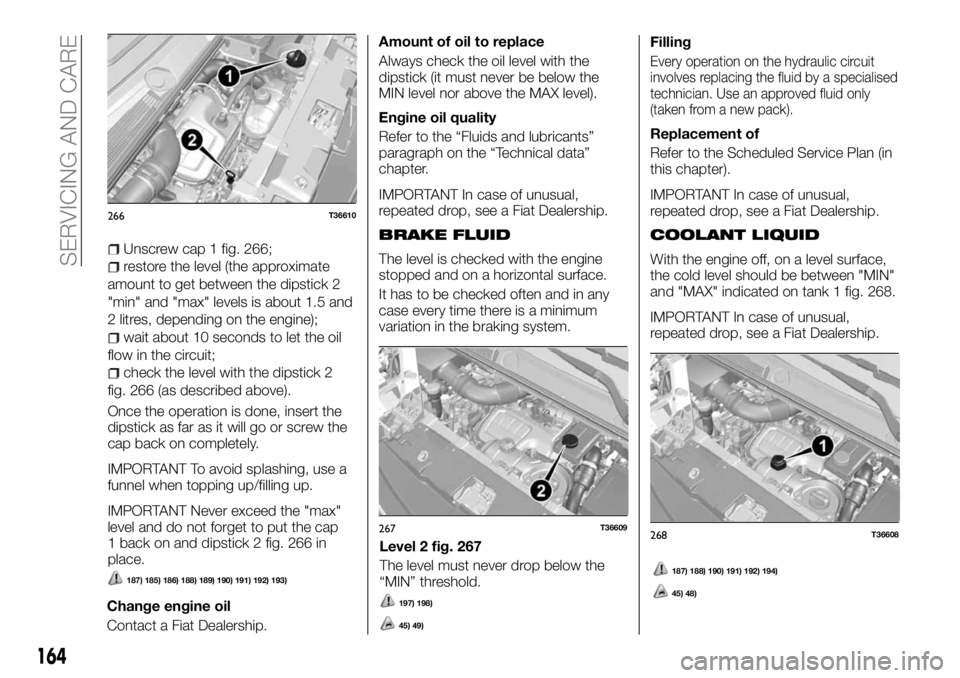
Unscrew cap 1 fig. 266;
restore the level (the approximate
amount to get between the dipstick 2
"min" and "max" levels is about 1.5 and
2 litres, depending on the engine);
wait about 10 seconds to let the oil
flow in the circuit;
check the level with the dipstick 2
fig. 266 (as described above).
Once the operation is done, insert the
dipstick as far as it will go or screw the
cap back on completely.
IMPORTANT To avoid splashing, use a
funnel when topping up/filling up.
IMPORTANT Never exceed the "max"
level and do not forget to put the cap
1 back on and dipstick 2 fig. 266 in
place.
187) 185) 186) 188) 189) 190) 191) 192) 193)
Change engine oil
Contact a Fiat Dealership.Amount of oil to replace
Always check the oil level with the
dipstick (it must never be below the
MIN level nor above the MAX level).
Engine oil quality
Refer to the “Fluids and lubricants”
paragraph on the “Technical data”
chapter.
IMPORTANT In case of unusual,
repeated drop, see a Fiat Dealership.
BRAKE FLUID
The level is checked with the engine
stopped and on a horizontal surface.
It has to be checked often and in any
case every time there is a minimum
variation in the braking system.
Level 2 fig. 267
The level must never drop below the
“MIN” threshold.
197) 198)
45) 49)
Filling
Every operation on the hydraulic circuit
involves replacing the fluid by a specialised
technician. Use an approved fluid only
(taken from a new pack).
Replacement of
Refer to the Scheduled Service Plan (in
this chapter).
IMPORTANT In case of unusual,
repeated drop, see a Fiat Dealership.
COOLANT LIQUID
With the engine off, on a level surface,
the cold level should be between "MIN"
and "MAX" indicated on tank 1 fig. 268.
IMPORTANT In case of unusual,
repeated drop, see a Fiat Dealership.
266T36610
267T36609268T36608
164
SERVICING AND CARE
187) 188) 190) 191) 192) 194)
45) 48)
Page 172 of 228
207)For safety and to respect legislation in
force, when replacement is necessary, you
must only fit the same brand, size, type
and structure tyres on the same axles.
They have to have a load and speed
capacity that is at least identical to the
original tyres, or they correspond to those
recommended by a Fiat Dealership. Failure
to observe these instructions can
compromise safety and vehicle
compliance. Risk of losing control of the
vehicle.
208)If the tyres are "unidirectional", do not
switch tyres from the right-hand side of the
vehicle to the left-hand side, and vice
versa. This type of tyres can only be
switched from the front axle to the rear axle
and vice versa, keeping them on the same
side of the vehicle.
209)Never submit alloy rims to repainting
treatments requiring the use of
temperatures exceeding 150°C. The
mechanical properties of the wheels could
be impaired.
IMPORTANT
53)Some driving accidents, such as
"hitting the curbstone" can damage the
tyres and change the front or rear end
adjustments. In that case, have them
checked by a Fiat Dealership.
54)Caution, a missing or badly screwed on
valve cap could impact the tyre's grip and
cause a loss of pressure. Always use valve
caps that are identical to the original ones
and make sure that they are screwed on
fully.55)Snow chains cannot be fitted with 17”
tyres, you must obtain specific equipment
from the Fiat Dealership.
56)Snow chains can only be fit on tyres of
the same dimensions as those originally on
the vehicle.
57)If you want to fit chains, contact the
Fiat Dealership.
58)Keep your speed down when snow
chains are fitted; do not exceed 50 km/h.
Avoid potholes, do not drive over steps or
pavements, and do not drive long
distances over roads without snow, to
avoid damaging both your vehicle and the
road surface.
WINDSCREEN/REAR
WINDOW WIPER
WIPER BLADES
IMPORTANT Check the status of the
wiper blades. Their duraton depends on
proper maintenance:
clean both windscreen and rear
window wipers regularly with soapy
water;
do not use them when the
windscreen and rear window are dry;
detach them from the windscreen or
rear window if they have not been used
for a long time.
59) 60) 61)
Replacing wiper blades with the
starter device inserted, engine
stopped:
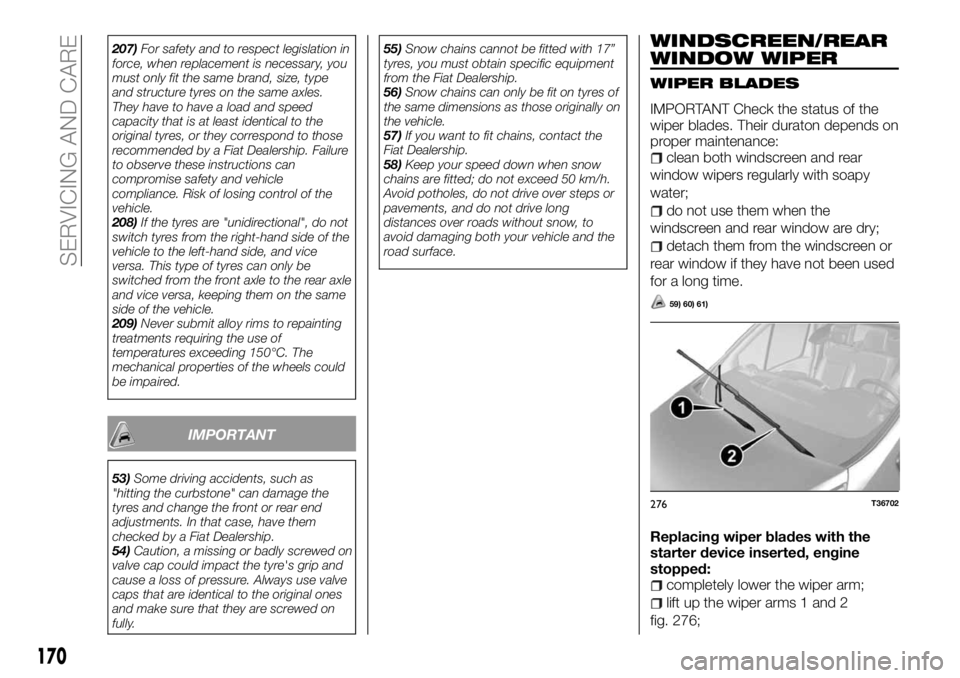
completely lower the wiper arm;
lift up the wiper arms 1 and 2
fig. 276;
276T36702
170
SERVICING AND CARE