headlights FIAT TALENTO 2017 Owner handbook (in English)
[x] Cancel search | Manufacturer: FIAT, Model Year: 2017, Model line: TALENTO, Model: FIAT TALENTO 2017Pages: 228, PDF Size: 4.47 MB
Page 11 of 228
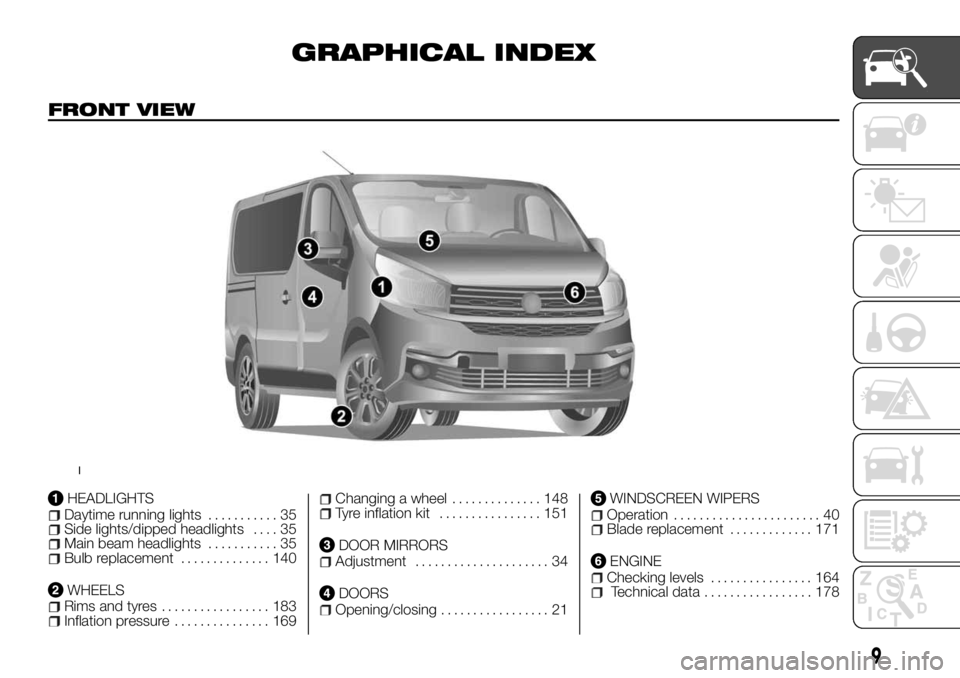
GRAPHICAL INDEX
FRONT VIEW
HEADLIGHTSDaytime running lights........... 35Side lights/dipped headlights.... 35Main beam headlights........... 35Bulb replacement.............. 140
WHEELSRims and tyres................. 183Inflation pressure............... 169
Changing a wheel.............. 148Tyre inflation kit................ 151
DOOR MIRRORSAdjustment..................... 34
DOORSOpening/closing................. 21
WINDSCREEN WIPERSOperation....................... 40Blade replacement............. 171
ENGINEChecking levels................ 164Technical data................. 178
1
9
Page 37 of 228
IMPORTANT If you are driving on the
left in a vehicle equipped for left hand
drive (or vice versa), you need to
regulate the lights for the visiting time
(refer to the "Headlight alignment
adjustment" paragraph in the "Knowing
your vehicle” chapter).
DIPPED HEADLIGHTS
Manual activation
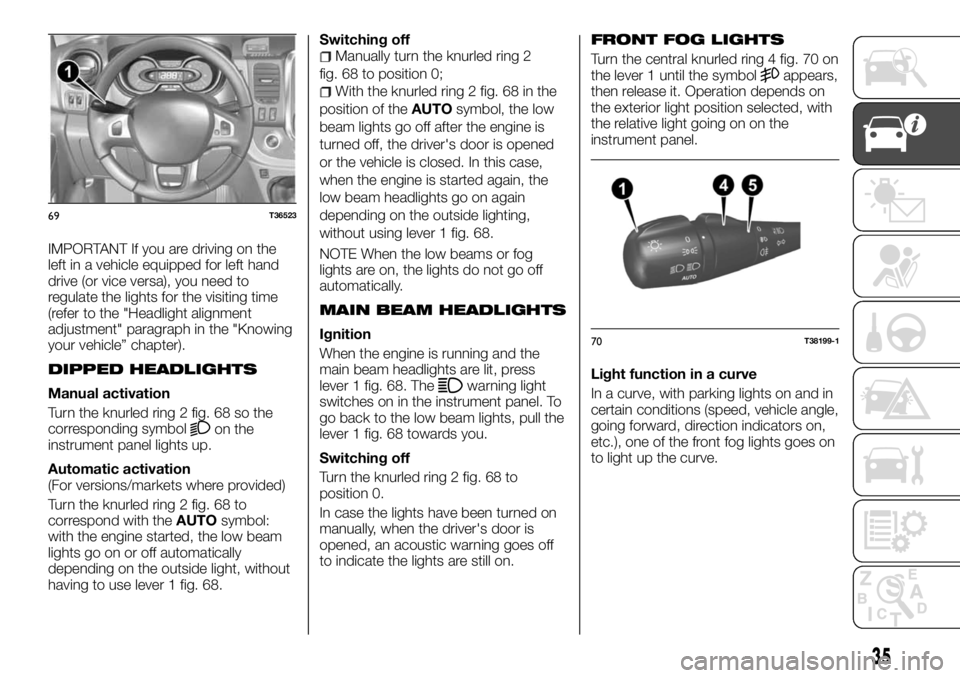
Turn the knurled ring 2 fig. 68 so the
corresponding symbol
on the
instrument panel lights up.
Automatic activation
(For versions/markets where provided)
Turn the knurled ring 2 fig. 68 to
correspond with theAUTOsymbol:
with the engine started, the low beam
lights go on or off automatically
depending on the outside light, without
having to use lever 1 fig. 68.Switching off
Manually turn the knurled ring 2
fig. 68 to position 0;
With the knurled ring 2 fig. 68 in the
position of theAUTOsymbol, the low
beam lights go off after the engine is
turned off, the driver's door is opened
or the vehicle is closed. In this case,
when the engine is started again, the
low beam headlights go on again
depending on the outside lighting,
without using lever 1 fig. 68.
NOTE When the low beams or fog
lights are on, the lights do not go off
automatically.
MAIN BEAM HEADLIGHTS
Ignition
When the engine is running and the
main beam headlights are lit, press
lever 1 fig. 68. The
warning light
switches on in the instrument panel. To
go back to the low beam lights, pull the
lever 1 fig. 68 towards you.
Switching off
Turn the knurled ring 2 fig. 68 to
position 0.
In case the lights have been turned on
manually, when the driver's door is
opened, an acoustic warning goes off
to indicate the lights are still on.
FRONT FOG LIGHTS
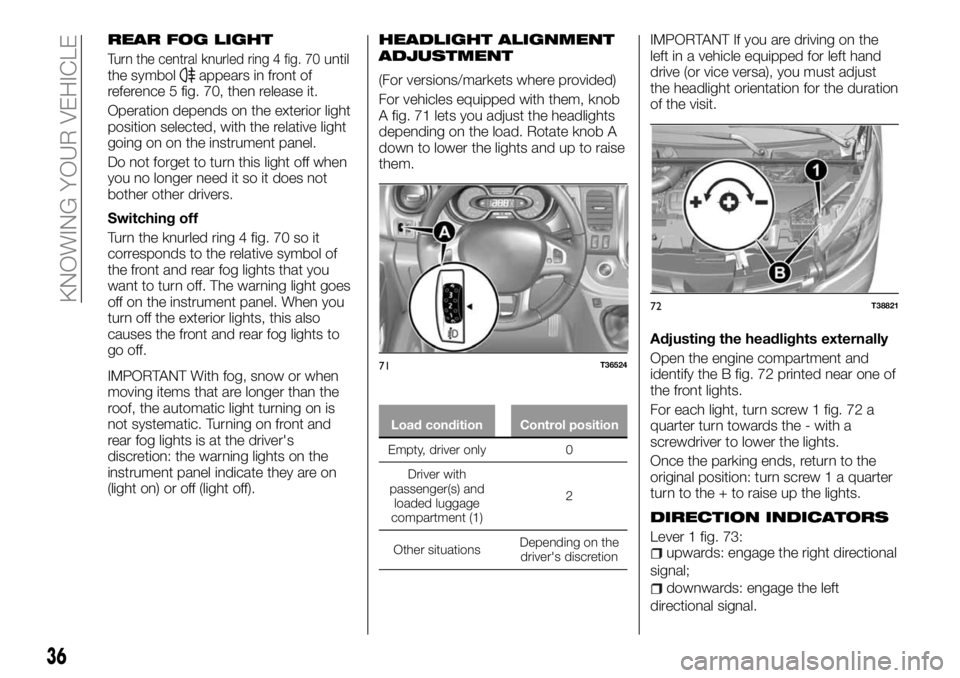
Turn the central knurled ring 4 fig. 70 on
the lever 1 until the symbolappears,
then release it. Operation depends on
the exterior light position selected, with
the relative light going on on the
instrument panel.
Light function in a curve
In a curve, with parking lights on and in
certain conditions (speed, vehicle angle,
going forward, direction indicators on,
etc.), one of the front fog lights goes on
to light up the curve.
69T36523
70T38199-1
35
Page 38 of 228
REAR FOG LIGHT
Turn the central knurled ring 4 fig. 70until
the symbolappears in front of
reference 5 fig. 70, then release it.
Operation depends on the exterior light
position selected, with the relative light
going on on the instrument panel.
Do not forget to turn this light off when
you no longer need it so it does not
bother other drivers.
Switching off
Turn the knurled ring 4 fig. 70 so it
corresponds to the relative symbol of
the front and rear fog lights that you
want to turn off. The warning light goes
off on the instrument panel. When you
turn off the exterior lights, this also
causes the front and rear fog lights to
go off.
IMPORTANT With fog, snow or when
moving items that are longer than the
roof, the automatic light turning on is
not systematic. Turning on front and
rear fog lights is at the driver's
discretion: the warning lights on the
instrument panel indicate they are on
(light on) or off (light off).
HEADLIGHT ALIGNMENT
ADJUSTMENT
(For versions/markets where provided)
For vehicles equipped with them, knob
A fig. 71 lets you adjust the headlights
depending on the load. Rotate knob A
down to lower the lights and up to raise
them.
Load condition Control position
Empty, driver only 0
Driver
with
passenger(s) and
loaded luggage
compartment (1)2
Other situationsDepending on the
driver's discretion
IMPORTANT If you are driving on the
left in a vehicle equipped for left hand
drive (or vice versa), you must adjust
the headlight orientation for the duration
of the visit.
Adjusting the headlights externally
Open the engine compartment and
identify the B fig. 72 printed near one of
the front lights.
For each light, turn screw 1 fig. 72 a
quarter turn towards the - with a
screwdriver to lower the lights.
Once the parking ends, return to the
original position: turn screw 1 a quarter
turn to the + to raise up the lights.
DIRECTION INDICATORS
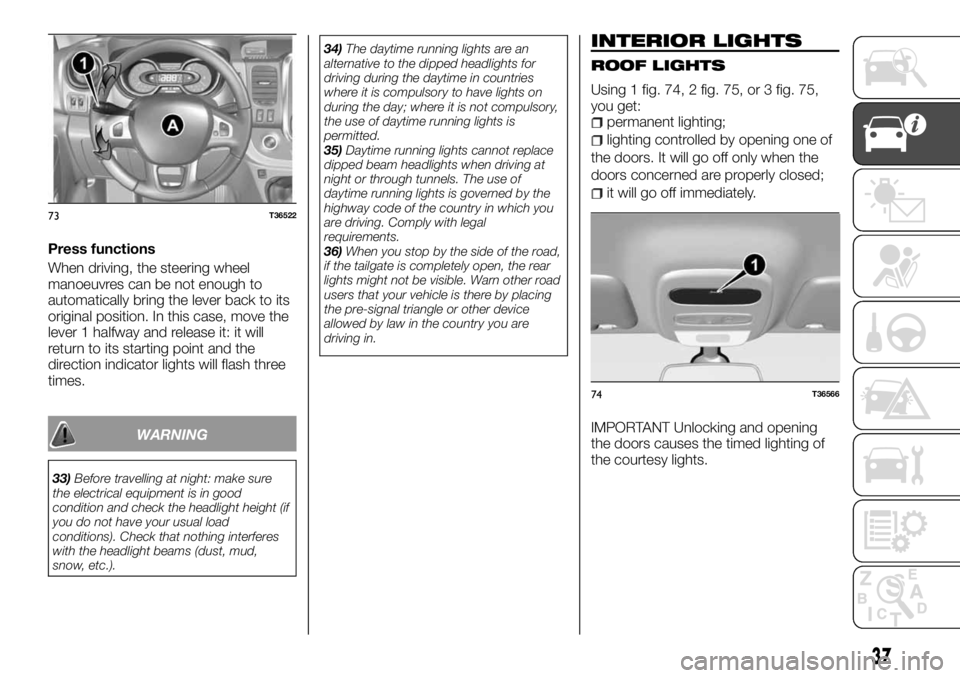
Lever 1 fig. 73:upwards: engage the right directional
signal;
downwards: engage the left
directional signal.
71T36524
72T38821
36
KNOWING YOUR VEHICLE
Page 39 of 228
Press functions
When driving, the steering wheel
manoeuvres can be not enough to
automatically bring the lever back to its
original position. In this case, move the
lever 1 halfway and release it: it will
return to its starting point and the
direction indicator lights will flash three
times.
WARNING
33)Before travelling at night: make sure
the electrical equipment is in good
condition and check the headlight height (if
you do not have your usual load
conditions). Check that nothing interferes
with the headlight beams (dust, mud,
snow, etc.).34)The daytime running lights are an
alternative to the dipped headlights for
driving during the daytime in countries
where it is compulsory to have lights on
during the day; where it is not compulsory,
the use of daytime running lights is
permitted.
35)Daytime running lights cannot replace
dipped beam headlights when driving at
night or through tunnels. The use of
daytime running lights is governed by the
highway code of the country in which you
are driving. Comply with legal
requirements.
36)When you stop by the side of the road,
if the tailgate is completely open, the rear
lights might not be visible. Warn other road
users that your vehicle is there by placing
the pre-signal triangle or other device
allowed by law in the country you are
driving in.
INTERIOR LIGHTS
ROOF LIGHTS
Using 1 fig. 74, 2 fig. 75, or 3 fig. 75,
you get:
permanent lighting;
lighting controlled by opening one of
the doors. It will go off only when the
doors concerned are properly closed;
it will go off immediately.
IMPORTANT Unlocking and opening
the doors causes the timed lighting of
the courtesy lights.
73T36522
74T36566
37
Page 79 of 228
Warning light What it means
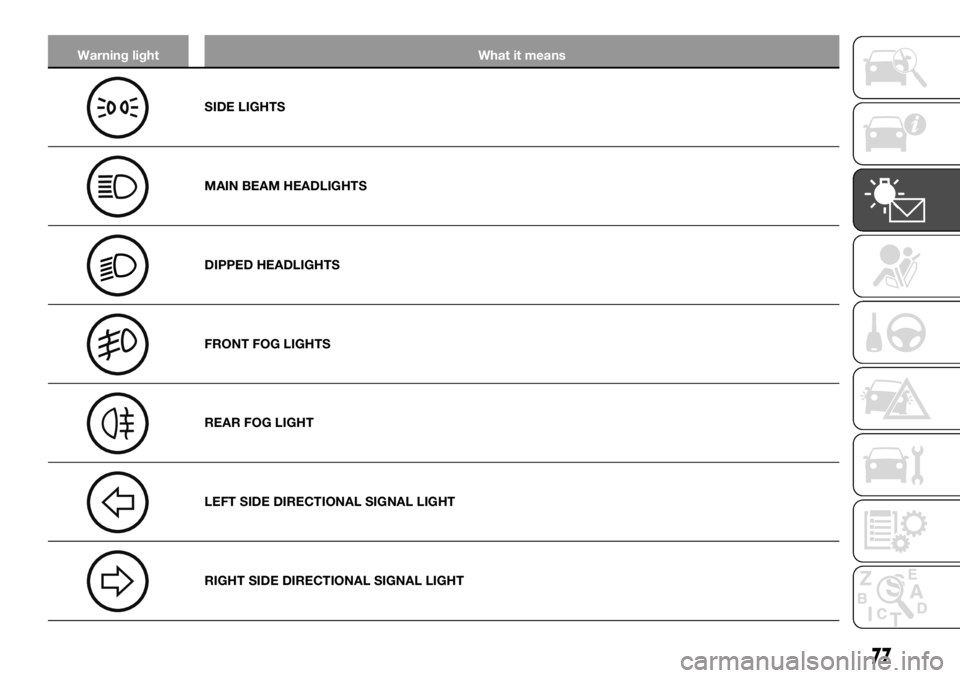
SIDE LIGHTS
MAIN BEAM HEADLIGHTS
DIPPED HEADLIGHTS
FRONT FOG LIGHTS
REAR FOG LIGHT
LEFT SIDE DIRECTIONAL SIGNAL LIGHT
RIGHT SIDE DIRECTIONAL SIGNAL LIGHT
77
Page 141 of 228
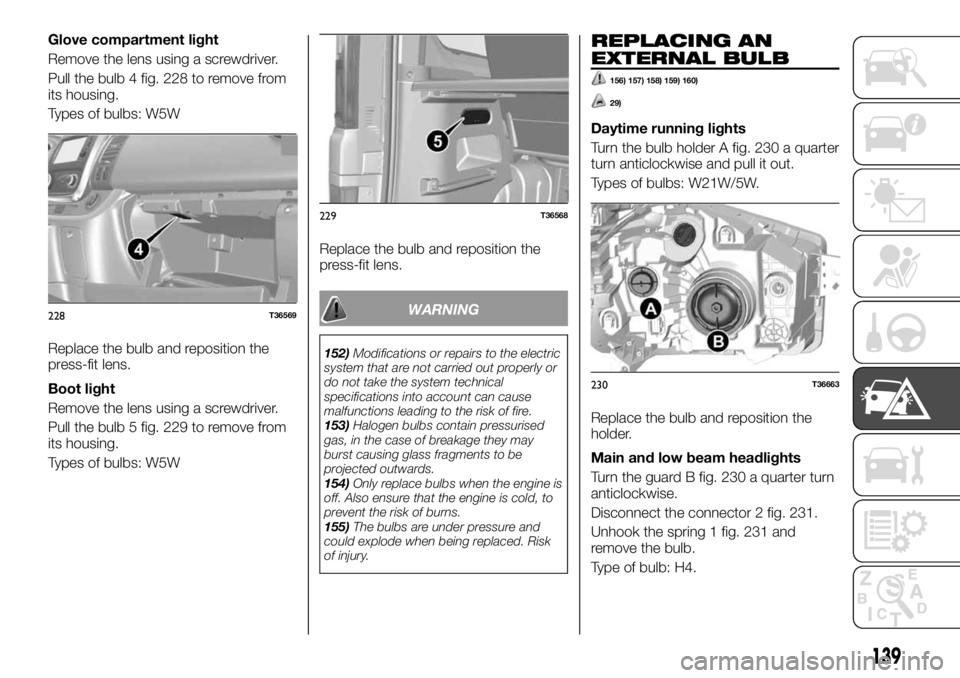
Glove compartment light
Remove the lens using a screwdriver.
Pull the bulb 4 fig. 228 to remove from
its housing.
Types of bulbs: W5W
Replace the bulb and reposition the
press-fit lens.
Boot light
Remove the lens using a screwdriver.
Pull the bulb 5 fig. 229 to remove from
its housing.
Types of bulbs: W5WReplace the bulb and reposition the
press-fit lens.
WARNING
152)Modifications or repairs to the electric
system that are not carried out properly or
do not take the system technical
specifications into account can cause
malfunctions leading to the risk of fire.
153)Halogen bulbs contain pressurised
gas, in the case of breakage they may
burst causing glass fragments to be
projected outwards.
154)Only replace bulbs when the engine is
off. Also ensure that the engine is cold, to
prevent the risk of burns.
155)The bulbs are under pressure and
could explode when being replaced. Risk
of injury.
REPLACING AN
EXTERNAL BULB
156) 157) 158) 159) 160)
29)
Daytime running lights
Turn the bulb holder A fig. 230 a quarter
turn anticlockwise and pull it out.
Types of bulbs: W21W/5W.
Replace the bulb and reposition the
holder.
Main and low beam headlights
Turn the guard B fig. 230 a quarter turn
anticlockwise.
Disconnect the connector 2 fig. 231.
Unhook the spring 1 fig. 231 and
remove the bulb.
Type of bulb: H4.
228T36569
229T36568
230T36663
139
Page 160 of 228
SERVICE SCHEDULE
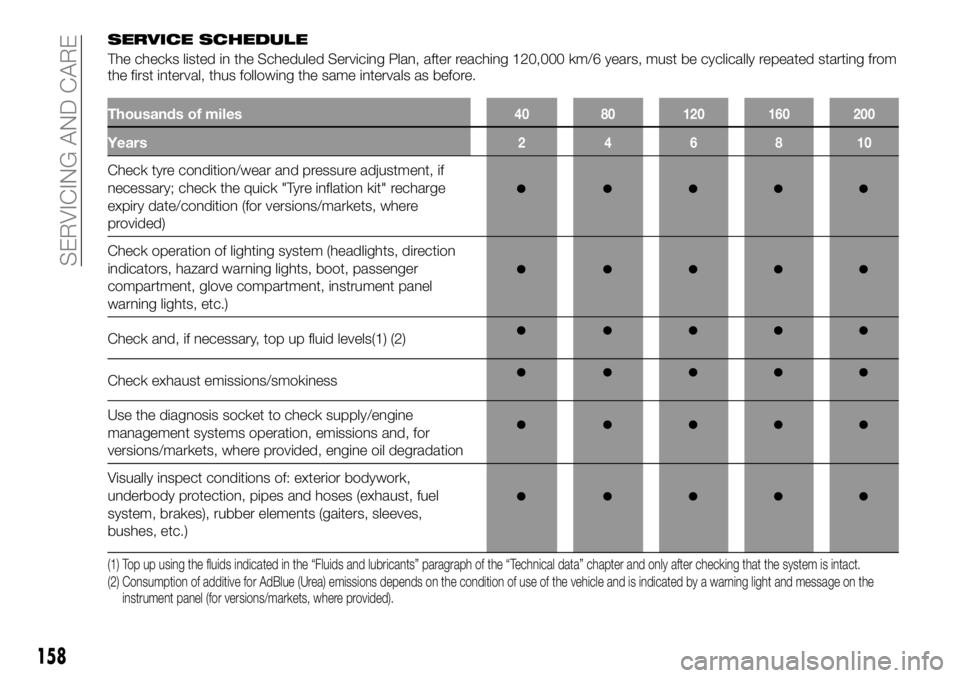
The checks listed in the Scheduled Servicing Plan, after reaching 120,000 km/6 years, must be cyclically repeated starting from
the first interval, thus following the same intervals as before.
Thousands of miles40 80 120 160 200
Years246810
Check tyre condition/wear and pressure adjustment, if
necessary; check the quick "Tyre inflation kit" recharge
expiry date/condition (for versions/markets, where
provided)
Check operation of lighting system (headlights, direction
indicators, hazard warning lights, boot, passenger
compartment, glove compartment, instrument panel
warning lights, etc.)
Check and, if necessary, top up fluid levels(1) (2)
Check exhaust emissions/smokiness
Use the diagnosis socket to check supply/engine
management systems operation, emissions and, for
versions/markets, where provided, engine oil degradation
Visually inspect conditions of: exterior bodywork,
underbody protection, pipes and hoses (exhaust, fuel
system, brakes), rubber elements (gaiters, sleeves,
bushes, etc.)
(1) Top up using the fluids indicated in the “Fluids and lubricants” paragraph of the “Technical data” chapter and only after checking that the system is intact.
(2) Consumption of additive for AdBlue (Urea) emissions depends on the condition of use of the vehicle and is indicated by a warning light and message onthe
instrument panel (for versions/markets, where provided).
158
SERVICING AND CARE
Page 164 of 228
PERIODIC CHECKS
Every1,000km or before long trips
check and, if necessary, top up:
engine coolant level;
brake fluid level;
windscreen washer fluid level;
tyre inflation pressure and condition;
operation of lighting system
(headlights, direction indicators, hazard
warning lights, etc.);
operation of screen washer/wiper
system and positioning/wear of
windscreen/rear window wiper blades.
Every3,000km, check and top up the
engine oil level.
DEMANDING VEHICLE
USE
If the vehicle is mostly used in one of
the following conditions:
dusty roads;
short, repeated journeys (less than
7-8 km) at sub-zero outside
temperatures;
engine often idling or driving long
distances at low speeds or long periods
of inactivity;
the following checks must be carried
out more often than indicated in the
Scheduled Service Plan:
check front disc brake pad condition
and wear;
check cleanliness of bonnet and
boot locks, cleanliness and lubrication
of linkage;
visually inspect conditions of: engine,
gearbox, transmission, pipes and hoses
(exhaust/fuel system/brakes) and
rubber elements (gaiters/sleeves/
bushes, etc.);
check battery charge and battery
fluid level (electrolyte);
visually inspect conditions of the
accessory drive belts;
check and, if necessary, change
engine oil and replace oil filter;
check and, if necessary, replace
pollen filter;
check and, if necessary, replace air
cleaner.
SERVICING
PROCEDURES
The vehicle respects the recycling
criteria and scrapped vehicle
assessment that will become law in
2016.
Therefore, some of the vehicle’s
components are designed with their
ultimate recycling in mind.
These components can easily be
disassembled to be recovered and
reused in the recycling industry.
Moreover, thanks to its advanced
design, its original setup and its modest
fuel consumption, the vehicle complies
with the anti-pollution regulations in
force. We are actively committed to
reducing polluting gases and saving
energy. But the level of polluting gas
emissions and vehicle consumption
also depend on you. Take care to use
and service your vehicle correctly.
Keep in mind that lack of respect for
anti-pollution laws can expose the
vehicle's owner to administrative
sanctions. Moreover, replacing engine,
fuel system and exhaust parts with
other non-original ones voids the
vehicle's compliance with the
anti-pollution regulations.
162
SERVICING AND CARE
Page 175 of 228
What to do
Wash the car by hand, with lots of
water, using a soft cloth or sponge.
Going through an automatic car
wash
Bring the windscreen wiper to the stop
position (refer to the "Windscreen /
Rearscreen wiper” paragraph in the
"Getting to know your vehicle” chapter).
Check that external equipment is fixed
properly (additional lamps, rearview
mirrors) and remove the radio aerial (for
versions/markets where provided).
Headlight cleaning
Since the headlights are equipped with
plastic materials, use a soft cloth or
cotton pad. If this is not sufficient, wet it
slightly with soapy water, then rinse with
a soft cloth or cotton. Finish by drying
delicately with a soft, dry cloth. Do not
use alcohol-based products.
Windows
(e.g.: the instrument panel, clock,
outside temperature display panel,
radio display panel, multi-media or
multi-function display panel, etc.)
Use a soft, cotton cloth. If this is not
sufficient, use a soft cloth (or a cotton
pad) slightly wetted with soapy water,
then rinse with a soft cloth or wet
cotton.
Finish by drying delicately with a soft,
dry cloth.
Do not use alcohol-based productsand/or nebulisers on the area.
WARNING
210)In order to preserve the aesthetic
appearance of the paint, abrasive products
and/or polishes should not be used for
cleaning the vehicle.
211)Avoid washing with rollers and/or
brushes in washing stations. Wash the
vehicle only by hand using neutral pH
detergents; dry it with a dampened
chamois leather. Abrasive products and/or
polishes should not be used for cleaning
the vehicle. Bird droppings must be
washed off immediately and thoroughly as
the acid they contain is particularly
aggressive. Avoid (if at all possible) parking
the vehicle under trees; remove vegetable
resins immediately as, when dried, it may
only be possible to remove them with
abrasive products and/or polishes, which is
highly inadvisable as they could alter the
typical opaqueness of the paint. Do not
use pure windscreen washer fluid for
cleaning the front windscreen and rear
window; dilute it min. 50% with water. Only
use pure screen washer fluid when strictly
necessary due to outside temperature
conditions.
IMPORTANT
7)Detergents pollute the environment. The
vehicle should be washed in areas
equipped for collecting and purifying the
liquid used in the washing process.
INTERIOR
212) 213) 214)
62) 63)
If it undergoes correct service, the
vehicle can last longer. Therefore, we
advise you to regularly see to servicing
the interior of your vehicle.
Every spot must be seen to promptly.
Whatever caused the stain, use cold,
soapy water (possibly warm) based on
mild soap.
Detergents are prohibited (liquid
detergent for dishes, powdered
detergent, alcohol-based products).
Use a soft cloth.
Rinse and blot the excess water.
Fabric (seats, door coverings, etc.)
Dust the fabric regularly.
Liquid spots
Use soapy water.
Blot lightly (without rubbing) with a soft
cloth, then rinse and remove residual
liquid.
Solid or pasty spots
Immediately and delicately remove the
excess solid or pasty material with a
spatula (working from the edges to the
middle, keeping the spot from growing).
Clean as indicated for liquid spots.
Special procedure for candy,
chewing gum
Apply an ice cube to crystalise it, then
proceed as indicated for solid spots.
173
Page 218 of 228
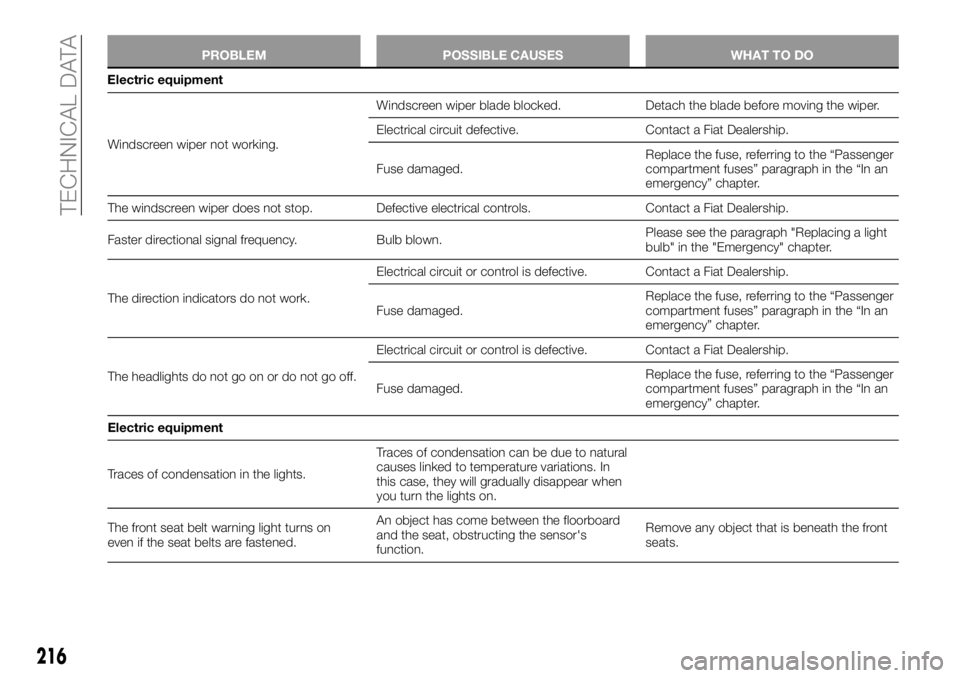
PROBLEM POSSIBLE CAUSES WHAT TO DO
Windscreen wiper not working.Windscreen wiper blade blocked. Detach the blade before moving the wiper.
Electrical circuit defective. Contact a Fiat Dealership.
Fuse damaged.Replace the fuse, referring to the “Passenger
compartment fuses” paragraph in the “In an
emergency” chapter.
The windscreen wiper does not stop. Defective electrical controls. Contact a Fiat Dealership.
Faster directional signal frequency. Bulb blown.Please see the paragraph "Replacing a light
bulb" in the "Emergency" chapter.
The direction indicators do not work.Electrical circuit or control is defective. Contact a Fiat Dealership.
Fuse damaged.Replace the fuse, referring to the “Passenger
compartment fuses” paragraph in the “In an
emergency” chapter.
The headlights do not go on or do not go off.Electrical circuit or control is defective. Contact a Fiat Dealership.
Fuse damaged.Replace the fuse, referring to the “Passenger
compartment fuses” paragraph in the “In an
emergency” chapter.
Electric equipment
Traces of condensation in the lights.Traces of condensation can be due to natural
causes linked to temperature variations. In
this case, they will gradually disappear when
you turn the lights on.
The front seat belt warning light turns on
even if the seat belts are fastened.An object has come between the floorboard
and the seat, obstructing the sensor's
function.Remove any object that is beneath the front
seats.
216
TECHNICAL DATA
Electric equipment