remote control FIAT TALENTO 2017 Owner handbook (in English)
[x] Cancel search | Manufacturer: FIAT, Model Year: 2017, Model line: TALENTO, Model: FIAT TALENTO 2017Pages: 228, PDF Size: 4.47 MB
Page 15 of 228
THE KEYS
KEY WITH REMOTE
CONTROL
1)
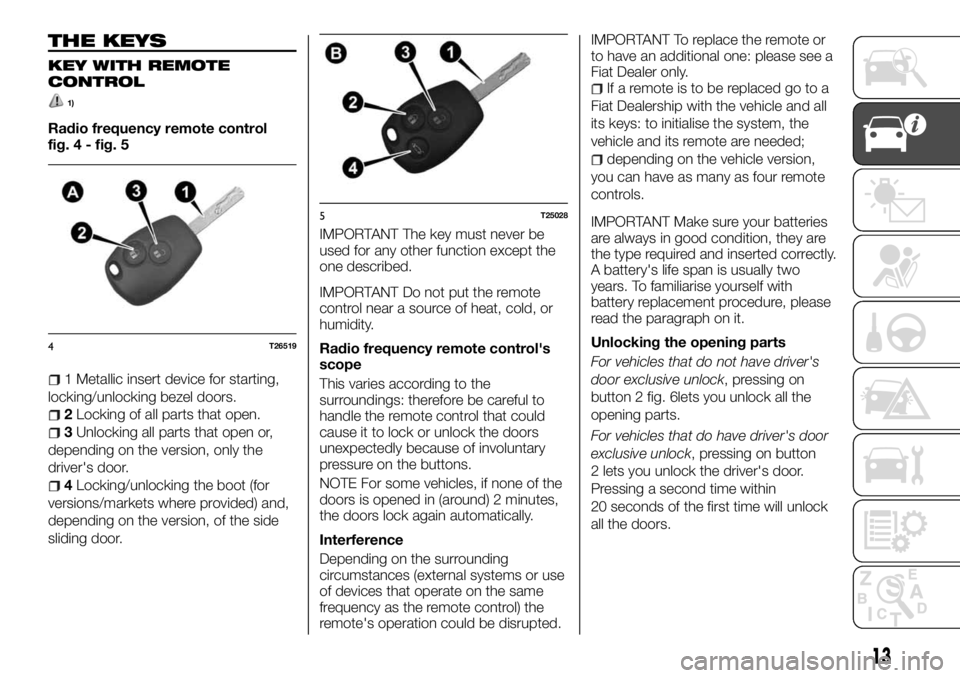
Radio frequency remote control
fig. 4 - fig. 5
1 Metallic insert device for starting,
locking/unlocking bezel doors.
2Locking of all parts that open.
3Unlocking all parts that open or,
depending on the version, only the
driver's door.
4Locking/unlocking the boot (for
versions/markets where provided) and,
depending on the version, of the side
sliding door.IMPORTANT The key must never be
used for any other function except the
one described.
IMPORTANT Do not put the remote
control near a source of heat, cold, or
humidity.
Radio frequency remote control's
scope
This varies according to the
surroundings: therefore be careful to
handle the remote control that could
cause it to lock or unlock the doors
unexpectedly because of involuntary
pressure on the buttons.
NOTE For some vehicles, if none of the
doors is opened in (around) 2 minutes,
the doors lock again automatically.
Interference
Depending on the surrounding
circumstances (external systems or use
of devices that operate on the same
frequency as the remote control) the
remote's operation could be disrupted.IMPORTANT To replace the remote or
to have an additional one: please see a
Fiat Dealer only.
If a remote is to be replaced go to a
Fiat Dealership with the vehicle and all
its keys: to initialise the system, the
vehicle and its remote are needed;
depending on the vehicle version,
you can have as many as four remote
controls.
IMPORTANT Make sure your batteries
are always in good condition, they are
the type required and inserted correctly.
A battery's life span is usually two
years. To familiarise yourself with
battery replacement procedure, please
read the paragraph on it.
Unlocking the opening parts
For vehicles that do not have driver's
door exclusive unlock, pressing on
button 2 fig. 6lets you unlock all the
opening parts.
For vehicles that do have driver's door
exclusive unlock, pressing on button
2 lets you unlock the driver's door.
Pressing a second time within
20 seconds of the first time will unlock
all the doors.
4T26519
5T25028
13
Page 16 of 228
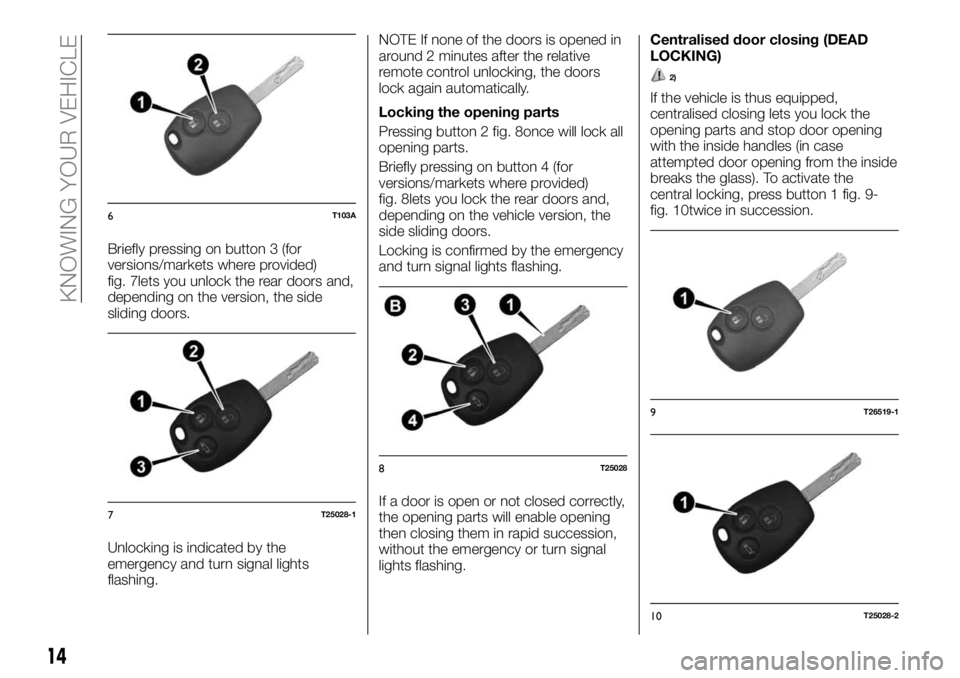
Briefly pressing on button 3 (for
versions/markets where provided)
fig. 7lets you unlock the rear doors and,
depending on the version, the side
sliding doors.
Unlocking is indicated by the
emergency and turn signal lights
flashing.NOTE If none of the doors is opened in
around 2 minutes after the relative
remote control unlocking, the doors
lock again automatically.
Locking the opening parts
Pressing button 2 fig. 8once will lock all
opening parts.
Briefly pressing on button 4 (for
versions/markets where provided)
fig. 8lets you lock the rear doors and,
depending on the vehicle version, the
side sliding doors.
Locking is confirmed by the emergency
and turn signal lights flashing.
If a door is open or not closed correctly,
the opening parts will enable opening
then closing them in rapid succession,
without the emergency or turn signal
lights flashing.Centralised door closing (DEAD
LOCKING)
2)
If the vehicle is thus equipped,
centralised closing lets you lock the
opening parts and stop door opening
with the inside handles (in case
attempted door opening from the inside
breaks the glass). To activate the
central locking, press button 1 fig. 9-
fig. 10twice in succession.
6T103A
7T25028-1
8T25028
9T26519-1
10T25028-2
14
KNOWING YOUR VEHICLE
Page 17 of 228
Locking is confirmed by the emergency
and turn signal lights flashing five times.
NOTE Centralised closing is not
possible if the emergency or parking
lights are on.
Replacing the remote control
battery
1)
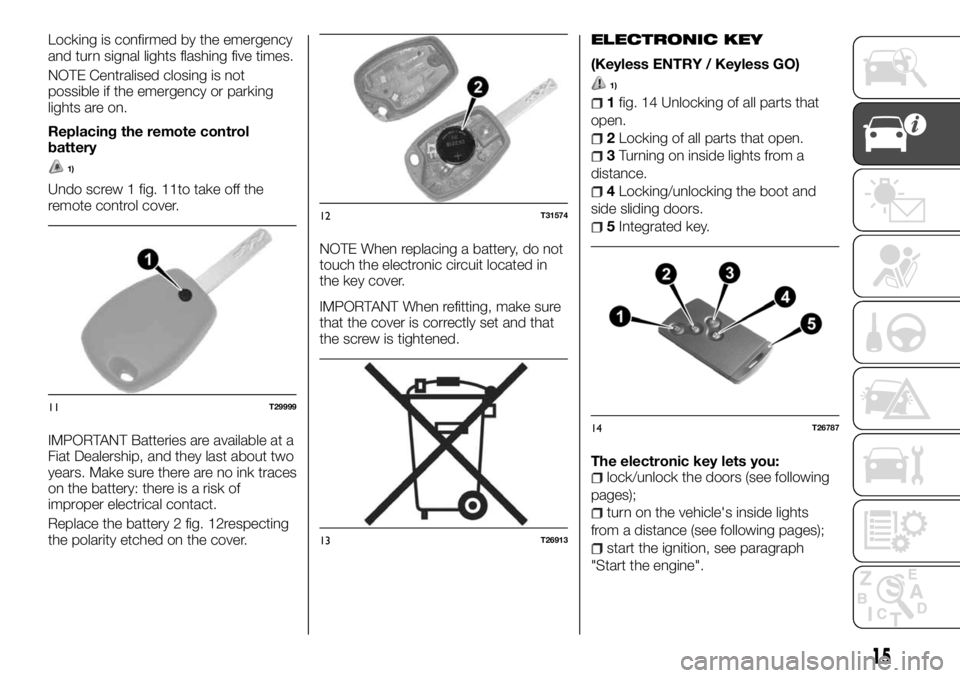
Undo screw 1 fig. 11to take off the
remote control cover.
IMPORTANT Batteries are available at a
Fiat Dealership, and they last about two
years. Make sure there are no ink traces
on the battery: there is a risk of
improper electrical contact.
Replace the battery 2 fig. 12respecting
the polarity etched on the cover.NOTE When replacing a battery, do not
touch the electronic circuit located in
the key cover.
IMPORTANT When refitting, make sure
that the cover is correctly set and that
the screw is tightened.
ELECTRONIC KEY
(Keyless ENTRY / Keyless GO)
1)
1fig. 14 Unlocking of all parts that
open.
2Locking of all parts that open.
3Turning on inside lights from a
distance.
4Locking/unlocking the boot and
side sliding doors.
5Integrated key.
The electronic key lets you:
lock/unlock the doors (see following
pages);
turn on the vehicle's inside lights
from a distance (see following pages);
start the ignition, see paragraph
"Start the engine".
11T29999
12T31574
13T26913
14T26787
15
Page 18 of 228
Autonomy
Make sure your batteries are in good
condition, they are the type required
and inserted correctly. The battery has
a two-year life span: replace it when
you see the apposite message on the
instrument panel (see following pages).
The electronic key's scope
This varies according to the
surroundings; therefore be careful to
handle the remote control that could
cause it to lock or unlock the doors
accidentally because of involuntary
pressure on the buttons.
Integrated key
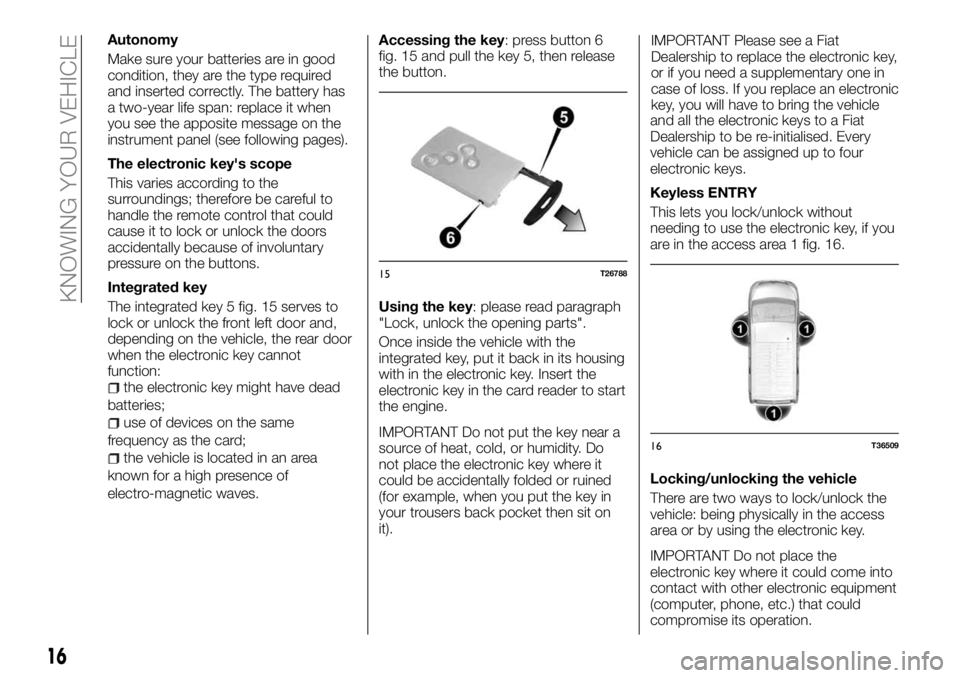
The integrated key 5 fig. 15 serves to
lock or unlock the front left door and,
depending on the vehicle, the rear door
when the electronic key cannot
function:
the electronic key might have dead
batteries;
use of devices on the same
frequency as the card;
the vehicle is located in an area
known for a high presence of
electro-magnetic waves.Accessing the key: press button 6
fig. 15 and pull the key 5, then release
the button.
Using the key: please read paragraph
"Lock, unlock the opening parts".
Once inside the vehicle with the
integrated key, put it back in its housing
with in the electronic key. Insert the
electronic key in the card reader to start
the engine.
IMPORTANT Do not put the key near a
source of heat, cold, or humidity. Do
not place the electronic key where it
could be accidentally folded or ruined
(for example, when you put the key in
your trousers back pocket then sit on
it).IMPORTANT Please see a Fiat
Dealership to replace the electronic key,
or if you need a supplementary one in
case of loss. If you replace an electronic
key, you will have to bring the vehicle
and all the electronic keys to a Fiat
Dealership to be re-initialised. Every
vehicle can be assigned up to four
electronic keys.
Keyless ENTRY
This lets you lock/unlock without
needing to use the electronic key, if you
are in the access area 1 fig. 16.
Locking/unlocking the vehicle
There are two ways to lock/unlock the
vehicle: being physically in the access
area or by using the electronic key.
IMPORTANT Do not place the
electronic key where it could come into
contact with other electronic equipment
(computer, phone, etc.) that could
compromise its operation.
15T26788
16T36509
16
KNOWING YOUR VEHICLE
Page 22 of 228
WARNING
1)Never leave the vehicle unguarded with
the electronic key and a child, a
handicapped person or an animal inside,
even for a short time. This could result in
your own safety or that of others who
could start the engine, setting in motion
equipment such as the electric windows or
even locking the doors. Moreover, in hot
and/or sunny weather, the vehicle's interior
temperature will increase rapidly. Risk of
death or serious injury.
2)Never use the centralised door closing if
someone is still in the vehicle.
IMPORTANT
1)Used batteries may be harmful to the
environment if not disposed of correctly.
They must be disposed of as specified by
law in the special containers or taken to a
Fiat Dealership, which will take care of their
disposal.
DOORS
FRONT DOORS
3) 4) 5) 6) 7) 8)
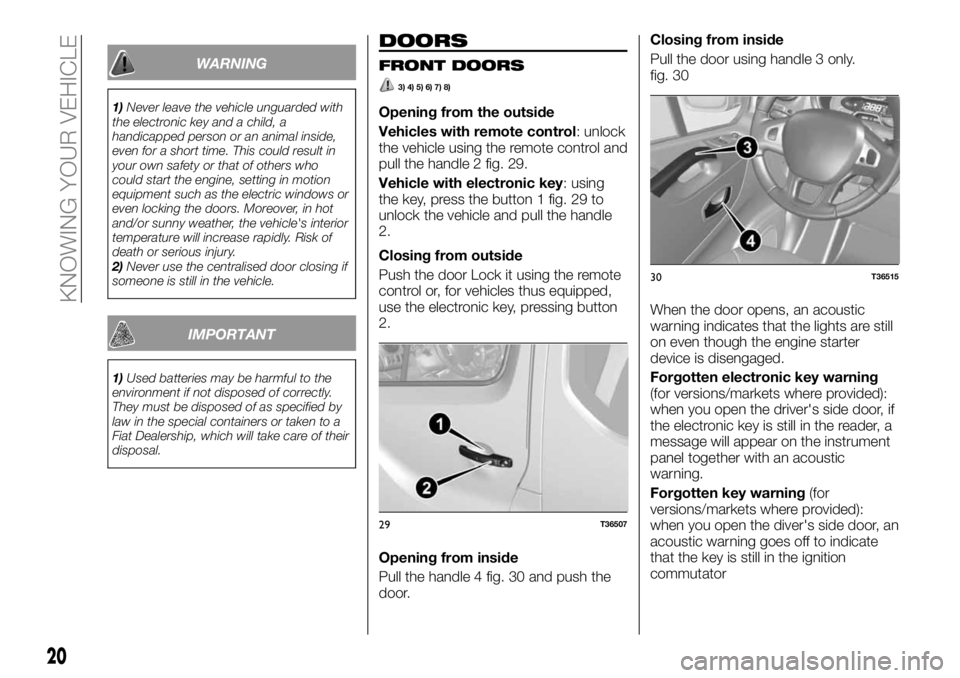
Opening from the outside
Vehicles with remote control: unlock
the vehicle using the remote control and
pull the handle 2 fig. 29.
Vehicle with electronic key: using
the key, press the button 1 fig. 29 to
unlock the vehicle and pull the handle
2.
Closing from outside
Push the door Lock it using the remote
control or, for vehicles thus equipped,
use the electronic key, pressing button
2.
Opening from inside
Pull the handle 4 fig. 30 and push the
door.Closing from inside
Pull the door using handle 3 only.
fig. 30
When the door opens, an acoustic
warning indicates that the lights are still
on even though the engine starter
device is disengaged.
Forgotten electronic key warning
(for versions/markets where provided):
when you open the driver's side door, if
the electronic key is still in the reader, a
message will appear on the instrument
panel together with an acoustic
warning.
Forgotten key warning(for
versions/markets where provided):
when you open the diver's side door, an
acoustic warning goes off to indicate
that the key is still in the ignition
commutator
29T36507
30T36515
20
KNOWING YOUR VEHICLE
Page 23 of 228
Forgotten open door warning:ifa
door is open or not properly closed, as
soon as the vehicle has gone over
about 20 km/h, a message to this effect
will appear on the instrument panel
together with a warning light.
NOTE depending on the vehicle,
accessories (radio, etc.) disengage
when the engine is stopped, the
driver's side door is opened or doors
are closed.
SLIDING SIDE DOOR
9) 10) 11)
Vehicles with remote control
The sliding side door locks and unlocks
by pressing the remote control button.
Vehicles with electronic key
The sliding side door locks and
unlocks:
by pressing the button on the
electronic key;
in easy access mode by
locking/unlocking the front doors or
tailgate.
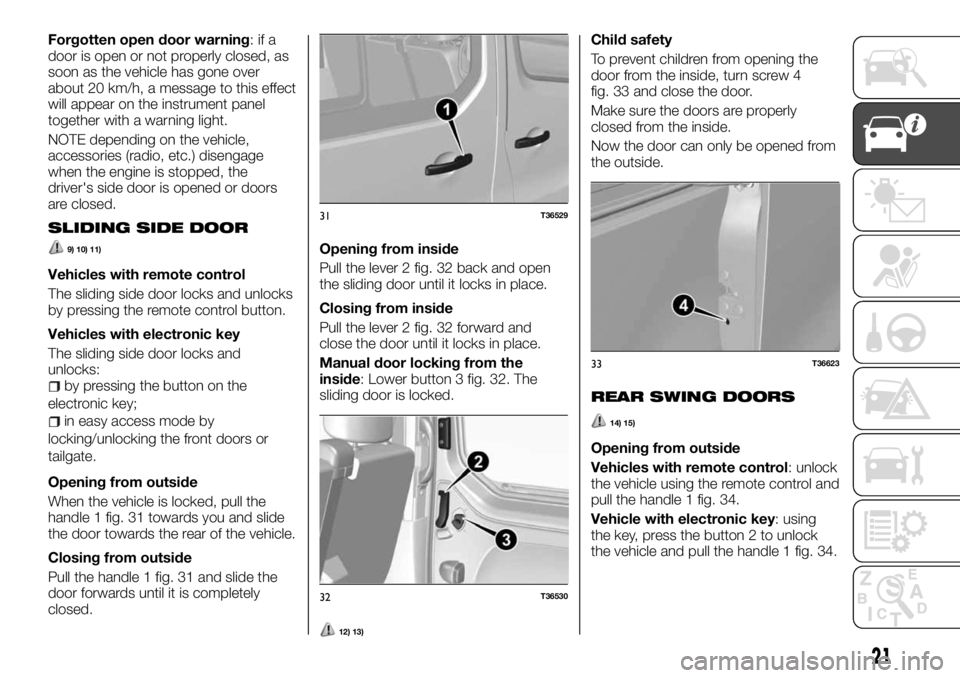
Opening from outside
When the vehicle is locked, pull the
handle 1 fig. 31 towards you and slide
the door towards the rear of the vehicle.
Closing from outside
Pull the handle 1 fig. 31 and slide the
door forwards until it is completely
closed.Opening from inside
Pull the lever 2 fig. 32 back and open
the sliding door until it locks in place.
Closing from inside
Pull the lever 2 fig. 32 forward and
close the door until it locks in place.
Manual door locking from the
inside: Lower button 3 fig. 32. The
sliding door is locked.
12) 13)
Child safety
To prevent children from opening the
door from the inside, turn screw 4
fig. 33 and close the door.
Make sure the doors are properly
closed from the inside.
Now the door can only be opened from
the outside.
REAR SWING DOORS
14) 15)
Opening from outside
Vehicles with remote control: unlock
the vehicle using the remote control and
pull the handle 1 fig. 34.
Vehicle with electronic key: using
the key, press the button 2 to unlock
the vehicle and pull the handle 1 fig. 34.
31T36529
32T36530
33T36623
21
Page 25 of 228
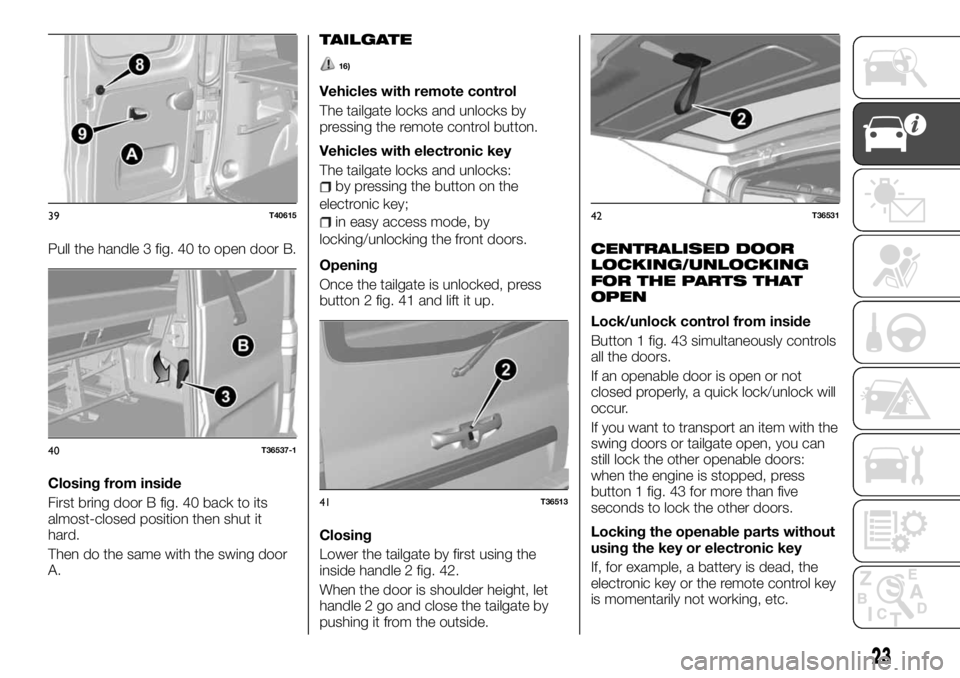
Pull the handle 3 fig. 40 to open door B.
Closing from inside
First bring door B fig. 40 back to its
almost-closed position then shut it
hard.
Then do the same with the swing door
A.
TAILGATE
16)
Vehicles with remote control
The tailgate locks and unlocks by
pressing the remote control button.
Vehicles with electronic key
The tailgate locks and unlocks:
by pressing the button on the
electronic key;
in easy access mode, by
locking/unlocking the front doors.
Opening
Once the tailgate is unlocked, press
button 2 fig. 41 and lift it up.
Closing
Lower the tailgate by first using the
inside handle 2 fig. 42.
When the door is shoulder height, let
handle 2 go and close the tailgate by
pushing it from the outside.
CENTRALISED DOOR
LOCKING/UNLOCKING
FOR THE PARTS THAT
OPEN
Lock/unlock control from inside
Button 1 fig. 43 simultaneously controls
all the doors.
If an openable door is open or not
closed properly, a quick lock/unlock will
occur.
If you want to transport an item with the
swing doors or tailgate open, you can
still lock the other openable doors:
when the engine is stopped, press
button 1 fig. 43 for more than five
seconds to lock the other doors.
Locking the openable parts without
using the key or electronic key
If, for example, a battery is dead, the
electronic key or the remote control key
is momentarily not working, etc.
39T40615
40T36537-1
41T36513
42T36531
23
Page 26 of 228
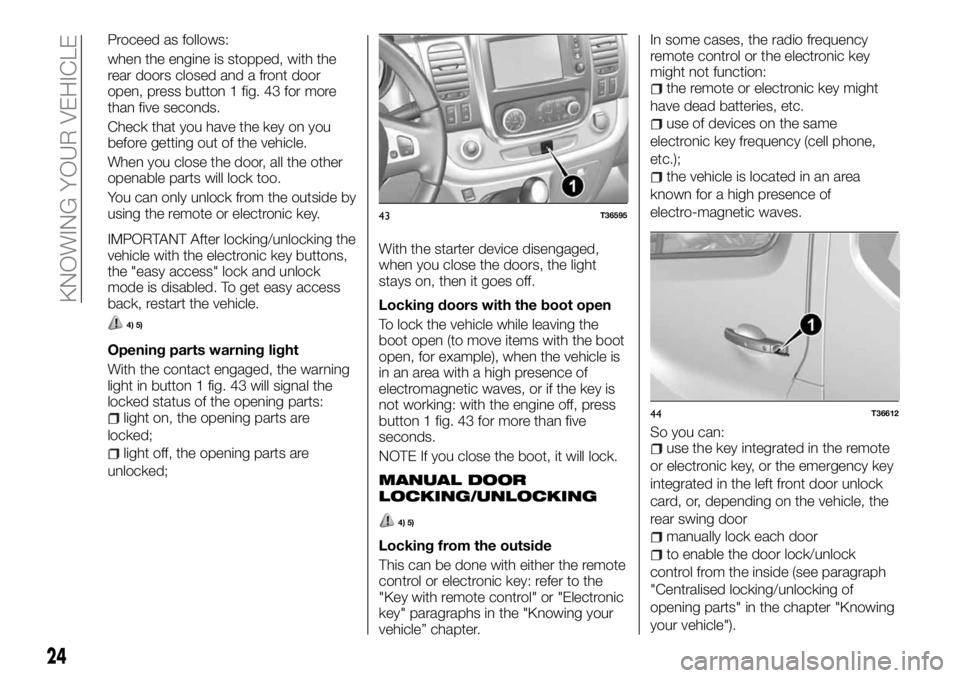
Proceed as follows:
when the engine is stopped, with the
rear doors closed and a front door
open, press button 1 fig. 43 for more
than five seconds.
Check that you have the key on you
before getting out of the vehicle.
When you close the door, all the other
openable parts will lock too.
You can only unlock from the outside by
using the remote or electronic key.
IMPORTANT After locking/unlocking the
vehicle with the electronic key buttons,
the "easy access" lock and unlock
mode is disabled. To get easy access
back, restart the vehicle.
4) 5)
Opening parts warning light
With the contact engaged, the warning
light in button 1 fig. 43 will signal the
locked status of the opening parts:
light on, the opening parts are
locked;
light off, the opening parts are
unlocked;With the starter device disengaged,
when you close the doors, the light
stays on, then it goes off.
Locking doors with the boot open
To lock the vehicle while leaving the
boot open (to move items with the boot
open, for example), when the vehicle is
in an area with a high presence of
electromagnetic waves, or if the key is
not working: with the engine off, press
button 1 fig. 43 for more than five
seconds.
NOTE If you close the boot, it will lock.
MANUAL DOOR
LOCKING/UNLOCKING
4) 5)
Locking from the outside
This can be done with either the remote
control or electronic key: refer to the
"Key with remote control" or "Electronic
key" paragraphs in the "Knowing your
vehicle” chapter.In some cases, the radio frequency
remote control or the electronic key
might not function:
the remote or electronic key might
have dead batteries, etc.
use of devices on the same
electronic key frequency (cell phone,
etc.);
the vehicle is located in an area
known for a high presence of
electro-magnetic waves.
So you can:
use the key integrated in the remote
or electronic key, or the emergency key
integrated in the left front door unlock
card, or, depending on the vehicle, the
rear swing door
manually lock each door
to enable the door lock/unlock
control from the inside (see paragraph
"Centralised locking/unlocking of
opening parts" in the chapter "Knowing
your vehicle").
43T36595
44T36612
24
KNOWING YOUR VEHICLE
Page 35 of 228
Vehicles with remote control
Some of these conditions prevent
automatic engine restart when opening:
one of the doors (for vehicles with a
key);
the passenger door (for vehicles with
an electronic key).
IRREGULAR OPERATION
When the appropriate message
appears on the instrument panel, along
with the integrated light 2 in button 1
fig. 65, the system is deactivated.
Contact a Fiat Dealership.
WARNING
29)In case of an emergency stop, the
engine could restart by pressing the clutch
pedal if the Start&Stop function is
activated.
IMPORTANT
2)Do not drive when the engine is in
standby (the warning lighton the
instrument panel turns on).
3)When the engine in stand-by, the power
steering is deactivated.4)If you leave the vehicle, there is an
acoustic warning that the engine is in
stand-by mode (it is not off). Before getting
out of the vehicle, you must disengage the
starter device (refer to the "Starter switch”
paragraph in the “Knowing your vehicle”
chapter).
REAR VIEW
MIRRORS
DOOR MIRRORS
30) 31) 32)
Power Mirrors
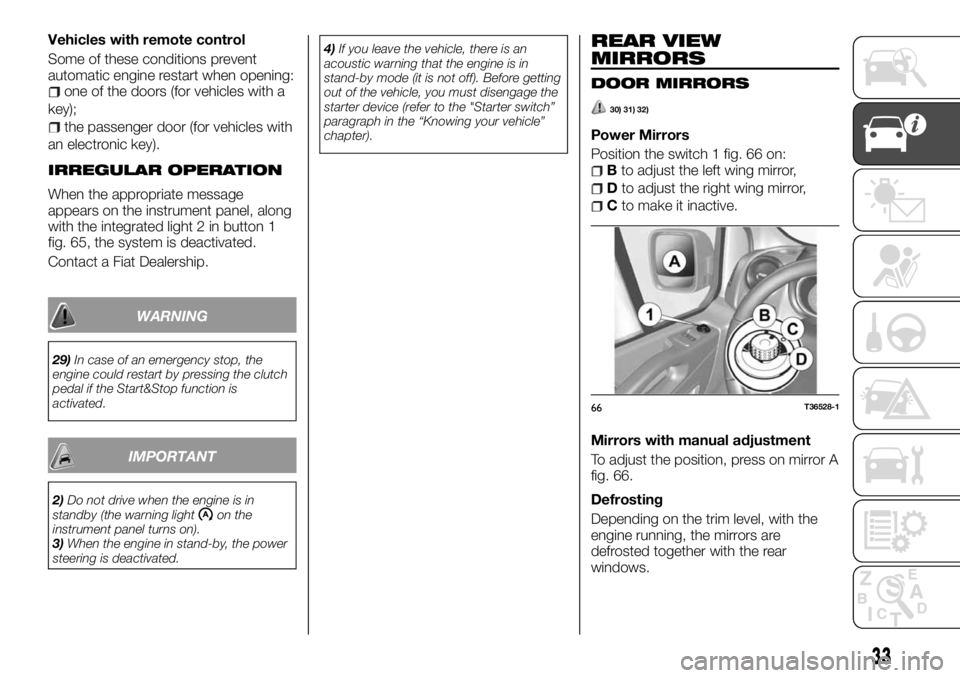
Position the switch 1 fig. 66 on:
Bto adjust the left wing mirror,
Dto adjust the right wing mirror,
Cto make it inactive.
Mirrors with manual adjustment
To adjust the position, press on mirror A
fig. 66.
Defrosting
Depending on the trim level, with the
engine running, the mirrors are
defrosted together with the rear
windows.
66T36528-1
33
Page 43 of 228
38)If the window needs to be cleaned,
make sure the device is deactivated or the
key is on STOP.
39)When working in the engine
compartment, make sure that the rear
window wiper is in the stopped position.
Risk of injury.
IMPORTANT
5)Never use the windscreen wipers to
remove layers of snow or ice from the
windscreen. In such conditions, the
windscreen wiper may be subjected to
excessive stress and the motor cut-out
switch, which prevents operation for a few
seconds, may intervene. If operation is not
subsequently restored, even after restarting
the vehicle, contact a Fiat Dealership.
6)Do not operate the windscreen wiper
with the blades lifted from the windscreen.
7)Make sure the device is switched off if
there is ice on the windscreen.
REFUELLING THE
VEHICLE
Useful tank capacity: Approx. 80 litres
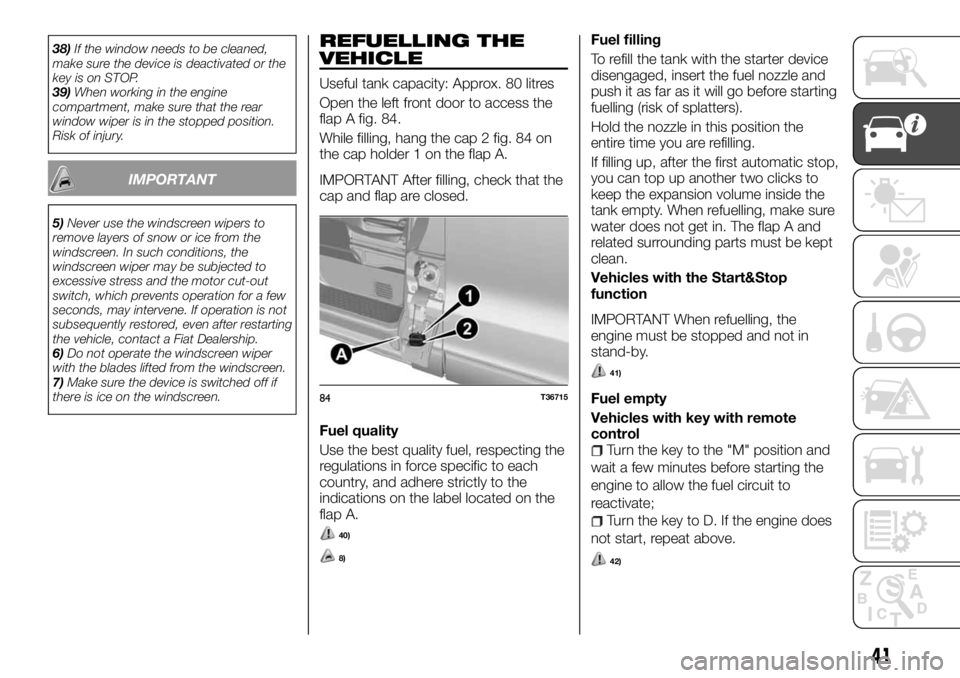
Open the left front door to access the
flap A fig. 84.
While filling, hang the cap 2 fig. 84 on
the cap holder 1 on the flap A.
IMPORTANT After filling, check that the
cap and flap are closed.
Fuel quality
Use the best quality fuel, respecting the
regulations in force specific to each
country, and adhere strictly to the
indications on the label located on the
flap A.
40)
8)
Fuel filling
To refill the tank with the starter device
disengaged, insert the fuel nozzle and
push it as far as it will go before starting
fuelling (risk of splatters).
Hold the nozzle in this position the
entire time you are refilling.
If filling up, after the first automatic stop,
you can top up another two clicks to
keep the expansion volume inside the
tank empty. When refuelling, make sure
water does not get in. The flap A and
related surrounding parts must be kept
clean.
Vehicles with the Start&Stop
function
IMPORTANT When refuelling, the
engine must be stopped and not in
stand-by.
41)
Fuel empty
Vehicles with key with remote
control
Turn the key to the "M" position and
wait a few minutes before starting the
engine to allow the fuel circuit to
reactivate;
Turn the key to D. If the engine does
not start, repeat above.
42)
84T36715
41