seat FIAT TALENTO 2017 Owner handbook (in English)
[x] Cancel search | Manufacturer: FIAT, Model Year: 2017, Model line: TALENTO, Model: FIAT TALENTO 2017Pages: 228, PDF Size: 4.47 MB
Page 5 of 228
USE OF THE OWNER HANDBOOK
OPERATING INSTRUCTIONS
Each time direction instructions (left/right or forwards/backwards) about the vehicle are given, these must be intended as
regarding an occupant in the driver's seat. Special cases not complying with this rule will be specified as appropriate in the text.
The figures in the Owner Handbook are provided by way of example only: this might imply that some details of the image do
not correspond to the actual arrangement of your vehicle. In addition, the Handbook has been conceived considering vehicles
with steering wheel on the left side; it is therefore possible that on vehicles with steering wheel on the right side, the position or
construction of some controls is not exactly mirror-like with respect to the figure.
To identify the chapter with the information needed you can consult the index at the end of this Owner Handbook.
Chapters can be rapidly identified with dedicated graphic tabs, at the side of each odd page. A few pages further there is a key
for getting to know the chapter order and the relevant symbols in the tabs. There is in any case a textual indication of the
current chapter at the side of each even page.
Page 14 of 228
KNOWING YOUR VEHICLE
In-depth knowledge of your new vehicle
starts here.
The handbook that you are reading
simply and directly explains how it is
made and how it works.
That’s why we advise you to read it
seated comfortably on board, so that
you can see what is described here for
yourself.THE KEYS.................14
DOORS...................21
HEADRESTS................27
SEATS....................28
STEERING WHEEL/POWER
STEERING.................32
START&STOP SYSTEM.........32
REAR VIEW MIRRORS.........34
EXTERNAL LIGHTS...........35
INTERIOR LIGHTS............38
WINDSCREEN / REAR WINDOW
WIPERS..................40
REFUELLING THE VEHICLE......42
AdBlue (Urea) ADDITIVE TANK....44
IGNITION DEVICE............45
CLIMATE CONTROL...........45
RADAR PARKING.............55
REAR CAMERA..............57
ELECTRIC WINDOWS..........58
ENGINE BONNET............60
INTERIOR FITTINGS...........61
RADIO....................67
BAGGAGE COVER............67
CRUISE CONTROL (constant speed
regulator)..................68
SPEED LIMITER..............70
PROTECTING THE ENVIRONMENT .72
DIESEL VERSION
PARTICULARITIES............73
12
KNOWING YOUR VEHICLE
Page 28 of 228
5)For safety reasons, always open/close
doors when the vehicle is stopped.
6)NEVER leave children unattended inside
the vehicle, let alone leave it with the doors
unlocked in a place that children can
access easily. Children may seriously, or
even fatally, injure themselves. Also ensure
that children do not inadvertently operate
the parking brake or the brake pedal.
7)Opening or closing the door, as for all
opening parts of the vehicle, must be done
keeping in mind the precautions for use
concerning this operation: check that there
is no one, no part of a body, an animal or
object that could come into contact during
this manoeuvre. Only use the inside and
outside handles to manoeuvre the door.
Use caution in both opening and closing
the doors. Caution: when the vehicle is
parked on an incline, open or close the
door carefully until it locks in place. Always
make sure the sliding door is completely
closed before the vehicle starts moving.
8)Before opening a door, ensure that you
can do it in conditions of safety.
9)You must not open the left-hand sliding
side door with the fuel flap open while
refuelling. Check that the fuel flap is closed
while opening/closing the sliding side door
to avoid damage.
10)Do not leave the sliding side door open
when the vehicle is parked on a gradient. A
knock could release the latch leaving the
door free to move forward.
11)Before leaving the vehicle parked with
sliding doors open, always check that the
latch is engaged.
12)Always use this device when carrying
children.13)The spring-loaded system is designed
for optimum usage. Accidental knocks or a
strong gust of wind may release the
springs, forcing the doors to close.
14)When closing, shut the right hand
swing door fully before you close the left
hand swing door. Never shut the two doors
at the same time.
15)In case of wind, do not leave the rear
swing doors open. Risk of injury.
16)When you stop by the side of the road,
if the tailgate is completely open, the rear
lights might not be visible. Warn other road
users that your vehicle is there by placing
the pre-signal triangle or other device
allowed by law in the country you are
driving in.HEADRESTS
FRONT HEADREST
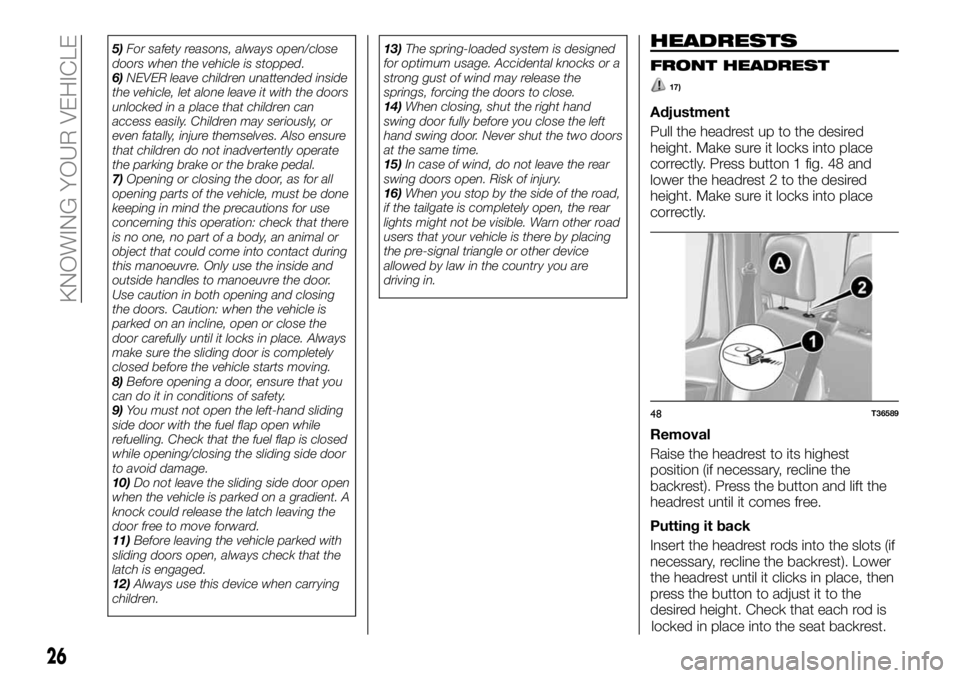
17)
Adjustment
Pull the headrest up to the desired
height. Make sure it locks into place
correctly. Press button 1 fig. 48 and
lower the headrest 2 to the desired
height. Make sure it locks into place
correctly.
Removal
Raise the headrest to its highest
position (if necessary, recline the
backrest). Press the button and lift the
headrest until it comes free.
Putting it back
Insert the headrest rods into the slots (if
necessary, recline the backrest). Lower
the headrest until it clicks in place, then
press the button to adjust it to the
desired height. Check that each rod is
48T36589
26
KNOWING YOUR VEHICLE
locked in place into the seat backrest.
Page 29 of 228
REAR HEADREST
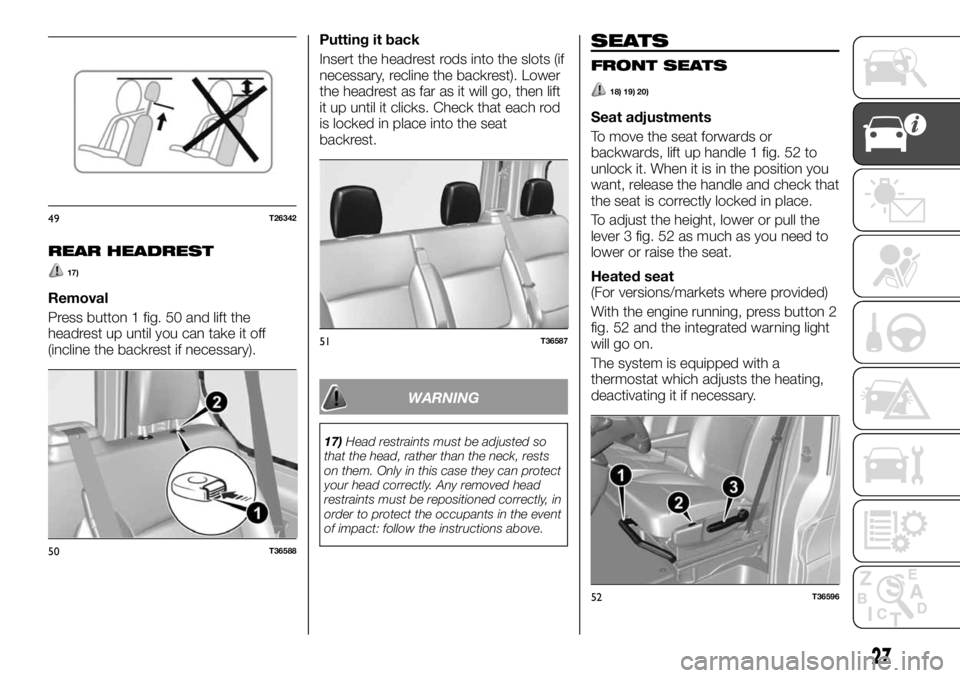
17)
Removal
Press button 1 fig. 50 and lift the
headrest up until you can take it off
(incline the backrest if necessary).Putting it back
Insert the headrest rods into the slots (if
necessary, recline the backrest). Lower
the headrest as far as it will go, then lift
it up until it clicks. Check that each rod
is locked in place into the seat
backrest.
WARNING
17)Head restraints must be adjusted so
that the head, rather than the neck, rests
on them. Only in this case they can protect
your head correctly. Any removed head
restraints must be repositioned correctly, in
order to protect the occupants in the event
of impact: follow the instructions above.
SEATS
FRONT SEATS
18) 19) 20)
Seat adjustments
To move the seat forwards or
backwards, lift up handle 1 fig. 52 to
unlock it. When it is in the position you
want, release the handle and check that
the seat is correctly locked in place.
To adjust the height, lower or pull the
lever 3 fig. 52 as much as you need to
lower or raise the seat.
Heated seat
(For versions/markets where provided)
With the engine running, press button 2
fig. 52 and the integrated warning light
will go on.
The system is equipped with a
thermostat which adjusts the heating,
deactivating it if necessary.
49T26342
50T36588
51T36587
52T36596
27
Page 30 of 228
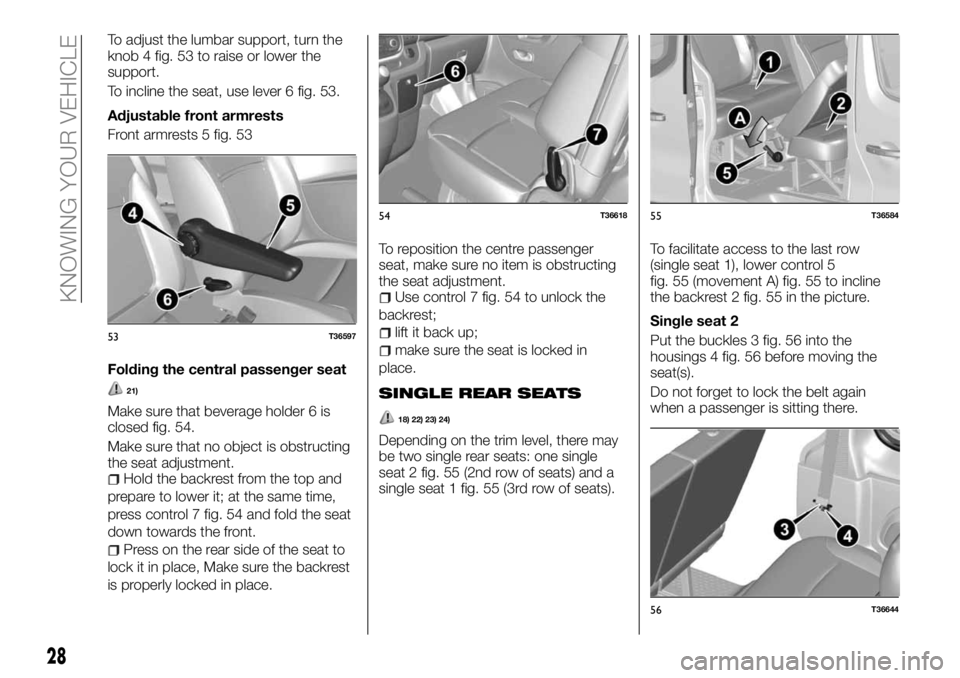
To adjust the lumbar support, turn the
knob 4 fig. 53 to raise or lower the
support.
To incline the seat, use lever 6 fig. 53.
Adjustable front armrests
Front armrests 5 fig. 53
Folding the central passenger seat
21)
Make sure that beverage holder 6 is
closed fig. 54.
Make sure that no object is obstructing
the seat adjustment.
Hold the backrest from the top and
prepare to lower it; at the same time,
press control 7 fig. 54 and fold the seat
down towards the front.
Press on the rear side of the seat to
lock it in place, Make sure the backrest
is properly locked in place.To reposition the centre passenger
seat, make sure no item is obstructing
the seat adjustment.
Use control 7 fig. 54 to unlock the
backrest;
lift it back up;
make sure the seat is locked in
place.
SINGLE REAR SEATS
18) 22) 23) 24)
Depending on the trim level, there may
be two single rear seats: one single
seat 2 fig. 55 (2nd row of seats) and a
single seat 1 fig. 55 (3rd row of seats).To facilitate access to the last row
(single seat 1), lower control 5
fig. 55 (movement A) fig. 55 to incline
the backrest 2 fig. 55 in the picture.
Single seat 2
Put the buckles 3 fig. 56 into the
housings 4 fig. 56 before moving the
seat(s).
Do not forget to lock the belt again
when a passenger is sitting there.
53T36597
54T3661855T36584
56T36644
28
KNOWING YOUR VEHICLE
Page 31 of 228
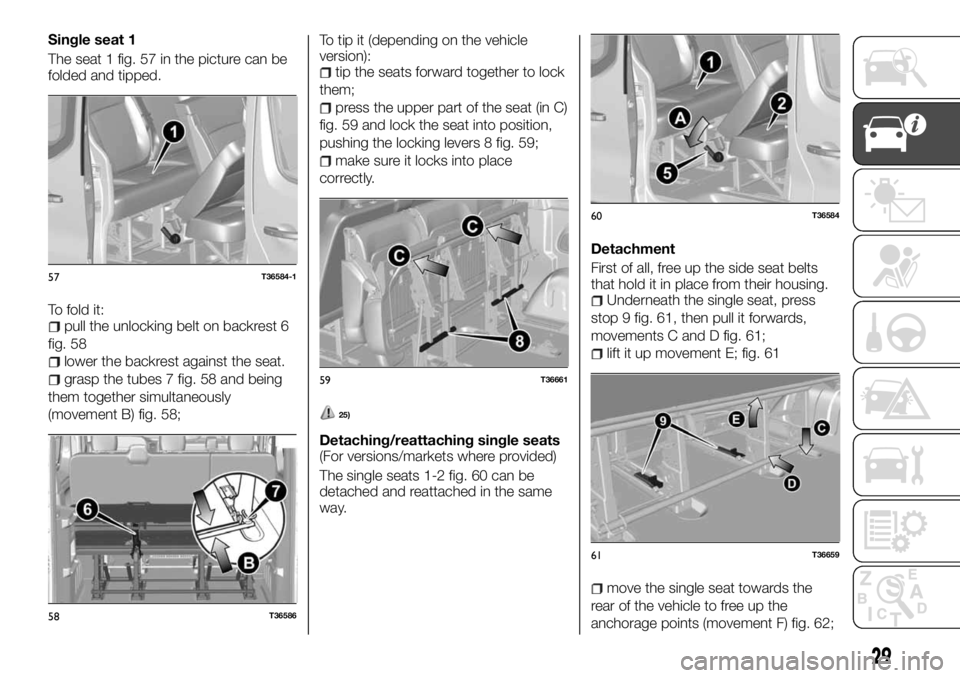
Single seat 1
The seat 1 fig. 57 in the picture can be
folded and tipped.
To fold it:
pull the unlocking belt on backrest 6
fig. 58
lower the backrest against the seat.
grasp the tubes 7 fig. 58 and being
them together simultaneously
(movement B) fig. 58;To tip it (depending on the vehicle
version):
tip the seats forward together to lock
them;
press the upper part of the seat (in C)
fig. 59 and lock the seat into position,
pushing the locking levers 8 fig. 59;
make sure it locks into place
correctly.
25)
Detaching/reattaching single seats
(For versions/markets where provided)
The single seats 1-2 fig. 60 can be
detached and reattached in the same
way.Detachment
First of all, free up the side seat belts
that hold it in place from their housing.
Underneath the single seat, press
stop 9 fig. 61, then pull it forwards,
movements C and D fig. 61;
lift it up movement E; fig. 61
move the single seat towards the
rear of the vehicle to free up the
anchorage points (movement F) fig. 62;
57T36584-1
58T36586
59T36661
60T36584
61T36659
29
Page 32 of 228
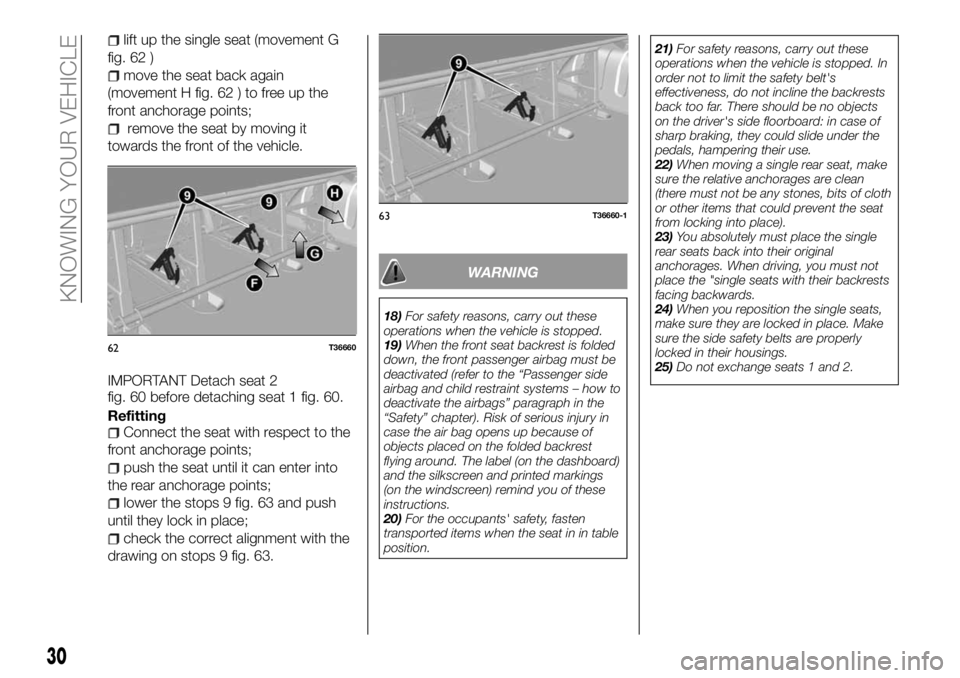
lift up the single seat (movement G
fig. 62 )
move the seat back again
(movement H fig. 62 ) to free up the
front anchorage points;
remove the seat by moving it
towards the front of the vehicle.
IMPORTANT Detach seat 2
fig. 60 before detaching seat 1 fig. 60.
Refitting
Connect the seat with respect to the
front anchorage points;
push the seat until it can enter into
the rear anchorage points;
lower the stops 9 fig. 63 and push
until they lock in place;
check the correct alignment with the
drawing on stops 9 fig. 63.
WARNING
18)For safety reasons, carry out these
operations when the vehicle is stopped.
19)When the front seat backrest is folded
down, the front passenger airbag must be
deactivated (refer to the “Passenger side
airbag and child restraint systems – how to
deactivate the airbags” paragraph in the
“Safety” chapter). Risk of serious injury in
case the air bag opens up because of
objects placed on the folded backrest
flying around. The label (on the dashboard)
and the silkscreen and printed markings
(on the windscreen) remind you of these
instructions.
20)For the occupants' safety, fasten
transported items when the seat in in table
position.21)For safety reasons, carry out these
operations when the vehicle is stopped. In
order not to limit the safety belt's
effectiveness, do not incline the backrests
back too far. There should be no objects
on the driver's side floorboard: in case of
sharp braking, they could slide under the
pedals, hampering their use.
22)When moving a single rear seat, make
sure the relative anchorages are clean
(there must not be any stones, bits of cloth
or other items that could prevent the seat
from locking into place).
23)You absolutely must place the single
rear seats back into their original
anchorages. When driving, you must not
place the "single seats with their backrests
facing backwards.
24)When you reposition the single seats,
make sure they are locked in place. Make
sure the side safety belts are properly
locked in their housings.
25)Do not exchange seats 1 and 2.
62T36660
63T36660-1
30
KNOWING YOUR VEHICLE
Page 34 of 228
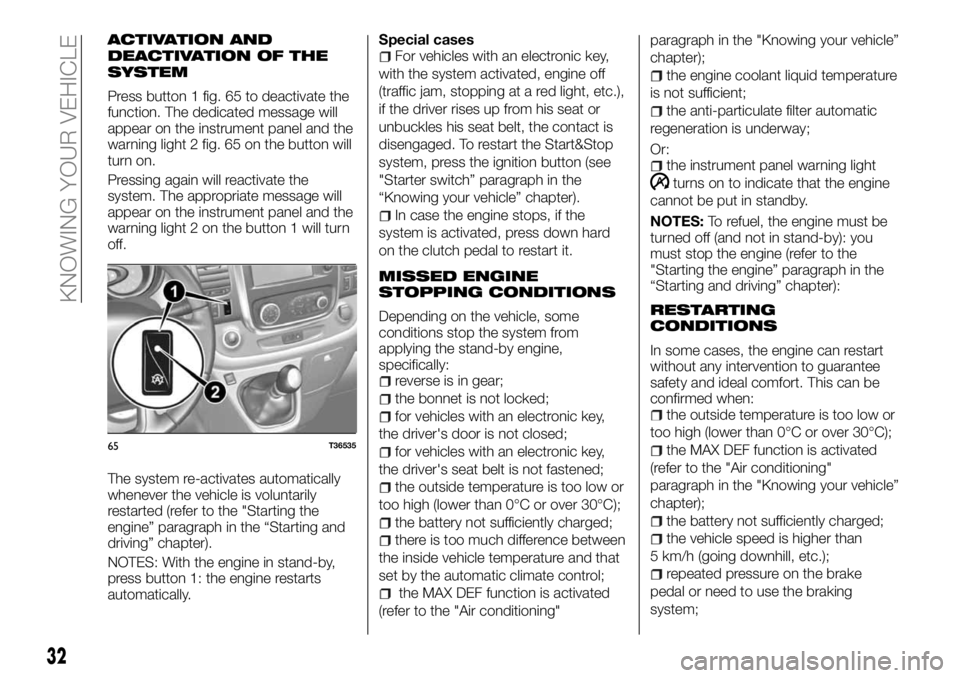
ACTIVATION AND
DEACTIVATION OF THE
SYSTEM
Press button 1 fig. 65 to deactivate the
function. The dedicated message will
appear on the instrument panel and the
warning light 2 fig. 65 on the button will
turn on.
Pressing again will reactivate the
system. The appropriate message will
appear on the instrument panel and the
warning light 2 on the button 1 will turn
off.
The system re-activates automatically
whenever the vehicle is voluntarily
restarted (refer to the "Starting the
engine” paragraph in the “Starting and
driving” chapter).
NOTES: With the engine in stand-by,
press button 1: the engine restarts
automatically.Special cases
For vehicles with an electronic key,
with the system activated, engine off
(traffic jam, stopping at a red light, etc.),
if the driver rises up from his seat or
unbuckles his seat belt, the contact is
disengaged. To restart the Start&Stop
system, press the ignition button (see
"Starter switch” paragraph in the
“Knowing your vehicle” chapter).
In case the engine stops, if the
system is activated, press down hard
on the clutch pedal to restart it.
MISSED ENGINE
STOPPING CONDITIONS
Depending on the vehicle, some
conditions stop the system from
applying the stand-by engine,
specifically:
reverse is in gear;
the bonnet is not locked;
for vehicles with an electronic key,
the driver's door is not closed;
for vehicles with an electronic key,
the driver's seat belt is not fastened;
the outside temperature is too low or
too high (lower than 0°C or over 30°C);
the battery not sufficiently charged;
there is too much difference between
the inside vehicle temperature and that
set by the automatic climate control;
the MAX DEF function is activated
(refer to the "Air conditioning"paragraph in the "Knowing your vehicle”
chapter);
the engine coolant liquid temperature
is not sufficient;
the anti-particulate filter automatic
regeneration is underway;
Or:
the instrument panel warning light
turns on to indicate that the engine
cannot be put in standby.
NOTES:To refuel, the engine must be
turned off (and not in stand-by): you
must stop the engine (refer to the
"Starting the engine” paragraph in the
“Starting and driving” chapter):
RESTARTING
CONDITIONS
In some cases, the engine can restart
without any intervention to guarantee
safety and ideal comfort. This can be
confirmed when:
the outside temperature is too low or
too high (lower than 0°C or over 30°C);
the MAX DEF function is activated
(refer to the "Air conditioning"
paragraph in the "Knowing your vehicle”
chapter);
the battery not sufficiently charged;
the vehicle speed is higher than
5 km/h (going downhill, etc.);
repeated pressure on the brake
pedal or need to use the braking
system;
65T36535
32
KNOWING YOUR VEHICLE
Page 48 of 228
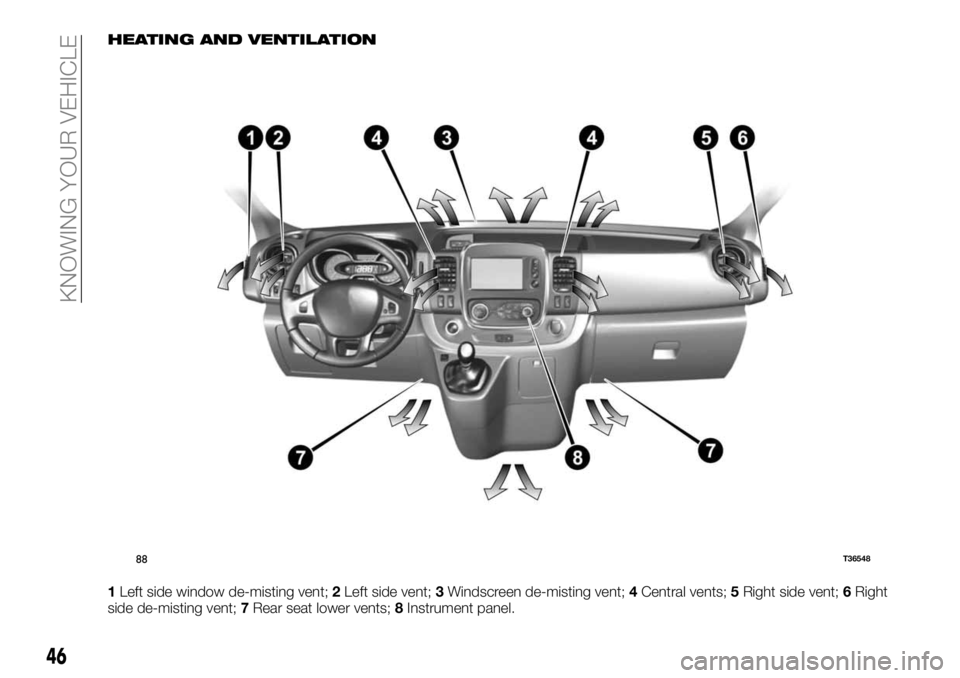
HEATING AND VENTILATION
1Left side window de-misting vent;2Left side vent;3Windscreen de-misting vent;4Central vents;5Right side vent;6Right
side de-misting vent;7Rear seat lower vents;8Instrument panel.
88T36548
46
KNOWING YOUR VEHICLE
Page 51 of 228
Air temperature adjustment
Use control 5 fig. 91 depending on the
desired temperature. The farther the
indicator is in the red zone, the higher
the temperature.
Ventilation speed adjustment
Use control 3 fig. 91 from 0 to 4 fig. 91.
The farther to the right you turn it, the
more air is diffused. If you want to stop
air entry, place control 3 fig. 91 at 0.
The system is deactivated: ventilation
speed in the passenger compartment is
nil (vehicle stopped), you can still notice
a slight air flow when the vehicle is
moving.
NOTE Prolonged use of this control in
position 0 can make the side windows
and windscreen mist up even though
the air inside the passenger
compartment is not stuffy.
Quick de-misting: Passenger
compartment isolation/air recycling
deactivated (warning light on button 4
fig. 91 is off), turn controls 1 fig. 91 and
3 fig. 91 to the positions
. Air
conditioning activation lets you speed
up de-misting.
Activating the passenger
compartment isolation/air
recycling.
Press button 4 fig. 91 (the warning light
will go on).
In this position, the air in the passenger
compartment is recycled without
introducing outside air.Air recirculation allows you:
to isolate the outside environment
(when driving in polluted areas, etc.);
to get the desired internal passenger
compartment temperature more
quickly.
IMPORTANT Prolonged use of air
recycling can make the side windows
and windscreen mist up even though
the air inside the passenger
compartment is not stuffy. We advise
you to return to normal function
(outside air) by pressing button 4
fig. 91 again as soon as air recycling is
no longer needed.
Passenger compartment air
distribution
Turn the knob 1 fig. 91 to select the
distribution type.
The airflow is directed to the
dashboard vents.
The airflow is directed to the
dashboard vents and to the rear seat
lower vents.
The airflow is mainly directed
towards the front seat lower vents and
the dashboard vents. To direct the air
downwards only, close the dashboard
vents.
The airflow is distributed among all
the vents, the front side window vents,
the windscreen demisting vents and the
lower vents.
. The airflow is directed towards the
windscreen demisting vents and the
front side window demisting vents.
Turning the climate control system
on/off
The button 2 fig. 91 lets you turn on
(indicator light on) or off (indicator light
off) the air conditioning.
It cannot be turned on if control 3
fig. 91 is set at 0.
Using air conditioning lets you:
lower the interior car temperature;
de-mist the windows more quickly.
Air conditioning does not work when
the outside temperature is low.
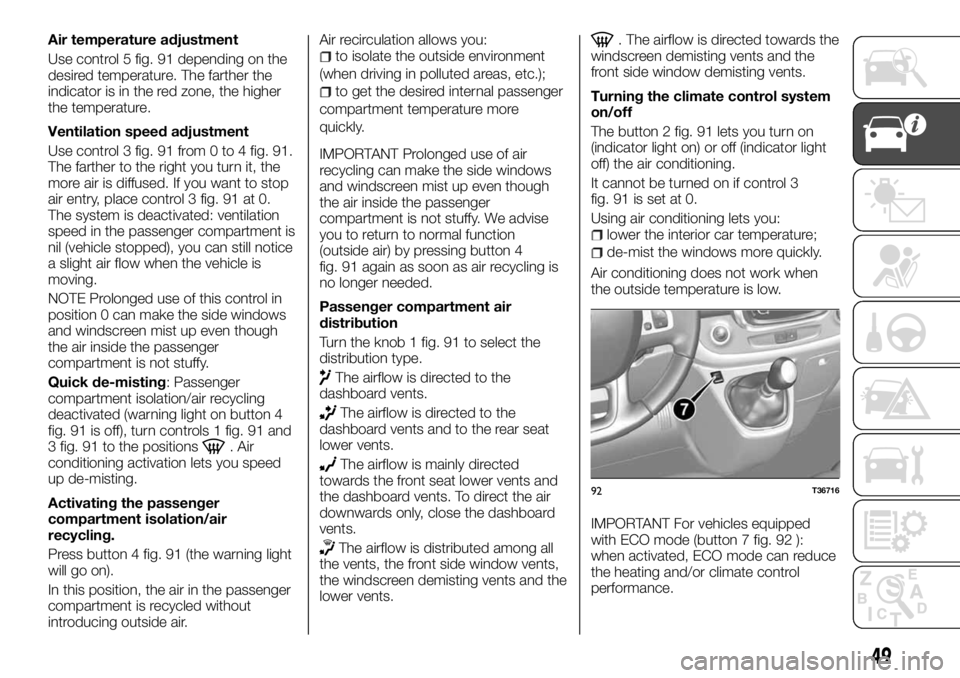
IMPORTANT For vehicles equipped
with ECO mode (button 7 fig. 92 ):
when activated, ECO mode can reduce
the heating and/or climate control
performance.
92T36716
49