tow FIAT TALENTO 2018 Owner handbook (in English)
[x] Cancel search | Manufacturer: FIAT, Model Year: 2018, Model line: TALENTO, Model: FIAT TALENTO 2018Pages: 232, PDF Size: 5.54 MB
Page 67 of 232
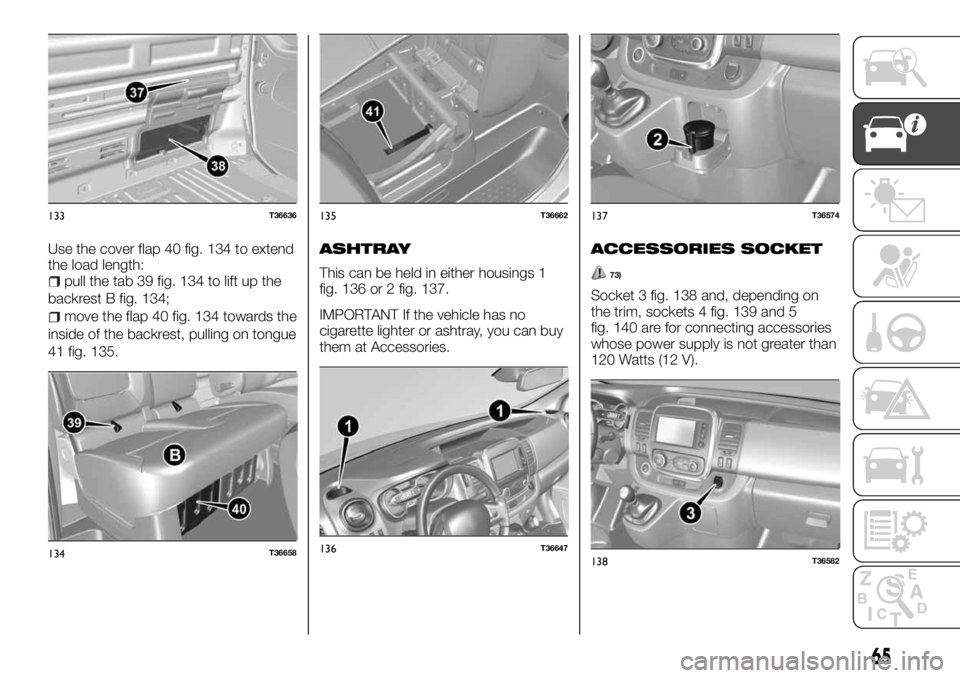
Use the cover flap 40 fig. 134 to extend
the load length:
pull the tab 39 fig. 134 to lift up the
backrest B fig. 134;
move the flap 40 fig. 134 towards the
inside of the backrest, pulling on tongue
41 fig. 135.
ASHTRAY
This can be held in either housings 1
fig. 136 or 2 fig. 137.
IMPORTANT If the vehicle has no
cigarette lighter or ashtray, you can buy
them at Accessories.
ACCESSORIES SOCKET
73)
Socket 3 fig. 138 and, depending on
the trim, sockets 4 fig. 139 and 5
fig. 140 are for connecting accessories
whose power supply is not greater than
120 Watts (12 V).
133T36636
134T36658
135T36662
136T36647
137T36574
138T36582
65
Page 90 of 232
88
KNOWING THE INSTRUMENT PANEL
Selection examples
Meaning of the data selected
On-board computer with service limit message
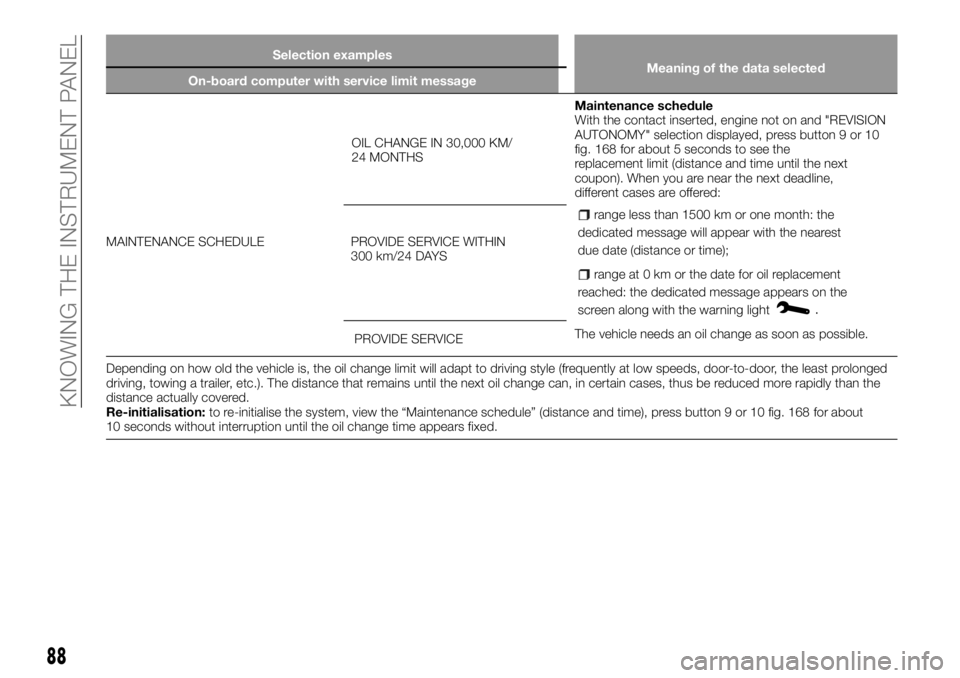
MAINTENANCE SCHEDULEOIL CHANGE IN 30,000 KM/
24 MONTHSMaintenance schedule
With the contact inserted, engine not on and "REVISION
AUTONOMY" selection displayed, press button 9 or 10
fig. 168 for about 5 seconds to see the
replacement limit (distance and time until the next
coupon). When you are near the next deadline,
different cases are offered:
range less than 1500 km or one month: the
dedicated message will appear with the nearest
due date (distance or time);
range at 0 km or the date for oil replacement
reached: the dedicated message appears on the
screen along with the warning light
.
The vehicle needs an oil change as soon as possible. PROVIDE SERVICE WITHIN
300 km/24 DAYS
PROVIDE SERVICE
Depending on how old the vehicle is, the oil change limit will adapt to driving style (frequently at low speeds, door-to-door, the least prolonged
driving, towing a trailer, etc.). The distance that remains until the next oil change can, in certain cases, thus be reduced more rapidly than the
distance actually covered.
Re-initialisation:to re-initialise the system, view the “Maintenance schedule” (distance and time), press button 9 or 10 fig. 168 for about
10 seconds without interruption until the oil change time appears fixed.
Page 131 of 232
STARTING AND DRIVING
Let’s get to the core of the vehicle:
seeing how you can exploit all of its
potential to the full.
We’ll look at how to drive it safely in any
situation, so that it can be a welcome
companion, with our comfort and our
wallets in mind.ENGINE RUN-IN.............130
STARTING THE ENGINE.......130
USING THE GEARBOX........132
PARKING THE VEHICLE........132
INSTALLING THE TOW HOOK. . . .133
LOADING ADVICE...........134
SPEED LIMITER.............135
MINIMUM SPEED............136
SUGGESTIONS FOR DRIVING. . . .136
129
Page 133 of 232
RemarksIf the vehicle does not start, a
dedicated message appears on the
instrument panel;
In some cases, you will need to
move the steering wheel while pressing
the ignition button 1 to unlock the
steering wheel column; You will be
warned with message to this effect;
When starting the engine in very cold
weather (less than -10°C): keep the
clutch pressed until the engine starts.
Accessory function
When the engine starts, you can
access a few functions (radio,
navigation system, windscreen wipers,
etc.).
To make the other functions available,
with the key in the passenger
compartment or inserted in the key
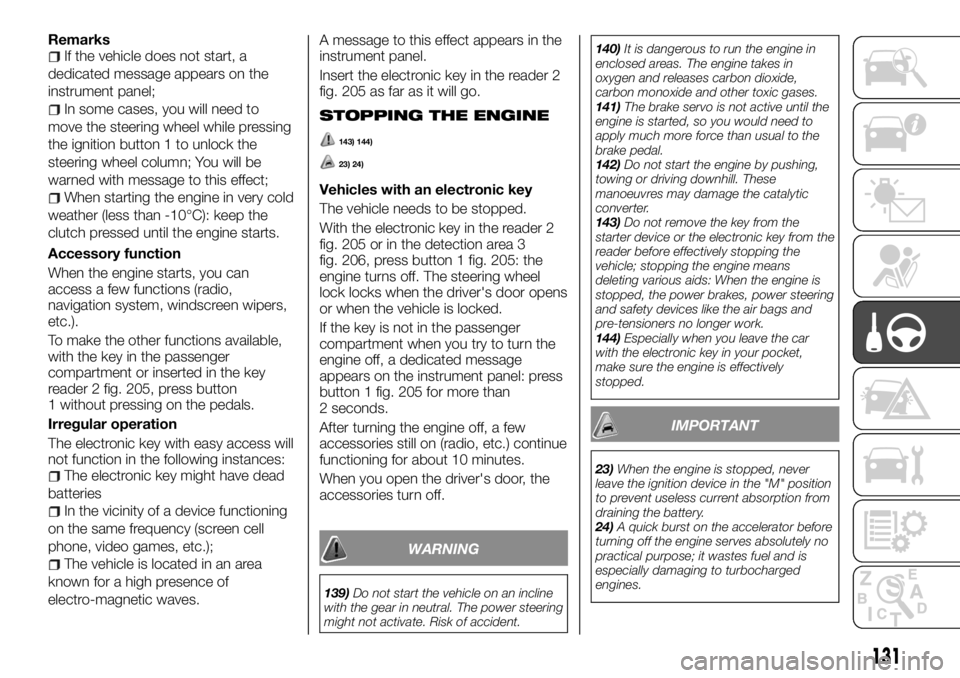
reader 2 fig. 205, press button
1 without pressing on the pedals.
Irregular operation
The electronic key with easy access will
not function in the following instances:
The electronic key might have dead
batteries
In the vicinity of a device functioning
on the same frequency (screen cell
phone, video games, etc.);
The vehicle is located in an area
known for a high presence of
electro-magnetic waves.A message to this effect appears in the
instrument panel.
Insert the electronic key in the reader 2
fig. 205 as far as it will go.
STOPPING THE ENGINE
143) 144)
23) 24)
Vehicles with an electronic key
The vehicle needs to be stopped.
With the electronic key in the reader 2
fig. 205 or in the detection area 3
fig. 206, press button 1 fig. 205: the
engine turns off. The steering wheel
lock locks when the driver's door opens
or when the vehicle is locked.
If the key is not in the passenger
compartment when you try to turn the
engine off, a dedicated message
appears on the instrument panel: press
button 1 fig. 205 for more than
2 seconds.
After turning the engine off, a few
accessories still on (radio, etc.) continue
functioning for about 10 minutes.
When you open the driver's door, the
accessories turn off.
WARNING
139)Do not start the vehicle on an incline
with the gear in neutral. The power steering
might not activate. Risk of accident.140)It is dangerous to run the engine in
enclosed areas. The engine takes in
oxygen and releases carbon dioxide,
carbon monoxide and other toxic gases.
141)The brake servo is not active until the
engine is started, so you would need to
apply much more force than usual to the
brake pedal.
142)Do not start the engine by pushing,
towing or driving downhill. These
manoeuvres may damage the catalytic
converter.
143)Do not remove the key from the
starter device or the electronic key from the
reader before effectively stopping the
vehicle; stopping the engine means
deleting various aids: When the engine is
stopped, the power brakes, power steering
and safety devices like the air bags and
pre-tensioners no longer work.
144)Especially when you leave the car
with the electronic key in your pocket,
make sure the engine is effectively
stopped.
IMPORTANT
23)When the engine is stopped, never
leave the ignition device in the "M" position
to prevent useless current absorption from
draining the battery.
24)A quick burst on the accelerator before
turning off the engine serves absolutely no
practical purpose; it wastes fuel and is
especially damaging to turbocharged
engines.
131
Page 135 of 232
WARNING
146)Never leave children unattended in
the vehicle. In addition, always remove the
ignition key when leaving the vehicle and
take it out with you.
147)For cars equipped with a front
armrest, lift it up to ensure that it does not
interfere with the action of the handbrake.
IMPORTANT
26)Depending on the slope and/or load,
you may need to tighten the brake another
two clicks.
27)When driving, check that the handbrake
is completely lowered and disengaged (the
red light is off): you could overheat or
deteriorate it.28)Following a collision with a kerb, a high
step, a stone post or other types of urban
features, have your vehicle checked by the
Fiat Dealership to avoid any risk of
accident: you may have damaged an axle
shaft, the steering gear or other part.
INSTALLING THE
TOW HOOK
TO: 1,090 mm
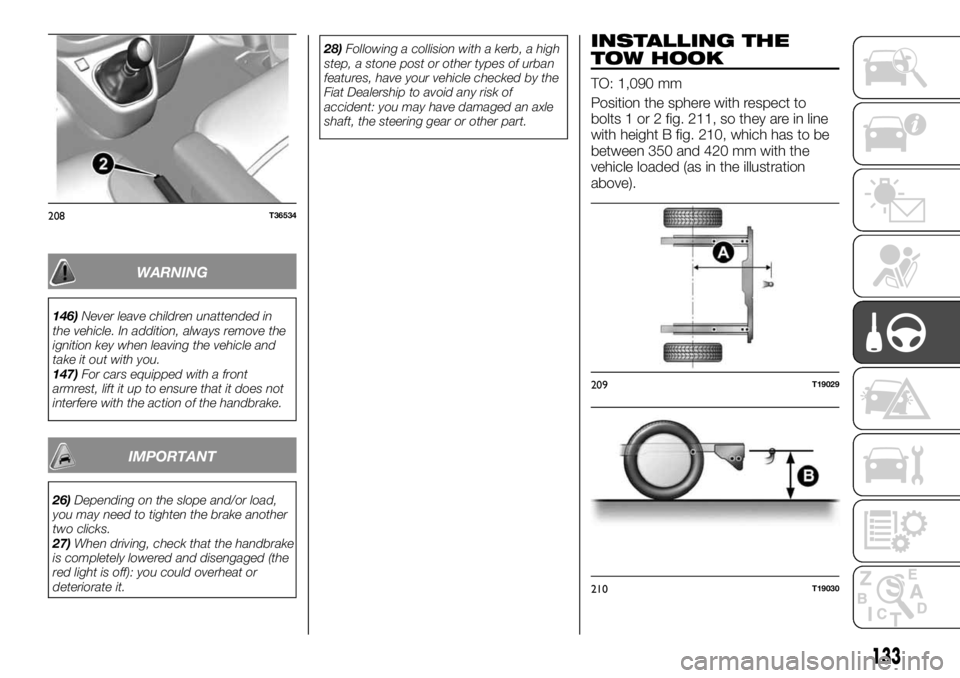
Position the sphere with respect to
bolts 1 or 2 fig. 211, so they are in line
with height B fig. 210, which has to be
between 350 and 420 mm with the
vehicle loaded (as in the illustration
above).
208T36534
209T19029
210T19030
133
Page 136 of 232
To mount the tow hook, refer to the
device manufacturer’s installation
instructions.
148) 149)
IMPORTANT Always remove the tow
hook when not in use. In any case, the
local laws in force must be observed in
all cases.
IMPORTANT Refer to the “Weights”
paragraph of the “Technical data”
chapter to find out the maximum
allowed load. We recommend keeping
the instructions provided by the device
manufacturer with the other vehicle
documents.
WARNING
148)The ABS with which the vehicle may
be equipped will not control the trailer's
braking system. Particular caution is
required on slippery roads.
149)Never modify the braking system of
the vehicle to control the trailer brake. The
trailer braking system must be fully
independent from the hydraulic system of
the vehicle.
LOADING ADVICE
Transporting items in the load
compartment
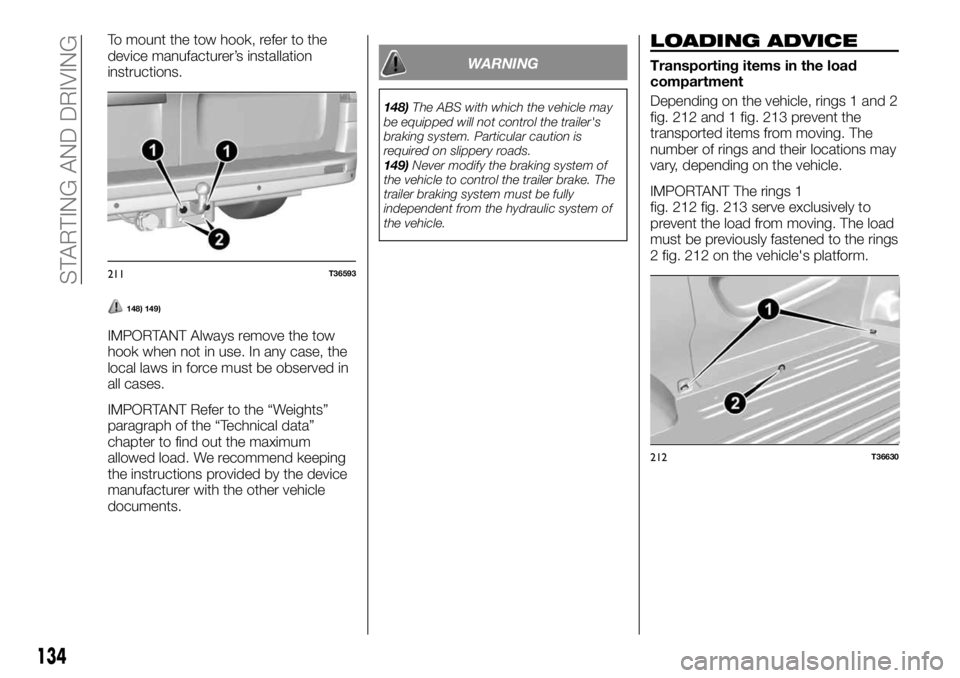
Depending on the vehicle, rings 1 and 2
fig. 212 and 1 fig. 213 prevent the
transported items from moving. The
number of rings and their locations may
vary, depending on the vehicle.
IMPORTANT The rings 1
fig. 212 fig. 213 serve exclusively to
prevent the load from moving. The load
must be previously fastened to the rings
2 fig. 212 on the vehicle's platform.
211T36593
212T36630
134
STARTING AND DRIVING
Page 140 of 232

BehaviourRather than heat the engine while
stopped, we advise you to drive
moderately until the engine reaches its
normal operating temperature.
Speed increases fuel consumption.
Do not strain the engine by
exceeding speed in intermediary gears.
Use the highest gear.
Avoid sudden acceleration.
Brake as little as possible. By
assessing the danger or curve in
advance, it will be sufficient to lift your
foot off the accelerator.
When going uphill, we advise you to
keep a steady speed, without having to
change it.
In modern vehicles, double clutching
before stopping the engine is not
necessary and could even cause
damage.Tyres fig. 221
Pressure too low can increase fuel
consumption.
Using unsuitable tyres can increase
fuel consumption.
Advice for use
Favour the ECOMODE function.
Electricity increases fuel
consumption. We advise you to turn off
accessories when they are not in use.
You must use your lights according to
the laws in effect in the country you are
in.
Use diffusers as much as possible.
Driving at 100 km/h with the windows
open increases fuel consumption by
4% fig. 222.
For vehicles with climate control, fuel
consumption is increased (especially in
cities) when in use. For vehicles with
manual climate control, turn off the
system when you no longer need it.Some advice for reducing fuel
consumption and thus helping
safeguard the environment:
If the vehicle has been parked in high
temperatures or in the sun, open up the
doors to let out the hot air before
leaving.
Do not leave the roof rack mounted if
not in use.
When transporting particularly large
objects, use a trailer if possible.
To tow a camper, use an approved
deflector and do not forget to adjust it.
Avoid "door to door" use of the
vehicle (short trips with prolonged
stops) because the engine never
reaches its ideal temperature.
221T26528
222T31077
138
STARTING AND DRIVING
Page 141 of 232
IN AN EMERGENCY
A punctured tyre or a burnt-out bulb?
At times, a problem may interfere with
our journey.
The pages on emergencies can help
you to deal with critical situations
independently and with calm.
In an emergency we recommend that
you call the toll free phone number
found in the Warranty Booklet.
It is also possible to call the national or
international universal freephone
number to search for the nearest Fiat
Dealership.HAZARD WARNING LIGHTS.....140
REPLACING AN INTERNAL
BULB...................140
REPLACING AN EXTERNAL
BULB...................141
PASSENGER COMPARTMENT
FUSES...................145
IN THE EVENT OF A PUNCTURE . .150
CHANGING A WHEEL.........150
TYRE INFLATION KIT..........153
JUMP STARTING............155
BATTERY RECHARGING.......156
TOWING THE VEHICLE........157
139
Page 150 of 232
No. Destination No. Destination No. Destination
1APC charger for vehicles with
electronic key10 Predisposition for towing system 19 Heater
2Free11Timer battery, central passenger
compartment unit20Rearscreen wipers, window washer
pump, horn
3Free12Right daytime running lights, front
parking lights, right high beam, left low
beam21 General APC charger
4+ battery for vehicles with
electronic key13Danger warning lights, direction
indicators22 Reversing lights
5 Additional air conditioning 14 Locking the opening parts 23 Stop switch
6 Additional cabin heating 15Left daytime running lights, rear parking
lights, left high beam, right low beam24
Injection, ignition
(1)
7Electric rear view mirrors,
complementary central
adaptation unit16Licence plate light, front and rear fog
lights25
Air bag, steering wheel lock(1)
8 Rear view mirror defroster 17Alarms, acoustic warnings, light and
windscreen wiper levers26 Passenger's electric window
9Radio, multi-media system, rear
view mirror, diagnostic socket.18 Instrument panel 27
Power steering
(1)
(1) Contact a Fiat Dealership to replace these fuses.
148
IN AN EMERGENCY
Page 152 of 232
IN THE EVENT OF A
PUNCTURE
Depending on the vehicle, there may be
a tyre inflating kit or a spare tyre (see
the following page).
CHANGING A WHEEL
167) 168) 169) 170) 171) 172)
Tools
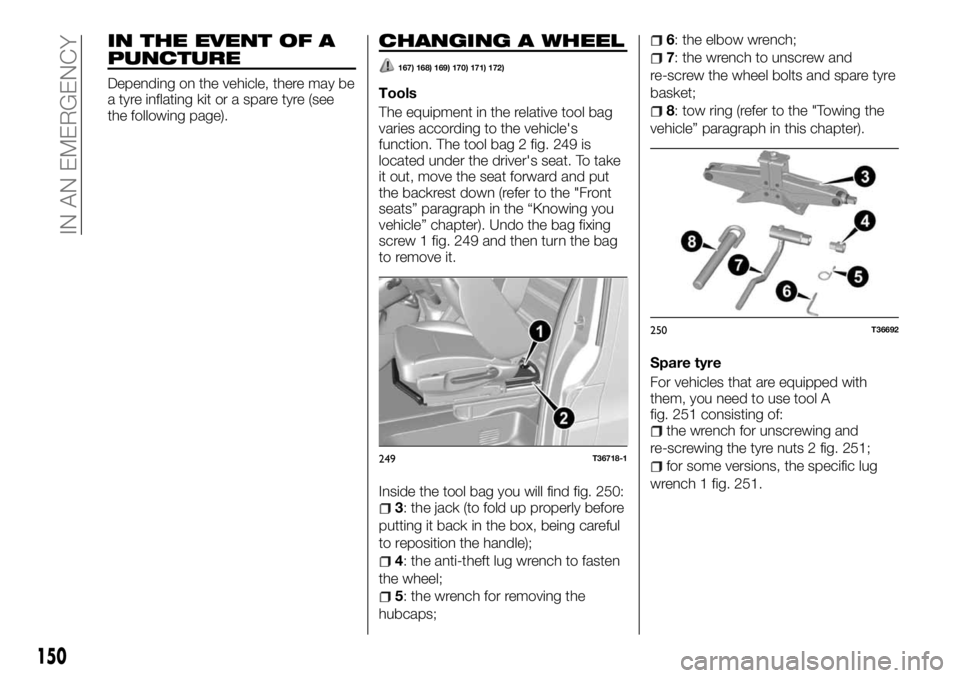
The equipment in the relative tool bag
varies according to the vehicle's
function. The tool bag 2 fig. 249 is
located under the driver's seat. To take
it out, move the seat forward and put
the backrest down (refer to the "Front
seats” paragraph in the “Knowing you
vehicle” chapter). Undo the bag fixing
screw 1 fig. 249 and then turn the bag
to remove it.
Inside the tool bag you will find fig. 250:
3: the jack (to fold up properly before
putting it back in the box, being careful
to reposition the handle);
4: the anti-theft lug wrench to fasten
the wheel;
5: the wrench for removing the
hubcaps;
6: the elbow wrench;
7: the wrench to unscrew and
re-screw the wheel bolts and spare tyre
basket;
8: tow ring (refer to the "Towing the
vehicle” paragraph in this chapter).
Spare tyre
For vehicles that are equipped with
them, you need to use tool A
fig. 251 consisting of:
the wrench for unscrewing and
re-screwing the tyre nuts 2 fig. 251;
for some versions, the specific lug
wrench 1 fig. 251.249T36718-1
250T36692
150
IN AN EMERGENCY