Brake lights FIAT TALENTO 2020 Owner handbook (in English)
[x] Cancel search | Manufacturer: FIAT, Model Year: 2020, Model line: TALENTO, Model: FIAT TALENTO 2020Pages: 236, PDF Size: 4.86 MB
Page 12 of 236
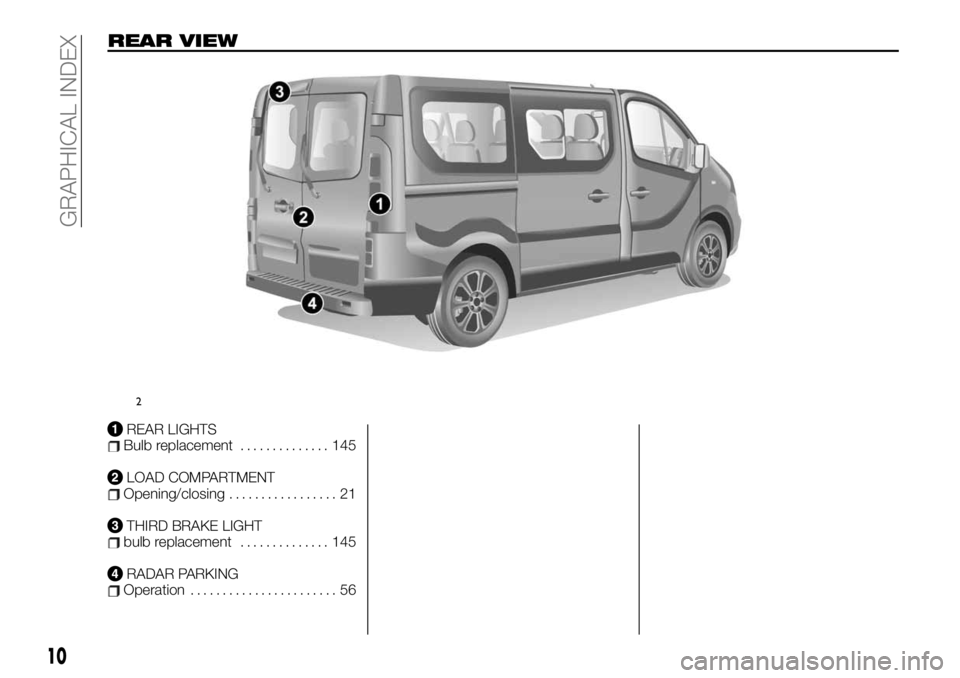
REAR VIEW
REAR LIGHTSBulb replacement.............. 145
LOAD COMPARTMENTOpening/closing................. 21
THIRD BRAKE LIGHTbulb replacement.............. 145
RADAR PARKINGOperation....................... 56
2
10
GRAPHICAL INDEX
Page 28 of 236
Also make sure the lock system was
not accidentally disabled.
In case it was disabled, re-enable it
after disconnecting and reconnecting
the starter device.
WARNING
3)For safety reasons, make sure all the
doors are well closed before setting out.
4)Never leave the vehicle with the remote
or electronic key inside.
5)For safety reasons, always open/close
doors when the vehicle is stopped.
6)NEVER leave children unattended inside
the vehicle, let alone leave it with the doors
unlocked in a place that children can
access easily. Children may seriously, or
even fatally, injure themselves. Also ensure
that children do not inadvertently operate
the parking brake or the brake pedal.
7)Opening or closing the door, as for all
opening parts of the vehicle, must be done
keeping in mind the precautions for use
concerning this operation: check that there
is no one, no part of a body, an animal or
object that could come into contact during
this manoeuvre. Only use the inside and
outside handles to manoeuvre the door.
Use caution in both opening and closing
the doors. Caution: when the vehicle is
parked on an incline, open or close the
door carefully until it locks in place. Always
make sure the sliding door is completely
closed before the vehicle starts moving.
8)Before opening a door, ensure that you
can do it in conditions of safety.9)You must not open the left-hand sliding
side door with the fuel flap open while
refuelling. Check that the fuel flap is closed
while opening/closing the sliding side door
to avoid damage.
10)Do not leave the sliding side door open
when the vehicle is parked on a gradient. A
knock could release the latch leaving the
door free to move forward.
11)Before leaving the vehicle parked with
sliding doors open, always check that the
latch is engaged.
12)Always use this device when carrying
children.
13)The spring-loaded system is designed
for optimum usage. Accidental knocks or a
strong gust of wind may release the
springs, forcing the doors to close.
14)When closing, shut the right hand
swing door fully before you close the left
hand swing door. Never shut the two doors
at the same time.
15)In case of wind, do not leave the rear
swing doors open. Risk of injury.
16)When you stop by the side of the road,
if the tailgate is completely open, the rear
lights might not be visible. Warn other road
users that your vehicle is there by placing
the pre-signal triangle or other device
allowed by law in the country you are
driving in.
HEADRESTS
FRONT HEADREST
17)
Adjustment
Pull the head restraint up to the desired
height. Make sure it locks into place
correctly.
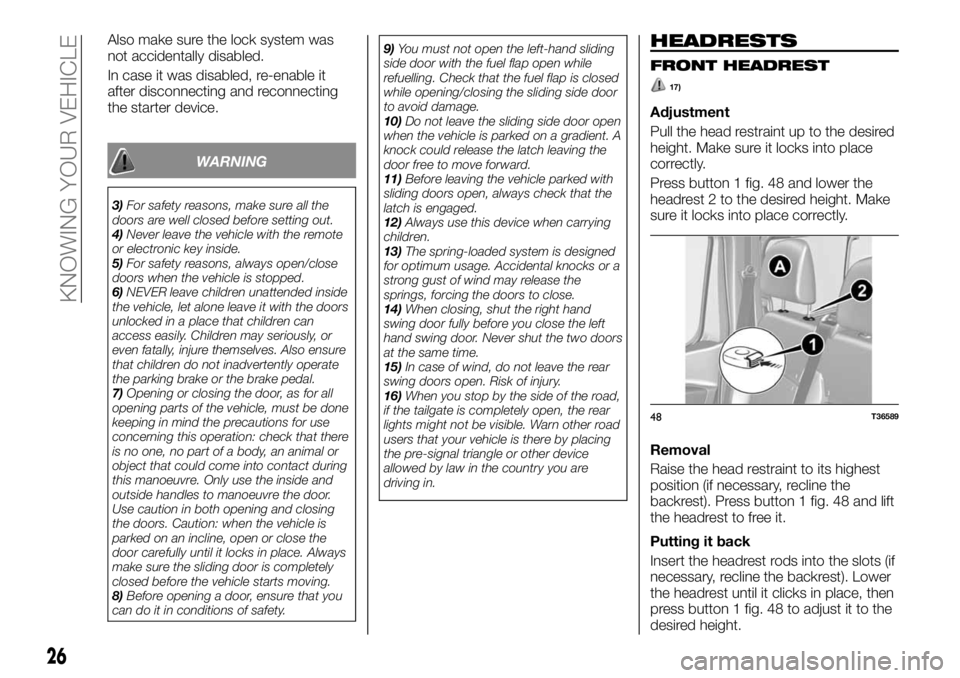
Press button 1 fig. 48 and lower the
headrest 2 to the desired height. Make
sure it locks into place correctly.
Removal
Raise the head restraint to its highest
position (if necessary, recline the
backrest). Press button 1 fig. 48 and lift
the headrest to free it.
Putting it back
Insert the headrest rods into the slots (if
necessary, recline the backrest). Lower
the headrest until it clicks in place, then
press button 1 fig. 48 to adjust it to the
desired height.
48T36589
26
KNOWING YOUR VEHICLE
Page 73 of 236
appears on the display screen.
Activation is confirmed when the light
goes off
.
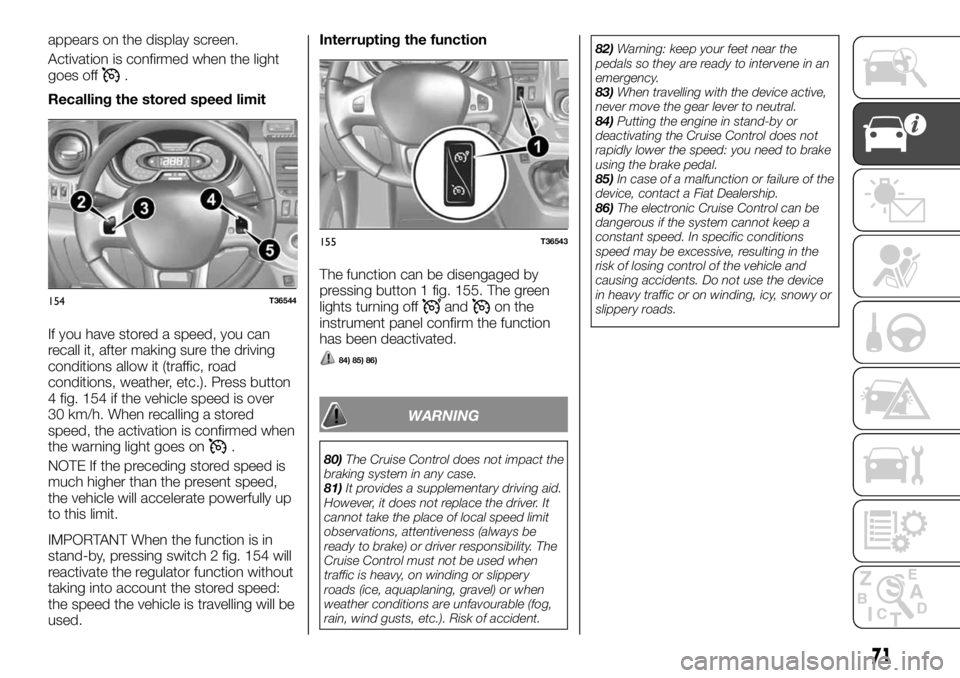
Recalling the stored speed limit
If you have stored a speed, you can
recall it, after making sure the driving
conditions allow it (traffic, road
conditions, weather, etc.). Press button
4 fig. 154 if the vehicle speed is over
30 km/h. When recalling a stored
speed, the activation is confirmed when
the warning light goes on
.
NOTE If the preceding stored speed is
much higher than the present speed,
the vehicle will accelerate powerfully up
to this limit.
IMPORTANT When the function is in
stand-by, pressing switch 2 fig. 154 will
reactivate the regulator function without
taking into account the stored speed:
the speed the vehicle is travelling will be
used.Interrupting the function
The function can be disengaged by
pressing button 1 fig. 155. The green
lights turning off
andon the
instrument panel confirm the function
has been deactivated.
84) 85) 86)
WARNING
80)The Cruise Control does not impact the
braking system in any case.
81)It provides a supplementary driving aid.
However, it does not replace the driver. It
cannot take the place of local speed limit
observations, attentiveness (always be
ready to brake) or driver responsibility. The
Cruise Control must not be used when
traffic is heavy, on winding or slippery
roads (ice, aquaplaning, gravel) or when
weather conditions are unfavourable (fog,
rain, wind gusts, etc.). Risk of accident.82)Warning: keep your feet near the
pedals so they are ready to intervene in an
emergency.
83)When travelling with the device active,
never move the gear lever to neutral.
84)Putting the engine in stand-by or
deactivating the Cruise Control does not
rapidly lower the speed: you need to brake
using the brake pedal.
85)In case of a malfunction or failure of the
device, contact a Fiat Dealership.
86)The electronic Cruise Control can be
dangerous if the system cannot keep a
constant speed. In specific conditions
speed may be excessive, resulting in the
risk of losing control of the vehicle and
causing accidents. Do not use the device
in heavy traffic or on winding, icy, snowy or
slippery roads.
154T36544
155T36543
71
Page 83 of 236
Warning light What it means
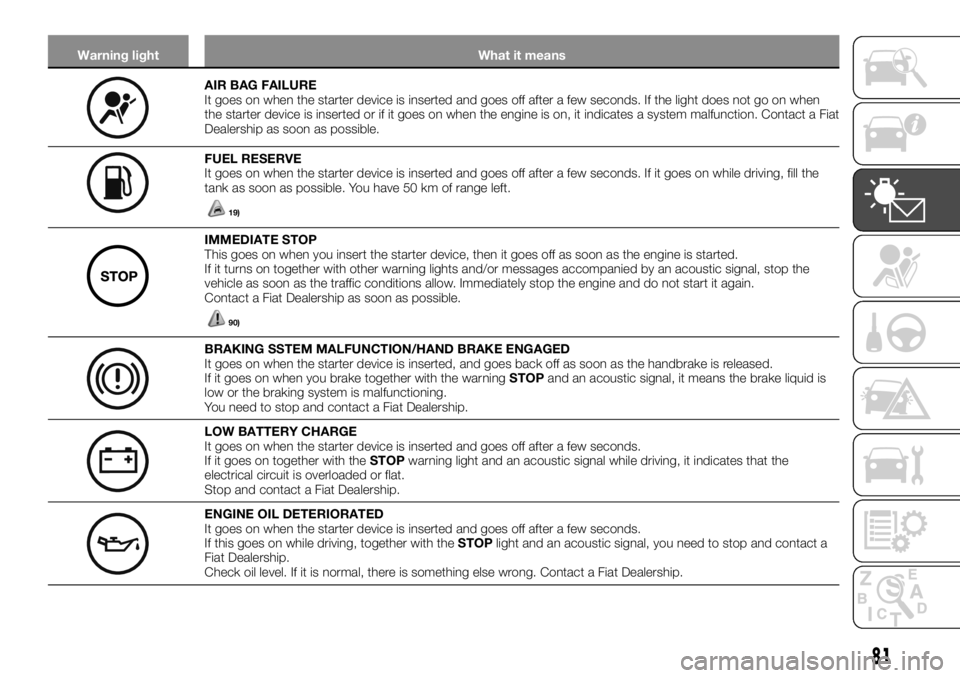
AIR BAG FAILURE
It goes on when the starter device is inserted and goes off after a few seconds. If the light does not go on when
the starter device is inserted or if it goes on when the engine is on, it indicates a system malfunction. Contact a Fiat
Dealership as soon as possible.
FUEL RESERVE
It goes on when the starter device is inserted and goes off after a few seconds. If it goes on while driving, fill the
tank as soon as possible. You have 50 km of range left.
19)
IMMEDIATE STOP
This goes on when you insert the starter device, then it goes off as soon as the engine is started.
If it turns on together with other warning lights and/or messages accompanied by an acoustic signal, stop the
vehicle as soon as the traffic conditions allow. Immediately stop the engine and do not start it again.
Contact a Fiat Dealership as soon as possible.
90)
BRAKING SSTEM MALFUNCTION/HAND BRAKE ENGAGED
It goes on when the starter device is inserted, and goes back off as soon as the handbrake is released.
If it goes on when you brake together with the warningSTOPand an acoustic signal, it means the brake liquid is
low or the braking system is malfunctioning.
You need to stop and contact a Fiat Dealership.
LOW BATTERY CHARGE
It goes on when the starter device is inserted and goes off after a few seconds.
If it goes on together with theSTOPwarning light and an acoustic signal while driving, it indicates that the
electrical circuit is overloaded or flat.
Stop and contact a Fiat Dealership.
ENGINE OIL DETERIORATED
It goes on when the starter device is inserted and goes off after a few seconds.
If this goes on while driving, together with theSTOPlight and an acoustic signal, you need to stop and contact a
Fiat Dealership.
Check oil level. If it is normal, there is something else wrong. Contact a Fiat Dealership.
81
Page 128 of 236
ACTIVE SAFETY
SYSTEMS
Depending on the version, they can
consist of:
by the anti-lock braking system
(ABS);
electronic stability control (ESC) with
understeering and traction control
system;
driving with a trailer assistance;
emergency brake assistance;
road grip control;
assisted departure on inclines.
ABS (Anti-lock Braking
System)
142) 143) 144) 145)
In case of sharp braking, the ABS
avoids wheel locking, so it manages the
braking distance and maintains vehicle
control.
In these conditions you can carry out
manoeuvres while braking fully.
Moreover, this system optimises the
braking distance, especially on slippery
surfaces (wet roadbed, etc.).
Every time you activate this device, you
know because the brake pedal shakes.
The ABS never improves the "physical"
performance associated with grip
between the wheel and the road. The
rules of the road must be respected
(safety distance between vehicles, etc.).IMPORTANT In an emergency, we
advise you to apply strong, continuous
pressure to the brake pedal. You do not
need to pump it. The ABS will modulate
the force applied to the brakes.
Irregular operation:
andlit on the instrument
panel accompanied by the dedicated
message on the display indicate
deactivation of the ABS, of the ESC
and of the emergency servo brake.
Braking is always guaranteed;
andSTOPlit on the
instrument panel, along with the
dedicated message on the display,
indicates that there is a fault in the
brake system.
In both cases, contact a Fiat
Dealership.
ESC (Electronic Stability
Control) SYSTEM
146) 147)
Electronic stability control ESC
This system helps maintain control of
the vehicle in "critical" driving conditions
(avoiding an obstacle, loss of grip in a
curve, etc.).
Operating principle
A sensor on the steering wheel
recognises the driving trajectory that the
driver set.
Other sensors installed in the vehicle
measure the real trajectory.The system compares the driver's
adherence to the effective trajectory,
correcting it if necessary, braking a few
wheels and/or reducing engine power if
the system was activated and its
warning light
flashes on the
instrument panel.
Understeering control
This system optimises the ESC action
in case of noticeable understeer (loss of
front grip).
Traction Control System
This system limits the drive wheels
slipping and helps control the vehicle
when starting out, accelerating or
decelerating.
Operating principle
Thanks to the sensor in the wheels, the
system measures and compares the
drive wheel rotation speed, detecting
immediately loss of grip. If a wheel
starts sliding, the system intervenes by
braking to re-stabilise the drive that is
compatible with the level of road grip.
The system also acts on the engine
speed, adapting it to wheel road grip,
independently of the driver's use of the
accelerator.
Irregular operation
When the system detects an
operational irregularity, the dedicated
message appears on the display and
the warning lights
andturn
on.
126
SAFETY
Page 129 of 236
In this case, the ESC and traction
control system are deactivated. Contact
a Fiat Dealership.
PBA (Panic Brake
Assist) SYSTEM
This is a complementary system to the
ABS that lets you reduce the vehicle's
braking distance.
Operating principle
The system detects an emergency
braking situation. In such cases, the
power brake immediately creates the
maximum braking, causing the ABS
system to also intervene.
ABS intervention lasts until the brake
pedal is released.
Hazard warning lights on
Depending on the versions, these lights
can go on when you slow down
abruptly.
Anticipated braking
Depending on the versions, when you
quickly release the accelerator, the
system anticipates braking so as to
diminish the braking distance.
When using Cruise Control:
if you are using the accelerator pedal,
with you release it, the system can
activate;
if you are not using the accelerator
pedal, the system will not activate.Irregular operation
When the system detects an
operational irregularity, the message to
that effect will appear on the instrument
panel with the alarm light
going
on.
Contact a Fiat Dealership.
TSA (Trailer Stability
Assist) DRIVING
ASSISTANCE WITH A
TRAILER
This system helps you maintain control
of the vehicle in case you are using a
trailer. It detects the swinging motion of
the trailer in certain driving conditions.
Operating conditions
the towing system must be
type-approved by the Fiat Dealership;
the wiring has to be approved by a
Fiat Dealership;
the trailer has to be connected to the
vehicle.
Operating principle
The function stabilises the vehicle by:
asymmetrical front wheel braking to
reduce swinging caused by the trailer;
four wheel braking and a limitation in
engine torque to reduce the vehicle
speed until the swinging stops.
The warning light
flashes on the
instrument panel to inform you of the
situation.
TRACTION PLUS
(GRIP CONTROL)
147) 23)
Where the vehicle is provided with one,
road grip check ensures easier control
of the vehicle in conditions where grip is
reduced (crumbly terrain).
"Road" mode
When the vehicle is started, the
appropriate message appears on the
display screen. The indicator light
on the instrument panel is off. This
position guarantees optimal use in
normal road conditions (dry, wet
roadbed, light snow, etc.).
The "Road" mode uses the traction
control system functions.
"Traction +" Mode
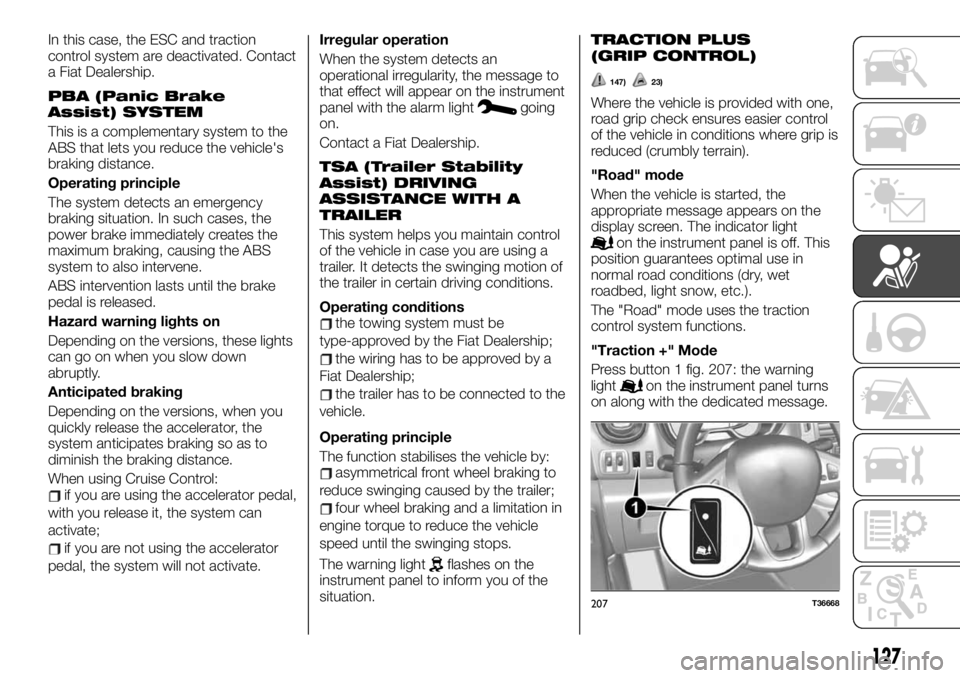
Press button 1 fig. 207: the warning
light
on the instrument panel turns
on along with the dedicated message.
207T36668
127
Page 136 of 236
USING THE
GEARBOX
155)
26)
To engage reverse (vehicle
stopped)
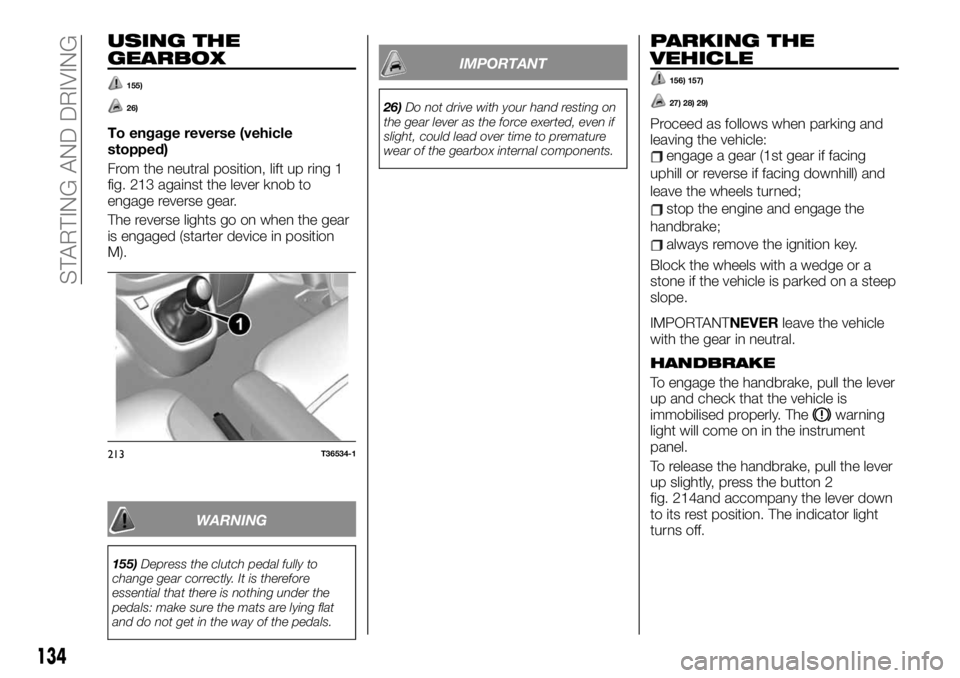
From the neutral position, lift up ring 1
fig. 213 against the lever knob to
engage reverse gear.
The reverse lights go on when the gear
is engaged (starter device in position
M).
WARNING
155)Depress the clutch pedal fully to
change gear correctly. It is therefore
essential that there is nothing under the
pedals: make sure the mats are lying flat
and do not get in the way of the pedals.
IMPORTANT
26)Do not drive with your hand resting on
the gear lever as the force exerted, even if
slight, could lead over time to premature
wear of the gearbox internal components.
PARKING THE
VEHICLE
156) 157)
27) 28) 29)
Proceed as follows when parking and
leaving the vehicle:
engage a gear (1st gear if facing
uphill or reverse if facing downhill) and
leave the wheels turned;
stop the engine and engage the
handbrake;
always remove the ignition key.
Block the wheels with a wedge or a
stone if the vehicle is parked on a steep
slope.
IMPORTANTNEVERleave the vehicle
with the gear in neutral.
HANDBRAKE
To engage the handbrake, pull the lever
up and check that the vehicle is
immobilised properly. The
warning
light will come on in the instrument
panel.
To release the handbrake, pull the lever
up slightly, press the button 2
fig. 214and accompany the lever down
to its rest position. The indicator light
turns off.
213T36534-1
134
STARTING AND DRIVING
Page 142 of 236
A general grade from 0 to 100 appears
that allows you to assess your
ecological driving performance: high
values mean reduced fuel consumption.
Below is some ecological advice to
improve your performance. Store your
preferred routes lets you compare
performances. For further information,
refer to the RADIO/TOUCH – RADIO
NAV supplement.
ECOMODE
ECOMODE is a function that optimises
fuel consumption. It acts on a few of
the vehicle's uses (heating, air
conditioning, power steering, etc.) and
on a few driving operations
(acceleration, gear shift, speed
regulation, deceleration, etc.).
Activation of the function
Press button 4 fig. 225.
TheECOfig. 226 indicator light 5 on
the instrument panel turns on to
confirm that it has been activated.
While driving, you can temporarily leave
the ECOMODE function to reset all
engine performances.
To do this, press the accelerator pedal
firmly.
The ECOMODE function is reactivated
as soon as you release the accelerator.
Deactivating the function
Press button 4 fig. 225.
TheECOfig. 226 warning light 5 on the
instrument panel turns off to confirm
that it has been deactivated.BehaviourRather than heat the engine while
stopped, we advise you to drive
moderately until the engine reaches its
normal operating temperature.
Speed increases fuel consumption.
Do not strain the engine by
exceeding speed in intermediary gears.
Use the highest gear.
Avoid sudden acceleration.
Brake as little as possible. By
assessing the danger or curve in
advance, it will be sufficient to lift your
foot off the accelerator.
When going uphill, we advise you to
keep a steady speed, without having to
change it.
In modern vehicles, double clutching
before stopping the engine is not
necessary and could even cause
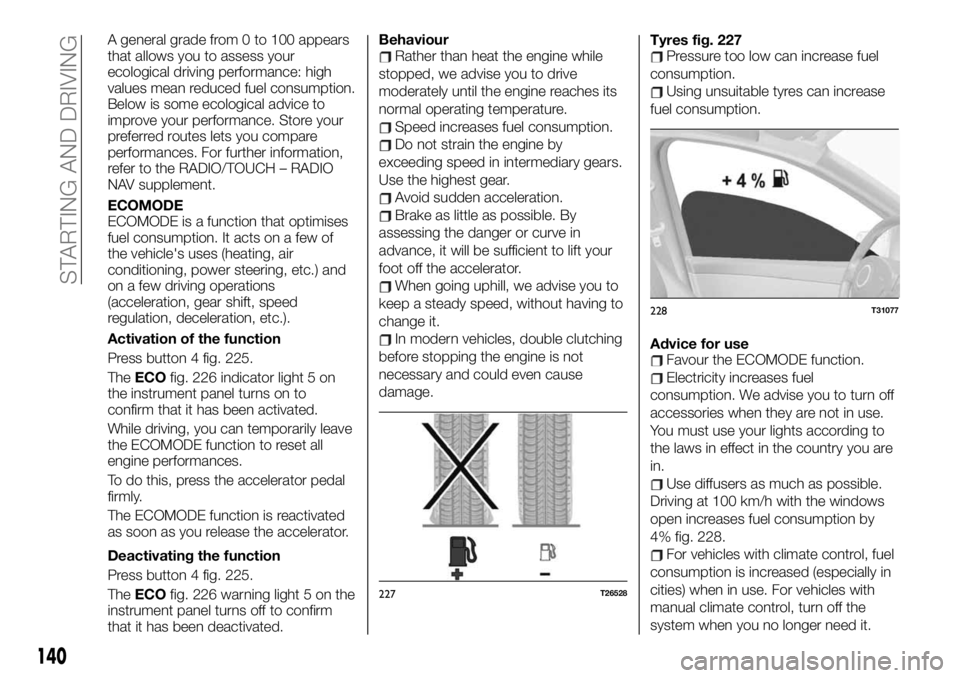
damage.Tyres fig. 227
Pressure too low can increase fuel
consumption.
Using unsuitable tyres can increase
fuel consumption.
Advice for use
Favour the ECOMODE function.
Electricity increases fuel
consumption. We advise you to turn off
accessories when they are not in use.
You must use your lights according to
the laws in effect in the country you are
in.
Use diffusers as much as possible.
Driving at 100 km/h with the windows
open increases fuel consumption by
4% fig. 228.
For vehicles with climate control, fuel
consumption is increased (especially in
cities) when in use. For vehicles with
manual climate control, turn off the
system when you no longer need it.
227T26528
228T31077
140
STARTING AND DRIVING
Page 148 of 236
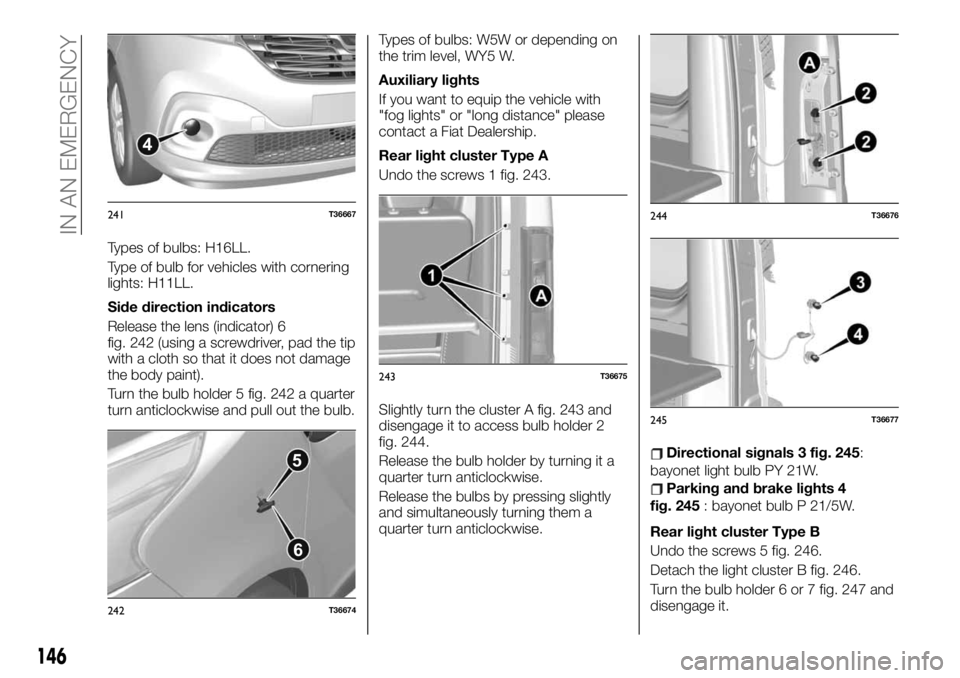
Types of bulbs: H16LL.
Type of bulb for vehicles with cornering
lights: H11LL.
Side direction indicators
Release the lens (indicator) 6
fig. 242 (using a screwdriver, pad the tip
with a cloth so that it does not damage
the body paint).
Turn the bulb holder 5 fig. 242 a quarter
turn anticlockwise and pull out the bulb.Types of bulbs: W5W or depending on
the trim level, WY5 W.
Auxiliary lights
If you want to equip the vehicle with
"fog lights" or "long distance" please
contact a Fiat Dealership.
Rear light cluster Type A
Undo the screws 1 fig. 243.
Slightly turn the cluster A fig. 243 and
disengage it to access bulb holder 2
fig. 244.
Release the bulb holder by turning it a
quarter turn anticlockwise.
Release the bulbs by pressing slightly
and simultaneously turning them a
quarter turn anticlockwise.
Directional signals 3 fig. 245:
bayonet light bulb PY 21W.
Parking and brake lights 4
fig. 245: bayonet bulb P 21/5W.
Rear light cluster Type B
Undo the screws 5 fig. 246.
Detach the light cluster B fig. 246.
Turn the bulb holder 6 or 7 fig. 247 and
disengage it.
4
241T36667
5
6
242T36674
243T36675
244T36676
245T36677
146
IN AN EMERGENCY
Page 149 of 236
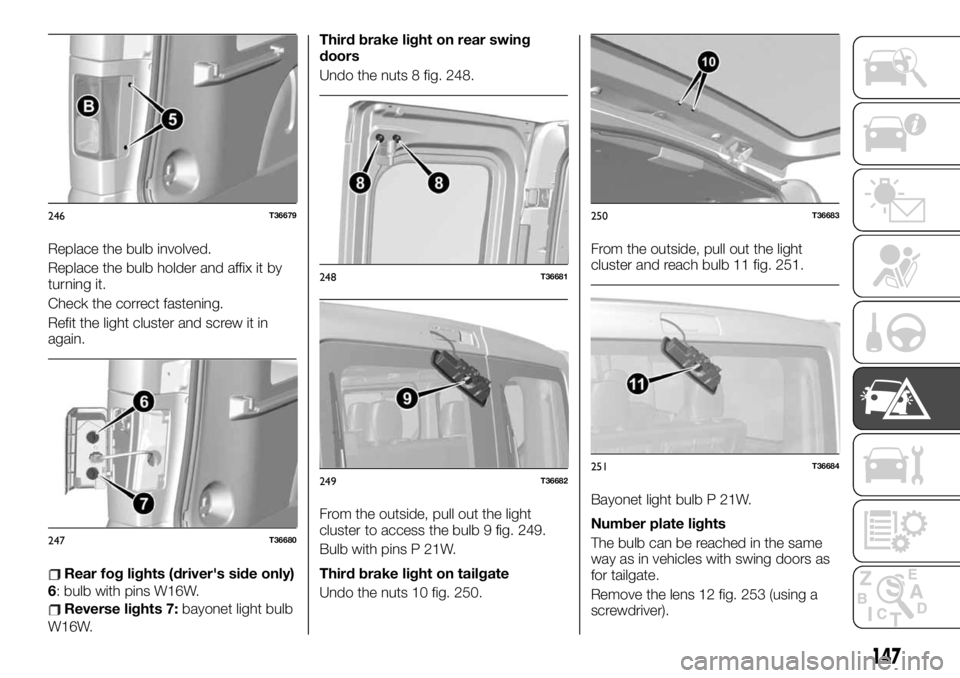
Replace the bulb involved.
Replace the bulb holder and affix it by
turning it.
Check the correct fastening.
Refit the light cluster and screw it in
again.
Rear fog lights (driver's side only)
6: bulb with pins W16W.
Reverse lights 7:bayonet light bulb
W16W.Third brake light on rear swing
doors
Undo the nuts 8 fig. 248.
From the outside, pull out the light
cluster to access the bulb 9 fig. 249.
Bulb with pins P 21W.
Third brake light on tailgate
Undo the nuts 10 fig. 250.From the outside, pull out the light
cluster and reach bulb 11 fig. 251.
Bayonet light bulb P 21W.
Number plate lights
The bulb can be reached in the same
way as in vehicles with swing doors as
for tailgate.
Remove the lens 12 fig. 253 (using a
screwdriver).
246T36679
247T36680
248T36681
249T36682
250T36683
251T36684
147