ESP FIAT TALENTO 2020 Owner handbook (in English)
[x] Cancel search | Manufacturer: FIAT, Model Year: 2020, Model line: TALENTO, Model: FIAT TALENTO 2020Pages: 236, PDF Size: 4.86 MB
Page 4 of 236
READ THIS CAREFULLY
REFUELLING
Only refuel with automotive diesel conforming to the European specification EN590. The use of other products or mixtures may damage the
engine beyond repair and consequently invalidate the warranty, due to the damage caused.
STARTING THE ENGINE
Make sure that the handbrake is engaged, put the gear in neutral, fully press the clutch without pressing the accelerator, then turn the ignition
key to AVV and release it as soon as the engine has started. In versions with an electronic key, the engine will start as soon as the button on
the starter device is pressed.
PARKING ON FLAMMABLE MATERIAL
The catalytic converter develops high temperatures during operation. Do not park on grass, dry leaves, pine needles or other flammable
material: fire hazard.
RESPECTING THE ENVIRONMENT
The vehicle is fitted with a system that allows continuous diagnosis of the emission-related components in order to help protect the
environment.
ELECTRICAL ACCESSORIES
If, after buying the vehicle, you decide to add electrical accessories (with the risk of gradually draining the battery), visit a Fiat Dealership. They
can calculate the overall electrical requirement and check that the vehicle's electrical system can support the required load.
SCHEDULED SERVICING
Correct maintenance enables the vehicle to perfectly maintain performance and safety characteristics, its environmental friendliness and low
running costs over time.
Page 5 of 236
USE OF THE OWNER HANDBOOK
OPERATING INSTRUCTIONS
Each time direction instructions (left/right or forwards/backwards) about the vehicle are given, these must be intended as
regarding an occupant in the driver's seat. Special cases not complying with this rule will be specified as appropriate in the text.
The figures in the Owner Handbook are provided by way of example only: this might imply that some details of the image do
not correspond to the actual arrangement of your vehicle. In addition, the Handbook has been conceived considering cars with
steering wheel on the left side; it is therefore possible that on cars with steering wheel on the right side, the position or
construction of some controls is not exactly mirror-like with respect to the figure.
To identify the chapter with the information needed you can consult the index at the end of this Owner Handbook.
Chapters can be rapidly identified with dedicated graphic tabs, at the side of each odd page. A few pages further there is a key
for getting to know the chapter order and the relevant symbols in the tabs. There is in any case a textual indication of the
current chapter at the side of each even page.
Page 6 of 236
WARNINGS AND PRECAUTIONS
While reading this Owner Handbook you will find a series ofWARNINGSto prevent procedures that could damage your
vehicle.
There are alsoPRECAUTIONSthat must be carefully followed to prevent incorrect use of the components of the vehicle,
which could cause accidents or injuries.
Therefore allWARNINGSandPRECAUTIONSmust always be carefully followed.
WARNINGSandPRECAUTIONSare recalled in the text with the following symbols:
personal safety;
vehicle integrity;
environmental protection.
NOTE These symbols, when necessary, are indicated besides the title or at the end of the line and are followed by a number.
That number recalls the corresponding warning at the end of the relevant section.
IMPORTANT
This Owner Handbook describes all Fiat Talento versions. Options, equipment dedicated to specific markets or
versions are not explicitly indicated in the text: as a consequence, you should only consider the information which
is related to the trim level, engine and version that you have purchased. Any content introduced throughout the
production of the model, outside the explicit request of options at the time of purchase, will be identified with the
wording (for versions/markets, where provided).
All data contained in this publication are intended to help you use your vehicle in the best possible way. FCA Italy
S.p.A. aims at a constant improvement of the vehicles produced. For this reason it reserves the right to make
changes to the model described for technical and/or commercial reasons.
For further information, contact a Fiat Dealership.
SYMBOLS
Some vehicle components have coloured labels whose symbols indicate precautions to be observed when using this
component.
4
Page 17 of 236
Replacing the remote control
battery
1)
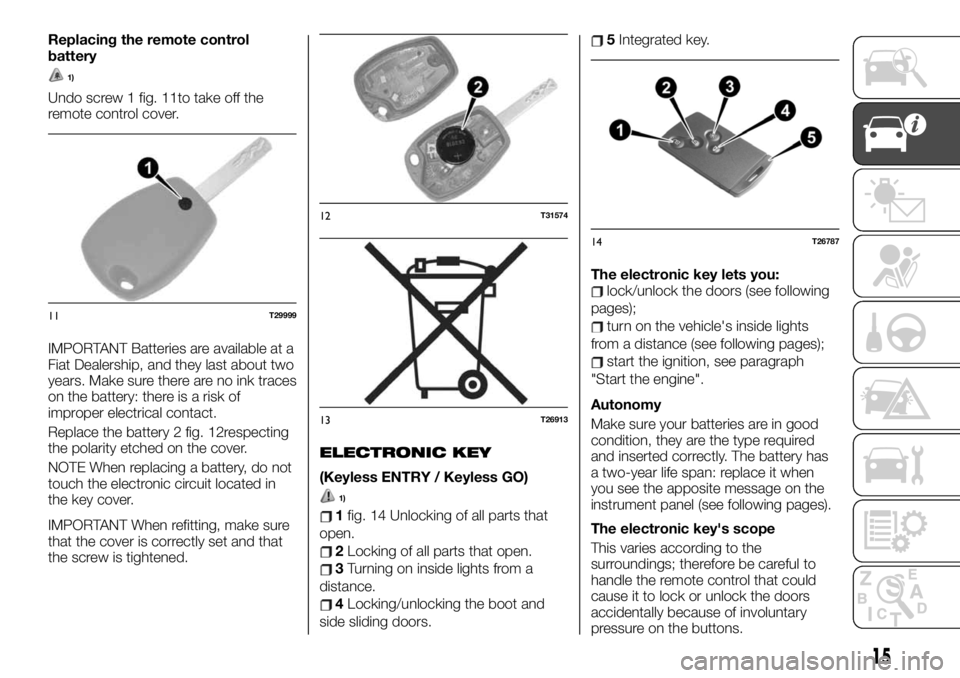
Undo screw 1 fig. 11to take off the
remote control cover.
IMPORTANT Batteries are available at a
Fiat Dealership, and they last about two
years. Make sure there are no ink traces
on the battery: there is a risk of
improper electrical contact.
Replace the battery 2 fig. 12respecting
the polarity etched on the cover.
NOTE When replacing a battery, do not
touch the electronic circuit located in
the key cover.
IMPORTANT When refitting, make sure
that the cover is correctly set and that
the screw is tightened.
ELECTRONIC KEY
(Keyless ENTRY / Keyless GO)
1)
1fig. 14 Unlocking of all parts that
open.
2Locking of all parts that open.
3Turning on inside lights from a
distance.
4Locking/unlocking the boot and
side sliding doors.
5Integrated key.
The electronic key lets you:
lock/unlock the doors (see following
pages);
turn on the vehicle's inside lights
from a distance (see following pages);
start the ignition, see paragraph
"Start the engine".
Autonomy
Make sure your batteries are in good
condition, they are the type required
and inserted correctly. The battery has
a two-year life span: replace it when
you see the apposite message on the
instrument panel (see following pages).
The electronic key's scope
This varies according to the
surroundings; therefore be careful to
handle the remote control that could
cause it to lock or unlock the doors
accidentally because of involuntary
pressure on the buttons.
11T29999
12T31574
13T26913
14T26787
15
Page 21 of 236
In both cases, the emergency lights will
flash five times to indicate the door is
locked.
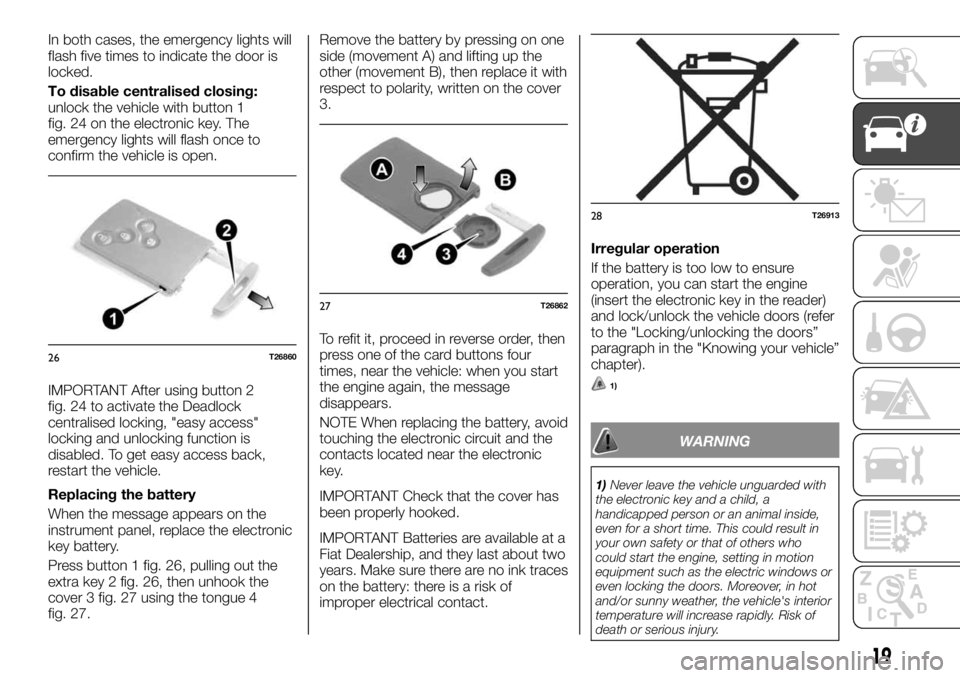
To disable centralised closing:
unlock the vehicle with button 1
fig. 24 on the electronic key. The
emergency lights will flash once to
confirm the vehicle is open.
IMPORTANT After using button 2
fig. 24 to activate the Deadlock
centralised locking, "easy access"
locking and unlocking function is
disabled. To get easy access back,
restart the vehicle.
Replacing the battery
When the message appears on the
instrument panel, replace the electronic
key battery.
Press button 1 fig. 26, pulling out the
extra key 2 fig. 26, then unhook the
cover 3 fig. 27 using the tongue 4
fig. 27.Remove the battery by pressing on one
side (movement A) and lifting up the
other (movement B), then replace it with
respect to polarity, written on the cover
3.
To refit it, proceed in reverse order, then
press one of the card buttons four
times, near the vehicle: when you start
the engine again, the message
disappears.
NOTE When replacing the battery, avoid
touching the electronic circuit and the
contacts located near the electronic
key.
IMPORTANT Check that the cover has
been properly hooked.
IMPORTANT Batteries are available at a
Fiat Dealership, and they last about two
years. Make sure there are no ink traces
on the battery: there is a risk of
improper electrical contact.Irregular operation
If the battery is too low to ensure
operation, you can start the engine
(insert the electronic key in the reader)
and lock/unlock the vehicle doors (refer
to the "Locking/unlocking the doors”
paragraph in the "Knowing your vehicle”
chapter).
1)
WARNING
1)Never leave the vehicle unguarded with
the electronic key and a child, a
handicapped person or an animal inside,
even for a short time. This could result in
your own safety or that of others who
could start the engine, setting in motion
equipment such as the electric windows or
even locking the doors. Moreover, in hot
and/or sunny weather, the vehicle's interior
temperature will increase rapidly. Risk of
death or serious injury.
26T26860
27T26862
28T26913
19
Page 32 of 236
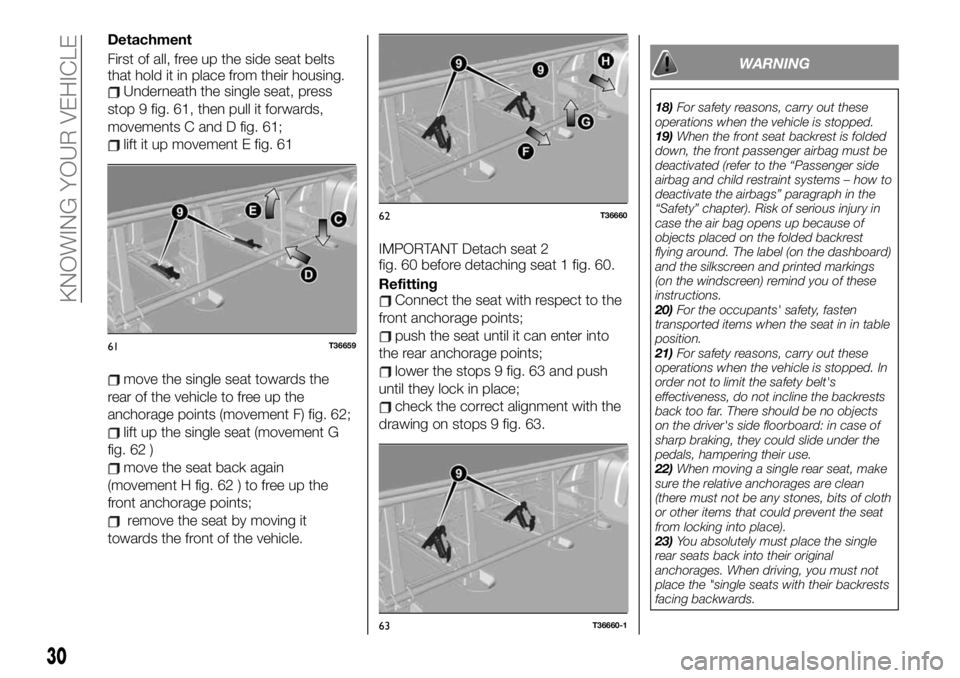
Detachment
First of all, free up the side seat belts
that hold it in place from their housing.
Underneath the single seat, press
stop 9 fig. 61, then pull it forwards,
movements C and D fig. 61;
lift it up movement E fig. 61
move the single seat towards the
rear of the vehicle to free up the
anchorage points (movement F) fig. 62;
lift up the single seat (movement G
fig. 62 )
move the seat back again
(movement H fig. 62 ) to free up the
front anchorage points;
remove the seat by moving it
towards the front of the vehicle.IMPORTANT Detach seat 2
fig. 60 before detaching seat 1 fig. 60.
Refitting
Connect the seat with respect to the
front anchorage points;
push the seat until it can enter into
the rear anchorage points;
lower the stops 9 fig. 63 and push
until they lock in place;
check the correct alignment with the
drawing on stops 9 fig. 63.
WARNING
18)For safety reasons, carry out these
operations when the vehicle is stopped.
19)When the front seat backrest is folded
down, the front passenger airbag must be
deactivated (refer to the “Passenger side
airbag and child restraint systems – how to
deactivate the airbags” paragraph in the
“Safety” chapter). Risk of serious injury in
case the air bag opens up because of
objects placed on the folded backrest
flying around. The label (on the dashboard)
and the silkscreen and printed markings
(on the windscreen) remind you of these
instructions.
20)For the occupants' safety, fasten
transported items when the seat in in table
position.
21)For safety reasons, carry out these
operations when the vehicle is stopped. In
order not to limit the safety belt's
effectiveness, do not incline the backrests
back too far. There should be no objects
on the driver's side floorboard: in case of
sharp braking, they could slide under the
pedals, hampering their use.
22)When moving a single rear seat, make
sure the relative anchorages are clean
(there must not be any stones, bits of cloth
or other items that could prevent the seat
from locking into place).
23)You absolutely must place the single
rear seats back into their original
anchorages. When driving, you must not
place the "single seats with their backrests
facing backwards.
61T36659
62T36660
63T36660-1
30
KNOWING YOUR VEHICLE
Page 37 of 236
EXTERNAL LIGHTS
SIDE LIGHTS
34) 35) 36) 37)
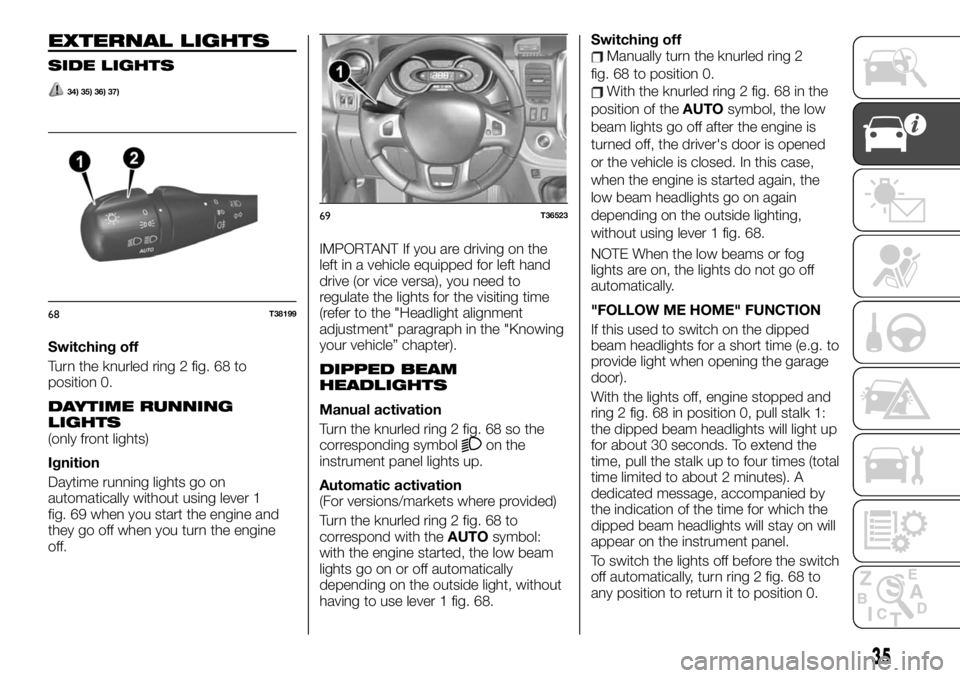
Switching off
Turn the knurled ring 2 fig. 68 to
position 0.
DAYTIME RUNNING
LIGHTS
(only front lights)
Ignition
Daytime running lights go on
automatically without using lever 1
fig. 69 when you start the engine and
they go off when you turn the engine
off.IMPORTANT If you are driving on the
left in a vehicle equipped for left hand
drive (or vice versa), you need to
regulate the lights for the visiting time
(refer to the "Headlight alignment
adjustment" paragraph in the "Knowing
your vehicle” chapter).
DIPPED BEAM
HEADLIGHTS
Manual activation
Turn the knurled ring 2 fig. 68 so the
corresponding symbol
on the
instrument panel lights up.
Automatic activation
(For versions/markets where provided)
Turn the knurled ring 2 fig. 68 to
correspond with theAUTOsymbol:
with the engine started, the low beam
lights go on or off automatically
depending on the outside light, without
having to use lever 1 fig. 68.Switching off
Manually turn the knurled ring 2
fig. 68 to position 0.
With the knurled ring 2 fig. 68 in the
position of theAUTOsymbol, the low
beam lights go off after the engine is
turned off, the driver's door is opened
or the vehicle is closed. In this case,
when the engine is started again, the
low beam headlights go on again
depending on the outside lighting,
without using lever 1 fig. 68.
NOTE When the low beams or fog
lights are on, the lights do not go off
automatically.
"FOLLOW ME HOME" FUNCTION
If this used to switch on the dipped
beam headlights for a short time (e.g. to
provide light when opening the garage
door).
With the lights off, engine stopped and
ring 2 fig. 68 in position 0, pull stalk 1:
the dipped beam headlights will light up
for about 30 seconds. To extend the
time, pull the stalk up to four times (total
time limited to about 2 minutes). A
dedicated message, accompanied by
the indication of the time for which the
dipped beam headlights will stay on will
appear on the instrument panel.
To switch the lights off before the switch
off automatically, turn ring 2 fig. 68 to
any position to return it to position 0.
68T38199
69T36523
35
Page 38 of 236
MAIN BEAM HEADLIGHTS
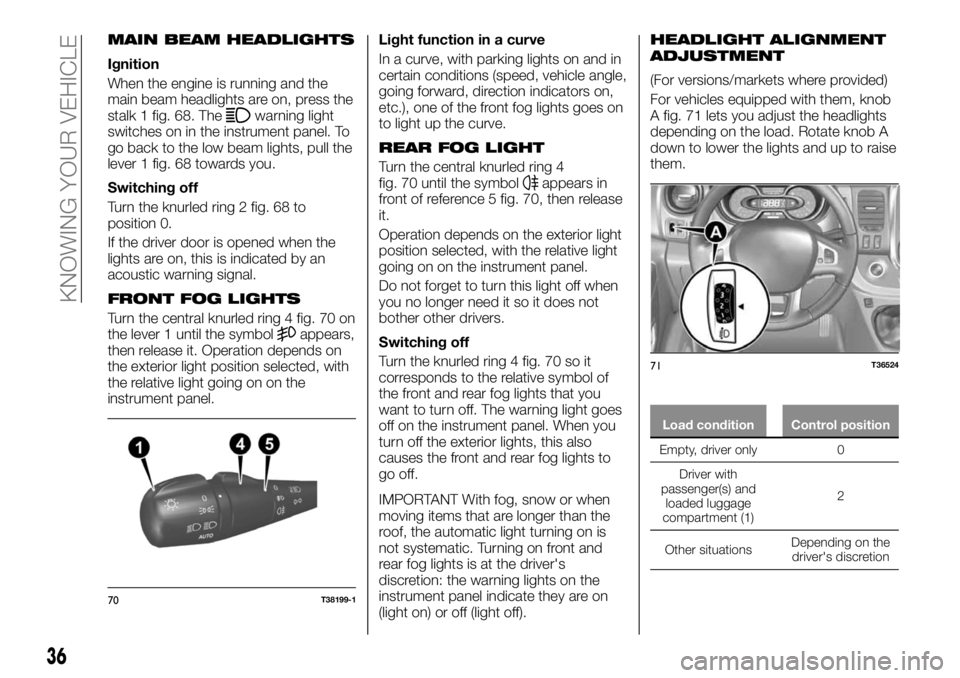
Ignition
When the engine is running and the
main beam headlights are on, press the
stalk 1 fig. 68. The
warning light
switches on in the instrument panel. To
go back to the low beam lights, pull the
lever 1 fig. 68 towards you.
Switching off
Turn the knurled ring 2 fig. 68 to
position 0.
If the driver door is opened when the
lights are on, this is indicated by an
acoustic warning signal.
FRONT FOG LIGHTS
Turn the central knurled ring 4 fig. 70 on
the lever 1 until the symbolappears,
then release it. Operation depends on
the exterior light position selected, with
the relative light going on on the
instrument panel.Light function in a curve
In a curve, with parking lights on and in
certain conditions (speed, vehicle angle,
going forward, direction indicators on,
etc.), one of the front fog lights goes on
to light up the curve.
REAR FOG LIGHT
Turn the central knurled ring 4
fig. 70 until the symbolappears in
front of reference 5 fig. 70, then release
it.
Operation depends on the exterior light
position selected, with the relative light
going on on the instrument panel.
Do not forget to turn this light off when
you no longer need it so it does not
bother other drivers.
Switching off
Turn the knurled ring 4 fig. 70 so it
corresponds to the relative symbol of
the front and rear fog lights that you
want to turn off. The warning light goes
off on the instrument panel. When you
turn off the exterior lights, this also
causes the front and rear fog lights to
go off.
IMPORTANT With fog, snow or when
moving items that are longer than the
roof, the automatic light turning on is
not systematic. Turning on front and
rear fog lights is at the driver's
discretion: the warning lights on the
instrument panel indicate they are on
(light on) or off (light off).
HEADLIGHT ALIGNMENT
ADJUSTMENT
(For versions/markets where provided)
For vehicles equipped with them, knob
A fig. 71 lets you adjust the headlights
depending on the load. Rotate knob A
down to lower the lights and up to raise
them.
Load condition Control position
Empty, driver only 0
Driver with
passenger(s) and
loaded
luggage
compartment (1)2
Other situationsDepending on the
driver's discretion
70T38199-1
71T36524
36
KNOWING YOUR VEHICLE
Page 44 of 236
REFUELLING THE
VEHICLE
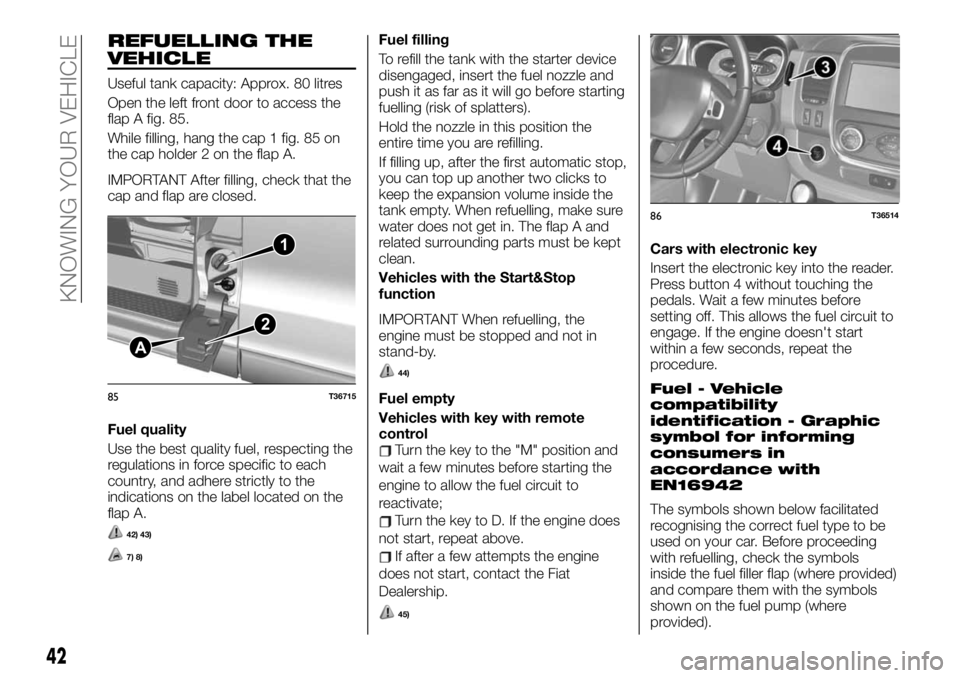
Useful tank capacity: Approx. 80 litres
Open the left front door to access the
flap A fig. 85.
While filling, hang the cap 1 fig. 85 on
the cap holder 2 on the flap A.
IMPORTANT After filling, check that the
cap and flap are closed.
Fuel quality
Use the best quality fuel, respecting the
regulations in force specific to each
country, and adhere strictly to the
indications on the label located on the
flap A.
42) 43)
7) 8)
Fuel filling
To refill the tank with the starter device
disengaged, insert the fuel nozzle and
push it as far as it will go before starting
fuelling (risk of splatters).
Hold the nozzle in this position the
entire time you are refilling.
If filling up, after the first automatic stop,
you can top up another two clicks to
keep the expansion volume inside the
tank empty. When refuelling, make sure
water does not get in. The flap A and
related surrounding parts must be kept
clean.
Vehicles with the Start&Stop
function
IMPORTANT When refuelling, the
engine must be stopped and not in
stand-by.
44)
Fuel empty
Vehicles with key with remote
control
Turn the key to the "M" position and
wait a few minutes before starting the
engine to allow the fuel circuit to
reactivate;
Turn the key to D. If the engine does
not start, repeat above.
If after a few attempts the engine
does not start, contact the Fiat
Dealership.
45)
Cars with electronic key
Insert the electronic key into the reader.
Press button 4 without touching the
pedals. Wait a few minutes before
setting off. This allows the fuel circuit to
engage. If the engine doesn't start
within a few seconds, repeat the
procedure.
Fuel - Vehicle
compatibility
identification - Graphic
symbol for informing
consumers in
accordance with
EN16942
The symbols shown below facilitated
recognising the correct fuel type to be
used on your car. Before proceeding
with refuelling, check the symbols
inside the fuel filler flap (where provided)
and compare them with the symbols
shown on the fuel pump (where
provided).
1
2
A
85T36715
86T36514
42
KNOWING YOUR VEHICLE
Page 47 of 236
IGNITION DEVICE
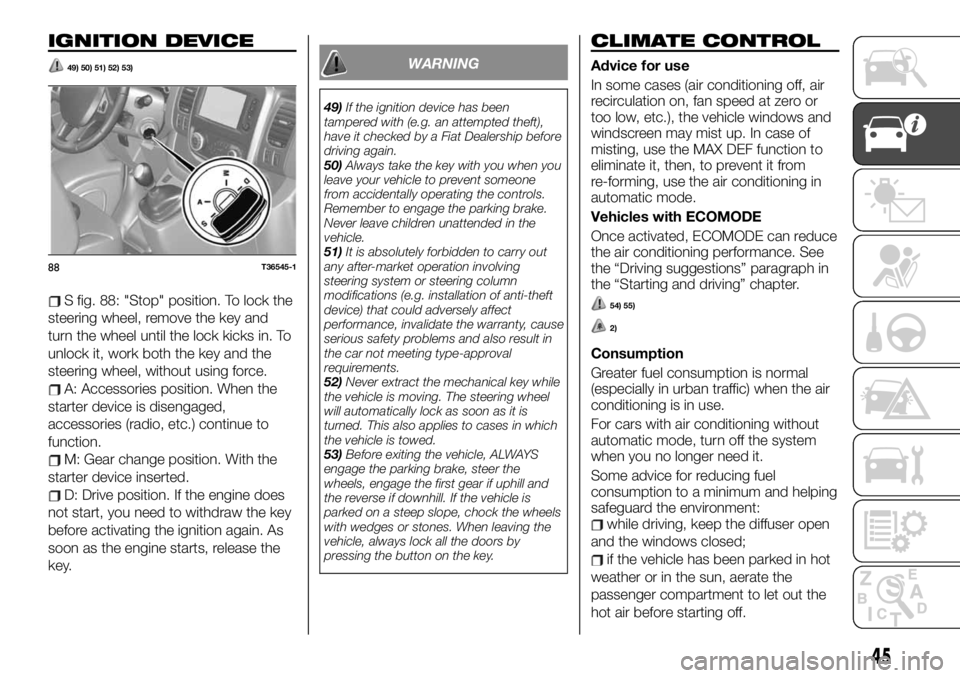
49) 50) 51) 52) 53)
S fig. 88: "Stop" position. To lock the
steering wheel, remove the key and
turn the wheel until the lock kicks in. To
unlock it, work both the key and the
steering wheel, without using force.
A: Accessories position. When the
starter device is disengaged,
accessories (radio, etc.) continue to
function.
M: Gear change position. With the
starter device inserted.
D: Drive position. If the engine does
not start, you need to withdraw the key
before activating the ignition again. As
soon as the engine starts, release the
key.
WARNING
49)If the ignition device has been
tampered with (e.g. an attempted theft),
have it checked by a Fiat Dealership before
driving again.
50)Always take the key with you when you
leave your vehicle to prevent someone
from accidentally operating the controls.
Remember to engage the parking brake.
Never leave children unattended in the
vehicle.
51)It is absolutely forbidden to carry out
any after-market operation involving
steering system or steering column
modifications (e.g. installation of anti-theft
device) that could adversely affect
performance, invalidate the warranty, cause
serious safety problems and also result in
the car not meeting type-approval
requirements.
52)Never extract the mechanical key while
the vehicle is moving. The steering wheel
will automatically lock as soon as it is
turned. This also applies to cases in which
the vehicle is towed.
53)Before exiting the vehicle, ALWAYS
engage the parking brake, steer the
wheels, engage the first gear if uphill and
the reverse if downhill. If the vehicle is
parked on a steep slope, chock the wheels
with wedges or stones. When leaving the
vehicle, always lock all the doors by
pressing the button on the key.
CLIMATE CONTROL
Advice for use
In some cases (air conditioning off, air
recirculation on, fan speed at zero or
too low, etc.), the vehicle windows and
windscreen may mist up. In case of
misting, use the MAX DEF function to
eliminate it, then, to prevent it from
re-forming, use the air conditioning in
automatic mode.
Vehicles with ECOMODE
Once activated, ECOMODE can reduce
the air conditioning performance. See
the “Driving suggestions” paragraph in
the “Starting and driving” chapter.
54) 55)
2)
Consumption
Greater fuel consumption is normal
(especially in urban traffic) when the air
conditioning is in use.
For cars with air conditioning without
automatic mode, turn off the system
when you no longer need it.
Some advice for reducing fuel
consumption to a minimum and helping
safeguard the environment:
while driving, keep the diffuser open
and the windows closed;
if the vehicle has been parked in hot
weather or in the sun, aerate the
passenger compartment to let out the
hot air before starting off.
88T36545-1
45