ignition FIAT TALENTO 2020 Owner handbook (in English)
[x] Cancel search | Manufacturer: FIAT, Model Year: 2020, Model line: TALENTO, Model: FIAT TALENTO 2020Pages: 236, PDF Size: 4.86 MB
Page 4 of 236
READ THIS CAREFULLY
REFUELLING
Only refuel with automotive diesel conforming to the European specification EN590. The use of other products or mixtures may damage the
engine beyond repair and consequently invalidate the warranty, due to the damage caused.
STARTING THE ENGINE
Make sure that the handbrake is engaged, put the gear in neutral, fully press the clutch without pressing the accelerator, then turn the ignition
key to AVV and release it as soon as the engine has started. In versions with an electronic key, the engine will start as soon as the button on
the starter device is pressed.
PARKING ON FLAMMABLE MATERIAL
The catalytic converter develops high temperatures during operation. Do not park on grass, dry leaves, pine needles or other flammable
material: fire hazard.
RESPECTING THE ENVIRONMENT
The vehicle is fitted with a system that allows continuous diagnosis of the emission-related components in order to help protect the
environment.
ELECTRICAL ACCESSORIES
If, after buying the vehicle, you decide to add electrical accessories (with the risk of gradually draining the battery), visit a Fiat Dealership. They
can calculate the overall electrical requirement and check that the vehicle's electrical system can support the required load.
SCHEDULED SERVICING
Correct maintenance enables the vehicle to perfectly maintain performance and safety characteristics, its environmental friendliness and low
running costs over time.
Page 14 of 236
KNOWING YOUR VEHICLE
In-depth knowledge of your new vehicle
starts here.
The handbook that you are reading
simply and directly explains how it is
made and how it works.
That’s why we advise you to read it
seated comfortably on board, so that
you can see what is described here for
yourself.THE KEYS.................13
DOORS...................20
HEADRESTS................26
SEATS....................27
STEERING WHEEL/POWER
STEERING.................31
START&STOP SYSTEM.........32
REAR VIEW MIRRORS.........34
EXTERNAL LIGHTS...........35
INTERIOR LIGHTS............38
WINDSCREEN / REAR WINDOW
WIPERS..................39
REFUELLING THE VEHICLE......42
AdBlue (Urea) ADDITIVE TANK....43
IGNITION DEVICE............45
CLIMATE CONTROL...........45
RADAR PARKING.............56
REAR CAMERA..............57
ELECTRIC WINDOWS..........59
ENGINE BONNET............60
INTERIOR FITTINGS...........61
MULTIMEDIA EQUIPMENT.......68
RADIO....................68
BAGGAGE COVER............69
CRUISE CONTROL
(constant speed regulator).......69
SPEED LIMITER..............72
PROTECTING THE
ENVIRONMENT..............73DIESEL VERSION
PARTICULARITIES............74
12
KNOWING YOUR VEHICLE
Page 17 of 236
Replacing the remote control
battery
1)
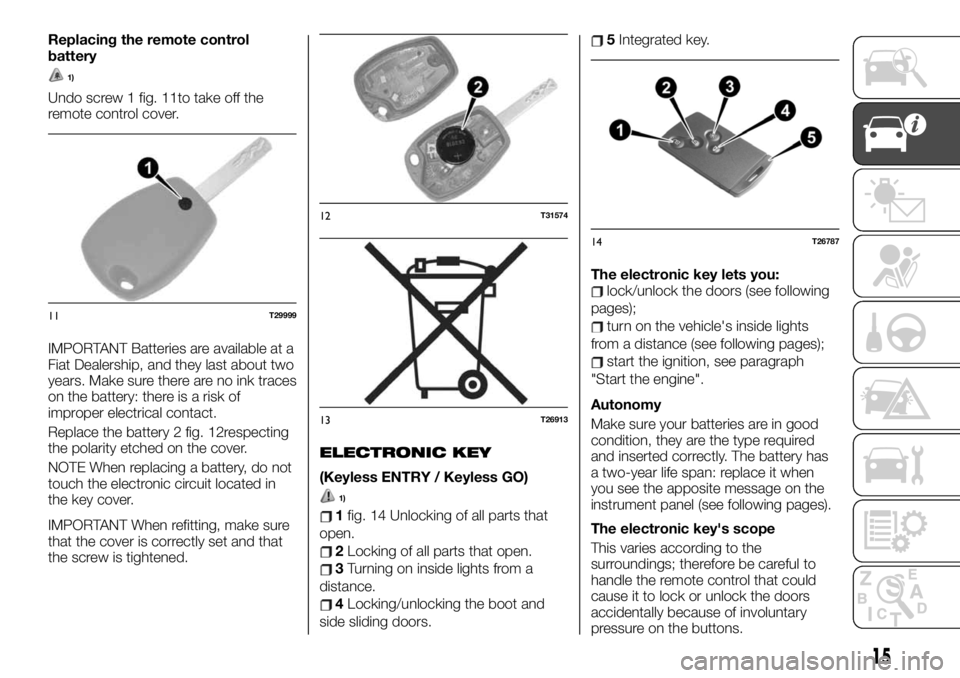
Undo screw 1 fig. 11to take off the
remote control cover.
IMPORTANT Batteries are available at a
Fiat Dealership, and they last about two
years. Make sure there are no ink traces
on the battery: there is a risk of
improper electrical contact.
Replace the battery 2 fig. 12respecting
the polarity etched on the cover.
NOTE When replacing a battery, do not
touch the electronic circuit located in
the key cover.
IMPORTANT When refitting, make sure
that the cover is correctly set and that
the screw is tightened.
ELECTRONIC KEY
(Keyless ENTRY / Keyless GO)
1)
1fig. 14 Unlocking of all parts that
open.
2Locking of all parts that open.
3Turning on inside lights from a
distance.
4Locking/unlocking the boot and
side sliding doors.
5Integrated key.
The electronic key lets you:
lock/unlock the doors (see following
pages);
turn on the vehicle's inside lights
from a distance (see following pages);
start the ignition, see paragraph
"Start the engine".
Autonomy
Make sure your batteries are in good
condition, they are the type required
and inserted correctly. The battery has
a two-year life span: replace it when
you see the apposite message on the
instrument panel (see following pages).
The electronic key's scope
This varies according to the
surroundings; therefore be careful to
handle the remote control that could
cause it to lock or unlock the doors
accidentally because of involuntary
pressure on the buttons.
11T29999
12T31574
13T26913
14T26787
15
Page 22 of 236
2)Never use the centralised door closing if
someone is still in the vehicle.
IMPORTANT
1)Used batteries may be harmful to the
environment if not disposed of correctly.
They must be disposed of as specified by
law in the special containers or taken to a
Fiat Dealership, which will take care of their
disposal.
DOORS
FRONT DOORS
3) 4) 5) 6) 7) 8)
Opening from the outside
Vehicles with remote control: unlock
the vehicle using the remote control and
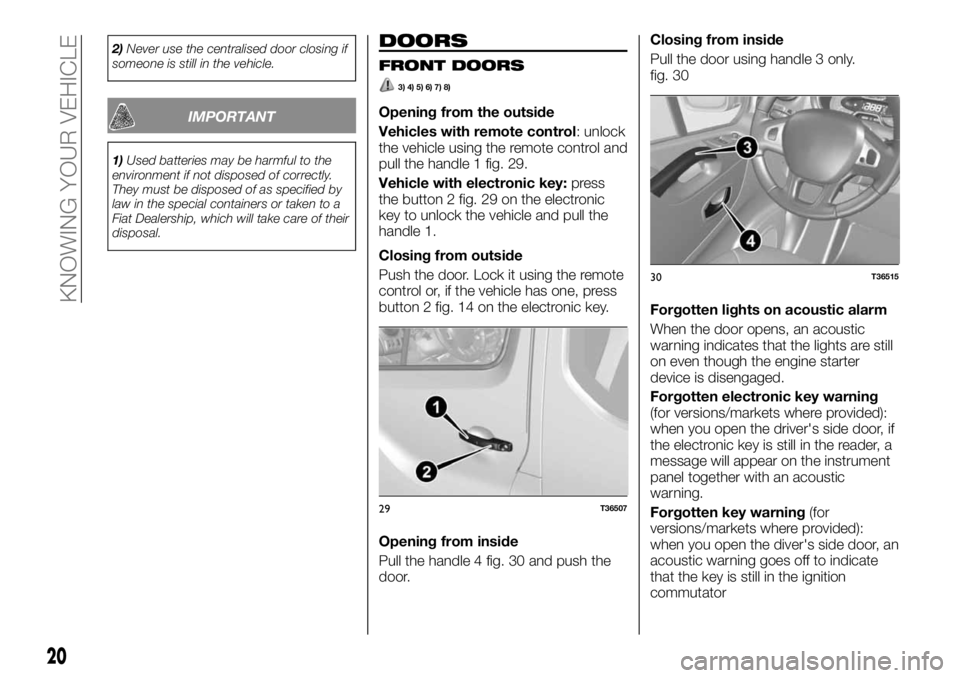
pull the handle 1 fig. 29.
Vehicle with electronic key:press
the button 2 fig. 29 on the electronic
key to unlock the vehicle and pull the
handle 1.
Closing from outside
Push the door. Lock it using the remote
control or, if the vehicle has one, press
button 2 fig. 14 on the electronic key.
Opening from inside
Pull the handle 4 fig. 30 and push the
door.Closing from inside
Pull the door using handle 3 only.
fig. 30
Forgotten lights on acoustic alarm
When the door opens, an acoustic
warning indicates that the lights are still
on even though the engine starter
device is disengaged.
Forgotten electronic key warning
(for versions/markets where provided):
when you open the driver's side door, if
the electronic key is still in the reader, a
message will appear on the instrument
panel together with an acoustic
warning.
Forgotten key warning(for
versions/markets where provided):
when you open the diver's side door, an
acoustic warning goes off to indicate
that the key is still in the ignition
commutator
29T36507
30T36515
20
KNOWING YOUR VEHICLE
Page 34 of 236
START&STOP
SYSTEM
29) 30)
This system lets you reduce fuel
consumption and harmful gas
emissions. When you start the vehicle,
the system is automatically activated.
When driving, the system stops the
engine (in stand-by) while the vehicle is
not moving (traffic jam, stop for a traffic
light, etc.).
OPERATING MODE
The engine is put in stand-by if:the vehicle was driven since its last
stop;
the gear is in neutral;
the clutch pedal is released;
the vehicle speed is lower than about
3 km/h.
2) 3)
The warning lightshown on the
instrument panel indicates that the
engine is in standby.
The equipment of the car remains
functioning for the entire time the
engine is off.
The engine is automatically restarted
when the clutch pedal is pressed and
the vehicle is put in gear.
ACTIVATION AND
DEACTIVATION OF THE
SYSTEM
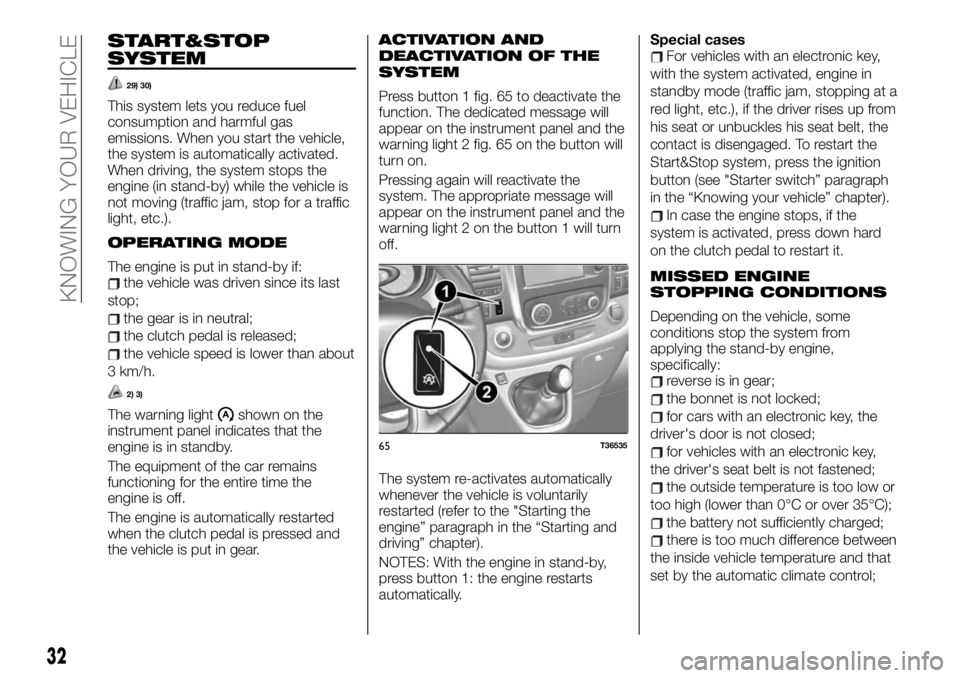
Press button 1 fig. 65 to deactivate the
function. The dedicated message will
appear on the instrument panel and the
warning light 2 fig. 65 on the button will
turn on.
Pressing again will reactivate the
system. The appropriate message will
appear on the instrument panel and the
warning light 2 on the button 1 will turn
off.
The system re-activates automatically
whenever the vehicle is voluntarily
restarted (refer to the "Starting the
engine” paragraph in the “Starting and
driving” chapter).
NOTES: With the engine in stand-by,
press button 1: the engine restarts
automatically.Special cases
For vehicles with an electronic key,
with the system activated, engine in
standby mode (traffic jam, stopping at a
red light, etc.), if the driver rises up from
his seat or unbuckles his seat belt, the
contact is disengaged. To restart the
Start&Stop system, press the ignition
button (see "Starter switch” paragraph
in the “Knowing your vehicle” chapter).
In case the engine stops, if the
system is activated, press down hard
on the clutch pedal to restart it.
MISSED ENGINE
STOPPING CONDITIONS
Depending on the vehicle, some
conditions stop the system from
applying the stand-by engine,
specifically:
reverse is in gear;
the bonnet is not locked;
for cars with an electronic key, the
driver's door is not closed;
for vehicles with an electronic key,
the driver's seat belt is not fastened;
the outside temperature is too low or
too high (lower than 0°C or over 35°C);
the battery not sufficiently charged;
there is too much difference between
the inside vehicle temperature and that
set by the automatic climate control;
65T36535
32
KNOWING YOUR VEHICLE
Page 37 of 236
EXTERNAL LIGHTS
SIDE LIGHTS
34) 35) 36) 37)
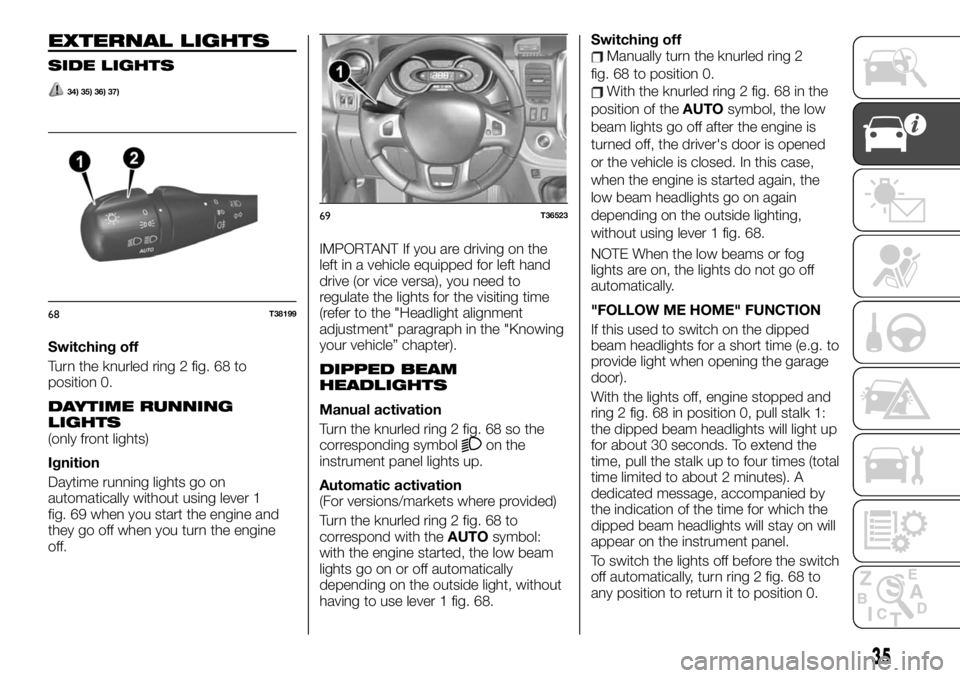
Switching off
Turn the knurled ring 2 fig. 68 to
position 0.
DAYTIME RUNNING
LIGHTS
(only front lights)
Ignition
Daytime running lights go on
automatically without using lever 1
fig. 69 when you start the engine and
they go off when you turn the engine
off.IMPORTANT If you are driving on the
left in a vehicle equipped for left hand
drive (or vice versa), you need to
regulate the lights for the visiting time
(refer to the "Headlight alignment
adjustment" paragraph in the "Knowing
your vehicle” chapter).
DIPPED BEAM
HEADLIGHTS
Manual activation
Turn the knurled ring 2 fig. 68 so the
corresponding symbol
on the
instrument panel lights up.
Automatic activation
(For versions/markets where provided)
Turn the knurled ring 2 fig. 68 to
correspond with theAUTOsymbol:
with the engine started, the low beam
lights go on or off automatically
depending on the outside light, without
having to use lever 1 fig. 68.Switching off
Manually turn the knurled ring 2
fig. 68 to position 0.
With the knurled ring 2 fig. 68 in the
position of theAUTOsymbol, the low
beam lights go off after the engine is
turned off, the driver's door is opened
or the vehicle is closed. In this case,
when the engine is started again, the
low beam headlights go on again
depending on the outside lighting,
without using lever 1 fig. 68.
NOTE When the low beams or fog
lights are on, the lights do not go off
automatically.
"FOLLOW ME HOME" FUNCTION
If this used to switch on the dipped
beam headlights for a short time (e.g. to
provide light when opening the garage
door).
With the lights off, engine stopped and
ring 2 fig. 68 in position 0, pull stalk 1:
the dipped beam headlights will light up
for about 30 seconds. To extend the
time, pull the stalk up to four times (total
time limited to about 2 minutes). A
dedicated message, accompanied by
the indication of the time for which the
dipped beam headlights will stay on will
appear on the instrument panel.
To switch the lights off before the switch
off automatically, turn ring 2 fig. 68 to
any position to return it to position 0.
68T38199
69T36523
35
Page 38 of 236
MAIN BEAM HEADLIGHTS
Ignition
When the engine is running and the
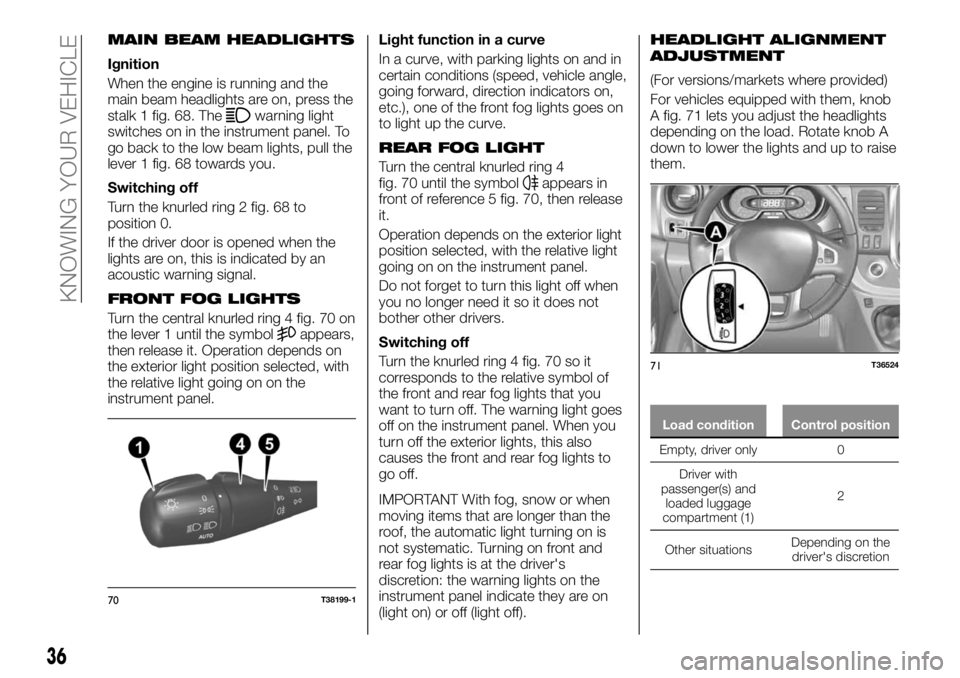
main beam headlights are on, press the
stalk 1 fig. 68. The
warning light
switches on in the instrument panel. To
go back to the low beam lights, pull the
lever 1 fig. 68 towards you.
Switching off
Turn the knurled ring 2 fig. 68 to
position 0.
If the driver door is opened when the
lights are on, this is indicated by an
acoustic warning signal.
FRONT FOG LIGHTS
Turn the central knurled ring 4 fig. 70 on
the lever 1 until the symbolappears,
then release it. Operation depends on
the exterior light position selected, with
the relative light going on on the
instrument panel.Light function in a curve
In a curve, with parking lights on and in
certain conditions (speed, vehicle angle,
going forward, direction indicators on,
etc.), one of the front fog lights goes on
to light up the curve.
REAR FOG LIGHT
Turn the central knurled ring 4
fig. 70 until the symbolappears in
front of reference 5 fig. 70, then release
it.
Operation depends on the exterior light
position selected, with the relative light
going on on the instrument panel.
Do not forget to turn this light off when
you no longer need it so it does not
bother other drivers.
Switching off
Turn the knurled ring 4 fig. 70 so it
corresponds to the relative symbol of
the front and rear fog lights that you
want to turn off. The warning light goes
off on the instrument panel. When you
turn off the exterior lights, this also
causes the front and rear fog lights to
go off.
IMPORTANT With fog, snow or when
moving items that are longer than the
roof, the automatic light turning on is
not systematic. Turning on front and
rear fog lights is at the driver's
discretion: the warning lights on the
instrument panel indicate they are on
(light on) or off (light off).
HEADLIGHT ALIGNMENT
ADJUSTMENT
(For versions/markets where provided)
For vehicles equipped with them, knob
A fig. 71 lets you adjust the headlights
depending on the load. Rotate knob A
down to lower the lights and up to raise
them.
Load condition Control position
Empty, driver only 0
Driver with
passenger(s) and
loaded
luggage
compartment (1)2
Other situationsDepending on the
driver's discretion
70T38199-1
71T36524
36
KNOWING YOUR VEHICLE
Page 47 of 236
IGNITION DEVICE
49) 50) 51) 52) 53)
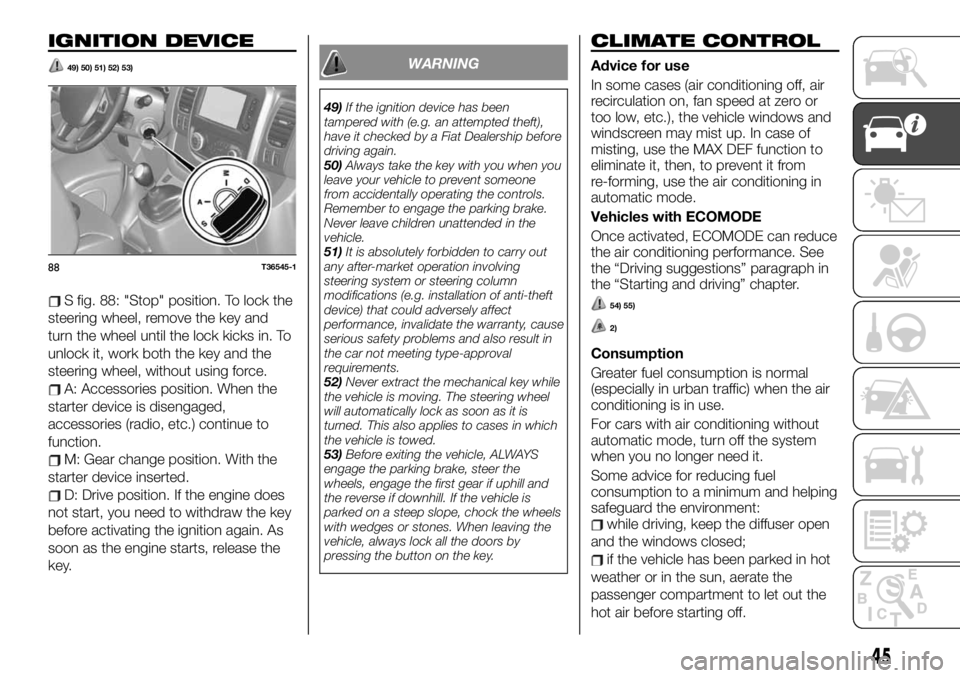
S fig. 88: "Stop" position. To lock the
steering wheel, remove the key and
turn the wheel until the lock kicks in. To
unlock it, work both the key and the
steering wheel, without using force.
A: Accessories position. When the
starter device is disengaged,
accessories (radio, etc.) continue to
function.
M: Gear change position. With the
starter device inserted.
D: Drive position. If the engine does
not start, you need to withdraw the key
before activating the ignition again. As
soon as the engine starts, release the
key.
WARNING
49)If the ignition device has been
tampered with (e.g. an attempted theft),
have it checked by a Fiat Dealership before
driving again.
50)Always take the key with you when you
leave your vehicle to prevent someone
from accidentally operating the controls.
Remember to engage the parking brake.
Never leave children unattended in the
vehicle.
51)It is absolutely forbidden to carry out
any after-market operation involving
steering system or steering column
modifications (e.g. installation of anti-theft
device) that could adversely affect
performance, invalidate the warranty, cause
serious safety problems and also result in
the car not meeting type-approval
requirements.
52)Never extract the mechanical key while
the vehicle is moving. The steering wheel
will automatically lock as soon as it is
turned. This also applies to cases in which
the vehicle is towed.
53)Before exiting the vehicle, ALWAYS
engage the parking brake, steer the
wheels, engage the first gear if uphill and
the reverse if downhill. If the vehicle is
parked on a steep slope, chock the wheels
with wedges or stones. When leaving the
vehicle, always lock all the doors by
pressing the button on the key.
CLIMATE CONTROL
Advice for use
In some cases (air conditioning off, air
recirculation on, fan speed at zero or
too low, etc.), the vehicle windows and
windscreen may mist up. In case of
misting, use the MAX DEF function to
eliminate it, then, to prevent it from
re-forming, use the air conditioning in
automatic mode.
Vehicles with ECOMODE
Once activated, ECOMODE can reduce
the air conditioning performance. See
the “Driving suggestions” paragraph in
the “Starting and driving” chapter.
54) 55)
2)
Consumption
Greater fuel consumption is normal
(especially in urban traffic) when the air
conditioning is in use.
For cars with air conditioning without
automatic mode, turn off the system
when you no longer need it.
Some advice for reducing fuel
consumption to a minimum and helping
safeguard the environment:
while driving, keep the diffuser open
and the windows closed;
if the vehicle has been parked in hot
weather or in the sun, aerate the
passenger compartment to let out the
hot air before starting off.
88T36545-1
45
Page 58 of 236
RADAR PARKING
57) 56)
13) 14) 15)
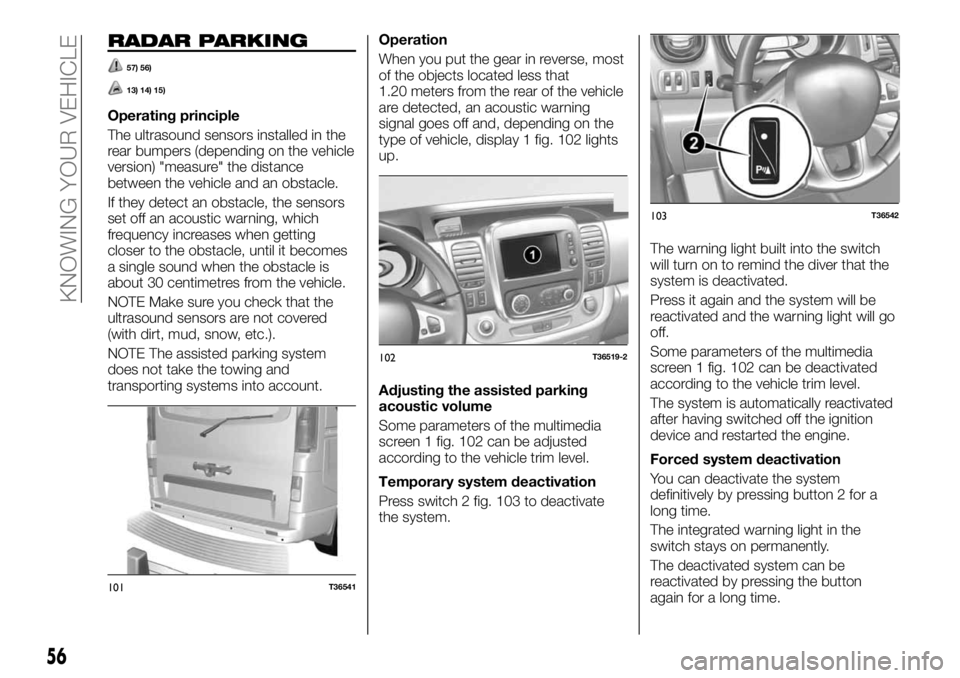
Operating principle
The ultrasound sensors installed in the
rear bumpers (depending on the vehicle
version) "measure" the distance
between the vehicle and an obstacle.
If they detect an obstacle, the sensors
set off an acoustic warning, which
frequency increases when getting
closer to the obstacle, until it becomes
a single sound when the obstacle is
about 30 centimetres from the vehicle.
NOTE Make sure you check that the
ultrasound sensors are not covered
(with dirt, mud, snow, etc.).
NOTE The assisted parking system
does not take the towing and
transporting systems into account.Operation
When you put the gear in reverse, most
of the objects located less that
1.20 meters from the rear of the vehicle
are detected, an acoustic warning
signal goes off and, depending on the
type of vehicle, display 1 fig. 102 lights
up.
Adjusting the assisted parking
acoustic volume
Some parameters of the multimedia
screen 1 fig. 102 can be adjusted
according to the vehicle trim level.
Temporary system deactivation
Press switch 2 fig. 103 to deactivate
the system.The warning light built into the switch
will turn on to remind the diver that the
system is deactivated.
Press it again and the system will be
reactivated and the warning light will go
off.
Some parameters of the multimedia
screen 1 fig. 102 can be deactivated
according to the vehicle trim level.
The system is automatically reactivated
after having switched off the ignition
device and restarted the engine.
Forced system deactivation
You can deactivate the system
definitively by pressing button 2 for a
long time.
The integrated warning light in the
switch stays on permanently.
The deactivated system can be
reactivated by pressing the button
again for a long time.
101T36541
102T36519-2
103T36542
56
KNOWING YOUR VEHICLE
Page 62 of 236
NOTE If the window encounters any
resistance during closing (for example a
tree branch, etc.) it stops and lowers a
few centimetres again.
Irregular operation
If the window closing fails to function,
the system moves to no pressure
mode: pull the concerned switch up as
much as needed until the window
closes completely (the window goes
back up gradually); then keep the
switch pulled up (always on the closing
side) for a second, then lower it and
raise it back up completely to reinstate
the system.
If necessary, contact a Fiat Dealership.
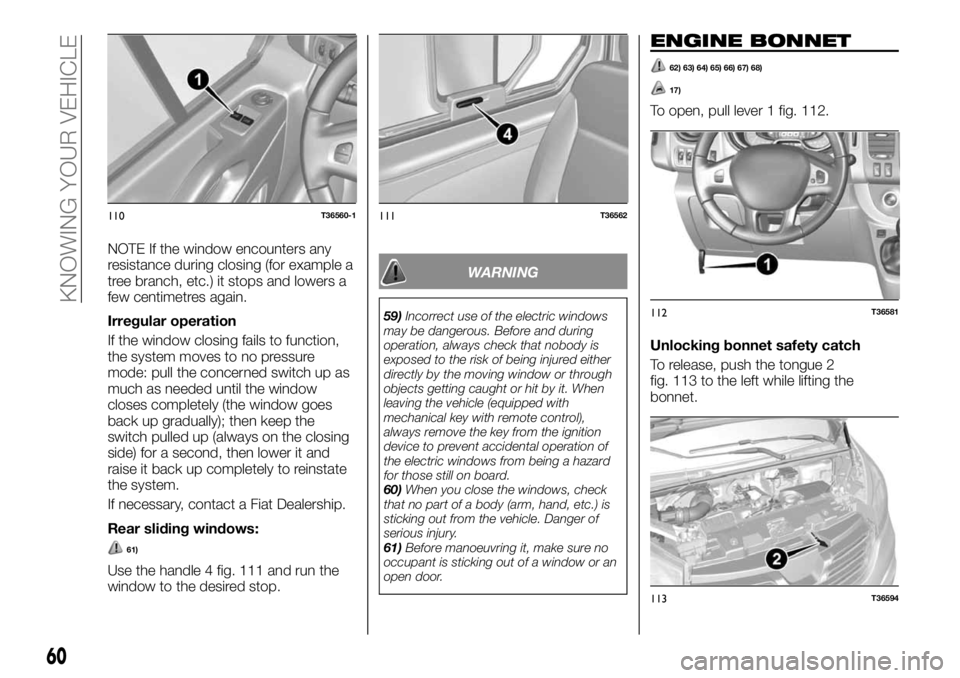
Rear sliding windows:
61)
Use the handle 4 fig. 111 and run the
window to the desired stop.
WARNING
59)Incorrect use of the electric windows
may be dangerous. Before and during
operation, always check that nobody is
exposed to the risk of being injured either
directly by the moving window or through
objects getting caught or hit by it. When
leaving the vehicle (equipped with
mechanical key with remote control),
always remove the key from the ignition
device to prevent accidental operation of
the electric windows from being a hazard
for those still on board.
60)When you close the windows, check
that no part of a body (arm, hand, etc.) is
sticking out from the vehicle. Danger of
serious injury.
61)Before manoeuvring it, make sure no
occupant is sticking out of a window or an
open door.
ENGINE BONNET
62) 63) 64) 65) 66) 67) 68)
17)
To open, pull lever 1 fig. 112.
Unlocking bonnet safety catch
To release, push the tongue 2
fig. 113 to the left while lifting the
bonnet.
110T36560-1111T36562
112T36581
113T36594
60
KNOWING YOUR VEHICLE