check oil FIAT TIPO 4DOORS 2016 1.G Owners Manual
[x] Cancel search | Manufacturer: FIAT, Model Year: 2016, Model line: TIPO 4DOORS, Model: FIAT TIPO 4DOORS 2016 1.GPages: 204, PDF Size: 4.94 MB
Page 44 of 204
WARNING LIGHTS AND MESSAGES
IMPORTANT The warning light switches on in the instrument panel together with a dedicated message and/or acoustic signal
when applicable. These indications are indicative and precautionary and as such must not be considered as exhaustive and/or
alternative to the information contained in the Owner Handbook, which you are advised to read carefully in all cases. Always
refer to the information in this section in the event of a failure indication.
IMPORTANT Failure indications displayed are divided into two categories: very serious and less serious failures. Serious faults
are indicated by a repeated and prolonged warning "cycle". Less serious faults are indicated by a warning "cycle" with a shorter
duration. The display cycle of both categories can be interrupted. The instrument panel warning light will stay on until the cause
of the failure is eliminated.
NOTE The warning lights and icons described below are indicative and can change based on the version or market.
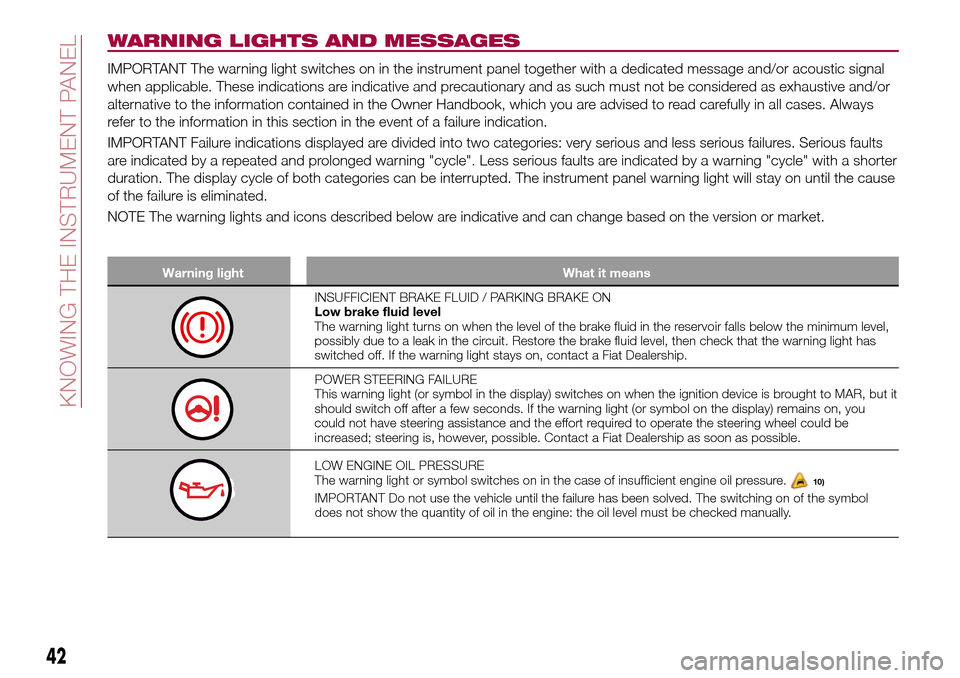
Warning light What it means
INSUFFICIENT BRAKE FLUID / PARKING BRAKE ON
Low brake fluid level
The warning light turns on when the level of the brake fluid in the reservoir falls below the minimum level,
possibly due to a leak in the circuit. Restore the brake fluid level, then check that the warning light has
switched off. If the warning light stays on, contact a Fiat Dealership.
POWER STEERING FAILURE
This warning light (or symbol in the display) switches on when the ignition device is brought to MAR, but it
should switch off after a few seconds. If the warning light (or symbol on the display) remains on, you
could not have steering assistance and the effort required to operate the steering wheel could be
increased; steering is, however, possible. Contact a Fiat Dealership as soon as possible.
LOW ENGINE OIL PRESSURE
The warning light or symbol switches on in the case of insufficient engine oil pressure.10)
IMPORTANT Do not use the vehicle until the failure has been solved. The switching on of the symbol
does not show the quantity of oil in the engine: the oil level must be checked manually.
42
KNOWING THE INSTRUMENT PANEL
Page 47 of 204
WARNING
31)If, when the ignition device is turned to MAR, thewarning light does not switch on or stays on whilst driving, a failure may have
occurred in the restraint systems. In this case the airbags or pretensioners may not be deployed in an impact or, in a lower number of cases,
they may be deployed accidentally. Before continuing, contact a Fiat Dealership immediately to have the system checked.
32)The failure of the
warning light is signalled by the lighting up of theicon on the instrument panel display (or, for versions where
provided, by the flashing of the generic failure warning light). In this case, the warning light may not indicate any faults with the restraint
systems. Before continuing, contact a Fiat Dealership immediately to have the system checked.
IMPORTANT
11)Driving the vehicle with this symbol on may severely damage the gearbox, with resulting breakage. The oil may also overheat: contact with
hot engine or with exhaust components at high temperature could cause fires.
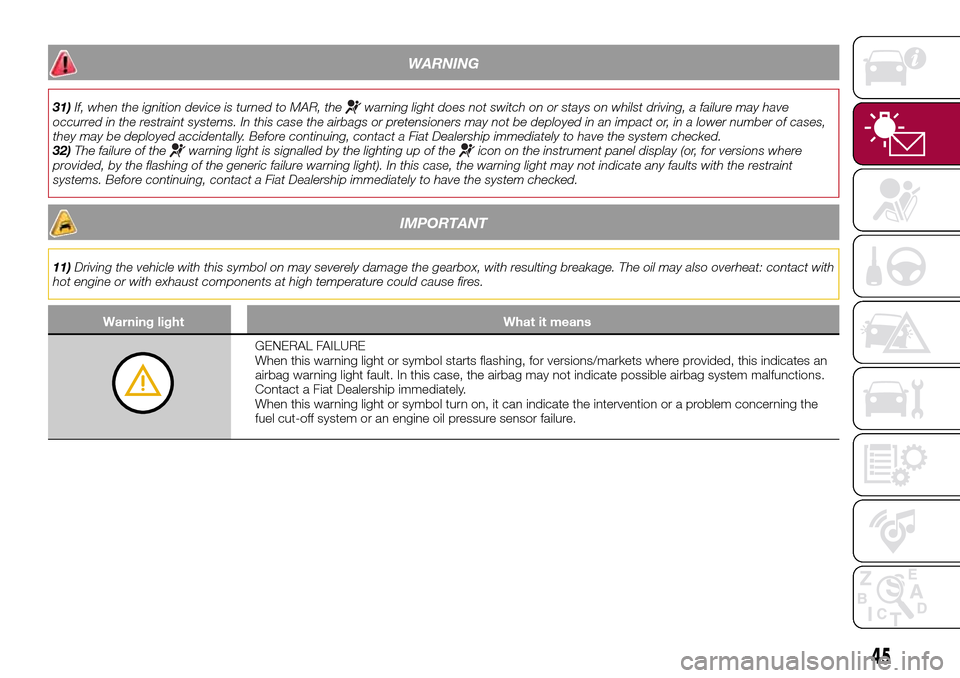
Warning light What it means
GENERAL FAILURE
When this warning light or symbol starts flashing, for versions/markets where provided, this indicates an
airbag warning light fault. In this case, the airbag may not indicate possible airbag system malfunctions.
Contact a Fiat Dealership immediately.
When this warning light or symbol turn on, it can indicate the intervention or a problem concerning the
fuel cut-off system or an engine oil pressure sensor failure.
45
Page 127 of 204
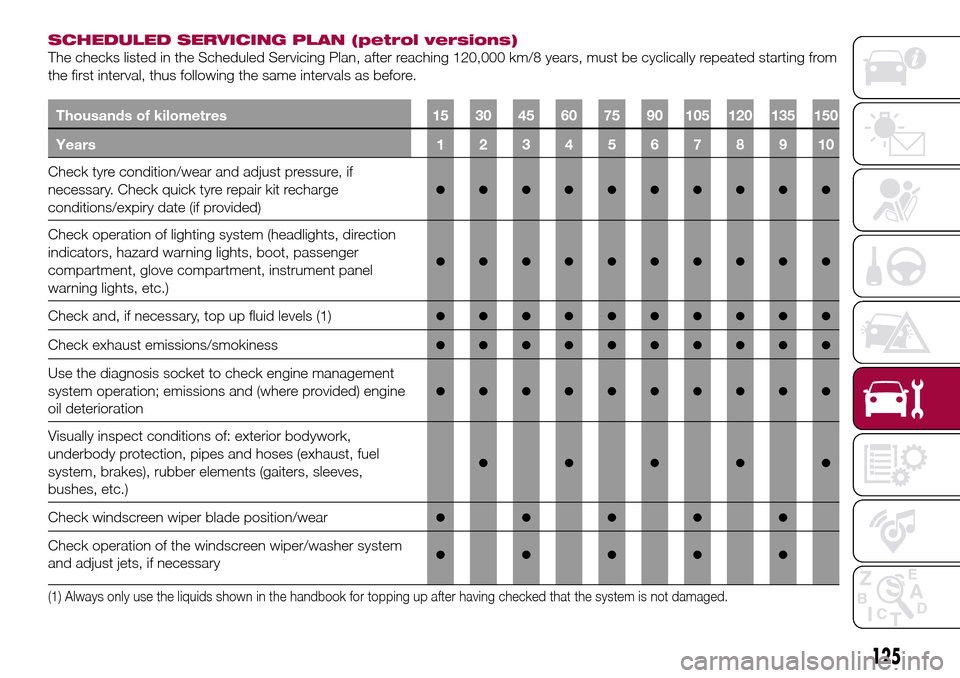
SCHEDULED SERVICING PLAN (petrol versions)
The checks listed in the Scheduled Servicing Plan, after reaching 120,000 km/8 years, must be cyclically repeated starting from
the first interval, thus following the same intervals as before.
Thousands of kilometres 15 30 45 60 75 90 105 120 135 150
Years 1 2 3 4 5 6 7 8 9 10
Check tyre condition/wear and adjust pressure, if
necessary. Check quick tyre repair kit recharge
conditions/expiry date (if provided)
●●●●●●●●●●
Check operation of lighting system (headlights, direction
indicators, hazard warning lights, boot, passenger
compartment, glove compartment, instrument panel
warning lights, etc.)
●●●●●●●●●●
Check and, if necessary, top up fluid levels (1)●●●●●●●●●●
Check exhaust emissions/smokiness●●●●●●●●●●
Use the diagnosis socket to check engine management
system operation; emissions and (where provided) engine
oil deterioration
●●●●●●●●●●
Visually inspect conditions of: exterior bodywork,
underbody protection, pipes and hoses (exhaust, fuel
system, brakes), rubber elements (gaiters, sleeves,
bushes, etc.)
●●●●●
Check windscreen wiper blade position/wear●●●●●
Check operation of the windscreen wiper/washer system
and adjust jets, if necessary●●●●●
(1) Always only use the liquids shown in the handbook for topping up after having checked that the system is not damaged.
125
Page 128 of 204
Thousands of kilometres 15 30 45 60 75 90 105 120 135 150
Years 1 2 3 4 5 6 7 8 9 10
Check cleanliness of bonnet and rear lid locks, cleanliness
and lubrication of linkage●●●●●
Check handbrake lever travel and adjust, if necessary●●●●●
Visually inspect conditions and wear of front disc brake
pads and check the integrity of the pad wear sensor●●●●●●●●●●
Visually inspect condition and wear of rear disc brake
pads and check the integrity of pad wear sensor (for
versions/markets where provided)
●●●●●●●●●●
Visually inspect rear drum brake lining condition and wear
(for versions/markets, where provided)●●●●●●●●●●
Visually inspect conditions of toothed timing drive belt
(1.4 16v 95 HP versions)●●
Visually inspect condition of various drive belt(s) (1.4 16v
95 HP versions)●●
Visually inspect condition of various drive belts (1.6
E.Torque versions)●●●●●●●●●●
Check tension of accessory drive belt (versions without
automatic tensioner) (1.4 16v 95 HP versions)●●
Check tension of accessory drive belt (versions without
automatic tensioner) (1.6 E.Torque versions)●●●●●●●●●●
Change engine oil and oil filter (1.6 E.Torque versions)●●●●●●●●●●
126
SERVICING AND CARE
Page 130 of 204
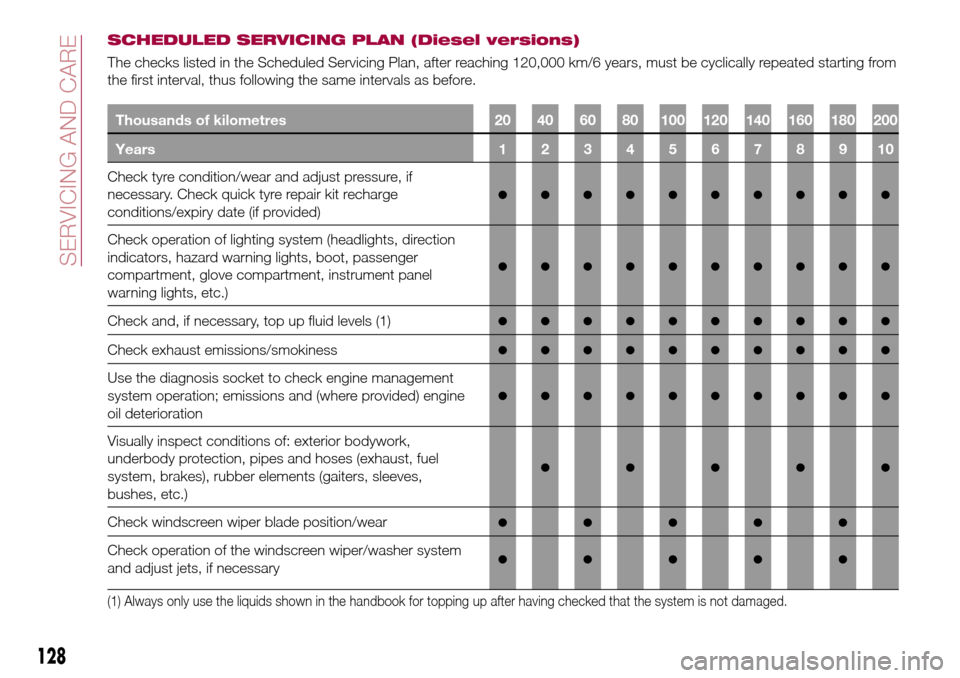
SCHEDULED SERVICING PLAN (Diesel versions)
The checks listed in the Scheduled Servicing Plan, after reaching 120,000 km/6 years, must be cyclically repeated starting from
the first interval, thus following the same intervals as before.
Thousands of kilometres 20 40 60 80 100 120 140 160 180 200
Years12345678910
Check tyre condition/wear and adjust pressure, if
necessary. Check quick tyre repair kit recharge
conditions/expiry date (if provided)
●●●●●●●●●●
Check operation of lighting system (headlights, direction
indicators, hazard warning lights, boot, passenger
compartment, glove compartment, instrument panel
warning lights, etc.)
●●●●●●●●●●
Check and, if necessary, top up fluid levels (1)●●●●●●●●●●
Check exhaust emissions/smokiness●●●●●●●●●●
Use the diagnosis socket to check engine management
system operation; emissions and (where provided) engine
oil deterioration
●●●●●●●●●●
Visually inspect conditions of: exterior bodywork,
underbody protection, pipes and hoses (exhaust, fuel
system, brakes), rubber elements (gaiters, sleeves,
bushes, etc.)
●●●●●
Check windscreen wiper blade position/wear●●●●●
Check operation of the windscreen wiper/washer system
and adjust jets, if necessary●●●●●
(1) Always only use the liquids shown in the handbook for topping up after having checked that the system is not damaged.
128
SERVICING AND CARE
Page 131 of 204
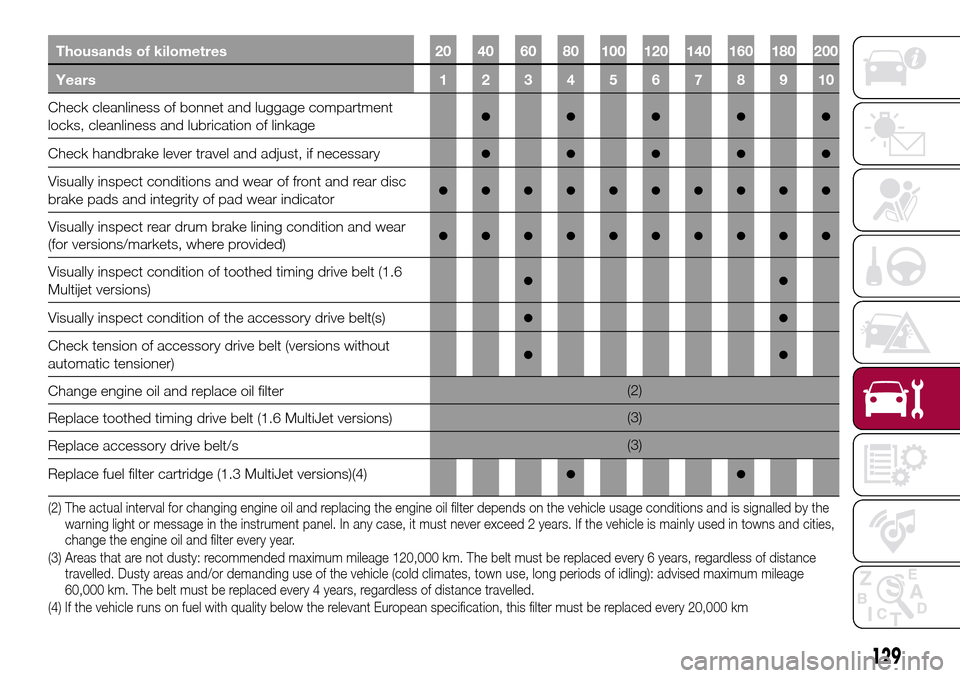
Thousands of kilometres 20 40 60 80 100 120 140 160 180 200
Years12345678910
Check cleanliness of bonnet and luggage compartment
locks, cleanliness and lubrication of linkage●●●●●
Check handbrake lever travel and adjust, if necessary●●●●●
Visually inspect conditions and wear of front and rear disc
brake pads and integrity of pad wear indicator●●●●●●●●●●
Visually inspect rear drum brake lining condition and wear
(for versions/markets, where provided)●●●●●●●●●●
Visually inspect condition of toothed timing drive belt (1.6
Multijet versions)●●
Visually inspect condition of the accessory drive belt(s)●●
Check tension of accessory drive belt (versions without
automatic tensioner)●●
Change engine oil and replace oil filter(2)
Replace toothed timing drive belt (1.6 MultiJet versions)(3)
Replace accessory drive belt/s(3)
Replace fuel filter cartridge (1.3 MultiJet versions)(4)
●●
(2) The actual interval for changing engine oil and replacing the engine oil filter depends on the vehicle usage conditions and is signalled by the
warning light or message in the instrument panel. In any case, it must never exceed 2 years. If the vehicle is mainly used in towns and cities,
change the engine oil and filter every year.
(3) Areas that are not dusty: recommended maximum mileage 120,000 km. The belt must be replaced every 6 years, regardless of distance
travelled. Dusty areas and/or demanding use of the vehicle (cold climates, town use, long periods of idling): advised maximum mileage
60,000 km. The belt must be replaced every 4 years, regardless of distance travelled.
(4) If the vehicle runs on fuel with quality below the relevant European specification, this filter must be replaced every 20,000 km
129
Page 133 of 204
PERIODIC CHECKS
Every1,000km or before long trips
check and, if necessary, top up:
engine coolant level;
brake fluid level;
windscreen washer fluid level;
tyre inflation pressure and condition;
operation of lighting system
(headlights, direction indicators, hazard
warning lights, etc.);
operation of screen washer/wiper
system and positioning/wear of
windscreen.
Every3,000km, check and top up if
required: engine oil level.
HEAVY USAGE OF THE
CAR
If the vehicle is used mainly under one
of the following conditions:
dusty roads;
short, repeated journeys (less than
7-8 km) at sub-zero outside
temperatures;
engine often idling or driving long
distances at low speeds or long periods
of inactivity;
the following checks must be carried
out more often than indicated in the
Scheduled Servicing Plan:
check front disc brake pad condition
and wear;
check cleanliness of bonnet and
luggage compartment locks,cleanliness and lubrication of linkage;
visually inspect conditions of: engine,
gearbox, transmission, pipes and hoses
(exhaust/fuel system/brakes) and
rubber elements (gaiters/sleeves/
bushes, etc.);
check battery charge and battery
fluid level (electrolyte);
visually inspect conditions of the
accessory drive belts;
check and, if necessary, change
engine oil and replace oil filter;
check and, if necessary, replace
pollen filter;
check and, if necessary, replace air
cleaner.
On versions with AT6 automatic
transmission, change the oil and
replace filters every 90,000 km (or 2
years) if the vehicle is used in the
following conditions: city driving, short
and repeated journeys (less than
78 km) or frequent towing of trailers or
caravans.
131
Page 134 of 204
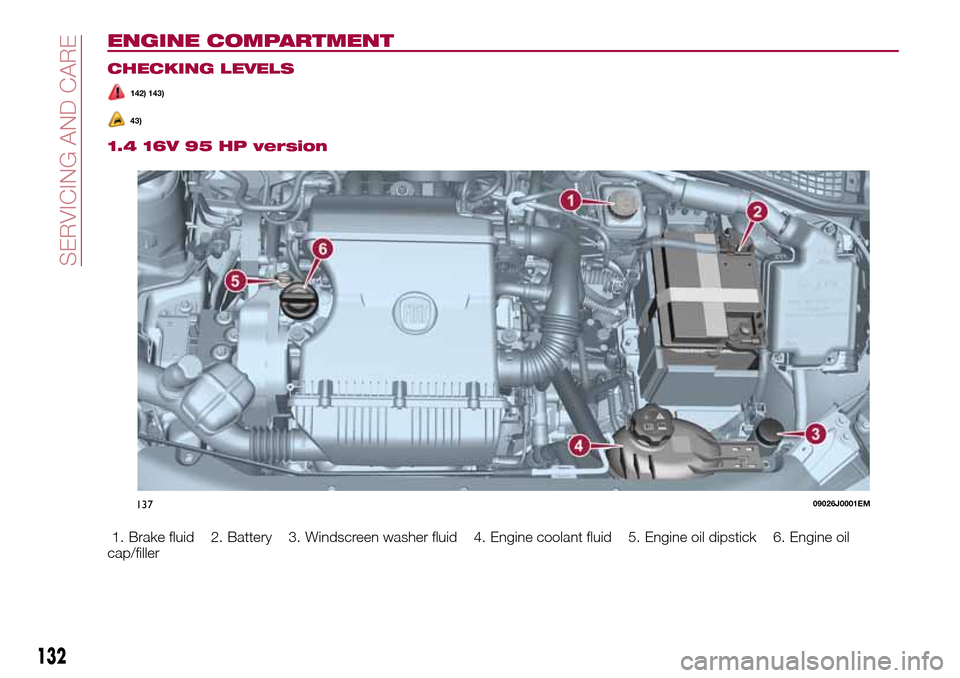
ENGINE COMPARTMENT
CHECKING LEVELS
142) 143)
43)
1.4 16V 95 HP version
1. Brake fluid 2. Battery 3. Windscreen washer fluid 4. Engine coolant fluid 5. Engine oil dipstick 6. Engine oil
cap/filler
13709026J0001EM
132
SERVICING AND CARE
Page 139 of 204
ENGINE OIL
144)
44)
Check the oil level a few minutes (about
5) after the engine has stopped, with
the vehicle parked on level ground.
Check that the oil level is between the
MIN and MAX references on the
dipstick.
If the level of the oil is close to or below
the MIN mark, add oil via the filler fitting
until the MAX mark is reached.
Take out the engine oil dipstick, clean it
with a lint-free cloth and reinsert it.
Extract it again and check that the level
is between the MIN and MAX marks on
the dipstick.
Engine oil consumption
45)
2) 3)
The maximum engine oil consumption
is usually 400 grams every 1000 km.
When the car is new, the engine needs
to be run in; therefore the engine oil
consumption can only be considered
stabilised after the first 5000 - 6000 km.
IMPORTANT After adding or changing
the oil, let the engine turn over for a few
seconds and wait a few minutes after
turning it off before you check the level.ENGINE COOLANT FLUID
46)
145)
If the level is too low, unscrew the cap
of reservoir 4 and add the fluid
described in the "Technical
Specifications" chapter.
WINDSCREEN WASHER
FLUID
146) 147)
If the level is too low, raise the reservoir
cap 3 and add the fluid described in the
"Technical Specifications" chapter.
BRAKE FLUID
47)
148) 149)
Check that the fluid is at the max. level.
If the fluid level in the reservoir is too
low, undo the reservoir cap 1 and add
the fluid described in the "Technical
Specifications" chapter.
IMPORTANT Carefully clean the cap of
the reservoir and the surrounding
surface. Take great care to ensure that
impurities do not enter the reservoir
when the cap is opened.
For topping-up, always use a funnel
with integrated filter with mesh equal to
or lower than 0.12 mm.
IMPORTANT Brake fluid is hygroscopic
(i.e. it absorbs moisture). For this
reason, if the vehicle is mainly used in
areas with a high degree of
atmospheric humidity, the fluid should
be replaced at more frequent intervals
than specified in the "Scheduled
Servicing Plan".
AUTOMATIC
TRANSMISSION
ACTIVATION SYSTEM OIL
(where provided)
3)
The transmission control oil level should
only be checked at a Fiat Dealership.
BATTERY
150) 151) 152)
48)
4)
The battery does not require the
electrolyte to be topped up with distilled
water.
A periodic check carried out at a Fiat
Dealership is, however, necessary to
check efficiency.
Replacing the battery
If necessary, replace the battery with
another original battery with the same
specifications. Follow the battery
Manufacturer’s instructions for
maintenance.
137
Page 142 of 204
"quick-type" battery charger is used
with the battery fitted on the vehicle,
before connecting it disconnect both
cables of the battery itself. Do not use a
"quick-type" battery charger to provide
the starting voltage.
VERSIONS WITHOUT
STOP/START SYSTEM
To recharge, proceed as follows:
disconnect the terminal from the
negative battery pole;
connect the charger cables to the
battery terminals, observing the polarity;
turn on the charger;
when it is recharged, turn the
charger off before disconnecting it from
the battery;
reconnect the terminal to the
negative battery pole.
VERSIONS WITH
STOP/START SYSTEM
(where provided)
To recharge, proceed as follows:
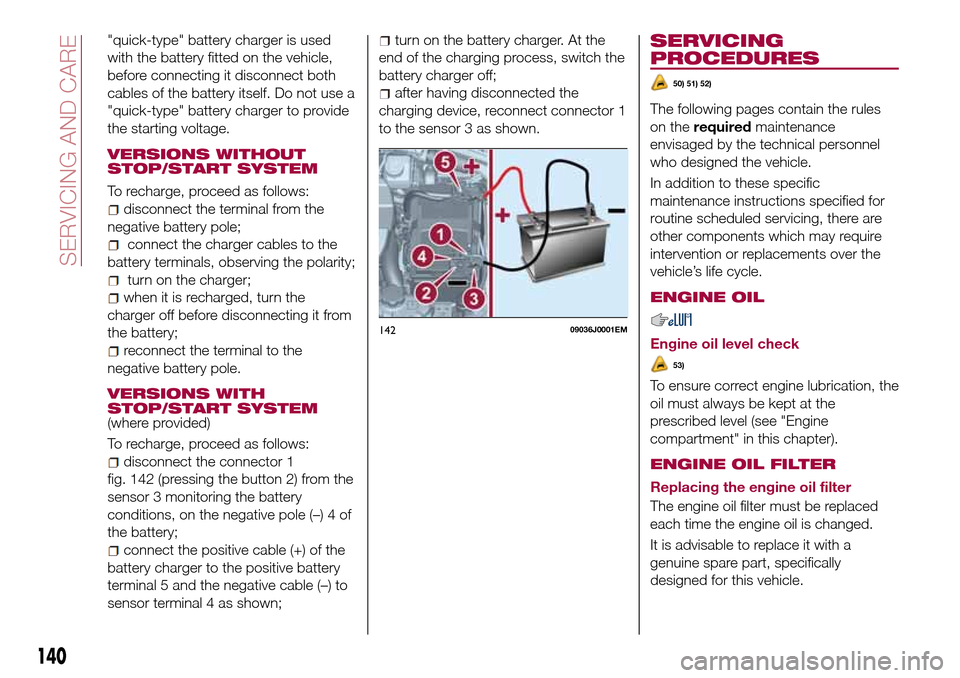
disconnect the connector 1
fig. 142 (pressing the button 2) from the
sensor 3 monitoring the battery
conditions, on the negative pole (–) 4 of
the battery;
connect the positive cable (+) of the
battery charger to the positive battery
terminal 5 and the negative cable (–) to
sensor terminal 4 as shown;
turn on the battery charger. At the
end of the charging process, switch the
battery charger off;
after having disconnected the
charging device, reconnect connector 1
to the sensor 3 as shown.
SERVICING
PROCEDURES
50) 51) 52)
The following pages contain the rules
on therequiredmaintenance
envisaged by the technical personnel
who designed the vehicle.
In addition to these specific
maintenance instructions specified for
routine scheduled servicing, there are
other components which may require
intervention or replacements over the
vehicle’s life cycle.
ENGINE OIL
Engine oil level check
53)
To ensure correct engine lubrication, the
oil must always be kept at the
prescribed level (see "Engine
compartment" in this chapter).
ENGINE OIL FILTER
Replacing the engine oil filter
The engine oil filter must be replaced
each time the engine oil is changed.
It is advisable to replace it with a
genuine spare part, specifically
designed for this vehicle.
14209036J0001EM
140
SERVICING AND CARE