FIAT TIPO 4DOORS 2017 1.G Owner's Manual
Manufacturer: FIAT, Model Year: 2017, Model line: TIPO 4DOORS, Model: FIAT TIPO 4DOORS 2017 1.GPages: 240, PDF Size: 4.15 MB
Page 21 of 240
REAR VIEW
MIRRORS
INTERIOR MIRROR
Manual adjustment
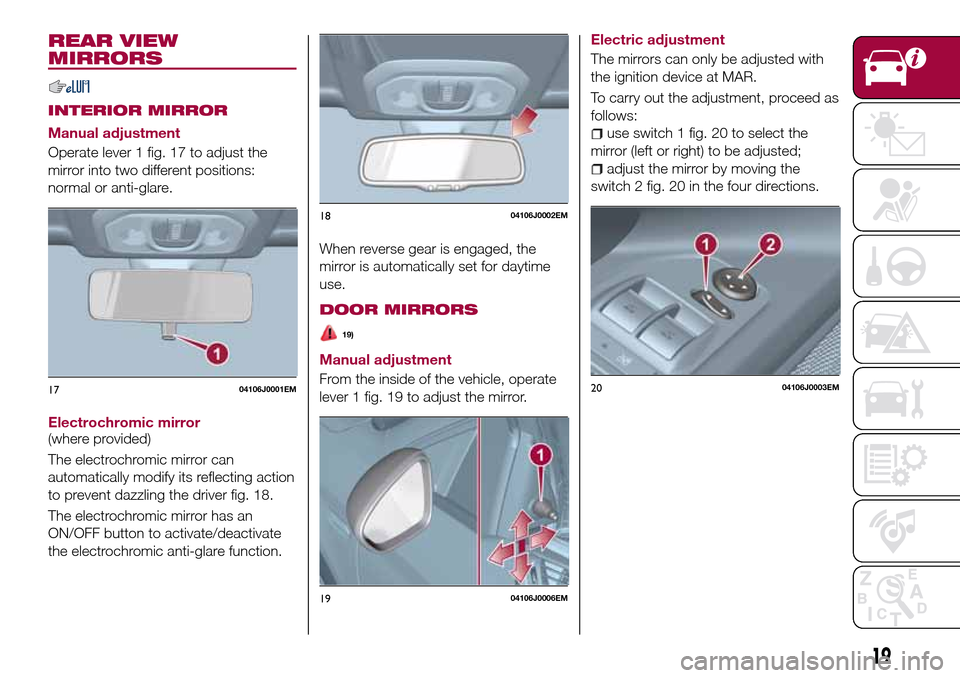
Operate lever 1 fig. 17 to adjust the
mirror into two different positions:
normal or anti-glare.
Electrochromic mirror
(where provided)
The electrochromic mirror can
automatically modify its reflecting action
to prevent dazzling the driver fig. 18.
The electrochromic mirror has an
ON/OFF button to activate/deactivate
the electrochromic anti-glare function.When reverse gear is engaged, the
mirror is automatically set for daytime
use.
DOOR MIRRORS
19)
Manual adjustment
From the inside of the vehicle, operate
lever 1 fig. 19 to adjust the mirror.Electric adjustment
The mirrors can only be adjusted with
the ignition device at MAR.
To carry out the adjustment, proceed as
follows:
use switch 1 fig. 20 to select the
mirror (left or right) to be adjusted;
adjust the mirror by moving the
switch 2 fig. 20 in the four directions.
1704106J0001EM
1804106J0002EM
1904106J0006EM
2004106J0003EM
19
Page 22 of 240
Manual folding
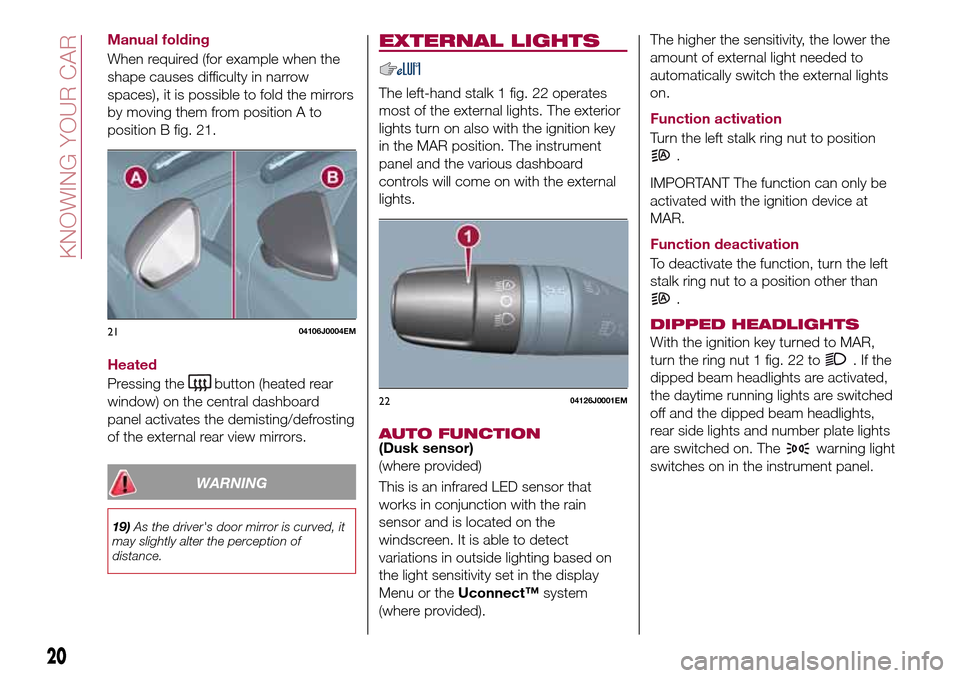
When required (for example when the
shape causes difficulty in narrow
spaces), it is possible to fold the mirrors
by moving them from position A to
position B fig. 21.
Heated
Pressing the
button (heated rear
window) on the central dashboard
panel activates the demisting/defrosting
of the external rear view mirrors.
WARNING
19)As the driver's door mirror is curved, it
may slightly alter the perception of
distance.
EXTERNAL LIGHTS
The left-hand stalk 1 fig. 22 operates
most of the external lights. The exterior
lights turn on also with the ignition key
in the MAR position. The instrument
panel and the various dashboard
controls will come on with the external
lights.
AUTO FUNCTION(Dusk sensor)
(where provided)
This is an infrared LED sensor that
works in conjunction with the rain
sensor and is located on the
windscreen. It is able to detect
variations in outside lighting based on
the light sensitivity set in the display
Menu or theUconnect™system
(where provided).The higher the sensitivity, the lower the
amount of external light needed to
automatically switch the external lights
on.
Function activation
Turn the left stalk ring nut to position
.
IMPORTANT The function can only be
activated with the ignition device at
MAR.
Function deactivation
To deactivate the function, turn the left
stalk ring nut to a position other than
.
DIPPED HEADLIGHTS
With the ignition key turned to MAR,
turn the ring nut 1 fig. 22 to
.Ifthe
dipped beam headlights are activated,
the daytime running lights are switched
off and the dipped beam headlights,
rear side lights and number plate lights
are switched on. The
warning light
switches on in the instrument panel.
2104106J0004EM
2204126J0001EM
20
KNOWING YOUR CAR
Page 23 of 240
DAYTIME RUNNING
LIGHTS (DRL)
"Daytime Running Lights"
20) 21)
With the key in MAR position and the
ring nut turned to the
position, the
daytime running lights and the rear side
lights switch on automatically; the other
lights and the internal lighting remain
off. If the daytime running lights are
deactivated (for versions/markets where
it is provided), no light comes on when
the ring nut is turned to
.
FRONT FOG LIGHTS(where provided)
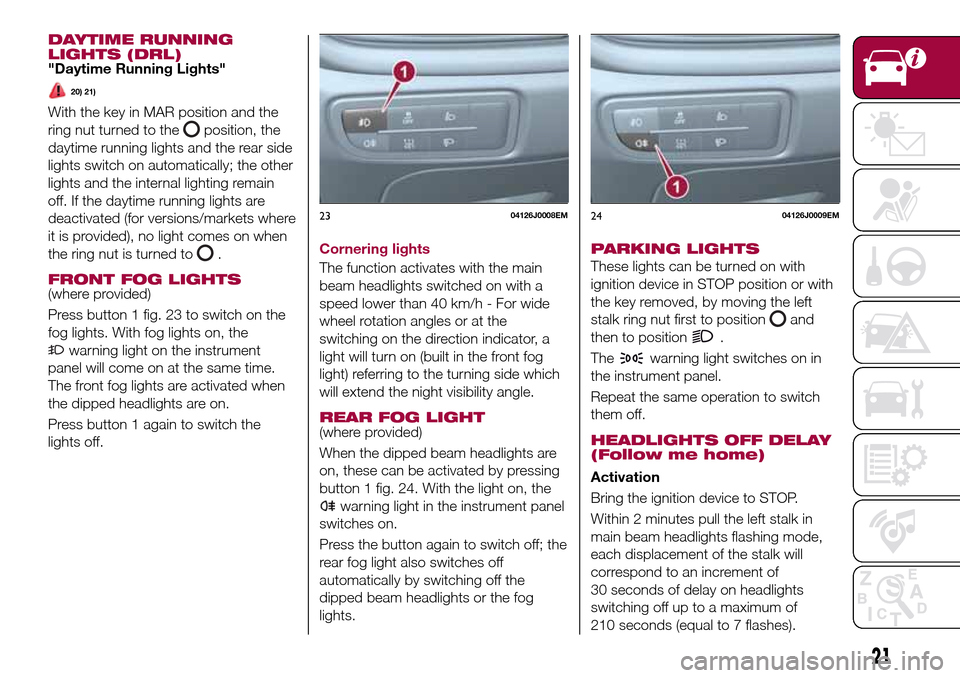
Press button 1 fig. 23 to switch on the
fog lights. With fog lights on, the
warning light on the instrument
panel will come on at the same time.
The front fog lights are activated when
the dipped headlights are on.
Press button 1 again to switch the
lights off.Cornering lights
The function activates with the main
beam headlights switched on with a
speed lower than 40 km/h - For wide
wheel rotation angles or at the
switching on the direction indicator, a
light will turn on (built in the front fog
light) referring to the turning side which
will extend the night visibility angle.
REAR FOG LIGHT(where provided)
When the dipped beam headlights are
on, these can be activated by pressing
button 1 fig. 24. With the light on, the
warning light in the instrument panel
switches on.
Press the button again to switch off; the
rear fog light also switches off
automatically by switching off the
dipped beam headlights or the fog
lights.
PARKING LIGHTS
These lights can be turned on with
ignition device in STOP position or with
the key removed, by moving the left
stalk ring nut first to position
and
then to position
.
The
warning light switches on in
the instrument panel.
Repeat the same operation to switch
them off.
HEADLIGHTS OFF DELAY
(Follow me home)
Activation
Bring the ignition device to STOP.
Within 2 minutes pull the left stalk in
main beam headlights flashing mode,
each displacement of the stalk will
correspond to an increment of
30 seconds of delay on headlights
switching off up to a maximum of
210 seconds (equal to 7 flashes).
2304126J0008EM2404126J0009EM
21
Page 24 of 240
Deactivation
Keep the left stalk in main beam
headlights flashing position for a few
seconds or turn the key to MAR
position or wait until the period
previously set has ended.
MAIN BEAM HEADLIGHTS
With ring nut in position, push the
stalk forward toward the dashboard
(stable position). The
warning light
switches on in the instrument panel.
They are switched off by pulling the
stalk towards the steering wheel.
Flashing the headlights
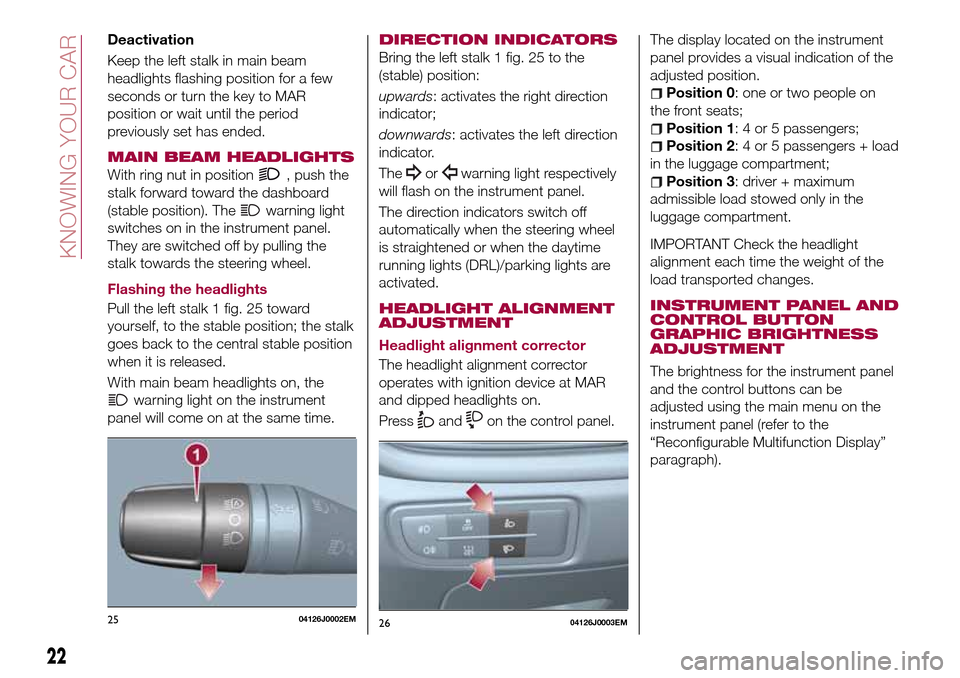
Pull the left stalk 1 fig. 25 toward
yourself, to the stable position; the stalk
goes back to the central stable position
when it is released.
With main beam headlights on, the
warning light on the instrument
panel will come on at the same time.
DIRECTION INDICATORS
Bring the left stalk 1 fig. 25 to the
(stable) position:
upwards: activates the right direction
indicator;
downwards: activates the left direction
indicator.
The
orwarning light respectively
will flash on the instrument panel.
The direction indicators switch off
automatically when the steering wheel
is straightened or when the daytime
running lights (DRL)/parking lights are
activated.
HEADLIGHT ALIGNMENT
ADJUSTMENT
Headlight alignment corrector
The headlight alignment corrector
operates with ignition device at MAR
and dipped headlights on.
Press
andon the control panel.The display located on the instrument
panel provides a visual indication of the
adjusted position.
Position 0: one or two people on
the front seats;
Position 1: 4 or 5 passengers;
Position 2: 4 or 5 passengers + load
in the luggage compartment;
Position 3: driver + maximum
admissible load stowed only in the
luggage compartment.
IMPORTANT Check the headlight
alignment each time the weight of the
load transported changes.
INSTRUMENT PANEL AND
CONTROL BUTTON
GRAPHIC BRIGHTNESS
ADJUSTMENT
The brightness for the instrument panel
and the control buttons can be
adjusted using the main menu on the
instrument panel (refer to the
“Reconfigurable Multifunction Display”
paragraph).
2504126J0002EM2604126J0003EM
22
KNOWING YOUR CAR
Page 25 of 240
WARNING
20)The daytime running lights are an
alternative to the dipped headlights for
driving during the daytime in countries
where it is compulsory to have lights on
during the day; where it is not compulsory,
the use of daytime running lights is
permitted.
21)Daytime running lights cannot replace
dipped beam headlights when driving at
night or through tunnels. The use of
daytime running lights is governed by the
highway code of the country in which you
are driving. Comply with legal
requirements.
INTERIOR LIGHTS
FRONT CEILING LIGHT
Singe-bulb ceiling light
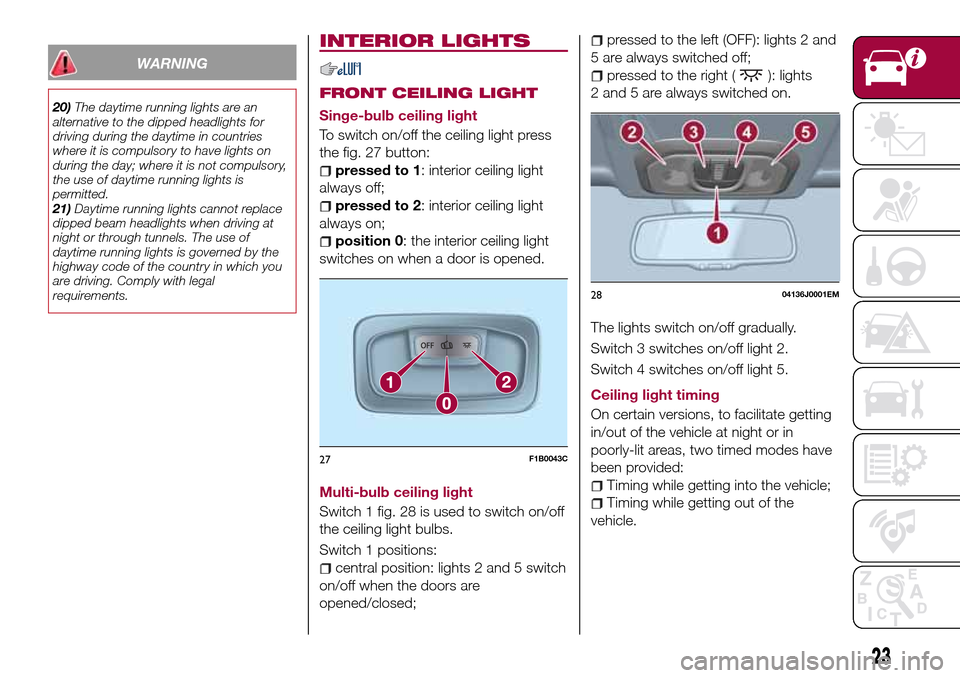
To switch on/off the ceiling light press
the fig. 27 button:
pressed to 1: interior ceiling light
always off;
pressed to 2: interior ceiling light
always on;
position 0: the interior ceiling light
switches on when a door is opened.
Multi-bulb ceiling light
Switch 1 fig. 28 is used to switch on/off
the ceiling light bulbs.
Switch 1 positions:
central position: lights 2 and 5 switch
on/off when the doors are
opened/closed;
pressed to the left (OFF): lights 2 and
5 are always switched off;
pressed to the right (): lights
2 and 5 are always switched on.
The lights switch on/off gradually.
Switch 3 switches on/off light 2.
Switch 4 switches on/off light 5.
Ceiling light timing
On certain versions, to facilitate getting
in/out of the vehicle at night or in
poorly-lit areas, two timed modes have
been provided:
Timing while getting into the vehicle;
Timing while getting out of the
vehicle.
27F1B0043C
2804136J0001EM
23
Page 26 of 240
WINDSCREEN
WASHER / WIPER
Operation is only possible with the
ignition device at MAR.
WINDSCREEN WIPER /
WASHER
Operation
22)
5) 6)
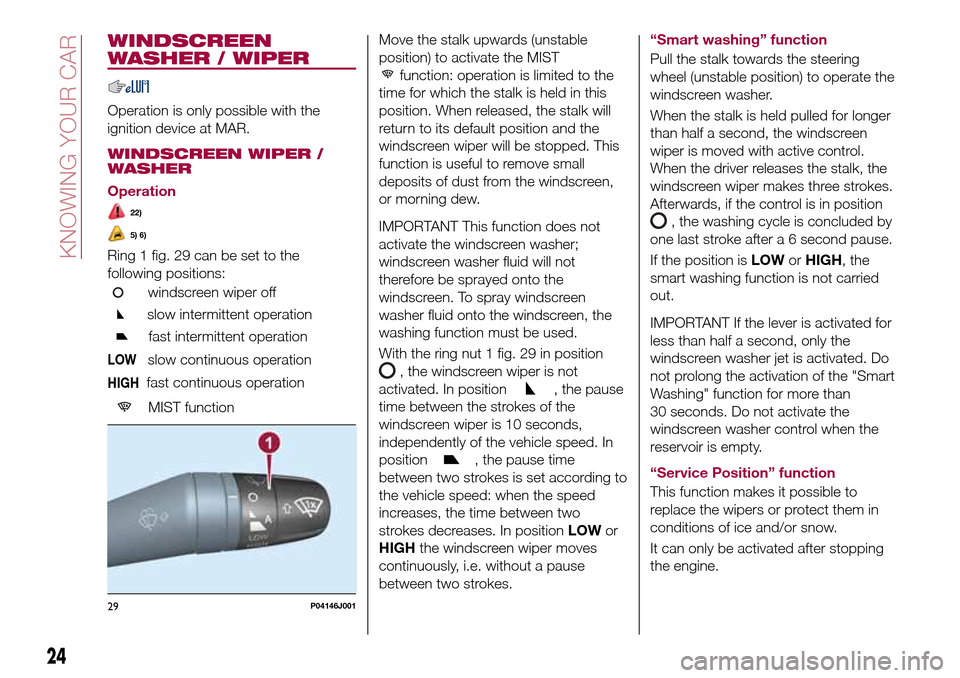
Ring 1 fig. 29 can be set to the
following positions:
windscreen wiper off
slow intermittent operation
fast intermittent operation
LOWslow continuous operation
HIGHfast continuous operation
MIST function
Move the stalk upwards (unstable
position) to activate the MIST
function: operation is limited to the
time for which the stalk is held in this
position. When released, the stalk will
return to its default position and the
windscreen wiper will be stopped. This
function is useful to remove small
deposits of dust from the windscreen,
or morning dew.
IMPORTANT This function does not
activate the windscreen washer;
windscreen washer fluid will not
therefore be sprayed onto the
windscreen. To spray windscreen
washer fluid onto the windscreen, the
washing function must be used.
With the ring nut 1 fig. 29 in position
, the windscreen wiper is not
activated. In position
, the pause
time between the strokes of the
windscreen wiper is 10 seconds,
independently of the vehicle speed. In
position
, the pause time
between two strokes is set according to
the vehicle speed: when the speed
increases, the time between two
strokes decreases. In positionLOWor
HIGHthe windscreen wiper moves
continuously, i.e. without a pause
between two strokes.“Smart washing” function
Pull the stalk towards the steering
wheel (unstable position) to operate the
windscreen washer.
When the stalk is held pulled for longer
than half a second, the windscreen
wiper is moved with active control.
When the driver releases the stalk, the
windscreen wiper makes three strokes.
Afterwards, if the control is in position
, the washing cycle is concluded by
one last stroke after a 6 second pause.
If the position isLOWorHIGH, the
smart washing function is not carried
out.
IMPORTANT If the lever is activated for
less than half a second, only the
windscreen washer jet is activated. Do
not prolong the activation of the "Smart
Washing" function for more than
30 seconds. Do not activate the
windscreen washer control when the
reservoir is empty.
“Service Position” function
This function makes it possible to
replace the wipers or protect them in
conditions of ice and/or snow.
It can only be activated after stopping
the engine.
29P04146J001
24
KNOWING YOUR CAR
Page 27 of 240
The "Service Position" function can be
explicitly requested within two minutes
of stopping the engine, when the
wipers have correctly returned to the
parking position.
The function can be activated by
turning the ring nut to position
and
moving the stalk upwards, to the MIST
position, more than three times. The
activations are used to position the
wipers as preferred. The function is
deactivated when the vehicle is turned
on, with a wiping request or when the
vehicle is moving (speed above
5 Km/h).
IMPORTANT Make sure, when starting
the engine, that the windscreen is free
of snow or ice before turning the
ignition key.
RAIN SENSOR
(where provided)
7) 8)
The sensor will be activated when the
ignition device is turned to MAR, and
will be deactivated in the STOP
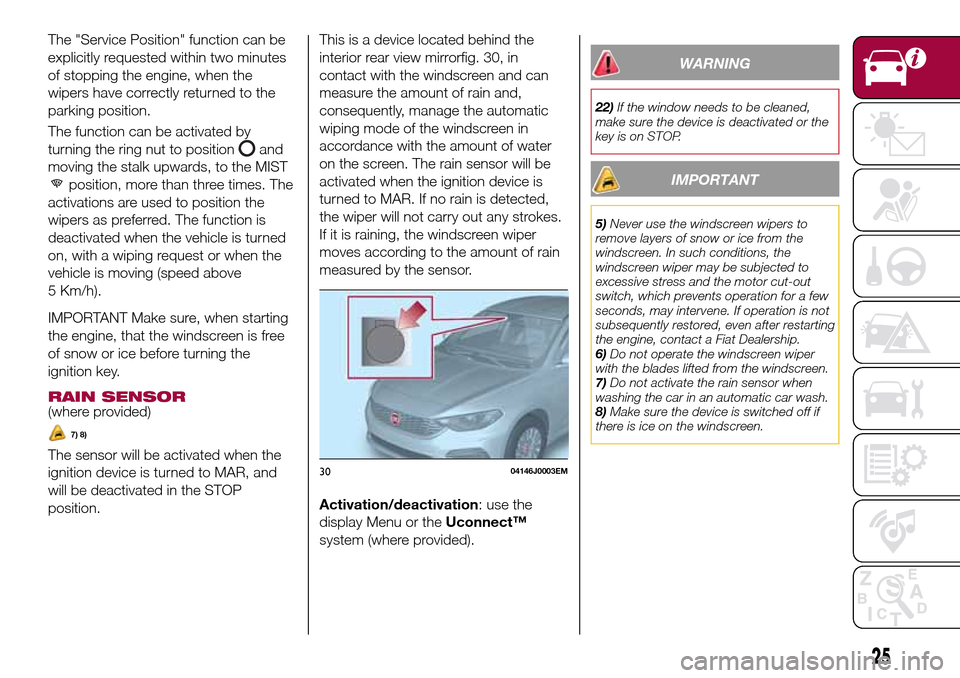
position.This is a device located behind the
interior rear view mirrorfig. 30, in
contact with the windscreen and can
measure the amount of rain and,
consequently, manage the automatic
wiping mode of the windscreen in
accordance with the amount of water
on the screen. The rain sensor will be
activated when the ignition device is
turned to MAR. If no rain is detected,
the wiper will not carry out any strokes.
If it is raining, the windscreen wiper
moves according to the amount of rain
measured by the sensor.
Activation/deactivation: use the
display Menu or theUconnect™
system (where provided).
WARNING
22)If the window needs to be cleaned,
make sure the device is deactivated or the
key is on STOP.
IMPORTANT
5)Never use the windscreen wipers to
remove layers of snow or ice from the
windscreen. In such conditions, the
windscreen wiper may be subjected to
excessive stress and the motor cut-out
switch, which prevents operation for a few
seconds, may intervene. If operation is not
subsequently restored, even after restarting
the engine, contact a Fiat Dealership.
6)Do not operate the windscreen wiper
with the blades lifted from the windscreen.
7)Do not activate the rain sensor when
washing the car in an automatic car wash.
8)Make sure the device is switched off if
there is ice on the windscreen.
3004146J0003EM
25
Page 28 of 240
CLIMATE CONTROL
SYSTEM
1)
PASSENGER
COMPARTMENT AIR
DIFFUSERS
Adjustable air diffusers
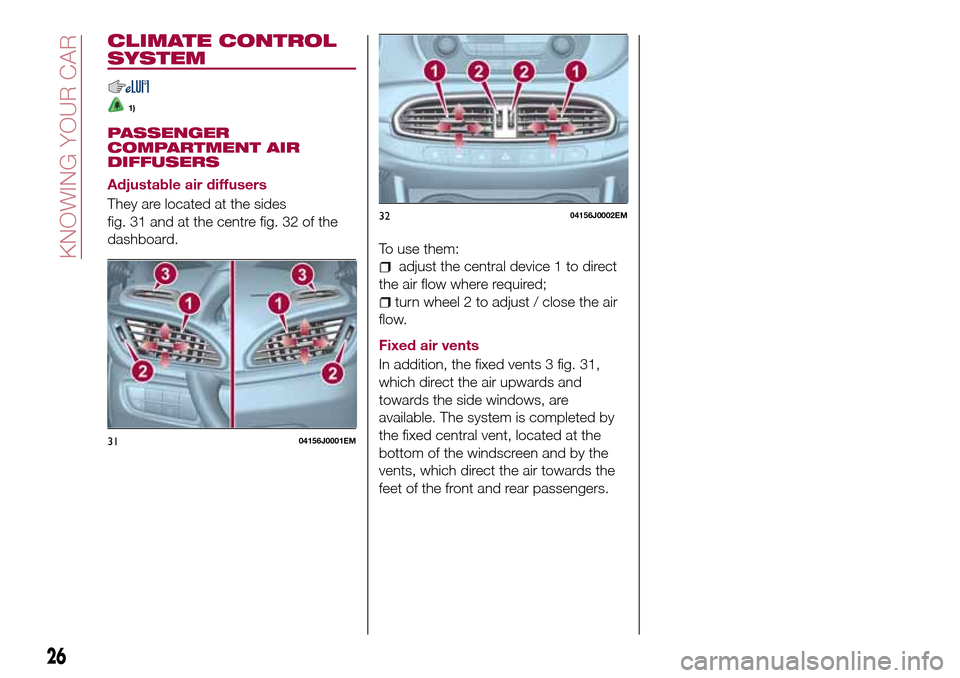
They are located at the sides
fig. 31 and at the centre fig. 32 of the
dashboard.
To use them:
adjust the central device 1 to direct
the air flow where required;
turn wheel 2 to adjust / close the air
flow.
Fixed air vents
In addition, the fixed vents 3 fig. 31,
which direct the air upwards and
towards the side windows, are
available. The system is completed by
the fixed central vent, located at the
bottom of the windscreen and by the
vents, which direct the air towards the
feet of the front and rear passengers.
3104156J0001EM
3204156J0002EM
26
KNOWING YOUR CAR
Page 29 of 240
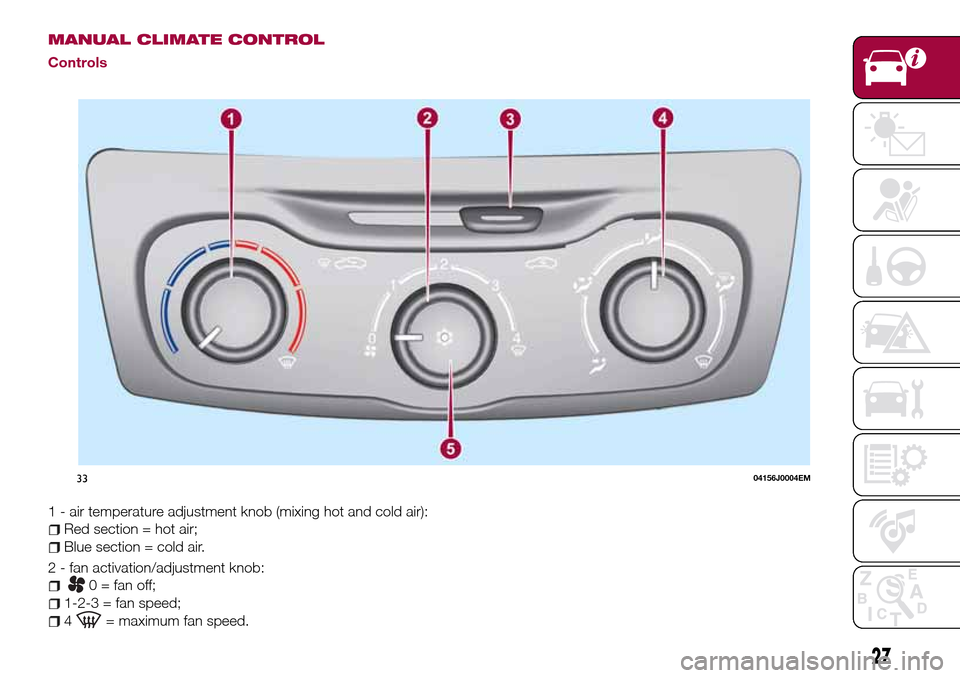
MANUAL CLIMATE CONTROL
Controls
1 - air temperature adjustment knob (mixing hot and cold air):
Red section = hot air;
Blue section = cold air.
2 - fan activation/adjustment knob:
0 = fan off;
1-2-3 = fan speed;
4= maximum fan speed.
3304156J0004EM
27
Page 30 of 240
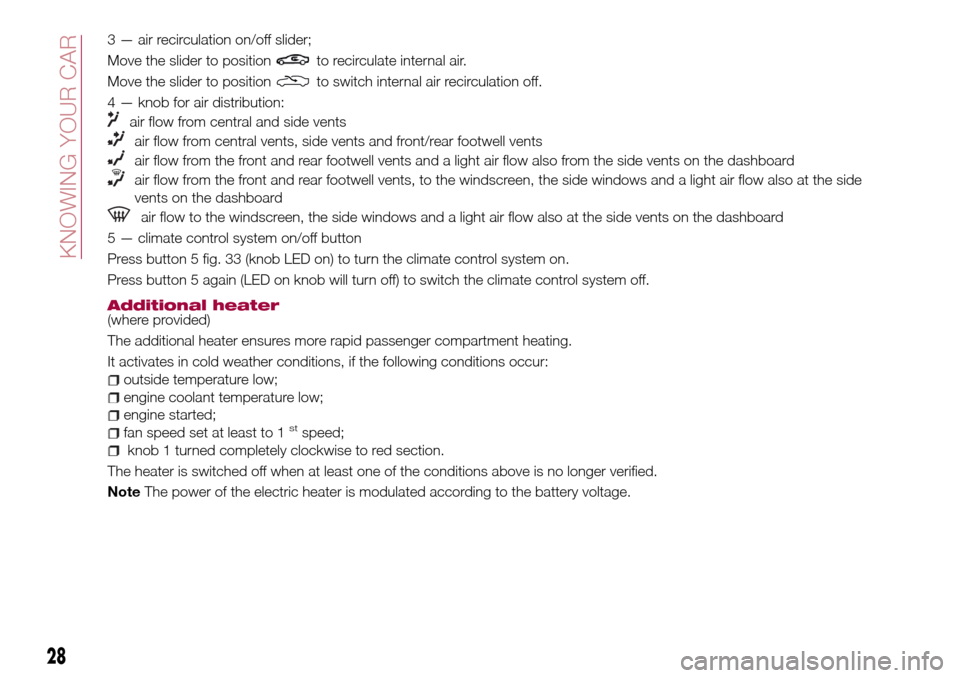
3 — air recirculation on/off slider;
Move the slider to position
to recirculate internal air.
Move the slider to position
to switch internal air recirculation off.
4 — knob for air distribution:
air flow from central and side vents
air flow from central vents, side vents and front/rear footwell vents
air flow from the front and rear footwell vents and a light air flow also from the side vents on the dashboard
air flow from the front and rear footwell vents, to the windscreen, the side windows and a light air flow also at the side
vents on the dashboard
air flow to the windscreen, the side windows and a light air flow also at the side vents on the dashboard
5 — climate control system on/off button
Press button 5 fig. 33 (knob LED on) to turn the climate control system on.
Press button 5 again (LED on knob will turn off) to switch the climate control system off.
Additional heater(where provided)
The additional heater ensures more rapid passenger compartment heating.
It activates in cold weather conditions, if the following conditions occur:
outside temperature low;
engine coolant temperature low;
engine started;
fan speed set at least to 1stspeed;
knob 1 turned completely clockwise to red section.
The heater is switched off when at least one of the conditions above is no longer verified.
NoteThe power of the electric heater is modulated according to the battery voltage.
28
KNOWING YOUR CAR