sensor FIAT TIPO 4DOORS 2017 1.G Owner's Manual
[x] Cancel search | Manufacturer: FIAT, Model Year: 2017, Model line: TIPO 4DOORS, Model: FIAT TIPO 4DOORS 2017 1.GPages: 240, PDF Size: 4.15 MB
Page 117 of 240
Some conditions may influence the
performance of the parking system:
reduced sensor sensitivity and a
reduction in the parking assistance
system performance could be due to
the presence of: ice, snow, mud, paint,
etc. on the surface of the sensor;
the sensor may detect a
non-existent obstacle ("echo
interference") due to mechanical
interference, for example when washing
the vehicle, in rain (strong wind), hail;
the signals sent by the sensor can
also be altered by the presence of
ultrasonic systems (e.g. pneumatic
brake systems of trucks or pneumatic
drills) near the vehicle;
parking assistance system
performance can also be influenced by
the position of the sensors, for example
due to a change in the ride setting
(caused by wear to the shock
absorbers, suspension), or by changing
tyres, overloading the vehicle or fitting
specific trims that require the vehicle to
be lowered;
the presence of a tow hook without
trailer, which may interfere with the
correct operation of the parking
sensors. In the case of vehicles fitted
with removable tow hook, whether as
standard or installed after the vehicle
was purchased, it is advisable to
remove it whenever it is not used, to
prevent incorrect operation of the
sensors;
the presence of adhesives on the
sensors. Therefore, take care not to
place adhesives on the sensors.
WARNING
120)Parking and other potentially
dangerous manoeuvres are, however,
always the driver’s responsibility. When
performing these operations, always make
sure that there are no other people
(especially children) or animals on the route
you want to take. The parking sensors are
an aid for the driver, but the driver must
never allow their attention to lapse during
potentially dangerous manoeuvres, even
those executed at low speeds.
IMPORTANT
44)The sensors must be clean of mud,
dirt, snow or ice in order for the system to
operate correctly. Be careful not to scratch
or damage the sensors while cleaning
them. Avoid using dry, rough or hard
cloths. The sensors should be washed
using clean water with the addition of car
shampoo if necessary. When using special
washing equipment such as high pressure
jets or steam cleaning, clean the sensors
very quickly keeping the jet more than
10 cm away.
45)Have interventions on the bumper in
the area of the sensors carried out only by
a Fiat Dealership. Interventions on the
bumper that are not carried out properly
may compromise the operation of the
parking sensors
46)Only have the bumpers repainted or
any retouches to the paintwork in the area
of the sensors carried out by a Fiat
Dealership. Incorrect paint application
could affect the operation of the parking
sensors.
115
Page 118 of 240
REAR VIEW CAMERA
(where provided)
DESCRIPTION
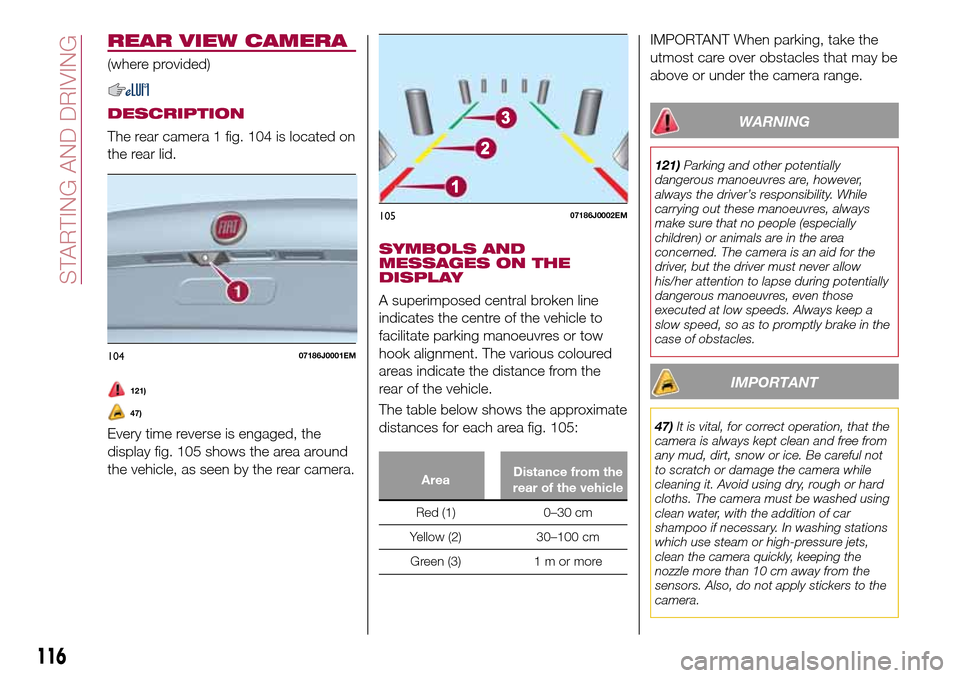
The rear camera 1 fig. 104 is located on
the rear lid.
121)
47)
Every time reverse is engaged, the
display fig. 105 shows the area around
the vehicle, as seen by the rear camera.
SYMBOLS AND
MESSAGES ON THE
DISPLAY
A superimposed central broken line
indicates the centre of the vehicle to
facilitate parking manoeuvres or tow
hook alignment. The various coloured
areas indicate the distance from the
rear of the vehicle.
The table below shows the approximate
distances for each area fig. 105:
AreaDistance from the
rear of the vehicle
Red (1) 0–30 cm
Yellow (2) 30–100 cm
Green (3) 1 m or more
IMPORTANT When parking, take the
utmost care over obstacles that may be
above or under the camera range.
WARNING
121)Parking and other potentially
dangerous manoeuvres are, however,
always the driver’s responsibility. While
carrying out these manoeuvres, always
make sure that no people (especially
children) or animals are in the area
concerned. The camera is an aid for the
driver, but the driver must never allow
his/her attention to lapse during potentially
dangerous manoeuvres, even those
executed at low speeds. Always keep a
slow speed, so as to promptly brake in the
case of obstacles.
IMPORTANT
47)It is vital, for correct operation, that the
camera is always kept clean and free from
any mud, dirt, snow or ice. Be careful not
to scratch or damage the camera while
cleaning it. Avoid using dry, rough or hard
cloths. The camera must be washed using
clean water, with the addition of car
shampoo if necessary. In washing stations
which use steam or high-pressure jets,
clean the camera quickly, keeping the
nozzle more than 10 cm away from the
sensors. Also, do not apply stickers to the
camera.
10407186J0001EM
10507186J0002EM
116
STARTING AND DRIVING
Page 154 of 240
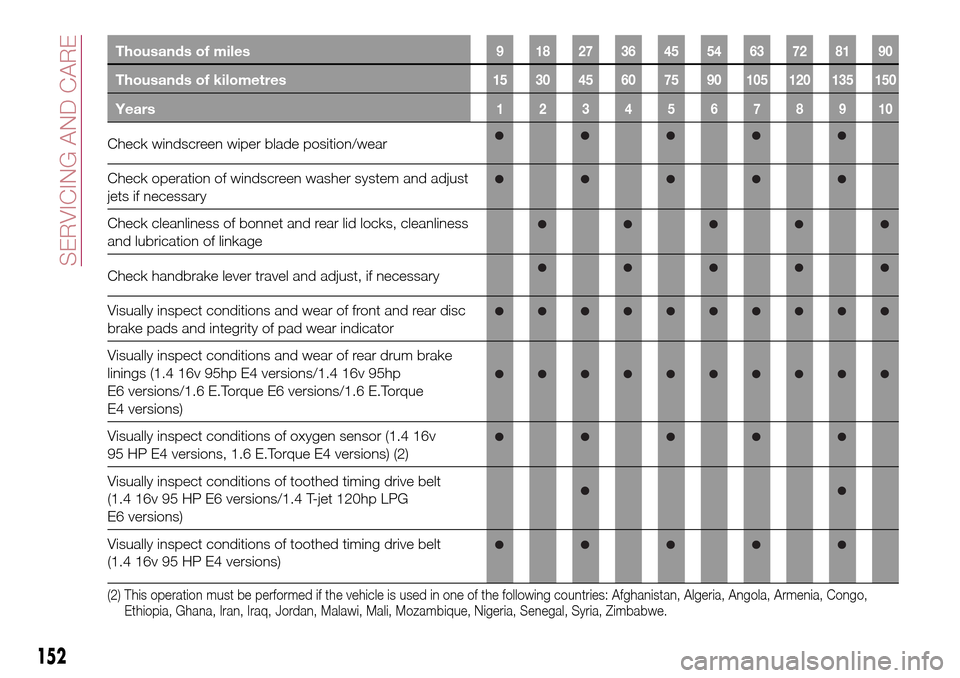
Thousands of miles9 182736455463728190
Thousands of kilometres15 30 45 60 75 90 105 120 135 150
Years12345678910
Check windscreen wiper blade position/wear
Check operation of windscreen washer system and adjust
jets if necessary
Check cleanliness of bonnet and rear lid locks, cleanliness
and lubrication of linkage
Check handbrake lever travel and adjust, if necessary
Visually inspect conditions and wear of front and rear disc
brake pads and integrity of pad wear indicator
Visually inspect conditions and wear of rear drum brake
linings (1.4 16v 95hp E4 versions/1.4 16v 95hp
E6 versions/1.6 E.Torque E6 versions/1.6 E.Torque
E4 versions)
Visually inspect conditions of oxygen sensor (1.4 16v
95 HP E4 versions, 1.6 E.Torque E4 versions) (2)
Visually inspect conditions of toothed timing drive belt
(1.4 16v 95 HP E6 versions/1.4 T-jet 120hp LPG
E6 versions)
Visually inspect conditions of toothed timing drive belt
(1.4 16v 95 HP E4 versions)
(2) This operation must be performed if the vehicle is used in one of the following countries: Afghanistan, Algeria, Angola, Armenia, Congo,
Ethiopia, Ghana, Iran, Iraq, Jordan, Malawi, Mali, Mozambique, Nigeria, Senegal, Syria, Zimbabwe.
152
SERVICING AND CARE
Page 157 of 240
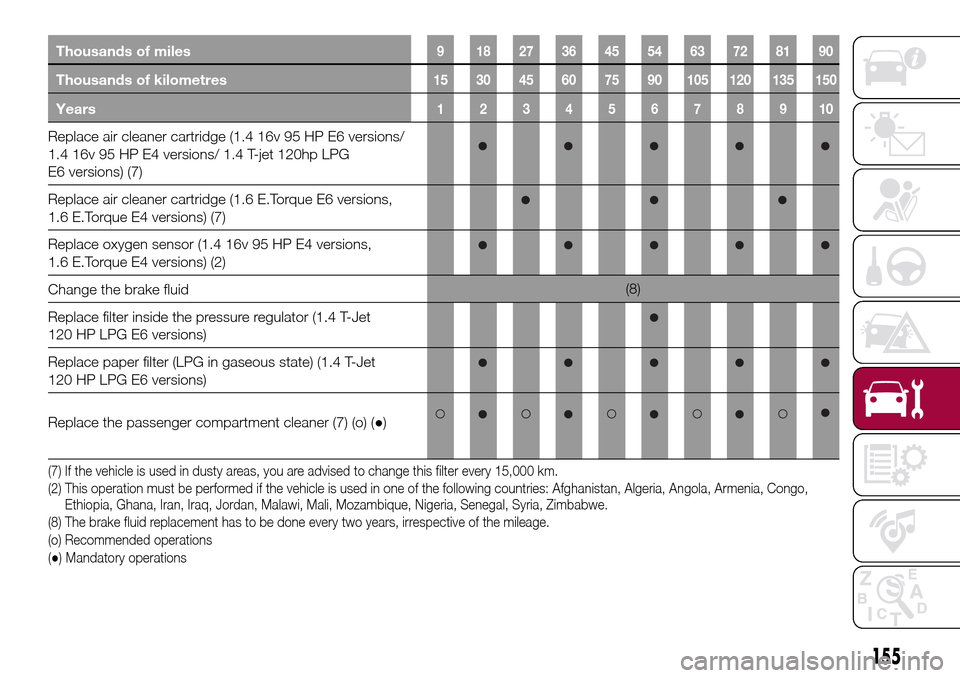
Thousands of miles9 182736455463728190
Thousands of kilometres15 30 45 60 75 90 105 120 135 150
Years12345678910
Replace air cleaner cartridge (1.4 16v 95 HP E6 versions/
1.4 16v 95 HP E4 versions/ 1.4 T-jet 120hp LPG
E6 versions) (7)
Replace air cleaner cartridge (1.6 E.Torque E6 versions,
1.6 E.Torque E4 versions) (7)
Replace oxygen sensor (1.4 16v 95 HP E4 versions,
1.6 E.Torque E4 versions) (2)
Change the brake fluid(8)
Replace filter inside the pressure regulator (1.4 T-Jet
120 HP LPG E6 versions)
Replace paper filter (LPG in gaseous state) (1.4 T-Jet
120 HP LPG E6 versions)
Replace the passenger compartment cleaner (7) (o) (●)
(7) If the vehicle is used in dusty areas, you are advised to change this filter every 15,000 km.
(2) This operation must be performed if the vehicle is used in one of the following countries: Afghanistan, Algeria, Angola, Armenia, Congo,
Ethiopia, Ghana, Iran, Iraq, Jordan, Malawi, Mali, Mozambique, Nigeria, Senegal, Syria, Zimbabwe.
(8) The brake fluid replacement has to be done every two years, irrespective of the mileage.
(o) Recommended operations
(●) Mandatory operations
155
Page 173 of 240
If a "quick-type" battery charger is used
with the battery fitted on the vehicle,
before connecting it disconnect both
cables of the battery itself. Do not use a
"quick-type" battery charger to provide
the starting voltage.
VERSIONS WITHOUT
STOP/START SYSTEM
To recharge, proceed as follows:
disconnect the terminal from the
negative battery pole;
connect the charger cables to the
battery terminals, observing the polarity;
turn on the charger;
when it is recharged, turn the
charger off before disconnecting it from
the battery;
reconnect the terminal to the
negative battery pole.
VERSIONS WITH
STOP/START SYSTEM
(where provided)
To recharge, proceed as follows:
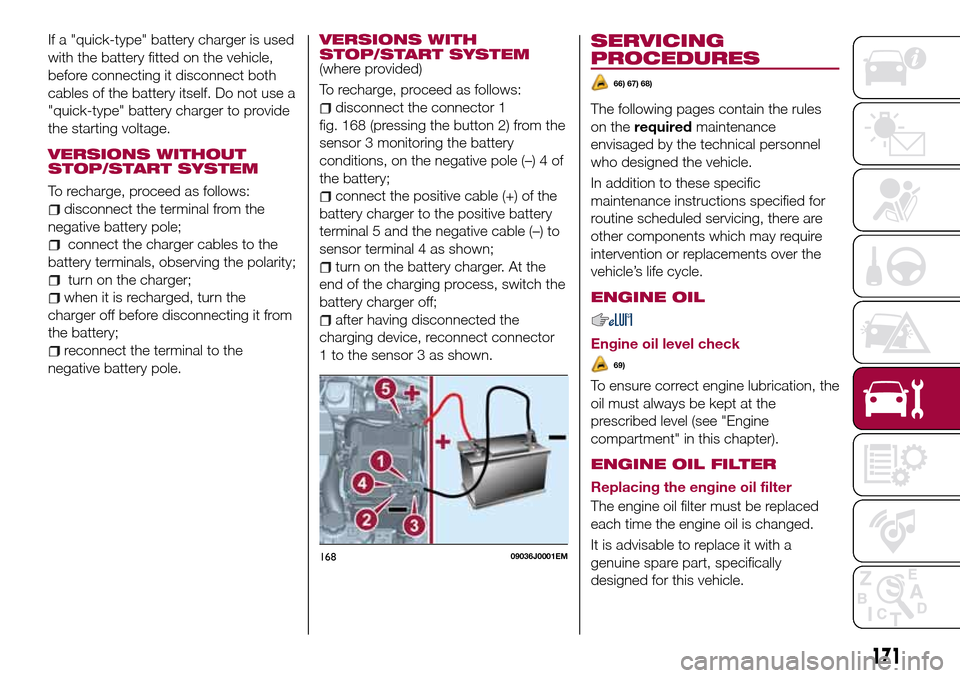
disconnect the connector 1
fig. 168 (pressing the button 2) from the
sensor 3 monitoring the battery
conditions, on the negative pole (–) 4 of
the battery;
connect the positive cable (+) of the
battery charger to the positive battery
terminal 5 and the negative cable (–) to
sensor terminal 4 as shown;
turn on the battery charger. At the
end of the charging process, switch the
battery charger off;
after having disconnected the
charging device, reconnect connector
1 to the sensor 3 as shown.
SERVICING
PROCEDURES
66) 67) 68)
The following pages contain the rules
on therequiredmaintenance
envisaged by the technical personnel
who designed the vehicle.
In addition to these specific
maintenance instructions specified for
routine scheduled servicing, there are
other components which may require
intervention or replacements over the
vehicle’s life cycle.
ENGINE OIL
Engine oil level check
69)
To ensure correct engine lubrication, the
oil must always be kept at the
prescribed level (see "Engine
compartment" in this chapter).
ENGINE OIL FILTER
Replacing the engine oil filter
The engine oil filter must be replaced
each time the engine oil is changed.
It is advisable to replace it with a
genuine spare part, specifically
designed for this vehicle.
16809036J0001EM
171
Page 226 of 240
"Lane Assist Strength"(where
provided): this function can be used to
select the force to apply to the steering
wheel to put the vehicle back in the
lane through the electric steering
system, in the event of Lane Assist
system intervention.
"Blind Spot Alert"(where provided):
this function can be used to select the
type of warning ("Sound Only" or
"Sound & Display") to indicate the
presence of objects in the blind spot of
the door mirror.
"Rain sensor"(where provided): this
function can be used to activate/
deactivate the automatic operation of
the wipers in the event of rain.
"Brakes"(where provided): this
function can be used to select the
following submenus:
- "Brake Service" (where provided):
allows you to activate the procedure for
carrying out braking system servicing;
- "Auto Park Brake" (where provided):
allows you to activate/deactivate the
automatic park brake engagement.
NAVIGATION(only UConnect™ 5” Nav)
Programming a route
WARNING In the interest of safety and
to reduce distractions while you are
driving, you should always plan a route
before you start driving.
Using the destination search function, it
is possible to find and reach your
destinations in different ways: searching
for a specific address, a partial address,
a specific type of location (for example
a service station or a restaurant), a
postal code, a POI (Point Of Interest)
near your current position (for example,
a restaurant with the search type set to
"nearby"), a pair of latitude and
longitude coordinates, or by selecting a
point on the map.
Select “Search” in the Main menu and
set the search for a destination.
While entering the information, the list
displays the corresponding addresses
and POIs in two separate lists. The
corresponding address and city are
displayed in the Address list and the
POI, the type of POIs and the locations
are displayed in the Point of Interest
lists.
To plan a route towards the destination,
select the “Guide” button.A route is planned and you are guided
to your destination, using spoken
instructions and on-screen directions.
VOICE COMMANDS
NoteFor languages not supported by
the system, voice commands are not
available.
To use the voice commands, press the
button on the steering wheel ("Voice"
button) and say out loud the command
you want to activate.
224
MULTIMEDIA
Page 236 of 240
Important information and
recommendations..........226
Interior lights................23
Interiors (cleaning)............177
ISOFIX child restraint system
(installation)...............89
iTPMS (indirect Tyre Pressure
Monitoring System)..........76
Jump starting..............141
Key removal (automatic
transmission).............146
Keys.....................10
key with remote control.......10
Lever release (automatic
transmission).............145
Lifting the vehicle.............174
Light bulbs
types of bulbs............122
Luggage compartment
(extension)................15
Main beam headlights..........22
Main beam headlights (changing
a bulb)..................124
Main menu...............48,49
Manual climate control..........27
Manual gearbox.............106
Multi-functional display - Right
hand drive version...........45
Multi-Functional Reconfigurable
Display - Right hand drive
version..................46Multifunction display...........42
Number plate lights (bulb
replacement)..............127
Occupant protection systems.....78
Paintwork (cleaning and
maintenance).............175
Parking Brake...............105
Parking lights................21
Parking sensors.............113
Parking the vehicle...........105
Passenger compartment air
diffusers.................26
Passive/active safety (LPG
system)..................36
PBA (system)................69
Performance (top speed)........198
Periodic checks (scheduled
servicing)................159
Pre-tensioners...............83
Load limiters..............83
Prescriptions for handling the
vehicle at the end of its life.....202
Rain sensor................25
Rear direction indicators (bulb
replacement)..............126
Rear power socket............35
Rear seats..................15
Rear side lights (bulb
replacement)..............126
Rear view camera............116Rear View Camera............116
Rear view mirrors.............19
Reconfigurable Multifunction
Display..................43
Refuelling.................191
Refuelling procedure..........118
Emergency refuelling........118
Refuelling the vehicle..........118
Replacing a bulb.............121
Replacing an external bulb......124
Rims and tyres (dimensions)......184
SBR (Seat Belt Reminder).......80
SBR (Seat Belt Reminder) system . . .80
Scheduled servicing...........150
Scheduled Servicing Plan.......151
Screen wiper/washer...........24
Smart washing function.......24
Seat belts..................78
Seats.....................14
Servicing procedures..........171
Side bag..................100
Side direction indicators (bulb
replacement)..............126
Snow chains...............174
Speed limiter...............110
SRS (supplementary restraint
system)..................96
Starting the engine...........104
Steering lock................11
INDEX