engine FIAT TIPO 4DOORS 2018 Owner handbook (in English)
[x] Cancel search | Manufacturer: FIAT, Model Year: 2018, Model line: TIPO 4DOORS, Model: FIAT TIPO 4DOORS 2018Pages: 244, PDF Size: 5.77 MB
Page 140 of 244

140)A 16” spare wheel is provided with
17” and 18” tyres. This spare wheel must
be used only in an emergency. Never use it
for more than strictly necessary and never
exceed 80 km/h. On the wheel there is an
orange sticker, summarising the main
warnings regarding wheel usage
restrictions. Never remove or cover the
label. The label contains the following
indications in four languages: "Warning! For
temporary use only! 80 km/h max! Replace
with standard wheel as soon as possible.
Never cover this indication." Never apply a
wheel cap on the wheel. The driving
characteristics of the car will be modified
with the wheel fitted. Avoid violent
acceleration and braking, abrupt steering
and fast cornering. Have the wheel
repaired and refitted as soon as possible.
Using two or more spare wheels at the
same time is forbidden. Do not apply
grease to the bolt threads before fitting:
they could come unscrewed.
IMPORTANT
52)When turning the jack handle make
sure that it can turn freely without scraping
your hand against the ground. The moving
components of the jack ("worm screw" and
joints) can also cause injuries: avoid
touching them. If you come into contact
with lubricating grease, clean yourself
thoroughly.
53)Contact a Fiat Dealership as soon as
possible to have the correct tightening of
the wheel bolts checked.
FIX&GO AUTOMATIC
KIT
(where provided)
141) 142)
54)
DESCRIPTION
The Fix&Go quick tyre repair kit
fig. 146 is located in the boot, inside a
dedicated container and consists of:
one cartridge 1 containing sealant
and fitted with: transparent tube for
injecting the sealant 4 and sticker 3 with
the wording “Max. 80 km/h” to be
placed in a clearly visible position (e.g.
on the dashboard) after repairing the
tyre;
one compressor 2;
one leaflet containing instructions for
using the kit;
a pair of gloves located in the hose
compartment of the cartridge 4.
REPAIR PROCEDURE
Proceed as follows:
stop the car in a position that is not
dangerous for oncoming traffic where
you can carry out the procedure safely.
The ground must be flat and sufficiently
compact;
stop the engine, engage the hazard
warning lights and the parking brake;
wear the reflective safety jacket
before getting out of the car (anyway
comply with the laws in force in the
country you are driving in);
Insert the cartridge 1 containing the
sealant in the proper compartment of
the compressor 2, pressing it down
hard fig. 146. Remove the speed limit
sticker 3 and apply it in a clearly visible
position fig. 147;
146P2000158
138
IN AN EMERGENCY
Page 143 of 244
EMERGENCY
STARTING
If the battery is flat, a jump starting can
be performed using the battery and the
cables of another vehicle, or using an
auxiliary battery. In all cases, the battery
used must have a capacity equal to or
a little higher than the flat one.
55)
IMPORTANT NOTES
Do not use an auxiliary battery or any
other source of external supply with a
voltage above 12 V: the battery, the
starter, the alternator and the electrical
system of the vehicle could be
damaged.
Do not attempt jump starting if the
battery is frozen. The battery could
break and explode!
PREPARATION TO JUMP
STARTING
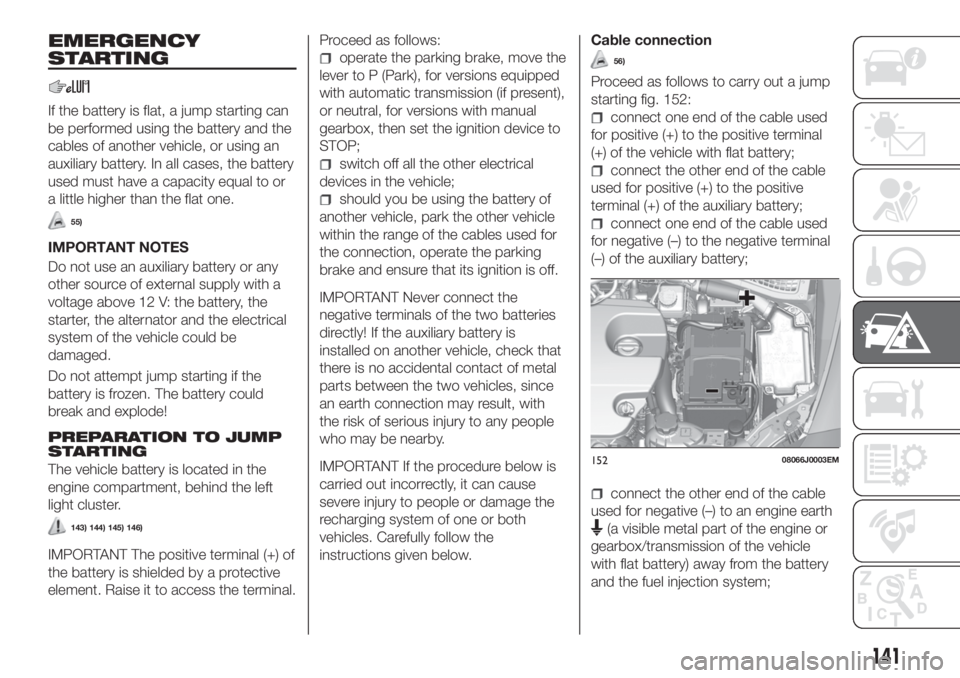
The vehicle battery is located in the
engine compartment, behind the left
light cluster.
143) 144) 145) 146)
IMPORTANT The positive terminal (+) of
the battery is shielded by a protective
element. Raise it to access the terminal.
Proceed as follows:
operate the parking brake, move the
lever to P (Park), for versions equipped
with automatic transmission (if present),
or neutral, for versions with manual
gearbox, then set the ignition device to
STOP;
switch off all the other electrical
devices in the vehicle;
should you be using the battery of
another vehicle, park the other vehicle
within the range of the cables used for
the connection, operate the parking
brake and ensure that its ignition is off.
IMPORTANT Never connect the
negative terminals of the two batteries
directly! If the auxiliary battery is
installed on another vehicle, check that
there is no accidental contact of metal
parts between the two vehicles, since
an earth connection may result, with
the risk of serious injury to any people
who may be nearby.
IMPORTANT If the procedure below is
carried out incorrectly, it can cause
severe injury to people or damage the
recharging system of one or both
vehicles. Carefully follow the
instructions given below.
Cable connection
56)
Proceed as follows to carry out a jump
starting fig. 152:
connect one end of the cable used
for positive (+) to the positive terminal
(+) of the vehicle with flat battery;
connect the other end of the cable
used for positive (+) to the positive
terminal (+) of the auxiliary battery;
connect one end of the cable used
for negative (–) to the negative terminal
(–) of the auxiliary battery;
connect the other end of the cable
used for negative (–) to an engine earth
(a visible metal part of the engine or
gearbox/transmission of the vehicle
with flat battery) away from the battery
and the fuel injection system;
15208066J0003EM
141
Page 144 of 244
start the vehicle engine with the
auxiliary battery, let it run for a few
minutes at idling. Start the engine of the
vehicle with flat battery.
Cable disconnection
Once the engine is started, remove the
leads, reversing the order above.
If after a few attempts the engine does
not start, do not persist but contact a
Fiat Dealership.
If it is often necessary to perform a
jump starting, have the vehicle battery
and the recharging system checked by
a Fiat Dealership.
WARNING
143)Before opening the bonnet, make
sure that the engine is off and that the
ignition key is in the STOP position. Follow
the indications on the plate underneath the
bonnet. We recommend that you remove
the key from the ignition if other people
remain in the vehicle. The vehicle should
always be left after the key has been
removed or turned to the STOP position.
During refuelling, make sure that the engine
is off (and that the ignition key is in the
STOP position).
144)Do not get too close to the radiator
cooling fan: the electric fan may start;
danger of injury. Scarves, ties and other
loose clothing might be pulled by moving
parts.145)Remove any metal objects (e.g. rings,
watches, bracelets), that might cause an
accidental electrical contact and cause
serious injury.
146)The batteries contain acid that can
burn skin or eyes. Batteries produce
hydrogen, which is easily flammable and
explosive. Therefore, keep away flames or
devices which may cause sparks.
IMPORTANT
55)Never use a fast battery-charger to
start the engine as this could damage the
electronic systems of your vehicle,
particularly the ignition and engine fuel
supply control units.
56)Do not connect the cable to the
negative terminal (–) of the flat battery. The
following spark could lead to battery
explosion and cause serious harm. Only
use the specific earth point; do not use any
other exposed metallic part.
FUEL CUT-OFF
SYSTEM
DESCRIPTION
Diesel and petrol versions
This intervenes in the case of an impact
causing:
the interruption of the fuel supply
with the engine consequently switching
off;
the automatic unlocking of the
doors;
turning on of the lights inside the
vehicle;
deactivation of climate control
system ventilation;
switching on of the hazard warning
lights (to deactivate the lights press the
button on the dashboard).
On some versions, the intervention of
the system is indicated by a message
shown on the display. In the same way,
a dedicated message on the display
warns the driver if system operation is
compromised.
IMPORTANT Carefully check the vehicle
for fuel leaks, for instance in the engine
compartment, under the vehicle or near
the tank area. After a collision, bring the
ignition device to STOP to prevent the
battery from running down.
142
IN AN EMERGENCY
Page 145 of 244

LPG versions
(where provided)
On LPG versions, in addition to the
above, the fuel cut-off system stops
petrol supply immediately, closes the
LPG safety solenoid valve and stops
injection, consequently shutting off the
engine.
143
Page 147 of 244
WARNING
147)If, after an impact, you smell fuel or
notice leaks from the fuel system, do not
reactivate the system to avoid the risk of
fire.
AUTOMATIC
TRANSMISSION
Lever release
In the event of a fault, to move the gear
lever from P (Park), proceed as follows:
stop the engine;
engage the parking brake;
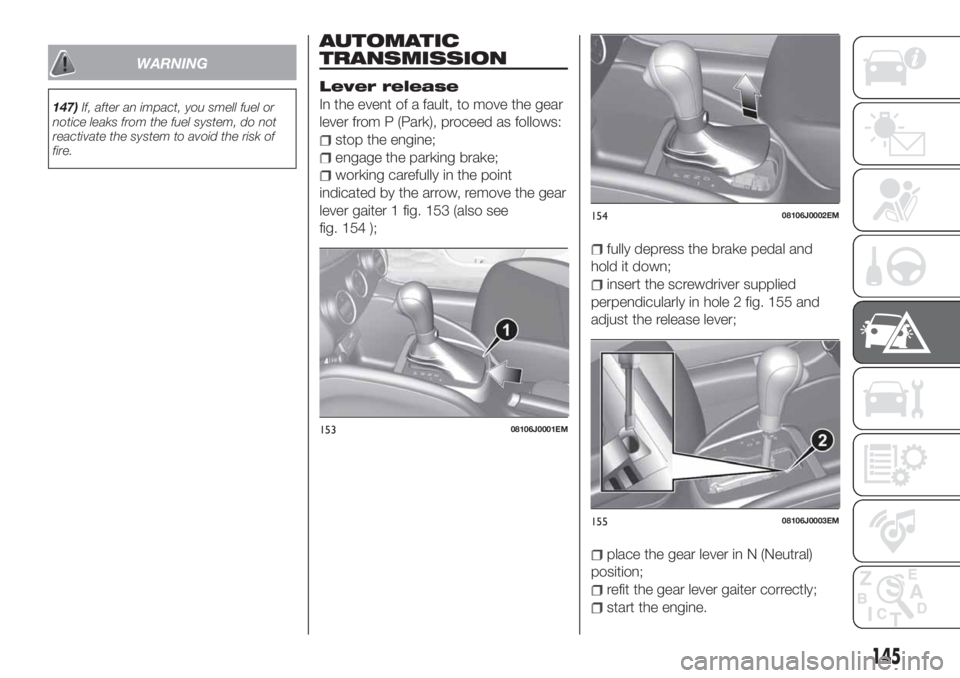
working carefully in the point
indicated by the arrow, remove the gear
lever gaiter 1 fig. 153 (also see
fig. 154 );
fully depress the brake pedal and
hold it down;
insert the screwdriver supplied
perpendicularly in hole 2 fig. 155 and
adjust the release lever;
place the gear lever in N (Neutral)
position;
refit the gear lever gaiter correctly;
start the engine.
15308106J0001EM
15408106J0002EM
15508106J0003EM
145
Page 150 of 244

149)The brake servo and the
electromechanical power steering will not
work while the vehicle is being towed. You
will therefore need to apply more force on
the brake pedal and steering wheel. Do not
use flexible ropes when towing, and avoid
jerky movements. During towing, make
sure that the trailer hitch does not damage
any components it is touching. When
towing the car, you must comply with all
specific traffic regulations and adopt an
appropriate driving behaviour. Do not start
the engine while towing the car. Before
tightening the ring, clean the threaded
housing thoroughly. Make sure that the ring
is fully screwed into the housing before
towing the car.
150)The front and rear tow hooks should
be used only for emergencies on the road.
You are allowed to tow the vehicle for short
distances using an appropriate device in
accordance with the highway code (a rigid
bar), to move the vehicle on the road in
readiness for towing or transport via a
breakdown vehicle. Tow hooks MUST NOT
be used to tow vehicles off the road or
where there are obstacles and/or for
towing operations using cables or other
non-rigid devices. In compliance with the
above conditions, towing must take place
with the two vehicles (one towing, the other
towed) aligned as much as possible along
the same centre line.
148
IN AN EMERGENCY
Page 151 of 244

SERVICING AND CARE
Correct servicing permits the
performance of the vehicle to be
maintained over time, as well as limited
running costs and safeguarding the
efficiency of the safety systems.
This chapter explains how.SCHEDULED SERVICING.......150
ENGINE COMPARTMENT......161
BATTERY RECHARGING.......172
SERVICING PROCEDURES.....173
LIFTING THE VEHICLE.........175
WHEELS AND TYRES.........176
BODY...................177
INTERIOR.................179
149
Page 153 of 244

SCHEDULED SERVICING PLAN (petrol versions — LPG versions)
WARNING: Once you have carried out the last intervention in the table, continue with the scheduled servicing, maintaining the
frequency indicated in the plan by marking each operation with a dot or dedicated note. Warning: simply restarting the
maintenance from the start of the plan may cause the allowed interval to be exceeded for some operations!
Thousands of miles9 182736455463728190
Thousands of kilometres15 30 45 60 75 90 105 120 135 150
Years12345678910
Check tyre condition/wear and adjust pressure, if
necessary. Check quick tyre repair kit recharge
conditions/expiry date (if provided)
Check operation of lighting system (headlights, direction
indicators, hazard warning lights, boot, passenger
compartment, glove compartment, instrument panel
warning lights, etc.)
Check and, if necessary, top up fluid levels(1)
Visually inspect condition of: LPG pipes and connectors,
LPG tank fixing (1.4 T-jet 120HP LPG E6 versions)
Check exhaust emissions
Use the diagnosis socket to check engine management
system operation; emissions and (where provided) engine
oil deterioration
(1) Always only use the liquids shown in the handbook for topping up after having checked that the system is not damaged.
151
Page 156 of 244

Thousands of miles9 182736455463728190
Thousands of kilometres15 30 45 60 75 90 105 120 135 150
Years12345678910
Change the engine oil and oil filter (1.4 16V 95 HP E4 /
1.6 E.TorQ E6 versions / 1.6 E.TorQ E4 versions)
Change engine oil and oil filter (1.4 16V 95 HP
E6 versions, 1.4 T-jet 120 HP LPG E6 versions) (4) (o) (●)
Replace the spark plugs (1.4 16V 95 HP E6 versions)
Replace spark plugs (1.4 T-jet 120 HP LPG E6 versions)(5)
Replace the spark plugs (1.4 16V 95 HP E4 versions /
1.6 E.TorQ E6 versions / 1.6 E.TorQ E4 versions)(6)
Replace toothed timing drive belt (1.4 16V 95 HP
E6 versions / 1.4 16V 95 HP E4 versions/ 1.4 T-jet
120 HP LPG E6 versions)(3)
(4) If the car's annual mileage is less than 10,000 km, the engine oil and filter must be replaced every year.
(o) Recommended operations
(●) Obligatory operations (5) For 1.4 T-jet LPG versions, to guarantee correct operation and prevent serious damage to the engine, it is essential to proceed as follows: only usespark plugs
specifically certified for these engines; all spark plugs should be of the same type and brand (see the "Engine" paragraph in the "Technical specifications"
chapter); strictly comply with the spark plugs replacement intervals in the Scheduled Servicing Plan. It is advisable to contact a FIAT Dealership for plug
replacement.
(6) This operation must be performed every 15,000 km if the vehicle is used in one of the following countries: Afghanistan, Algeria, Angola, Armenia, Congo,
Ethiopia, Ghana, Iran, Iraq, Jordan, Malawi, Mali, Mozambique, Nigeria, Senegal, Syria, Zimbabwe. (3) The maximum mileage is 120,000 km. The belt must be replaced every 6 years, regardless of distance travelled. If the vehicle is used in heavy conditions (dusty
areas, cold climates, urban driving, long periods of idling), the maximum mileage is 60,000 km. The belt must be replaced every 4 years regardless of the
mileage.
154
SERVICING AND CARE
Page 159 of 244

SCHEDULED SERVICING PLAN (Diesel versions)
WARNING: Once you have carried out the last intervention in the table, continue with the scheduled servicing, maintaining the
frequency indicated in the plan by marking each operation with a dot or dedicated note. Warning: simply restarting the
maintenance from the start of the plan may cause the allowed interval to be exceeded for some operations!
Thousands of miles12 24 36 48 60 72 84 96 108 120
Thousands of kilometres20 40 60 80 100 120 140 160 180 200
Years12345678910
Check tyre condition/wear and adjust pressure, if
necessary. Check quick tyre repair kit recharge
conditions/expiry date (if provided)
Check operation of lighting system (headlights, direction
indicators, hazard warning lights, boot, passenger
compartment, glove compartment, instrument panel
warning lights, etc.)
Check and, if necessary, top up fluid levels(1)
Check exhaust emissions
Use the diagnosis socket to check engine management
system operation; emissions and (where provided) engine
oil deterioration
Visually inspect conditions of: exterior bodywork,
underbody protection, pipes and hoses (exhaust, fuel
system, brakes), rubber elements (gaiters, sleeves,
bushes, etc.)
(1) Always only use the liquids shown in the handbook for topping up after having checked that the system is not damaged.
157