overheating FIAT TIPO 4DOORS 2019 Owner handbook (in English)
[x] Cancel search | Manufacturer: FIAT, Model Year: 2019, Model line: TIPO 4DOORS, Model: FIAT TIPO 4DOORS 2019Pages: 252, PDF Size: 7.29 MB
Page 35 of 252
Make sure that the bonnet is
completely closed and not only
fastened by the locking device by trying
to open it. If it is not perfectly closed,
do not try to press the bonnet lid down
but open it and repeat the procedure.
IMPORTANT Always check that the
bonnet is closed correctly to prevent it
from opening while the vehicle is
travelling.
WARNING
24)Perform these operations only when
the car is stationary.
25)The bonnet may drop suddenly if the
supporting rod is not positioned correctly.
26)Use both hands to lift the bonnet.
Before lifting, check that the windscreen
wiper arms are not raised from the
windscreen, that the vehicle is stationary
and that the parking brake is engaged.
27)For safety reasons, the bonnet must
always be properly closed while the car is
travelling. Therefore, make sure that the
bonnet is properly closed and that the lock
is engaged. If you discover that the bonnet
is not perfectly closed during travel, stop
immediately and close the bonnet in the
correct manner.
DUALDRIVE
ELECTRIC POWER
STEERING
This only operates with the key turned
to MAR and the engine started. The
electric steering allows the force
required at the steering wheel to be
adjusted to suit driving conditions.
IMPORTANT When turning the ignition
key quickly, full power steering
functionality can be achieved after a
few seconds.
IMPORTANT During parking
manoeuvres requiring a lot of steering,
the steering may become harder; this is
normal and is due to the intervention of
the system to protect the electric
steering motor from overheating. No
repair intervention is needed in this
case. When the car is used again, the
power steering will work normally again.
IMPORTANT The Dualdrive electric
power steering provides an electronic
damping effect when approaching the
end of travel. In some manoeuvring
conditions, the steering wheel may
perform an additional small rotation until
reaching its mechanical stop. This
behaviour is normal and is intended to
prevent excessive impacts with the
mechanical components located inside
the device.POWER STEERING
ACTIVATION/
DEACTIVATION
28) 29)
Engagement/disengagement
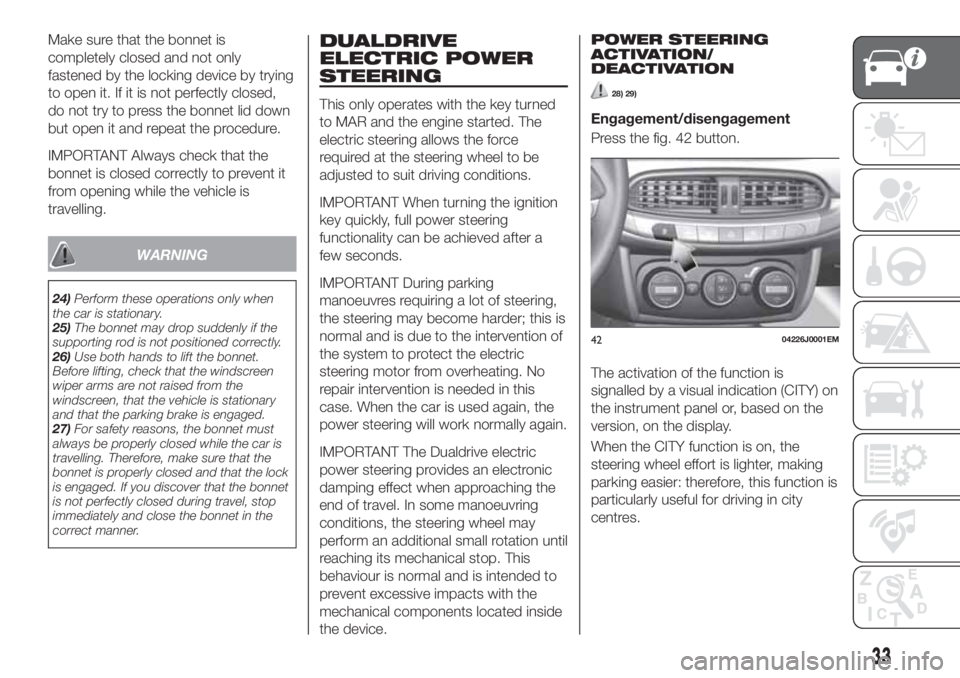
Press the fig. 42 button.
The activation of the function is
signalled by a visual indication (CITY) on
the instrument panel or, based on the
version, on the display.
When the CITY function is on, the
steering wheel effort is lighter, making
parking easier: therefore, this function is
particularly useful for driving in city
centres.
4204226J0001EM
33
Page 43 of 252
CONTROL PANEL AND ON-BOARD INSTRUMENTS
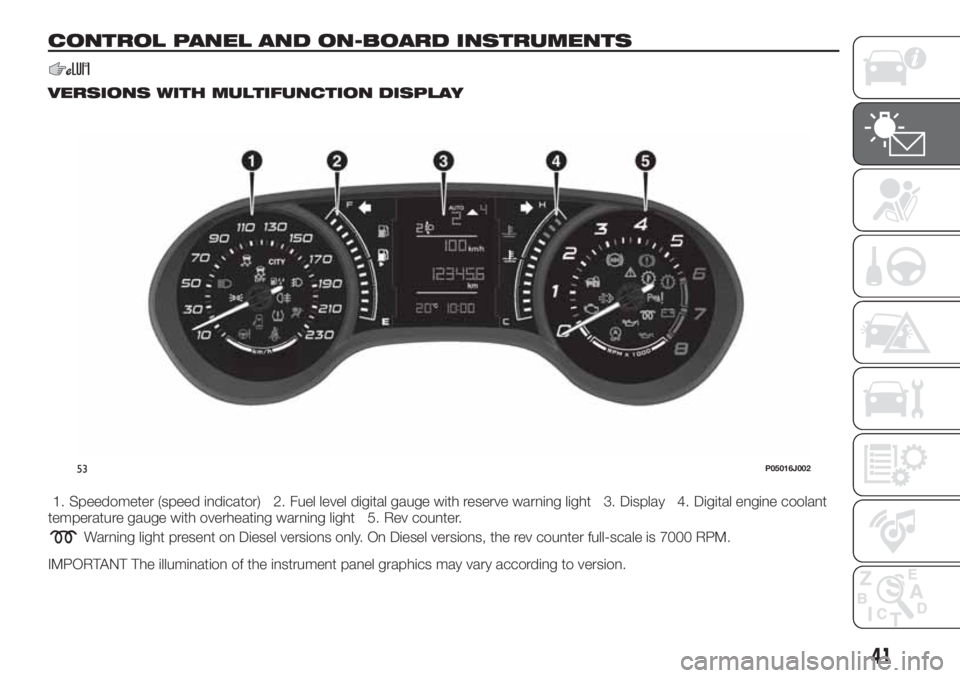
VERSIONS WITH MULTIFUNCTION DISPLAY
1. Speedometer (speed indicator) 2. Fuel level digital gauge with reserve warning light 3. Display 4. Digital engine coolant
temperature gauge with overheating warning light 5. Rev counter.
Warning light present on Diesel versions only. On Diesel versions, the rev counter full-scale is 7000 RPM.
IMPORTANT The illumination of the instrument panel graphics may vary according to version.
53P05016J002
41
Page 44 of 252
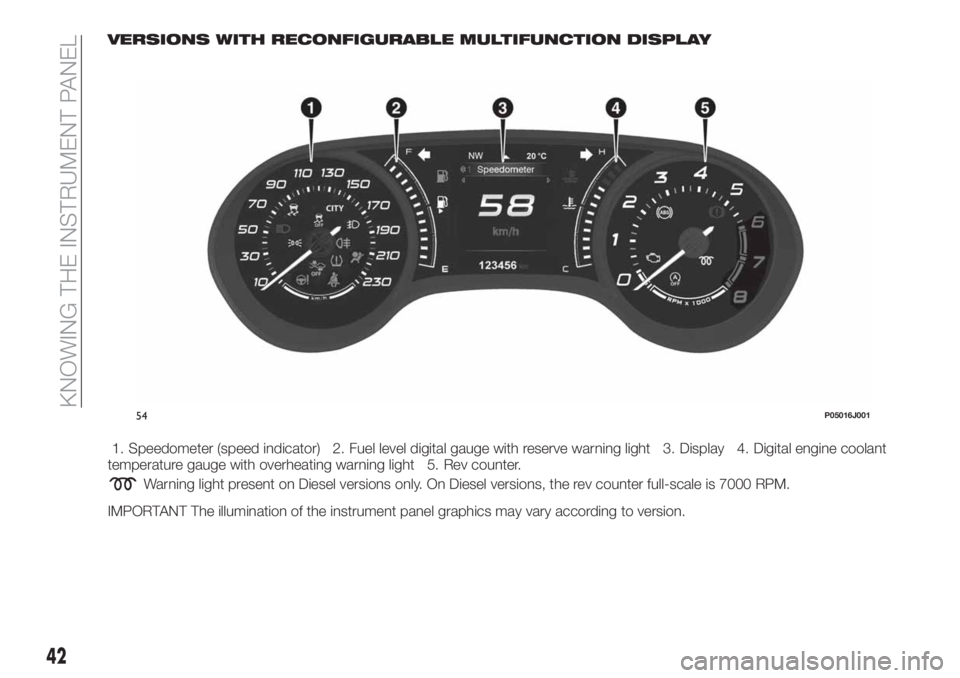
VERSIONS WITH RECONFIGURABLE MULTIFUNCTION DISPLAY
1. Speedometer (speed indicator) 2. Fuel level digital gauge with reserve warning light 3. Display 4. Digital engine coolant
temperature gauge with overheating warning light 5. Rev counter.
Warning light present on Diesel versions only. On Diesel versions, the rev counter full-scale is 7000 RPM.
IMPORTANT The illumination of the instrument panel graphics may vary according to version.
54P05016J001
42
KNOWING THE INSTRUMENT PANEL
Page 46 of 252
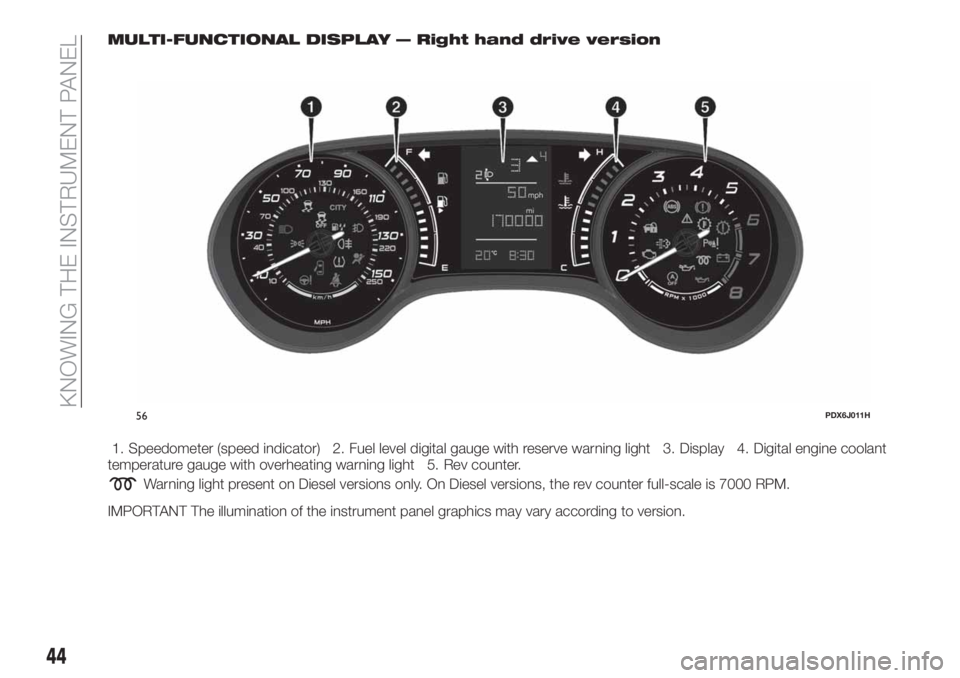
MULTI-FUNCTIONAL DISPLAY — Right hand drive version
1. Speedometer (speed indicator) 2. Fuel level digital gauge with reserve warning light 3. Display 4. Digital engine coolant
temperature gauge with overheating warning light 5. Rev counter.
Warning light present on Diesel versions only. On Diesel versions, the rev counter full-scale is 7000 RPM.
IMPORTANT The illumination of the instrument panel graphics may vary according to version.
56PDX6J011H
44
KNOWING THE INSTRUMENT PANEL
Page 47 of 252
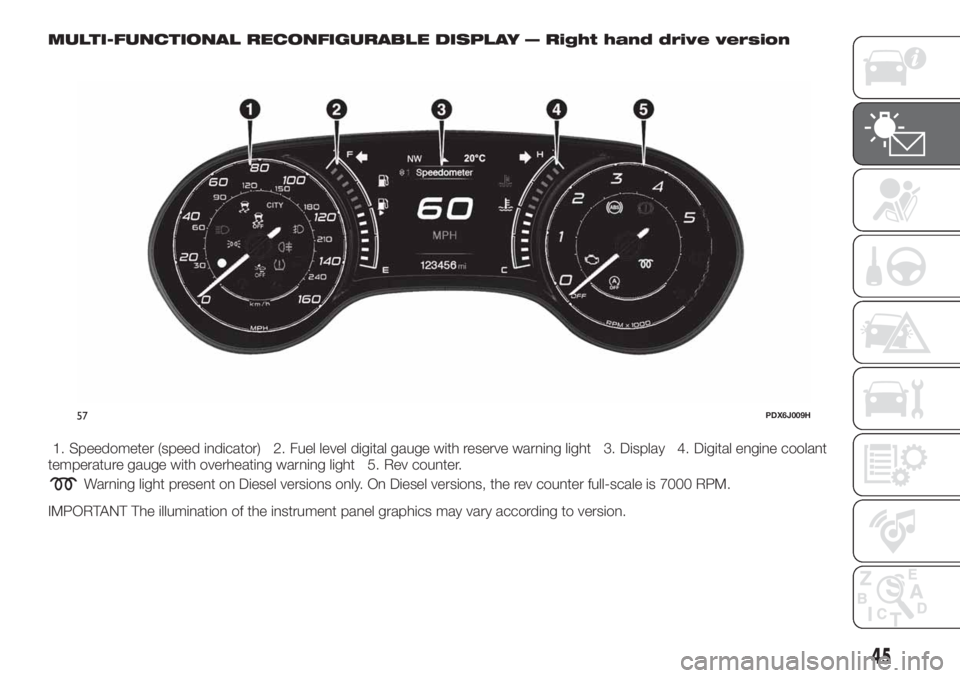
MULTI-FUNCTIONAL RECONFIGURABLE DISPLAY — Right hand drive version
1. Speedometer (speed indicator) 2. Fuel level digital gauge with reserve warning light 3. Display 4. Digital engine coolant
temperature gauge with overheating warning light 5. Rev counter.
Warning light present on Diesel versions only. On Diesel versions, the rev counter full-scale is 7000 RPM.
IMPORTANT The illumination of the instrument panel graphics may vary according to version.
57PDX6J009H
45
Page 58 of 252
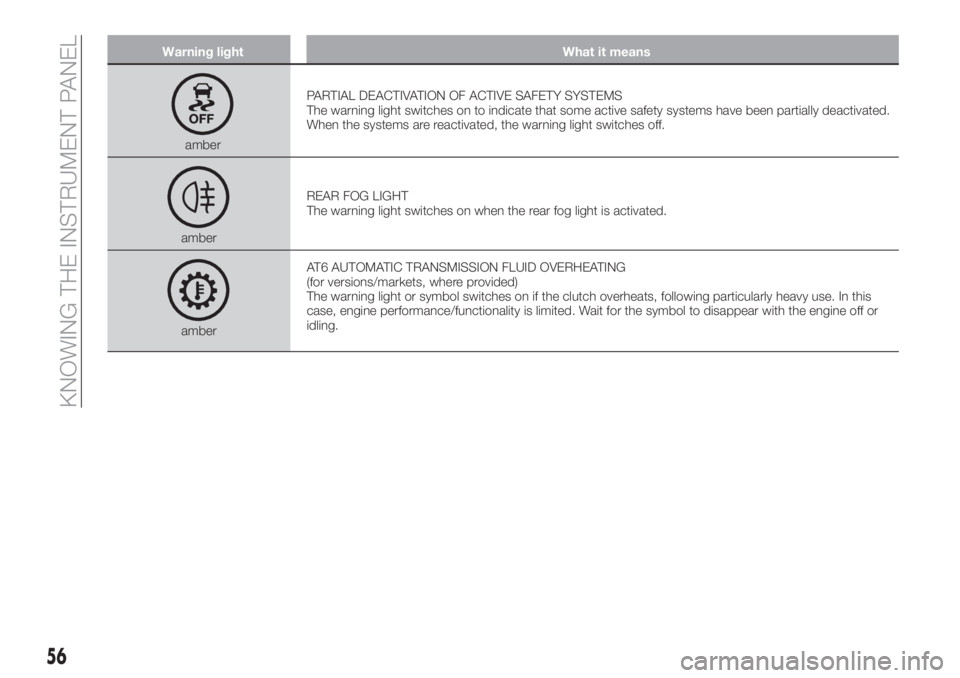
Warning light What it means
amberPARTIAL DEACTIVATION OF ACTIVE SAFETY SYSTEMS
The warning light switches on to indicate that some active safety systems have been partially deactivated.
When the systems are reactivated, the warning light switches off.
amberREAR FOG LIGHT
The warning light switches on when the rear fog light is activated.
amberAT6 AUTOMATIC TRANSMISSION FLUID OVERHEATING
(for versions/markets, where provided)
The warning light or symbol switches on if the clutch overheats, following particularly heavy use. In this
case, engine performance/functionality is limited. Wait for the symbol to disappear with the engine off or
idling.
56
KNOWING THE INSTRUMENT PANEL
Page 106 of 252
STARTING THE
ENGINE
Before starting the engine, adjust the
seat, the interior rear view mirrors, the
door mirrors and fasten the seat belt
correctly.
Never press the accelerator pedal for
starting the engine.
If necessary, messages indicating the
starting procedure can be shown on
the display.
ENGINE STARTING
PROCEDURE
105) 106) 107) 108)
37) 38) 39) 40)
Versions with mechanical gearbox
Proceed as follows:
engage the parking brake and place
the gear lever in neutral;
bring the ignition device to MAR,
warning light
will come on in the
instrument panel - wait for the warning
light to switch off;
fully depress the clutch pedal
without touching the accelerator;
turn the ignition device to AVV and
release it as soon as the engine starts;
if the engine does not start within
10 seconds, bring the ignition device
back to STOP and wait for
10-15 seconds before repeating the
starting procedure;
after the manoeuvre has been
repeated, if the problem persists,
contact a Fiat Dealership.
Versions with automatic
transmission
(where provided)
Proceed as follows:
engage the parking brake and set
the gear lever to P (Park) or N (Neutral);
fully depress the brake pedal without
touching the accelerator;
set the ignition device to AVV;
if the engine does not start, bring
the ignition device back to STOP and
wait for 10-15 seconds before
repeating the starting procedure;
after the manoeuvre has been
repeated, if the problem persists,
contact a Fiat Dealership.
ENGINE STARTING
FAILURE
105)
Important notes
Do not try to start the engine by towing
or pushing the vehicle. This manoeuvre
could let unburnt fuel enter the catalytic
converter.When the engine is started, this would
ignite, causing catalytic converter
overheating and damage.
If the battery is flat, you can jump start
the vehicle by connecting the battery
with an auxiliary one or with one on
another vehicle using suitable cables.
This manoeuvre can anyway be
dangerous when not performed
correctly. See the indications in the
"Emergency starting" paragraph in the
"In an emergency" chapter.
WARNING
105)Do not try to start the engine pouring
fuel or other flammable fluid inside the
throttle body air intake: this might damage
the engine and injury people nearby.
106)It is dangerous to run the engine in
enclosed areas. The engine takes in
oxygen and releases carbon dioxide,
carbon monoxide and other toxic gases.
107)The brake servo is not active until the
engine is started, so you would need to
apply much more force than usual to the
brake pedal.
108)Do not start the engine by pushing,
towing or driving downhill. These
manoeuvres may damage the catalytic
converter.
104
STARTING AND DRIVING
Page 109 of 252
AUTOMATIC
TRANSMISSION
(where provided)
113) 114) 114) 115)
42) 43)
GEAR LEVER
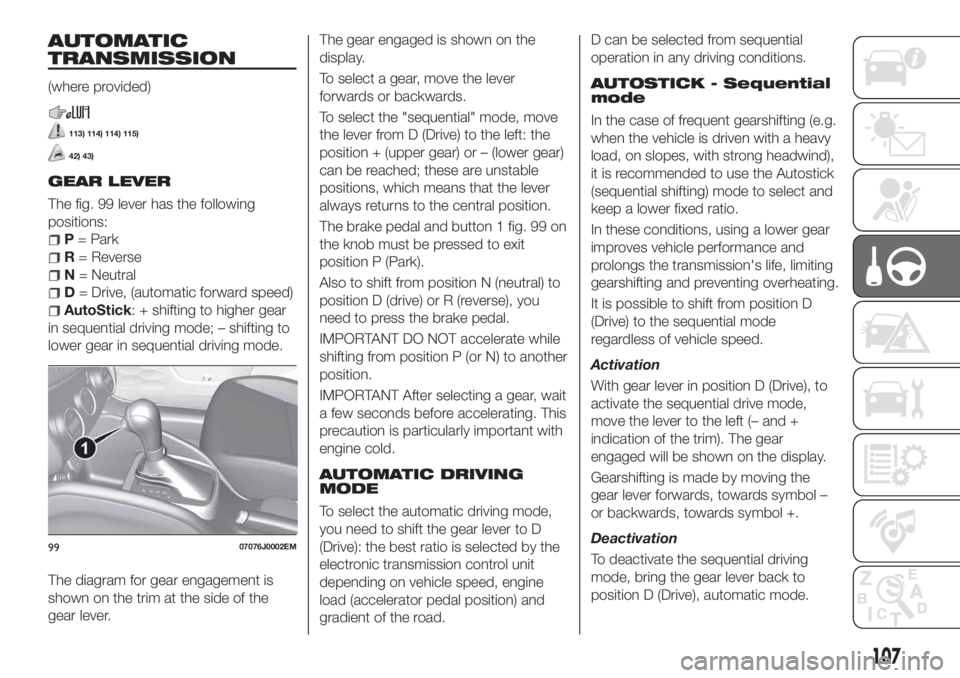
The fig. 99 lever has the following
positions:
P= Park
R= Reverse
N= Neutral
D= Drive, (automatic forward speed)
AutoStick: + shifting to higher gear
in sequential driving mode; – shifting to
lower gear in sequential driving mode.
The diagram for gear engagement is
shown on the trim at the side of the
gear lever.The gear engaged is shown on the
display.
To select a gear, move the lever
forwards or backwards.
To select the "sequential" mode, move
the lever from D (Drive) to the left: the
position + (upper gear) or – (lower gear)
can be reached; these are unstable
positions, which means that the lever
always returns to the central position.
The brake pedal and button 1 fig. 99 on
the knob must be pressed to exit
position P (Park).
Also to shift from position N (neutral) to
position D (drive) or R (reverse), you
need to press the brake pedal.
IMPORTANT DO NOT accelerate while
shifting from position P (or N) to another
position.
IMPORTANT After selecting a gear, wait
a few seconds before accelerating. This
precaution is particularly important with
engine cold.
AUTOMATIC DRIVING
MODE
To select the automatic driving mode,
you need to shift the gear lever to D
(Drive): the best ratio is selected by the
electronic transmission control unit
depending on vehicle speed, engine
load (accelerator pedal position) and
gradient of the road.D can be selected from sequential
operation in any driving conditions.
AUTOSTICK - Sequential
mode
In the case of frequent gearshifting (e.g.
when the vehicle is driven with a heavy
load, on slopes, with strong headwind),
it is recommended to use the Autostick
(sequential shifting) mode to select and
keep a lower fixed ratio.
In these conditions, using a lower gear
improves vehicle performance and
prolongs the transmission's life, limiting
gearshifting and preventing overheating.
It is possible to shift from position D
(Drive) to the sequential mode
regardless of vehicle speed.
Activation
With gear lever in position D (Drive), to
activate the sequential drive mode,
move the lever to the left (– and +
indication of the trim). The gear
engaged will be shown on the display.
Gearshifting is made by moving the
gear lever forwards, towards symbol –
or backwards, towards symbol +.
Deactivation
To deactivate the sequential driving
mode, bring the gear lever back to
position D (Drive), automatic mode.
9907076J0002EM
107
Page 147 of 252
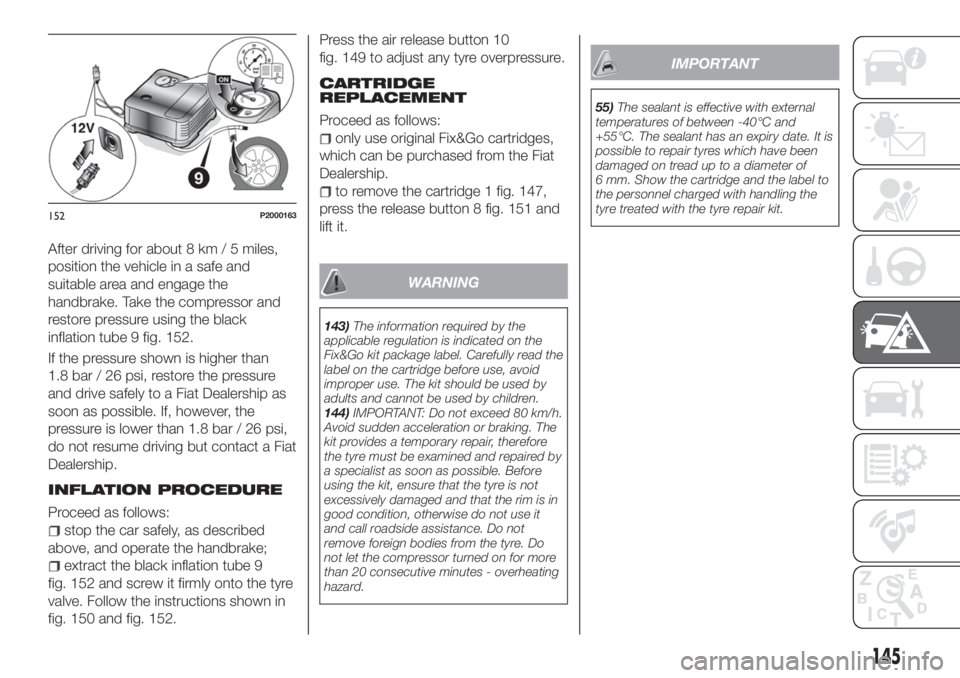
After driving for about 8 km / 5 miles,
position the vehicle in a safe and
suitable area and engage the
handbrake. Take the compressor and
restore pressure using the black
inflation tube 9 fig. 152.
If the pressure shown is higher than
1.8 bar / 26 psi, restore the pressure
and drive safely to a Fiat Dealership as
soon as possible. If, however, the
pressure is lower than 1.8 bar / 26 psi,
do not resume driving but contact a Fiat
Dealership.
INFLATION PROCEDURE
Proceed as follows:
stop the car safely, as described
above, and operate the handbrake;
extract the black inflation tube 9
fig. 152 and screw it firmly onto the tyre
valve. Follow the instructions shown in
fig. 150 and fig. 152.Press the air release button 10
fig. 149 to adjust any tyre overpressure.
CARTRIDGE
REPLACEMENT
Proceed as follows:
only use original Fix&Go cartridges,
which can be purchased from the Fiat
Dealership.
to remove the cartridge 1 fig. 147,
press the release button 8 fig. 151 and
lift it.
WARNING
143)The information required by the
applicable regulation is indicated on the
Fix&Go kit package label. Carefully read the
label on the cartridge before use, avoid
improper use. The kit should be used by
adults and cannot be used by children.
144)IMPORTANT: Do not exceed 80 km/h.
Avoid sudden acceleration or braking. The
kit provides a temporary repair, therefore
the tyre must be examined and repaired by
a specialist as soon as possible. Before
using the kit, ensure that the tyre is not
excessively damaged and that the rim is in
good condition, otherwise do not use it
and call roadside assistance. Do not
remove foreign bodies from the tyre. Do
not let the compressor turned on for more
than 20 consecutive minutes - overheating
hazard.
IMPORTANT
55)The sealant is effective with external
temperatures of between -40°C and
+55°C. The sealant has an expiry date. It is
possible to repair tyres which have been
damaged on tread up to a diameter of
6 mm. Show the cartridge and the label to
the personnel charged with handling the
tyre treated with the tyre repair kit.
152P2000163
145
Page 182 of 252
IMPORTANT
66)It is recommended to have the vehicle
serviced by a Fiat Dealership. When
carrying out normal periodic operations and
small servicing interventions personally on
the vehicle, it is recommended to use
suitable equipment, genuine spare parts
and the necessary fluids. Do not carry out
any interventions if you don't have the
necessary experience.
67)Incorrect servicing of the vehicle or
failure to carry out operations or repairs
(when necessary) may lead to more
expensive repairs, damage to other
components or have a negative impact on
the vehicle performance. Have any
malfunction inspected immediately by a Fiat
Dealership.
68)The vehicle is equipped with fluids
which are optimised or protecting its
performance and life and extending service
intervals. Do not use chemicals for washing
these components since they may damage
the engine, the gearbox or the climate
control system. This damage is not covered
by the vehicle’s warranty. If any component
needs to be washed due to malfunctioning,
use only the specific liquid for that
procedure.
69)An excessive or insufficient amount of
oil inside the base is extremely damaging to
the engine. Make sure it is always at an
adequate level.70)Always require the use of only
compressor coolants and lubricants
approved and suitable for the specific air
conditioning system fitted on the vehicle.
Some non-approved coolants are
flammable and may explode, with the risk
of injuries. The use of non-approved
coolants or lubricants may adversely affect
system efficiency, leading to expensive
repairs.
71)The air conditioner system contains
coolant under high pressure: to avoid
injuries to people or damage to the system,
any coolant addition or repair that requires
to disconnect the cables must be carried
out by a Fiat Dealership.
72)Vehicles equipped with catalytic
converter must be fuelled only with
unleaded petrol. Leaded petrol would
permanently damage the catalytic
converter and eliminate its ability to reduce
polluting emissions, seriously
compromising the engine performance,
which would be irreparably damaged. If the
engine does not work correctly, especially if
it starts irregularly or if there is a reduction
of its performance, immediately go to a Fiat
Dealership. Prolonged and faulty operation
of the engine may cause overheating of the
converter and, as a consequence, possible
damage to the converter and the vehicle.
73)Using a gearbox fluid different from that
approved may compromise gearshifting
quality and/or cause vibration of the
gearbox itself.
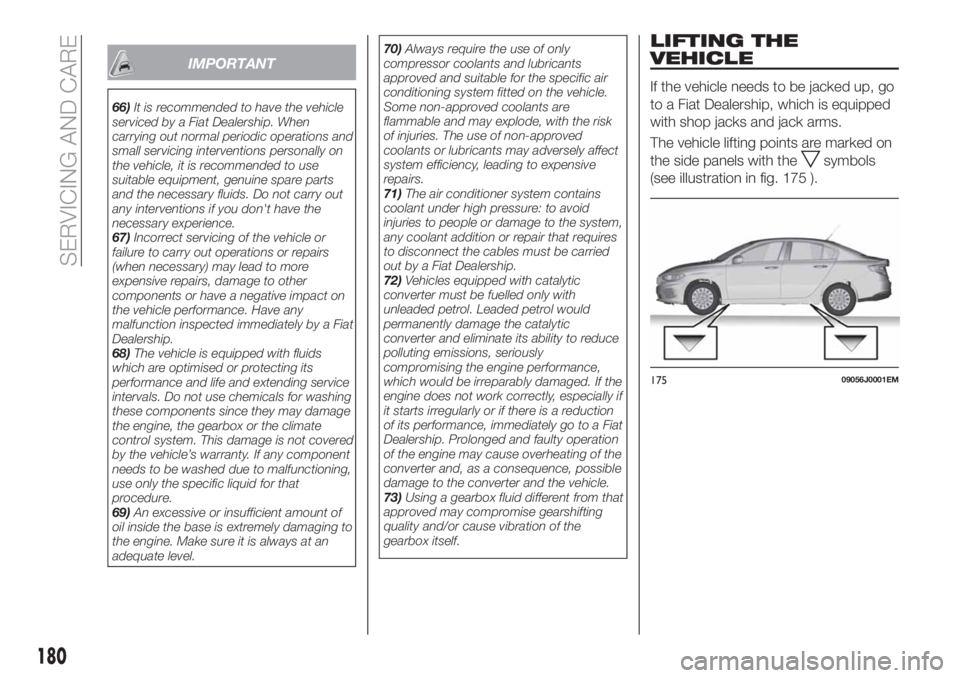
LIFTING THE
VEHICLE
If the vehicle needs to be jacked up, go
to a Fiat Dealership, which is equipped
with shop jacks and jack arms.
The vehicle lifting points are marked on
the side panels with the
symbols
(see illustration in fig. 175 ).
17509056J0001EM
180
SERVICING AND CARE