buttons FIAT TIPO 4DOORS 2020 Owner handbook (in English)
[x] Cancel search | Manufacturer: FIAT, Model Year: 2020, Model line: TIPO 4DOORS, Model: FIAT TIPO 4DOORS 2020Pages: 252, PDF Size: 7.29 MB
Page 50 of 252
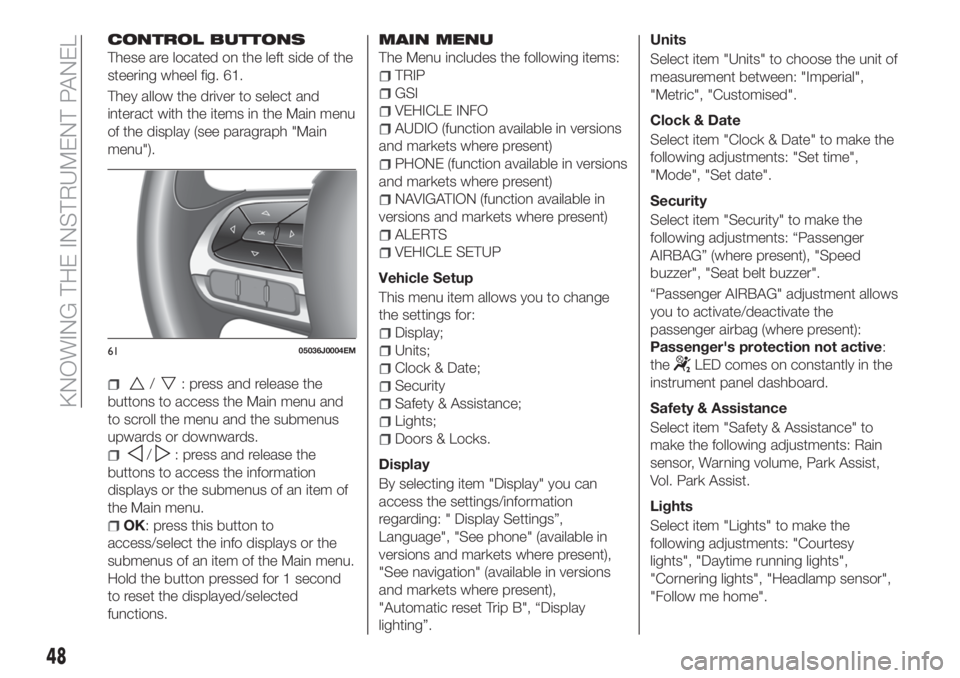
CONTROL BUTTONS
These are located on the left side of the
steering wheel fig. 61.
They allow the driver to select and
interact with the items in the Main menu
of the display (see paragraph "Main
menu").
/: press and release the
buttons to access the Main menu and
to scroll the menu and the submenus
upwards or downwards.
/: press and release the
buttons to access the information
displays or the submenus of an item of
the Main menu.
OK: press this button to
access/select the info displays or the
submenus of an item of the Main menu.
Hold the button pressed for 1 second
to reset the displayed/selected
functions.
MAIN MENU
The Menu includes the following items:
TRIP
GSI
VEHICLE INFO
AUDIO (function available in versions
and markets where present)
PHONE (function available in versions
and markets where present)
NAVIGATION (function available in
versions and markets where present)
ALERTS
VEHICLE SETUP
Vehicle Setup
This menu item allows you to change
the settings for:
Display;
Units;
Clock & Date;
Security
Safety & Assistance;
Lights;
Doors & Locks.
Display
By selecting item "Display" you can
access the settings/information
regarding: " Display Settings”,
Language", "See phone" (available in
versions and markets where present),
"See navigation" (available in versions
and markets where present),
"Automatic reset Trip B", “Display
lighting”.Units
Select item "Units" to choose the unit of
measurement between: "Imperial",
"Metric", "Customised".
Clock & Date
Select item "Clock & Date" to make the
following adjustments: "Set time",
"Mode", "Set date".
Security
Select item "Security" to make the
following adjustments: “Passenger
AIRBAG” (where present), "Speed
buzzer", "Seat belt buzzer".
“Passenger AIRBAG" adjustment allows
you to activate/deactivate the
passenger airbag (where present):
Passenger's protection not active:
the
LED comes on constantly in the
instrument panel dashboard.
Safety & Assistance
Select item "Safety & Assistance" to
make the following adjustments: Rain
sensor, Warning volume, Park Assist,
Vol. Park Assist.
Lights
Select item "Lights" to make the
following adjustments: "Courtesy
lights", "Daytime running lights",
"Cornering lights", "Headlamp sensor",
"Follow me home".6105036J0004EM
48
KNOWING THE INSTRUMENT PANEL
Page 83 of 252
WARNING
70)Never press button 3 when travelling.
71)Remember that, in the event of an
accident, the rear seat passengers not
wearing seat belts are exposed to a very
serious risk and also represent a serious
danger for the front seat occupants.
72)Make height adjustment of the seat
belts when the car is stationary.
73)After the height adjustment, always
check that the grip is locked in one of the
preset positions. To do this, with buttons
1 released, exert further pressure
downwards to allow the locking device to
click if the grip has not been released in
one of the possible positions.
SBR (SEAT BELT
REMINDER) SYSTEM
(for versions/markets, where provided)
The SBR system warns the passengers
of the front and rear (where provided)
seats if their seat belt is not fastened.
The system signals unfastened seat
belts with visual warnings (warning light
on the instrument panel and symbols
on the display) and an acoustic signal
(see the following paragraphs).
NOTE Contact a Fiat Dealership to
deactivate this acoustic warning
permanently. The acoustic warning can
be reactivated at any time through the
display Menu (see the "Display"
paragraph in the “Knowing the
instrument panel” chapter).
FRONT SEAT BELT
WARNING LIGHT
BEHAVIOUR
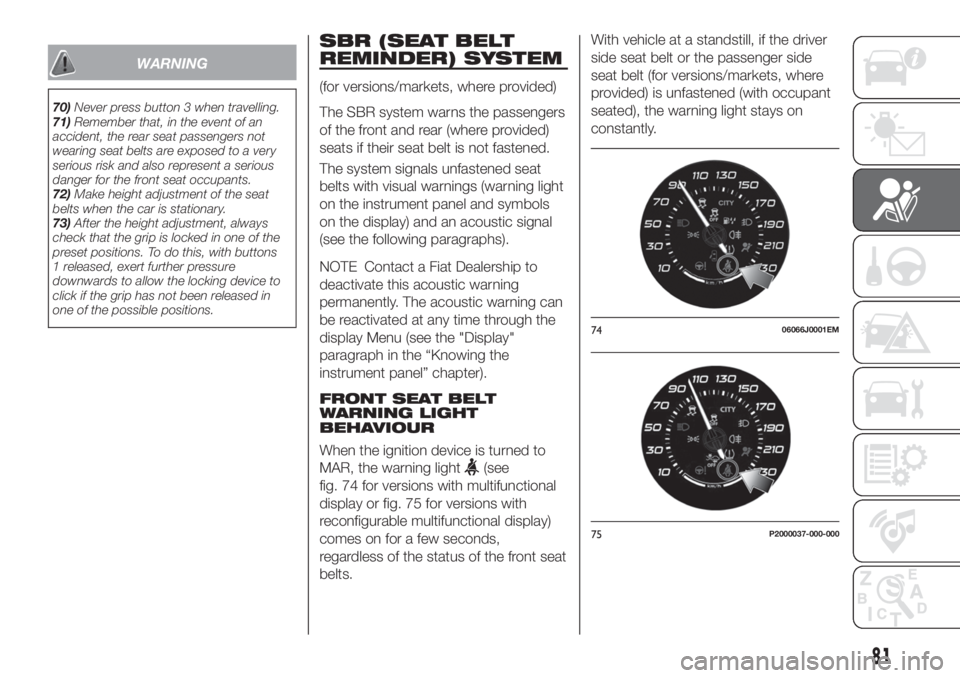
When the ignition device is turned to
MAR, the warning light
(see
fig. 74 for versions with multifunctional
display or fig. 75 for versions with
reconfigurable multifunctional display)
comes on for a few seconds,
regardless of the status of the front seat
belts.With vehicle at a standstill, if the driver
side seat belt or the passenger side
seat belt (for versions/markets, where
provided) is unfastened (with occupant
seated), the warning light stays on
constantly.
7406066J0001EM
75P2000037-000-000
81
Page 113 of 252
SPEED LIMITER
(where provided)
DESCRIPTION
This device allows the speed of the
vehicle to be limited to values which
can be set by the driver.
The maximum speed can be set both
with vehicle stationary and in motion.
The minimum speed that can be set is
30 km/h.
When the device is active, the vehicle
speed depends on the pressure at the
accelerator pedal, until the
programmed speed limit is reached
(see "Speed limit programming"
paragraph).
ACTIVATING THE DEVICE
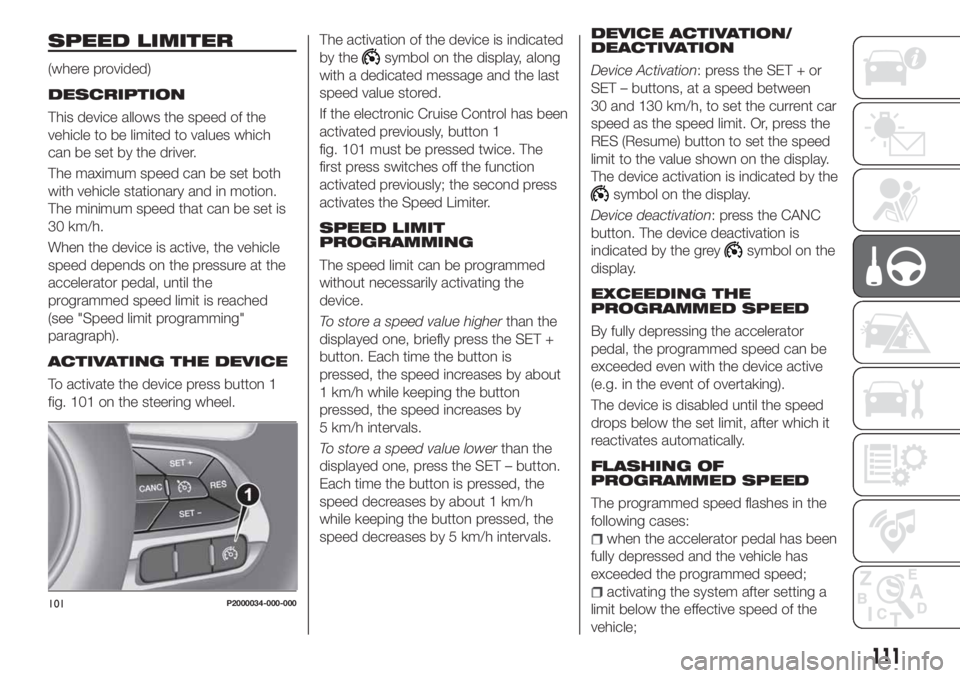
To activate the device press button 1
fig. 101 on the steering wheel.The activation of the device is indicated
by the
symbol on the display, along
with a dedicated message and the last
speed value stored.
If the electronic Cruise Control has been
activated previously, button 1
fig. 101 must be pressed twice. The
first press switches off the function
activated previously; the second press
activates the Speed Limiter.
SPEED LIMIT
PROGRAMMING
The speed limit can be programmed
without necessarily activating the
device.
To store a speed value higherthan the
displayed one, briefly press the SET +
button. Each time the button is
pressed, the speed increases by about
1 km/h while keeping the button
pressed, the speed increases by
5 km/h intervals.
To store a speed value lowerthan the
displayed one, press the SET – button.
Each time the button is pressed, the
speed decreases by about 1 km/h
while keeping the button pressed, the
speed decreases by 5 km/h intervals.
DEVICE ACTIVATION/
DEACTIVATION
Device Activation: press the SET + or
SET – buttons, at a speed between
30 and 130 km/h, to set the current car
speed as the speed limit. Or, press the
RES (Resume) button to set the speed
limit to the value shown on the display.
The device activation is indicated by the
symbol on the display.
Device deactivation: press the CANC
button. The device deactivation is
indicated by the grey
symbol on the
display.
EXCEEDING THE
PROGRAMMED SPEED
By fully depressing the accelerator
pedal, the programmed speed can be
exceeded even with the device active
(e.g. in the event of overtaking).
The device is disabled until the speed
drops below the set limit, after which it
reactivates automatically.
FLASHING OF
PROGRAMMED SPEED
The programmed speed flashes in the
following cases:
when the accelerator pedal has been
fully depressed and the vehicle has
exceeded the programmed speed;
activating the system after setting a
limit below the effective speed of the
vehicle;101P2000034-000-000
111
Page 115 of 252
If needed (e.g. when overtaking), you
can increase speed simply by pressing
the accelerator; when you release the
pedal, the vehicle goes back to the
speed stored previously.
When travelling downhill with the device
active, the vehicle speed may exceed
the set one.
IMPORTANT Before pressing the SET +
or SET – buttons, the vehicle must be
travelling at a constant speed on a flat
surface.
SPEED INCREASE
Once the electronic Cruise Control has
been activated, the speed can be
increased by pressing button SET +.
DECREASING SPEED
With the device activated, the speed
can be decreased by pressing button
SET–.
RECALLING THE SPEED
For versions with automatic
transmission (if present) operating in D
mode (Drive - automatic), press and
release the RES (Resume) button to
recall the previously set speed.
For versions with manual gearbox or
automatic transmission (if present) inAutostick (sequential) mode, before
recalling the previously set speed you
should accelerate until getting close to
it, then press and release the RES
(Resume) button.
DEACTIVATING THE
DEVICE
Lightly pressing the brake pedal or
pressing the CANC button deactivates
the electronic Cruise Control without
deleting the stored speed.
The Cruise Control may be deactivated
also by applying the parking brake,
when the braking system is operated
(e.g. operation of the ESC system) or by
pressing the clutch pedal while shifting
gear.
DEACTIVATING THE
DEVICE
The electronic Cruise Control is
deactivated by pressing button 1
fig. 102 or bringing the ignition device
to STOP.
WARNING
117)When travelling with the device active,
never move the gear lever to neutral.
118)In case of a malfunction or failure of
the device, contact a Fiat Dealership.119)The electronic Cruise Control can be
dangerous if the system cannot keep a
constant speed. In specific conditions
speed may be excessive, resulting in the
risk of losing control of the vehicle and
causing accidents. Do not use the device
in heavy traffic or on winding, icy, snowy or
slippery roads.
113
Page 214 of 252
TIPS, CONTROLS
AND GENERAL
INFORMATION
ROAD SAFETY
Learn how to use the various system
functions before setting off.
Read the instructions for the system
carefully before setting off.
180) 181)
RECEPTION CONDITIONS
Reception conditions change
constantly while driving. Reception may
be interfered with by the presence of
mountains, buildings or bridges,
especially when you are far away from
the broadcaster.
IMPORTANT The volume may be
increased when receiving traffic
information and news.
CARE AND
MAINTENANCE
Observe the following precautions to
ensure the system is fully operational:
the display lens should not come into
contact with pointed or rigid objects
which could damage its surface; use a
soft, dry anti-static cloth to clean and
do not press.
never use alcohol, petrols and
derivatives to clean the display lens.
prevent any liquid from entering the
system: this could damage it beyond
repair.
81) 82)
ANTITHEFT PROTECTION
The system is equipped with an
anti-theft protection system based on
the exchange of information with the
electronic control unit (Body Computer)
on the vehicle.
This guarantees maximum safety and
prevents the secret code from being
entered after the power supply has
been disconnected.
If the check has a positive outcome, the
system will start to operate, whereas if
the comparison codes are not the same
or if the electronic control unit (Body
Computer) is replaced, the system will
ask the user to enter the secret code
according to the procedure described
in the paragraph below.
Entering the secret code
When the system is switched on, if the
code is requested, the display will show
"Please enter Anti-Theft Code" followed
by the screen showing a keypad to
enter the secret code.
The secret code is made up of four
digits from 0 to 9.Uconnect™ Radio:
To enter the first digit of the code,
turn the "BROWSE/ENTER" right knob
and press to confirm.
After inserting the fourth digit, move
the cursor to "OK" and press the
"BROWSE ENTER" right knob: the
system will start to operate.
Uconnect™ 5” and Uconnect™ 5”
Nav:
Use the graphic buttons on the
display to enter the code digits.
If an incorrect code is entered, the
system displays "Incorrect Code" to
notify the user of the need to enter the
correct code.
After the 3 available attempts to enter
the code, the system displays
"Incorrect Code. Radio locked. Wait for
30 minutes". After the text has
disappeared it is possible to start the
code entering procedure again.
Vehicle radio passport
This document certifies ownership of
the system. The vehicle radio passport
shows the system model, serial number
and secret code.
In case of loss of the car radio
passport, contact the Fiat Dealership,
taking an ID document and the car
ownership documents.
212
MULTIMEDIA
Page 221 of 252
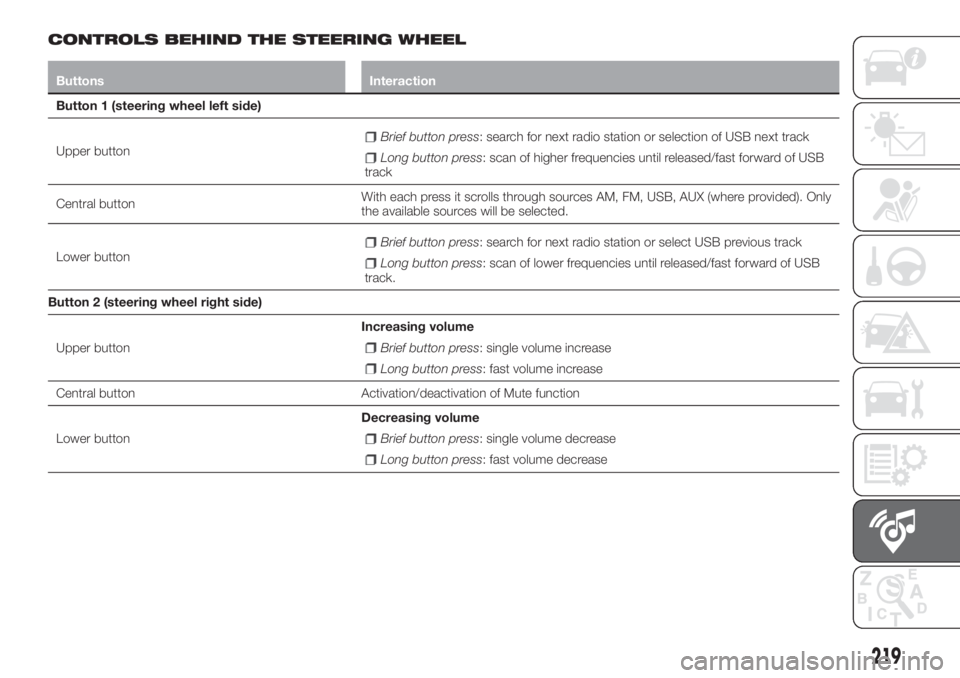
CONTROLS BEHIND THE STEERING WHEEL
Buttons Interaction
Button 1 (steering wheel left side)
Upper button
Brief button press: search for next radio station or selection of USB next track
Long button press: scan of higher frequencies until released/fast forward of USB
track
Central buttonWith each press it scrolls through sources AM, FM, USB, AUX (where provided). Only
the available sources will be selected.
Lower button
Brief button press: search for next radio station or select USB previous track
Long button press: scan of lower frequencies until released/fast forward of USB
track.
Button 2 (steering wheel right side)
Upper buttonIncreasing volume
Brief button press: single volume increase
Long button press: fast volume increase
Central button Activation/deactivation of Mute function
Lower buttonDecreasing volume
Brief button press: single volume decrease
Long button press: fast volume decrease
219
Page 222 of 252
SWITCHING THE SYSTEM
ON/OFF
The system is switched on/off by
pressing the
button/knob.
Turn the button/knob clockwise to
increase the radio volume or
anticlockwise to decrease it. The
electronic volume adjustment control
rotates continuously (360°) in both
directions, without stop positions.
RADIO (TUNER) MODE
The system is equipped with the
following tuners: AM and FM .
Radio mode selection
Press the RADIO button on the front
panel to activate radio mode.
Selecting a frequency band
The different tuning modes can be
selected by pressing the RADIO button
on the front panel.
Displayed information
After the desired radio station is
selected on the display, the following
information is shown (INFO mode
activated):
In the upper part: the preset station, the
time and the other active radio settings
are highlighted.In the central part: the name of the
current station, the frequency and the
radio text information (if any) are
highlighted.
FM station list
Press the BROWSE ENTER
button/knob to display the complete list
of the FM stations that can be received.
AM/FM radio station storage
The preset stations are available in all
system modes and are selected by
touching one of the presetting buttons
1-2-3-4-5-6on the front panel. If you
are tuned to a radio station that you
wish to store, hold down the button on
the display which corresponds to the
desired preset until an acoustic warning
is emitted.
AM/FM radio station selection
To search for the desired radio station
press the
orbutton or use the
wheel of the steering wheel controls, or
turn the "BROWSE ENTER" knob.
Previous/next radio station search
Briefly press the
orbutton:
when the button is released the
previous or the next radio station is
displayed.Previous/next radio station fast
search
Hold down the
orbutton to
start the fast search: when the button is
released, the first tunable radio is
played.
MEDIA MODE
Interaction modes for AUX (where
provided), USB operation.
Audio source selection
To select the desired audio source
among those available: AUX (where
provided) or USB, press theMEDIA
media.
To select and playback music tracks on
the cell phone CD card (where the
phone allows) press the BROWSE
ENTER button, select Folders then
Card.
IMPORTANT Some multimedia players
may not be compatible with the
Uconnect™.
CHANGE TRACK (next/previous)
Briefly press the
button to play the
next track or briefly press the
button to return to the beginning
of the selected track or to the beginning
of the previous track if this has been
played for less than 3 seconds.
220
MULTIMEDIA
Page 230 of 252
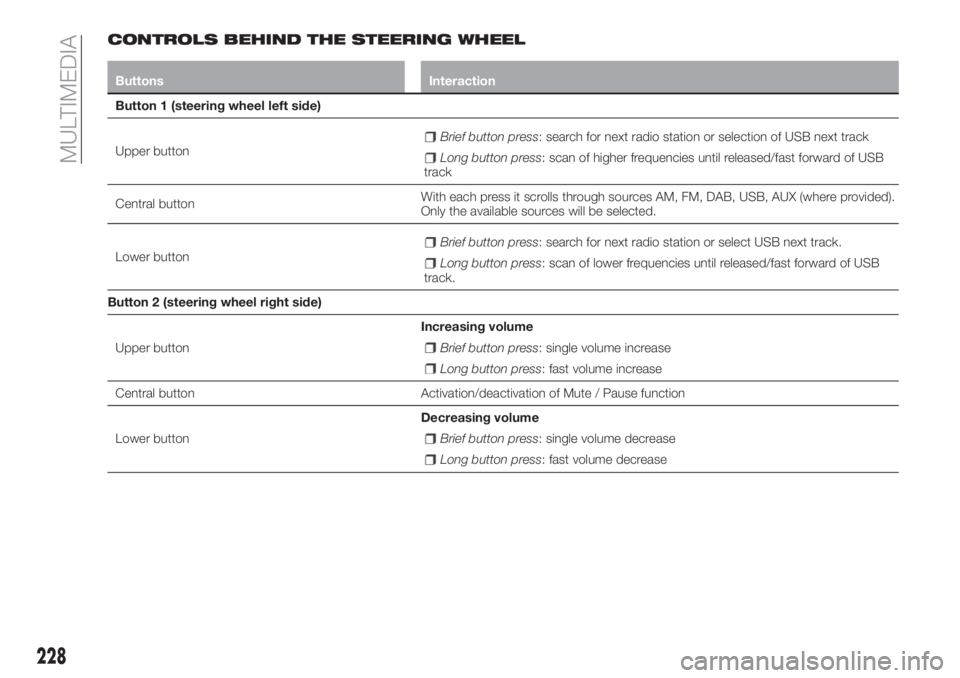
CONTROLS BEHIND THE STEERING WHEEL
Buttons Interaction
Button 1 (steering wheel left side)
Upper button
Brief button press: search for next radio station or selection of USB next track
Long button press: scan of higher frequencies until released/fast forward of USB
track
Central buttonWith each press it scrolls through sources AM, FM, DAB, USB, AUX (where provided).
Only the available sources will be selected.
Lower button
Brief button press: search for next radio station or select USB next track.
Long button press: scan of lower frequencies until released/fast forward of USB
track.
Button 2 (steering wheel right side)
Upper buttonIncreasing volume
Brief button press: single volume increase
Long button press: fast volume increase
Central button Activation/deactivation of Mute / Pause function
Lower buttonDecreasing volume
Brief button press: single volume decrease
Long button press: fast volume decrease
228
MULTIMEDIA
Page 231 of 252
SWITCHING THE SYSTEM
ON/OFF
The system is switched on/off by
pressing the
button/knob.
Turn the button/knob clockwise to
increase the radio volume or
anticlockwise to decrease it. The
electronic volume adjustment control
rotates continuously (360°) in both
directions, without stop positions.
RADIO MODE
After the desired radio station is
selected, the following information is
shown on the display:
At the top: the list of radio stations
stored (preset) is displayed; the station
being listened to is highlighted.
In the middle: display of the name of
the current radio station and the
buttons for selecting the previous or
next radio station.
At the bottom: display of the following
buttons:
"Browse": list of the radio stations
available;
"AM/FM", "AM/DAB", "FM/DAB":
selection of the desired frequency band
(button reconfigurable according to the
band selected: AM, FM or DAB);
"Tune" : manual radio station tuning
(not available for DAB radios);
"Info": additional information on the
source being listened to;
"Audio": access to the "Audio
setting" screen.
Audio menu
To access the "Audio" menu press the
Audio" button located at the bottom of
the display.
The following adjustments can be
carried out using the "Audio" menu:
"Equalizer" (for versions/markets,
where provided);
"Balance/Fader" (left/right and
front/rear audio balance adjustment);
"Speed/Volume" (speed-dependent
automatic volume control);
"Loudness" (for versions/markets,
where provided);
"Auto-On Radio";
To exit the "Audio" menu, press the
/Done button.
MEDIA MODE
Press the "Source" button to select the
desired audio source among those
available: AUX (where provided), USB or
Bluetooth®
.
Applications used on portable devices
may be not compatible with the
Uconnect™system
Track selection (browse)
Use this function to scroll through and
select the tracks on the active device.The choices available depend on the
device connected.
For example, on a USB device, you can
also use the BROWSE ENTER
button/knob to scroll through the list of
artists, genres and albums available on
the device, depending on the
information available in the tracks.
Within each list, the "ABC" button
allows the user to skip to the desired
letter in the list.
NOTE This button might be disabled for
some
Apple®
devices.
NOTE The BROWSE ENTER button
does not allow any operation on an
AUX device (where provided).
Press the BROWSE ENTER button to
activate this function on the source
being played.
Turn the BROWSE ENTER button/knob
to select the desired category and then
press the button/knob to confirm the
selection.
Press the
button to cancel the
function.
Bluetooth®SOURCE
This mode is activated by pairing a
Bluetooth®
device containing music
tracks with the system.
229
Page 233 of 252
IMPORTANT NOTES
The functions of the device connected
with the AUX socket are directly
managed by the device itself: it is not
possible to change track/folder/playlist
or control playing start/end/pause with
the controls on the front panel or on the
steering wheel.
Do not leave the cable of your portable
player connected to the AUX socket
after disconnection, to avoid possible
hiss from the speakers.
PHONE MODE
PHONE MODE ACTIVATION
Press the PHONE button on the front
panel to activate the Phone mode.
NOTE To consult the list of mobile
phones and supported functions, visit
the www.driveuconnect.eu website
Use the buttons on the display to:
dial the phone number (using the
graphic keypad on the display);
display and call the contacts in the
mobile phone phonebook;
display and call contacts from the
registers of previous calls;
pair up to 10 phones/audio devices
to make access and connection easier
and quicker;
transfer calls from the system to the
mobile phone and vice versa and
deactivate the microphone audio for
private conversations.The mobile phone audio is transmitted
through the vehicle’s audio system; the
system automatically mutes the radio
when the Phone function is used.
PAIRING A MOBILE PHONE
IMPORTANT Carry out this operation
only with vehicle stationary and in safety
conditions; this function is deactivated
when the vehicle is moving.
The pairing procedure for a mobile
phone is described below: always
consult the handbook for the mobile
phone in any case.
To pair the mobile phone, proceed as
follows:
activate theBluetooth®
function on
the mobile phone;
press the PHONE button on the front
panel;
if no phone is paired with the system
yet, the display shows a dedicated
screen;
select "Yes" to start the recording
process, then search for the
Uconnect™device on the cell phone
(by selecting "No"instead you see the
main Phone screen);
when prompted by the mobile
phone, use its keypad to enter the PIN
code shown on the system display or
confirm on the mobile phone the PIN
displayed;
from the "Phone" screen you can
always pair a mobile phone by pressing
the "Settings" button: press the "Add
Device" button and proceed as
described above;
during the pairing stage a screen is
displayed showing the progress of the
operation;
when the pairing procedure is
completed successfully, a screen is
displayed: answer "Yes" to the question
to pair the mobile phone as favourite
(the mobile phone will have priority over
all other mobile phones to be paired
subsequently). If no other devices are
paired, the system will consider the first
associated device as favourite.
NOTE After updating the telephone
software, for correct operation it is
advisable to remove the telephone from
the list of devices paired to the radio,
delete the previous system pairing from
the telephone's availableBluetooth®
device list and pair it again.
MAKING A PHONE CALL
The operations described below can
only be accessed if supported by the
mobile phone in use.
For all functions available, refer to the
mobile phone owner's handbook.
A call can be made by:
selecting theicon (mobile phone
phonebook);
231