key FIAT TIPO 4DOORS 2020 Owner handbook (in English)
[x] Cancel search | Manufacturer: FIAT, Model Year: 2020, Model line: TIPO 4DOORS, Model: FIAT TIPO 4DOORS 2020Pages: 252, PDF Size: 7.29 MB
Page 232 of 252

PAIRING A Bluetooth®
AUDIO DEVICE
To pair aBluetooth®
audio device,
proceed as follows:
activate theBluetooth®
function on
the device;
press the MEDIA button on the front
panel;
if the "Media" source is active, press
the "Source" button;
select theBluetooth®
Media
source;
press the "Add Device" button;
search forUconnect™on the
Bluetooth®
audio device (during the
pairing stage a screen is displayed
showing the progress of the operation);
when requested by the audio device,
enter the PIN code shown on the
system display or confirm on the device
the PIN displayed;
if the pairing procedure is completed
successfully, a screen is displayed.
Answer "Yes" to the question to pair the
Bluetooth®
audio device as favourite
(the device will have priority over all
other devices to be paired
subsequently). If "No" is selected, the
priority is determined according to the
order of connection. The last device
connected will have the highest priority;
an audio device can also be paired
by pressing the PHONE
button on
the front panel and by selecting
"Settings" or, from the "Settings" menu,selecting "Phone/Bluetooth".
WARNING If the
Bluetooth®
connection between mobile phone and
system is lost, consult the mobile
phone handbook.
USB SOURCE
To activate the USB mode, insert the
corresponding USB device into the
USB port on the central console.
When a USB device is inserted with the
radio on, it starts to play the tracks on
the device if the “AutoPlay” is set to ON
in the “Audio” menu.
NOTE TheUconnect™system may
not support some USB keys: in this
case, it will not automatically switch
from “Radio” mode to “Media” mode. If
the device used does not play, verify its
compatibility by selecting Media mode:
a dedicated message will appear on the
Uconnect™system display.
IMPORTANT After using a USB
recharging socket, we recommend
disconnecting the device (smartphone),
always removing the cable from the
vehicle socket first, never from the
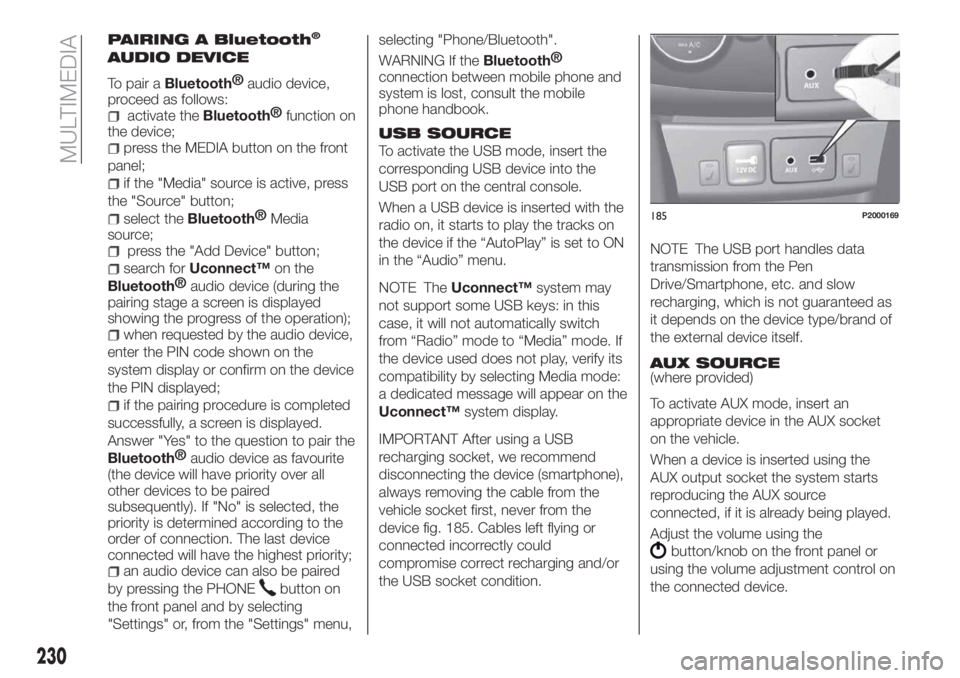
device fig. 185. Cables left flying or
connected incorrectly could
compromise correct recharging and/or
the USB socket condition.NOTE The USB port handles data
transmission from the Pen
Drive/Smartphone, etc. and slow
recharging, which is not guaranteed as
it depends on the device type/brand of
the external device itself.
AUX SOURCE
(where provided)
To activate AUX mode, insert an
appropriate device in the AUX socket
on the vehicle.
When a device is inserted using the
AUX output socket the system starts
reproducing the AUX source
connected, if it is already being played.
Adjust the volume using the
button/knob on the front panel or
using the volume adjustment control on
the connected device.
185P2000169
230
MULTIMEDIA
Page 233 of 252

IMPORTANT NOTES
The functions of the device connected
with the AUX socket are directly
managed by the device itself: it is not
possible to change track/folder/playlist
or control playing start/end/pause with
the controls on the front panel or on the
steering wheel.
Do not leave the cable of your portable
player connected to the AUX socket
after disconnection, to avoid possible
hiss from the speakers.
PHONE MODE
PHONE MODE ACTIVATION
Press the PHONE button on the front
panel to activate the Phone mode.
NOTE To consult the list of mobile
phones and supported functions, visit
the www.driveuconnect.eu website
Use the buttons on the display to:
dial the phone number (using the
graphic keypad on the display);
display and call the contacts in the
mobile phone phonebook;
display and call contacts from the
registers of previous calls;
pair up to 10 phones/audio devices
to make access and connection easier
and quicker;
transfer calls from the system to the
mobile phone and vice versa and
deactivate the microphone audio for
private conversations.The mobile phone audio is transmitted
through the vehicle’s audio system; the
system automatically mutes the radio
when the Phone function is used.
PAIRING A MOBILE PHONE
IMPORTANT Carry out this operation
only with vehicle stationary and in safety
conditions; this function is deactivated
when the vehicle is moving.
The pairing procedure for a mobile
phone is described below: always
consult the handbook for the mobile
phone in any case.
To pair the mobile phone, proceed as
follows:
activate theBluetooth®
function on
the mobile phone;
press the PHONE button on the front
panel;
if no phone is paired with the system
yet, the display shows a dedicated
screen;
select "Yes" to start the recording
process, then search for the
Uconnect™device on the cell phone
(by selecting "No"instead you see the
main Phone screen);
when prompted by the mobile
phone, use its keypad to enter the PIN
code shown on the system display or
confirm on the mobile phone the PIN
displayed;
from the "Phone" screen you can
always pair a mobile phone by pressing
the "Settings" button: press the "Add
Device" button and proceed as
described above;
during the pairing stage a screen is
displayed showing the progress of the
operation;
when the pairing procedure is
completed successfully, a screen is
displayed: answer "Yes" to the question
to pair the mobile phone as favourite
(the mobile phone will have priority over
all other mobile phones to be paired
subsequently). If no other devices are
paired, the system will consider the first
associated device as favourite.
NOTE After updating the telephone
software, for correct operation it is
advisable to remove the telephone from
the list of devices paired to the radio,
delete the previous system pairing from
the telephone's availableBluetooth®
device list and pair it again.
MAKING A PHONE CALL
The operations described below can
only be accessed if supported by the
mobile phone in use.
For all functions available, refer to the
mobile phone owner's handbook.
A call can be made by:
selecting theicon (mobile phone
phonebook);
231
Page 239 of 252

IMPORTANT INFORMATION AND RECOMMENDATIONS
WARNING
INTERIOR FITTINGS
Do not travel with the storage compartment open: it may injure the front seat occupants in the event of an accident.
The cigar lighter gets extremely hot. Handle it carefully and make sure that children don’t use it: risk of fire and/or burns.
Do not use the ashtray as a waste paper basket: it may catch fire in contact with cigarette stubs.
ROOF RACK/SKI RACK
Before driving, make sure that the transversal bars have been fitted properly.
ENVIRONMENTAL PROTECTION SYSTEMS
The catalytic converter and particulate filter (DPF) reach very high temperatures during operation. Therefore do not park the
vehicle on flammable materials (e.g. grass, dry leaves, pine needles, etc.): fire hazard.
FUEL
Modifications or repairs to the supply system that are not carried out correctly or do not take the system technical
specifications into account can cause malfunctions leading to the risk of fire.
IMPORTANT
ROOF RACK/SKI RACK
Never exceed the maximum permitted loads (see the "Weights" paragraph in the "Technical specifications" chapter).
Fully comply with the regulations in force concerning maximum clearance.
IMPORTANT
THE KEYS
Used batteries may be harmful to the environment if not disposed of correctly. They must be disposed of as specified by law
in the special containers or taken to a Fiat Dealership, which will take care of their disposal.
237
Page 248 of 252

engine marking............188
identification data plate.......187
Ignition device...............11
Important information and
recommendations..........237
Interior lights................23
Interiors (cleaning)............184
ISOFIX child restraint system
(installation)...............89
iTPMS (indirect Tyre Pressure
Monitoring System)..........76
Jump starting..............146
Key removal (automatic
transmission).............150
Keys.....................10
key with remote control.......10
Lever release
(automatic transmission)......150
Lifting the vehicle.............180
Light bulbs
Bulbs types..............127
Luggage compartment
(extension)................15
Main beam headlights..........22
Main beam headlights
(changing a bulb)...........130
Main menu...............47,48
Manual climate control..........27
Manual transmission..........106
Mopar Connect.............235Multi-functional display - Right
hand drive version...........44
Multi-Functional Reconfigurable
Display - Right hand drive
version..................45
Multifunction display...........41
Number plate lights
(bulb replacement)..........132
Occupant protection systems.....79
Official type approvals.........236
Paintwork (cleaning and
maintenance).............182
Parking Brake...............105
Parking lights................21
Parking sensors.............114
Parking the vehicle...........105
Passenger compartment air
diffusers.................26
Passive/active safety
(LPG system)..............36
PBA (system)................70
Performance (top speed)........208
Periodic checks
(scheduled servicing)........164
Pre-tensioners...............83
Load limiters..............84
Prescriptions for handling the
vehicle at the end of its life.....210
Rain sensor................25
Rear direction indicators
(bulb replacement)..........131Rear power socket............35
Rear seats..................15
Rear side lights (bulb
replacement)..............131
Rear view camera............116
Rear View Camera............116
Rear view mirrors.............19
Reconfigurable Multifunction
Display..................42
Refuelling.................200
Refuelling procedure..........120
Emergency refuelling........122
Refuelling the vehicle..........119
Replacing a bulb.............126
Replacing an external bulb......129
Rims and tyres (dimensions)......192
Saving fuel................118
SBR (Seat Belt Reminder)........81
SBR (Seat Belt Reminder)
system..................81
Scheduled servicing...........154
Screen wiper/washer...........24
Smart washing function.......24
Seat belts..................79
Seats.....................14
Service schedule.............155
Servicing procedures..........178
Side bag..................101
INDEX