change time FIAT TIPO 5DOORS STATION WAGON 2018 Owner handbook (in English)
[x] Cancel search | Manufacturer: FIAT, Model Year: 2018, Model line: TIPO 5DOORS STATION WAGON, Model: FIAT TIPO 5DOORS STATION WAGON 2018Pages: 292, PDF Size: 7.74 MB
Page 80 of 292
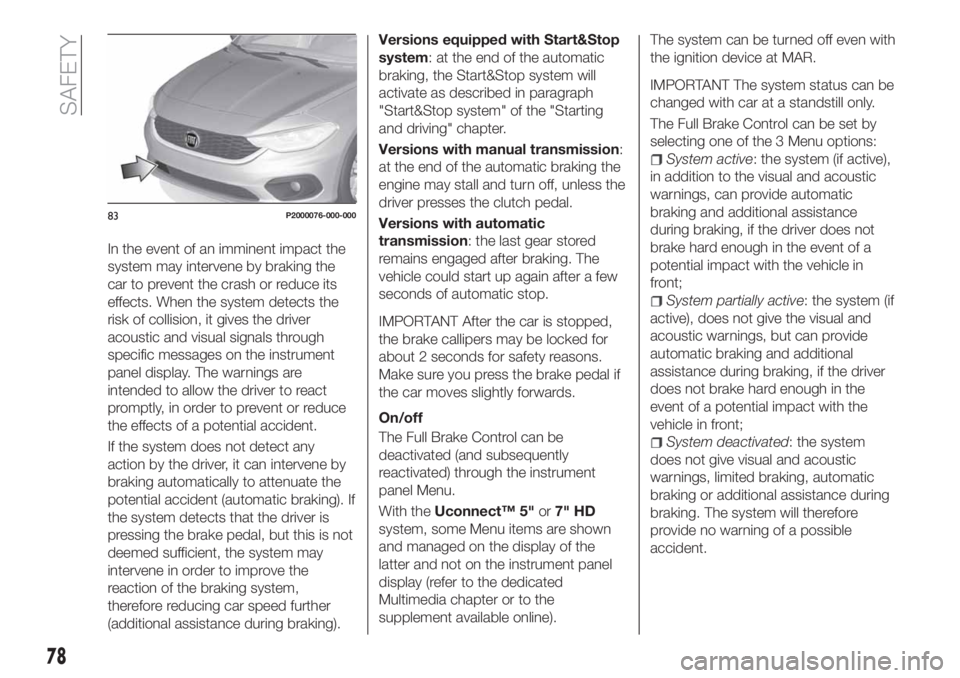
In the event of an imminent impact the
system may intervene by braking the
car to prevent the crash or reduce its
effects. When the system detects the
risk of collision, it gives the driver
acoustic and visual signals through
specific messages on the instrument
panel display. The warnings are
intended to allow the driver to react
promptly, in order to prevent or reduce
the effects of a potential accident.
If the system does not detect any
action by the driver, it can intervene by
braking automatically to attenuate the
potential accident (automatic braking). If
the system detects that the driver is
pressing the brake pedal, but this is not
deemed sufficient, the system may
intervene in order to improve the
reaction of the braking system,
therefore reducing car speed further
(additional assistance during braking).Versions equipped with Start&Stop
system: at the end of the automatic
braking, the Start&Stop system will
activate as described in paragraph
"Start&Stop system" of the "Starting
and driving" chapter.
Versions with manual transmission:
at the end of the automatic braking the
engine may stall and turn off, unless the
driver presses the clutch pedal.
Versions with automatic
transmission: the last gear stored
remains engaged after braking. The
vehicle could start up again after a few
seconds of automatic stop.
IMPORTANT After the car is stopped,
the brake callipers may be locked for
about 2 seconds for safety reasons.
Make sure you press the brake pedal if
the car moves slightly forwards.
On/off
The Full Brake Control can be
deactivated (and subsequently
reactivated) through the instrument
panel Menu.
With theUconnect™ 5"or7" HD
system, some Menu items are shown
and managed on the display of the
latter and not on the instrument panel
display (refer to the dedicated
Multimedia chapter or to the
supplement available online).The system can be turned off even with
the ignition device at MAR.
IMPORTANT The system status can be
changed with car at a standstill only.
The Full Brake Control can be set by
selecting one of the 3 Menu options:
System active: the system (if active),
in addition to the visual and acoustic
warnings, can provide automatic
braking and additional assistance
during braking, if the driver does not
brake hard enough in the event of a
potential impact with the vehicle in
front;
System partially active: the system (if
active), does not give the visual and
acoustic warnings, but can provide
automatic braking and additional
assistance during braking, if the driver
does not brake hard enough in the
event of a potential impact with the
vehicle in front;
System deactivated: the system
does not give visual and acoustic
warnings, limited braking, automatic
braking or additional assistance during
braking. The system will therefore
provide no warning of a possible
accident.
83P2000076-000-000
78
SAFETY
Page 81 of 292
Activation/deactivation
If the Full Brake Control system has
been correctly activated from the Menu,
it will be active each time the engine is
started.
Following a deactivation, the system will
not warn the driver about the possible
accident with the preceding vehicle.
The system deactivation status will not
be stored when the engine is switched
off: if the system is deactivated when
the engine is switched off, it will be
active when it is next started.
This function is not active at a speed
lower than 7 km/h or higher than
200 km/h.
The system is only active if:
it is correctly activated through the
Menu;
the ignition device is at MAR;
the car speed is between 7 and
200 km/h;
the front seat belts are fastened.
Changing the system sensitivity
The sensitivity of the system can be
changed through the Menu, choosing
from one of the following three options:
"Near", "Med" or "Far". See the
description in theUconnect™ 5"o7"
HDsupplement for how to change the
settings.
The default option is "Near".With this setting, the system will warn
the driver of a possible accident with
the vehicle in front when it is close. This
setting offers the driver a lower reaction
time compared to the "Med" and "Far"
settings, in the event of a potential
accident, but permits more dynamic
driving of the car.
With the system sensitivity set to "Far",
the system will warn the driver of a
possible accident with the vehicle in
front when that vehicle is at a greater
distance, thus providing the possibility
of acting on the brakes more lightly and
gradually. This setting provides the
drivers with the maximum possible
reaction time to prevent a potential
accident.
Changing the setting to “Med”, the
system warns the driver of a possible
accident with the vehicle in front when it
is at a standard distance, between that
of the other two settings. The system
sensitivity setting is kept in the memory
when the engine is switched off.
System failure warning
If the system switches off and a
dedicated message is shown on the
display, it means that there is a failure
on the system.
In this case, it is still possible to drive
the car, but you are advised to contact
a Fiat Dealership as soon as possible.Radar warning not available
If conditions are such that the radar
cannot detect obstacles correctly, the
system is deactivated and a dedicated
message appears on the display. This
generally occurs in the event of poor
visibility, such as when it is snowing or
raining heavily.
The system can also be temporarily
dimmed due to obstructions such as
mud, dirt or ice on the bumper. In such
cases, a dedicated message will be
shown on the display and the system
will be deactivated. This message can
sometimes appear in conditions of high
reflectivity (e.g. tunnels with reflective
tiles or ice or snow). When the
conditions limiting the system functions
end, this will go back to normal and
complete operation.
In certain particular cases, this
dedicated message could be displayed
when the radar is not detecting any
vehicles or objects within its view range.
If atmospheric conditions are not the
real reason behind this message, check
if the sensor is dirty. It could be
necessary to clean or remove any
obstructions in the area shown in
fig. 83.
If the message appears often, even in
the absence of atmospheric conditions
such as snow, rain, mud or other
79
Page 84 of 292
This indication is displayed also when
turning the engine off and on again until
the RESET procedure is carried out.
Reset procedure
The iTPMS needs an initial
"self-learning" phase (with length
depending on the driving style and road
conditions: optimal conditions being
driving on a straight road at 80 km/h for
at least 20 minutes) which starts when
the RESET procedure is carried out.
The RESET procedure must be carried
out:
each time tyre pressure is modified;
when even only one tyre is changed;
when tyres are rotated/inverted;
when the space-saver wheel is fitted.
Before carrying out the RESET
procedure, inflate the tyres to the rated
pressure values specified in the inflation
pressure table (see "Wheels" paragraph
in the "Technical specifications"
chapter).
If the RESET is not carried out, in all
above cases, the
warning light may
give false indications on one or more
tyres.
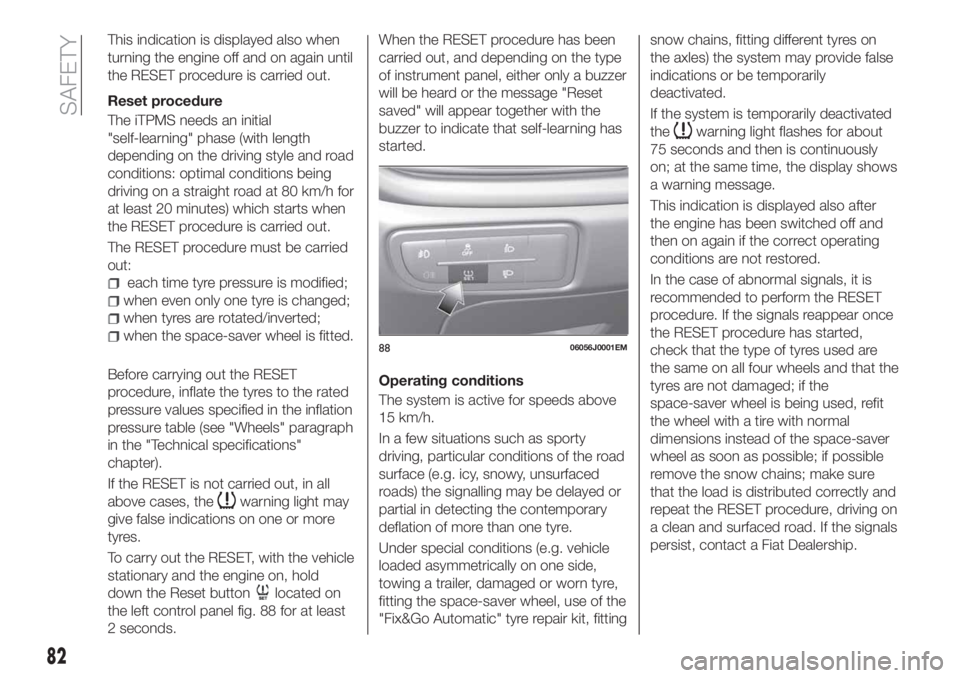
To carry out the RESET, with the vehicle
stationary and the engine on, hold
down the Reset button
located on
the left control panel fig. 88 for at least
2 seconds.When the RESET procedure has been
carried out, and depending on the type
of instrument panel, either only a buzzer
will be heard or the message "Reset
saved" will appear together with the
buzzer to indicate that self-learning has
started.
Operating conditions
The system is active for speeds above
15 km/h.
In a few situations such as sporty
driving, particular conditions of the road
surface (e.g. icy, snowy, unsurfaced
roads) the signalling may be delayed or
partial in detecting the contemporary
deflation of more than one tyre.
Under special conditions (e.g. vehicle
loaded asymmetrically on one side,
towing a trailer, damaged or worn tyre,
fitting the space-saver wheel, use of the
"Fix&Go Automatic" tyre repair kit, fittingsnow chains, fitting different tyres on
the axles) the system may provide false
indications or be temporarily
deactivated.
If the system is temporarily deactivated
the
warning light flashes for about
75 seconds and then is continuously
on; at the same time, the display shows
a warning message.
This indication is displayed also after
the engine has been switched off and
then on again if the correct operating
conditions are not restored.
In the case of abnormal signals, it is
recommended to perform the RESET
procedure. If the signals reappear once
the RESET procedure has started,
check that the type of tyres used are
the same on all four wheels and that the
tyres are not damaged; if the
space-saver wheel is being used, refit
the wheel with a tire with normal
dimensions instead of the space-saver
wheel as soon as possible; if possible
remove the snow chains; make sure
that the load is distributed correctly and
repeat the RESET procedure, driving on
a clean and surfaced road. If the signals
persist, contact a Fiat Dealership.
8806056J0001EM
82
SAFETY
Page 88 of 292
SBR (SEAT BELT
REMINDER) SYSTEM
(for versions/markets, where provided)
The SBR system warns the passengers
of the front and rear (where provided)
seats if their seat belt is not fastened.
The system signals unfastened seat
belts with visual warnings (warning
lights on in the instrument panel and
symbols on the display) and an
acoustic signal (see the following
paragraphs).
NOTE To deactivate the acoustic
warning permanently go to a Fiat
Dealership. The acoustic warning can
be reactivated at any time through the
display menu (see the "Display"
paragraph in the "Knowing the
instrument panel" chapter).
Front seat belt warning light
behaviour
When the ignition device is turned to
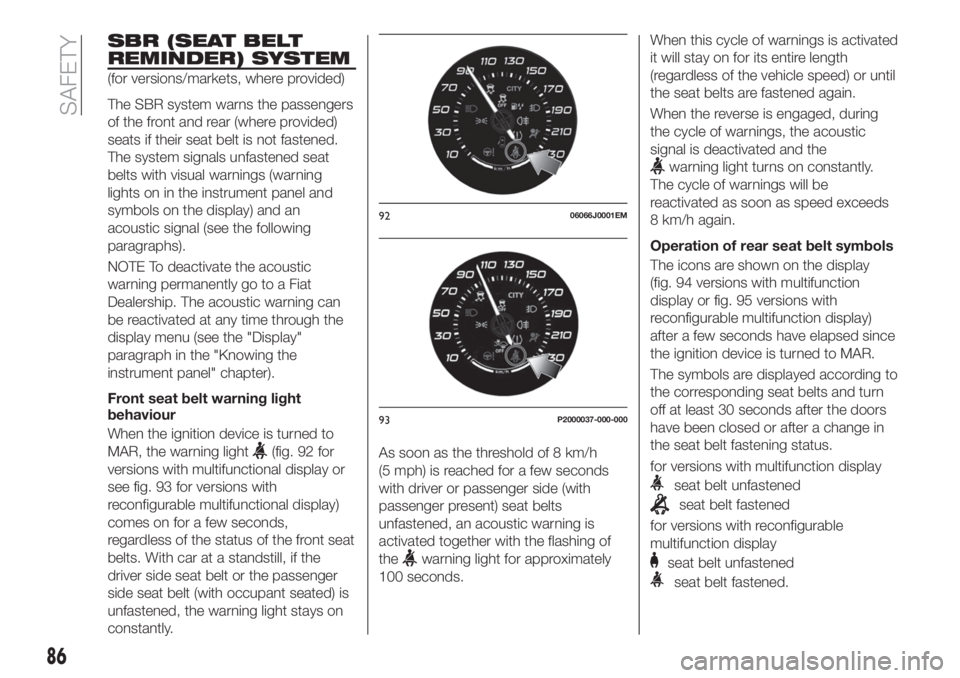
MAR, the warning light
(fig. 92 for
versions with multifunctional display or
see fig. 93 for versions with
reconfigurable multifunctional display)
comes on for a few seconds,
regardless of the status of the front seat
belts. With car at a standstill, if the
driver side seat belt or the passenger
side seat belt (with occupant seated) is
unfastened, the warning light stays on
constantly.As soon as the threshold of 8 km/h
(5 mph) is reached for a few seconds
with driver or passenger side (with
passenger present) seat belts
unfastened, an acoustic warning is
activated together with the flashing of
the
warning light for approximately
100 seconds.When this cycle of warnings is activated
it will stay on for its entire length
(regardless of the vehicle speed) or until
the seat belts are fastened again.
When the reverse is engaged, during
the cycle of warnings, the acoustic
signal is deactivated and the
warning light turns on constantly.
The cycle of warnings will be
reactivated as soon as speed exceeds
8 km/h again.
Operation of rear seat belt symbols
The icons are shown on the display
(fig. 94 versions with multifunction
display or fig. 95 versions with
reconfigurable multifunction display)
after a few seconds have elapsed since
the ignition device is turned to MAR.
The symbols are displayed according to
the corresponding seat belts and turn
off at least 30 seconds after the doors
have been closed or after a change in
the seat belt fastening status.
9206066J0001EM
93P2000037-000-000
86
SAFETY
for versions with multifunction display
seat belt unfastened
seat belt fastened
for versions with reconfigurable
multifunction display
seat belt unfastened
seat belt fastened.
Page 89 of 292
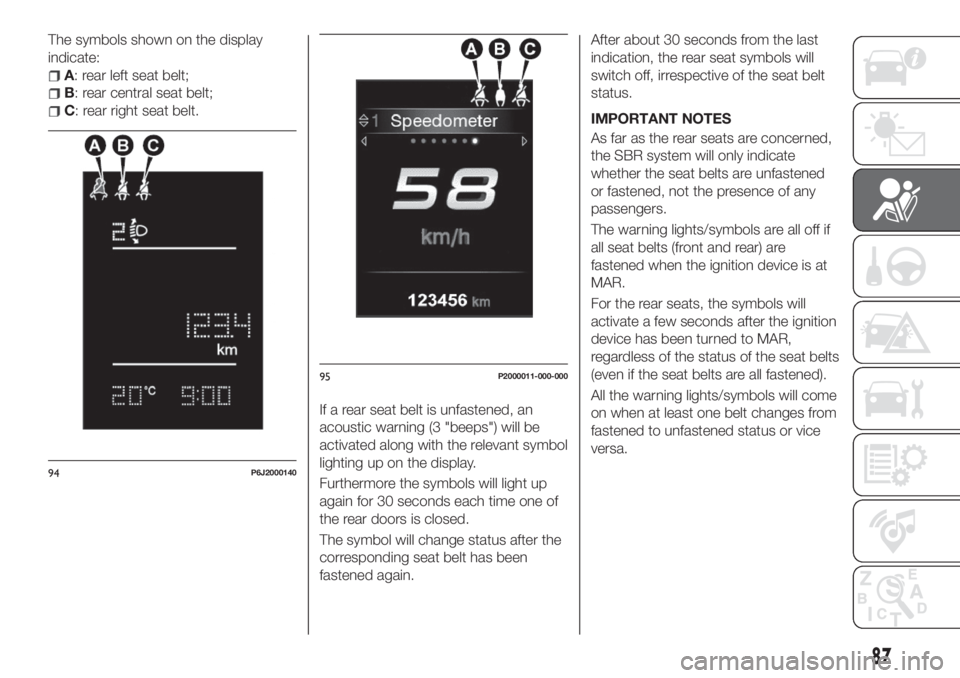
The symbols shown on the display
indicate:
A: rear left seat belt;
B: rear central seat belt;
C: rear right seat belt.
If a rear seat belt is unfastened, an
acoustic warning (3 "beeps") will be
activated along with the relevant symbol
lighting up on the display.
Furthermore the symbols will light up
again for 30 seconds each time one of
the rear doors is closed.
The symbol will change status after the
corresponding seat belt has been
fastened again.After about 30 seconds from the last
indication, the rear seat symbols will
switch off, irrespective of the seat belt
status.
IMPORTANT NOTES
As far as the rear seats are concerned,
the SBR system will only indicate
whether the seat belts are unfastened
or fastened, not the presence of any
passengers.
The warning lights/symbols are all off if
all seat belts (front and rear) are
fastened when the ignition device is at
MAR.
For the rear seats, the symbols will
activate a few seconds after the ignition
device has been turned to MAR,
regardless of the status of the seat belts
(even if the seat belts are all fastened).
All the warning lights/symbols will come
on when at least one belt changes from
fastened to unfastened status or vice
versa.
94P6J2000140
95P2000011-000-000
87
Page 90 of 292
PRE-TENSIONERS
The vehicle is equipped with front seat
belt pretensioners, which draw back the
seat belts by several centimetres in the
event of a strong frontal impact. This
guarantees the perfect adherence of
the seat belts to the occupant's bodies
before the retention action begins.
It is evident that the pretensioners have
been activated when the safety belt
withdraws toward the retractor.
This vehicle is also equipped with a
second pretensioner (in the kick plate
area). Its activation is signalled by the
shortening of the metal cable and rolling
up of the protective sheath.
A slight discharge of smoke may be
produced during the activation of the
pretensioner which is not harmful and
does not involve any fire hazard.
The pretensioner does not require any
maintenance or lubrication: any
changes to its original conditions will
invalidate its efficiency.
If, due to unusual natural events (floods,
sea storms, etc.), the device has been
affected by water and/or mud, contact
a Fiat Dealership to have it replaced.
IMPORTANT To obtain the highest
degree of protection from the action of
the pretensioner, wear the seat belt
tight to the torso and pelvis.LOAD LIMITERS
76)
37)
To increase safety in the event of an
accident, the front seat belt retractors
contain a load limiter which controls the
force acting on the chest and shoulders
during the belt restraining action in the
event of a head-on collision.
GENERAL
INSTRUCTIONS FOR
USING THE SEAT BELTS
77) 78) 79)
Seat belts must also be worn by
pregnant women: the risk of injury in the
event of an accident is reduced for
them and the unborn child if they are
wearing a seat belt.
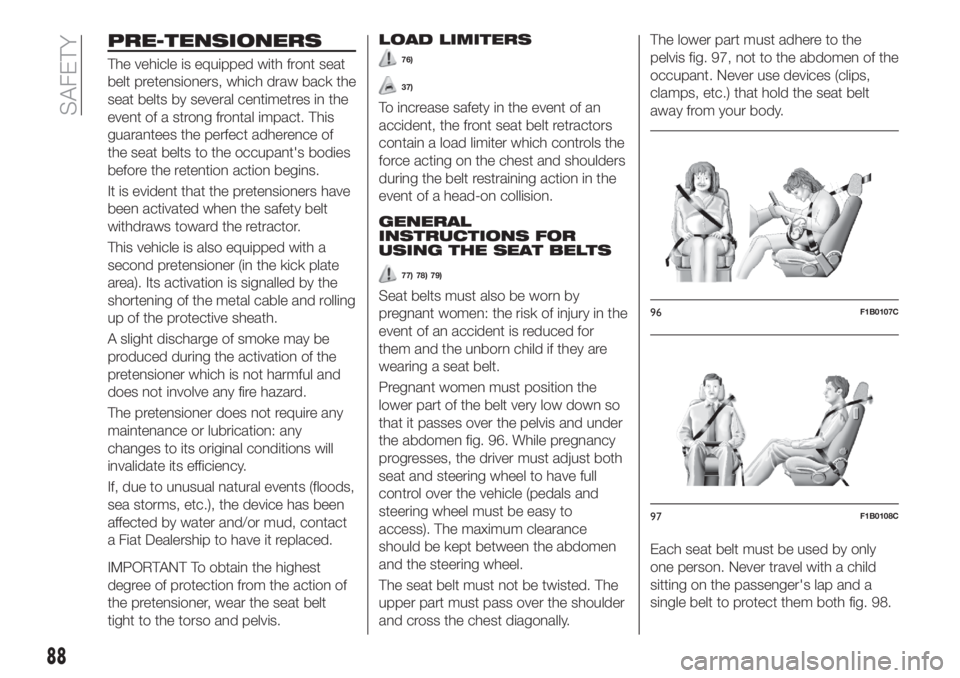
Pregnant women must position the
lower part of the belt very low down so
that it passes over the pelvis and under
the abdomen fig. 96. While pregnancy
progresses, the driver must adjust both
seat and steering wheel to have full
control over the vehicle (pedals and
steering wheel must be easy to
access). The maximum clearance
should be kept between the abdomen
and the steering wheel.
The seat belt must not be twisted. The
upper part must pass over the shoulder
and cross the chest diagonally.The lower part must adhere to the
pelvis fig. 97, not to the abdomen of the
occupant. Never use devices (clips,
clamps, etc.) that hold the seat belt
away from your body.
Each seat belt must be used by only
one person. Never travel with a child
sitting on the passenger's lap and a
single belt to protect them both fig. 98.96F1B0107C
97F1B0108C
88
SAFETY
Page 113 of 292
MANUAL GEARBOX
114)
42)
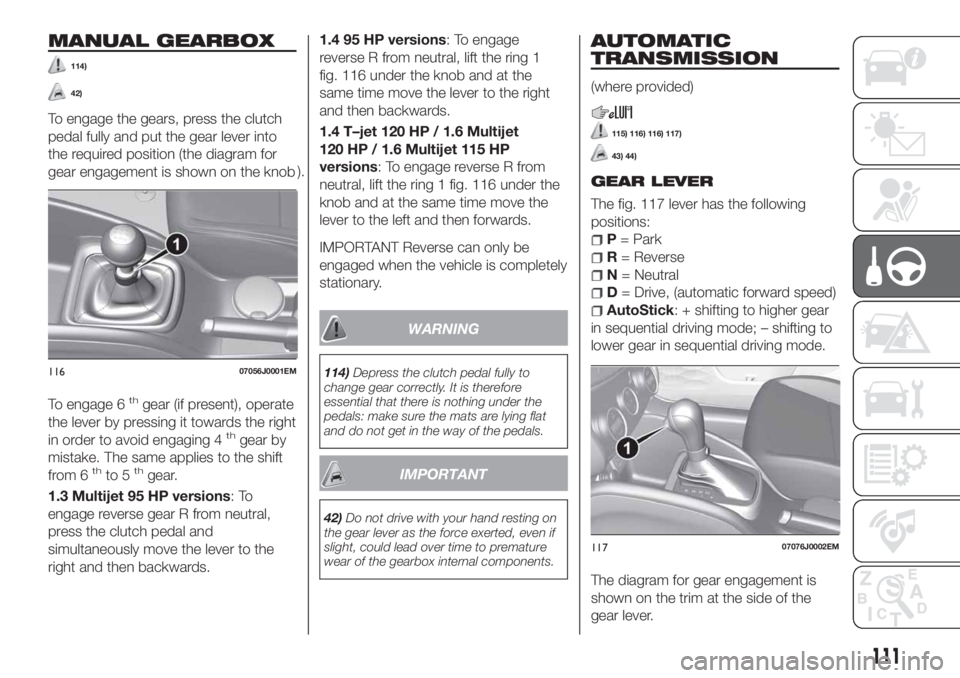
To engage the gears, press the clutch
pedal fully and put the gear lever into
the required position (the diagram for
gear engagement is shown on the knob).
To engage 6
thgear (if present), operate
the lever by pressing it towards the right
in order to avoid engaging 4
thgear by
mistake. The same applies to the shift
from 6
thto 5thgear.
1.3 Multijet 95 HP versions:To
engage reverse gear R from neutral,
press the clutch pedal and
simultaneously move the lever to the
right and then backwards.1.4 95 HP versions: To engage
reverse R from neutral, lift the ring 1
fig. 116 under the knob and at the
same time move the lever to the right
and then backwards.
1.4 T–jet 120 HP / 1.6 Multijet
120 HP / 1.6 Multijet 115 HP
versions: To engage reverse R from
neutral, lift the ring 1 fig. 116 under the
knob and at the same time move the
lever to the left and then forwards.
IMPORTANT Reverse can only be
engaged when the vehicle is completely
stationary.
WARNING
114)Depress the clutch pedal fully to
change gear correctly. It is therefore
essential that there is nothing under the
pedals: make sure the mats are lying flat
and do not get in the way of the pedals.
IMPORTANT
42)Do not drive with your hand resting on
the gear lever as the force exerted, even if
slight, could lead over time to premature
wear of the gearbox internal components.
AUTOMATIC
TRANSMISSION
(where provided)
115) 116) 116) 117)
43) 44)
GEAR LEVER
The fig. 117 lever has the following
positions:
P= Park
R= Reverse
N= Neutral
D= Drive, (automatic forward speed)
AutoStick: + shifting to higher gear
in sequential driving mode; – shifting to
lower gear in sequential driving mode.
The diagram for gear engagement is
shown on the trim at the side of the
gear lever.
11607056J0001EM
11707076J0002EM
111
Page 126 of 292
Decreasing speed
After having set the device, the stored
speed can be reduced by holding the
SET – button pressed.
Press the SET – button once, the set
speed will decrease by 1 km/h (or the
equivalent in mph). Each subsequent
touch of the button will reduce the
speed by 1 km/h (or the equivalent
in mph).
Hold the SET – button down, the set
speed will decrease in 10 km/h steps
(or the equivalent in mph) until the
button is released. The set speed
decrease is shown on the display.
IMPORTANT NOTES
By keeping the accelerator pedal
depressed, the car can continue to
accelerate beyond the set speed. In this
case, press the SET + (or SET – )
button to set the speed to the current
speed of the car.
When the SET – button is pressed to
reduce the speed, the braking system
intervenes automatically if the engine
brake does not slow the car down
sufficiently to reach the set speed.
The device holds the set speed uphill
and downhill; however a slight variation
is entirely normal, particularly on slight
gradients.For versions with manual transmission,
gears can be shifted during operation of
the device to allow to select the gear
suited to the set speed and keep the
device set.
The device is cancelled when you press
and hold the clutch pedal down or
putting the gear lever in the neutral
position for more than a certain time
limit.
The automatic transmission (or dual
clutch automatic transmission) could
change to a lower gear when driving
downhill or when accelerating. This is
normal and necessary to maintain the
set speed.
The device is switched off while driving
if the brakes overheat.
ACCELERATING WHEN
OVERTAKING
If driving behind a vehicle at a speed
above 50 km/h with the Adaptive
Cruise Control on, when the direction
indicator is turned on, the device
provides additional acceleration to aid
overtaking.
For left-hand drive vehicles, the
overtaking aid is activated when the left
direction indicator is turned on, while for
right-hand vehicles it is activated by the
right direction indicator.In left-hand traffic, the overtaking assist
function is only active when the
left-hand lane is used for overtaking the
vehicle ahead (the opposite activation
logic is used in right-hand traffic
countries).
The device detects the direction of
traffic automatically when the car
passes from left-hand traffic to
right-hand traffic. In this case, the
overtaking assist function is only active
when the reference vehicle is overtaken
on the right.
The additional acceleration is activated
when the driver uses the right direction
indicator.
In this condition, the device no longer
provides the overtaking assist function
on the left-hand side until it determines
that the car has returned to left-hand
traffic conditions.
IMPORTANT For versions equipped
with dual-clutch automatic
transmission, the ECO function also
acts on the acceleration
responsiveness of the Adaptive Cruise
Control. If you prefer a more responsive
behaviour, you can turn off the ECO
function or operate the accelerator
pedal. In the latter case, normal
Adaptive Cruise Control operation will
resume when the pedal is released.
124
STARTING AND DRIVING
Page 127 of 292
RECALLING THE SPEED
Once the system has been cancelled
but not deactivated, if a speed was
previously set simply press the RES
(Resume) button and remove your foot
from the accelerator to recall it.
The system will be set to the last stored
speed.
Before returning to the previously set
speed, bring the speed close to that
value, press the RES (Resume) button
and then release it.
IMPORTANT The recall function must
only be used if the road and traffic
conditions so allow. Recalling an
excessively high or low speed for the
current traffic and road conditions could
cause an acceleration or a deceleration
of the vehicle. Failure to comply with
these precautions may cause serious
accidents and fatal injuries.
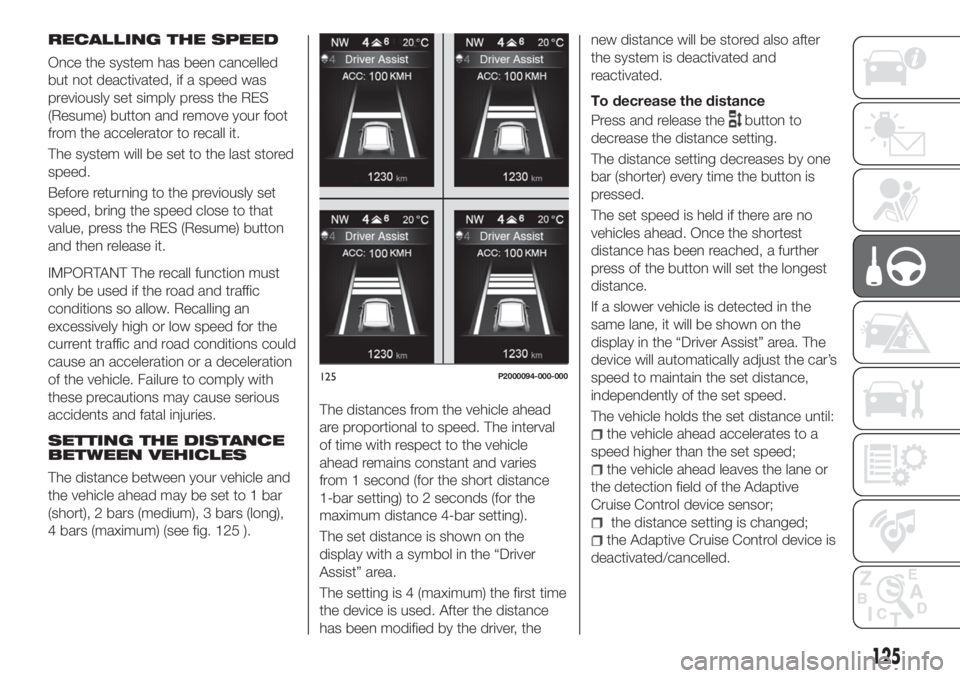
SETTING THE DISTANCE
BETWEEN VEHICLES
The distance between your vehicle and
the vehicle ahead may be set to 1 bar
(short), 2 bars (medium), 3 bars (long),
4 bars (maximum) (see fig. 125 ).The distances from the vehicle ahead
are proportional to speed. The interval
of time with respect to the vehicle
ahead remains constant and varies
from 1 second (for the short distance
1-bar setting) to 2 seconds (for the
maximum distance 4-bar setting).
The set distance is shown on the
display with a symbol in the “Driver
Assist” area.
The setting is 4 (maximum) the first time
the device is used. After the distance
has been modified by the driver, thenew distance will be stored also after
the system is deactivated and
reactivated.
To decrease the distance
Press and release the
button to
decrease the distance setting.
The distance setting decreases by one
bar (shorter) every time the button is
pressed.
The set speed is held if there are no
vehicles ahead. Once the shortest
distance has been reached, a further
press of the button will set the longest
distance.
If a slower vehicle is detected in the
same lane, it will be shown on the
display in the “Driver Assist” area. The
device will automatically adjust the car’s
speed to maintain the set distance,
independently of the set speed.
The vehicle holds the set distance until:
the vehicle ahead accelerates to a
speed higher than the set speed;
the vehicle ahead leaves the lane or
the detection field of the Adaptive
Cruise Control device sensor;
the distance setting is changed;
the Adaptive Cruise Control device is
deactivated/cancelled.
125P2000094-000-000
125
Page 129 of 292
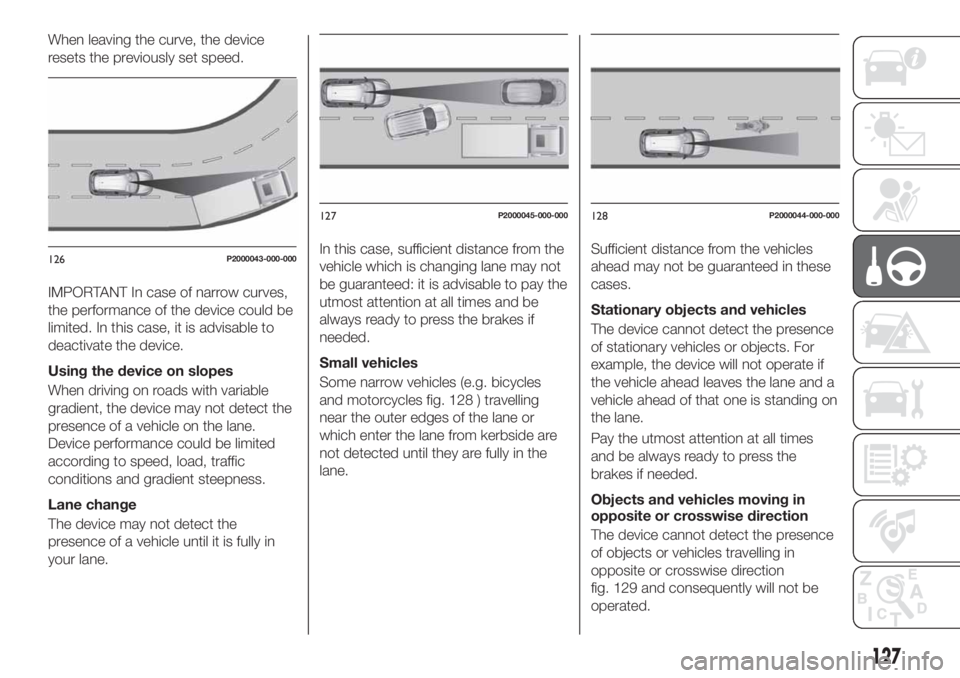
When leaving the curve, the device
resets the previously set speed.
IMPORTANT In case of narrow curves,
the performance of the device could be
limited. In this case, it is advisable to
deactivate the device.
Using the device on slopes
When driving on roads with variable
gradient, the device may not detect the
presence of a vehicle on the lane.
Device performance could be limited
according to speed, load, traffic
conditions and gradient steepness.
Lane change
The device may not detect the
presence of a vehicle until it is fully in
your lane.In this case, sufficient distance from the
vehicle which is changing lane may not
be guaranteed: it is advisable to pay the
utmost attention at all times and be
always ready to press the brakes if
needed.
Small vehicles
Some narrow vehicles (e.g. bicycles
and motorcycles fig. 128 ) travelling
near the outer edges of the lane or
which enter the lane from kerbside are
not detected until they are fully in the
lane.Sufficient distance from the vehicles
ahead may not be guaranteed in these
cases.
Stationary objects and vehicles
The device cannot detect the presence
of stationary vehicles or objects. For
example, the device will not operate if
the vehicle ahead leaves the lane and a
vehicle ahead of that one is standing on
the lane.
Pay the utmost attention at all times
and be always ready to press the
brakes if needed.
Objects and vehicles moving in
opposite or crosswise direction
The device cannot detect the presence
of objects or vehicles travelling in
opposite or crosswise direction
fig. 129 and consequently will not be
operated.
126P2000043-000-000
127P2000045-000-000128P2000044-000-000
127