tow FIAT TIPO 5DOORS STATION WAGON 2018 Owner handbook (in English)
[x] Cancel search | Manufacturer: FIAT, Model Year: 2018, Model line: TIPO 5DOORS STATION WAGON, Model: FIAT TIPO 5DOORS STATION WAGON 2018Pages: 292, PDF Size: 7.74 MB
Page 83 of 292
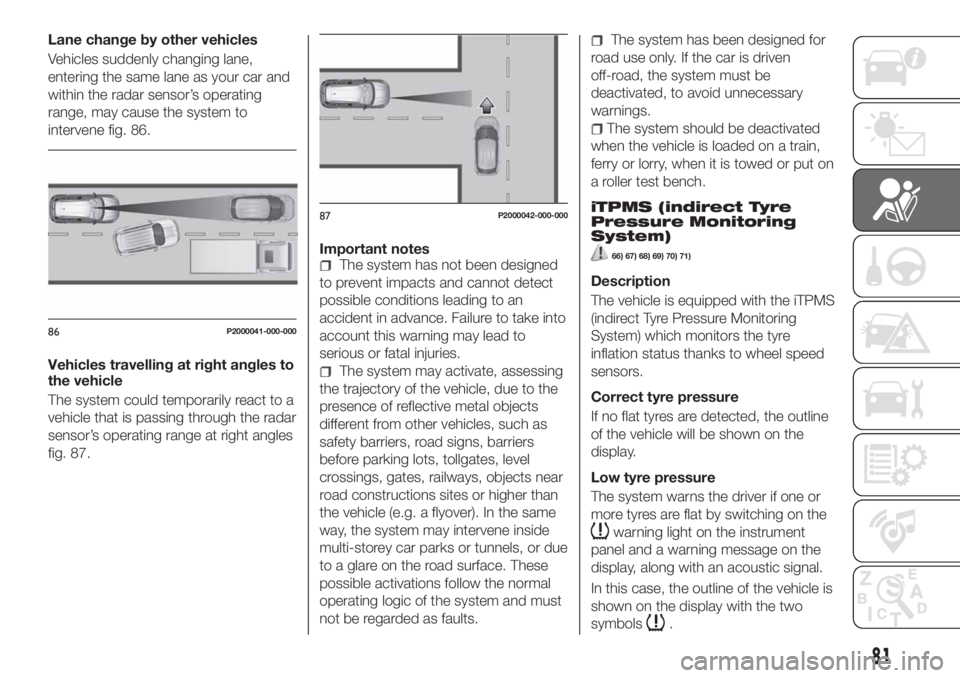
Lane change by other vehicles
Vehicles suddenly changing lane,
entering the same lane as your car and
within the radar sensor’s operating
range, may cause the system to
intervene fig. 86.
Vehicles travelling at right angles to
the vehicle
The system could temporarily react to a
vehicle that is passing through the radar
sensor’s operating range at right angles
fig. 87.Important notes
The system has not been designed
to prevent impacts and cannot detect
possible conditions leading to an
accident in advance. Failure to take into
account this warning may lead to
serious or fatal injuries.
The system may activate, assessing
the trajectory of the vehicle, due to the
presence of reflective metal objects
different from other vehicles, such as
safety barriers, road signs, barriers
before parking lots, tollgates, level
crossings, gates, railways, objects near
road constructions sites or higher than
the vehicle (e.g. a flyover). In the same
way, the system may intervene inside
multi-storey car parks or tunnels, or due
to a glare on the road surface. These
possible activations follow the normal
operating logic of the system and must
not be regarded as faults.
The system has been designed for
road use only. If the car is driven
off-road, the system must be
deactivated, to avoid unnecessary
warnings.
The system should be deactivated
when the vehicle is loaded on a train,
ferry or lorry, when it is towed or put on
a roller test bench.
iTPMS (indirect Tyre
Pressure Monitoring
System)
66) 67) 68) 69) 70) 71)
Description
The vehicle is equipped with the iTPMS
(indirect Tyre Pressure Monitoring
System) which monitors the tyre
inflation status thanks to wheel speed
sensors.
Correct tyre pressure
If no flat tyres are detected, the outline
of the vehicle will be shown on the
display.
Low tyre pressure
The system warns the driver if one or
more tyres are flat by switching on the
warning light on the instrument
panel and a warning message on the
display, along with an acoustic signal.
In this case, the outline of the vehicle is
shown on the display with the two
symbols
.
86P2000041-000-000
87P2000042-000-000
81
Page 84 of 292
This indication is displayed also when
turning the engine off and on again until
the RESET procedure is carried out.
Reset procedure
The iTPMS needs an initial
"self-learning" phase (with length
depending on the driving style and road
conditions: optimal conditions being
driving on a straight road at 80 km/h for
at least 20 minutes) which starts when
the RESET procedure is carried out.
The RESET procedure must be carried
out:
each time tyre pressure is modified;
when even only one tyre is changed;
when tyres are rotated/inverted;
when the space-saver wheel is fitted.
Before carrying out the RESET
procedure, inflate the tyres to the rated
pressure values specified in the inflation
pressure table (see "Wheels" paragraph
in the "Technical specifications"
chapter).
If the RESET is not carried out, in all
above cases, the
warning light may
give false indications on one or more
tyres.
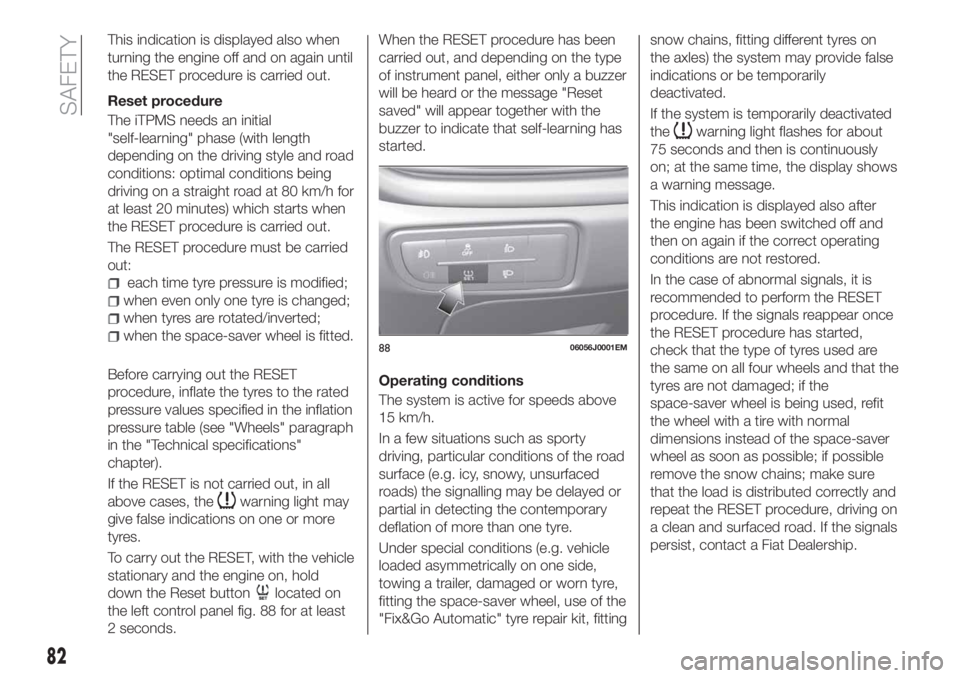
To carry out the RESET, with the vehicle
stationary and the engine on, hold
down the Reset button
located on
the left control panel fig. 88 for at least
2 seconds.When the RESET procedure has been
carried out, and depending on the type
of instrument panel, either only a buzzer
will be heard or the message "Reset
saved" will appear together with the
buzzer to indicate that self-learning has
started.
Operating conditions
The system is active for speeds above
15 km/h.
In a few situations such as sporty
driving, particular conditions of the road
surface (e.g. icy, snowy, unsurfaced
roads) the signalling may be delayed or
partial in detecting the contemporary
deflation of more than one tyre.
Under special conditions (e.g. vehicle
loaded asymmetrically on one side,
towing a trailer, damaged or worn tyre,
fitting the space-saver wheel, use of the
"Fix&Go Automatic" tyre repair kit, fittingsnow chains, fitting different tyres on
the axles) the system may provide false
indications or be temporarily
deactivated.
If the system is temporarily deactivated
the
warning light flashes for about
75 seconds and then is continuously
on; at the same time, the display shows
a warning message.
This indication is displayed also after
the engine has been switched off and
then on again if the correct operating
conditions are not restored.
In the case of abnormal signals, it is
recommended to perform the RESET
procedure. If the signals reappear once
the RESET procedure has started,
check that the type of tyres used are
the same on all four wheels and that the
tyres are not damaged; if the
space-saver wheel is being used, refit
the wheel with a tire with normal
dimensions instead of the space-saver
wheel as soon as possible; if possible
remove the snow chains; make sure
that the load is distributed correctly and
repeat the RESET procedure, driving on
a clean and surfaced road. If the signals
persist, contact a Fiat Dealership.
8806056J0001EM
82
SAFETY
Page 85 of 292
WARNING
62)The system is an aid for the driver, who
must always pay full attention while driving.
The responsibility always rests with the
driver, who must take into account the
traffic conditions in order to drive in
complete safety. The driver must always
maintain a safe distance from the vehicle in
front.
63)If the driver depresses the brake pedal
fully or carries out a fast steering during
system operation, the automatic braking
function may stop (e.g. to allow a possible
manoeuvre to avoid the obstacle).
64)The system intervenes on vehicles
travelling in the same lane. People, animals
and things (e.g. pushchairs) are not taken
into consideration.
65)If the car must be placed on a roller
bench for maintenance interventions or if it
is washed in an automatic roller washing
tunnel with an obstacle in the front part
(e.g. another car, a wall or another
obstacle), the system may detect its
presence and activate. In this case the
system must be deactivated through the
settings of theUconnect™5"or7" HD
system.
66)If the iTMPS system signals a pressure
decrease on the tyres, it is recommended
to check the pressure on all four tyres.
67)The iTPMS does not relieve the driver
from the obligation to check the tyre
pressure every month; it is not even to be
considered a replacing system for
maintenance or a safety system.68)Tyre pressure must be checked with
tyres cold. Should it become necessary for
whatever reason to check pressure with
warm tyres, do not reduce pressure even
though it is higher than the prescribed
value, but repeat the check when tyres are
cold
69)The iTPMS cannot indicate sudden tyre
pressure drops (e.g. if a tyre bursts). In this
case, stop the vehicle, braking with caution
and avoiding abrupt steering.
70)The system only warns that the tyre
pressure is low: it is not able to inflate
them.
71)Insufficient tyre inflation increases fuel
consumption, reduces the tread duration
and may affect the capacity to drive safely.
IMPORTANT
28)The system may have limited or absent
operation due to weather conditions such
as: heavy rain, hail, thick fog, heavy snow.
29)The section of the bumper before the
sensor must not be covered with
adhesives, auxiliary headlights or any other
object.
30)System intervention might be
unexpected or delayed when other vehicles
transport loads projecting from the side,
above or from the rear, with respect to the
normal size of the vehicle.
31)Operation can be adversely affected by
any structural change made to the vehicle,
such as a modification to the front
geometry, tyre change, or a heavier load
than the standard load of the vehicle.32)Incorrect repairs made on the front part
of the vehicle (e.g. bumper, chassis) may
alter the position of the radar sensor, and
adversely affect its operation. Go to a Fiat
Dealership for any operation of this type.
33)Do not tamper nor operate on the radar
sensor. In the event of a sensor failure,
contact a Fiat Dealership.
34)When towing a trailer (with modules
installed after purchasing the vehicle), a
vehicle or during loading manoeuvres on a
vehicle transporter (or in vehicle for
transport), the system must be deactivated
via theUconnect™5"or7" HDsystem.
35)Do not wash with high-pressure jets in
the bumper lower area: in particular do not
operate on the system's electrical
connector.
36)Be careful in the case of repairs and
new paintings in the area around the
sensor (panel covering the sensor on the
left side of the bumper). In the event of a
frontal impact the sensor may automatically
deactivate and display a warning to indicate
that the sensor needs to be repaired. Even
without a malfunction warning, deactivate
the system operation if you think that the
position of the radar sensor has changed
(e.g. due to low-speed frontal impact as
during parking manoeuvres). In these
cases, go to a Fiat Dealership to have the
radar sensor realigned or replaced.
83
Page 90 of 292
PRE-TENSIONERS
The vehicle is equipped with front seat
belt pretensioners, which draw back the
seat belts by several centimetres in the
event of a strong frontal impact. This
guarantees the perfect adherence of
the seat belts to the occupant's bodies
before the retention action begins.
It is evident that the pretensioners have
been activated when the safety belt
withdraws toward the retractor.
This vehicle is also equipped with a
second pretensioner (in the kick plate
area). Its activation is signalled by the
shortening of the metal cable and rolling
up of the protective sheath.
A slight discharge of smoke may be
produced during the activation of the
pretensioner which is not harmful and
does not involve any fire hazard.
The pretensioner does not require any
maintenance or lubrication: any
changes to its original conditions will
invalidate its efficiency.
If, due to unusual natural events (floods,
sea storms, etc.), the device has been
affected by water and/or mud, contact
a Fiat Dealership to have it replaced.
IMPORTANT To obtain the highest
degree of protection from the action of
the pretensioner, wear the seat belt
tight to the torso and pelvis.LOAD LIMITERS
76)
37)
To increase safety in the event of an
accident, the front seat belt retractors
contain a load limiter which controls the
force acting on the chest and shoulders
during the belt restraining action in the
event of a head-on collision.
GENERAL
INSTRUCTIONS FOR
USING THE SEAT BELTS
77) 78) 79)
Seat belts must also be worn by
pregnant women: the risk of injury in the
event of an accident is reduced for
them and the unborn child if they are
wearing a seat belt.
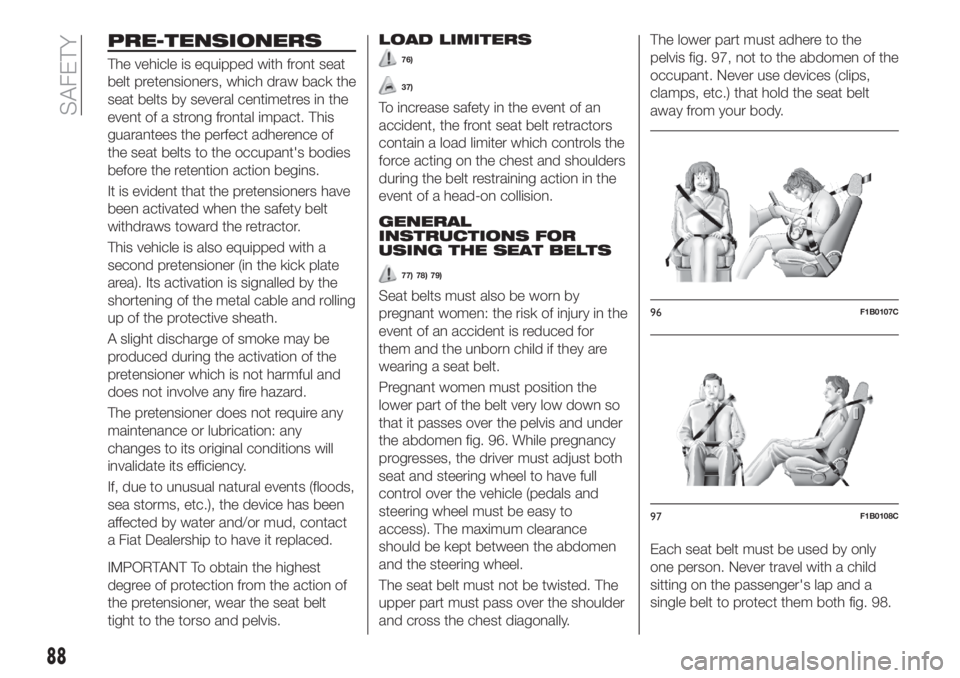
Pregnant women must position the
lower part of the belt very low down so
that it passes over the pelvis and under
the abdomen fig. 96. While pregnancy
progresses, the driver must adjust both
seat and steering wheel to have full
control over the vehicle (pedals and
steering wheel must be easy to
access). The maximum clearance
should be kept between the abdomen
and the steering wheel.
The seat belt must not be twisted. The
upper part must pass over the shoulder
and cross the chest diagonally.The lower part must adhere to the
pelvis fig. 97, not to the abdomen of the
occupant. Never use devices (clips,
clamps, etc.) that hold the seat belt
away from your body.
Each seat belt must be used by only
one person. Never travel with a child
sitting on the passenger's lap and a
single belt to protect them both fig. 98.96F1B0107C
97F1B0108C
88
SAFETY
Page 110 of 292
STARTING AND DRIVING
Let’s get to the core of the vehicle:
seeing how you can exploit all of its
potential to the full.
We’ll look at how to drive it safely in any
situation, so that it can be a welcome
companion, with our comfort and our
wallets in mind.STARTING THE ENGINE.......109
PARKING THE VEHICLE........110
PARKING BRAKE............110
MANUAL GEARBOX..........111
AUTOMATIC TRANSMISSION. . . .111
DUAL-CLUTCH AUTOMATIC
TRANSMISSION.............114
STOP/START SYSTEM........116
SPEED LIMITER.............118
ELECTRONIC CRUISE CONTROL .120
ADAPTIVE CRUISE CONTROL
(ACC)....................121
PARKING SENSORS..........129
REAR VIEW CAMERA.........131
TOWING TRAILERS..........133
REFUELLING THE VEHICLE.....134
108
STARTING AND DRIVING
Page 111 of 292
STARTING THE
ENGINE
Before starting the engine, adjust the
seat, the interior rear view mirrors, the
door mirrors and fasten the seat belt
correctly.
Never press the accelerator pedal for
starting the engine.
If necessary, messages indicating the
starting procedure can be shown on
the display.
ENGINE STARTING
PROCEDURE
107) 108) 109) 110)
38) 39) 40) 41)
Versions with manual transmission
Proceed as follows:
engage the parking brake and place
the gear lever in neutral;
fully depress the clutch pedal
without touching the accelerator;
only for diesel versions, bring the
ignition device to MAR, warning light
will come on in the instrument
panel and wait for the warning light to
switch off;
turn the ignition device to AVV and
release it as soon as the engine starts;
if the engine does not start within
10 seconds, bring the ignition deviceback to STOP and wait for
10-15 seconds before repeating the
starting procedure;
after the manoeuvre has been
repeated, if the problem persists,
contact a Fiat Dealership.
Versions with automatic
transmission
(where provided)
Proceed as follows:
engage the parking brake and set
the gear lever to P (Park) or N (Neutral);
set the ignition device to AVV;
if the engine does not start, bring the
ignition device back to STOP and wait
for 10-15 seconds before repeating the
starting procedure;
after the manoeuvre has been
repeated, if the problem persists,
contact a Fiat Dealership.
WARNING
107)Do not try to start the engine pouring
fuel or other flammable fluid inside the
throttle body air intake: this might damage
the engine and injury people nearby.
108)It is dangerous to run the engine in
enclosed areas. The engine takes in
oxygen and releases carbon dioxide,
carbon monoxide and other toxic gases.
109)The brake servo is not active until the
engine is started, so you would need to
apply much more force than usual to the
brake pedal.110)Do not start the engine by pushing,
towing or driving downhill. These
manoeuvres may damage the catalytic
converter.
IMPORTANT
38)We recommend that during the initial
period, or during the first 1600 km, you do
not drive to full car performance (e.g.
excessive acceleration, long journeys at top
speed, sharp braking, etc.).
39)When the engine is switched off never
leave the ignition device in the MAR
position to prevent useless current
absorption from draining the battery.
40)A quick burst on the accelerator before
turning off the engine serves absolutely no
practical purpose; it wastes fuel and is
especially damaging to turbocharged
engines.
41)Warning light
will flash after starting
or during prolonged cranking to indicate a
fault with the glow plug heating system. If
the engine starts, the vehicle can be used
as normal, but a Fiat Dealership must be
contacted as soon as possible.
109
Page 113 of 292
MANUAL GEARBOX
114)
42)
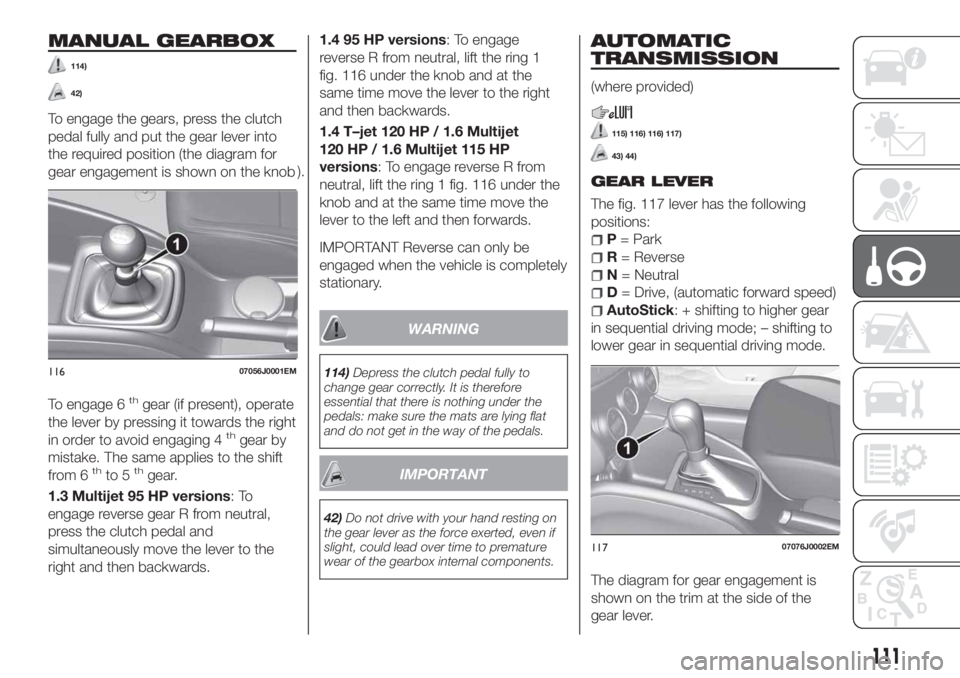
To engage the gears, press the clutch
pedal fully and put the gear lever into
the required position (the diagram for
gear engagement is shown on the knob).
To engage 6
thgear (if present), operate
the lever by pressing it towards the right
in order to avoid engaging 4
thgear by
mistake. The same applies to the shift
from 6
thto 5thgear.
1.3 Multijet 95 HP versions:To
engage reverse gear R from neutral,
press the clutch pedal and
simultaneously move the lever to the
right and then backwards.1.4 95 HP versions: To engage
reverse R from neutral, lift the ring 1
fig. 116 under the knob and at the
same time move the lever to the right
and then backwards.
1.4 T–jet 120 HP / 1.6 Multijet
120 HP / 1.6 Multijet 115 HP
versions: To engage reverse R from
neutral, lift the ring 1 fig. 116 under the
knob and at the same time move the
lever to the left and then forwards.
IMPORTANT Reverse can only be
engaged when the vehicle is completely
stationary.
WARNING
114)Depress the clutch pedal fully to
change gear correctly. It is therefore
essential that there is nothing under the
pedals: make sure the mats are lying flat
and do not get in the way of the pedals.
IMPORTANT
42)Do not drive with your hand resting on
the gear lever as the force exerted, even if
slight, could lead over time to premature
wear of the gearbox internal components.
AUTOMATIC
TRANSMISSION
(where provided)
115) 116) 116) 117)
43) 44)
GEAR LEVER
The fig. 117 lever has the following
positions:
P= Park
R= Reverse
N= Neutral
D= Drive, (automatic forward speed)
AutoStick: + shifting to higher gear
in sequential driving mode; – shifting to
lower gear in sequential driving mode.
The diagram for gear engagement is
shown on the trim at the side of the
gear lever.
11607056J0001EM
11707076J0002EM
111
Page 114 of 292
The gear engaged is shown on the
display.
To select a gear, move the lever
forwards or backwards.
To select the "sequential" mode, move
the lever from D (Drive) to the left: the
position + (upper gear) or – (lower gear)
can be reached; these are unstable
positions, which means that the lever
always returns to the central position.
The brake pedal and button 1
fig. 117 on the knob must be pressed
to exit position P (Park).
Also to shift from position N (neutral) to
position D (drive) or R (reverse), you
need to press the brake pedal.
IMPORTANT DO NOT accelerate while
shifting from position P (or N) to another
position.
IMPORTANT After selecting a gear, wait
a few seconds before accelerating. This
precaution is particularly important with
engine cold.
AUTOMATIC DRIVING
MODE
To select the automatic driving mode,
you need to shift the gear lever to D
(Drive): the best ratio is selected by the
electronic transmission control unit
depending on vehicle speed, engine
load (accelerator pedal position) and
gradient of the road.D can be selected from sequential
operation in any driving conditions.
AUTOSTICK - Sequential
mode
The Autostick mode (sequential shift), in
which the driver can decide when to
shift gear, is recommended in some
specific driving conditions, such as
when driving a heavily loaded car on a
gradient, in a strong headwind or when
towing a heavy trailer.
In these conditions, using a lower gear
improves vehicle performance and
prolongs the transmission's life, limiting
gearshifting and preventing overheating.
It is possible to shift from position D
(Drive) to the sequential mode
regardless of car speed.
Activation
With gear lever in position D (Drive), to
activate the sequential drive mode,
move the lever to the left (– and +
indication of the trim). The gear
engaged will be shown on the display.
Gearshifting is made by moving the
gear lever forwards, towards symbol –
or backwards, towards symbol +.
Deactivation
To deactivate the sequential driving
mode, bring the gear lever back to
position D (Drive), automatic mode.Important notes
Do not downshift on slippery
surfaces: the drive wheels might lose
grip with following risk for the car to
slip. This could cause accidents or
personal injuries.
The car will keep the gear selected
by the driver until the safety conditions
allow it. This means, for example, that
the system will try to prevent the engine
from switching off, automatically
downshifting if the engine speed is too
low.
TRANSMISSION
EMERGENCY FUNCTION
(where provided)
Transmission operation is constantly
monitored to detect any fault. If a
condition that might damage the
transmission is detected, the "recovery"
function is activated.
In this condition, the transmission stays
in 3
thgear, regardless of the selected
gear.
Positions P (Parking), R (Reverse) and N
(Neutral) still work. Icon
might light
up on the display.
In the case of "recovery" operation
immediately contact the nearest Fiat
Dealership.
112
STARTING AND DRIVING
Page 116 of 292
DUAL-CLUTCH
AUTOMATIC
TRANSMISSION
(where provided)
118) 119) 120) 121)
45) 46) 47)
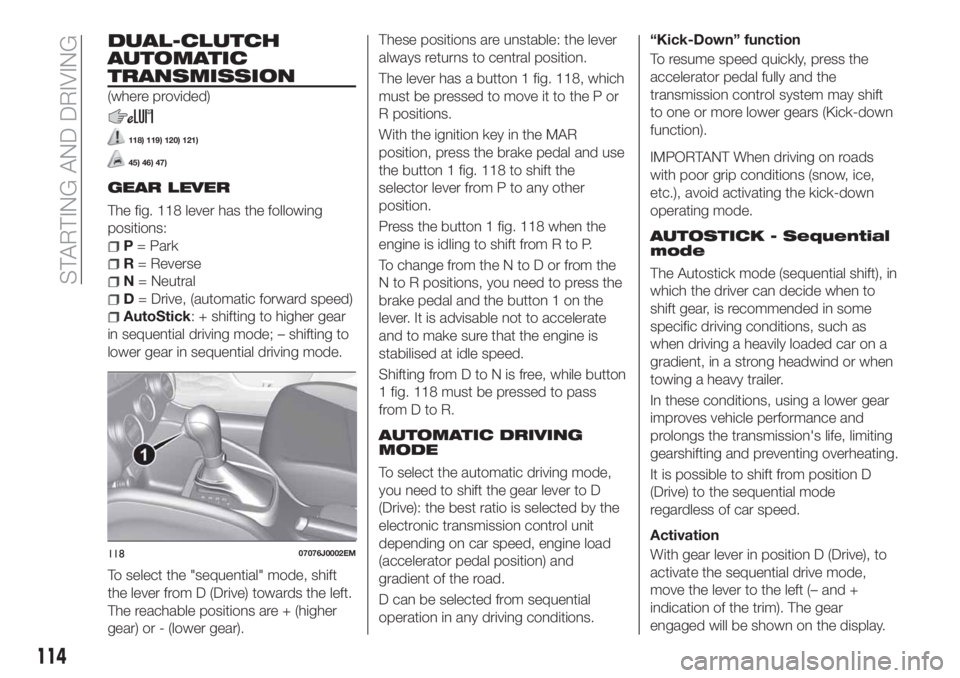
GEAR LEVER
The fig. 118 lever has the following
positions:
P= Park
R= Reverse
N= Neutral
D= Drive, (automatic forward speed)
AutoStick: + shifting to higher gear
in sequential driving mode; – shifting to
lower gear in sequential driving mode.
To select the "sequential" mode, shift
the lever from D (Drive) towards the left.
The reachable positions are + (higher
gear) or - (lower gear).These positions are unstable: the lever
always returns to central position.
The lever has a button 1 fig. 118, which
must be pressed to move it to the P or
R positions.
With the ignition key in the MAR
position, press the brake pedal and use
the button 1 fig. 118 to shift the
selector lever from P to any other
position.
Press the button 1 fig. 118 when the
engine is idling to shift from R to P.
To change from the N to D or from the
N to R positions, you need to press the
brake pedal and the button 1 on the
lever. It is advisable not to accelerate
and to make sure that the engine is
stabilised at idle speed.
Shifting from D to N is free, while button
1 fig. 118 must be pressed to pass
fromDtoR.
AUTOMATIC DRIVING
MODE
To select the automatic driving mode,
you need to shift the gear lever to D
(Drive): the best ratio is selected by the
electronic transmission control unit
depending on car speed, engine load
(accelerator pedal position) and
gradient of the road.
D can be selected from sequential
operation in any driving conditions.“Kick-Down” function
To resume speed quickly, press the
accelerator pedal fully and the
transmission control system may shift
to one or more lower gears (Kick-down
function).
IMPORTANT When driving on roads
with poor grip conditions (snow, ice,
etc.), avoid activating the kick-down
operating mode.
AUTOSTICK - Sequential
mode
The Autostick mode (sequential shift), in
which the driver can decide when to
shift gear, is recommended in some
specific driving conditions, such as
when driving a heavily loaded car on a
gradient, in a strong headwind or when
towing a heavy trailer.
In these conditions, using a lower gear
improves vehicle performance and
prolongs the transmission's life, limiting
gearshifting and preventing overheating.
It is possible to shift from position D
(Drive) to the sequential mode
regardless of car speed.
Activation
With gear lever in position D (Drive), to
activate the sequential drive mode,
move the lever to the left (– and +
indication of the trim). The gear
engaged will be shown on the display.
11807076J0002EM
114
STARTING AND DRIVING
Page 117 of 292
Gearshifting is made by moving the
gear lever forwards, towards symbol –
or backwards, towards symbol +.
Deactivation
To deactivate the sequential driving
mode, bring the gear lever back to
position D (Drive), automatic mode.
STARTING THE ENGINE
Engine start-up is allowed only with the
gear lever in P or N position.
Therefore, on starting the engine, the
system will be in the N or P position
(the latter corresponds to neutral, but
with the car wheels mechanically
locked).
MOVING THE CAR
To move the car, from P press the brake
pedal and, using the button on the gear
lever, move the lever to the desired
position (D, R or "Sequential mode").
The display will show the gear engaged.
When the brake pedal is released, the
car starts moving forwards or
backwards, as soon as the manoeuvre
is activated ("creeping" effect). The
accelerator should not be pressed in
this case.
IMPORTANT The inconsistency
between the speed actually engaged
(shown on the display) and the position
of the gear lever is indicated by theletter corresponding to the position of
the gear lever flashing on the panel
(also accompanied by an acoustic
warning). This condition should not be
interpreted as an operational fault, but
simply as a request by the system to
repeat the manoeuvre.
GEAR ENGAGEMENT
DISABLE
This system prevents you from moving
the shift lever from the P (Park) or N
(Neutral) position if you have not
pressed the brake pedal first. With the
start switch in the MAR position (engine
on or off):
to move the shift lever to a position
other than P (Park) or from N to R, you
must press the brake pedal and the
button 1 fig. 118 on the shift lever knob;
to move the lever from the N
position to the D position, you must
press the brake pedal.
In the event of a fault or when the
vehicle battery is flat, the lever remains
locked in the P position. To manually
release the lever, see the "Dual clutch
automatic transmission - Releasing the
lever" paragraph in the "In an
emergency" chapter.
STOPPING THE ENGINE
Versions equipped with key without
remote control: this function requires
the gear lever to be positioned at P
(Park) before extracting the key from the
ignition device. If the car battery is flat
and the ignition key is engaged, the
latter is locked in position. To remove
the key manually see the "Dual-clutch
automatic transmission - Key removal"
paragraph in the "In an emergency"
chapter.
Versions with a Stop/Start system:
in order to switch off the engine, the
vehicle needs to be stopped by
applying appropriate pressure on the
brake pedal. If the pressure is not
sufficient, the engine will not switch off.
This feature can be exploited so that
the engine does not switch off in
particular traffic conditions.
"RECOVERY"
FUNCTIONS
In case of a gear lever failure, the
instrument panel display could show a
dedicated message recommending that
the driver continues driving without
shifting the lever to the P position.
In this case, the transmission will
maintain the forward gear (with reduced
performance) even if the lever is shifted
toRorN.
115