key FIAT TIPO 5DOORS STATION WAGON 2018 Owner handbook (in English)
[x] Cancel search | Manufacturer: FIAT, Model Year: 2018, Model line: TIPO 5DOORS STATION WAGON, Model: FIAT TIPO 5DOORS STATION WAGON 2018Pages: 292, PDF Size: 7.74 MB
Page 106 of 292
Deactivating passenger front airbag
and seat-mounted side bag for
pelvis, chest and shoulders
protection
If a child must be carried on the front
seat in a rearward facing child restraint
system, deactivate the passenger side
front airbag and front side bag.
To deactivate the airbags use the
display Menu (see the instructions in the
"Display" paragraph, "Knowing the
instrument panel" chapter).
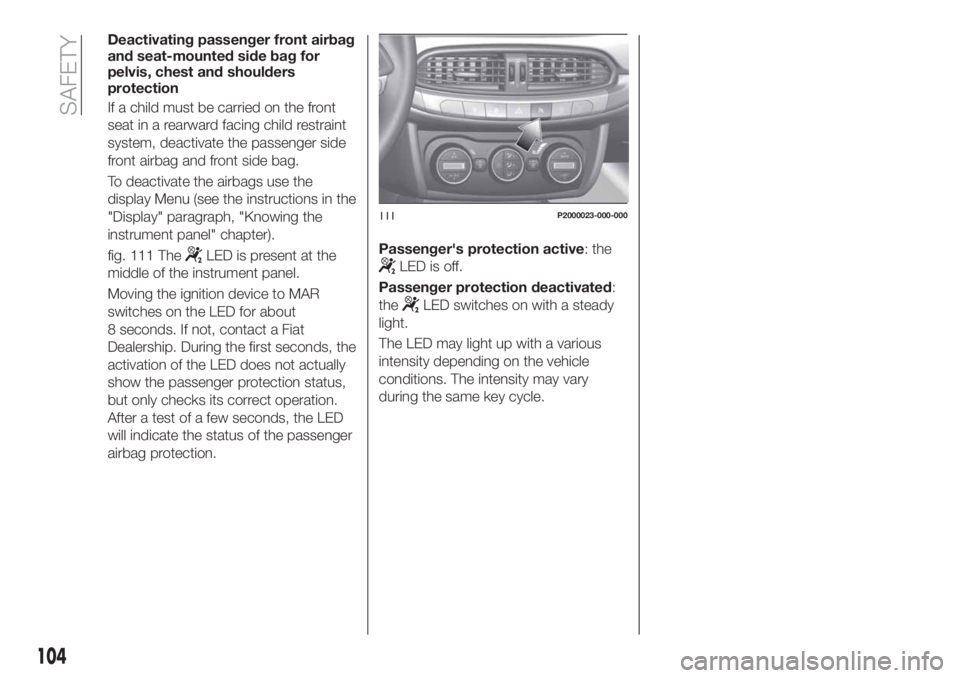
fig. 111 The
LED is present at the
middle of the instrument panel.
Moving the ignition device to MAR
switches on the LED for about
8 seconds. If not, contact a Fiat
Dealership. During the first seconds, the
activation of the LED does not actually
show the passenger protection status,
but only checks its correct operation.
After a test of a few seconds, the LED
will indicate the status of the passenger
airbag protection.Passenger's protection active: theLED is off.
Passenger protection deactivated:
the
LED switches on with a steady
light.
The LED may light up with a various
intensity depending on the vehicle
conditions. The intensity may vary
during the same key cycle.
111P2000023-000-000
104
SAFETY
Page 112 of 292
PARKING THE
VEHICLE
When parking and leaving the car,
proceed as follows:
engage a gear (1stgear if facing
uphill or reverse if facing downhill) and
leave the wheels turned;
stop the engine and engage the
handbrake;
always remove the ignition key.
Block the wheels with a wedge or a
stone if the car is parked on a steep
slope.
On versions equipped with automatic
transmission, wait for the letter P to be
displayed before releasing the brake
pedal.
IMPORTANTNEVERleave the car with
the gearbox in neutral (or, on versions
equipped with automatic transmission,
before placing the gear lever at P).
111)
WARNING
111)Never leave children unattended in
the car. Always remove the key from the
ignition when leaving the car and take it
with you.
PARKING BRAKE
112) 113)
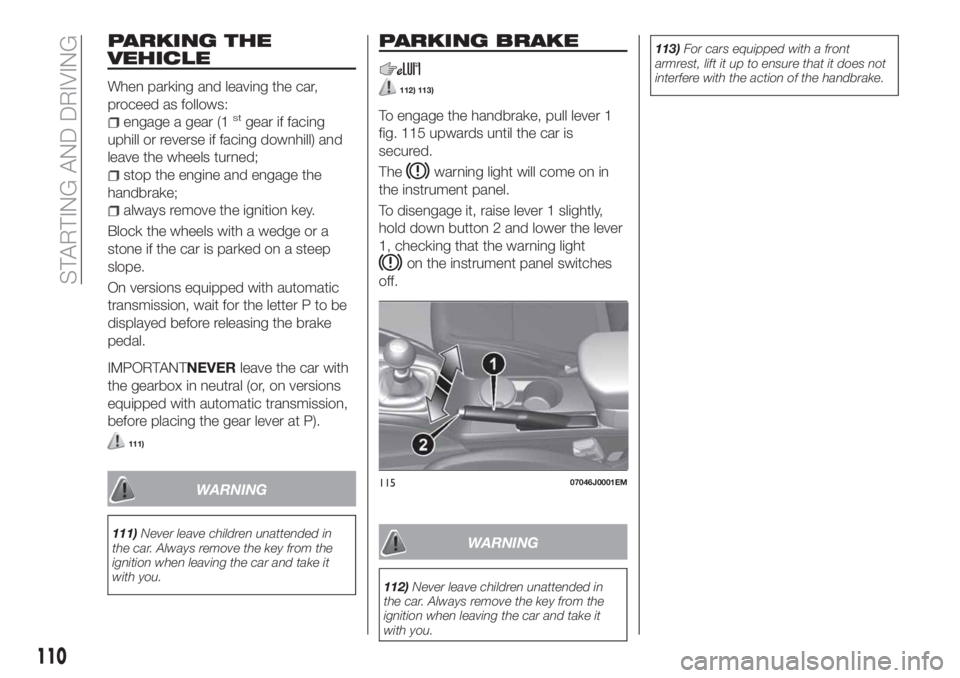
To engage the handbrake, pull lever 1
fig. 115 upwards until the car is
secured.
The
warning light will come on in
the instrument panel.
To disengage it, raise lever 1 slightly,
hold down button 2 and lower the lever
1, checking that the warning light
on the instrument panel switches
off.
WARNING
112)Never leave children unattended in
the car. Always remove the key from the
ignition when leaving the car and take it
with you.113)For cars equipped with a front
armrest, lift it up to ensure that it does not
interfere with the action of the handbrake.
11507046J0001EM
110
STARTING AND DRIVING
Page 116 of 292
DUAL-CLUTCH
AUTOMATIC
TRANSMISSION
(where provided)
118) 119) 120) 121)
45) 46) 47)
GEAR LEVER
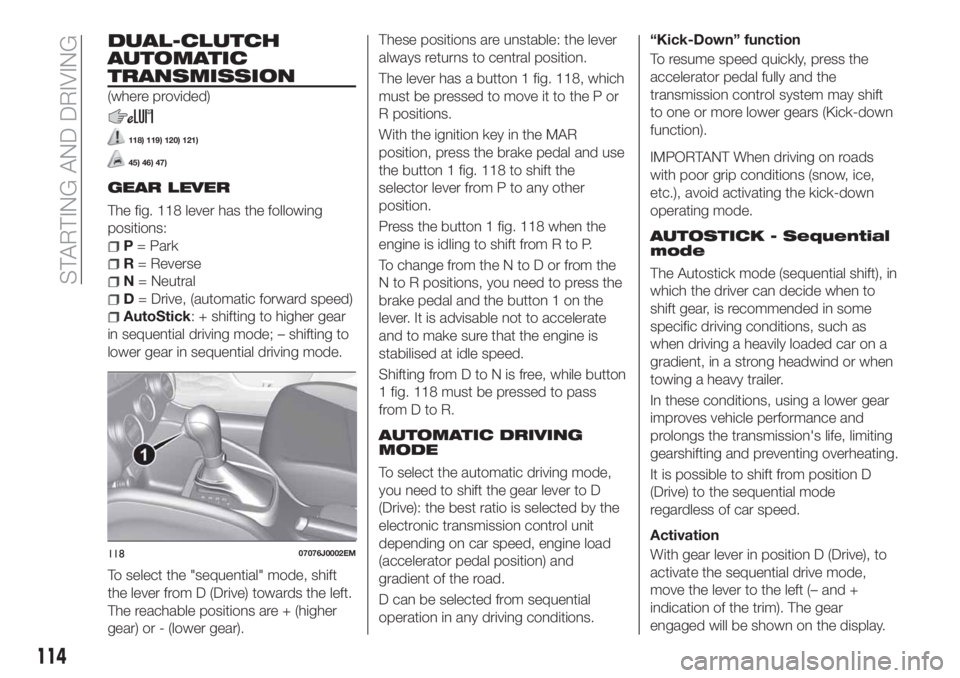
The fig. 118 lever has the following
positions:
P= Park
R= Reverse
N= Neutral
D= Drive, (automatic forward speed)
AutoStick: + shifting to higher gear
in sequential driving mode; – shifting to
lower gear in sequential driving mode.
To select the "sequential" mode, shift
the lever from D (Drive) towards the left.
The reachable positions are + (higher
gear) or - (lower gear).These positions are unstable: the lever
always returns to central position.
The lever has a button 1 fig. 118, which
must be pressed to move it to the P or
R positions.
With the ignition key in the MAR
position, press the brake pedal and use
the button 1 fig. 118 to shift the
selector lever from P to any other
position.
Press the button 1 fig. 118 when the
engine is idling to shift from R to P.
To change from the N to D or from the
N to R positions, you need to press the
brake pedal and the button 1 on the
lever. It is advisable not to accelerate
and to make sure that the engine is
stabilised at idle speed.
Shifting from D to N is free, while button
1 fig. 118 must be pressed to pass
fromDtoR.
AUTOMATIC DRIVING
MODE
To select the automatic driving mode,
you need to shift the gear lever to D
(Drive): the best ratio is selected by the
electronic transmission control unit
depending on car speed, engine load
(accelerator pedal position) and
gradient of the road.
D can be selected from sequential
operation in any driving conditions.“Kick-Down” function
To resume speed quickly, press the
accelerator pedal fully and the
transmission control system may shift
to one or more lower gears (Kick-down
function).
IMPORTANT When driving on roads
with poor grip conditions (snow, ice,
etc.), avoid activating the kick-down
operating mode.
AUTOSTICK - Sequential
mode
The Autostick mode (sequential shift), in
which the driver can decide when to
shift gear, is recommended in some
specific driving conditions, such as
when driving a heavily loaded car on a
gradient, in a strong headwind or when
towing a heavy trailer.
In these conditions, using a lower gear
improves vehicle performance and
prolongs the transmission's life, limiting
gearshifting and preventing overheating.
It is possible to shift from position D
(Drive) to the sequential mode
regardless of car speed.
Activation
With gear lever in position D (Drive), to
activate the sequential drive mode,
move the lever to the left (– and +
indication of the trim). The gear
engaged will be shown on the display.
11807076J0002EM
114
STARTING AND DRIVING
Page 117 of 292
Gearshifting is made by moving the
gear lever forwards, towards symbol –
or backwards, towards symbol +.
Deactivation
To deactivate the sequential driving
mode, bring the gear lever back to
position D (Drive), automatic mode.
STARTING THE ENGINE
Engine start-up is allowed only with the
gear lever in P or N position.
Therefore, on starting the engine, the
system will be in the N or P position
(the latter corresponds to neutral, but
with the car wheels mechanically
locked).
MOVING THE CAR
To move the car, from P press the brake
pedal and, using the button on the gear
lever, move the lever to the desired
position (D, R or "Sequential mode").
The display will show the gear engaged.
When the brake pedal is released, the
car starts moving forwards or
backwards, as soon as the manoeuvre
is activated ("creeping" effect). The
accelerator should not be pressed in
this case.
IMPORTANT The inconsistency
between the speed actually engaged
(shown on the display) and the position
of the gear lever is indicated by theletter corresponding to the position of
the gear lever flashing on the panel
(also accompanied by an acoustic
warning). This condition should not be
interpreted as an operational fault, but
simply as a request by the system to
repeat the manoeuvre.
GEAR ENGAGEMENT
DISABLE
This system prevents you from moving
the shift lever from the P (Park) or N
(Neutral) position if you have not
pressed the brake pedal first. With the
start switch in the MAR position (engine
on or off):
to move the shift lever to a position
other than P (Park) or from N to R, you
must press the brake pedal and the
button 1 fig. 118 on the shift lever knob;
to move the lever from the N
position to the D position, you must
press the brake pedal.
In the event of a fault or when the
vehicle battery is flat, the lever remains
locked in the P position. To manually
release the lever, see the "Dual clutch
automatic transmission - Releasing the
lever" paragraph in the "In an
emergency" chapter.
STOPPING THE ENGINE
Versions equipped with key without
remote control: this function requires
the gear lever to be positioned at P
(Park) before extracting the key from the
ignition device. If the car battery is flat
and the ignition key is engaged, the
latter is locked in position. To remove
the key manually see the "Dual-clutch
automatic transmission - Key removal"
paragraph in the "In an emergency"
chapter.
Versions with a Stop/Start system:
in order to switch off the engine, the
vehicle needs to be stopped by
applying appropriate pressure on the
brake pedal. If the pressure is not
sufficient, the engine will not switch off.
This feature can be exploited so that
the engine does not switch off in
particular traffic conditions.
"RECOVERY"
FUNCTIONS
In case of a gear lever failure, the
instrument panel display could show a
dedicated message recommending that
the driver continues driving without
shifting the lever to the P position.
In this case, the transmission will
maintain the forward gear (with reduced
performance) even if the lever is shifted
toRorN.
115
Page 118 of 292
Once the lever is in the P position, or
after turning off the car, it will not be
possible to select R nor any forward
gear. In this case, contact a Fiat
Dealership.
WARNING
118)Never use position P (Park) instead of
the parking brake. Always engage the
parking brake when parking the car to
avoid the accidental movement of the car.
119)If the P (Park) position is not engaged,
the car could move and injure people.
Before leaving the car, make sure that the
gear lever is in position P and that the
parking brake is engaged.
120)Do not shift the gear lever to N
(Neutral) and do not stop the engine when
driving on a downhill road. This type of
driving is dangerous and reduces the
possibility of intervening in the case of
variation of the road traffic or surface. You
risk losing control of your car and causing
accidents.
121)Never leave children unattended in
the car. Always remove the ignition key
when leaving the car and take the key with
you.
IMPORTANT
45)Before moving the gear lever from
position P (Park), bring the ignition device
to position MAR and press the brake pedal.
Otherwise, the gear lever may get
damaged.46)If the car is on a slope, always engage
the parking brake BEFORE moving the shift
lever to the P position.
47)Only engage reverse gear with the car
stationary, the engine idling and the
accelerator pedal fully released.
STOP/START
SYSTEM
(where provided)
The Start&Stop system automatically
stops the engine each time the vehicle
is stationary and starts it again when
the driver wants to move off.
In this way, the vehicle efficiency is
increased, by reducing consumption,
dangerous gas emissions and sound
pollution.
OPERATING MODE
Stopping the engine
Versions with manual transmission
With the vehicle stopped, the engine
stops with gearbox in neutral and clutch
pedal released.
Versions with automatic
transmission
With car at a standstill and brake pedal
pressed, the engine switches off if the
gear lever is in a position other than R.
The system does not operate when the
gear lever is in R, for making parking
manoeuvres easier. In the event of
stops uphill, engine switching off is
disabled to make the "Hill Hold Control"
function available (works only with the
engine running).
116
STARTING AND DRIVING
Page 138 of 292

To access the filler 2 fig. 135 open the
access flap 1.
Observe the following precautions
during the refuelling operation:
switch off the engine;
apply the handbrake;
ignition key turned to the OFF
position;
do not smoke;
hand the special adapter over to the
qualified LPG refuelling personnel.
IMPORTANT Depending on the country,
there are various types of adapters for
the refuelling pump. Adapter 1 fig. 136,
supplied with the car and located in a
special case, is specifically designed for
the country in which the car is sold. If
you are in a different country, find out
what type of adapter is used there.IMPORTANT Before refuelling with LPG,
the qualified personnel must make sure
that the adapter is correctly screwed
onto the filler.
IMPORTANT Look after the LPG
adapter carefully so that it does not get
damaged.
IMPORTANT Only use LPG for motor
vehicles.Fuel - Vehicle
compatibility
identification Graphic
symbol for informing
consumers in
accordance with
EN16942
The symbols shown below facilitated
recognising the correct fuel type to be
used on your car.
Before proceeding with refuelling, check
the symbols inside the fuel filler flap
(where provided) and compare them
with the symbols shown on the fuel
pump (where provided).
Symbols for petrol powered cars
E5: Unleaded petrol containing up to
2.7% (m/m) oxygen and with maximum
5.0% (V/V) ethanol compliant with
EN228
E10: Unleaded petrol containing up to
3.7% (m/m) oxygen and with maximum
10.0% (V/V) ethanol compliant with
EN228
135PGL000017
136PGL000018
136
STARTING AND DRIVING
Page 148 of 292
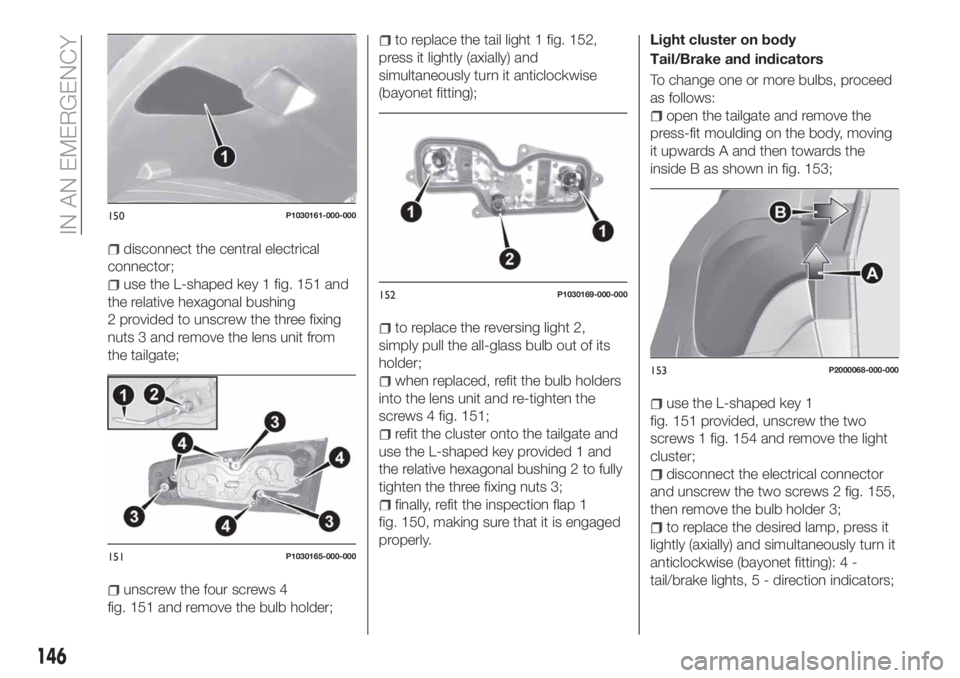
disconnect the central electrical
connector;
use the L-shaped key 1 fig. 151 and
the relative hexagonal bushing
2 provided to unscrew the three fixing
nuts 3 and remove the lens unit from
the tailgate;
unscrew the four screws 4
fig. 151 and remove the bulb holder;
to replace the tail light 1 fig. 152,
press it lightly (axially) and
simultaneously turn it anticlockwise
(bayonet fitting);
to replace the reversing light 2,
simply pull the all-glass bulb out of its
holder;
when replaced, refit the bulb holders
into the lens unit and re-tighten the
screws 4 fig. 151;
refit the cluster onto the tailgate and
use the L-shaped key provided 1 and
the relative hexagonal bushing 2 to fully
tighten the three fixing nuts 3;
finally, refit the inspection flap 1
fig. 150, making sure that it is engaged
properly.Light cluster on body
Tail/Brake and indicators
To change one or more bulbs, proceed
as follows:
open the tailgate and remove the
press-fit moulding on the body, moving
it upwards A and then towards the
inside B as shown in fig. 153;
use the L-shaped key 1
fig. 151 provided, unscrew the two
screws 1 fig. 154 and remove the light
cluster;
disconnect the electrical connector
and unscrew the two screws 2 fig. 155,
then remove the bulb holder 3;
to replace the desired lamp, press it
lightly (axially) and simultaneously turn it
anticlockwise (bayonet fitting): 4 -
tail/brake lights, 5 - direction indicators;
150P1030161-000-000
151P1030165-000-000
152P1030169-000-000
153P2000068-000-000
146
IN AN EMERGENCY
Page 149 of 292
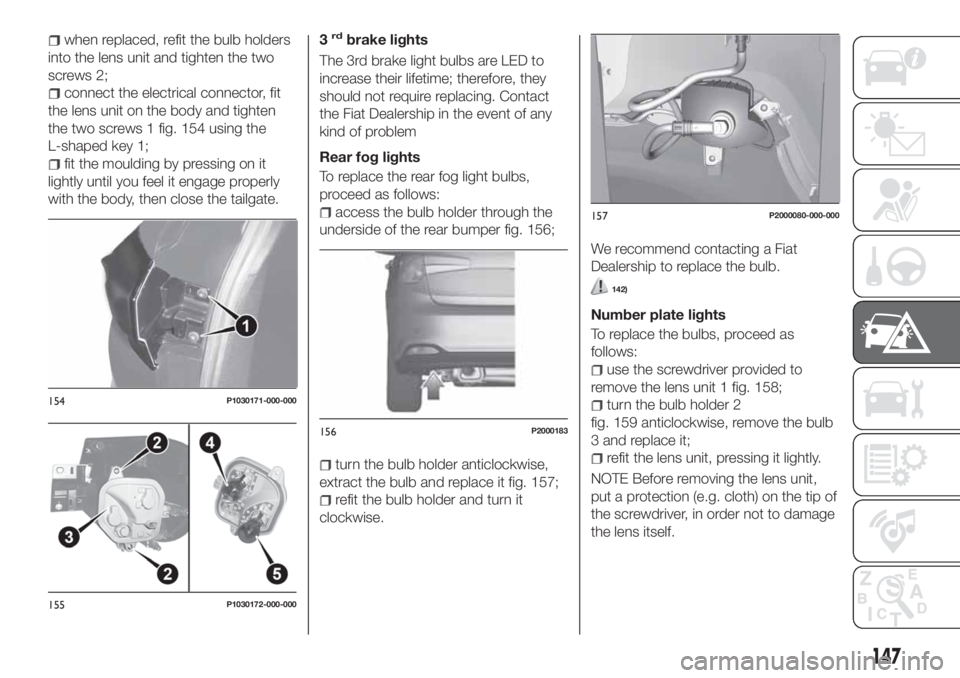
when replaced, refit the bulb holders
into the lens unit and tighten the two
screws 2;
connect the electrical connector, fit
the lens unit on the body and tighten
the two screws 1 fig. 154 using the
L-shaped key 1;
fit the moulding by pressing on it
lightly until you feel it engage properly
with the body, then close the tailgate.3
rdbrake lights
The 3rd brake light bulbs are LED to
increase their lifetime; therefore, they
should not require replacing. Contact
the Fiat Dealership in the event of any
kind of problem
Rear fog lights
To replace the rear fog light bulbs,
proceed as follows:
access the bulb holder through the
underside of the rear bumper fig. 156;
turn the bulb holder anticlockwise,
extract the bulb and replace it fig. 157;
refit the bulb holder and turn it
clockwise.We recommend contacting a Fiat
Dealership to replace the bulb.
142)
Number plate lights
To replace the bulbs, proceed as
follows:
use the screwdriver provided to
remove the lens unit 1 fig. 158;
turn the bulb holder 2
fig. 159 anticlockwise, remove the bulb
3 and replace it;
refit the lens unit, pressing it lightly.
NOTE Before removing the lens unit,
put a protection (e.g. cloth) on the tip of
the screwdriver, in order not to damage
the lens itself.
154P1030171-000-000
155P1030172-000-000
156P2000183
157P2000080-000-000
147
Page 156 of 292

WARNING
143)If the replaced fuse blows again, contact a Fiat Dealership.
144)Never replace a fuse with another with a higher amp rating; DANGER OF FIRE
145)If a fuse NOT indicated in this or the previous page is used, contact a Fiat Dealership.
146)Before replacing a fuse, make sure that the ignition device is at STOP, that the key, if mechanical, has been removed and that all devices
are switched off and/or disconnected.
IMPORTANT
62)Never replace a fuse with metal wires or anything else.
63)If it is necessary to wash the engine compartment, take care not to directly hit the fuse box and the window wiper motor with the water jet.
154
IN AN EMERGENCY
Page 165 of 292
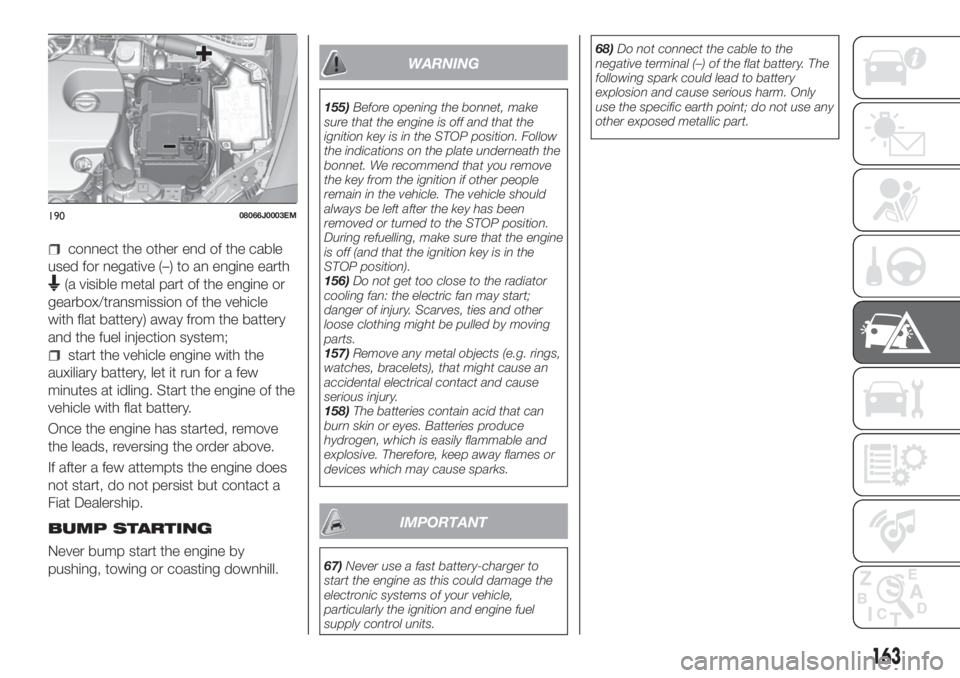
connect the other end of the cable
used for negative (–) to an engine earth
(a visible metal part of the engine or
gearbox/transmission of the vehicle
with flat battery) away from the battery
and the fuel injection system;
start the vehicle engine with the
auxiliary battery, let it run for a few
minutes at idling. Start the engine of the
vehicle with flat battery.
Once the engine has started, remove
the leads, reversing the order above.
If after a few attempts the engine does
not start, do not persist but contact a
Fiat Dealership.
BUMP STARTING
Never bump start the engine by
pushing, towing or coasting downhill.
WARNING
155)Before opening the bonnet, make
sure that the engine is off and that the
ignition key is in the STOP position. Follow
the indications on the plate underneath the
bonnet. We recommend that you remove
the key from the ignition if other people
remain in the vehicle. The vehicle should
always be left after the key has been
removed or turned to the STOP position.
During refuelling, make sure that the engine
is off (and that the ignition key is in the
STOP position).
156)Do not get too close to the radiator
cooling fan: the electric fan may start;
danger of injury. Scarves, ties and other
loose clothing might be pulled by moving
parts.
157)Remove any metal objects (e.g. rings,
watches, bracelets), that might cause an
accidental electrical contact and cause
serious injury.
158)The batteries contain acid that can
burn skin or eyes. Batteries produce
hydrogen, which is easily flammable and
explosive. Therefore, keep away flames or
devices which may cause sparks.
IMPORTANT
67)Never use a fast battery-charger to
start the engine as this could damage the
electronic systems of your vehicle,
particularly the ignition and engine fuel
supply control units.68)Do not connect the cable to the
negative terminal (–) of the flat battery. The
following spark could lead to battery
explosion and cause serious harm. Only
use the specific earth point; do not use any
other exposed metallic part.
19008066J0003EM
163