ECU FIAT TIPO 5DOORS STATION WAGON 2018 Owner handbook (in English)
[x] Cancel search | Manufacturer: FIAT, Model Year: 2018, Model line: TIPO 5DOORS STATION WAGON, Model: FIAT TIPO 5DOORS STATION WAGON 2018Pages: 292, PDF Size: 7.74 MB
Page 21 of 292
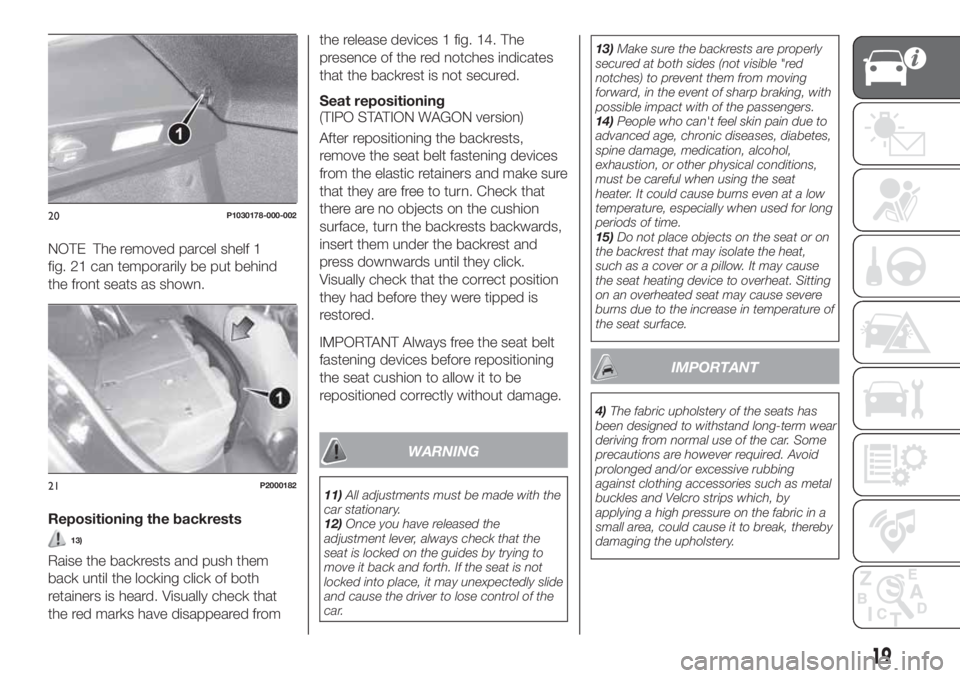
NOTE The removed parcel shelf 1
fig. 21 can temporarily be put behind
the front seats as shown.
Repositioning the backrests
13)
Raise the backrests and push them
back until the locking click of both
retainers is heard. Visually check that
the red marks have disappeared fromthe release devices 1 fig. 14. The
presence of the red notches indicates
that the backrest is not secured.
Seat repositioning
(TIPO STATION WAGON version)
After repositioning the backrests,
remove the seat belt fastening devices
from the elastic retainers and make sure
that they are free to turn. Check that
there are no objects on the cushion
surface, turn the backrests backwards,
insert them under the backrest and
press downwards until they click.
Visually check that the correct position
they had before they were tipped is
restored.
IMPORTANT Always free the seat belt
fastening devices before repositioning
the seat cushion to allow it to be
repositioned correctly without damage.
WARNING
11)All adjustments must be made with the
car stationary.
12)Once you have released the
adjustment lever, always check that the
seat is locked on the guides by trying to
move it back and forth. If the seat is not
locked into place, it may unexpectedly slide
and cause the driver to lose control of the
car.13)Make sure the backrests are properly
secured at both sides (not visible "red
notches) to prevent them from moving
forward, in the event of sharp braking, with
possible impact with of the passengers.
14)People who can't feel skin pain due to
advanced age, chronic diseases, diabetes,
spine damage, medication, alcohol,
exhaustion, or other physical conditions,
must be careful when using the seat
heater. It could cause burns even at a low
temperature, especially when used for long
periods of time.
15)Do not place objects on the seat or on
the backrest that may isolate the heat,
such as a cover or a pillow. It may cause
the seat heating device to overheat. Sitting
on an overheated seat may cause severe
burns due to the increase in temperature of
the seat surface.
IMPORTANT
4)The fabric upholstery of the seats has
been designed to withstand long-term wear
deriving from normal use of the car. Some
precautions are however required. Avoid
prolonged and/or excessive rubbing
against clothing accessories such as metal
buckles and Velcro strips which, by
applying a high pressure on the fabric in a
small area, could cause it to break, thereby
damaging the upholstery.
20P1030178-000-002
21P2000182
19
Page 38 of 292
CLOSING
To close the tailgate, lower it onto the
lock until you hear it click.
IMPORTANT Before closing the tailgate
make sure that you have the keys,
since the tailgate is automatically
locked.
INITIALISATION
IMPORTANT If the battery is
disconnected or the protective fuse
blows, the tailgate opening/closing
mechanism must be reinitialised as
follows:
close all the doors and the tailgate;
press the"FIAT" button on the
remote control;
press thebutton on the remote
control.
TOOL BOX
(where provided)
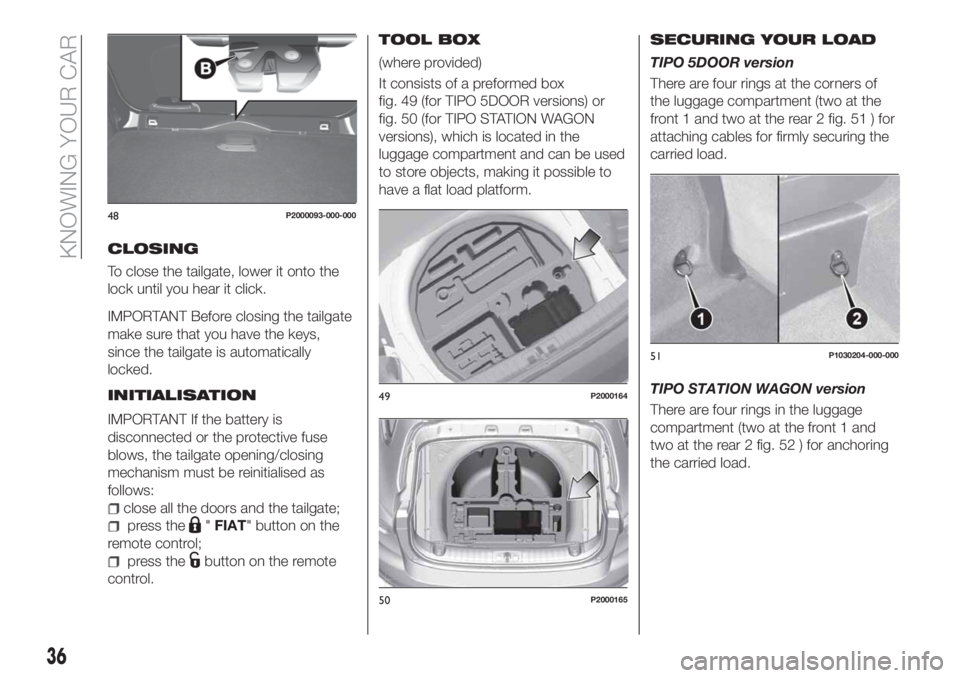
It consists of a preformed box
fig. 49 (for TIPO 5DOOR versions) or
fig. 50 (for TIPO STATION WAGON
versions), which is located in the
luggage compartment and can be used
to store objects, making it possible to
have a flat load platform.
SECURING YOUR LOAD
TIPO 5DOOR version
There are four rings at the corners of
the luggage compartment (two at the
front 1 and two at the rear 2 fig. 51 ) for
attaching cables for firmly securing the
carried load.
TIPO STATION WAGON version
There are four rings in the luggage
compartment (two at the front 1 and
two at the rear 2 fig. 52 ) for anchoring
the carried load.
48P2000093-000-000
49P2000164
50P2000165
51P1030204-000-000
36
KNOWING YOUR CAR
Page 39 of 292
LUGGAGE COVERING
CURTAIN
TIPO STATION WAGON version
31)
Complete closure
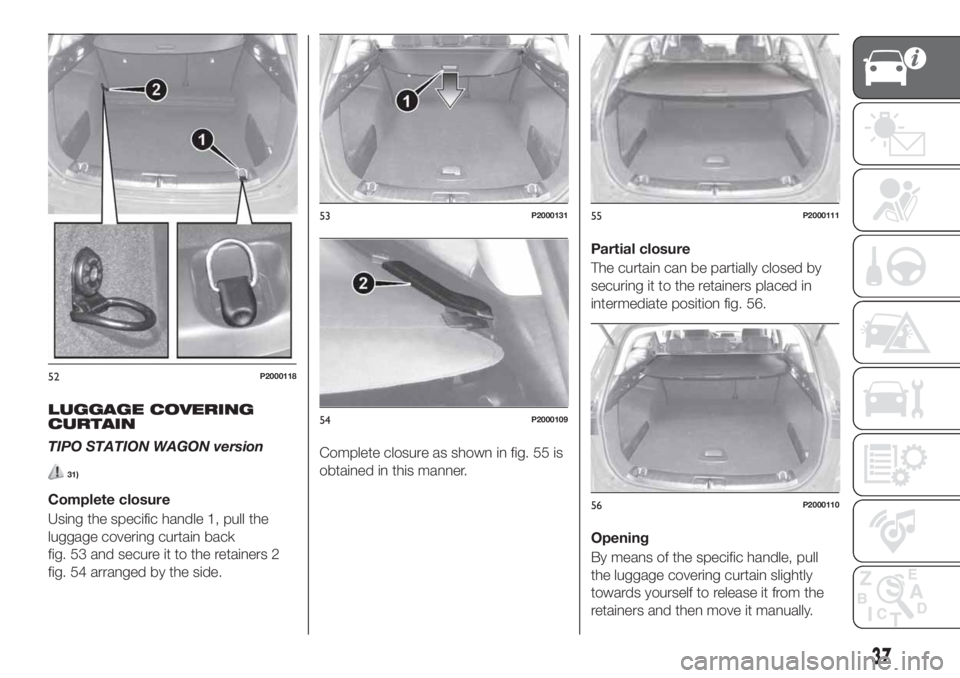
Using the specific handle 1, pull the
luggage covering curtain back
fig. 53 and secure it to the retainers 2
fig. 54 arranged by the side.Complete closure as shown in fig. 55 is
obtained in this manner.Partial closure
The curtain can be partially closed by
securing it to the retainers placed in
intermediate position fig. 56.
Opening
By means of the specific handle, pull
the luggage covering curtain slightly
towards yourself to release it from the
retainers and then move it manually.
52P2000118
53P2000131
54P2000109
55P2000111
56P2000110
37
Page 56 of 292
Doors & Locks.
Display
By selecting item "Display" you can
access the settings/information
regarding: " Display Settings”,
Language", "See phone" (available in
versions and markets where present),
"See navigation" (available in versions
and markets where present),
"Automatic reset Trip B", “Display
lighting”.
Units
Select item "Units" to choose the unit of
measurement between: "Imperial",
"Metric", "Customised".
Clock & Date
Select item "Clock & Date" to make the
following adjustments: "Set time", "Time
format", "Set date".
Safety
Select item "Security" to make the
following adjustments: "Passenger
AIRBAG", "Speed warning", "Seat belt
buzzer".
"Passenger AIRBAG" adjustment allows
you to activate/deactivate the
passenger airbag.Passenger's
protection not active: the
LED
comes on constantly in the dashboard
dashboard.Safety & Assistance
Select item "Safety & Assistance" to
make the following adjustments: Rain
sensor, Warning Volume, Brake Control,
Brake C.Sensivity, Park Assist, Vol. Park
Assist.
Lights
Select item "Lights" to make the
following adjustments: "Courtesy
lights", "Daytime running lights",
"Cornering lights", "Headlamp sensor",
"Follow me home".
Doors & Locks
Select item "Doors & Locks" to make
the following adjustments: "Autoclose",
"Flash Lights w/Lock", "Auto unlock on
exit".
NOTE With theUconnect™system,
some Menu items are shown and
managed on the display of the latter
and not on the instrument panel display
(refer to the dedicated Multimedia
chapter or to the supplement available
online).CONTROL BUTTONS
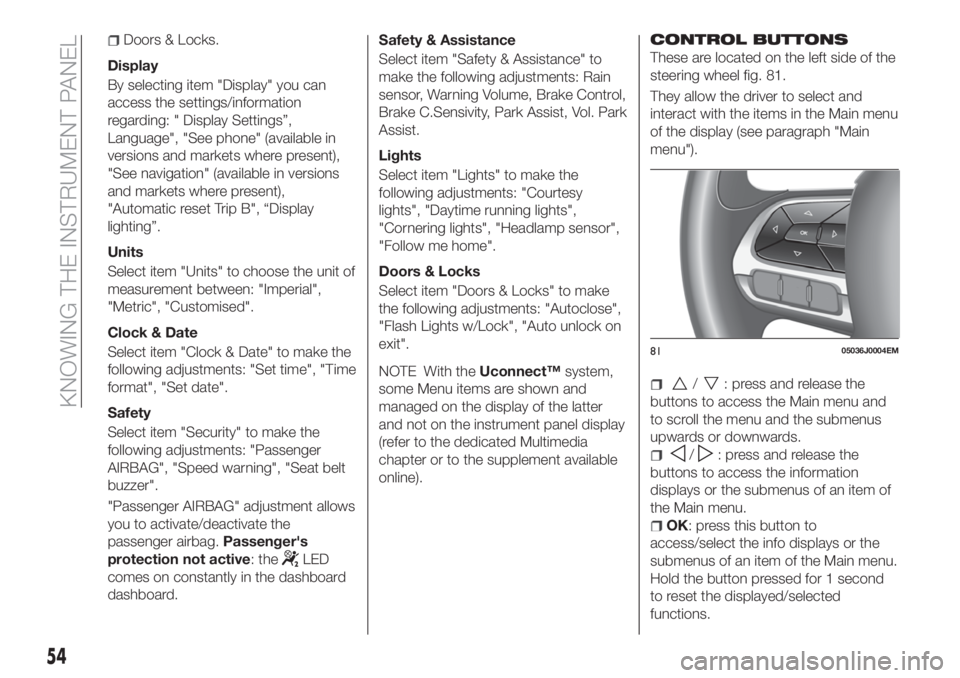
These are located on the left side of the
steering wheel fig. 81.
They allow the driver to select and
interact with the items in the Main menu
of the display (see paragraph "Main
menu").
/: press and release the
buttons to access the Main menu and
to scroll the menu and the submenus
upwards or downwards.
/: press and release the
buttons to access the information
displays or the submenus of an item of
the Main menu.
OK: press this button to
access/select the info displays or the
submenus of an item of the Main menu.
Hold the button pressed for 1 second
to reset the displayed/selected
functions.
8105036J0004EM
54
KNOWING THE INSTRUMENT PANEL
Page 92 of 292
CHILD PROTECTION
SYSTEMS
CARRYING CHILDREN
SAFELY
80) 81) 82) 83)
For optimal protection in the event of an
impact, all occupants must be seated
and wearing adequate restraint
systems, including newborn and other
children!
This prescription is compulsory in all EC
countries according to EC Directive
2003/20/EC.
Children below the height of
1.50 metres and up to 12 years must
be protected with suitable restraint
systems and be seated on the rear
seats.
Statistics on accidents indicate that the
rear seats offer greater safety for
children.
Compared with an adult, a child's head
is larger and heavier in proportion to
their body and the child's muscular and
bone structures are not fully developed.
Therefore, correct restraint systems
other than adult seat belts are
necessary, to reduce as much as
possible the risk of injuries in the event
of an accident, braking or sudden
manoeuvre.Children must be seated safely and
comfortably. As far as the
characteristics of the child seats used
allow, you are advised to keep children
in rear facing child seats for as long as
possible (at least until 3–4 years old),
since this is the most protected position
in the event of an impact.
The choice of the most suitable child
restraint system depends on the weight
and size of the child. There are various
types of child restraint systems, which
can be secured to the car by means of
the seat belts or with the ISOFIX/i-Size
anchorages.
It is recommended to always choose
the restraint system most suitable for
the child; for this reason always refer to
the Owner Handbook provided with the
child restraint system, to be sure that it
is of the right type for the children it is
intended for.In Europe the characteristics of child
restraint systems are ruled by the
regulation ECE-R44, dividing them into
five weight groups:Group Weight range
Group 0up to 10 kg in
weight
Group 0+up to 13 kg in
weight
Group 1 9-18 kg
Group 2 15 - 25 kg
Group 3 22 - 36 kg
The ECE-R44 standard was recently
paired with the ECE R-129 regulation,
which defines the characteristics of the
new i-Size child restraint systems (see
the "Suitability of passenger seats for
i-Size child restraint system use"
paragraph for more information).
All restraint devices must bear the
type-approval data, together with the
control mark, on a label solidly fixed to
the child restraint system which must
never be removed.
Lineaccessori MOPAR
®includes child
restraint systems for each weight
group. These devices are
recommended having been specifically
designed for Fiat vehicles.
90
SAFETY
Page 93 of 292
IMPORTANT For correct installation on
the vehicle, some universal child
restraint systems require an accessory
(base) sold separately by the restraint
system's producer. Therefore, FCA
recommends confirming the retailer if
the desired child seat can be installed in
the car by having it done, before buying
the seat.
FITTING A CHILD
RESTRAINT SYSTEM
WITH SEAT BELTS
The Universal child restraint systems
installed with the seat belts only are
type-approved on the basis of the ECE
R44 standard and are divided into
various weight groups.
84) 85) 86) 87)
IMPORTANT The figures are indicative
and provided for assembly purposes
only. Fit the child restraint system
according to the instructions, which
must be included.
Group 0 and 0+
Babies up to 13 kg must be carried
with a rear facing child restraint system
of a type as shown in fig. 99 which,
supporting the head, does not induce
stress on the neck in the event of
sudden decelerations.
The child restraint system is secured by
the vehicle seat belts, as shown in and
it must restrain the child in turn with its
own belts.Group 1
Children of weight from 9 to 18 kg may
be transported in forward facing child
restraint systems fig. 100.
9906096J0001EM
10006096J0002EM
91
Page 103 of 292
Main recommendations to carry
children safely
Install the child restraint systems on
the rear seat, which is the most
protected position in the event of an
impact.
Keep children in rearward facing child
restraint systems for as long as
possible, until 3–4 years old if possible.
If the passenger's front airbag is
deactivated always check the
dedicated warning light on the trim
located on the dashboard to make sure
that it has actually been deactivated.
Carefully follow the instructions
supplied with the child restraint system.
Keep the instructions in the vehicle
along with the other documents and
this handbook. Do not use
second-hand child restraint systems
without instructions.
Only one child is to be strapped into
each restraint system; never carry two
children using one child restraint
system.
Always check that the seat belts do
not rest on the child’s neck.
Always check that the seat belt is
well fastened by pulling on it.
While travelling, do not let the child
sit incorrectly or unfasten the belts.
Never allow a child to put the belt's
diagonal section under an arm or
behind their back.
Never carry children on your lap,
even newborns. No one can hold a
child in the case of an accident.
If the car has been involved in a road
accident, replace the child restraint
system with a new one. In addition, and
depending on the type of child restraint
system installed, replace the isofix
anchorages or the seat belt with which
the child restraint system was
connected.
Any child restraint systems fitted
facing forward on an outside rear seat,
independently of its weight group, must
be fitted after removing the headrest
relative to the seat where it is to be
fitted. This does not apply to child
restraint systems that only consist of a
cushion (without backrest): these child
restraint systems must be installed
when the relative headrest is fitted.
WARNING
80)SEVERE DANGER When a front
passenger airbag is fitted, do not install
rearward facing child restraint systems on
the front passenger seat. Deployment of
the airbag in an accident could cause fatal
injuries to the child regardless of the
severity of the collision. It is advisable to
always carry children in a child restraint
system on the rear seat, which is the most
protected position in the event of a
collision.81)On the sun visor there is a label with
suitable symbols reminding the user that it
is compulsory to deactivate the airbag if a
rearward facing child restraint system is
fitted. Always comply with the instructions
on the passenger side sun visor (see the
"Supplementary Restraint System (SRS) -
Airbag" paragraph).
82)Should it be necessary to carry a child
on the passenger side front seat in a rear
facing child restraint system, the passenger
side front airbag and side bag must be
deactivated through the Connect system
main menu (see the "Supplementary
Restraint System (SRS) - Airbag"
paragraph), verifying deactivation by
checking whether the
LED has
illuminated on the dashboard. Move the
passenger's seat as far back as possible to
avoid contact between the child seat and
the dashboard.
83)Do not move the front or rear seat if a
child is seated on it or on the dedicated
child restraint system
84)Incorrect fitting of the child restraint
system may result in an inefficient
protection system. In the event of an
accident the child restraint system may
become loose and the child may be
injured, even fatally. When fitting a restraint
system for newborns or children, strictly
comply with the instructions provided by
the Manufacturer.
85)When the child restraint system is not
used, secure it with the seat belt or with
the ISOFIX anchorages, or remove it from
the vehicle. Do not leave it unsecured
inside the passenger compartment. In this
way, in the case of sudden braking or an
accident, it will not cause injuries to the
occupants.
101
Page 104 of 292
86)After installing a child restraint system,
do not move the seat: always remove the
child restraint system before making any
adjustment.
87)Always make sure that the diagonal
section of the seat belt does not pass
under the arms or behind the back of the
child. In the event of an accident the seat
belt will not be able to secure the child,
with the risk of injury, including fatal injury.
Therefore the child must always wear the
seat belt correctly.
88)Do not use the same lower anchorage
to install more than one child restraint
system.
89)If a Universal ISOFIX child seat system
is not fixed to all three anchorages, it will
not be able to protect the child correctly. In
a crash, the child could be seriously or
fatally injured.
90)Fit the child restraint system when the
car is stationary. The child restraint system
is correctly fixed to the brackets when you
hear the click. Follow the instructions for
assembly, disassembly and positioning that
the Manufacturer must supply with the
child restraint system.SUPPLEMENTARY
RESTRAINT SYSTEM
(SRS) - AIRBAG
The vehicle is equipped with:
front driver airbag;
front passenger airbag;
driver and passenger front side bags
for pelvis, chest and shoulder
protection (Side bags);
side bags for head protection of front
seat passengers and rear side seat
passengers (window bag).
The location of the airbags on the
vehicle is marked by the word
"AIRBAG" in the middle of the steering
wheel, on the dashboard, on the side
trim or on a label placed next to the
airbag deployment area.
FRONT AIRBAGS
The front (driver and passenger) airbags
protect the front seat occupants in the
event of head-on crashes of
medium-high severity, by placing the
cushion between the occupant and the
steering wheel or dashboard.
Therefore non-activation of airbags in
other types of collisions (side impacts,
rear shunts, roll-overs, etc.) does not
indicate a system malfunction.
Driver and passenger front airbags are
not a replacement of but
complementary to the seat belts, whichshould always be worn, as specified by
law in Europe and most non-European
countries.
In the event of impact, those not
wearing a seat belt are projected
forwards and may come into contact
with the bag which is still inflating. The
protection offered by the bag is
compromised in these circumstances.
Front airbags may not activate in the
following situations:
frontal impacts against highly
deformable objects not involving the
front surface of the vehicle (e.g. wing
collision against guard rail, etc.);
vehicle wedging under other
vehicles or protective barriers (e.g.
trucks or guard rails).
Failure to activate in the conditions
described above is due to the fact that
they may not provide any additional
protection compared with seat belts, so
their activation would be inappropriate.
In these cases, non-deployment does
not indicate a system malfunction.
The driver's and passenger's front
airbags have been designed and
calibrated to protect front seat
occupants wearing seat belts. At their
maximum inflation, their volume fills
most of the space between the steering
wheel and the driver and between the
dashboard and the passenger.
102
SAFETY
Page 112 of 292
PARKING THE
VEHICLE
When parking and leaving the car,
proceed as follows:
engage a gear (1stgear if facing
uphill or reverse if facing downhill) and
leave the wheels turned;
stop the engine and engage the
handbrake;
always remove the ignition key.
Block the wheels with a wedge or a
stone if the car is parked on a steep
slope.
On versions equipped with automatic
transmission, wait for the letter P to be
displayed before releasing the brake
pedal.
IMPORTANTNEVERleave the car with
the gearbox in neutral (or, on versions
equipped with automatic transmission,
before placing the gear lever at P).
111)
WARNING
111)Never leave children unattended in
the car. Always remove the key from the
ignition when leaving the car and take it
with you.
PARKING BRAKE
112) 113)
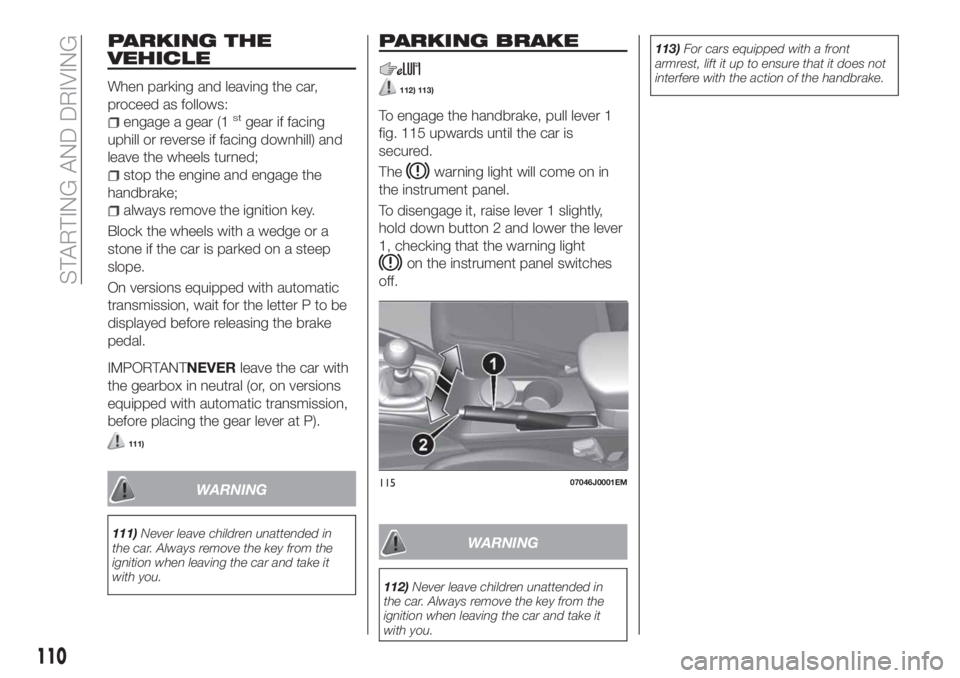
To engage the handbrake, pull lever 1
fig. 115 upwards until the car is
secured.
The
warning light will come on in
the instrument panel.
To disengage it, raise lever 1 slightly,
hold down button 2 and lower the lever
1, checking that the warning light
on the instrument panel switches
off.
WARNING
112)Never leave children unattended in
the car. Always remove the key from the
ignition when leaving the car and take it
with you.113)For cars equipped with a front
armrest, lift it up to ensure that it does not
interfere with the action of the handbrake.
11507046J0001EM
110
STARTING AND DRIVING
Page 132 of 292
OPERATION WITH A
TRAILER
The operation of the sensors is
automatically deactivated when the
trailer's electrical connection is inserted
in the vehicle's tow hook socket.
Sensors are reactivated on removing
the trailer's electrical connection.
IMPORTANT NOTES
When parking, take the utmost care
over obstacles that may be above or
under the sensor. Objects close to the
vehicle are not detected under certain
circumstances and could therefore
cause damage to the vehicle or be
damaged.
Some conditions may influence the
performance of the parking system:
reduced sensor sensitivity and a
reduction in the parking assistance
system performance could be due to
the presence of: ice, snow, mud, paint,
etc. on the surface of the sensor;
the sensor may detect a
non-existent obstacle ("echo
interference") due to mechanical
interference, for example when washing
the vehicle, in rain (strong wind), hail;
the signals sent by the sensor can
also be altered by the presence of
ultrasonic systems (e.g. pneumatic
brake systems of trucks or pneumatic
drills) near the vehicle;
parking assistance system
performance can also be influenced by
the position of the sensors, for example
due to a change in the ride setting
(caused by wear to the shock
absorbers, suspension), or by changing
tyres, overloading the vehicle or fitting
specific trims that require the vehicle to
be lowered;
the presence of a tow hook without
trailer, which may interfere with the
correct operation of the parking
sensors;
the presence of adhesives on the
sensors. Therefore, take care not to
place adhesives on the sensors.
WARNING
132)Parking and other potentially
dangerous manoeuvres are, however,
always the driver’s responsibility. When
performing these operations, always make
sure that there are no other people
(especially children) or animals on the route
you want to take. The parking sensors are
an aid for the driver, but the driver must
never allow their attention to lapse during
potentially dangerous manoeuvres, even
those executed at low speeds.
IMPORTANT
56)The sensors must be clean of mud,
dirt, snow or ice in order for the system to
operate correctly. Be careful not to scratch
or damage the sensors while cleaning
them. Avoid using dry, rough or hard
cloths. The sensors should be washed
using clean water with the addition of car
shampoo if necessary. When using special
washing equipment such as high pressure
jets or steam cleaning, clean the sensors
very quickly keeping the jet more than
10 cm away.
57)Have interventions on the bumper in
the area of the sensors carried out only by
a Fiat Dealership. Interventions on the
bumper that are not carried out properly
may compromise the operation of the
parking sensors
58)Only have the bumpers repainted or
any retouches to the paintwork in the area
of the sensors carried out by a Fiat
Dealership. Incorrect paint application
could affect the operation of the parking
sensors.
130
STARTING AND DRIVING