roof FIAT TIPO 5DOORS STATION WAGON 2018 Owner handbook (in English)
[x] Cancel search | Manufacturer: FIAT, Model Year: 2018, Model line: TIPO 5DOORS STATION WAGON, Model: FIAT TIPO 5DOORS STATION WAGON 2018Pages: 292, PDF Size: 7.74 MB
Page 9 of 292
KNOWING YOUR CAR
In-depth knowledge of your new vehicle
starts here.
The booklet that you are reading simply
and directly explains how it is made and
how it works.
That’s why we advise you to read it
seated comfortably on board, so that
you can see immediately what is
described here for yourself.INSTRUMENT PANEL...........8
THE KEYS.................11
IGNITION DEVICE............12
FIAT CODE.................13
DOORS...................14
SEATS....................16
HEAD RESTRAINTS...........20
STEERING WHEEL............21
REAR VIEW MIRRORS.........21
EXTERNAL LIGHTS...........23
INTERIOR LIGHTS............26
WINDSCREEN / REAR WINDOW
WIPERS..................27
CLIMATE CONTROL SYSTEM.....29
ELECTRIC WINDOWS..........33
BONNET..................33
DUALDRIVE ELECTRIC POWER
STEERING.................34
LUGGAGE COMPARTMENT......35
ROOF RACK/SKI RACK........40
VERSION WITH LPG SYSTEM....41
ACTIVE GRILLE SHUTTER.......44
ECO FUNCTION.............45
7
Page 22 of 292
HEAD RESTRAINTS
16)
FRONT HEAD
RESTRAINTS
Adjustment
They can be adjusted to 4 height
positions (completely raised /
2 intermediate positions / completely
lowered).
Upward adjustment: raise the head
restraint until it clicks into place.
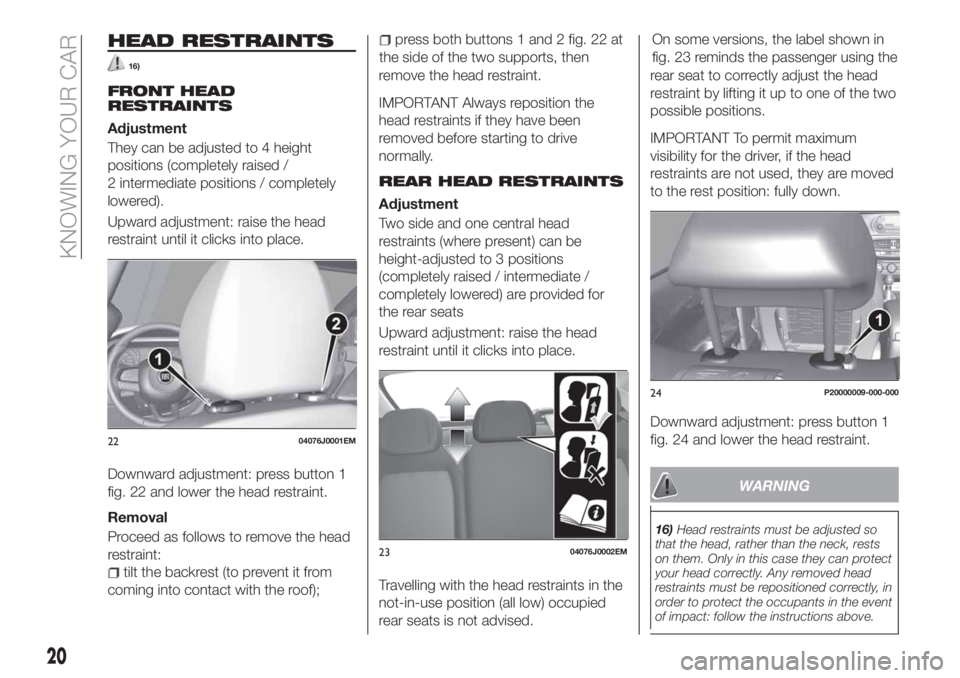
Downward adjustment: press button 1
fig. 22 and lower the head restraint.
Removal
Proceed as follows to remove the head
restraint:
tilt the backrest (to prevent it from
coming into contact with the roof);
press both buttons 1 and 2 fig. 22 at
the side of the two supports, then
remove the head restraint.
IMPORTANT Always reposition the
head restraints if they have been
removed before starting to drive
normally.
REAR HEAD RESTRAINTS
Adjustment
Two side and one central head
restraints (where present) can be
height-adjusted to 3 positions
(completely raised / intermediate /
completely lowered) are provided for
the rear seats
Upward adjustment: raise the head
restraint until it clicks into place.
Travelling with the head restraints in the
not-in-use position (all low) occupied
rear seats is not advised.On some versions, the label shown in
fig. 23 reminds the passenger using the
rear seat to correctly adjust the head
restraint by lifting it up to one of the two
possible positions.
IMPORTANT To permit maximum
visibility for the driver, if the head
restraints are not used, they are moved
to the rest position: fully down.
Downward adjustment: press button 1
fig. 24 and lower the head restraint.
WARNING
16)Head restraints must be adjusted so
that the head, rather than the neck, rests
on them. Only in this case they can protect
your head correctly. Any removed head
restraints must be repositioned correctly, in
order to protect the occupants in the event
of impact: follow the instructions above.
2204076J0001EM
2304076J0002EM
24P20000009-000-000
20
KNOWING YOUR CAR
Page 28 of 292
INTERIOR LIGHTS
FRONT CEILING LIGHT
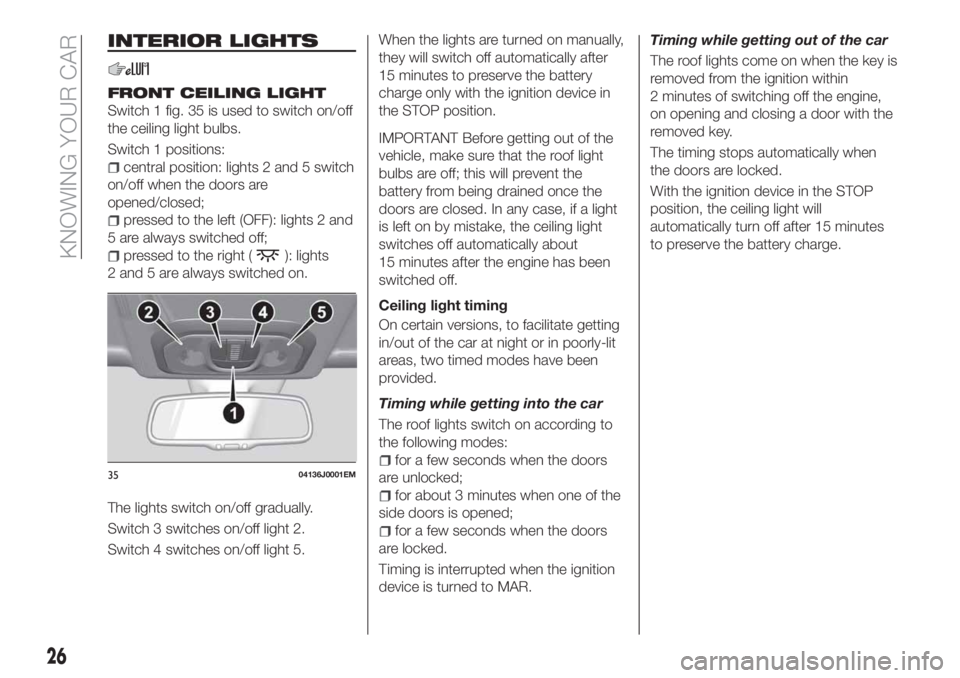
Switch 1 fig. 35 is used to switch on/off
the ceiling light bulbs.
Switch 1 positions:
central position: lights 2 and 5 switch
on/off when the doors are
opened/closed;
pressed to the left (OFF): lights 2 and
5 are always switched off;
pressed to the right (): lights
2 and 5 are always switched on.
The lights switch on/off gradually.
Switch 3 switches on/off light 2.
Switch 4 switches on/off light 5.When the lights are turned on manually,
they will switch off automatically after
15 minutes to preserve the battery
charge only with the ignition device in
the STOP position.
IMPORTANT Before getting out of the
vehicle, make sure that the roof light
bulbs are off; this will prevent the
battery from being drained once the
doors are closed. In any case, if a light
is left on by mistake, the ceiling light
switches off automatically about
15 minutes after the engine has been
switched off.
Ceiling light timing
On certain versions, to facilitate getting
in/out of the car at night or in poorly-lit
areas, two timed modes have been
provided.
Timing while getting into the car
The roof lights switch on according to
the following modes:
for a few seconds when the doors
are unlocked;
for about 3 minutes when one of the
side doors is opened;
for a few seconds when the doors
are locked.
Timing is interrupted when the ignition
device is turned to MAR.Timing while getting out of the car
The roof lights come on when the key is
removed from the ignition within
2 minutes of switching off the engine,
on opening and closing a door with the
removed key.
The timing stops automatically when
the doors are locked.
With the ignition device in the STOP
position, the ceiling light will
automatically turn off after 15 minutes
to preserve the battery charge.
3504136J0001EM
26
KNOWING YOUR CAR
Page 37 of 292
When the CITY function is on, the
steering wheel effort is lighter, making
parking easier: therefore, this function is
particularly useful for driving in city
centres.
To ensure steering uniformity, when the
key is pressed while the steering wheel
is being turned, the change of force will
only be felt when it is turned in the
opposite direction, or the steering
wheel is released.
WARNING
28)It is absolutely forbidden to carry out
any after-market operation involving
steering system or steering column
modifications (e.g. installation of anti-theft
device) that could adversely affect
performance, invalidate the warranty, cause
serious safety problems and also result in
the car not meeting type-approval
requirements.
29)Before performing any maintenance
operations, always stop the engine and
remove the key from the ignition to lock the
steering column (especially when the car
wheels are not touching the ground). If this
is not possible (for example if the key
needs to be turned to MAR or the engine
must be running), remove the main fuse
that protects the electric power steering.
LUGGAGE
COMPARTMENT
IMPORTANT When travelling, do not
put any object on the rear parcel shelf
because they can injure passengers in
the event of an accident or sudden
braking.
OPENING
30)
Tailgate opening
When the central locking system is
unlocked, the tailgate can be opened
from outside the car using the electric
opening handle (where provided)
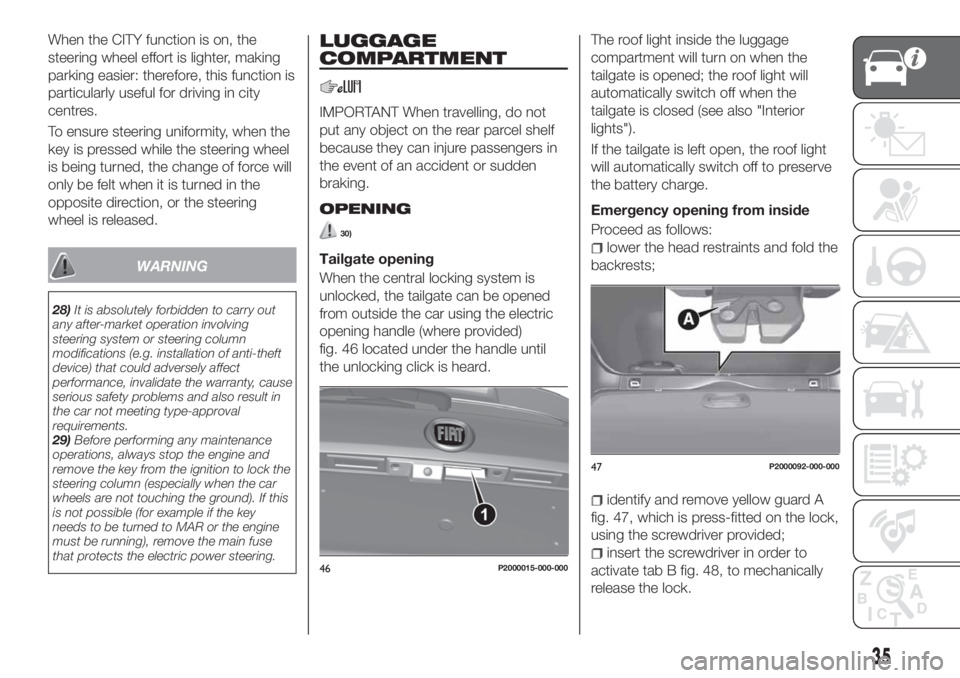
fig. 46 located under the handle until
the unlocking click is heard.The roof light inside the luggage
compartment will turn on when the
tailgate is opened; the roof light will
automatically switch off when the
tailgate is closed (see also "Interior
lights").
If the tailgate is left open, the roof light
will automatically switch off to preserve
the battery charge.
Emergency opening from inside
Proceed as follows:lower the head restraints and fold the
backrests;
identify and remove yellow guard A
fig. 47, which is press-fitted on the lock,
using the screwdriver provided;
insert the screwdriver in order to
activate tab B fig. 48, to mechanically
release the lock.46P2000015-000-000
47P2000092-000-000
35
Page 41 of 292
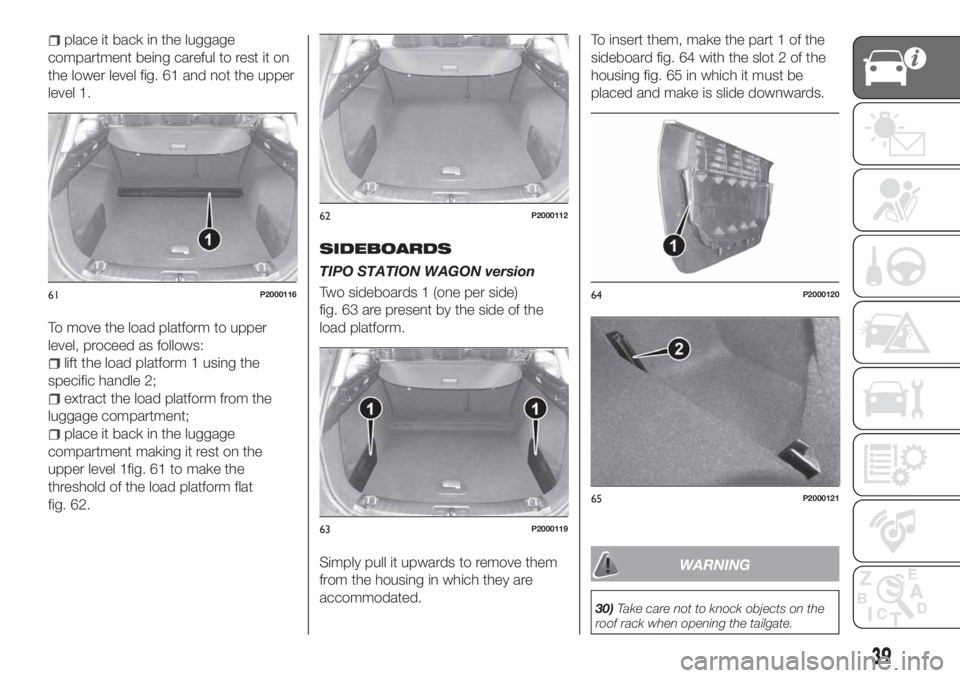
place it back in the luggage
compartment being careful to rest it on
the lower level fig. 61 and not the upper
level 1.
To move the load platform to upper
level, proceed as follows:
lift the load platform 1 using the
specific handle 2;
extract the load platform from the
luggage compartment;
place it back in the luggage
compartment making it rest on the
upper level 1fig. 61 to make the
threshold of the load platform flat
fig. 62.
SIDEBOARDS
TIPO STATION WAGON version
Two sideboards 1 (one per side)
fig. 63 are present by the side of the
load platform.
Simply pull it upwards to remove them
from the housing in which they are
accommodated.To insert them, make the part 1 of the
sideboard fig. 64 with the slot 2 of the
housing fig. 65 in which it must be
placed and make is slide downwards.
WARNING
30)Take care not to knock objects on the
roof rack when opening the tailgate.
61P2000116
62P2000112
63P2000119
64P2000120
65P2000121
39
Page 42 of 292
31)In the event of an accident or sharp
braking, any object placed on the curtain
may be projected into the passenger
compartment, and risk hurting the
occupants.
IMPORTANT
9)The dimensions of the platform permit a
maximum distributed weight capacity of
95 kg: do not load objects with a greater
weight.
ROOF RACK/SKI
RACK
The vehicle might be equipped with two
transversal bars which, with the
addition of special accessories, can be
used to carry various objects (e.g. skis,
surfboards, bikes, etc.).
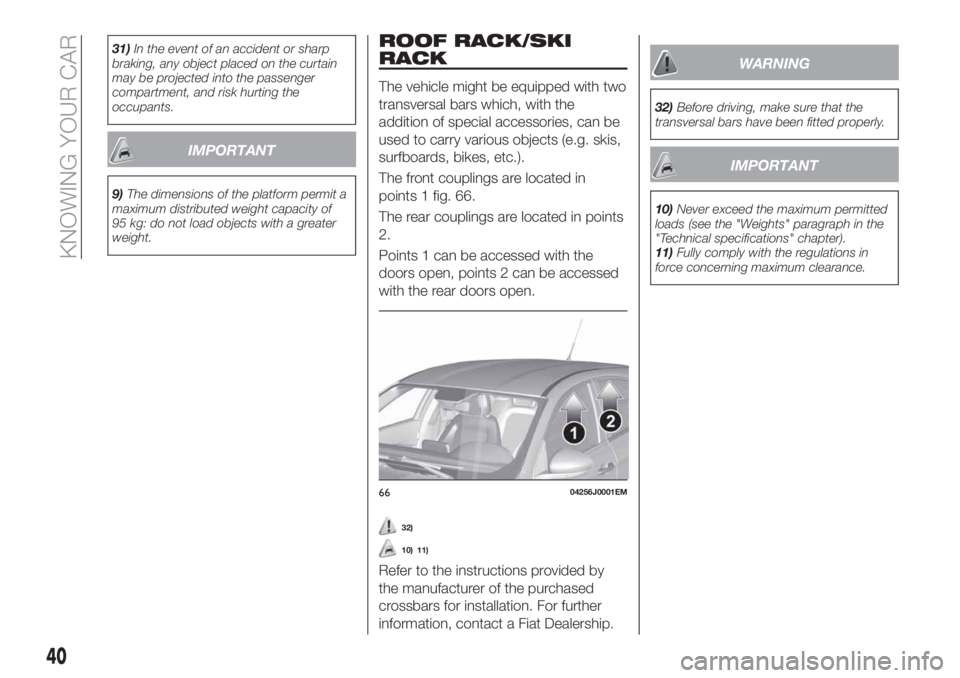
The front couplings are located in
points 1 fig. 66.
The rear couplings are located in points
2.
Points 1 can be accessed with the
doors open, points 2 can be accessed
with the rear doors open.
32)
10) 11)
Refer to the instructions provided by
the manufacturer of the purchased
crossbars for installation. For further
information, contact a Fiat Dealership.
WARNING
32)Before driving, make sure that the
transversal bars have been fitted properly.
IMPORTANT
10)Never exceed the maximum permitted
loads (see the "Weights" paragraph in the
"Technical specifications" chapter).
11)Fully comply with the regulations in
force concerning maximum clearance.
6604256J0001EM
40
KNOWING YOUR CAR
Page 108 of 292
SIDE BAGS
To help increase occupants protection
in the event of side impact collisions,
the vehicle is equipped with front side
bags and window bags.
Side bag
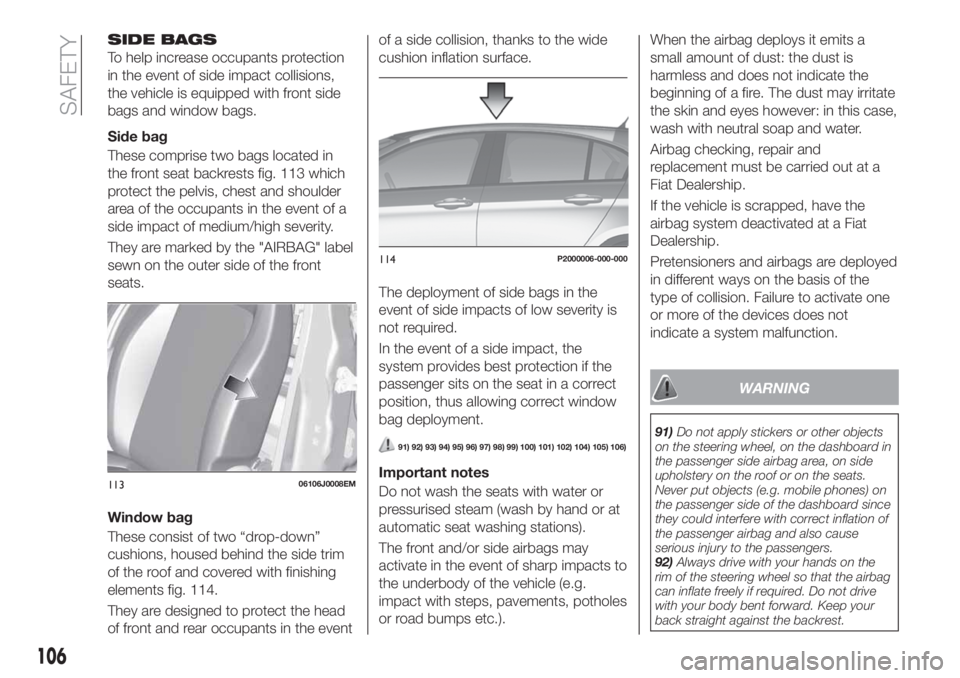
These comprise two bags located in
the front seat backrests fig. 113 which
protect the pelvis, chest and shoulder
area of the occupants in the event of a
side impact of medium/high severity.
They are marked by the "AIRBAG" label
sewn on the outer side of the front
seats.
Window bag
These consist of two “drop-down”
cushions, housed behind the side trim
of the roof and covered with finishing
elements fig. 114.
They are designed to protect the head
of front and rear occupants in the eventof a side collision, thanks to the wide
cushion inflation surface.
The deployment of side bags in the
event of side impacts of low severity is
not required.
In the event of a side impact, the
system provides best protection if the
passenger sits on the seat in a correct
position, thus allowing correct window
bag deployment.
91) 92) 93) 94) 95) 96) 97) 98) 99) 100) 101) 102) 104) 105) 106)
Important notes
Do not wash the seats with water or
pressurised steam (wash by hand or at
automatic seat washing stations).
The front and/or side airbags may
activate in the event of sharp impacts to
the underbody of the vehicle (e.g.
impact with steps, pavements, potholes
or road bumps etc.).When the airbag deploys it emits a
small amount of dust: the dust is
harmless and does not indicate the
beginning of a fire. The dust may irritate
the skin and eyes however: in this case,
wash with neutral soap and water.
Airbag checking, repair and
replacement must be carried out at a
Fiat Dealership.
If the vehicle is scrapped, have the
airbag system deactivated at a Fiat
Dealership.
Pretensioners and airbags are deployed
in different ways on the basis of the
type of collision. Failure to activate one
or more of the devices does not
indicate a system malfunction.
WARNING
91)Do not apply stickers or other objects
on the steering wheel, on the dashboard in
the passenger side airbag area, on side
upholstery on the roof or on the seats.
Never put objects (e.g. mobile phones) on
the passenger side of the dashboard since
they could interfere with correct inflation of
the passenger airbag and also cause
serious injury to the passengers.
92)Always drive with your hands on the
rim of the steering wheel so that the airbag
can inflate freely if required. Do not drive
with your body bent forward. Keep your
back straight against the backrest.
11306106J0008EM
114P2000006-000-000
106
SAFETY
Page 143 of 292
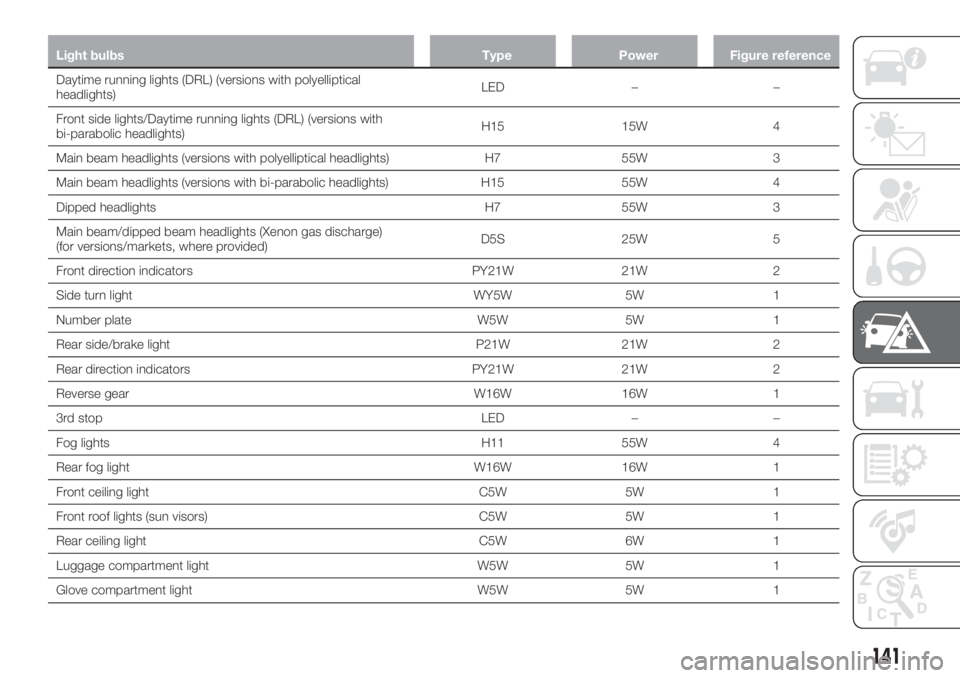
Light bulbs Type Power Figure reference
Daytime running lights (DRL) (versions with polyelliptical
headlights)LED – –
Front side lights/Daytime running lights (DRL) (versions with
bi-parabolic headlights)H15 15W 4
Main beam headlights (versions with polyelliptical headlights) H7 55W 3
Main beam headlights (versions with bi-parabolic headlights) H15 55W 4
Dipped headlights H7 55W 3
Main beam/dipped beam headlights (Xenon gas discharge)
(for versions/markets, where provided)D5S 25W 5
Front direction indicators PY21W 21W 2
Side turn light WY5W 5W 1
Number plate W5W 5W 1
Rear side/brake light P21W 21W 2
Rear direction indicators PY21W 21W 2
Reverse gear W16W 16W 1
3rd stop LED – –
Fog lights H11 55W 4
Rear fog light W16W 16W 1
Front ceiling light C5W 5W 1
Front roof lights (sun visors) C5W 5W 1
Rear ceiling light C5W 6W 1
Luggage compartment light W5W 5W 1
Glove compartment light W5W 5W 1
141
Page 195 of 292
AUTOMATIC
TRANSMISSION / DUAL
CLUTCH AUTOMATIC
TRANSMISSION
ACTUATION SYSTEM OIL
(where provided)
4)
The transmission control oil level should
only be checked at a Fiat Dealership.
BATTERY
171) 172) 173)
75)
5)
The battery does not require the
electrolyte to be topped up with distilled
water.
A periodic check carried out at a Fiat
Dealership is, however, necessary to
check efficiency.
Replacing the battery
If necessary, replace the battery with
another original battery with the same
specifications. Follow the battery
Manufacturer’s instructions for
maintenance.
USEFUL ADVICE FOR
EXTENDING THE LIFE OF
YOUR BATTERY
Useful advice for extending the life
of your battery
To avoid draining your battery and
make it last longer, observe the
following instructions:
when you park the car, ensure that
the doors, tailgate and bonnet are
closed properly, to prevent any lights
from remaining on inside the
passenger's compartment;
switch off all roof lights inside the car:
the car is however equipped with a
system which switches all internal lights
off automatically;
do not keep accessories (e.g. radio,
hazard warning lights, etc.) switched on
for a long time when the engine is not
running;
before performing any operation on
the electrical system, disconnect the
negative battery cable.
If, after purchasing the vehicle, you wish
to install electrical accessories which
require permanent electrical supply (e.g.
alarm, etc.) or accessories which
influence the electrical supply
requirements, contact a Fiat Dealership,
whose qualified staff will evaluate the
overall electrical consumption.
77)
IMPORTANT After the battery is
disconnected, the steering must be
initialised. The
warning light on the
instrument panel (or symbol on the
display) switches on to indicate this. To
carry out this procedure, simply turn the
steering wheel all the way from one end
to the other or drive in a straight line for
about a hundred metres.
IMPORTANT If the charge level remains
under 50% for a long time, the battery
is damaged by sulphation, reducing its
capacity and efficiency at start-up. The
battery is also more prone to the risk of
freezing (at temperatures as high as
-10°C). Refer to the "Vehicle inactivity"
paragraph in "Starting and driving"
chapter if the vehicle is left parked for a
long time.
WARNING
163)Never smoke while working in the
engine compartment: gas and inflammable
vapours may be present, with the risk of
fire.
164)Be very careful when working in the
engine compartment when the engine is
hot: you may get burned. Do not get too
close to the radiator cooling fan: the
electric fan may start; danger of injury.
Scarves, ties and other loose clothing
might be pulled by moving parts.
193
Page 203 of 292
BODY
PRESERVING THE
BODYWORK
Paint
87)
6)
Touch up abrasions and scratches
immediately to prevent the formation of
rust.
Maintenance of paintwork consists of
washing the car: the frequency
depends on the conditions and
environment where the car is used. For
example, it is advisable to wash the
vehicle more often in areas with high
levels of atmospheric pollution or salted
roads.
Some parts of the vehicle may be
covered with a matt paint which, in
order to be maintained intact, requires
special care: see the instructions in the
warning at the end of this paragraph
88)
To correctly wash the vehicle, follow
these instructions:
if the vehicle is washed remove the
aerial from the roof;
if high pressure jets or cleaners are
used to wash the vehicle, keep a
distance of at least 40 cm from thebodywork to avoid damage or
alteration. Build up of water could
cause damage to the vehicle in the long
term;
wash the bodywork using a low
pressure jet of water if possible;
wipe a sponge with a slightly soapy
solution over the bodywork, frequently
rinsing the sponge;
rinse well with water and dry with a
jet of air or a chamois leather.
Dry the less visible parts (e.g. door
frames, bonnet, headlight frames, etc.)
with special care, as water may
stagnate more easily in these areas. Do
not wash the car after it has been left in
the sun or with the bonnet hot: this may
alter the shine of the paintwork.
Exterior plastic parts must be cleaned
in the same way as the rest of the
vehicle.
IMPORTANT NOTES
Avoid parking under trees; the resin
dropped by trees makes the paintwork
go opaque and increases the possibility
of corrosion.
Bird droppings must be washed off
immediately and thoroughly as the acid
they contain is particularly aggressive.Windows
Use specific detergents and clean
cloths to prevent scratching or altering
the transparency.
IMPORTANT Wipe the rear window
inside gently with a cloth following the
direction of the filaments to avoid
damaging the heating device.
Front headlights
Use a soft cloth soaked in water and
detergent for washing cars.
IMPORTANT Never use aromatic
substances (e.g. petrol) or ketones (e.g.
acetone) for cleaning the plastic lenses
of the headlights.
IMPORTANT When cleaning with a
pressure washer, keep the water jet at
least 20 cm away from the headlights.
Engine compartment
At the end of every winter, wash the
engine compartment thoroughly, taking
care not to aim the jet of water directly
at the electronic control units or at the
windscreen wiper motors. Have this
operation performed at a specialised
workshop.
IMPORTANT The washing should take
place with the engine cold and the
ignition device in the STOP position.
After the washing operation, make sure
201