reset FIAT TIPO 5DOORS STATION WAGON 2020 Owner handbook (in English)
[x] Cancel search | Manufacturer: FIAT, Model Year: 2020, Model line: TIPO 5DOORS STATION WAGON, Model: FIAT TIPO 5DOORS STATION WAGON 2020Pages: 304, PDF Size: 9.12 MB
Page 89 of 304
75)After the height adjustment, always
check that the grip is locked in one of the
preset positions. To do this, with button
1 released, exert further pressure
downwards to allow the locking device to
click if the grip has not been released in
one of the possible positions.SBR (SEAT BELT
REMINDER) SYSTEM
(for versions/markets, where provided)
The SBR system warns the passengers
of the front and rear (where provided)
seats if their seat belt is not fastened.
The system signals unfastened seat
belts with visual warnings (warning
lights on in the instrument panel and
symbols on the display) and an
acoustic signal (see the following
paragraphs).
NOTE To deactivate the acoustic
warning permanently go to a Fiat
Dealership. The acoustic warning can
be reactivated at any time through the
display menu (see the "Display"
paragraph in the "Knowing the
instrument panel" chapter).
Front seat belt warning light
behaviour
When the ignition device is turned to
MAR, the warning light
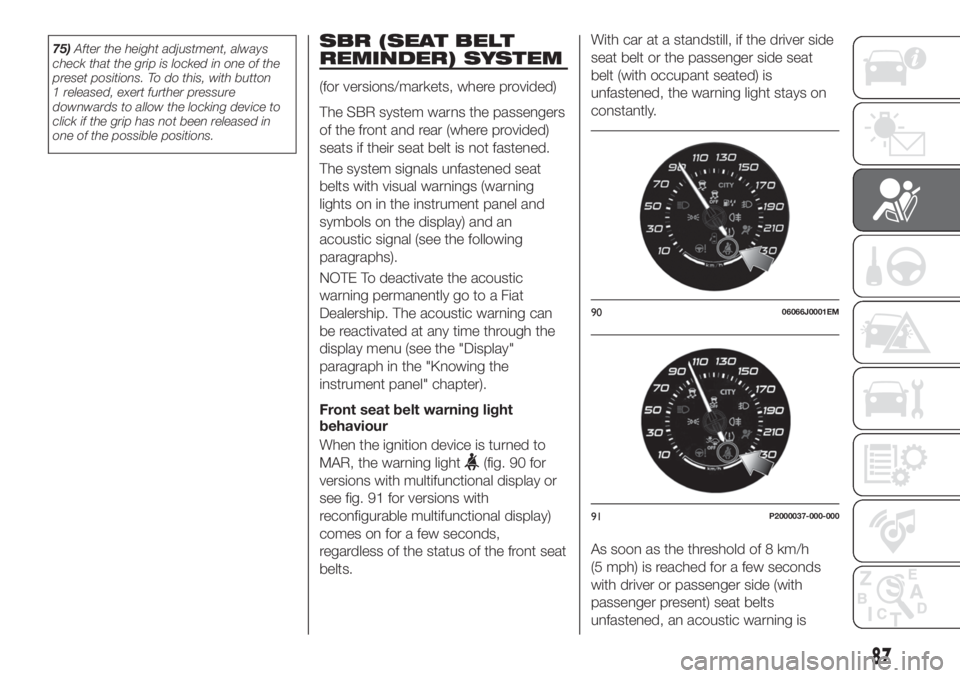
(fig. 90 for
versions with multifunctional display or
see fig. 91 for versions with
reconfigurable multifunctional display)
comes on for a few seconds,
regardless of the status of the front seat
belts.With car at a standstill, if the driver side
seat belt or the passenger side seat
belt (with occupant seated) is
unfastened, the warning light stays on
constantly.
As soon as the threshold of 8 km/h
(5 mph) is reached for a few seconds
with driver or passenger side (with
passenger present) seat belts
unfastened, an acoustic warning is
9006066J0001EM
91P2000037-000-000
87
Page 126 of 304
ADAPTIVE CRUISE
CONTROL (ACC)
(where provided)
126) 127) 128) 129) 130) 131)
50) 51) 52) 54) 54) 55) 56)
DESCRIPTION
The Adaptive Cruise Control (ACC) is a
driver assist device which combines the
Cruise Control functions with one for
controlling the distance from the vehicle
ahead.
The device allows to hold the car at the
desired speed without needing to press
the accelerator. It also allows to hold a
given distance from the vehicle ahead
(the distance can be set by the driver).
The Adaptive Cruise Control (ACC) uses
a radar sensor, located behind the front
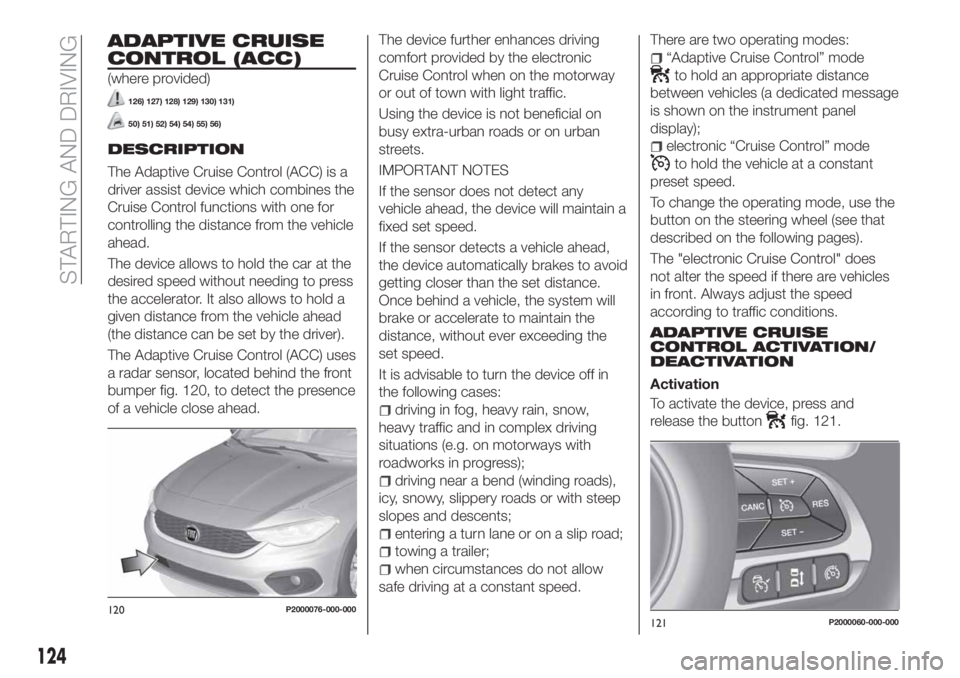
bumper fig. 120, to detect the presence
of a vehicle close ahead.The device further enhances driving
comfort provided by the electronic
Cruise Control when on the motorway
or out of town with light traffic.
Using the device is not beneficial on
busy extra-urban roads or on urban
streets.
IMPORTANT NOTES
If the sensor does not detect any
vehicle ahead, the device will maintain a
fixed set speed.
If the sensor detects a vehicle ahead,
the device automatically brakes to avoid
getting closer than the set distance.
Once behind a vehicle, the system will
brake or accelerate to maintain the
distance, without ever exceeding the
set speed.
It is advisable to turn the device off in
the following cases:
driving in fog, heavy rain, snow,
heavy traffic and in complex driving
situations (e.g. on motorways with
roadworks in progress);
driving near a bend (winding roads),
icy, snowy, slippery roads or with steep
slopes and descents;
entering a turn lane or on a slip road;
towing a trailer;
when circumstances do not allow
safe driving at a constant speed.There are two operating modes:
“Adaptive Cruise Control” mode
to hold an appropriate distance
between vehicles (a dedicated message
is shown on the instrument panel
display);
electronic “Cruise Control” mode
to hold the vehicle at a constant
preset speed.
To change the operating mode, use the
button on the steering wheel (see that
described on the following pages).
The "electronic Cruise Control" does
not alter the speed if there are vehicles
in front. Always adjust the speed
according to traffic conditions.
ADAPTIVE CRUISE
CONTROL ACTIVATION/
DEACTIVATION
Activation
To activate the device, press and
release the button
fig. 121.
120P2000076-000-000121P2000060-000-000
124
STARTING AND DRIVING
Page 131 of 304
When the conditions limiting the system
functions end, this will go back to
normal and complete operation. Should
the fault persist, contact a Fiat
Dealership.
PRECAUTIONS WHILE
DRIVING
The device may not work correctly in
some driving conditions (see below):
the driver must control the vehicle at all
times.
Towing a trailer
Use of the device is not recommended
while towing a trailer.
Vehicle not aligned
The device may not detect a vehicle
travelling on the same lane but which is
not aligned along the same direction of
travel or a vehicle which is cutting in
from a side lane. Sufficient distance
from the vehicles ahead may not be
guaranteed in these cases.
The non-aligned vehicle can weave in
and out of the driving direction causing
the vehicle to brake or accelerate
unexpectedly.
Steering and curves
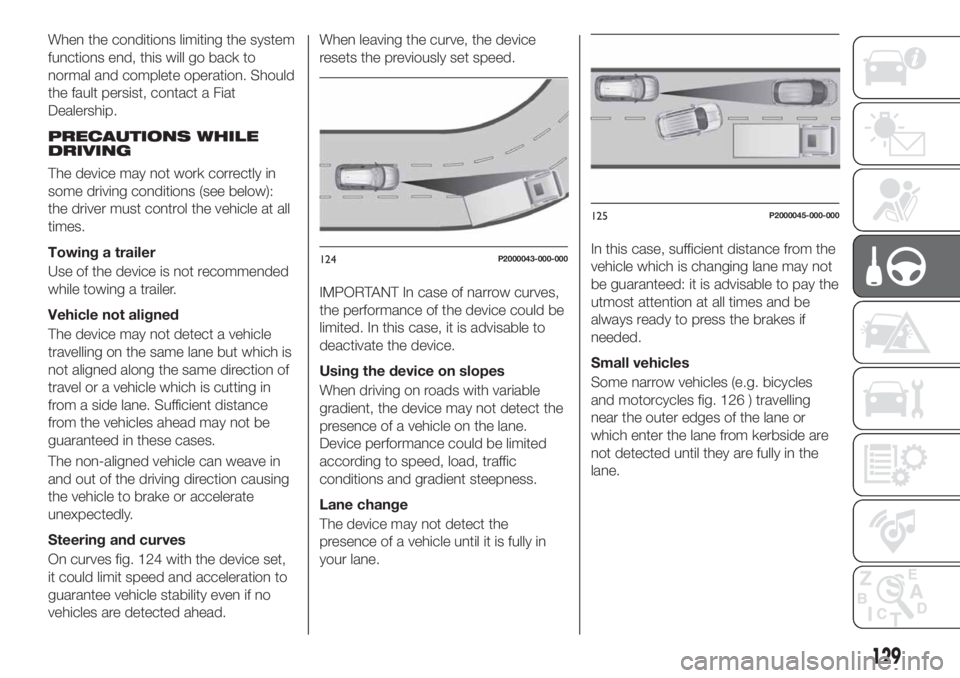
On curves fig. 124 with the device set,
it could limit speed and acceleration to
guarantee vehicle stability even if no
vehicles are detected ahead.When leaving the curve, the device
resets the previously set speed.
IMPORTANT In case of narrow curves,
the performance of the device could be
limited. In this case, it is advisable to
deactivate the device.
Using the device on slopes
When driving on roads with variable
gradient, the device may not detect the
presence of a vehicle on the lane.
Device performance could be limited
according to speed, load, traffic
conditions and gradient steepness.
Lane change
The device may not detect the
presence of a vehicle until it is fully in
your lane.In this case, sufficient distance from the
vehicle which is changing lane may not
be guaranteed: it is advisable to pay the
utmost attention at all times and be
always ready to press the brakes if
needed.
Small vehicles
Some narrow vehicles (e.g. bicycles
and motorcycles fig. 126 ) travelling
near the outer edges of the lane or
which enter the lane from kerbside are
not detected until they are fully in the
lane.
124P2000043-000-000
125P2000045-000-000
129
Page 139 of 304
Do not exceed the speed limits specific
to each country you are driving in, in the
case of vehicles towing trailers. In any
case, the top speed must not exceed
100 km/h.
Any electric brake must be powered
directly by the battery through a cable
with a cross-section of no less than
2.5 mm
2.
In addition to the electrical branches,
the vehicle electrical system can only be
connected to the supply cable for an
electric brake and to the cable for an
internal light for the trailer, not
exceeding 15 W. For connections, use
the preset control unit with a battery
cable with section not less than 2.5 mm
2.
IMPORTANT The use of auxiliary loads
other than external lights (e.g. electric
brake) must take place with engine
running.
INSTALLING A TOW
HOOK
To install a tow hook contact a Fiat
Dealership.
WARNING
134)The ABS with which the car is
equipped will not control the braking
system of the trailer. Particular caution is
required on slippery roads.
135)Never modify the braking system of
the vehicle to control the trailer brake. The
trailer braking system must be fully
independent of the car’s hydraulic system.
SUGGESTIONS FOR
DRIVING
SAVING FUEL
Below are some suggestions which
may help you save fuel and thus lower
the amount of harmful emissions
released into the atmosphere.
Vehicle maintenance
Checks and operations should be
carried out in accordance with the
"Scheduled Servicing Plan" (see the
"Maintenance and care" chapter).
Tyres
Check the tyre pressures at least once
every four weeks: if the pressure is too
low, consumption levels increase as
resistance to rolling is higher.
Unnecessary loads
Do not travel with an overloaded boot.
The weight of the vehicle and its
arrangement greatly affect fuel
consumption and stability.
Roof rack/ski rack
(where provided)
Remove the roof rack or the ski rack
from the roof when they are not used.
These accessories lower aerodynamic
penetration and adversely affect
137
consumption levels.
Page 174 of 304
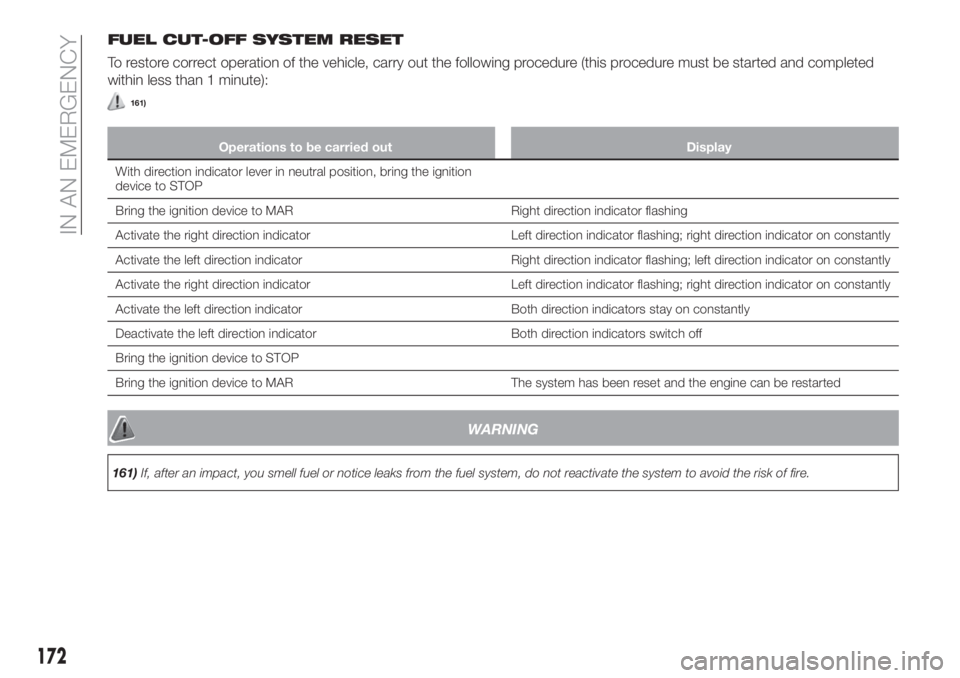
FUEL CUT-OFF SYSTEM RESET
To restore correct operation of the vehicle, carry out the following procedure (this procedure must be started and completed
within less than 1 minute):
161)
Operations to be carried out Display
With direction indicator lever in neutral position, bring the ignition
device to STOP
Bring the ignition device to MAR Right direction indicator flashing
Activate the right direction indicator Left direction indicator flashing; right direction indicator on constantly
Activate the left direction indicator Right direction indicator flashing; left direction indicator on constantly
Activate the right direction indicator Left direction indicator flashing; right direction indicator on constantly
Activate the left direction indicator Both direction indicators stay on constantly
Deactivate the left direction indicator Both direction indicators switch off
Bring the ignition device to STOP
Bring the ignition device to MAR The system has been reset and the engine can be restarted
WARNING
161)If, after an impact, you smell fuel or notice leaks from the fuel system, do not reactivate the system to avoid the risk of fire.
172
IN AN EMERGENCY
Page 251 of 304
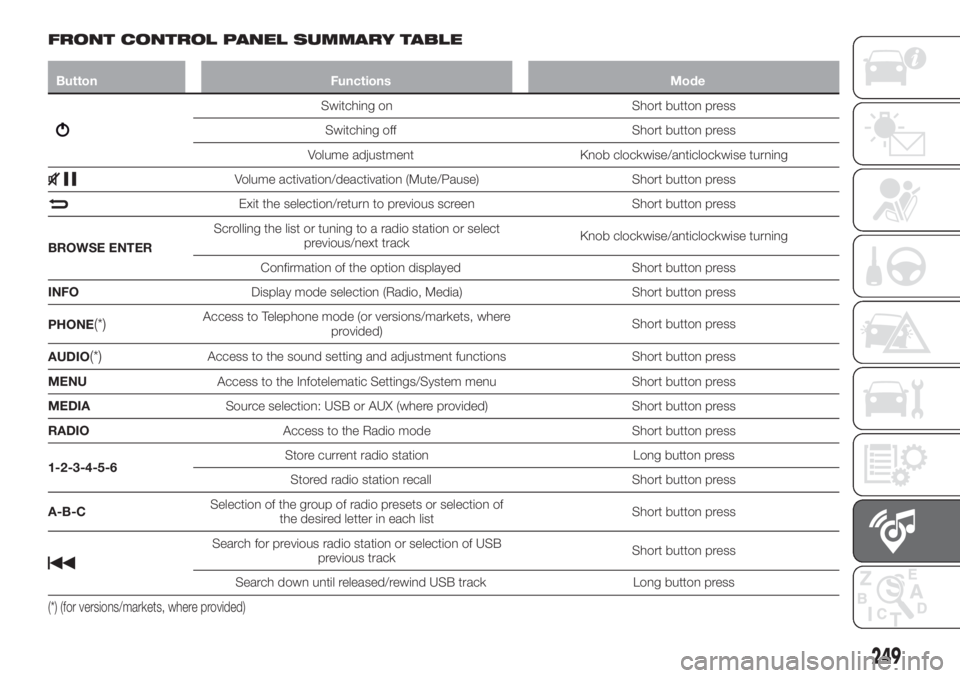
FRONT CONTROL PANEL SUMMARY TABLE
Button Functions Mode
Switching on Short button press
Switching off Short button press
Volume adjustment Knob clockwise/anticlockwise turning
Volume activation/deactivation (Mute/Pause) Short button press
Exit the selection/return to previous screen Short button press
BROWSE ENTERScrolling the list or tuning to a radio station or select
previous/next trackKnob clockwise/anticlockwise turning
Confirmation of the option displayed Short button press
INFODisplay mode selection (Radio, Media) Short button press
PHONE
(*)Access to Telephone mode (or versions/markets, where
provided)Short button press
AUDIO
(*)Access to the sound setting and adjustment functions Short button press
MENUAccess to the Infotelematic Settings/System menu Short button press
MEDIASource selection: USB or AUX (where provided) Short button press
RADIOAccess to the Radio mode Short button press
1-2-3-4-5-6Store current radio station Long button press
Stored radio station recall Short button press
A-B-CSelection of the group of radio presets or selection of
the desired letter in each listShort button press
Search for previous radio station or selection of USB
previous trackShort button press
Search down until released/rewind USB track Long button press
(*) (for versions/markets, where provided)
249
Page 256 of 304
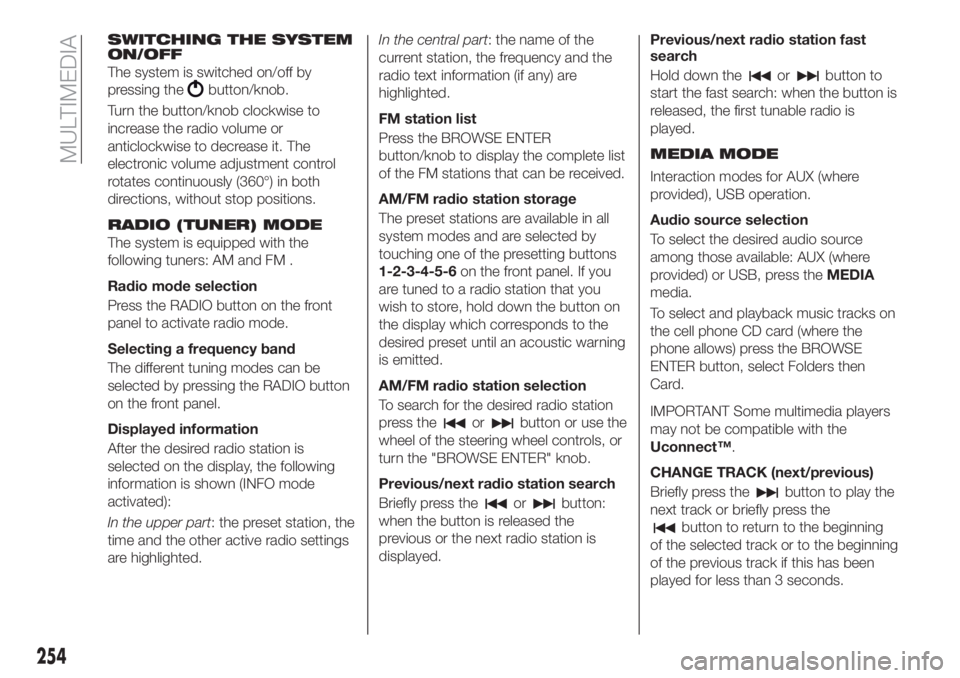
SWITCHING THE SYSTEM
ON/OFF
The system is switched on/off by
pressing the
button/knob.
Turn the button/knob clockwise to
increase the radio volume or
anticlockwise to decrease it. The
electronic volume adjustment control
rotates continuously (360°) in both
directions, without stop positions.
RADIO (TUNER) MODE
The system is equipped with the
following tuners: AM and FM .
Radio mode selection
Press the RADIO button on the front
panel to activate radio mode.
Selecting a frequency band
The different tuning modes can be
selected by pressing the RADIO button
on the front panel.
Displayed information
After the desired radio station is
selected on the display, the following
information is shown (INFO mode
activated):
In the upper part: the preset station, the
time and the other active radio settings
are highlighted.In the central part: the name of the
current station, the frequency and the
radio text information (if any) are
highlighted.
FM station list
Press the BROWSE ENTER
button/knob to display the complete list
of the FM stations that can be received.
AM/FM radio station storage
The preset stations are available in all
system modes and are selected by
touching one of the presetting buttons
1-2-3-4-5-6on the front panel. If you
are tuned to a radio station that you
wish to store, hold down the button on
the display which corresponds to the
desired preset until an acoustic warning
is emitted.
AM/FM radio station selection
To search for the desired radio station
press the
orbutton or use the
wheel of the steering wheel controls, or
turn the "BROWSE ENTER" knob.
Previous/next radio station search
Briefly press the
orbutton:
when the button is released the
previous or the next radio station is
displayed.Previous/next radio station fast
search
Hold down the
orbutton to
start the fast search: when the button is
released, the first tunable radio is
played.
MEDIA MODE
Interaction modes for AUX (where
provided), USB operation.
Audio source selection
To select the desired audio source
among those available: AUX (where
provided) or USB, press theMEDIA
media.
To select and playback music tracks on
the cell phone CD card (where the
phone allows) press the BROWSE
ENTER button, select Folders then
Card.
IMPORTANT Some multimedia players
may not be compatible with the
Uconnect™.
CHANGE TRACK (next/previous)
Briefly press the
button to play the
next track or briefly press the
button to return to the beginning
of the selected track or to the beginning
of the previous track if this has been
played for less than 3 seconds.
254
MULTIMEDIA
Page 265 of 304
SWITCHING THE SYSTEM
ON/OFF
The system is switched on/off by
pressing the
button/knob.
Turn the button/knob clockwise to
increase the radio volume or
anticlockwise to decrease it. The
electronic volume adjustment control
rotates continuously (360°) in both
directions, without stop positions.
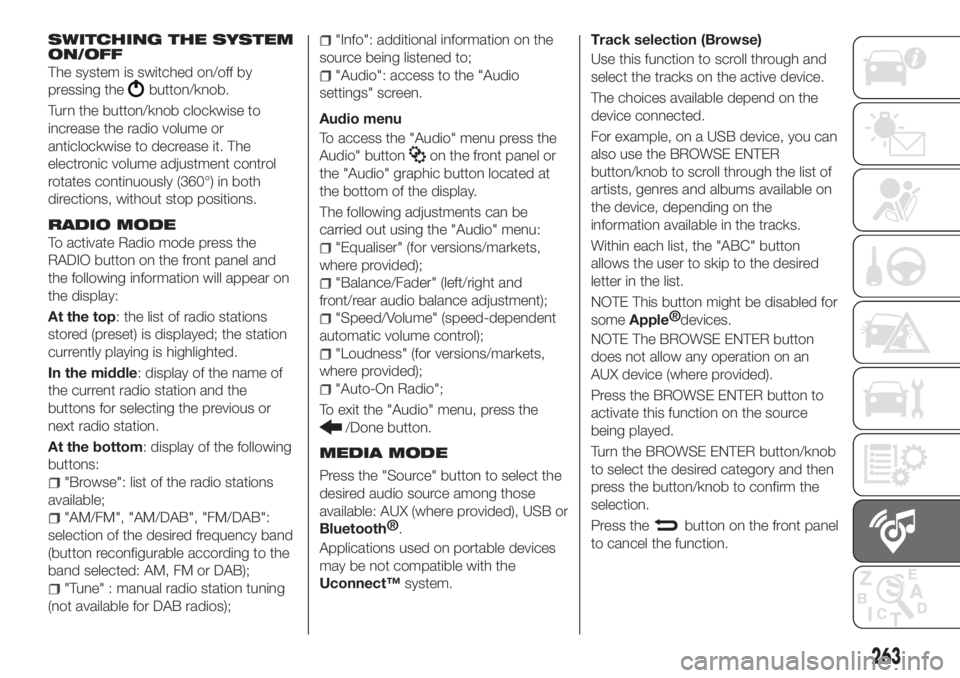
RADIO MODE
To activate Radio mode press the
RADIO button on the front panel and
the following information will appear on
the display:
At the top: the list of radio stations
stored (preset) is displayed; the station
currently playing is highlighted.
In the middle: display of the name of
the current radio station and the
buttons for selecting the previous or
next radio station.
At the bottom: display of the following
buttons:
"Browse": list of the radio stations
available;
"AM/FM", "AM/DAB", "FM/DAB":
selection of the desired frequency band
(button reconfigurable according to the
band selected: AM, FM or DAB);
"Tune" : manual radio station tuning
(not available for DAB radios);
"Info": additional information on the
source being listened to;
"Audio": access to the "Audio
settings" screen.
Audio menu
To access the "Audio" menu press the
Audio" button
on the front panel or
the "Audio" graphic button located at
the bottom of the display.
The following adjustments can be
carried out using the "Audio" menu:
"Equaliser" (for versions/markets,
where provided);
"Balance/Fader" (left/right and
front/rear audio balance adjustment);
"Speed/Volume" (speed-dependent
automatic volume control);
"Loudness" (for versions/markets,
where provided);
"Auto-On Radio";
To exit the "Audio" menu, press the
/Done button.
MEDIA MODE
Press the "Source" button to select the
desired audio source among those
available: AUX (where provided), USB or
Bluetooth®
.
Applications used on portable devices
may be not compatible with the
Uconnect™system.Track selection (Browse)
Use this function to scroll through and
select the tracks on the active device.
The choices available depend on the
device connected.
For example, on a USB device, you can
also use the BROWSE ENTER
button/knob to scroll through the list of
artists, genres and albums available on
the device, depending on the
information available in the tracks.
Within each list, the "ABC" button
allows the user to skip to the desired
letter in the list.
NOTE This button might be disabled for
some
Apple®
devices.
NOTE The BROWSE ENTER button
does not allow any operation on an
AUX device (where provided).
Press the BROWSE ENTER button to
activate this function on the source
being played.
Turn the BROWSE ENTER button/knob
to select the desired category and then
press the button/knob to confirm the
selection.
Press the
button on the front panel
to cancel the function.
263
Page 279 of 304
SWITCHING THE SYSTEM
ON/OFF
The system is switched on/off by
pressing the
button/knob.
Turn the button/knob clockwise to
increase the radio volume or
anticlockwise to decrease it. The
electronic volume adjustment control
rotates continuously (360°) in both
directions, without stop positions.
RADIO MODE
After the desired radio station is
selected, the following information is
shown on the display:
At the top: the list of radio stations
stored (preset) is displayed; the station
currently playing is highlighted.
At the centre: the name of station
being listened too is displayed.
On the left side: the "AM", "FM",
"DAB” (for versions/markets, where
provided) buttons to select the desired
frequency band are displayed (the
button corresponding to the selected
band is highlighted);
On the right: display of the following
buttons:
"Info": additional information on the
source being listened to;
"Map": navigation map view
(Uconnect™7" HD Nav LIVEversions
only).At the bottom: display of the following
buttons:
“Browse": list of the radio stations
available;
/selecting previous/next
radio station;
“Tune” : manual radio station tuning;
"Audio": access to the "Audio
settings" screen.
Audio menu
To access the "Audio" menu press the
Audio" button located at the bottom of
the display.
The following adjustments can be
carried out using the "Audio" menu:
“Balance & Fader" (left/right and
front/rear audio balance adjustment);
"Equalizer" (where provided);
“Speed Adj Volume" (speed-
dependent automatic volume control);
"Loudness" (where provided);
“AUX Volume Offset” (only active if an
AUX device is inserted);
“AutoPlay”;
"Auto-On Radio".
MEDIA MODE
Press the "Media" button to select the
desired audio source among those
available: USB,
Bluetooth®
and AUX
(where present).
IMPORTANT Applications used on
portable devices may be not
compatible with theUconnect™
system.
After Media mode is selected, the
following information is shown on the
display:
At the top: information on the track
being played and the following graphic
buttons:
"Repeat": to repeat the track being
played;
“Shuffle": to play the tracks in
random order;
Track progress and duration.
In the middle: information on the track
being played.
On the left: display of the following
buttons:
Selected device or audio source;
"Select source": select the required
audio source.
On the right: display of the following
buttons:
"Info": additional information about
the song playing;
“Tracks": list of available tracks;
"Map": navigation map view
(Uconnect™7" HD Nav LIVEversions
only).
277