FIAT ULYSSE 2009 2.G Owners Manual
Manufacturer: FIAT, Model Year: 2009, Model line: ULYSSE, Model: FIAT ULYSSE 2009 2.GPages: 254, PDF Size: 3.56 MB
Page 151 of 254
DRIVING YOUR CAR
150
The specific characteristics of the
winter tyres mean that under normal
driving conditions or when driving long
distances on motorways, their perfor-
mance is greatly reduced in compari-
son to those normally fitted to the car.
The use of these tyres should there-
fore be limited to the conditions for
which they were designed and certified.
IMPORTANTWhen using winter
tyres with a maximum speed rating
lower than the speed which can be
reached by the car (plus 5%), place a
suitable notice in the passenger com-
partment to inform the driver of the
top speed which the winter tyre can
run at (as per Directive CE).
All four tyres should be the same
(brand and track) to ensure greater
safety when driving, braking and cor-
nering.SNOW CHAINS
The use of snow chains is regulated
by the legislation in force in the coun-
try the car is driven in.
The chains may only be applied to
the front wheel (drive wheel) tyres.
Use only low profile chains (maxi-
mum 12 mm off the tyre).
We recommend using Lineaccessori
Fiat snow chains.
Check the tautness of the chains af-
ter driving some ten meters. The max speed for snow
tyres with “Q” marking is
160 km/h, 190 Km/h for
tyres with “T” marking and
210 Km/h for tyres with “H”
marking. The Road Traffic Code
speed limits must however be al-
ways strictly observed.
Remember not to invert the tyre di-
rection of rotation.
136-152 ULYSSE ING 10-03-2009 11:40 Pagina 150
Page 152 of 254
DRIVING YOUR CAR
151
STORING THE CAR
The following precautions should be
taken if the car will not be used for
several months:
– park the vehicle in covered, dry and
if possible well-ventilated premises;
– engage a gear (Pfor versions with
automatic electronic gear);
– make sure the handbrake is not en-
gaged;
– clean and protect the painted parts
using protective wax;
– sprinkle talcum powder on the rub-
ber windscreen and rear window
wiper blades and lift them off the glass;
– slightly open the windows;
– inflate the tyres to 0.5 bar above
the normal specified pressure and
check it at intervals;– switch off the electronic car alarm;
– disconnect the terminals (–) from
the battery poles (negative pole first)
and check the battery charge. When
the vehicle is in storage, this check
should be carried out once a month.
If no-load voltage is less than 12.5V,
recharge the battery;
– do not drain the engine cooling sys-
tem;
– cover the vehicle with a cloth or
perforated plastic sheet. Do not use
sheets of non-perforated plastic as
they do not allow moisture on the car
body to evaporate.RESTARTING THE CAR
AFTER STORAGE
Before restarting the vehicle after a
long storage, make the following op-
erations:
– do not take dust off the bodywork
without water;
– check if there are fluid leakages (oil,
brake and clutch fluid, engine coolant,
etc.);
– have the engine oil and the filter re-
placed;
– check the level of: brake and clutch
fluid, engine coolant;
136-152 ULYSSE ING 10-03-2009 11:40 Pagina 151
Page 153 of 254
DRIVING YOUR CAR
152
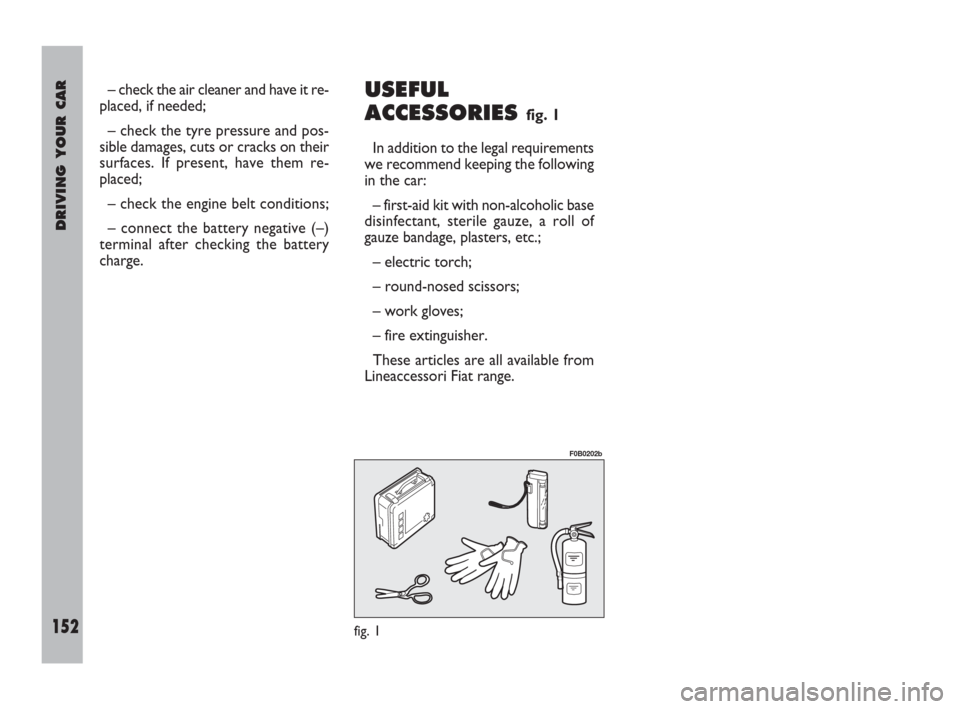
USEFUL
ACCESSORIES
fig. 1
In addition to the legal requirements
we recommend keeping the following
in the car:
– first-aid kit with non-alcoholic base
disinfectant, sterile gauze, a roll of
gauze bandage, plasters, etc.;
– electric torch;
– round-nosed scissors;
– work gloves;
– fire extinguisher.
These articles are all available from
Lineaccessori Fiat range.
fig. 1
F0B0202b
– check the air cleaner and have it re-
placed, if needed;
– check the tyre pressure and pos-
sible damages, cuts or cracks on their
surfaces. If present, have them re-
placed;
– check the engine belt conditions;
– connect the battery negative (–)
terminal after checking the battery
charge.
136-152 ULYSSE ING 10-03-2009 11:40 Pagina 152
Page 154 of 254
IN AN EMERGENCY
153
I I
N N
A A
N N
E E
M M
E E
R R
G G
E E
N N
C C
Y Y
JUMP STARTING
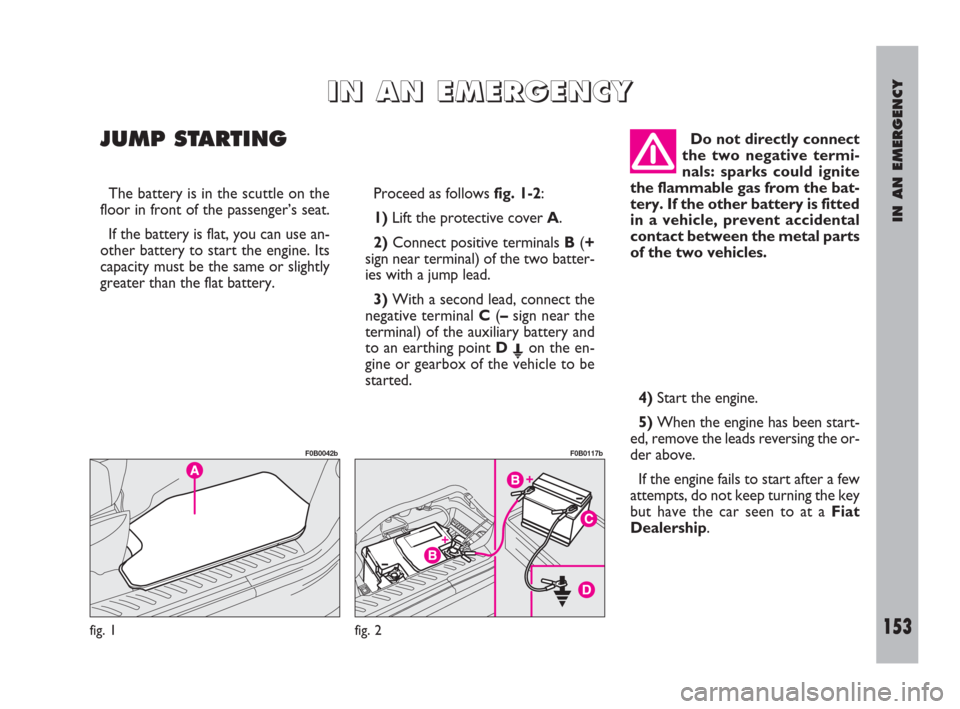
Proceed as follows fig. 1-2:
1)Lift the protective cover A.
2)Connect positive terminals B(+
sign near terminal) of the two batter-
ies with a jump lead.
3)With a second lead, connect the
negative terminal C(–sign near the
terminal) of the auxiliary battery and
to an earthing point DEon the en-
gine or gearbox of the vehicle to be
started. The battery is in the scuttle on the
floor in front of the passenger’s seat.
If the battery is flat, you can use an-
other battery to start the engine. Its
capacity must be the same or slightly
greater than the flat battery.Do not directly connect
the two negative termi-
nals: sparks could ignite
the flammable gas from the bat-
tery. If the other battery is fitted
in a vehicle, prevent accidental
contact between the metal parts
of the two vehicles.
4)Start the engine.
5)When the engine has been start-
ed, remove the leads reversing the or-
der above.
If the engine fails to start after a few
attempts, do not keep turning the key
but have the car seen to at a Fiat
Dealership.
fig. 1
F0B0042b
fig. 2
F0B0117b
153-183 ULYSSE ING:153-183 ULYSSE ING 13-11-2009 10:07 Pagina 153
Page 155 of 254
IN AN EMERGENCY
154
Do not carry out this
procedure if you lack ex-
perience; if it is not done
correctly it can cause very in-
tense electrical discharges. In ad-
dition, the fluid contained in the
battery is poisonous and corro-
sive. Avoid contact with skin and
eyes. You are also advised not to
put naked flames or lighted cig-
arettes near the battery and not
to cause sparks.
Remember that until
the engine has started the
brake booster and elec-
trical power steering systems will
not work and a greater effort will
therefore be required to press
the brake pedal or turn the steer-
ing wheel.IF A TYRE
IS PUNCTURED
Certain versions (for versions/ mar-
kets, where provided) are fitted with
wheel identification and tyre inflation
sensors; pressure loss is signalled to
the driver in the following way:
pressure loss- the infotelematic
CONNECT system displays the relat-
ed message and a “gong” is emitted by
the system. Contact a Fiat Dealer-
ship;
punctured tyre- warning light
“STOP” comes on and the in-
fotelematic CONNECT system dis-
plays the related message together
with 3 consecutive “gong” sounds.
Change the wheel in the following
way.
The system can also display a dedi-
cated message in the event it should
not be able to detect the tyre pres-
sure. Under no circumstances
should a battery charger
be used to start the en-
gine: it could damage the elec-
tronic systems and in particular
the ignition and injection control
units.
BUMP STARTING
Do not bump start by
pushing, towing or coast-
ing downhill. This way of
starting could cause a
rush of fuel into the catalytic con-
verter and damage it beyond re-
pair.
153-183 ULYSSE ING:153-183 ULYSSE ING 13-11-2009 10:07 Pagina 154
Page 156 of 254
IN AN EMERGENCY
155
An incorrectly posi-
tioned jack may cause the
vehicle to fall. Do not use
the jack to lift loads exceeding
that indicated on the label at-
tached to the jack itself.Do not lubricate the bolt
threads before fitting
them back: they could
come loose.
Never start the engine when the
vehicle is jacked up.
If you are towing a trailer, re-
move the trailer before jacking
up the vehicle.Never tamper with the
inflation valve. Never
place tools between the
rim and the tyre.
Check the tyre and space-saver
spare wheel pressure regularly.
The tyre inflation pressure is
shown in the “Technical specifi-
cations” chapter.
The jack should only be
used to change a wheel
on the vehicle for which it
was designed. It should not be put
to other uses or employed to
raise other models. Under no cir-
cumstances should it be used
when carrying out repairs under
the vehicle.
Check the inflation pres-
sure of the tyres and the
spare wheel regularly. If
you change the type of wheels (al-
loy rims instead of steel rims) you
will have to change the entire set
of fastening bolts with another
set of suitably sized bolts.
You should keep the bolts in
case you decide to use the origi-
nal type of wheel later on.Signal the presence of
the stopped car according
to the laws in force: haz-
ard lights, reflecting triangle, etc.
Any passengers on board should
leave the car, especially if it is
heavily laden. Passengers should
stay away from oncoming traffic
while the wheel is being changed.
If the wheel is being changed on
a steep or badly surfaced road,
place wedges or other suitable
material under the wheels to
stop the car.
GENERAL INSTRUCTIONS
Observe the instructions on this and
the following pages to use the jack and
space-saver spare wheel correctly.
153-183 ULYSSE ING:153-183 ULYSSE ING 13-11-2009 10:07 Pagina 155
Page 157 of 254
IN AN EMERGENCY
156
CHANGING A WHEEL
Please note:
– the jack weighs 3.4 kg;
– the jack requires no adjustments;
– the jack cannot be repaired. If it
breaks it must be replaced with a new
jack;
– no tool with the exception of the
handle can be fitted on the jack.
Proceed as follows:
1) Stop the car in a position that is
not dangerous for oncoming traffic
where you can change the wheel safe-
ly. The ground should be flat and ad-
equately firm. 2) Turn the engine off and pull up the
handbrake.
3) Engage first gear or reverse or, for
versions with automatic electronic
gear, select P.
4) Lift the boot mat (see the relative
instructions in the “Bonnet” paragraph
of “Getting to know your car” chap-
ter).
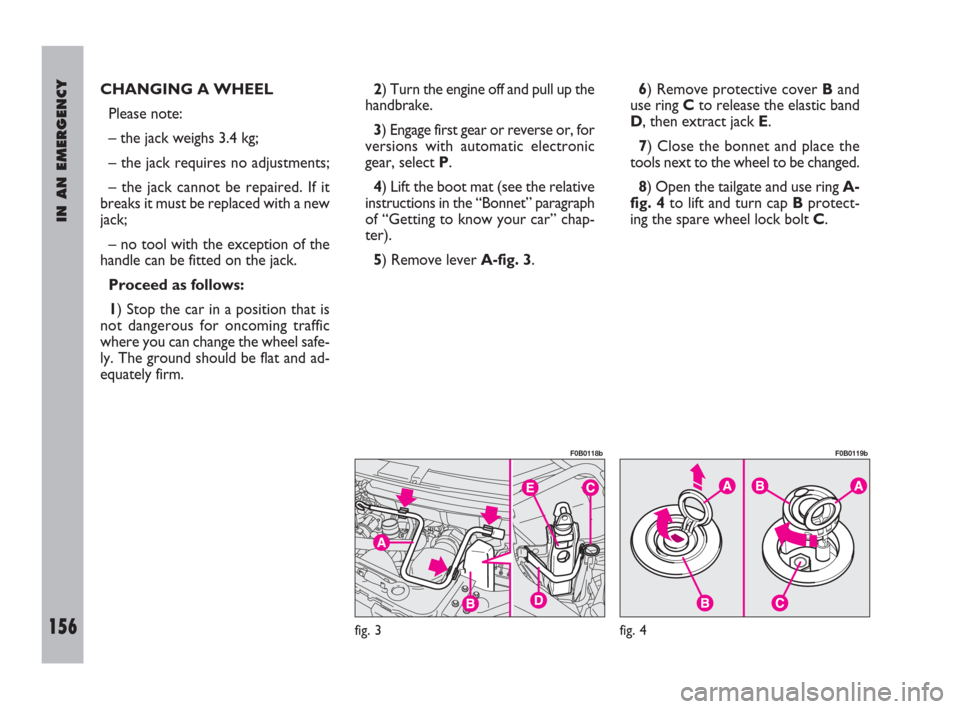
5) Remove lever A-fig. 3.6) Remove protective cover Band
use ring Cto release the elastic band
D, then extract jack E.
7) Close the bonnet and place the
tools next to the wheel to be changed.
8) Open the tailgate and use ringA-
fig. 4to lift and turn cap Bprotect-
ing the spare wheel lock bolt C.
fig. 3
F0B0118b
fig. 4
F0B0119b
153-183 ULYSSE ING:153-183 ULYSSE ING 13-11-2009 10:07 Pagina 156
Page 158 of 254
IN AN EMERGENCY
157
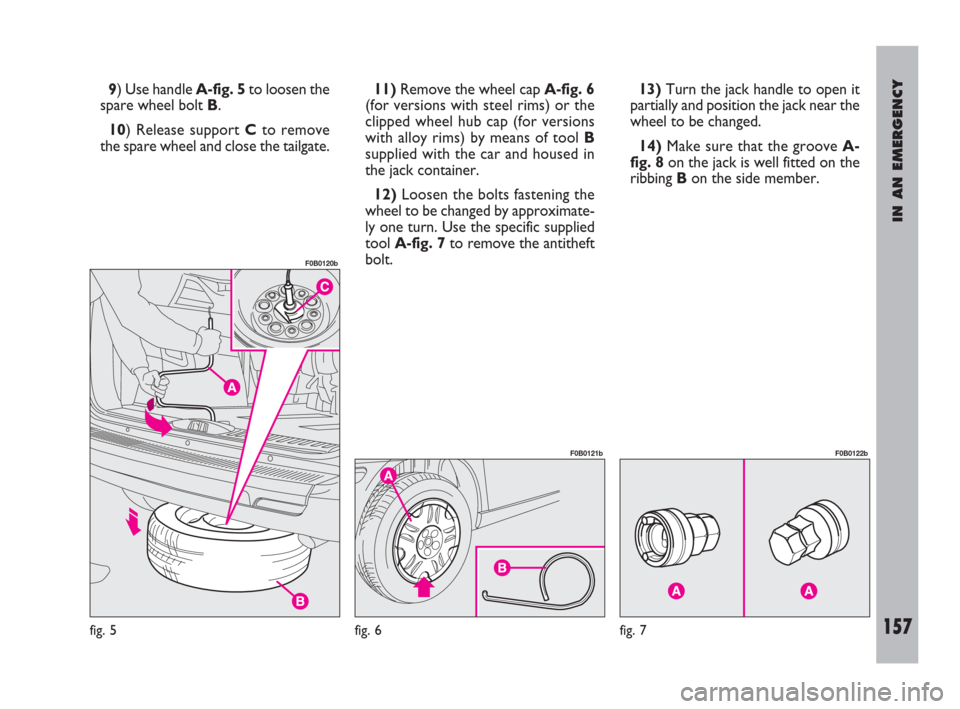
9) Use handle A-fig. 5to loosen the
spare wheel bolt B.
10) Release support Cto remove
the spare wheel and close the tailgate.11)Remove the wheel cap A-fig. 6
(for versions with steel rims) or the
clipped wheel hub cap (for versions
with alloy rims) by means of tool B
supplied with the car and housed in
the jack container.
12)Loosen the bolts fastening the
wheel to be changed by approximate-
ly one turn. Use the specific supplied
tool A-fig. 7to remove the antitheft
bolt.13) Turn the jack handle to open it
partially and position the jack near the
wheel to be changed.
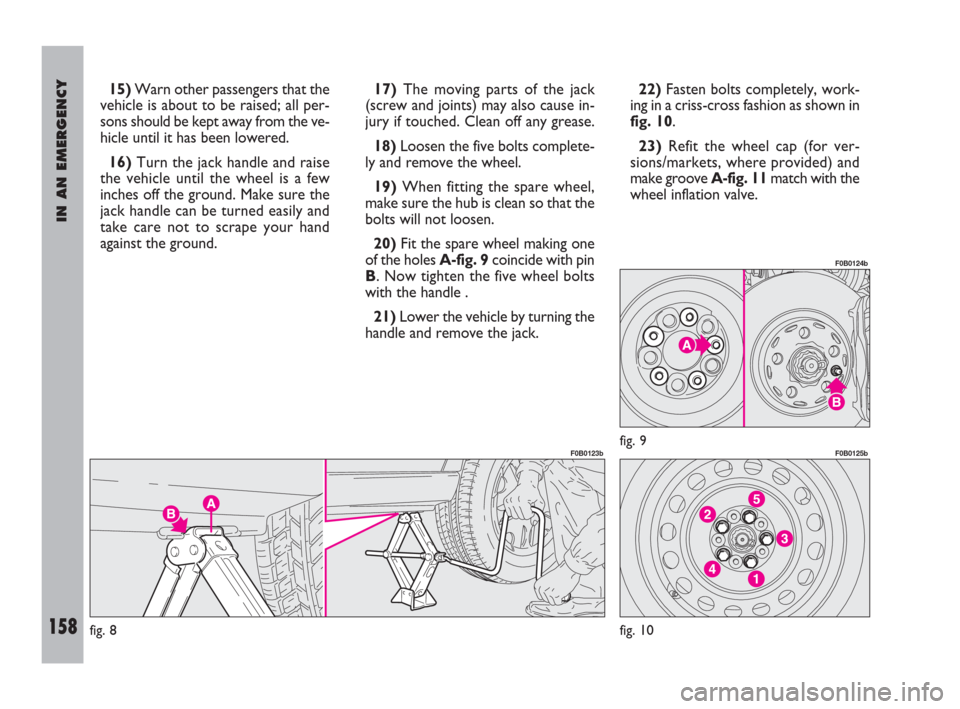
14)Make sure that the groove A-
fig. 8on the jack is well fitted on the
ribbing Bon the side member.
fig. 5
F0B0120b
fig. 6
F0B0121b
fig. 7
F0B0122b
153-183 ULYSSE ING:153-183 ULYSSE ING 13-11-2009 10:07 Pagina 157
Page 159 of 254
IN AN EMERGENCY
158
15)Warn other passengers that the
vehicle is about to be raised; all per-
sons should be kept away from the ve-
hicle until it has been lowered.
16)Turn the jack handle and raise
the vehicle until the wheel is a few
inches off the ground. Make sure the
jack handle can be turned easily and
take care not to scrape your hand
against the ground.17)The moving parts of the jack
(screw and joints) may also cause in-
jury if touched. Clean off any grease.
18)Loosen the five bolts complete-
ly and remove the wheel.
19)When fitting the spare wheel,
make sure the hub is clean so that the
bolts will not loosen.
20)Fit the spare wheel making one
of the holes A-fig. 9coincide with pin
B. Now tighten the five wheel bolts
with the handle .
21)Lower the vehicle by turning the
handle and remove the jack.22)Fasten bolts completely, work-
ing in a criss-cross fashion as shown in
fig. 10.
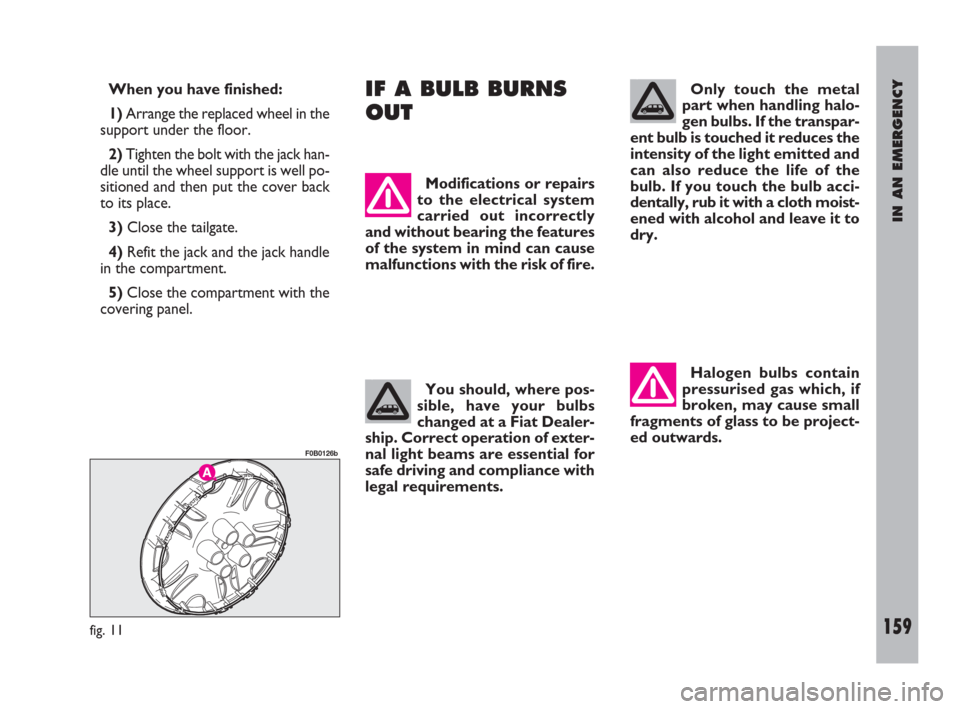
23)Refit the wheel cap (for ver-
sions/markets, where provided) and
make groove A-fig. 11match with the
wheel inflation valve.
fig. 8
F0B0123bfig. 9
F0B0124b
fig. 10
F0B0125b
153-183 ULYSSE ING:153-183 ULYSSE ING 13-11-2009 10:07 Pagina 158
Page 160 of 254
IN AN EMERGENCY
159
When you have finished:
1)Arrange the replaced wheel in the
support under the floor.
2)Tighten the bolt with the jack han-
dle until the wheel support is well po-
sitioned and then put the cover back
to its place.
3)Close the tailgate.
4)Refit the jack and the jack handle
in the compartment.
5)Close the compartment with the
covering panel.IF A BULB BURNS
OUT
Modifications or repairs
to the electrical system
carried out incorrectly
and without bearing the features
of the system in mind can cause
malfunctions with the risk of fire.
You should, where pos-
sible, have your bulbs
changed at a Fiat Dealer-
ship. Correct operation of exter-
nal light beams are essential for
safe driving and compliance with
legal requirements.
fig. 11
F0B0126b
Only touch the metal
part when handling halo-
gen bulbs. If the transpar-
ent bulb is touched it reduces the
intensity of the light emitted and
can also reduce the life of the
bulb. If you touch the bulb acci-
dentally, rub it with a cloth moist-
ened with alcohol and leave it to
dry.
Halogen bulbs contain
pressurised gas which, if
broken, may cause small
fragments of glass to be project-
ed outwards.
153-183 ULYSSE ING:153-183 ULYSSE ING 13-11-2009 10:07 Pagina 159