sensor FIAT UNO 1983 Service Service Manual
[x] Cancel search | Manufacturer: FIAT, Model Year: 1983, Model line: UNO, Model: FIAT UNO 1983Pages: 303, PDF Size: 10.36 MB
Page 209 of 303
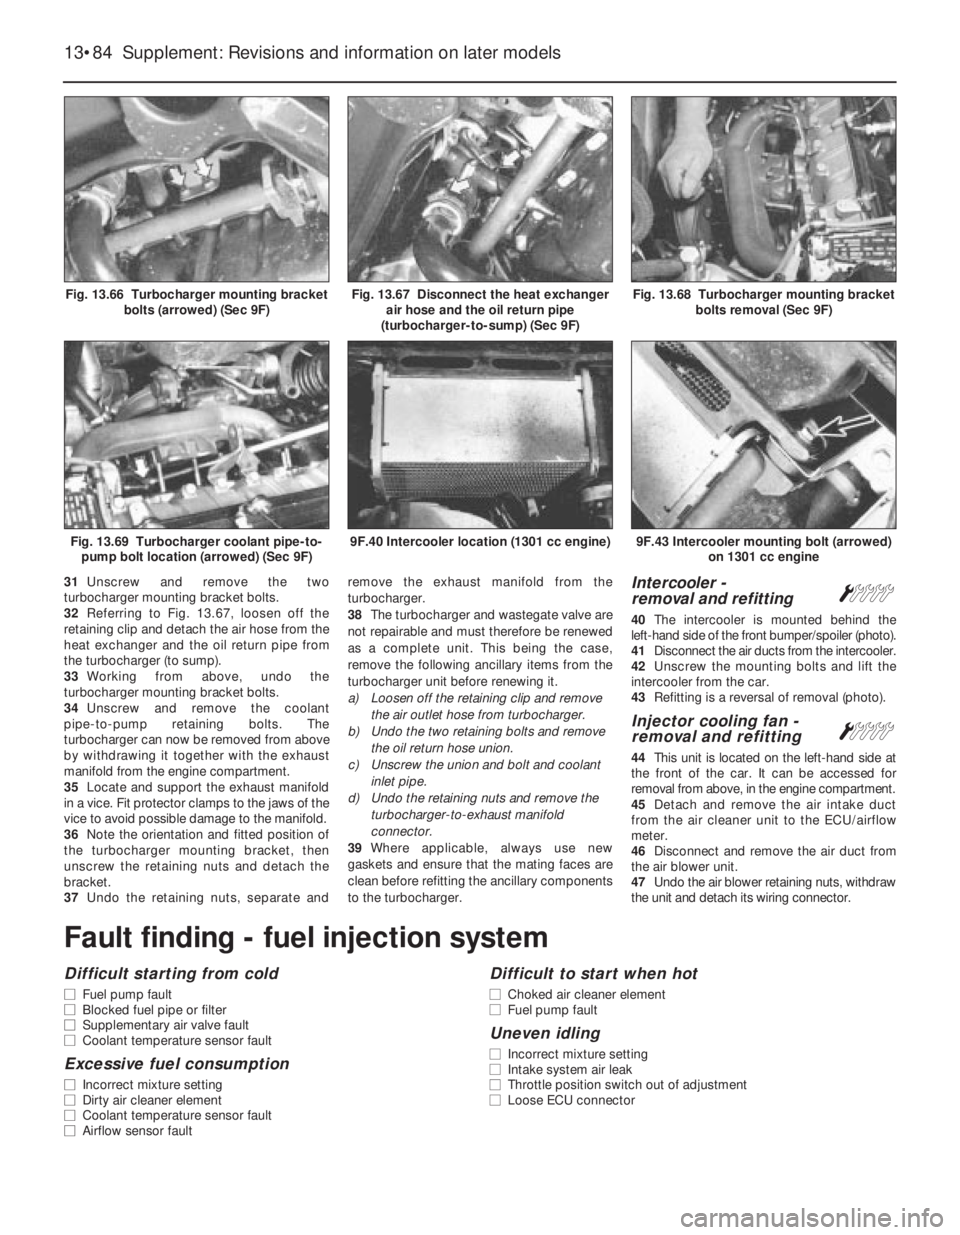
31Unscrew and remove the two
turbocharger mounting bracket bolts.
32Referring to Fig. 13.67, loosen off the
retaining clip and detach the air hose from the
heat exchanger and the oil return pipe from
the turbocharger (to sump).
33Working from above, undo the
turbocharger mounting bracket bolts.
34Unscrew and remove the coolant
pipe-to-pump retaining bolts. The
turbocharger can now be removed from above
by withdrawing it together with the exhaust
manifold from the engine compartment.
35Locate and support the exhaust manifold
in a vice. Fit protector clamps to the jaws of the
vice to avoid possible damage to the manifold.
36Note the orientation and fitted position of
the turbocharger mounting bracket, then
unscrew the retaining nuts and detach the
bracket.
37Undo the retaining nuts, separate andremove the exhaust manifold from the
turbocharger.
38The turbocharger and wastegate valve are
not repairable and must therefore be renewed
as a complete unit. This being the case,
remove the following ancillary items from the
turbocharger unit before renewing it.
a) Loosen off the retaining clip and remove
the air outlet hose from turbocharger.
b) Undo the two retaining bolts and remove
the oil return hose union.
c) Unscrew the union and bolt and coolant
inlet pipe.
d) Undo the retaining nuts and remove the
turbocharger-to-exhaust manifold
connector.
39Where applicable, always use new
gaskets and ensure that the mating faces are
clean before refitting the ancillary components
to the turbocharger.Intercooler -
removal and refitting Á
40The intercooler is mounted behind the
left-hand side of the front bumper/spoiler (photo).
41Disconnect the air ducts from the intercooler.
42Unscrew the mounting bolts and lift the
intercooler from the car.
43Refitting is a reversal of removal (photo).
Injector cooling fan -
removal and refitting Á
44This unit is located on the left-hand side at
the front of the car. It can be accessed for
removal from above, in the engine compartment.
45Detach and remove the air intake duct
from the air cleaner unit to the ECU/airflow
meter.
46Disconnect and remove the air duct from
the air blower unit.
47Undo the air blower retaining nuts, withdraw
the unit and detach its wiring connector.
13•84 Supplement: Revisions and information on later models
9F.43 Intercooler mounting bolt (arrowed)
on 1301 cc engine9F.40 Intercooler location (1301 cc engine)Fig. 13.69 Turbocharger coolant pipe-to-
pump bolt location (arrowed) (Sec 9F)
Fig. 13.68 Turbocharger mounting bracket
bolts removal (Sec 9F)Fig. 13.67 Disconnect the heat exchanger
air hose and the oil return pipe
(turbocharger-to-sump) (Sec 9F)Fig. 13.66 Turbocharger mounting bracket
bolts (arrowed) (Sec 9F)
Fault finding - fuel injection system
Difficult starting from cold
m mFuel pump fault
m mBlocked fuel pipe or filter
m mSupplementary air valve fault
m mCoolant temperature sensor fault
Excessive fuel consumption
m
mIncorrect mixture setting
m mDirty air cleaner element
m mCoolant temperature sensor fault
m mAirflow sensor fault
Difficult to start when hot
m
mChoked air cleaner element
m mFuel pump fault
Uneven idling
m
mIncorrect mixture setting
m mIntake system air leak
m mThrottle position switch out of adjustment
m mLoose ECU connector
Page 210 of 303
Fault finding - turbocharger system
Supplement: Revisions and information on later models 13•85
13
Noise or vibration
m mWorn shaft bearings
m mLack of lubrication
m mInlet or exhaust manifold leaking
m mOut-of-balance impeller shaft
Engine “pinking”
m
mHigh boost pressure, caused by faulty wastegate valve
m mFuel octane rating too low
m mFaulty TDC sensor (ignition advanced)
m mIncorrect spark plugs or plug gaps, or spark plugs worn
Indicated boost pressure too high
m
mFaulty wastegate valve
m mIce forming in exhaust pipe (during very cold weather)
Power loss/indicated boost pressure too low
m
mTurbocharger leaking, or leak at turbocharger mounting
m mIncorrectly adjusted wastegate valve/wastegate valve not closing
m mBlocked exhaust pipe
m mClogged air cleaner element
m mFaulty TDC sensor (ignition retarded)
m mTurbo/intercooler connecting hose leaking
Oil leaks from shaft oil seals, with blue exhaust
fumes
m mOil return pipe blocked
m mAir cleaner element clogged
m mWorn oil seals
10 Ignition system
General
1The ignition systems dealt with in this
Section are all fully electronic and are referred
to individually according to type as the
“breakerless”, Microplex and Digiplex 2
system. The Microplex system is used on the
1301 and 1372 cc Turbo ie engines, the
Digiplex 2 on the 1372 cc ie engine and the
“breakerless” system on all other models.
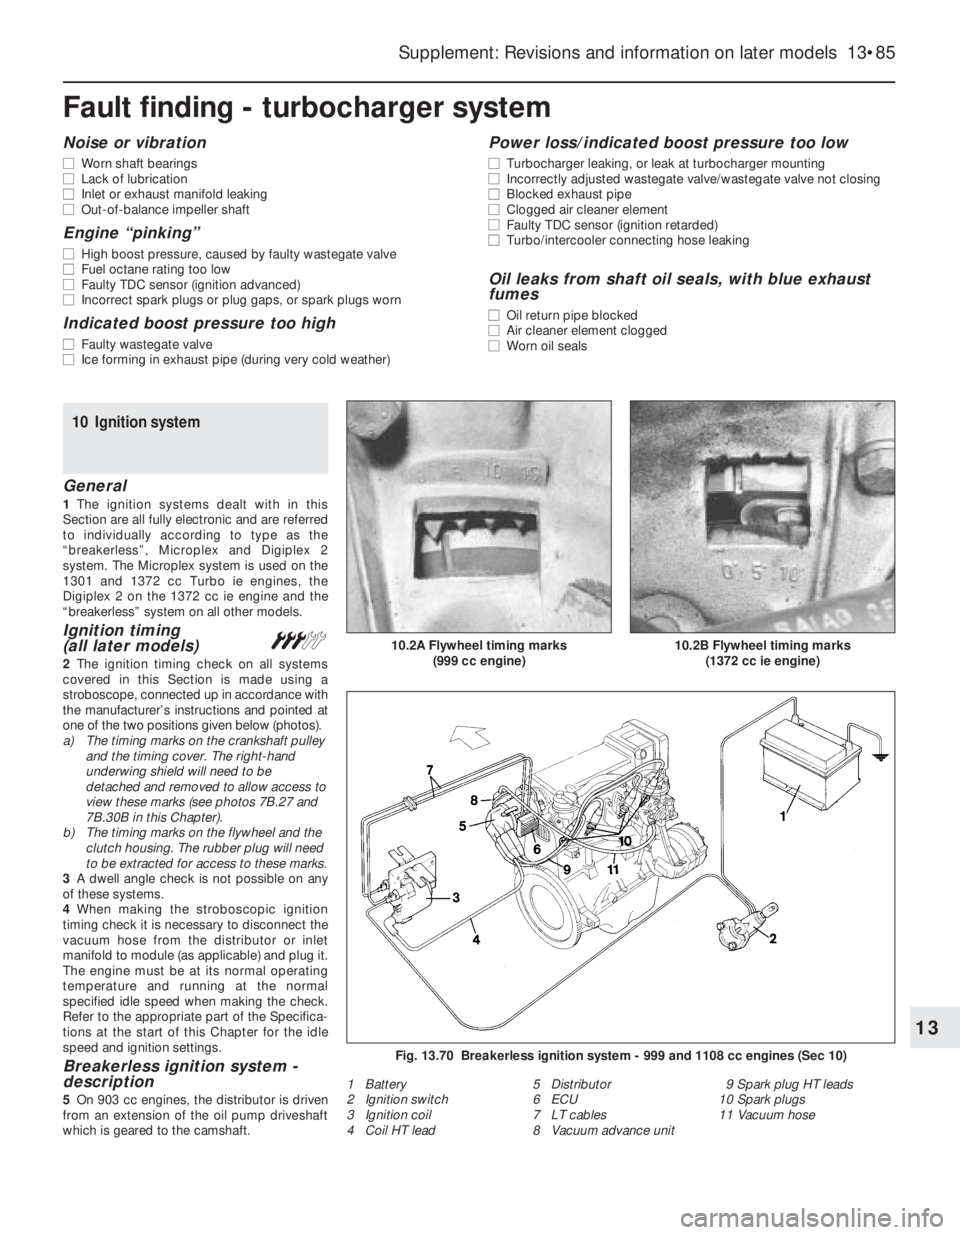
Ignition timing
(all later models)#
2The ignition timing check on all systems
covered in this Section is made using a
stroboscope, connected up in accordance with
the manufacturer’s instructions and pointed at
one of the two positions given below (photos).
a) The timing marks on the crankshaft pulley
and the timing cover. The right-hand
underwing shield will need to be
detached and removed to allow access to
view these marks (see photos 7B.27 and
7B.30B in this Chapter).
b) The timing marks on the flywheel and the
clutch housing. The rubber plug will need
to be extracted for access to these marks.
3A dwell angle check is not possible on any
of these systems.
4When making the stroboscopic ignition
timing check it is necessary to disconnect the
vacuum hose from the distributor or inlet
manifold to module (as applicable) and plug it.
The engine must be at its normal operating
temperature and running at the normal
specified idle speed when making the check.
Refer to the appropriate part of the Specifica-
tions at the start of this Chapter for the idle
speed and ignition settings.
Breakerless ignition system -
description
5On 903 cc engines, the distributor is driven
from an extension of the oil pump driveshaft
which is geared to the camshaft.
10.2B Flywheel timing marks
(1372 cc ie engine)10.2A Flywheel timing marks
(999 cc engine)
Fig. 13.70 Breakerless ignition system - 999 and 1108 cc engines (Sec 10)
1 Battery
2 Ignition switch
3 Ignition coil
4 Coil HT lead5 Distributor
6 ECU
7 LT cables
8 Vacuum advance unit9 Spark plug HT leads
10 Spark plugs
11 Vacuum hose
Page 211 of 303
6On 999, 1108 and 1372 cc engines, the
distributor is driven from the rear end of the
camshaft.
7On the 1116 and 1299/1301 cc engines, the
distributor is driven from an extension of the
oil pump driveshaft which is geared to the
auxiliary shaft.
8The distributor contains a reluctor mounted
on its shaft, and a magnet and stator fixed to
the baseplate.
9Ignition advance is controlled in the
conventional way mechanically by centrifugal
weights and a diaphragm unit for vacuum
advance.
10Instead of the conventional method of
interrupting the low tension circuit to generate
high tension voltage in the coil by means of a
mechanical contact breaker, when the
electronic ignition is switched on, the
switching of the transistors in the electronic
control unit (ECU) prevents current flow in the
coil primary windings.
11Once the crankshaft rotates, the reluctor
moves through the magnetic field created by
the stator and when the reluctor teeth are in
alignment with the stator projections a small
AC voltage is created. The ECU amplifies this
voltage and applies it to switch the transistors
and so provide an earth path for the primary
circuit.
12As the reluctor teeth move out of
alignment with the stator projections the AC
voltage changes, the transistors in the ECU
are switched again to interrupt the primary
circuit earth path. This causes a high voltage
to be induced in the secondary winding.
Distributor
(breakerless type) -
removal and refitting
#
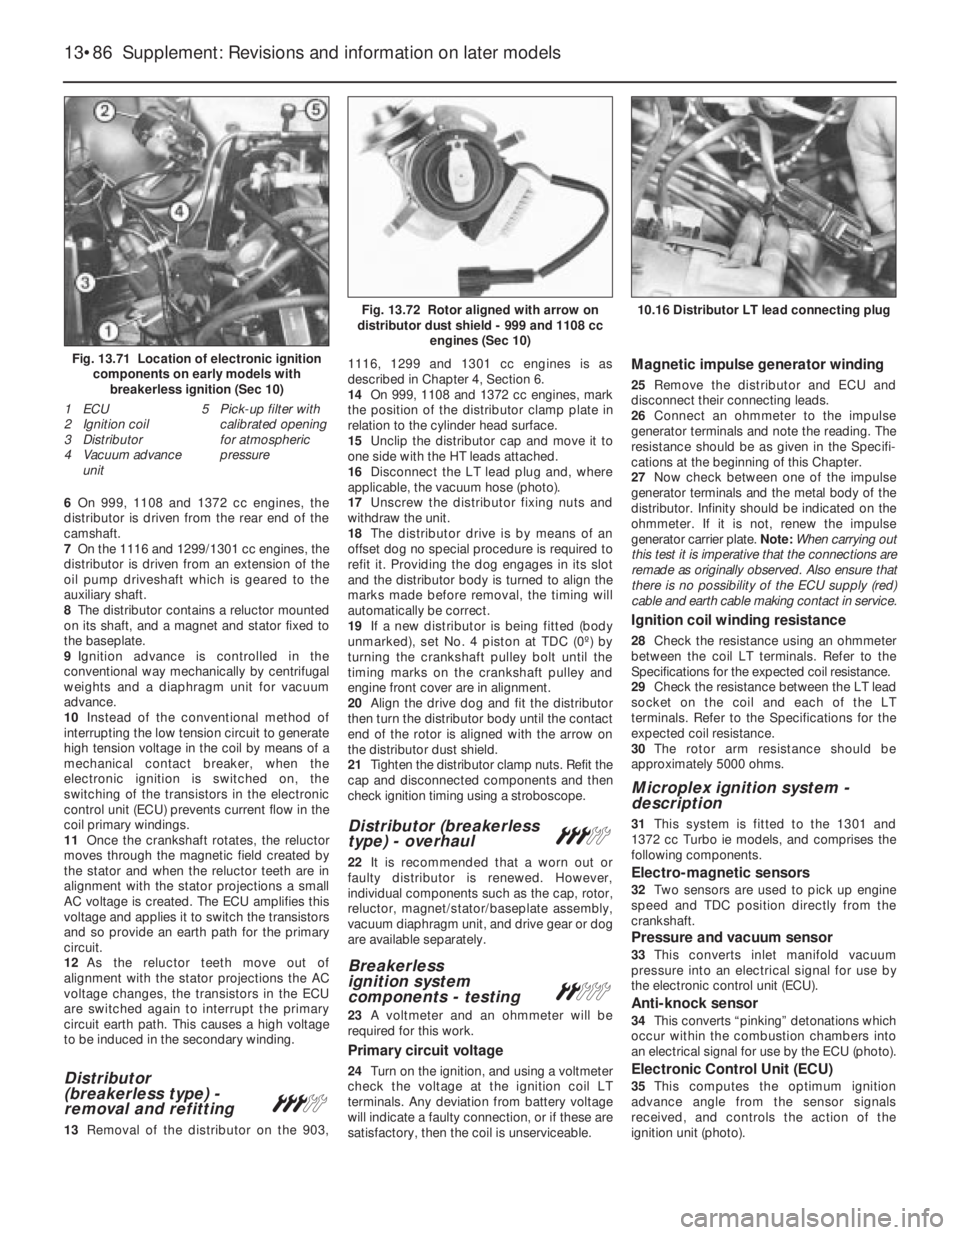
13Removal of the distributor on the 903,1116, 1299 and 1301 cc engines is as
described in Chapter 4, Section 6.
14On 999, 1108 and 1372 cc engines, mark
the position of the distributor clamp plate in
relation to the cylinder head surface.
15Unclip the distributor cap and move it to
one side with the HT leads attached.
16Disconnect the LT lead plug and, where
applicable, the vacuum hose (photo).
17Unscrew the distributor fixing nuts and
withdraw the unit.
18The distributor drive is by means of an
offset dog no special procedure is required to
refit it. Providing the dog engages in its slot
and the distributor body is turned to align the
marks made before removal, the timing will
automatically be correct.
19If a new distributor is being fitted (body
unmarked), set No. 4 piston at TDC (0º) by
turning the crankshaft pulley bolt until the
timing marks on the crankshaft pulley and
engine front cover are in alignment.
20Align the drive dog and fit the distributor
then turn the distributor body until the contact
end of the rotor is aligned with the arrow on
the distributor dust shield.
21Tighten the distributor clamp nuts. Refit the
cap and disconnected components and then
check ignition timing using a stroboscope.
Distributor (breakerless
type) - overhaul#
22It is recommended that a worn out or
faulty distributor is renewed. However,
individual components such as the cap, rotor,
reluctor, magnet/stator/baseplate assembly,
vacuum diaphragm unit, and drive gear or dog
are available separately.
Breakerless
ignition system
components - testing
ª
23A voltmeter and an ohmmeter will be
required for this work.
Primary circuit voltage
24Turn on the ignition, and using a voltmeter
check the voltage at the ignition coil LT
terminals. Any deviation from battery voltage
will indicate a faulty connection, or if these are
satisfactory, then the coil is unserviceable.
Magnetic impulse generator winding
25Remove the distributor and ECU and
disconnect their connecting leads.
26Connect an ohmmeter to the impulse
generator terminals and note the reading. The
resistance should be as given in the Specifi-
cations at the beginning of this Chapter.
27Now check between one of the impulse
generator terminals and the metal body of the
distributor. Infinity should be indicated on the
ohmmeter. If it is not, renew the impulse
generator carrier plate. Note: When carrying out
this test it is imperative that the connections are
remade as originally observed. Also ensure that
there is no possibility of the ECU supply (red)
cable and earth cable making contact in service.
Ignition coil winding resistance
28Check the resistance using an ohmmeter
between the coil LT terminals. Refer to the
Specifications for the expected coil resistance.
29Check the resistance between the LT lead
socket on the coil and each of the LT
terminals. Refer to the Specifications for the
expected coil resistance.
30The rotor arm resistance should be
approximately 5000 ohms.
Microplex ignition system -
description
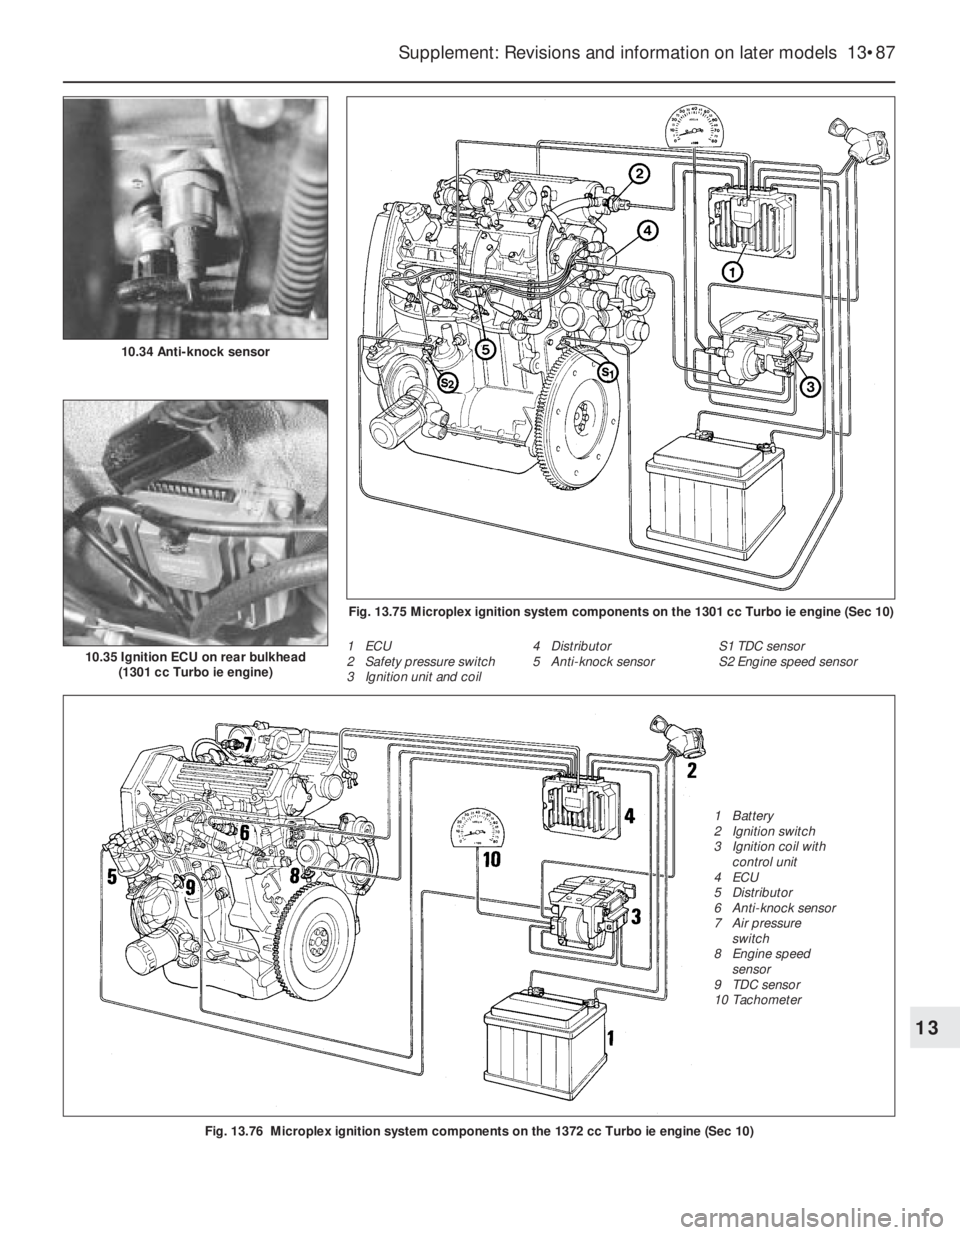
31This system is fitted to the 1301 and
1372 cc Turbo ie models, and comprises the
following components.
Electro-magnetic sensors
32Two sensors are used to pick up engine
speed and TDC position directly from the
crankshaft.
Pressure and vacuum sensor
33This converts inlet manifold vacuum
pressure into an electrical signal for use by
the electronic control unit (ECU).
Anti-knock sensor
34This converts “pinking” detonations which
occur within the combustion chambers into
an electrical signal for use by the ECU (photo).
Electronic Control Unit (ECU)
35This computes the optimum ignition
advance angle from the sensor signals
received, and controls the action of the
ignition unit (photo).
13•86 Supplement: Revisions and information on later models
Fig. 13.72 Rotor aligned with arrow on
distributor dust shield - 999 and 1108 cc
engines (Sec 10)
1 ECU
2 Ignition coil
3 Distributor
4 Vacuum advance
unit5 Pick-up filter with
calibrated opening
for atmospheric
pressure
Fig. 13.71 Location of electronic ignition
components on early models with
breakerless ignition (Sec 10)
10.16 Distributor LT lead connecting plug
Page 212 of 303
Supplement: Revisions and information on later models 13•87
13
10.35 Ignition ECU on rear bulkhead
(1301 cc Turbo ie engine)
Fig. 13.76 Microplex ignition system components on the 1372 cc Turbo ie engine (Sec 10)
Fig. 13.75 Microplex ignition system components on the 1301 cc Turbo ie engine (Sec 10)
1 ECU
2 Safety pressure switch
3 Ignition unit and coil4 Distributor
5 Anti-knock sensorS1 TDC sensor
S2 Engine speed sensor
1 Battery
2 Ignition switch
3 Ignition coil with
control unit
4 ECU
5 Distributor
6 Anti-knock sensor
7 Air pressure
switch
8 Engine speed
sensor
9 TDC sensor
10 Tachometer 10.34 Anti-knock sensor
Page 213 of 303
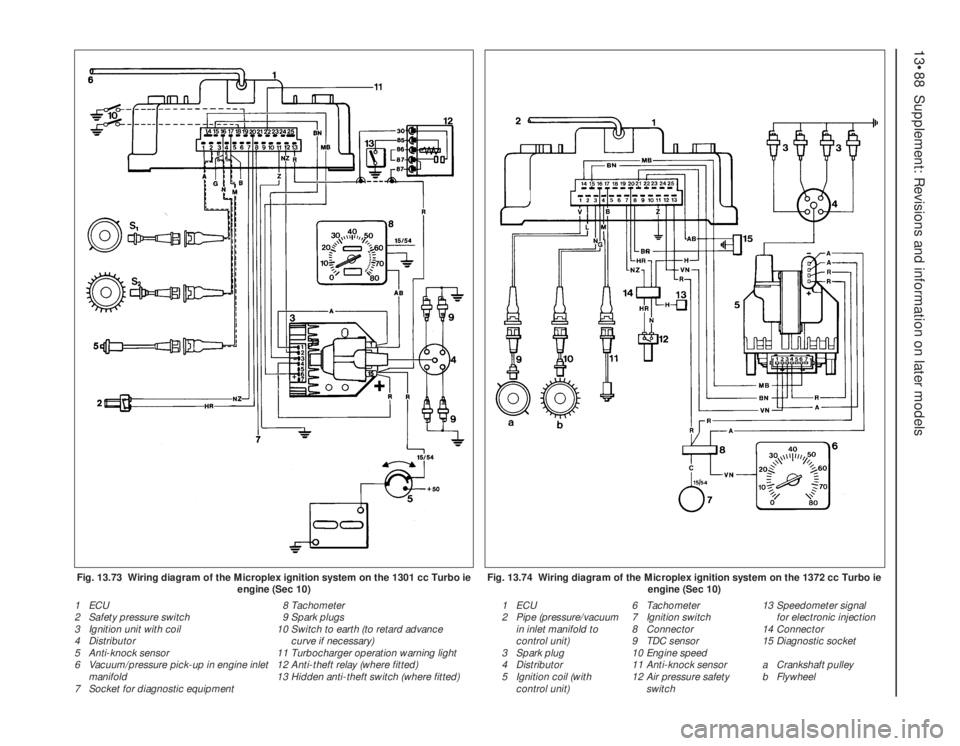
13•88 Supplement: Revisions and information on later models
Fig. 13.73 Wiring diagram of the Microplex ignition system on the 1301 cc Turbo ie
engine (Sec 10)Fig. 13.74 Wiring diagram of the Microplex ignition system on the 1372 cc Turbo ie
engine (Sec 10)1 ECU
2 Safety pressure switch
3 Ignition unit with coil
4 Distributor
5 Anti-knock sensor
6 Vacuum/pressure pick-up in engine inlet
manifold
7 Socket for diagnostic equipment8 Tachometer
9 Spark plugs
10 Switch to earth (to retard advance
curve if necessary)
11 Turbocharger operation warning light
12 Anti-theft relay (where fitted)
13 Hidden anti-theft switch (where fitted)1 ECU
2 Pipe (pressure/vacuum
in inlet manifold to
control unit)
3 Spark plug
4 Distributor
5 Ignition coil (with
control unit)6 Tachometer
7 Ignition switch
8 Connector
9 TDC sensor
10 Engine speed
11 Anti-knock sensor
12 Air pressure safety
switch13 Speedometer signal
for electronic injection
14 Connector
15 Diagnostic socket
a Crankshaft pulley
b Flywheel
Page 214 of 303
Ignition unit
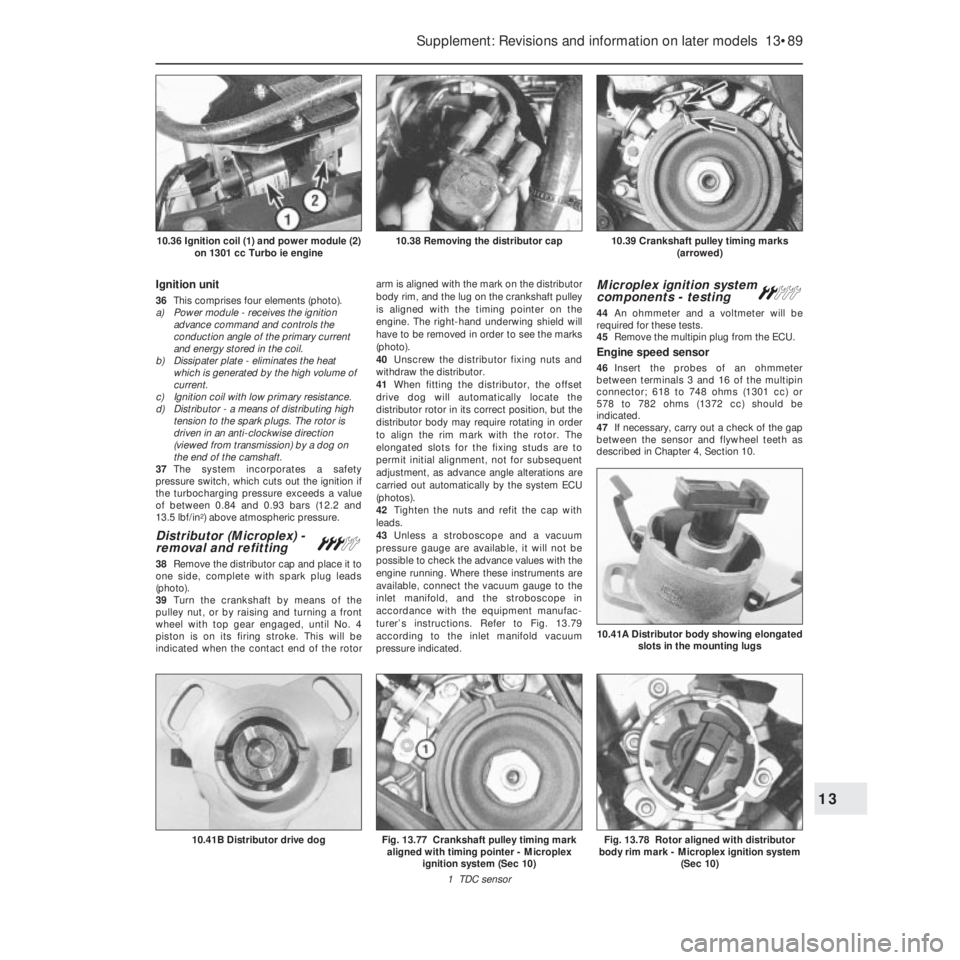
36This comprises four elements (photo).
a) Power module - receives the ignition
advance command and controls the
conduction angle of the primary current
and energy stored in the coil.
b) Dissipater plate - eliminates the heat
which is generated by the high volume of
current.
c) Ignition coil with low primary resistance.
d) Distributor - a means of distributing high
tension to the spark plugs. The rotor is
driven in an anti-clockwise direction
(viewed from transmission) by a dog on
the end of the camshaft.
37The system incorporates a safety
pressure switch, which cuts out the ignition if
the turbocharging pressure exceeds a value
of between 0.84 and 0.93 bars (12.2 and
13.5 lbf/in
2) above atmospheric pressure.
Distributor (Microplex) -
removal and refitting#
38Remove the distributor cap and place it to
one side, complete with spark plug leads
(photo).
39Turn the crankshaft by means of the
pulley nut, or by raising and turning a front
wheel with top gear engaged, until No. 4
piston is on its firing stroke. This will be
indicated when the contact end of the rotorarm is aligned with the mark on the distributor
body rim, and the lug on the crankshaft pulley
is aligned with the timing pointer on the
engine. The right-hand underwing shield will
have to be removed in order to see the marks
(photo).
40Unscrew the distributor fixing nuts and
withdraw the distributor.
41When fitting the distributor, the offset
drive dog will automatically locate the
distributor rotor in its correct position, but the
distributor body may require rotating in order
to align the rim mark with the rotor. The
elongated slots for the fixing studs are to
permit initial alignment, not for subsequent
adjustment, as advance angle alterations are
carried out automatically by the system ECU
(photos).
42Tighten the nuts and refit the cap with
leads.
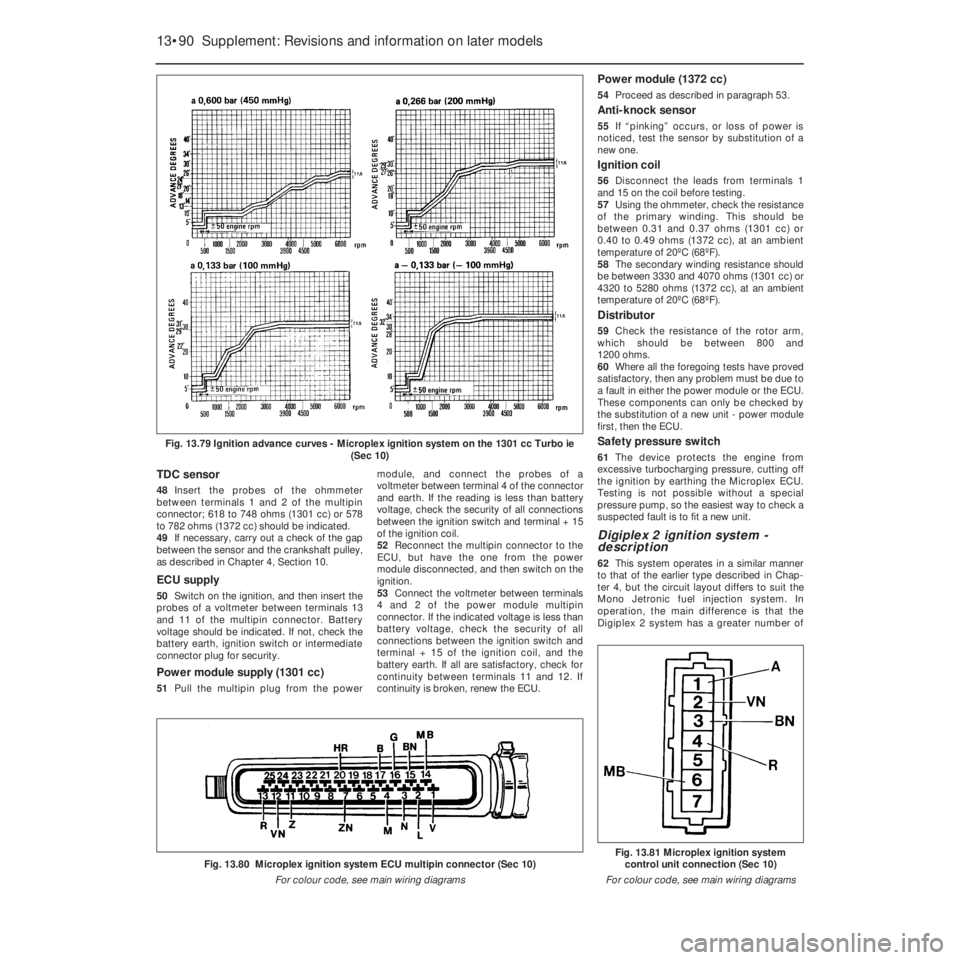
43Unless a stroboscope and a vacuum
pressure gauge are available, it will not be
possible to check the advance values with the
engine running. Where these instruments are
available, connect the vacuum gauge to the
inlet manifold, and the stroboscope in
accordance with the equipment manufac-
turer’s instructions. Refer to Fig. 13.79
according to the inlet manifold vacuum
pressure indicated.
Microplex ignition system
components - testing ª
44An ohmmeter and a voltmeter will be
required for these tests.
45Remove the multipin plug from the ECU.
Engine speed sensor
46Insert the probes of an ohmmeter
between terminals 3 and 16 of the multipin
connector; 618 to 748 ohms (1301 cc) or
578 to 782 ohms (1372 cc) should be
indicated.
47If necessary, carry out a check of the gap
between the sensor and flywheel teeth as
described in Chapter 4, Section 10.
Supplement: Revisions and information on later models 13•89
10.39 Crankshaft pulley timing marks
(arrowed)10.38 Removing the distributor cap10.36 Ignition coil (1) and power module (2)
on 1301 cc Turbo ie engine
Fig. 13.78 Rotor aligned with distributor
body rim mark - Microplex ignition system
(Sec 10)
10.41A Distributor body showing elongated
slots in the mounting lugs
Fig. 13.77 Crankshaft pulley timing mark
aligned with timing pointer - Microplex
ignition system (Sec 10)
1 TDC sensor10.41B Distributor drive dog
13
Page 215 of 303
TDC sensor
48Insert the probes of the ohmmeter
between terminals 1 and 2 of the multipin
connector; 618 to 748 ohms (1301 cc) or 578
to 782 ohms (1372 cc) should be indicated.
49If necessary, carry out a check of the gap
between the sensor and the crankshaft pulley,
as described in Chapter 4, Section 10.
ECU supply
50Switch on the ignition, and then insert the
probes of a voltmeter between terminals 13
and 11 of the multipin connector. Battery
voltage should be indicated. If not, check the
battery earth, ignition switch or intermediate
connector plug for security.
Power module supply (1301 cc)
51Pull the multipin plug from the powermodule, and connect the probes of a
voltmeter between terminal 4 of the connector
and earth. If the reading is less than battery
voltage, check the security of all connections
between the ignition switch and terminal + 15
of the ignition coil.
52Reconnect the multipin connector to the
ECU, but have the one from the power
module disconnected, and then switch on the
ignition.
53Connect the voltmeter between terminals
4 and 2 of the power module multipin
connector. If the indicated voltage is less than
battery voltage, check the security of all
connections between the ignition switch and
terminal + 15 of the ignition coil, and the
battery earth. If all are satisfactory, check for
continuity between terminals 11 and 12. If
continuity is broken, renew the ECU.
Power module (1372 cc)
54Proceed as described in paragraph 53.
Anti-knock sensor
55If “pinking” occurs, or loss of power is
noticed, test the sensor by substitution of a
new one.
Ignition coil
56Disconnect the leads from terminals 1
and 15 on the coil before testing.
57Using the ohmmeter, check the resistance
of the primary winding. This should be
between 0.31 and 0.37 ohms (1301 cc) or
0.40 to 0.49 ohms (1372 cc), at an ambient
temperature of 20ºC (68ºF).
58The secondary winding resistance should
be between 3330 and 4070 ohms (1301 cc) or
4320 to 5280 ohms (1372 cc), at an ambient
temperature of 20ºC (68ºF).
Distributor
59Check the resistance of the rotor arm,
which should be between 800 and
1200 ohms.
60Where all the foregoing tests have proved
satisfactory, then any problem must be due to
a fault in either the power module or the ECU.
These components can only be checked by
the substitution of a new unit - power module
first, then the ECU.
Safety pressure switch
61The device protects the engine from
excessive turbocharging pressure, cutting off
the ignition by earthing the Microplex ECU.
Testing is not possible without a special
pressure pump, so the easiest way to check a
suspected fault is to fit a new unit.
Digiplex 2 ignition system -
description
62This system operates in a similar manner
to that of the earlier type described in Chap-
ter 4, but the circuit layout differs to suit the
Mono Jetronic fuel injection system. In
operation, the main difference is that the
Digiplex 2 system has a greater number of
13•90 Supplement: Revisions and information on later models
Fig. 13.81 Microplex ignition system
control unit connection (Sec 10)
For colour code, see main wiring diagramsFig. 13.80 Microplex ignition system ECU multipin connector (Sec 10)
For colour code, see main wiring diagrams
Fig. 13.79 Ignition advance curves - Microplex ignition system on the 1301 cc Turbo ie
(Sec 10)
Page 216 of 303
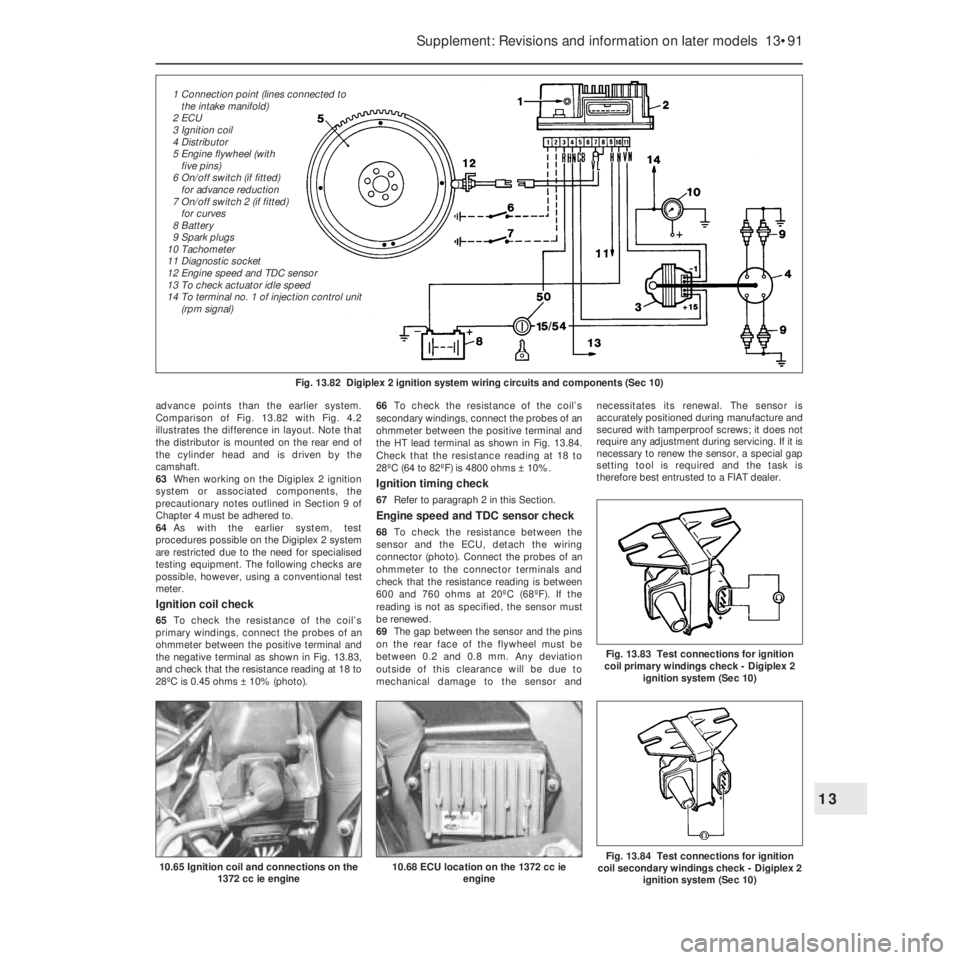
advance points than the earlier system.
Comparison of Fig. 13.82 with Fig. 4.2
illustrates the difference in layout. Note that
the distributor is mounted on the rear end of
the cylinder head and is driven by the
camshaft.
63When working on the Digiplex 2 ignition
system or associated components, the
precautionary notes outlined in Section 9 of
Chapter 4 must be adhered to.
64As with the earlier system, test
procedures possible on the Digiplex 2 system
are restricted due to the need for specialised
testing equipment. The following checks are
possible, however, using a conventional test
meter.
Ignition coil check
65To check the resistance of the coil’s
primary windings, connect the probes of an
ohmmeter between the positive terminal and
the negative terminal as shown in Fig. 13.83,
and check that the resistance reading at 18 to
28ºC is 0.45 ohms ± 10% (photo).66To check the resistance of the coil’s
secondary windings, connect the probes of an
ohmmeter between the positive terminal and
the HT lead terminal as shown in Fig. 13.84.
Check that the resistance reading at 18 to
28ºC (64 to 82ºF) is 4800 ohms ± 10%.
Ignition timing check
67Refer to paragraph 2 in this Section.
Engine speed and TDC sensor check
68To check the resistance between the
sensor and the ECU, detach the wiring
connector (photo). Connect the probes of an
ohmmeter to the connector terminals and
check that the resistance reading is between
600 and 760 ohms at 20ºC (68ºF). If the
reading is not as specified, the sensor must
be renewed.
69The gap between the sensor and the pins
on the rear face of the flywheel must be
between 0.2 and 0.8 mm. Any deviation
outside of this clearance will be due to
mechanical damage to the sensor andnecessitates its renewal. The sensor is
accurately positioned during manufacture and
secured with tamperproof screws; it does not
require any adjustment during servicing. If it is
necessary to renew the sensor, a special gap
setting tool is required and the task is
therefore best entrusted to a FIAT dealer.
Supplement: Revisions and information on later models 13•91
Fig. 13.82 Digiplex 2 ignition system wiring circuits and components (Sec 10)
10.68 ECU location on the 1372 cc ie
engine10.65 Ignition coil and connections on the
1372 cc ie engineFig. 13.84 Test connections for ignition
coil secondary windings check - Digiplex 2
ignition system (Sec 10)
Fig. 13.83 Test connections for ignition
coil primary windings check - Digiplex 2
ignition system (Sec 10)
13
1 Connection point (lines connected to
the intake manifold)
2 ECU
3 Ignition coil
4 Distributor
5 Engine flywheel (with
five pins)
6 On/off switch (if fitted)
for advance reduction
7 On/off switch 2 (if fitted)
for curves
8 Battery
9 Spark plugs
10 Tachometer
11 Diagnostic socket
12 Engine speed and TDC sensor
13 To check actuator idle speed
14 To terminal no. 1 of injection control unit
(rpm signal)
Page 217 of 303
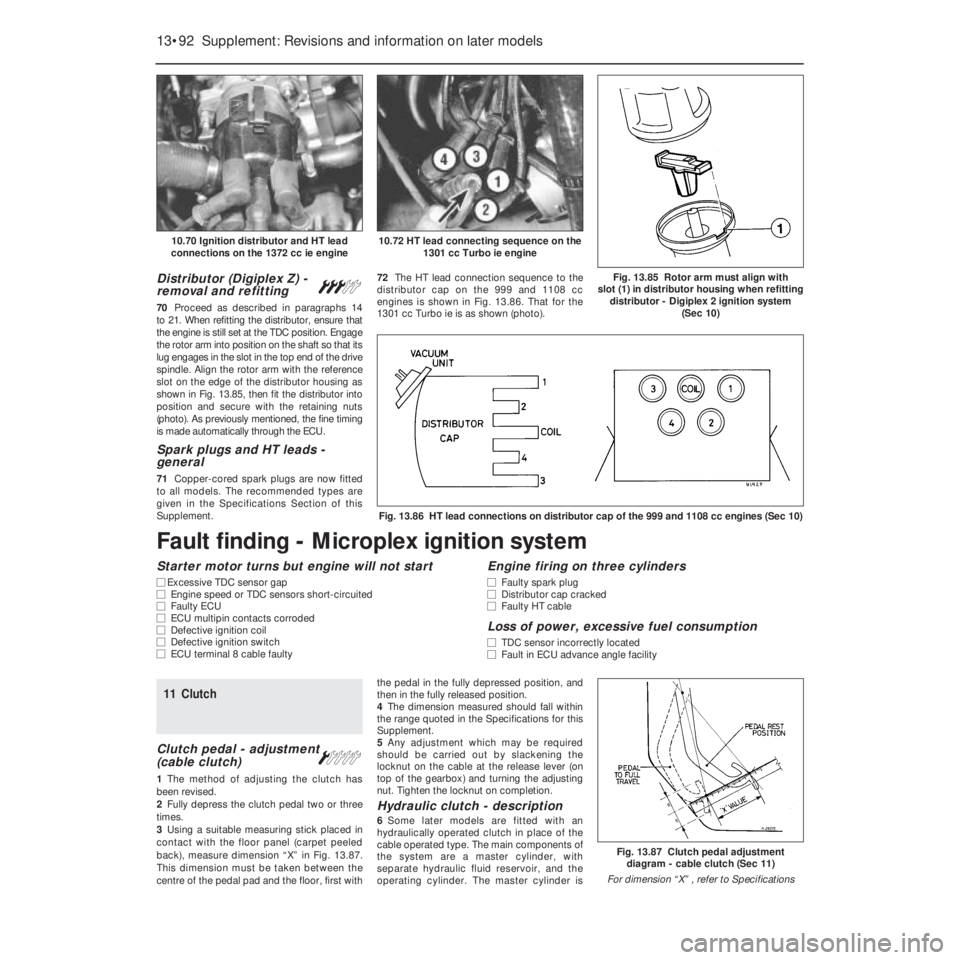
11 Clutch
Clutch pedal - adjustment
(cable clutch)
Á
1The method of adjusting the clutch has
been revised.
2Fully depress the clutch pedal two or three
times.
3Using a suitable measuring stick placed in
contact with the floor panel (carpet peeled
back), measure dimension “X” in Fig. 13.87.
This dimension must be taken between the
centre of the pedal pad and the floor, first withthe pedal in the fully depressed position, and
then in the fully released position.
4The dimension measured should fall within
the range quoted in the Specifications for this
Supplement.
5Any adjustment which may be required
should be carried out by slackening the
locknut on the cable at the release lever (on
top of the gearbox) and turning the adjusting
nut. Tighten the locknut on completion.
Hydraulic clutch - description
6Some later models are fitted with an
hydraulically operated clutch in place of the
cable operated type. The main components of
the system are a master cylinder, with
separate hydraulic fluid reservoir, and the
operating cylinder. The master cylinder is
Distributor (Digiplex Z) -
removal and refitting#
70Proceed as described in paragraphs 14
to 21. When refitting the distributor, ensure that
the engine is still set at the TDC position. Engage
the rotor arm into position on the shaft so that its
lug engages in the slot in the top end of the drive
spindle. Align the rotor arm with the reference
slot on the edge of the distributor housing as
shown in Fig. 13.85, then fit the distributor into
position and secure with the retaining nuts
(photo). As previously mentioned, the fine timing
is made automatically through the ECU.
Spark plugs and HT leads -
general
71Copper-cored spark plugs are now fitted
to all models. The recommended types are
given in the Specifications Section of this
Supplement.72The HT lead connection sequence to the
distributor cap on the 999 and 1108 cc
engines is shown in Fig. 13.86. That for the
1301 cc Turbo ie is as shown (photo).
13•92 Supplement: Revisions and information on later models
Fig. 13.87 Clutch pedal adjustment
diagram - cable clutch (Sec 11)
For dimension “X” , refer to Specifications
Fig. 13.86 HT lead connections on distributor cap of the 999 and 1108 cc engines (Sec 10)
Fig. 13.85 Rotor arm must align with
slot (1) in distributor housing when refitting
distributor - Digiplex 2 ignition system
(Sec 10)
10.72 HT lead connecting sequence on the
1301 cc Turbo ie engine10.70 Ignition distributor and HT lead
connections on the 1372 cc ie engine
Fault finding - Microplex ignition system
Starter motor turns but engine will not start
m mExcessive TDC sensor gap
m mEngine speed or TDC sensors short-circuited
m mFaulty ECU
m mECU multipin contacts corroded
m mDefective ignition coil
m mDefective ignition switch
m mECU terminal 8 cable faulty
Engine firing on three cylinders
m
mFaulty spark plug
m mDistributor cap cracked
m mFaulty HT cable
Loss of power, excessive fuel consumption
m
mTDC sensor incorrectly located
m mFault in ECU advance angle facility
Page 226 of 303
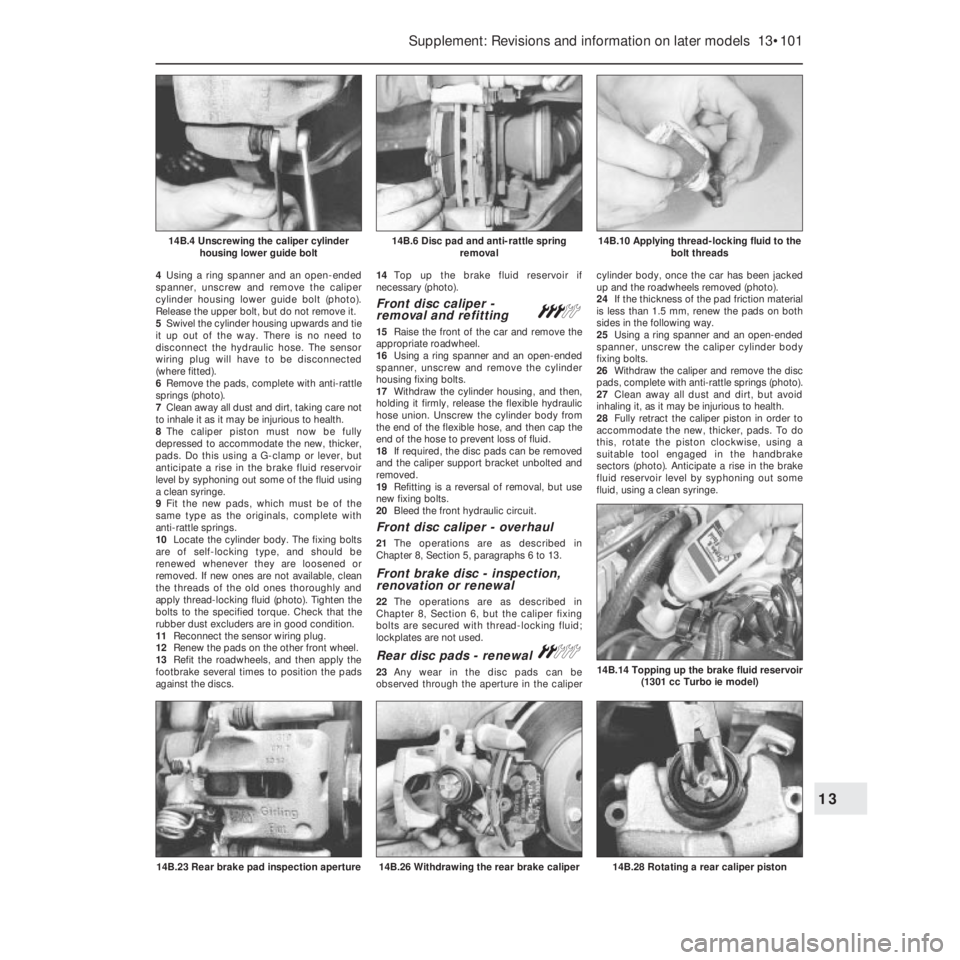
4Using a ring spanner and an open-ended
spanner, unscrew and remove the caliper
cylinder housing lower guide bolt (photo).
Release the upper bolt, but do not remove it.
5Swivel the cylinder housing upwards and tie
it up out of the way. There is no need to
disconnect the hydraulic hose. The sensor
wiring plug will have to be disconnected
(where fitted).
6Remove the pads, complete with anti-rattle
springs (photo).
7Clean away all dust and dirt, taking care not
to inhale it as it may be injurious to health.
8The caliper piston must now be fully
depressed to accommodate the new, thicker,
pads. Do this using a G-clamp or lever, but
anticipate a rise in the brake fluid reservoir
level by syphoning out some of the fluid using
a clean syringe.
9Fit the new pads, which must be of the
same type as the originals, complete with
anti-rattle springs.
10Locate the cylinder body. The fixing bolts
are of self-locking type, and should be
renewed whenever they are loosened or
removed. If new ones are not available, clean
the threads of the old ones thoroughly and
apply thread-locking fluid (photo). Tighten the
bolts to the specified torque. Check that the
rubber dust excluders are in good condition.
11Reconnect the sensor wiring plug.
12Renew the pads on the other front wheel.
13Refit the roadwheels, and then apply the
footbrake several times to position the pads
against the discs.14Top up the brake fluid reservoir if
necessary (photo).
Front disc caliper -
removal and refitting#
15Raise the front of the car and remove the
appropriate roadwheel.
16Using a ring spanner and an open-ended
spanner, unscrew and remove the cylinder
housing fixing bolts.
17Withdraw the cylinder housing, and then,
holding it firmly, release the flexible hydraulic
hose union. Unscrew the cylinder body from
the end of the flexible hose, and then cap the
end of the hose to prevent loss of fluid.
18If required, the disc pads can be removed
and the caliper support bracket unbolted and
removed.
19Refitting is a reversal of removal, but use
new fixing bolts.
20Bleed the front hydraulic circuit.
Front disc caliper - overhaul
21The operations are as described in
Chapter 8, Section 5, paragraphs 6 to 13.
Front brake disc - inspection,
renovation or renewal
22The operations are as described in
Chapter 8, Section 6, but the caliper fixing
bolts are secured with thread-locking fluid;
lockplates are not used.
Rear disc pads - renewal ª
23Any wear in the disc pads can be
observed through the aperture in the calipercylinder body, once the car has been jacked
up and the roadwheels removed (photo).
24If the thickness of the pad friction material
is less than 1.5 mm, renew the pads on both
sides in the following way.
25Using a ring spanner and an open-ended
spanner, unscrew the caliper cylinder body
fixing bolts.
26Withdraw the caliper and remove the disc
pads, complete with anti-rattle springs (photo).
27Clean away all dust and dirt, but avoid
inhaling it, as it may be injurious to health.
28Fully retract the caliper piston in order to
accommodate the new, thicker, pads. To do
this, rotate the piston clockwise, using a
suitable tool engaged in the handbrake
sectors (photo). Anticipate a rise in the brake
fluid reservoir level by syphoning out some
fluid, using a clean syringe.
Supplement: Revisions and information on later models 13•101
14B.10 Applying thread-locking fluid to the
bolt threads14B.6 Disc pad and anti-rattle spring
removal14B.4 Unscrewing the caliper cylinder
housing lower guide bolt
14B.28 Rotating a rear caliper piston14B.26 Withdrawing the rear brake caliper14B.23 Rear brake pad inspection aperture
14B.14 Topping up the brake fluid reservoir
(1301 cc Turbo ie model)
13