mirror FIAT UNO 1983 Service Repair Manual
[x] Cancel search | Manufacturer: FIAT, Model Year: 1983, Model line: UNO, Model: FIAT UNO 1983Pages: 303, PDF Size: 10.36 MB
Page 114 of 303
12
For dimensions, weights etc. refer to the Introductory Section of this Manual.
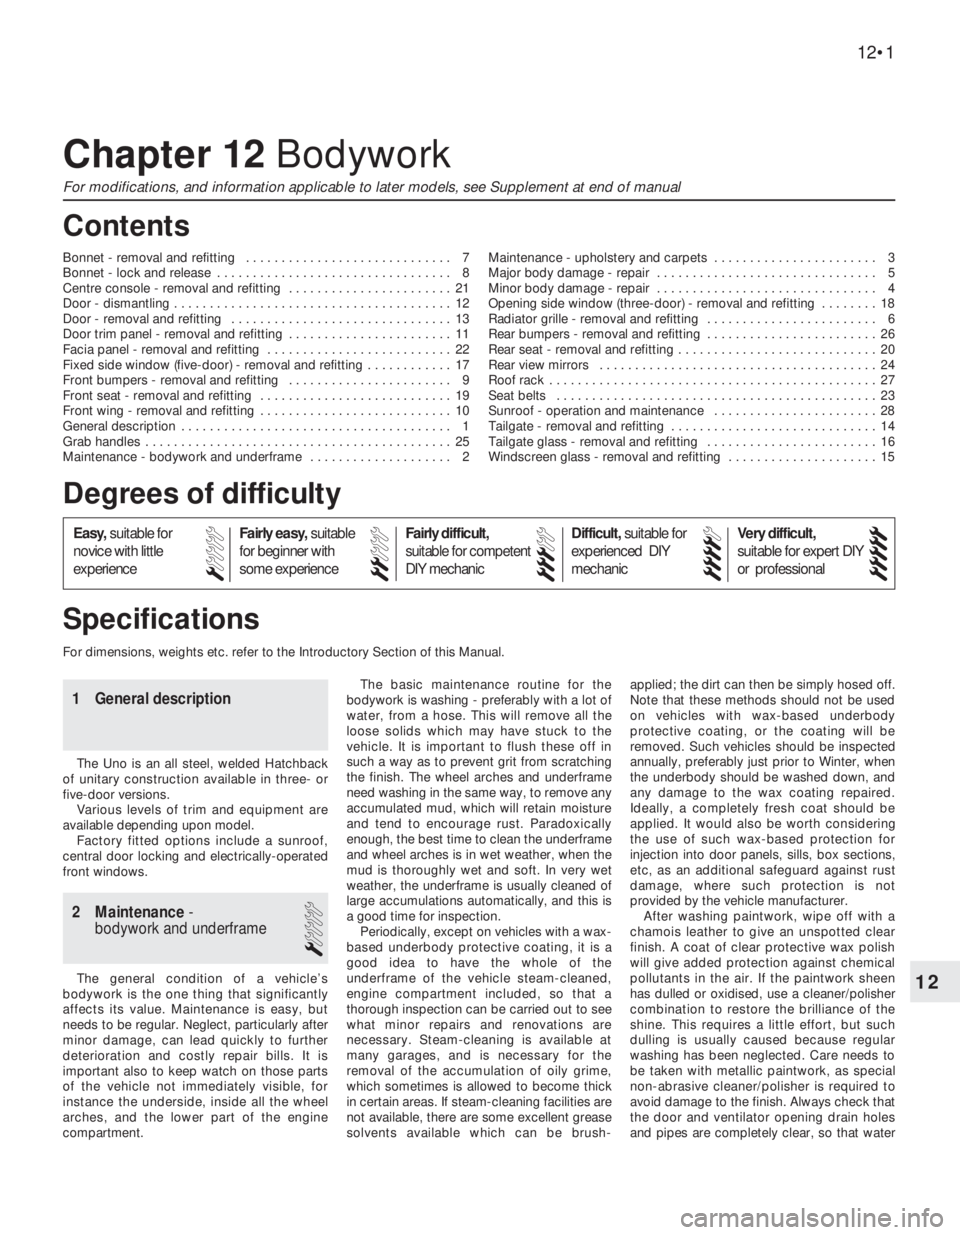
Chapter 12 Bodywork
For modifications, and information applicable to later models, see Supplement at end of manual
Bonnet - removal and refitting . . . . . . . . . . . . . . . . . . . . . . . . . . . . . 7
Bonnet - lock and release . . . . . . . . . . . . . . . . . . . . . . . . . . . . . . . . . 8
Centre console - removal and refitting . . . . . . . . . . . . . . . . . . . . . . . 21
Door - dismantling . . . . . . . . . . . . . . . . . . . . . . . . . . . . . . . . . . . . . . . 12
Door - removal and refitting . . . . . . . . . . . . . . . . . . . . . . . . . . . . . . . 13
Door trim panel - removal and refitting . . . . . . . . . . . . . . . . . . . . . . . 11
Facia panel - removal and refitting . . . . . . . . . . . . . . . . . . . . . . . . . . 22
Fixed side window (five-door) - removal and refitting . . . . . . . . . . . . 17
Front bumpers - removal and refitting . . . . . . . . . . . . . . . . . . . . . . . 9
Front seat - removal and refitting . . . . . . . . . . . . . . . . . . . . . . . . . . . 19
Front wing - removal and refitting . . . . . . . . . . . . . . . . . . . . . . . . . . . 10
General description . . . . . . . . . . . . . . . . . . . . . . . . . . . . . . . . . . . . . . 1
Grab handles . . . . . . . . . . . . . . . . . . . . . . . . . . . . . . . . . . . . . . . . . . . 25
Maintenance - bodywork and underframe . . . . . . . . . . . . . . . . . . . . 2Maintenance - upholstery and carpets . . . . . . . . . . . . . . . . . . . . . . . 3
Major body damage - repair . . . . . . . . . . . . . . . . . . . . . . . . . . . . . . . 5
Minor body damage - repair . . . . . . . . . . . . . . . . . . . . . . . . . . . . . . . 4
Opening side window (three-door) - removal and refitting . . . . . . . . 18
Radiator grille - removal and refitting . . . . . . . . . . . . . . . . . . . . . . . . 6
Rear bumpers - removal and refitting . . . . . . . . . . . . . . . . . . . . . . . . 26
Rear seat - removal and refitting . . . . . . . . . . . . . . . . . . . . . . . . . . . . 20
Rear view mirrors . . . . . . . . . . . . . . . . . . . . . . . . . . . . . . . . . . . . . . . 24
Roof rack . . . . . . . . . . . . . . . . . . . . . . . . . . . . . . . . . . . . . . . . . . . . . . 27
Seat belts . . . . . . . . . . . . . . . . . . . . . . . . . . . . . . . . . . . . . . . . . . . . . 23
Sunroof - operation and maintenance . . . . . . . . . . . . . . . . . . . . . . . 28
Tailgate - removal and refitting . . . . . . . . . . . . . . . . . . . . . . . . . . . . . 14
Tailgate glass - removal and refitting . . . . . . . . . . . . . . . . . . . . . . . . 16
Windscreen glass - removal and refitting . . . . . . . . . . . . . . . . . . . . . 15
12•1
Specifications Contents
Easy,suitable for
novice with little
experienceFairly easy,suitable
for beginner with
some experienceFairly difficult,
suitable for competent
DIY mechanic
Difficult,suitable for
experienced DIY
mechanicVery difficult,
suitable for expert DIY
or professional
Degrees of difficulty
54321
1 General description
The Uno is an all steel, welded Hatchback
of unitary construction available in three- or
five-door versions.
Various levels of trim and equipment are
available depending upon model.
Factory fitted options include a sunroof,
central door locking and electrically-operated
front windows.
2 Maintenance-
bodywork and underframe
1
The general condition of a vehicle’s
bodywork is the one thing that significantly
affects its value. Maintenance is easy, but
needs to be regular. Neglect, particularly after
minor damage, can lead quickly to further
deterioration and costly repair bills. It is
important also to keep watch on those parts
of the vehicle not immediately visible, for
instance the underside, inside all the wheel
arches, and the lower part of the engine
compartment.The basic maintenance routine for the
bodywork is washing - preferably with a lot of
water, from a hose. This will remove all the
loose solids which may have stuck to the
vehicle. It is important to flush these off in
such a way as to prevent grit from scratching
the finish. The wheel arches and underframe
need washing in the same way, to remove any
accumulated mud, which will retain moisture
and tend to encourage rust. Paradoxically
enough, the best time to clean the underframe
and wheel arches is in wet weather, when the
mud is thoroughly wet and soft. In very wet
weather, the underframe is usually cleaned of
large accumulations automatically, and this is
a good time for inspection.
Periodically, except on vehicles with a wax-
based underbody protective coating, it is a
good idea to have the whole of the
underframe of the vehicle steam-cleaned,
engine compartment included, so that a
thorough inspection can be carried out to see
what minor repairs and renovations are
necessary. Steam-cleaning is available at
many garages, and is necessary for the
removal of the accumulation of oily grime,
which sometimes is allowed to become thick
in certain areas. If steam-cleaning facilities are
not available, there are some excellent grease
solvents available which can be brush-applied; the dirt can then be simply hosed off.
Note that these methods should not be used
on vehicles with wax-based underbody
protective coating, or the coating will be
removed. Such vehicles should be inspected
annually, preferably just prior to Winter, when
the underbody should be washed down, and
any damage to the wax coating repaired.
Ideally, a completely fresh coat should be
applied. It would also be worth considering
the use of such wax-based protection for
injection into door panels, sills, box sections,
etc, as an additional safeguard against rust
damage, where such protection is not
provided by the vehicle manufacturer.
After washing paintwork, wipe off with a
chamois leather to give an unspotted clear
finish. A coat of clear protective wax polish
will give added protection against chemical
pollutants in the air. If the paintwork sheen
has dulled or oxidised, use a cleaner/polisher
combination to restore the brilliance of the
shine. This requires a little effort, but such
dulling is usually caused because regular
washing has been neglected. Care needs to
be taken with metallic paintwork, as special
non-abrasive cleaner/polisher is required to
avoid damage to the finish. Always check that
the door and ventilator opening drain holes
and pipes are completely clear, so that water
Page 121 of 303
speakers, central door locking or power
operated windows, the electrical leads must be
disconnected and withdrawn through the
flexible duct before the door hinges are
unbolted. Disconnection will require removal of
the door trim panel as described in Section 11.
5It is recommended that the door is unbolted
from the hinge, leaving the hinge attached to
the body pillar.
6Refitting is a reversal of removal, but leave
the bolts finger tight until the door has been
gently closed and its alignment checked.
7The door can be moved up and down or
sideways using the travel provided by the
elongated bolt holes.
8If the door is not flush with the adjacent
body panels then shims should be inserted
under the hinges.9Adjust the striker to provide smooth
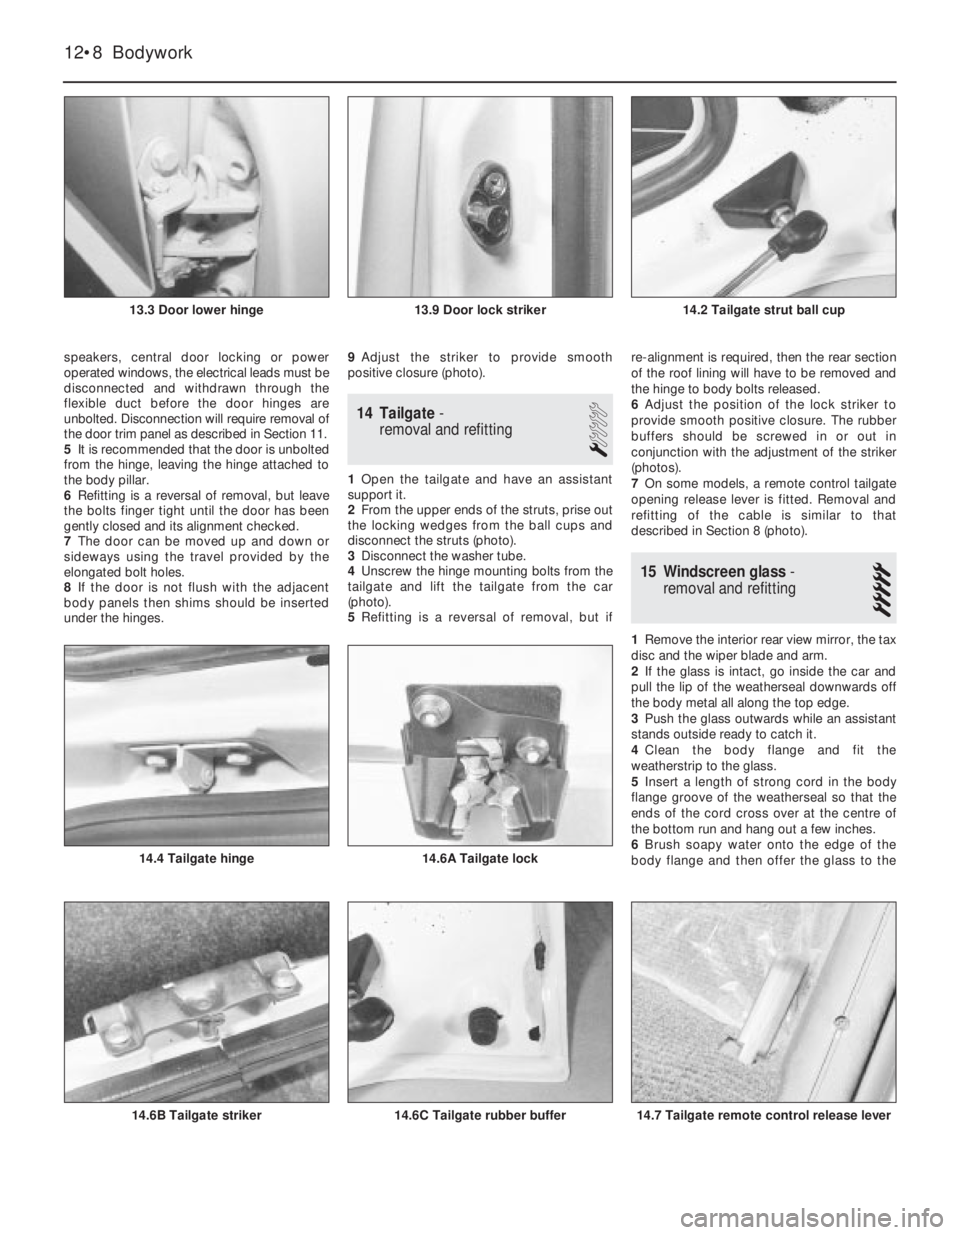
positive closure (photo).
14 Tailgate-
removal and refitting
1
1Open the tailgate and have an assistant
support it.
2From the upper ends of the struts, prise out
the locking wedges from the ball cups and
disconnect the struts (photo).
3Disconnect the washer tube.
4Unscrew the hinge mounting bolts from the
tailgate and lift the tailgate from the car
(photo).
5Refitting is a reversal of removal, but ifre-alignment is required, then the rear section
of the roof lining will have to be removed and
the hinge to body bolts released.
6Adjust the position of the lock striker to
provide smooth positive closure. The rubber
buffers should be screwed in or out in
conjunction with the adjustment of the striker
(photos).
7On some models, a remote control tailgate
opening release lever is fitted. Removal and
refitting of the cable is similar to that
described in Section 8 (photo).
15 Windscreen glass-
removal and refitting
5
1Remove the interior rear view mirror, the tax
disc and the wiper blade and arm.
2If the glass is intact, go inside the car and
pull the lip of the weatherseal downwards off
the body metal all along the top edge.
3Push the glass outwards while an assistant
stands outside ready to catch it.
4Clean the body flange and fit the
weatherstrip to the glass.
5Insert a length of strong cord in the body
flange groove of the weatherseal so that the
ends of the cord cross over at the centre of
the bottom run and hang out a few inches.
6Brush soapy water onto the edge of the
body flange and then offer the glass to the
12•8 Bodywork
14.7 Tailgate remote control release lever14.6C Tailgate rubber buffer14.6B Tailgate striker
14.6A Tailgate lock14.4 Tailgate hinge
14.2 Tailgate strut ball cup13.9 Door lock striker13.3 Door lower hinge
Page 122 of 303
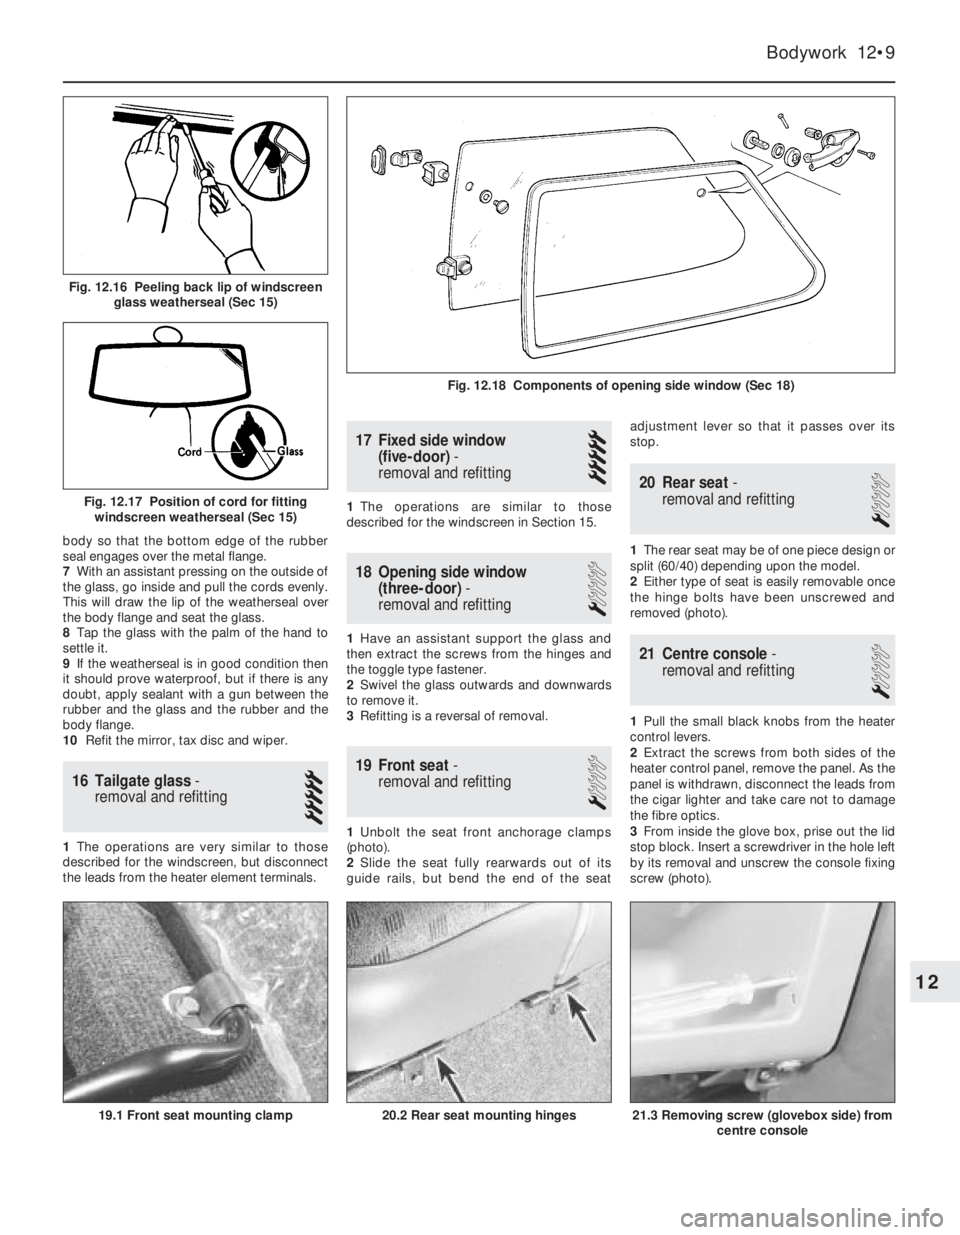
body so that the bottom edge of the rubber
seal engages over the metal flange.
7With an assistant pressing on the outside of
the glass, go inside and pull the cords evenly.
This will draw the lip of the weatherseal over
the body flange and seat the glass.
8Tap the glass with the palm of the hand to
settle it.
9If the weatherseal is in good condition then
it should prove waterproof, but if there is any
doubt, apply sealant with a gun between the
rubber and the glass and the rubber and the
body flange.
10Refit the mirror, tax disc and wiper.
16 Tailgate glass-
removal and refitting
5
1The operations are very similar to those
described for the windscreen, but disconnect
the leads from the heater element terminals.
17 Fixed side window
(five-door)-
removal and refitting
5
1The operations are similar to those
described for the windscreen in Section 15.
18 Opening side window
(three-door)-
removal and refitting
1
1Have an assistant support the glass and
then extract the screws from the hinges and
the toggle type fastener.
2Swivel the glass outwards and downwards
to remove it.
3Refitting is a reversal of removal.
19 Front seat-
removal and refitting
1
1Unbolt the seat front anchorage clamps
(photo).
2Slide the seat fully rearwards out of its
guide rails, but bend the end of the seatadjustment lever so that it passes over its
stop.
20 Rear seat-
removal and refitting
1
1The rear seat may be of one piece design or
split (60/40) depending upon the model.
2Either type of seat is easily removable once
the hinge bolts have been unscrewed and
removed (photo).
21 Centre console-
removal and refitting
1
1Pull the small black knobs from the heater
control levers.
2Extract the screws from both sides of the
heater control panel, remove the panel. As the
panel is withdrawn, disconnect the leads from
the cigar lighter and take care not to damage
the fibre optics.
3From inside the glove box, prise out the lid
stop block. Insert a screwdriver in the hole left
by its removal and unscrew the console fixing
screw (photo).
Bodywork 12•9
Fig. 12.18 Components of opening side window (Sec 18)
Fig. 12.17 Position of cord for fitting
windscreen weatherseal (Sec 15)
Fig. 12.16 Peeling back lip of windscreen
glass weatherseal (Sec 15)
21.3 Removing screw (glovebox side) from
centre console20.2 Rear seat mounting hinges19.1 Front seat mounting clamp
12
Page 124 of 303
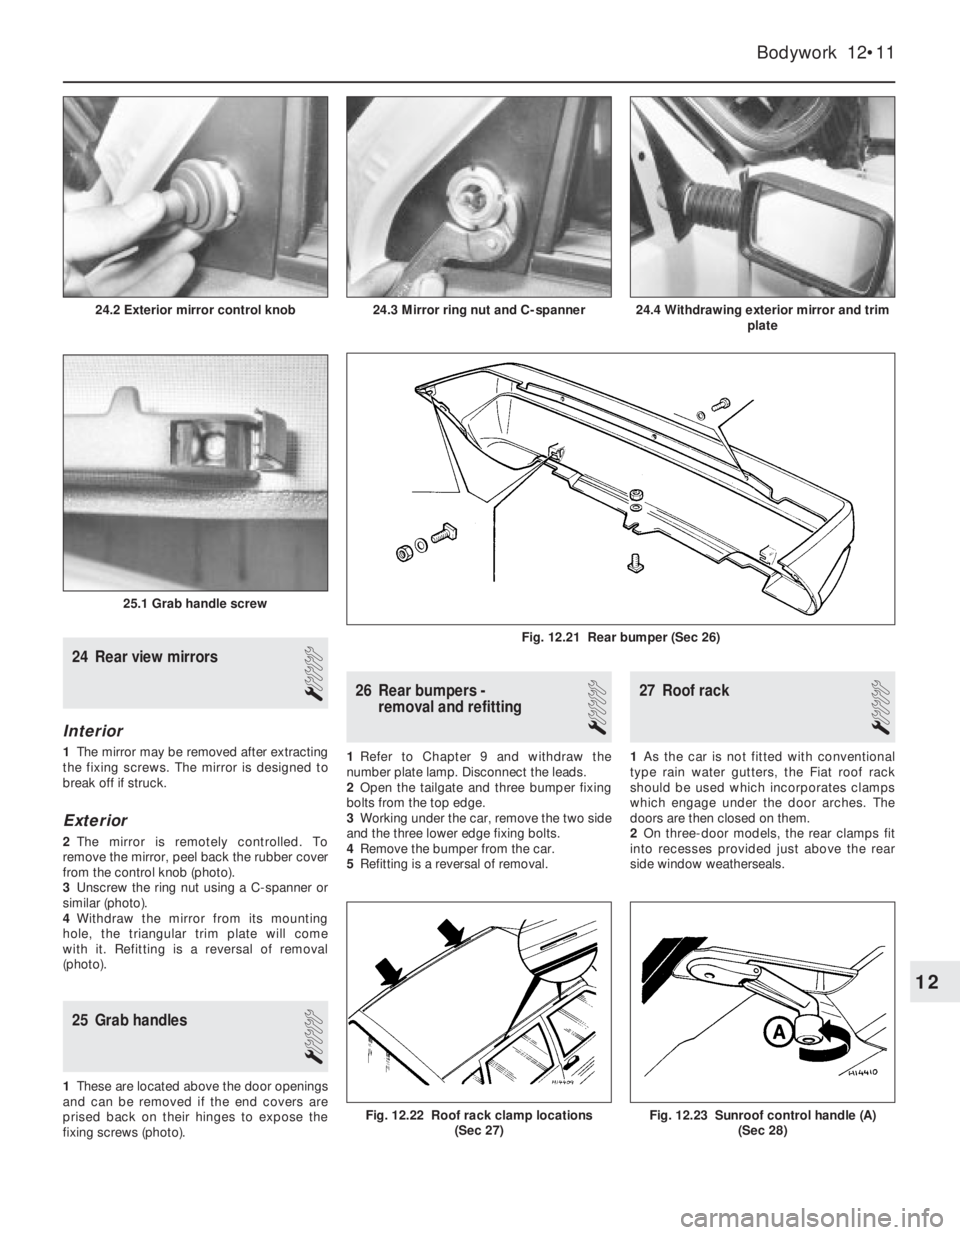
24 Rear view mirrors
1
Interior
1The mirror may be removed after extracting
the fixing screws. The mirror is designed to
break off if struck.
Exterior
2The mirror is remotely controlled. To
remove the mirror, peel back the rubber cover
from the control knob (photo).
3Unscrew the ring nut using a C-spanner or
similar (photo).
4Withdraw the mirror from its mounting
hole, the triangular trim plate will come
with it. Refitting is a reversal of removal
(photo).
25 Grab handles
1
1These are located above the door openings
and can be removed if the end covers are
prised back on their hinges to expose the
fixing screws (photo).
26 Rear bumpers -
removal and refitting
1
1Refer to Chapter 9 and withdraw the
number plate lamp. Disconnect the leads.
2Open the tailgate and three bumper fixing
bolts from the top edge.
3Working under the car, remove the two side
and the three lower edge fixing bolts.
4Remove the bumper from the car.
5Refitting is a reversal of removal.
27 Roof rack
1
1As the car is not fitted with conventional
type rain water gutters, the Fiat roof rack
should be used which incorporates clamps
which engage under the door arches. The
doors are then closed on them.
2On three-door models, the rear clamps fit
into recesses provided just above the rear
side window weatherseals.
Bodywork 12•11
24.4 Withdrawing exterior mirror and trim
plate
25.1 Grab handle screw
24.3 Mirror ring nut and C-spanner24.2 Exterior mirror control knob
Fig. 12.23 Sunroof control handle (A)
(Sec 28)Fig. 12.22 Roof rack clamp locations
(Sec 27)
Fig. 12.21 Rear bumper (Sec 26)
12
Page 128 of 303
Braking system................................................................................. 14
Part A: Braking system general
Front brake pads all later models
Part B: Braking system - Turbo ie models
Description
Front disc pads - renewal
Front disc caliper - removal and refitting
Front disc caliper - overhaul
Front brake disc - inspection, renovation or renewal
Rear disc pads - renewal
Rear disc caliper - removal, overhaul and refitting
Rear brake disc - inspection, renovation and renewal
Pressure regulating valve
Brake pedal - removal and refitting
Vacuum servo unit and master cylinder - general
Antiskid system - description
Electrical system.............................................................................. 15
Alternator (999 cc models) - removal and refitting
Alternator (later models) - removal and refitting
Alternator brushes - renewal
Starter motor (999 cc models) - removal and refitting
Starter motor (1301 cc Turbo ie, 1372 cc ie, 1372 cc Turbo ie)
- removal and refitting
Starter motor brushes (later models) - renewal
Fuses - later models
Relays (Turbo ie models) - general
Headlamps - later models
Headlamp beam adjusters for load compensation - later models
Headlamp unit removal - later models
Headlamp dim-dip system - description
Front fog lamps bulb/unit - removal and refitting and beam
adjustment
Horn - relocation
Steering column combination switches (later models) - removal
and refittingInstrument panel (Turbo ie models) - removal and refitting
Facia-mounted switches (1301 cc Turbo ie model) - removal
and refitting
Instrument panel (later models) - removal and refitting
Auxiliary control panel (later models) - removal and refitting
Heater control panel (later models) - removal and refitting
Trip master
Interior roof mounted spotlamp, switch and/or clock - removal
and refitting
Central door locking system
Cigar lighter (later models) - removal and refitting
Electrically operated window switches - removal and refitting
Windscreen wiper motor (later models) - removal and refitting
Windscreen washer reservoir (Turbo) - removal and refitting
Tailgate wiper motor (later models) - removal and refitting
Radio Check control system sensors - description
Check control system sensors - testing
Suspension....................................................................................... 16
Front anti-roll bar - removal and refitting
Suspension strut later models
Bodywork.......................................................................................... 17
Plastic components
Rear view mirrors
Door armrest
Tailgate (Turbo ie model) - component removal and refitting
Radiator grille (1301 cc Turbo ie model) - removal and
refitting
Radiator grille (1372 cc ie and 1372 cc Turbo ie models) -
removal and refitting
Bumpers (1301 cc Turbo ie, 1372 cc ie and 1372 cc Turbo ie
models) - removal and refitting
Rear hinged windows - removal and refitting
Door trim panel (Turbo ie model) - removal and refitting
Supplement: Revisions and information on later models 13•3
13
1 Introduction
Since its introduction in 1983, the FIAT Uno
has had a number of modifications and
improvements including the fitting of a twin
choke carburettor, low profile tyres, tinted
windows and remotely-controlled central door
locking.
The major mechanical change was the
introduction of the FIRE (Fully Integrated
Robotised Engine) on 45 and 45S models to
be followed by a new 1108 cc “FIRE” engine
on the 60S model from 1989 on.
A 1301 cc Turbo ie engine model wasavailable for a short period. This model had a
Bosch LE2 Jetronic electronic fuel injection
(ie) and a turbocharger to give added
performance. To uprate the braking to suit,
disc brakes were fitted to the rear in place of
the original drum type brakes.
A 1372 cc engine model was introduced in
1989. Two versions were initially available. A
Bosch Mono-Jetronic single-point fuel
injection (SPi) system, as found on the 70 SX
model and Bosch L3.1 or L3.2 Jetronic
multi-point fuel injection (MPi) systems were
fitted to Turbo models. L3.2 MPi system
models were equipped with catalytic
converters, to improve exhaust emission. All
fuel injection engines are fitted with electroni-
cally controlled engine management systems.
A new style instrument panel, switchgearand a revised facia layout was introduced in
1989.
During 1992, SPi fuel systems were fitted to
the 999 cc and 1108 cc engines, along with
catalytic converters for improved exhaust
emissions.
Five speed transmissions were introduced
to 999 cc models in 1993.
It is recommended that this Supplement is
always referred to before the main Chapters
of the Manual.
Project vehicles
The vehicles used in the preparation of this
supplement, and appearing in many of the
photographic sequences were a 1986 Uno
45S FIRE, a 1988 1301 cc Uno Turbo ie and a
1991 1372 cc Uno SXie.
Easy,suitable for
novice with little
experienceFairly easy,suitable
for beginner with
some experienceFairly difficult,
suitable for competent
DIY mechanic
Difficult,suitable for
experienced DIY
mechanicVery difficult,
suitable for expert DIY
or professional
Degrees of difficulty
54321
Page 185 of 303
9 Fuel and exhaust systems
Warning: Many of the
procedures in this Section
require the removal of fuel lines
and connections that may result
in some fuel spillage. Before carrying out
any operation on the fuel system refer to
the precautions given in ‘Safety first!’ at
the beginning of this Manual and follow
them implicitly. Petrol is a highly
dangerous and volatile liquid, and the
precautions necessary when handling it
cannot be overstressed.
Caution: On fuel injection
models, the system is
pressurised, therefore extra
care must be taken when
disconnecting fuel lines. When
disconnecting a fuel line union, loosen the
union slowly, to avoid a sudden release of
pressure that may cause fuel to spray out
and have a container and cloth ready to
catch spillages. Fuel pressure checking
must be entrusted to a Fiat dealer, or other
specialist, who has the necessary special
equipment.
PART A: GENERAL
Unleaded fuel
Note: On models with catalytic convertersonly unleaded petrol must be used - the use
of leaded petrol will destroy the catalyst.
1It is possible to use unleaded fuel (minimum
95 RON) in the following models with the
indicated serial numbers.
Engine Serial number
903 cc 146A.000
146A.046
146A.048
999 cc 156A2.00
1108 cc 160A3.000
1116 cc 138B.000
138B.046
146A4000
146A4.048
1299/1301 cc 138B2.000
138B2.046
149A7.000
1149A7.000
146A2.000
1372 cc 146C1.000
146A8.000
160A1.046
2On all except the 903 cc engine, the use of
unleaded fuel is conditional upon the
avoidance of constant high speeds and
sudden acceleration.
Air cleaner - modified types
3The air cleaner on later models is of the
automatic temperature controlled type. The
need to move the intake control lever to winter
or summer positions is no longer required.
4The air cleaner on the 999 cc engine is ofrectangular shape and the element is
removed for renewal after prising back the
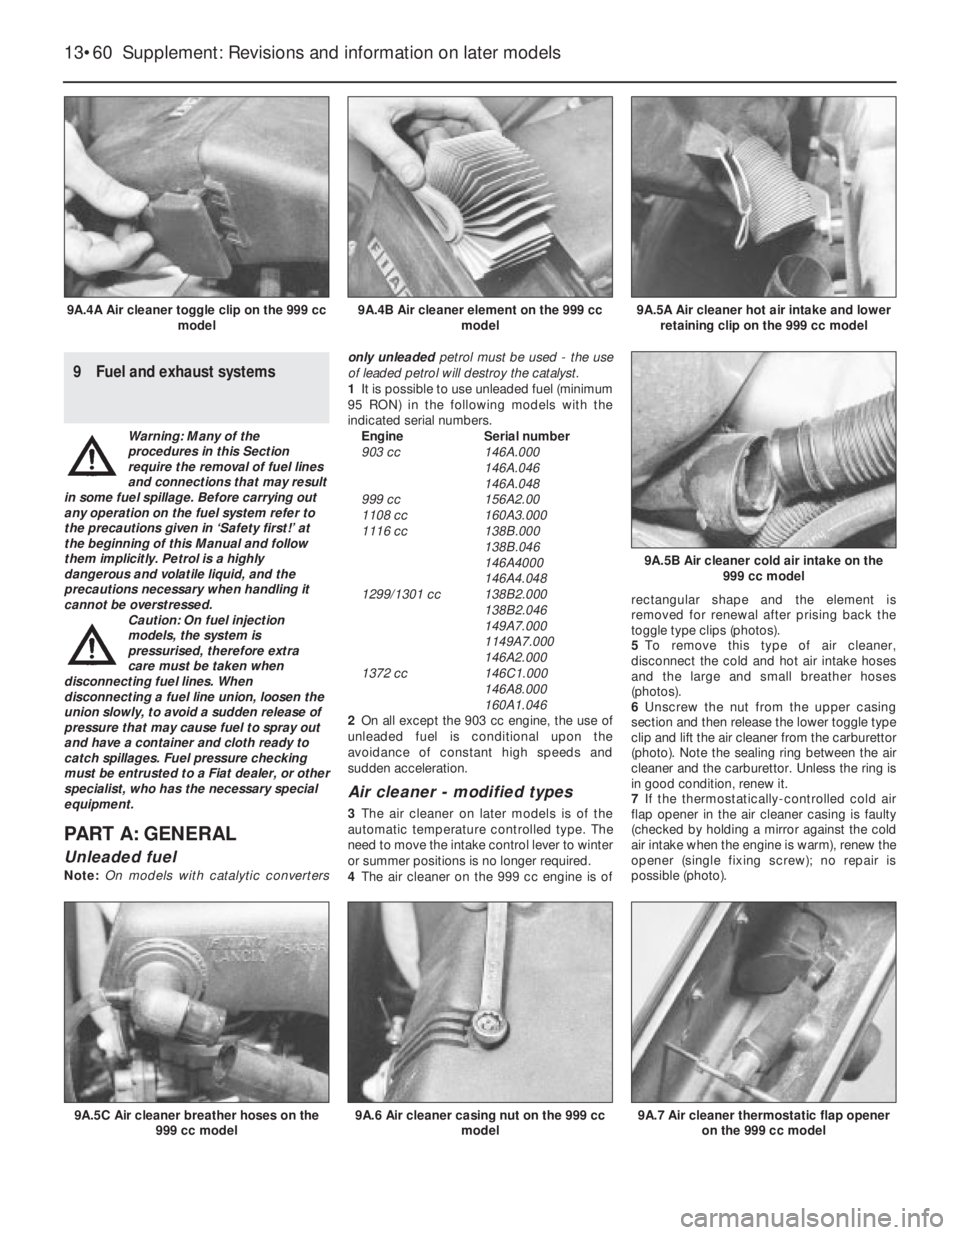
toggle type clips (photos).
5To remove this type of air cleaner,
disconnect the cold and hot air intake hoses
and the large and small breather hoses
(photos).
6Unscrew the nut from the upper casing
section and then release the lower toggle type
clip and lift the air cleaner from the carburettor
(photo). Note the sealing ring between the air
cleaner and the carburettor. Unless the ring is
in good condition, renew it.
7If the thermostatically-controlled cold air
flap opener in the air cleaner casing is faulty
(checked by holding a mirror against the cold
air intake when the engine is warm), renew the
opener (single fixing screw); no repair is
possible (photo).
13•60 Supplement: Revisions and information on later models
9A.7 Air cleaner thermostatic flap opener
on the 999 cc model9A.6 Air cleaner casing nut on the 999 cc
model9A.5C Air cleaner breather hoses on the
999 cc model
9A.5B Air cleaner cold air intake on the
999 cc model
9A.5A Air cleaner hot air intake and lower
retaining clip on the 999 cc model9A.4B Air cleaner element on the 999 cc
model9A.4A Air cleaner toggle clip on the 999 cc
model
Page 236 of 303
Door closure sensor
117The sensor consists of a microswitch
within the lock. The switch actuates the
warning lamp according to whether the lock is
in the open or closed mode.
Check control system sensors -
testing
Brake fluid level sensor
118With the fluid level correct, switch on the
ignition and depress the centre of the
reservoir cap. If the sensor switches are
working correctly, then “FAULT” should be
indicated on the check panel.
Coolant level sensor
119With the coolant level in the expansion
tank correct, switch on the ignition and then
pull the wiring plug from the sensor. “FAULT”
should be indicated on the check panel. If it is
not, then it is the panel which is faulty.
120An ohmmeter should be used to check
for continuity, holding the float in both the full
and low level positions.
Engine oil level sensor
121With the oil level correct, disconnect the
wiring plug from the dipstick, and then bridge
the plug terminals (not dipstick side) with a 12
ohm resistor. Switch on the ignition.
122If the red light on the check panel goes
out, then the fault is due to the sensor.
123If the light stays on, then it is the check
panel module which is faulty.
Door closure sensor
124Any fault in the lock microswitch can best
be detected using an ohmmeter.
16 Suspension
Front anti-roll bar -
removal and refittingª
1A front anti-roll bar is fitted to the 1301 cc,
1372 cc ie and 1372 cc Turbo ie engined
models. Removal of the bar on all models isas follows. Firstly loosen off the front
roadwheel bolts, then raise the front of the
car, securely support it on axle stands and
remove the front roadwheels.
2Disconnect the two gearchange rods from
the transmission.
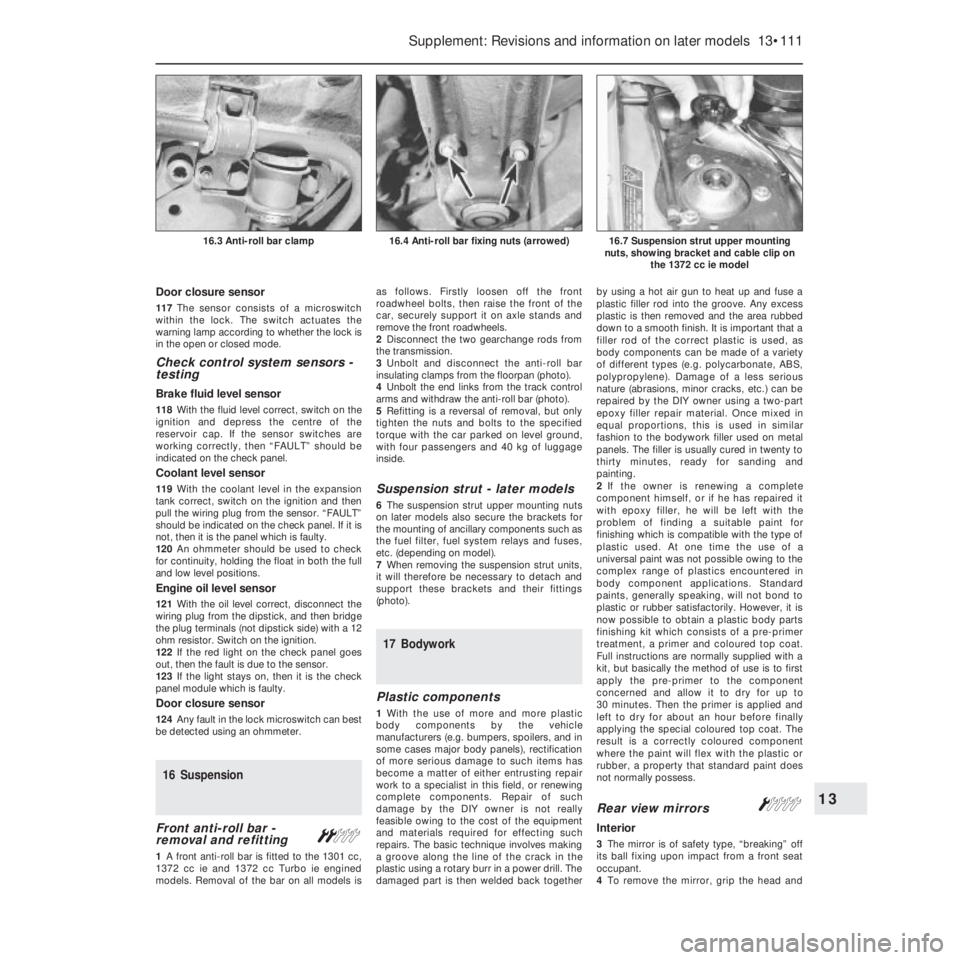
3Unbolt and disconnect the anti-roll bar
insulating clamps from the floorpan (photo).
4Unbolt the end links from the track control
arms and withdraw the anti-roll bar (photo).
5Refitting is a reversal of removal, but only
tighten the nuts and bolts to the specified
torque with the car parked on level ground,
with four passengers and 40 kg of luggage
inside.
Suspension strut - later models
6The suspension strut upper mounting nuts
on later models also secure the brackets for
the mounting of ancillary components such as
the fuel filter, fuel system relays and fuses,
etc. (depending on model).
7When removing the suspension strut units,
it will therefore be necessary to detach and
support these brackets and their fittings
(photo).
17 Bodywork
Plastic components
1With the use of more and more plastic
body components by the vehicle
manufacturers (e.g. bumpers, spoilers, and in
some cases major body panels), rectification
of more serious damage to such items has
become a matter of either entrusting repair
work to a specialist in this field, or renewing
complete components. Repair of such
damage by the DIY owner is not really
feasible owing to the cost of the equipment
and materials required for effecting such
repairs. The basic technique involves making
a groove along the line of the crack in the
plastic using a rotary burr in a power drill. The
damaged part is then welded back togetherby using a hot air gun to heat up and fuse a
plastic filler rod into the groove. Any excess
plastic is then removed and the area rubbed
down to a smooth finish. It is important that a
filler rod of the correct plastic is used, as
body components can be made of a variety
of different types (e.g. polycarbonate, ABS,
polypropylene). Damage of a less serious
nature (abrasions, minor cracks, etc.) can be
repaired by the DIY owner using a two-part
epoxy filler repair material. Once mixed in
equal proportions, this is used in similar
fashion to the bodywork filler used on metal
panels. The filler is usually cured in twenty to
thirty minutes, ready for sanding and
painting.
2If the owner is renewing a complete
component himself, or if he has repaired it
with epoxy filler, he will be left with the
problem of finding a suitable paint for
finishing which is compatible with the type of
plastic used. At one time the use of a
universal paint was not possible owing to the
complex range of plastics encountered in
body component applications. Standard
paints, generally speaking, will not bond to
plastic or rubber satisfactorily. However, it is
now possible to obtain a plastic body parts
finishing kit which consists of a pre-primer
treatment, a primer and coloured top coat.
Full instructions are normally supplied with a
kit, but basically the method of use is to first
apply the pre-primer to the component
concerned and allow it to dry for up to
30 minutes. Then the primer is applied and
left to dry for about an hour before finally
applying the special coloured top coat. The
result is a correctly coloured component
where the paint will flex with the plastic or
rubber, a property that standard paint does
not normally possess.
Rear view mirrors Á
Interior
3The mirror is of safety type, “breaking” off
its ball fixing upon impact from a front seat
occupant.
4To remove the mirror, grip the head and
Supplement: Revisions and information on later models 13•111
16.7 Suspension strut upper mounting
nuts, showing bracket and cable clip on
the 1372 cc ie model16.4 Anti-roll bar fixing nuts (arrowed)16.3 Anti-roll bar clamp
13
Page 237 of 303
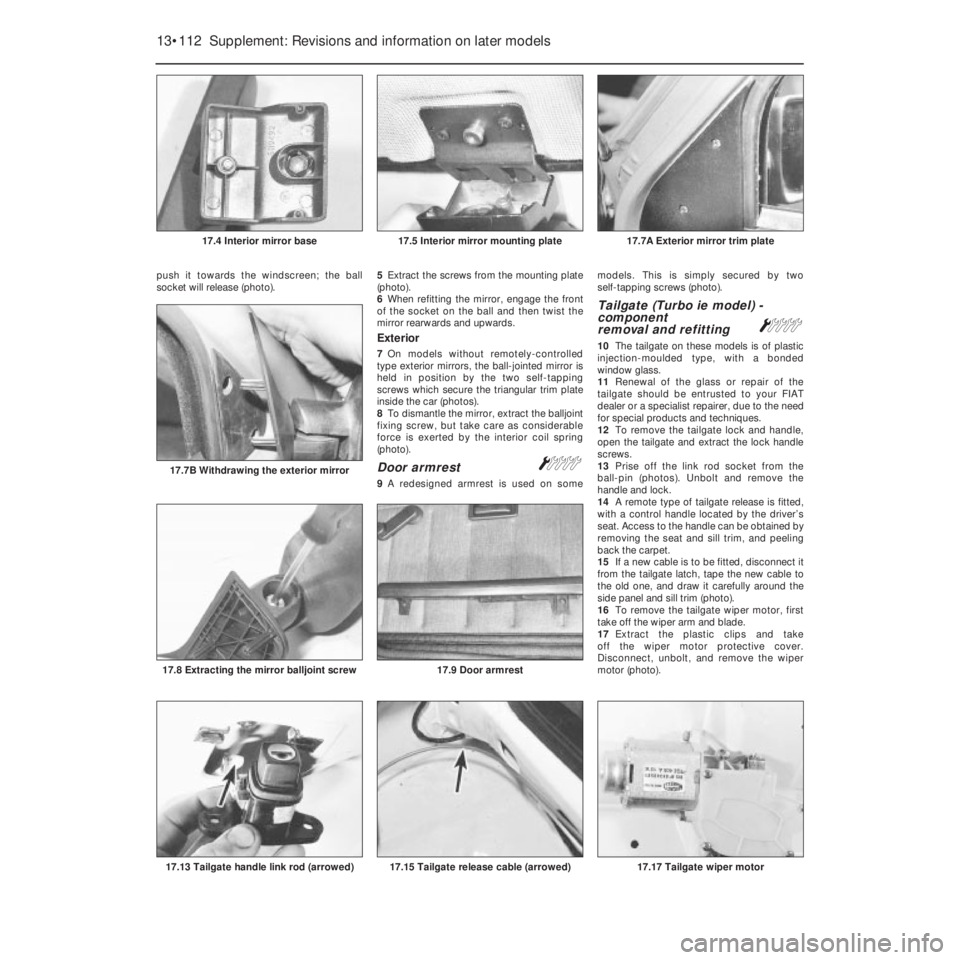
push it towards the windscreen; the ball
socket will release (photo).5Extract the screws from the mounting plate
(photo).
6When refitting the mirror, engage the front
of the socket on the ball and then twist the
mirror rearwards and upwards.
Exterior
7On models without remotely-controlled
type exterior mirrors, the ball-jointed mirror is
held in position by the two self-tapping
screws which secure the triangular trim plate
inside the car (photos).
8To dismantle the mirror, extract the balljoint
fixing screw, but take care as considerable
force is exerted by the interior coil spring
(photo).
Door armrestÁ
9A redesigned armrest is used on somemodels. This is simply secured by two
self-tapping screws (photo).
Tailgate (Turbo ie model) -
component
removal and refitting
Á
10The tailgate on these models is of plastic
injection-moulded type, with a bonded
window glass.
11Renewal of the glass or repair of the
tailgate should be entrusted to your FIAT
dealer or a specialist repairer, due to the need
for special products and techniques.
12To remove the tailgate lock and handle,
open the tailgate and extract the lock handle
screws.
13Prise off the link rod socket from the
ball-pin (photos). Unbolt and remove the
handle and lock.
14A remote type of tailgate release is fitted,
with a control handle located by the driver’s
seat. Access to the handle can be obtained by
removing the seat and sill trim, and peeling
back the carpet.
15If a new cable is to be fitted, disconnect it
from the tailgate latch, tape the new cable to
the old one, and draw it carefully around the
side panel and sill trim (photo).
16To remove the tailgate wiper motor, first
take off the wiper arm and blade.
17Extract the plastic clips and take
off the wiper motor protective cover.
Disconnect, unbolt, and remove the wiper
motor (photo).
13•112 Supplement: Revisions and information on later models
17.17 Tailgate wiper motor17.15 Tailgate release cable (arrowed)17.13 Tailgate handle link rod (arrowed)
17.9 Door armrest17.8 Extracting the mirror balljoint screw
17.7B Withdrawing the exterior mirror
17.7A Exterior mirror trim plate17.5 Interior mirror mounting plate17.4 Interior mirror base
Page 260 of 303
Wiring diagrams 14•21
14
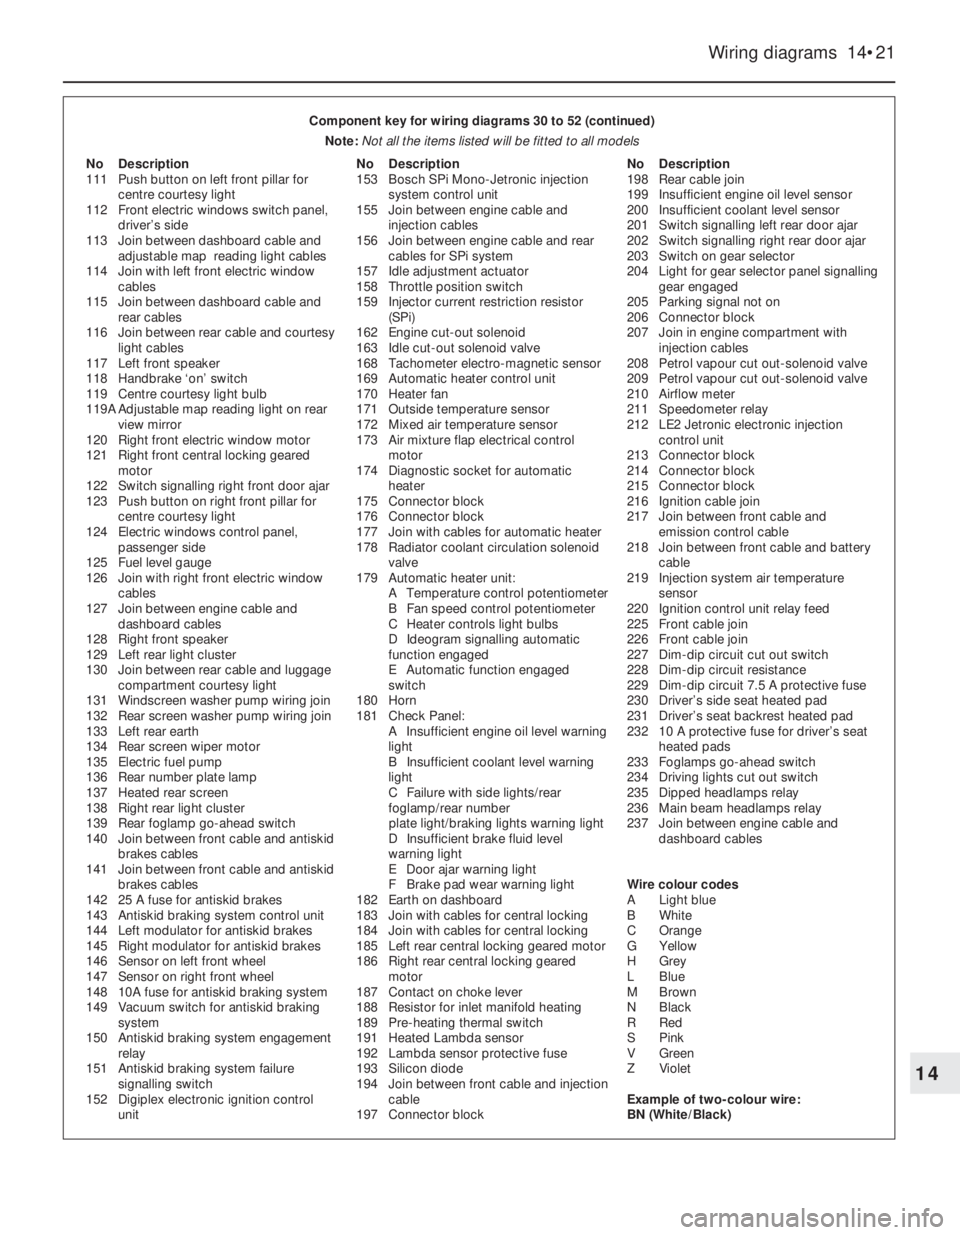
Component key for wiring diagrams 30 to 52 (continued)
Note: Not all the items listed will be fitted to all models
No Description
111 Push button on left front pillar for
centre courtesy light
112 Front electric windows switch panel,
driver’s side
113 Join between dashboard cable and
adjustable map reading light cables
114 Join with left front electric window
cables
115 Join between dashboard cable and
rear cables
116 Join between rear cable and courtesy
light cables
117 Left front speaker
118 Handbrake ‘on’ switch
119 Centre courtesy light bulb
119A Adjustable map reading light on rear
view mirror
120 Right front electric window motor
121 Right front central locking geared
motor
122 Switch signalling right front door ajar
123 Push button on right front pillar for
centre courtesy light
124 Electric windows control panel,
passenger side
125 Fuel level gauge
126 Join with right front electric window
cables
127 Join between engine cable and
dashboard cables
128 Right front speaker
129 Left rear light cluster
130 Join between rear cable and luggage
compartment courtesy light
131 Windscreen washer pump wiring join
132 Rear screen washer pump wiring join
133 Left rear earth
134 Rear screen wiper motor
135 Electric fuel pump
136 Rear number plate lamp
137 Heated rear screen
138 Right rear light cluster
139 Rear foglamp go-ahead switch
140 Join between front cable and antiskid
brakes cables
141 Join between front cable and antiskid
brakes cables
142 25 A fuse for antiskid brakes
143 Antiskid braking system control unit
144 Left modulator for antiskid brakes
145 Right modulator for antiskid brakes
146 Sensor on left front wheel
147 Sensor on right front wheel
148 10A fuse for antiskid braking system
149 Vacuum switch for antiskid braking
system
150 Antiskid braking system engagement
relay
151 Antiskid braking system failure
signalling switch
152 Digiplex electronic ignition control
unitNo Description
153 Bosch SPi Mono-Jetronic injection
system control unit
155 Join between engine cable and
injection cables
156 Join between engine cable and rear
cables for SPi system
157 Idle adjustment actuator
158 Throttle position switch
159 Injector current restriction resistor
(SPi)
162 Engine cut-out solenoid
163 Idle cut-out solenoid valve
168 Tachometer electro-magnetic sensor
169 Automatic heater control unit
170 Heater fan
171 Outside temperature sensor
172 Mixed air temperature sensor
173 Air mixture flap electrical control
motor
174 Diagnostic socket for automatic
heater
175 Connector block
176 Connector block
177 Join with cables for automatic heater
178 Radiator coolant circulation solenoid
valve
179 Automatic heater unit:
A Temperature control potentiometer
B Fan speed control potentiometer
C Heater controls light bulbs
D Ideogram signalling automatic
function engaged
E Automatic function engaged
switch
180 Horn
181 Check Panel:
A Insufficient engine oil level warning
light
B Insufficient coolant level warning
light
C Failure with side lights/rear
foglamp/rear number
plate light/braking lights warning light
D Insufficient brake fluid level
warning light
E Door ajar warning light
F Brake pad wear warning light
182 Earth on dashboard
183 Join with cables for central locking
184 Join with cables for central locking
185 Left rear central locking geared motor
186 Right rear central locking geared
motor
187 Contact on choke lever
188 Resistor for inlet manifold heating
189 Pre-heating thermal switch
191 Heated Lambda sensor
192 Lambda sensor protective fuse
193 Silicon diode
194 Join between front cable and injection
cable
197 Connector blockNo Description
198 Rear cable join
199 Insufficient engine oil level sensor
200 Insufficient coolant level sensor
201 Switch signalling left rear door ajar
202 Switch signalling right rear door ajar
203 Switch on gear selector
204 Light for gear selector panel signalling
gear engaged
205 Parking signal not on
206 Connector block
207 Join in engine compartment with
injection cables
208 Petrol vapour cut out-solenoid valve
209 Petrol vapour cut out-solenoid valve
210 Airflow meter
211 Speedometer relay
212 LE2 Jetronic electronic injection
control unit
213 Connector block
214 Connector block
215 Connector block
216 Ignition cable join
217 Join between front cable and
emission control cable
218 Join between front cable and battery
cable
219 Injection system air temperature
sensor
220 Ignition control unit relay feed
225 Front cable join
226 Front cable join
227 Dim-dip circuit cut out switch
228 Dim-dip circuit resistance
229 Dim-dip circuit 7.5 A protective fuse
230 Driver’s side seat heated pad
231 Driver’s seat backrest heated pad
232 10 A protective fuse for driver’s seat
heated pads
233 Foglamps go-ahead switch
234 Driving lights cut out switch
235 Dipped headlamps relay
236 Main beam headlamps relay
237 Join between engine cable and
dashboard cables
Wire colour codes
A Light blue
B White
C Orange
G Yellow
H Grey
L Blue
M Brown
N Black
R Red
S Pink
V Green
Z Violet
Example of two-colour wire:
BN (White/Black)
Page 284 of 303
MOT Test ChecksREF•1
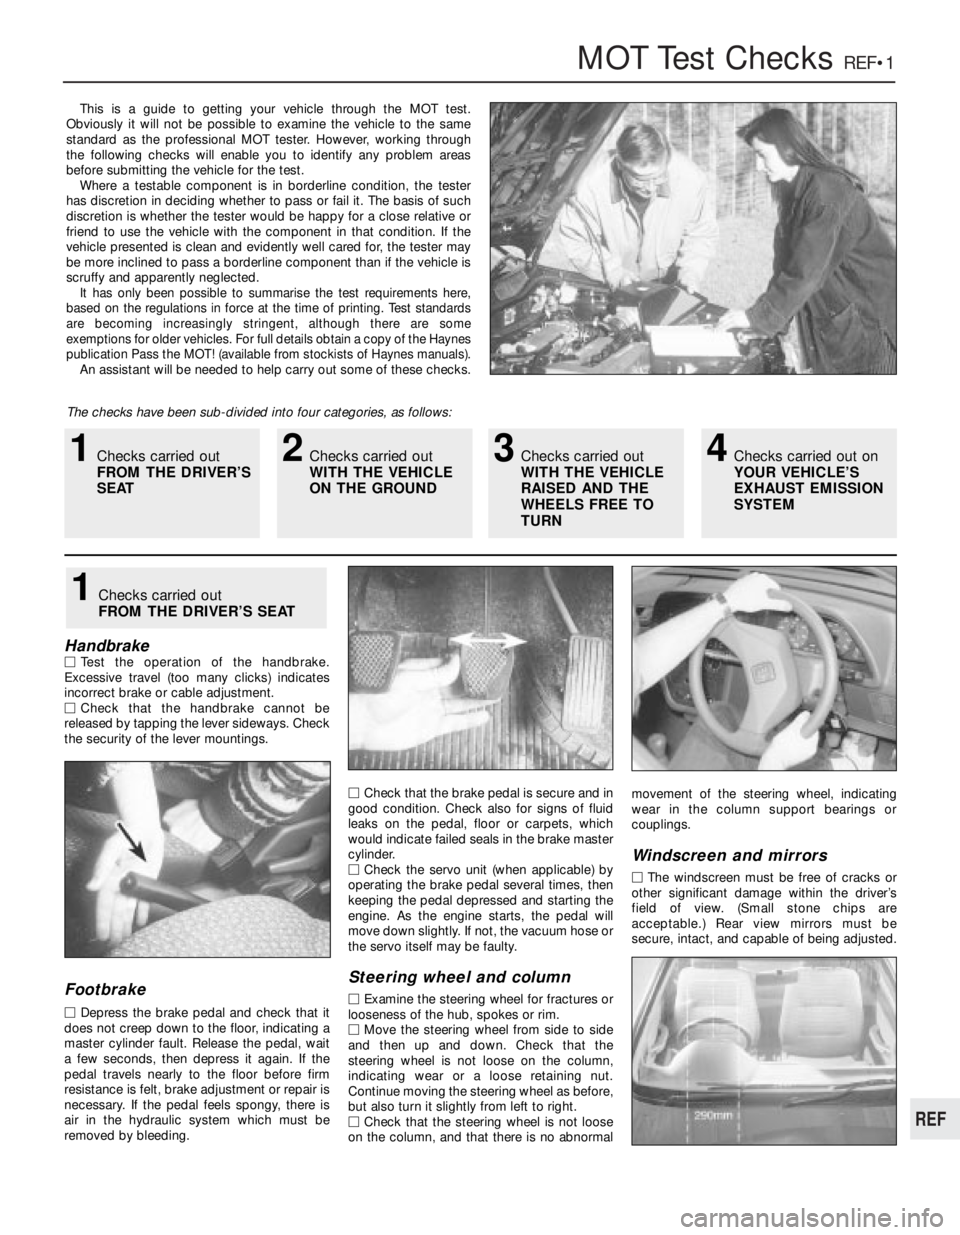
This is a guide to getting your vehicle through the MOT test.
Obviously it will not be possible to examine the vehicle to the same
standard as the professional MOT tester. However, working through
the following checks will enable you to identify any problem areas
before submitting the vehicle for the test.
Where a testable component is in borderline condition, the tester
has discretion in deciding whether to pass or fail it. The basis of such
discretion is whether the tester would be happy for a close relative or
friend to use the vehicle with the component in that condition. If the
vehicle presented is clean and evidently well cared for, the tester may
be more inclined to pass a borderline component than if the vehicle is
scruffy and apparently neglected.
It has only been possible to summarise the test requirements here,
based on the regulations in force at the time of printing. Test standards
are becoming increasingly stringent, although there are some
exemptions for older vehicles. For full details obtain a copy of the Haynes
publication Pass the MOT! (available from stockists of Haynes manuals).
An assistant will be needed to help carry out some of these checks.
The checks have been sub-divided into four categories, as follows:
HandbrakeMTest the operation of the handbrake.
Excessive travel (too many clicks) indicates
incorrect brake or cable adjustment.
MCheck that the handbrake cannot be
released by tapping the lever sideways. Check
the security of the lever mountings.
Footbrake
MDepress the brake pedal and check that it
does not creep down to the floor, indicating a
master cylinder fault. Release the pedal, wait
a few seconds, then depress it again. If the
pedal travels nearly to the floor before firm
resistance is felt, brake adjustment or repair is
necessary. If the pedal feels spongy, there is
air in the hydraulic system which must be
removed by bleeding.MCheck that the brake pedal is secure and in
good condition. Check also for signs of fluid
leaks on the pedal, floor or carpets, which
would indicate failed seals in the brake master
cylinder.
MCheck the servo unit (when applicable) by
operating the brake pedal several times, then
keeping the pedal depressed and starting the
engine. As the engine starts, the pedal will
move down slightly. If not, the vacuum hose or
the servo itself may be faulty.
Steering wheel and column
MExamine the steering wheel for fractures or
looseness of the hub, spokes or rim.
MMove the steering wheel from side to side
and then up and down. Check that the
steering wheel is not loose on the column,
indicating wear or a loose retaining nut.
Continue moving the steering wheel as before,
but also turn it slightly from left to right.
MCheck that the steering wheel is not loose
on the column, and that there is no abnormalmovement of the steering wheel, indicating
wear in the column support bearings or
couplings.
Windscreen and mirrors
MThe windscreen must be free of cracks or
other significant damage within the driver’s
field of view. (Small stone chips are
acceptable.) Rear view mirrors must be
secure, intact, and capable of being adjusted.
1Checks carried out
FROM THE DRIVER’S SEAT
1Checks carried out
FROM THE DRIVER’S
SEAT2Checks carried out
WITH THE VEHICLE
ON THE GROUND3Checks carried out
WITH THE VEHICLE
RAISED AND THE
WHEELS FREE TO
TURN4Checks carried out on
YOUR VEHICLE’S
EXHAUST EMISSION
SYSTEM
REF