service interval FIAT UNO 1983 Service Repair Manual
[x] Cancel search | Manufacturer: FIAT, Model Year: 1983, Model line: UNO, Model: FIAT UNO 1983Pages: 303, PDF Size: 10.36 MB
Page 22 of 303
2 Engine oil and filter
1
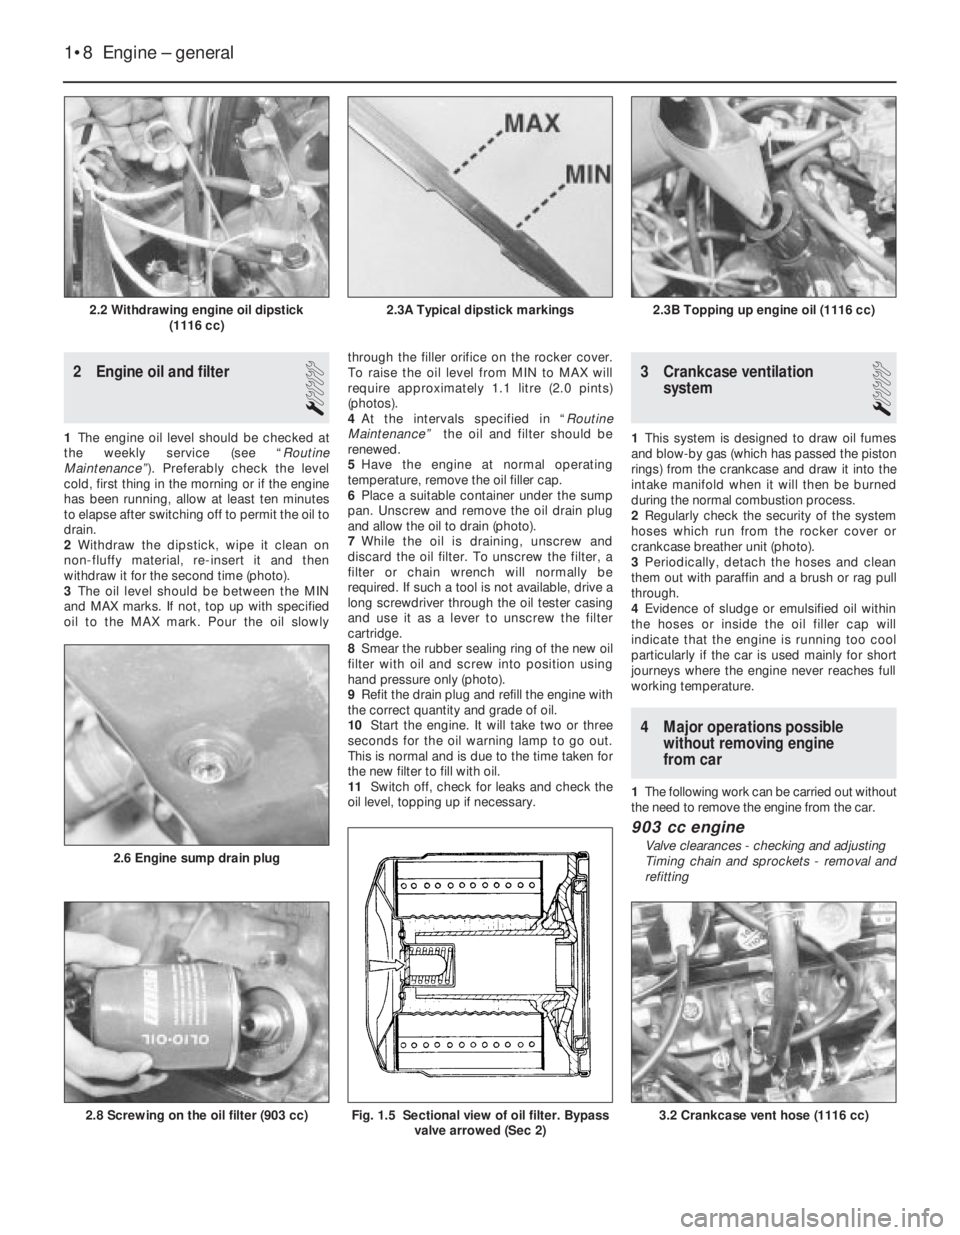
1The engine oil level should be checked at
the weekly service (see “Routine
Maintenance”). Preferably check the level
cold, first thing in the morning or if the engine
has been running, allow at least ten minutes
to elapse after switching off to permit the oil to
drain.
2Withdraw the dipstick, wipe it clean on
non-fluffy material, re-insert it and then
withdraw it for the second time (photo).
3The oil level should be between the MIN
and MAX marks. If not, top up with specified
oil to the MAX mark. Pour the oil slowlythrough the filler orifice on the rocker cover.
To raise the oil level from MIN to MAX will
require approximately 1.1 litre (2.0 pints)
(photos).
4At the intervals specified in “Routine
Maintenance” the oil and filter should be
renewed.
5Have the engine at normal operating
temperature, remove the oil filler cap.
6Place a suitable container under the sump
pan. Unscrew and remove the oil drain plug
and allow the oil to drain (photo).
7While the oil is draining, unscrew and
discard the oil filter. To unscrew the filter, a
filter or chain wrench will normally be
required. If such a tool is not available, drive a
long screwdriver through the oil tester casing
and use it as a lever to unscrew the filter
cartridge.
8Smear the rubber sealing ring of the new oil
filter with oil and screw into position using
hand pressure only (photo).
9Refit the drain plug and refill the engine with
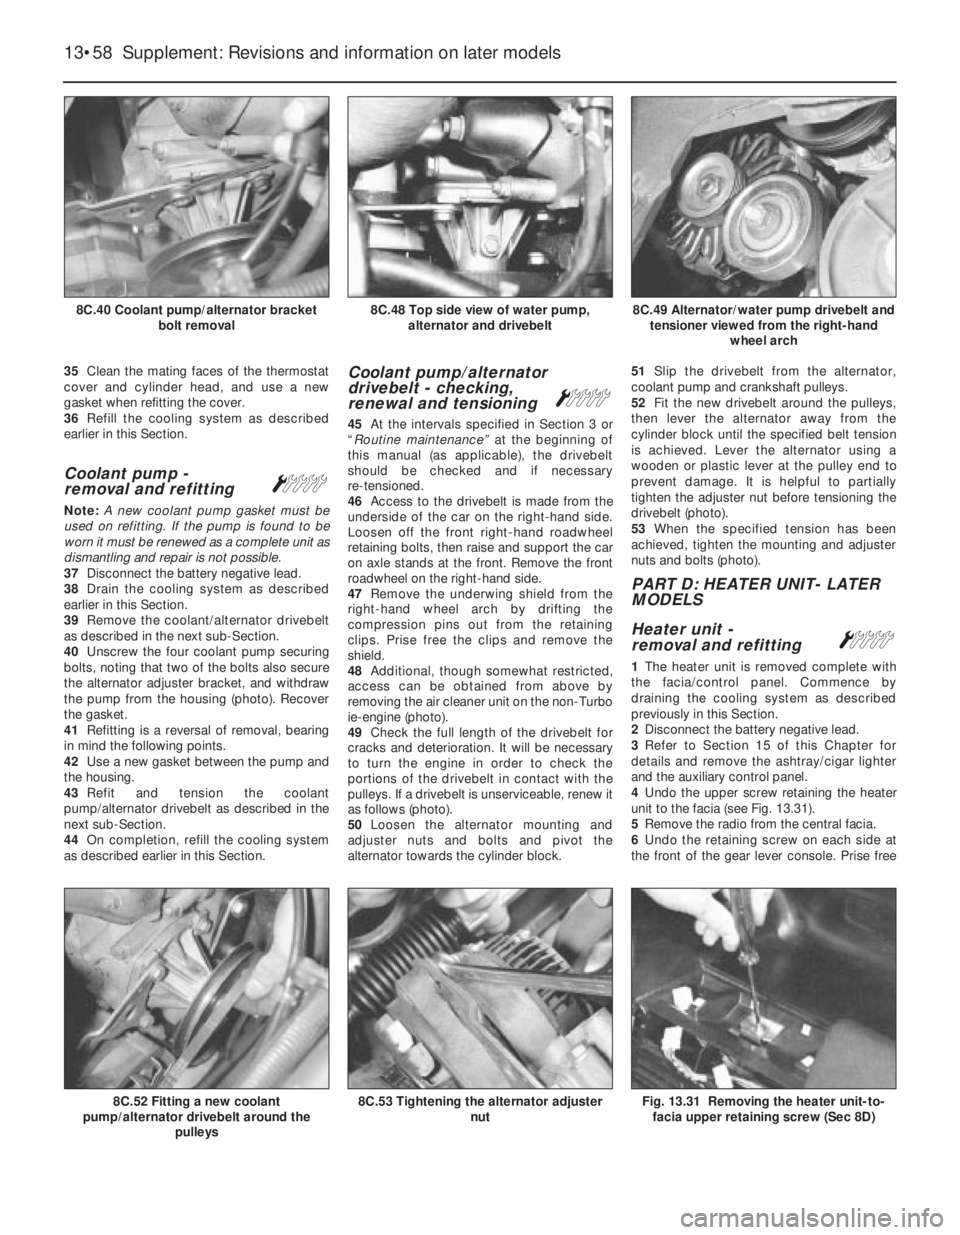
the correct quantity and grade of oil.
10Start the engine. It will take two or three
seconds for the oil warning lamp to go out.
This is normal and is due to the time taken for
the new filter to fill with oil.
11Switch off, check for leaks and check the
oil level, topping up if necessary.
3 Crankcase ventilation
system
1
1This system is designed to draw oil fumes
and blow-by gas (which has passed the piston
rings) from the crankcase and draw it into the
intake manifold when it will then be burned
during the normal combustion process.
2Regularly check the security of the system
hoses which run from the rocker cover or
crankcase breather unit (photo).
3Periodically, detach the hoses and clean
them out with paraffin and a brush or rag pull
through.
4Evidence of sludge or emulsified oil within
the hoses or inside the oil filler cap will
indicate that the engine is running too cool
particularly if the car is used mainly for short
journeys where the engine never reaches full
working temperature.
4 Major operations possible
without removing engine
from car
1The following work can be carried out without
the need to remove the engine from the car.
903 cc engine
Valve clearances - checking and adjusting
Timing chain and sprockets - removal and
refitting
1•8 Engine – general
3.2 Crankcase vent hose (1116 cc)Fig. 1.5 Sectional view of oil filter. Bypass
valve arrowed (Sec 2)2.8 Screwing on the oil filter (903 cc)
2.6 Engine sump drain plug
2.3B Topping up engine oil (1116 cc)2.3A Typical dipstick markings2.2 Withdrawing engine oil dipstick
(1116 cc)
Page 74 of 303
outwards, they rotate the cam relative to the
distributor shaft, and so advance the spark.
The weights are held in position by two
springs and it is the tension of the springs
which is largely responsible for correct spark
advancement.
The vacuum advance is controlled by a
diaphragm capsule connected to the
carburettor venturi. The vacuum pressure
varies according to the throttle valve plate
opening and so adjusts the ignition advance
in accordance with the engine requirements.
Digiplex ignition system
This electronic system eliminates the
mechanical contact breaker and centrifugal
advance mechanism of conventional
distributors and uses an electronic control
unit to provide advance values according to
engine speed and load. No provision is made
for adjustment of the ignition timing.
Information relayed to the control unit is
provided by two magnetic sensors which
monitor engine speed and TDC directly from
the engine crankshaft.
A vacuum sensor in the control unit
converts intake manifold vacuum into an
electric signal.
The control unit selects the optimum
advance angle required and a closed
magnetic circuit resin coil guarantees a spark
owing to the low primary winding resistance.
Five hundred and twelve advance values
are stored in the control unit memory to suit
any combination of engine operating
conditions.
No maintenance is required to the
distributor used on this system.
Distributor drive
The mechanical breaker type distributor on
903 cc engines and the Digiplex type
distributor on 903 cc ES engines are mounted
on the cylinder head and driven from a gear
on the camshaft through a shaft which also
drives the oil pump.
The distributor on 1116 cc and 1301 cc
engines is mounted on the crankcase and is
driven from a gear on the auxiliary shaft as is
also the oil pump.
2 Mechanical contact breaker
- points servicing
3
1At the intervals specified in “Routine
Maintenance”, prise down the clips on the
distributor cap and place the cap with high
tension leads to one side.
2Pull off the rotor.
3Remove the spark shield. Mechanical wear
of the contact breaker reduces the gap.
Electrical wear builds up a “pip” of burned
metal on one of the contacts. This
|prevents the gap being measured for
re-adjustment, and also spoils the electric
circuit.
Ducellier type distributor
4To remove the contact breaker movable
arm, extract the clip and take off the washer
from the top of the pivot post.
5Extract the screw and remove the fixed
contact arm.
6Clean the points by rubbing the surfaces on
a fine abrasive such as an oil stone. The point
surface should be shaped to a gentle convex
curve. All the “pip” burned onto one contact
must be removed. It is not necessary to go on
until all traces of the crater have been
removed from the other. There is enough
metal on the contacts to allow this to be done
once. At alternate services, fit new points.
Wash debris off cleaned points and
preservatives off new ones.
7Now the distributor should be lubricated.
This lubrication is important for the correct
mechanical function of the distributor, but
excess lubrication will ruin the electrical
circuits, and give difficult starting.
8Whilst the contact breaker is off, squirt
some engine oil into the bottom part of the
distributor, onto the centrifugal advance
mechanism below the plate.
9Wet with oil the felt pad on the top of the
distributor spindle, normally covered by the
rotor arm.
10Put just a drip of oil on the pivot for the
moving contact.11Smear a little general purpose grease
onto the cam, and the heel of the moving
contact breaker.
12Refit the contact points and then set the
gap in the following way.
13Turn the crankshaft by applying a spanner
to the pulley nut or by jacking up a front
wheel, engaging top gear and turning the
roadwheel in the forward direction of
travel. Keep turning until the plastic
heel of the movable contact arm is on the
high point of a cam lobe on the distributor
shaft.
14Set the points gap by moving the fixed
contact arm until the specified feeler blades
are a sliding fit. Tighten the fixed contact arm
screw.
15Check the contact end of the rotor arm.
Remove any slightly burnt deposits using fine
abrasive paper. Severe erosion will
necessitate renewal of the rotor.
16Wipe out the distributor cap and check for
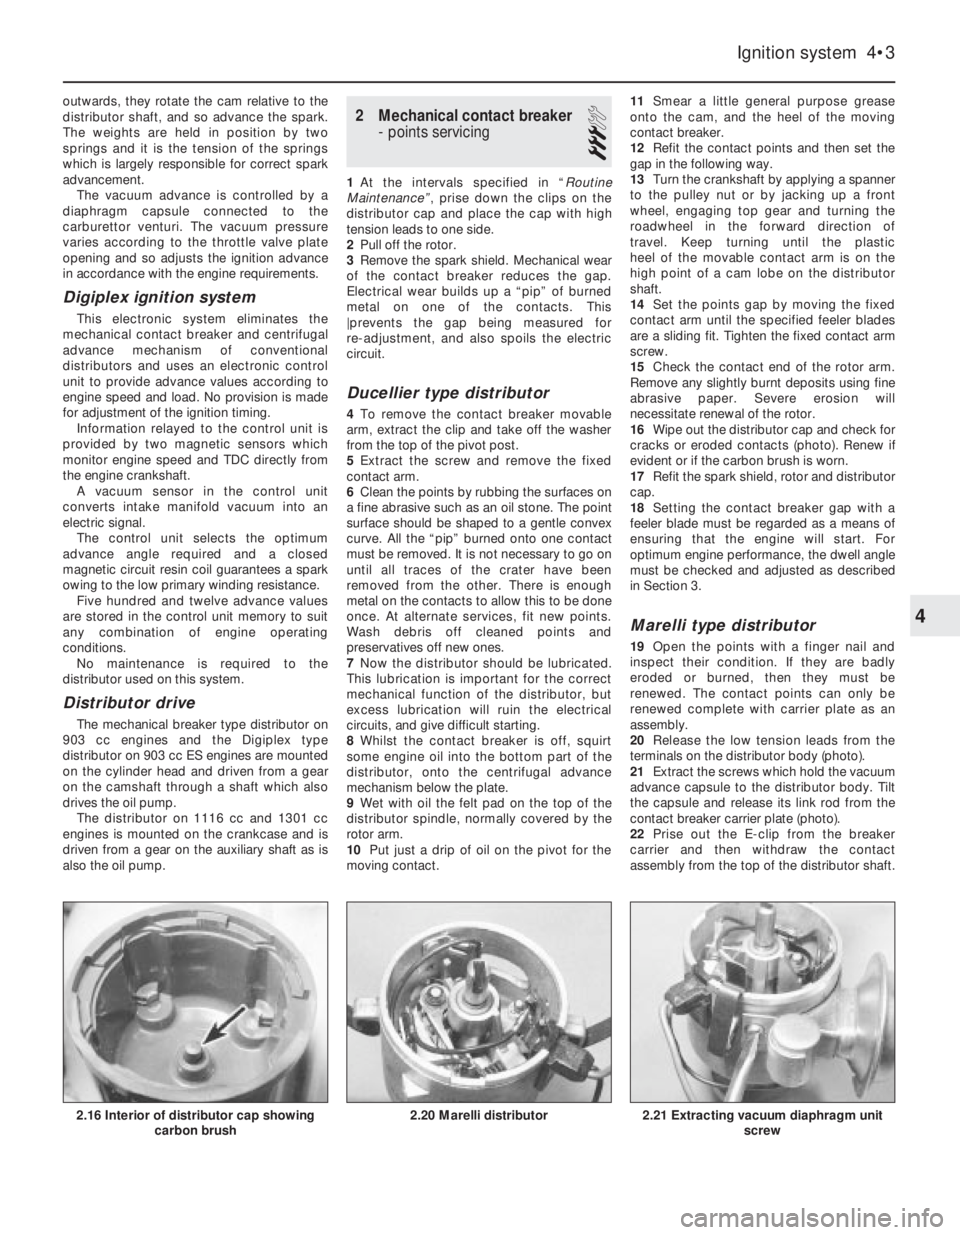
cracks or eroded contacts (photo). Renew if
evident or if the carbon brush is worn.
17Refit the spark shield, rotor and distributor
cap.
18Setting the contact breaker gap with a
feeler blade must be regarded as a means of
ensuring that the engine will start. For
optimum engine performance, the dwell angle
must be checked and adjusted as described
in Section 3.
Marelli type distributor
19Open the points with a finger nail and
inspect their condition. If they are badly
eroded or burned, then they must be
renewed. The contact points can only be
renewed complete with carrier plate as an
assembly.
20Release the low tension leads from the
terminals on the distributor body (photo).
21Extract the screws which hold the vacuum
advance capsule to the distributor body. Tilt
the capsule and release its link rod from the
contact breaker carrier plate (photo).
22Prise out the E-clip from the breaker
carrier and then withdraw the contact
assembly from the top of the distributor shaft.
Ignition system 4•3
2.21 Extracting vacuum diaphragm unit
screw2.20 Marelli distributor2.16 Interior of distributor cap showing
carbon brush
4
Page 82 of 303
3.4 Removing the caliper unit
1 General description
The braking system is of four wheel
hydraulic type with discs on the front wheels
and drums on the rear.The hydraulic system is of dual-circuit type
and incorporates a pressure regulator valve to
limit pressure to the rear brakes during heavy
braking to prevent rear wheel lock up.
A vacuum servo unit is fitted to some
models.
The handbrake is mechanically operated on
the rear wheels.
2 Maintenance
1
1At the weekly service check, inspect the
fluid level in the master cylinder reservoir.
Topping up should only be required at very
infrequent intervals and should only be
necessary owing to the need for extra fluid in
the hydraulic system caused by wear of the
friction material of the disc pads and shoe
linings.
2The need for frequent or regular topping up
will be due to a leak in the system, probably
from a hydraulic cylinder seal or a flexible
hose. Correct the problem immediately.
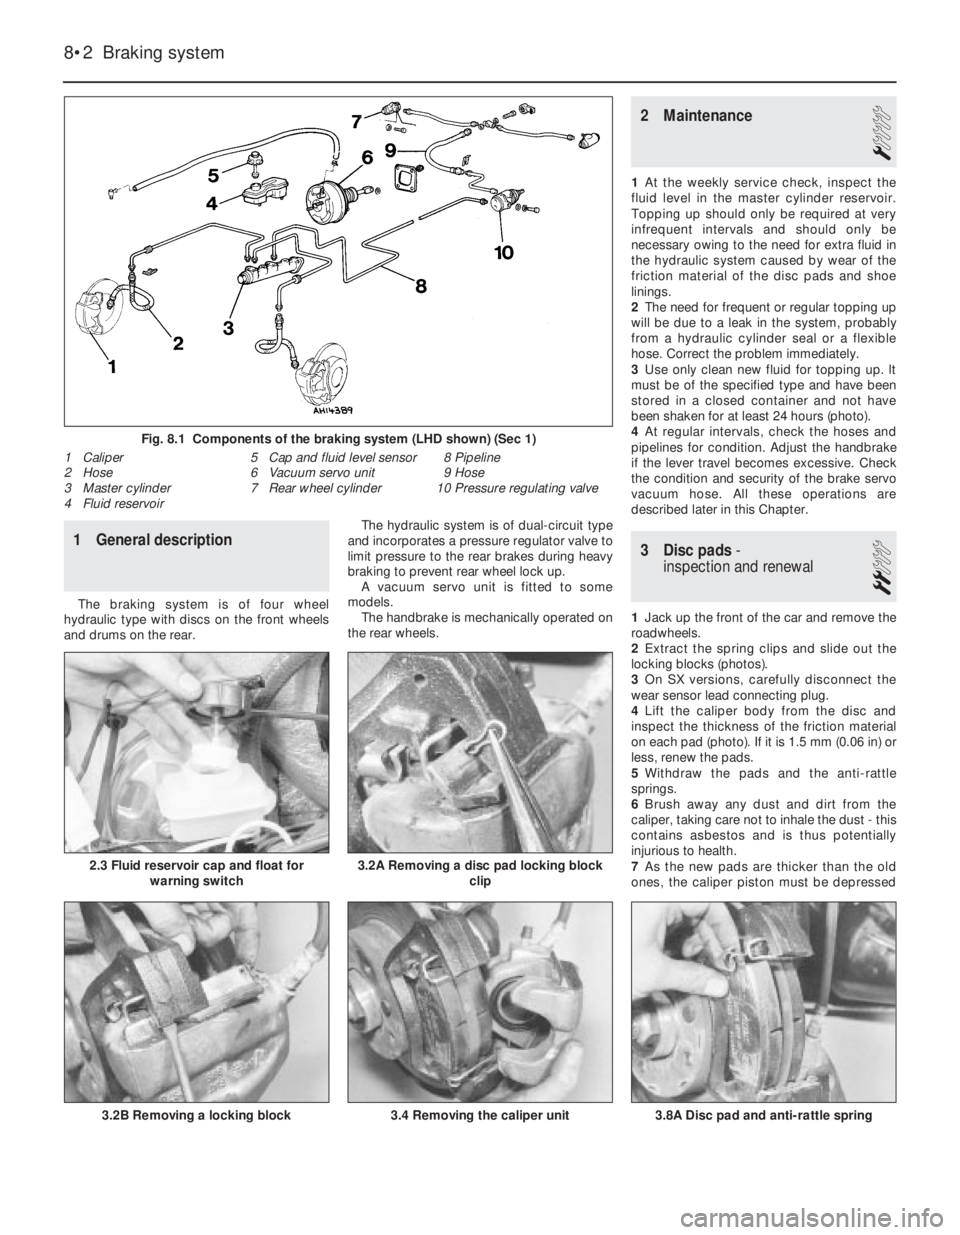
3Use only clean new fluid for topping up. lt
must be of the specified type and have been
stored in a closed container and not have
been shaken for at least 24 hours (photo).
4At regular intervals, check the hoses and
pipelines for condition. Adjust the handbrake
if the lever travel becomes excessive. Check
the condition and security of the brake servo
vacuum hose. All these operations are
described later in this Chapter.
3 Disc pads-
inspection and renewal
2
1Jack up the front of the car and remove the
roadwheels.
2Extract the spring clips and slide out the
locking blocks (photos).
3On SX versions, carefully disconnect the
wear sensor lead connecting plug.
4Lift the caliper body from the disc and
inspect the thickness of the friction material
on each pad (photo). If it is 1.5 mm (0.06 in) or
less, renew the pads.
5Withdraw the pads and the anti-rattle
springs.
6Brush away any dust and dirt from the
caliper, taking care not to inhale the dust - this
contains asbestos and is thus potentially
injurious to health.
7As the new pads are thicker than the old
ones, the caliper piston must be depressed
8•2 Braking system
3.8A Disc pad and anti-rattle spring
Fig. 8.1 Components of the braking system (LHD shown) (Sec 1)
1 Caliper
2 Hose
3 Master cylinder
4 Fluid reservoir5 Cap and fluid level sensor
6 Vacuum servo unit
7 Rear wheel cylinder8 Pipeline
9 Hose
10 Pressure regulating valve
3.2B Removing a locking block
3.2A Removing a disc pad locking block
clip2.3 Fluid reservoir cap and float for
warning switch
Page 143 of 303
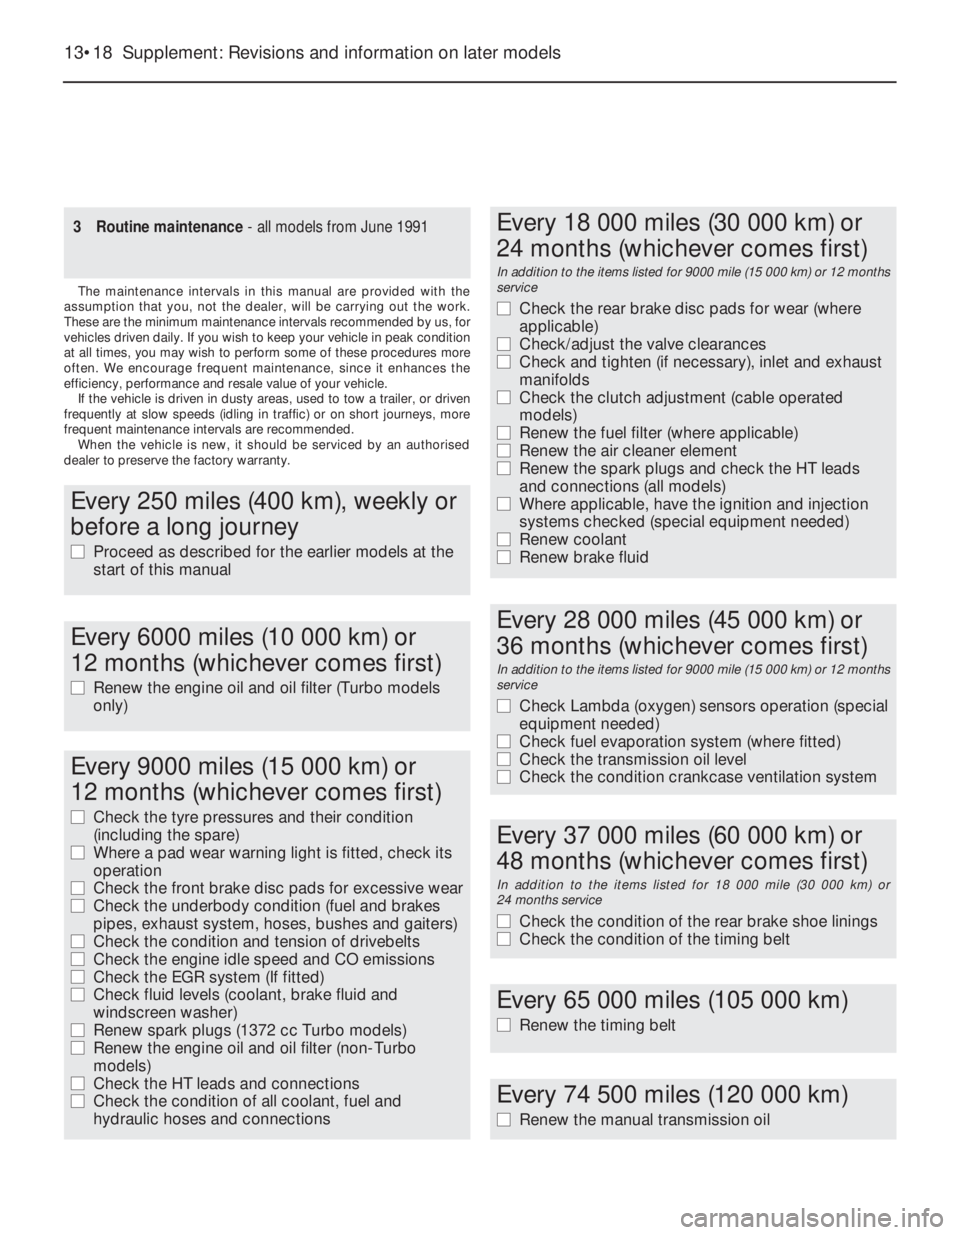
13•18 Supplement: Revisions and information on later models
Every 9000 miles (15 000 km) or
12 months (whichever comes first)
m mCheck the tyre pressures and their condition
(including the spare)
m mWhere a pad wear warning light is fitted, check its
operation
m mCheck the front brake disc pads for excessive wear
m mCheck the underbody condition (fuel and brakes
pipes, exhaust system, hoses, bushes and gaiters)
m mCheck the condition and tension of drivebelts
m mCheck the engine idle speed and CO emissions
m mCheck the EGR system (If fitted)
m mCheck fluid levels (coolant, brake fluid and
windscreen washer)
m mRenew spark plugs (1372 cc Turbo models)
m mRenew the engine oil and oil filter (non-Turbo
models)
m mCheck the HT leads and connections
m mCheck the condition of all coolant, fuel and
hydraulic hoses and connections
Every 18 000 miles (30 000 km) or
24 months (whichever comes first)
In addition to the items listed for 9000 mile (15 000 km) or 12 months
service
m mCheck the rear brake disc pads for wear (where
applicable)
m mCheck/adjust the valve clearances
m mCheck and tighten (if necessary), inlet and exhaust
manifolds
m mCheck the clutch adjustment (cable operated
models)
m mRenew the fuel filter (where applicable)
m mRenew the air cleaner element
m mRenew the spark plugs and check the HT leads
and connections (all models)
m mWhere applicable, have the ignition and injection
systems checked (special equipment needed)
m mRenew coolant
m mRenew brake fluid
Every 28 000 miles (45 000 km) or
36 months (whichever comes first)
In addition to the items listed for 9000 mile (15 000 km) or 12 months
service
m mCheck Lambda (oxygen) sensors operation (special
equipment needed)
m mCheck fuel evaporation system (where fitted)
m mCheck the transmission oil level
m mCheck the condition crankcase ventilation system
Every 37 000 miles (60 000 km) or
48 months (whichever comes first)
In addition to the items listed for 18 000 mile (30 000 km) or
24 months service
m mCheck the condition of the rear brake shoe linings
m mCheck the condition of the timing belt
Every 65 000 miles (105 000 km)
m
mRenew the timing belt
Every 74 500 miles (120 000 km)
m
mRenew the manual transmission oil
Every 250 miles (400 km), weekly or
before a long journey
m mProceed as described for the earlier models at the
start of this manual
Every 6000 miles (10 000 km) or
12 months (whichever comes first)
m mRenew the engine oil and oil filter (Turbo models
only)
3 Routine maintenance- all models from June 1991
The maintenance intervals in this manual are provided with the
assumption that you, not the dealer, will be carrying out the work.
These are the minimum maintenance intervals recommended by us, for
vehicles driven daily. If you wish to keep your vehicle in peak condition
at all times, you may wish to perform some of these procedures more
often. We encourage frequent maintenance, since it enhances the
efficiency, performance and resale value of your vehicle.
If the vehicle is driven in dusty areas, used to tow a trailer, or driven
frequently at slow speeds (idling in traffic) or on short journeys, more
frequent maintenance intervals are recommended.
When the vehicle is new, it should be serviced by an authorised
dealer to preserve the factory warranty.
Page 183 of 303
35Clean the mating faces of the thermostat
cover and cylinder head, and use a new
gasket when refitting the cover.
36Refill the cooling system as described
earlier in this Section.
Coolant pump -
removal and refittingÁ
Note: A new coolant pump gasket must be
used on refitting. If the pump is found to be
worn it must be renewed as a complete unit as
dismantling and repair is not possible.
37Disconnect the battery negative lead.
38Drain the cooling system as described
earlier in this Section.
39Remove the coolant/alternator drivebelt
as described in the next sub-Section.
40Unscrew the four coolant pump securing
bolts, noting that two of the bolts also secure
the alternator adjuster bracket, and withdraw
the pump from the housing (photo). Recover
the gasket.
41Refitting is a reversal of removal, bearing
in mind the following points.
42Use a new gasket between the pump and
the housing.
43Refit and tension the coolant
pump/alternator drivebelt as described in the
next sub-Section.
44On completion, refill the cooling system
as described earlier in this Section.
Coolant pump/alternator
drivebelt - checking,
renewal and tensioning
Á
45At the intervals specified in Section 3 or
“Routine maintenance” at the beginning of
this manual (as applicable), the drivebelt
should be checked and if necessary
re-tensioned.
46Access to the drivebelt is made from the
underside of the car on the right-hand side.
Loosen off the front right-hand roadwheel
retaining bolts, then raise and support the car
on axle stands at the front. Remove the front
roadwheel on the right-hand side.
47Remove the underwing shield from the
right-hand wheel arch by drifting the
compression pins out from the retaining
clips. Prise free the clips and remove the
shield.
48Additional, though somewhat restricted,
access can be obtained from above by
removing the air cleaner unit on the non-Turbo
ie-engine (photo).
49Check the full length of the drivebelt for
cracks and deterioration. It will be necessary
to turn the engine in order to check the
portions of the drivebelt in contact with the
pulleys. If a drivebelt is unserviceable, renew it
as follows (photo).
50Loosen the alternator mounting and
adjuster nuts and bolts and pivot the
alternator towards the cylinder block.51Slip the drivebelt from the alternator,
coolant pump and crankshaft pulleys.
52Fit the new drivebelt around the pulleys,
then lever the alternator away from the
cylinder block until the specified belt tension
is achieved. Lever the alternator using a
wooden or plastic lever at the pulley end to
prevent damage. It is helpful to partially
tighten the adjuster nut before tensioning the
drivebelt (photo).
53When the specified tension has been
achieved, tighten the mounting and adjuster
nuts and bolts (photo).
PART D: HEATER UNIT- LATER
MODELS
Heater unit -
removal and refitting
Á
1The heater unit is removed complete with
the facia/control panel. Commence by
draining the cooling system as described
previously in this Section.
2Disconnect the battery negative lead.
3Refer to Section 15 of this Chapter for
details and remove the ashtray/cigar lighter
and the auxiliary control panel.
4Undo the upper screw retaining the heater
unit to the facia (see Fig. 13.31).
5Remove the radio from the central facia.
6Undo the retaining screw on each side at
the front of the gear lever console. Prise free
13•58 Supplement: Revisions and information on later models
Fig. 13.31 Removing the heater unit-to-
facia upper retaining screw (Sec 8D)8C.53 Tightening the alternator adjuster
nut8C.52 Fitting a new coolant
pump/alternator drivebelt around the
pulleys
8C.49 Alternator/water pump drivebelt and
tensioner viewed from the right-hand
wheel arch8C.48 Top side view of water pump,
alternator and drivebelt8C.40 Coolant pump/alternator bracket
bolt removal
Page 202 of 303
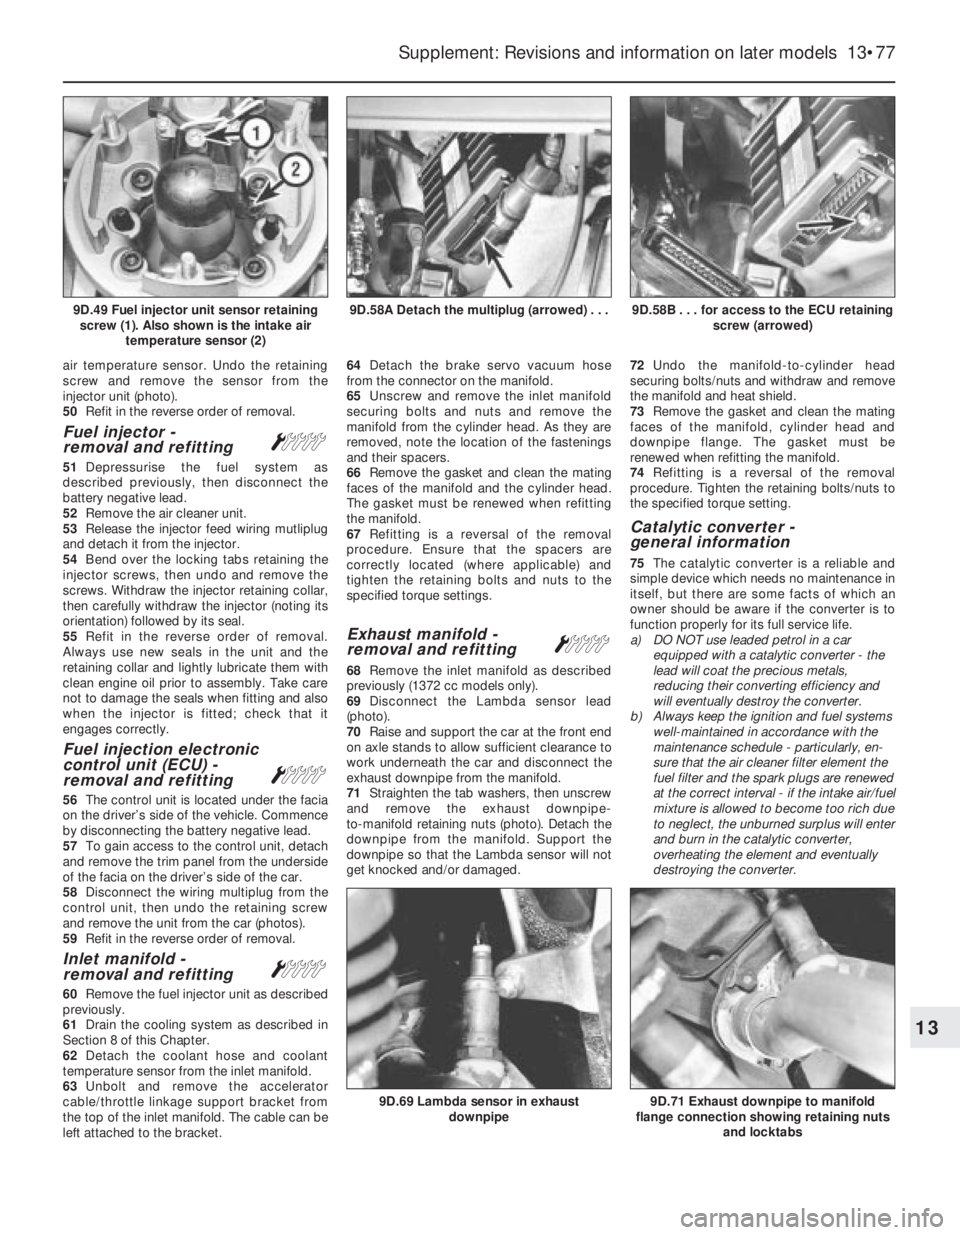
air temperature sensor. Undo the retaining
screw and remove the sensor from the
injector unit (photo).
50Refit in the reverse order of removal.
Fuel injector -
removal and refittingÁ
51Depressurise the fuel system as
described previously, then disconnect the
battery negative lead.
52Remove the air cleaner unit.
53Release the injector feed wiring mutliplug
and detach it from the injector.
54Bend over the locking tabs retaining the
injector screws, then undo and remove the
screws. Withdraw the injector retaining collar,
then carefully withdraw the injector (noting its
orientation) followed by its seal.
55Refit in the reverse order of removal.
Always use new seals in the unit and the
retaining collar and lightly lubricate them with
clean engine oil prior to assembly. Take care
not to damage the seals when fitting and also
when the injector is fitted; check that it
engages correctly.
Fuel injection electronic
control unit (ECU) -
removal and refitting
Á
56The control unit is located under the facia
on the driver’s side of the vehicle. Commence
by disconnecting the battery negative lead.
57To gain access to the control unit, detach
and remove the trim panel from the underside
of the facia on the driver’s side of the car.
58Disconnect the wiring multiplug from the
control unit, then undo the retaining screw
and remove the unit from the car (photos).
59Refit in the reverse order of removal.
Inlet manifold -
removal and refittingÁ
60Remove the fuel injector unit as described
previously.
61Drain the cooling system as described in
Section 8 of this Chapter.
62Detach the coolant hose and coolant
temperature sensor from the inlet manifold.
63Unbolt and remove the accelerator
cable/throttle linkage support bracket from
the top of the inlet manifold. The cable can be
left attached to the bracket.64Detach the brake servo vacuum hose
from the connector on the manifold.
65Unscrew and remove the inlet manifold
securing bolts and nuts and remove the
manifold from the cylinder head. As they are
removed, note the location of the fastenings
and their spacers.
66Remove the gasket and clean the mating
faces of the manifold and the cylinder head.
The gasket must be renewed when refitting
the manifold.
67Refitting is a reversal of the removal
procedure. Ensure that the spacers are
correctly located (where applicable) and
tighten the retaining bolts and nuts to the
specified torque settings.
Exhaust manifold -
removal and refittingÁ
68Remove the inlet manifold as described
previously (1372 cc models only).
69Disconnect the Lambda sensor lead
(photo).
70Raise and support the car at the front end
on axle stands to allow sufficient clearance to
work underneath the car and disconnect the
exhaust downpipe from the manifold.
71Straighten the tab washers, then unscrew
and remove the exhaust downpipe-
to-manifold retaining nuts (photo). Detach the
downpipe from the manifold. Support the
downpipe so that the Lambda sensor will not
get knocked and/or damaged.72Undo the manifold-to-cylinder head
securing bolts/nuts and withdraw and remove
the manifold and heat shield.
73Remove the gasket and clean the mating
faces of the manifold, cylinder head and
downpipe flange. The gasket must be
renewed when refitting the manifold.
74Refitting is a reversal of the removal
procedure. Tighten the retaining bolts/nuts to
the specified torque setting.
Catalytic converter -
general information
75The catalytic converter is a reliable and
simple device which needs no maintenance in
itself, but there are some facts of which an
owner should be aware if the converter is to
function properly for its full service life.
a) DO NOT use leaded petrol in a car
equipped with a catalytic converter - the
lead will coat the precious metals,
reducing their converting efficiency and
will eventually destroy the converter.
b) Always keep the ignition and fuel systems
well-maintained in accordance with the
maintenance schedule - particularly, en-
sure that the air cleaner filter element the
fuel filter and the spark plugs are renewed
at the correct interval - if the intake air/fuel
mixture is allowed to become too rich due
to neglect, the unburned surplus will enter
and burn in the catalytic converter,
overheating the element and eventually
destroying the converter.
Supplement: Revisions and information on later models 13•77
9D.58B . . . for access to the ECU retaining
screw (arrowed)9D.58A Detach the multiplug (arrowed) . . .9D.49 Fuel injector unit sensor retaining
screw (1). Also shown is the intake air
temperature sensor (2)
9D.71 Exhaust downpipe to manifold
flange connection showing retaining nuts
and locktabs9D.69 Lambda sensor in exhaust
downpipe
13
Page 203 of 303
c) If the engine develops a misfire, do not
drive the car at all (or at least as little as
possible) until the fault is cured - the
misfire will allow unburned fuel to enter
the converter, which will result in its
overheating, as noted above.
d) DO NOT push- or tow-start the car - this
will soak the catalytic converter in
unburned fuel, causing it to overheat
when the engine does start - see b)
above.
e) DO NOT switch off the ignition at high
engine speeds - if the ignition is switched
off at anything above idle speed,
unburned fuel will enter the (very hot)
catalytic converter, with the possible risk
of its igniting on the element and
damaging the converter.
f) DO NOT use fuel or engine oil additives -
these may contain substances harmful to
the catalytic converter.
g) DO NOT continue to use the car if the
engine burns oil to the extent of leaving a
visible trail of blue smoke - the unburned
carbon deposits will clog the converter
passages and reduce its efficiency; in
severe cases the element will overheat.
h) Remember that the catalytic converter
operates at very high temperatures and
the casing will become hot enough to
ignite combustible materials which brush
against it. DO NOT, therefore, park the car
in dry undergrowth, over long grass or
piles of dead leaves.
i) Remember that the catalytic converter is
FRAGILE - do not strike it with tools
during servicing work, take great care
when working on the exhaust system,
ensure that the converter is well clear of
any jacks or other lifting gear used to raise
the car and do not drive the car over
rough ground road humps, etc., in such a
way as to ground the exhaust system.
j) In some cases, particularly when the car is
new and/or is used for stop/start driving, a
sulphurous smell (like that of rotten eggs)
may be noticed from the exhaust. This is
common to many catalytic
converter-equipped cars and seems to be
due to the small amount of sulphur found
in some petrols reacting with hydrogen in
the exhaust to produce hydrogen sulphide
(H
2S) gas; while this gas is toxic, it is not
produced in sufficient amounts to be a
problem. Once the car has covered a few
thousand miles the problem should
disappear - in the meanwhile a change of
driving style or of the brand of petrol used
may effect a solution.
k) The catalytic converter, used on a
well-maintained and well driven car,
should last for at least 50 000 miles
(80 000 km) or five years - from this point
on, careful checks should be made at all
specified service intervals on the CO level
to ensure that the converter is still
operating efficiently - if the converter is no
longer effective it must be renewed.
Fuel evaporation control system
- general
76As mentioned earlier, fuel evaporation is
contained within the system. In high outdoor
temperatures, when the vehicle is parked for a
period of time, the fuel in the tank evaporates,
building up pressure. When the pressure builds
up to a predetermined level a vent valve opens
to allow the vapours to pass on to and absorbed
by a carbon filter. However, if extreme pressure
or vacuum should build up, a two way safety
valve opens to allow external venting.
77If the safety valve needs replacing, note
that it must be fitted correctly. The black end
should be connected to the fuel tank and the
blue to the carbon filter.
78The vapours in the carbon filter are
flushed by warm air passing through the filter
on to a ECU controlled vapour cut-off
solenoid.
79The cut-off solenoid is closed when
starting the engine and opens to allow
vapours to be drawn into the inlet manifold,
through a second solenoid. If the cut-off
solenoid needs replacing ensure that the
black arrow on the casing is pointing towards
the inlet manifold.
80The second solenoid, known as an Elbi
solenoid, is closed when the engine is turned
off, thus preventing engine run-on. The side
facing connection is for the inlet manifold
pipe.
PART E:
BOSCH L3.1/2 JETRONIC
FUEL INJECTION SYSTEMS
Warning: Refer to the beginning
of this Section before starting
any work.
Description
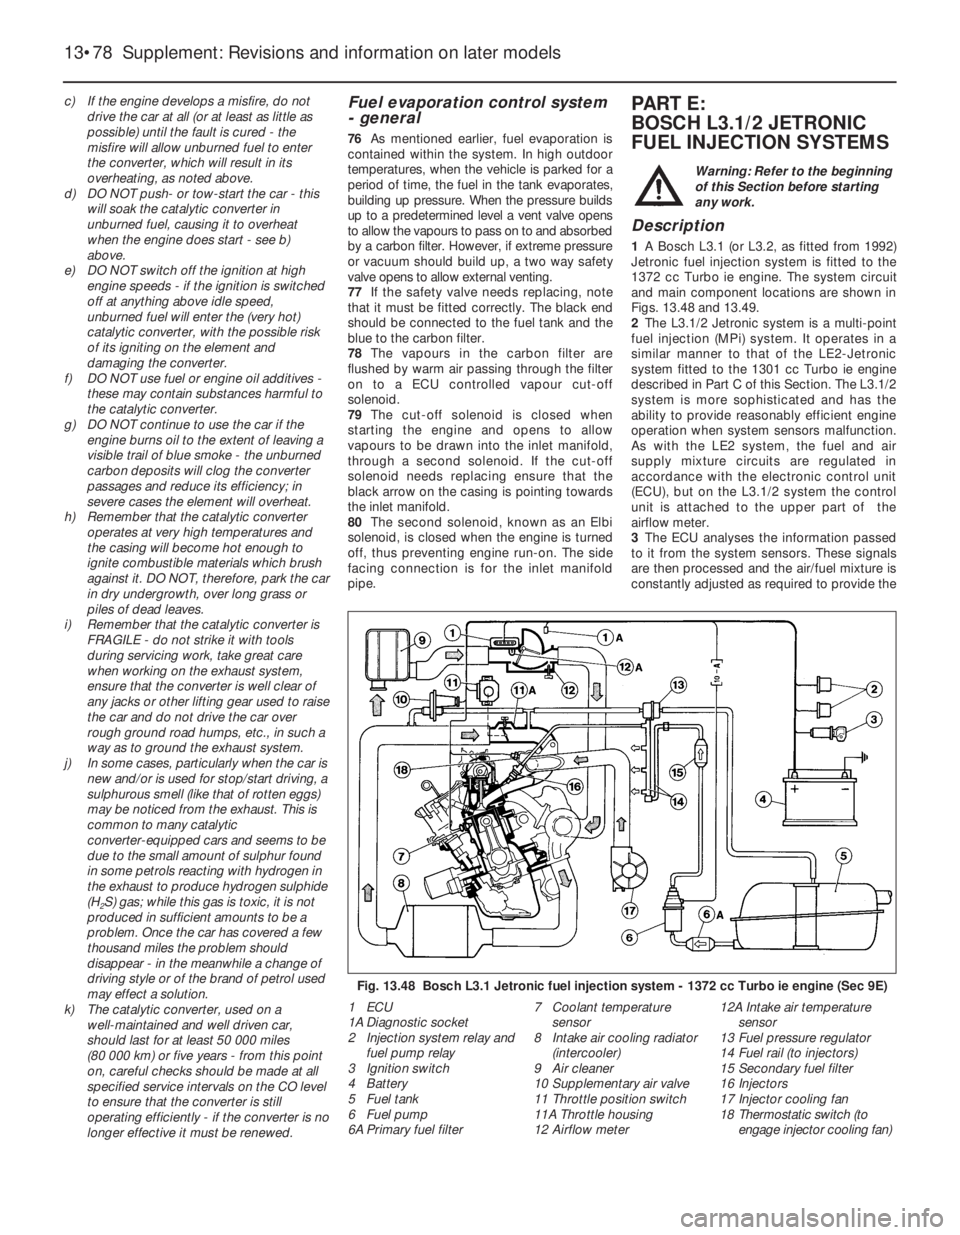
1A Bosch L3.1 (or L3.2, as fitted from 1992)
Jetronic fuel injection system is fitted to the
1372 cc Turbo ie engine. The system circuit
and main component locations are shown in
Figs. 13.48 and 13.49.
2The L3.1/2 Jetronic system is a multi-point
fuel injection (MPi) system. It operates in a
similar manner to that of the LE2-Jetronic
system fitted to the 1301 cc Turbo ie engine
described in Part C of this Section. The L3.1/2
system is more sophisticated and has the
ability to provide reasonably efficient engine
operation when system sensors malfunction.
As with the LE2 system, the fuel and air
supply mixture circuits are regulated in
accordance with the electronic control unit
(ECU), but on the L3.1/2 system the control
unit is attached to the upper part of the
airflow meter.
3The ECU analyses the information passed
to it from the system sensors. These signals
are then processed and the air/fuel mixture is
constantly adjusted as required to provide the
13•78 Supplement: Revisions and information on later models
Fig. 13.48 Bosch L3.1 Jetronic fuel injection system - 1372 cc Turbo ie engine (Sec 9E)
1 ECU
1A Diagnostic socket
2 Injection system relay and
fuel pump relay
3 Ignition switch
4 Battery
5 Fuel tank
6 Fuel pump
6A Primary fuel filter7 Coolant temperature
sensor
8 Intake air cooling radiator
(intercooler)
9 Air cleaner
10 Supplementary air valve
11 Throttle position switch
11A Throttle housing
12 Airflow meter12A Intake air temperature
sensor
13 Fuel pressure regulator
14 Fuel rail (to injectors)
15 Secondary fuel filter
16 Injectors
17 Injector cooling fan
18 Thermostatic switch (to
engage injector cooling fan)