ECO mode FORD B MAX 2012 1.G User Guide
[x] Cancel search | Manufacturer: FORD, Model Year: 2012, Model line: B MAX, Model: FORD B MAX 2012 1.GPages: 256, PDF Size: 19.67 MB
Page 178 of 256
Downloaded from www.Manualslib.com manuals search engine 1.Press the MENU button and selectAUDIO or AUDIO SETTINGS.
2.Select AVC LEVEL or ADAPTIVEVOL.
3.Use the left or right arrow button toadjust the setting.
4.Press the OK button to confirm yourselection.
5.Press the MENU button to return.
News Broadcasts
Your audio unit may interrupt normalreception to broadcast news bulletins fromstations on the FM waveband, radio datasystem or other enhanced network linkedstations.
The display will indicate there is anincoming announcement, during newsbroadcasts. When the audio unit interruptsfor a news broadcast the preset volumelevel will be the same as trafficannouncements.
1.Press the MENU button.
2.Select AUDIO or AUDIO SETTINGS.
3.Scroll to NEWS and turn on or off withthe OK button.
4.Press the MENU button to return.
Alternative Frequencies
The majority of programs that broadcaston the FM waveband have a programidentification code, it can be recognised byaudio units.
When your vehicle moves from onetransmission area to another with thealternative frequencies tuning switchedon, this function will search for thestrongest station signal.
Under certain conditions, alternativefrequencies tuning may temporarily disruptnormal reception.
When selected, the unit continuallyevaluates signal strength and if a bettersignal becomes available, the unit willswitch to that alternative. It mutes whileit checks a list of alternative frequenciesand if necessary, it will search once acrossthe selected waveband for a genuinealternative frequency.
It will restore radio reception when it findsone or if one is not found, the unit willreturn to the original stored frequency.
When selected,AF will be shown in thedisplay.
1.Press the MENU button.
2.Select AUDIO or AUDIO SETTINGS.
3.Scroll to ALTERNAT FREQ orALTERNATIVE FREQ and turn on oroff with the OK button.
4.Press the MENU button to return.
Regional Mode
Regional mode controls the behavior ofalternative frequencies switching betweenregionally related networks of a parentbroadcaster. A broadcaster may run a fairlylarge network across a large part of thecountry. At various times of the day thislarge network may be broken down into anumber of smaller regional networks,typically centred on major towns or cities.When the network is not split into regionalvariants, the whole network caries thesame programming.
Regional mode ON: This prevents randomalternative frequency switches whenneighbouring regional networks are notcarrying the same programming.
Regional mode OFF: This allows a largercoverage area if neighbouring regionalnetworks are carrying the sameprogramming, but can cause randomalternative frequency switches if they arenot.
1.Press the MENU button.
176Audio System
Page 182 of 256
Downloaded from www.Manualslib.com manuals search engine Note:When you drive to another part of thecountry, stations that broadcast onalternative frequencies, and are stored onpreset buttons, may be updated with thecorrect frequency and station name for thatarea.
Autostore Control
Note:This will store up to a maximum ofthe 10 strongest signals available, eitherfrom the AM or the FM waveband, andoverwrite the previously stored stations. Youcan also store stations manually in the sameway as other wavebands.
•Press the MENU button, select audiomode then press and hold the RADIObutton.
•When the search is complete, sound isrestored and the strongest signals arestored on the autostore presets.
Traffic Information Control
Many stations that broadcast on the FMwaveband have a TP code to signify thatthey carry traffic program information.
Turning Traffic Announcements On andOff
Before you can receive trafficannouncements, you must press either theTA or TRAFFIC button. A TA display willappear to show the feature is switched on.
If you are already tuned to a station thatbroadcasts traffic information,TP will alsobe displayed. Otherwise the unit will searchfor a traffic program.
When traffic information is broadcast, itwill automatically interrupt normal radioor CD playback and Trafficannouncement will appear in the display.
If a non-traffic station is selected orrecalled using a preset button, the audiounit will remain on that station unless TAor TRAFFIC is turned off, then on again.
Note:If traffic announcement is on and youselect a preset or manual tune to a nontraffic announcement station no trafficannouncement will be heard.
Note:When you are listening to a nontraffic announcement station and turntraffic announcement off and on again a TPseek will occur.
Traffic Announcement Volume
Traffic announcements interrupt normalbroadcasts at a preset minimum level thatis usually louder than normal listeningvolumes.
To adjust the preset volume:
•Use the volume control to make thenecessary adjustment during anincoming traffic announcementbroadcast. The display will show thelevel selected.
Ending Traffic Announcements
The audio unit will return to normaloperation at the end of each trafficannouncement. To end the announcementprematurely, press TA or TRAFFIC duringthe announcement.
Note:If you press TA or TRAFFIC at anyother time it will switch all announcementsoff.
Automatic Volume Control
When available, automatic volume controladjusts the volume level to compensatefor engine noise and road speed noise.
1.Press the MENU button and selectAUDIO or AUDIO SETTINGS.
2.Select AVC LEVEL or ADAPTIVEVOL.
3.Use the left or right arrow button toadjust the setting.
4.Press the OK button to confirm yourselection.
180Audio System
Page 183 of 256
Downloaded from www.Manualslib.com manuals search engine 5.Press the MENU button to return.
News Broadcasts
Your audio unit may interrupt normalreception to broadcast news bulletins fromstations on the FM waveband, radio datasystem or other enhanced network linkedstations.
The display will indicate there is anincoming announcement, during newsbroadcasts. When the audio unit interruptsfor a news broadcast the preset volumelevel will be the same as trafficannouncements.
1.Press the MENU button.
2.Select AUDIO or AUDIO SETTINGS.
3.Scroll to NEWS and turn on or off withthe OK button.
4.Press the MENU button to return.
Alternative Frequencies
The majority of programs that broadcaston the FM waveband have a programidentification code, it can be recognised byaudio units.
When your vehicle moves from onetransmission area to another with thealternative frequencies tuning switchedon, this function will search for thestrongest station signal.
Under certain conditions, alternativefrequencies tuning may temporarily disruptnormal reception.
When selected, the unit continuallyevaluates signal strength and, if a bettersignal becomes available, the unit willswitch to that alternative. It mutes whileit checks a list of alternative frequenciesand if necessary, it will search once acrossthe selected waveband for a genuinealternative frequency.
It will restore radio reception when it findsone or if one is not found, the unit willreturn to the original stored frequency.
When selected, AF will be shown in thedisplay.
1.Press the MENU button.
2.Select AUDIO or AUDIO SETTINGS.
3.Scroll to ALTERNAT FREQ. orALTERNATIVE FREQ. and turn on oroff with the OK button.
4.Press the MENU button to return.
Regional Mode
Regional mode controls the behaviour ofalternative frequencies switching betweenregionally related networks of a parentbroadcaster. A broadcaster may run a fairlylarge network across a large part of thecountry. At various times of the day thislarge network may be broken down into anumber of smaller regional networks,typically centred on major towns or cities.When the network is not split into regionalvariants, the whole network caries thesame programming.
Regional mode ON: This prevents randomalternative frequency switches whenneighbouring regional networks are notcarrying the same programming.
Regional mode OFF: This allows a largercoverage area if neighbouring regionalnetworks are carrying the sameprogramming, but can cause randomalternative frequency switches if they arenot.
1.Press the MENU button.
2.Select AUDIO or AUDIO SETTINGS.
3.Scroll to RDS REGIONAL and turn onor off with the OK button.
4.Press the MENU button to return.
181Audio System
Page 184 of 256
Downloaded from www.Manualslib.com manuals search engine AUDIO UNIT - VEHICLES WITH:
SONY AM/FM/CD
WARNING
Driving while distracted can result inloss of vehicle control, accident andinjury. We strongly recommend thatyou use extreme caution when using anydevice or feature that may take your focusoff the road. Your primary responsibility isthe safe operation of your vehicle. Werecommend against the use of anyhandheld device while driving andencourage the use of voice-operatedsystems when possible. Make sure you areaware of all applicable local laws that mayaffect the use of electronic devices whiledriving.
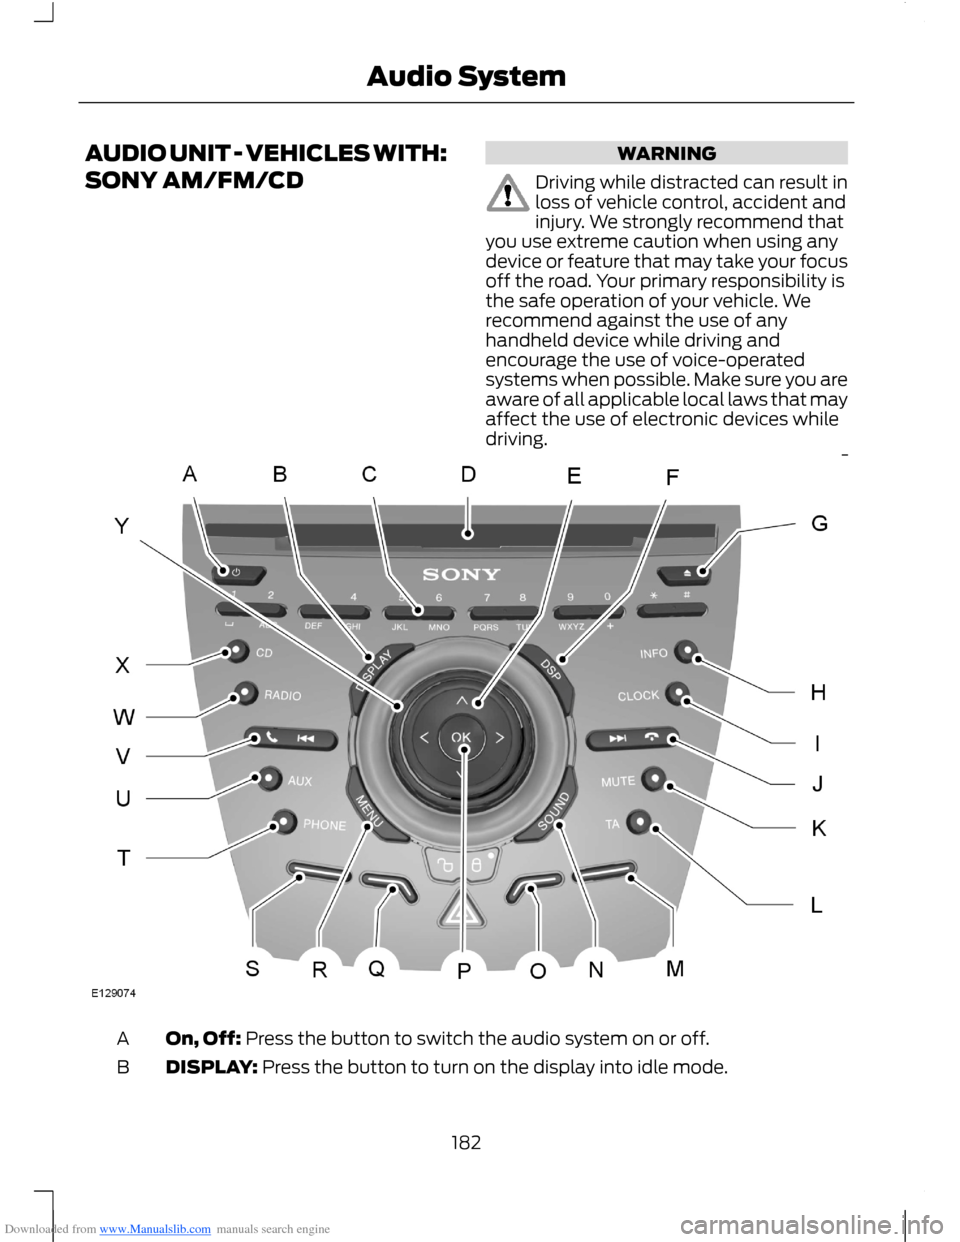
On, Off: Press the button to switch the audio system on or off.A
DISPLAY: Press the button to turn on the display into idle mode.B
182Audio System
Page 187 of 256
Downloaded from www.Manualslib.com manuals search engine 3.Press and hold one of the presetbuttons. A progress bar and messagewill appear. When the progress barcompletes the station has been stored.The audio unit will also mutemomentarily as confirmation.
You can repeat this on each waveband andfor each preset button.
Note:When you drive to another part of thecountry, stations that broadcast onalternative frequencies, and are stored onpreset buttons, may be updated with thecorrect frequency and station name for thatarea.
Autostore Control
Note:This will store up to a maximum ofthe 10 strongest signals available, eitherfrom the AM or the FM waveband, andoverwrite the previously stored stations. Youcan also store stations manually in the sameway as other wavebands.
Note:You must select either FM AST orAM AST to use this function.
•Press the MENU button, select audiomode then press and hold the RADIObutton.
•When the search is complete, sound isrestored and the strongest signals arestored on the autostore presets.
Traffic Information Control
Many stations that broadcast on the FMwaveband have a TP code to signify thatthey carry traffic program information.
Turning Traffic Announcements On andOff
Before you can receive trafficannouncements, you must press either theTA or TRAFFIC button. A TA display willappear to show the feature is switched on.
If you are already tuned to a station thatbroadcasts traffic information,TP will alsobe displayed. Otherwise the unit will searchfor a traffic program.
When traffic information is broadcast, itwill automatically interrupt normal radioor CD playback and Traffic announcementwill appear in the display.
If a non-traffic station is selected orrecalled using a preset button, the audiounit will remain on that station unless TAor TRAFFIC is turned off, then on again.
Note:If traffic announcement is on and youselect a preset or manual tune to a nontraffic announcement station no trafficannouncement will be heard.
Note:When you are listening to a nontraffic announcement station and turntraffic announcement off and on again a TPseek will occur.
Traffic Announcement Volume
Traffic announcements interrupt normalbroadcasts at a preset minimum level thatis usually louder than normal listeningvolumes.
To adjust the preset volume:
•Use the volume control to make thenecessary adjustment during anincoming traffic announcementbroadcast. The display will show thelevel selected.
Ending Traffic Announcements
The audio unit will return to normaloperation at the end of each trafficannouncement. To end the announcementprematurely, press TA or TRAFFIC duringthe announcement.
Note:If you press TA or TRAFFIC at anyother time it will switch all announcementsoff.
185Audio System
Page 189 of 256
Downloaded from www.Manualslib.com manuals search engine When selected, AF will be shown in thedisplay.
1.Press the MENU button.
2.Select AUDIO or AUDIO SETTINGS.
3.Scroll to ALTERNAT FREQ. orALTERNATIVE FREQ. and turn on oroff with the OK button.
4.Press the MENU button to return.
Regional Mode
Regional mode controls the behaviour ofalternative frequencies switching betweenregionally related networks of a parentbroadcaster. A broadcaster may run a fairlylarge network across a large part of thecountry. At various times of the day thislarge network may be broken down into anumber of smaller regional networks,typically centred on major towns or cities.When the network is not split into regionalvariants, the whole network caries thesame programming.
Regional mode ON: This prevents randomalternative frequency switches whenneighbouring regional networks are notcarrying the same programming.
Regional mode OFF: This allows a largercoverage area if neighbouring regionalnetworks are carrying the sameprogramming, but can cause 'random'alternative frequency switches if they arenot.
1.Press the MENU button.
2.Select AUDIO or AUDIO SETTINGS.
3.Scroll to RDS REGIONAL and turn onor off with the OK button.
4.Press the MENU button to return.
AUDIO SYSTEM SECURITY
Each unit incorporates a unique code thatis linked to the vehicle identificationnumber. The system will automaticallycheck that the audio unit and vehiclematch before allowing operation.
If a security code message appears, see anauthorised dealer.
COMPACT DISC PLAYER -
VEHICLES WITH: AM/FM/CD
Compact Disc Playback
Note:During playback, the display indicatesthe disc, track and time that has elapsedsince the start of the track.
During radio reception, press the CD buttononce to start CD playback.
After a disc is loaded, playback will startimmediately.
Track Selection
•Press the seek down button once toreplay the current track. If pressedwithin two seconds of the start of atrack, the previous track will beselected.
•Press the up or down arrow buttons toselect the required track, then pressthe OK button.
Fast Forward and Reverse
Press and hold the seek down or upbuttons to search backward or forwardwithin the tracks on the disc.
Shuffle and Random
Random track playback, also known asshuffle, plays all tracks on the CD inrandom order.
187Audio System
Page 190 of 256
Downloaded from www.Manualslib.com manuals search engine 1.Press the MENU button and select CDMODE.
2.Select SHUFFLE. This enables thefunction to be switched on or off.
When an MP3 CD is playing, optionsinclude SHUFFLE for the whole CD, or toplay all the tracks in the folder in a randomorder.
Repeat Compact Disc Tracks
1.Press the MENU button and select CDMODE.
2.Select REPEAT. This enables thefunction to be switched on or off. Thetrack will replay once ended.
When an MP3 or WMA CD is playing,options include REPEAT for the track, orto repeat all the tracks in the folder.
Compact Disc Track Scanning
The SCAN function allows you to previeweach track for approximately five seconds.
Various scan modes are possible,according to the type of CD currentlyplaying.
1.Press the MENU button and select CDMODE.
2.Select SCAN. This enables thefunction to be switched on or off.
Note:When an MP3 or WMA CD is playing,options include SCAN for the CD or just thetracks in the folder.
3.Press the OK button to stop the scanmode.
MP3 and WMA File Playback
MP3 (MPEG 1 Audio Layer-3) or WMA(Windows media audio) is a standardtechnology and format for compressingaudio data. This allows a more efficientuse of the media.
You can play MP3 files recorded onCD-ROM, CD-R and CD-RW formats. Thedisc must be in the ISO 9660 level 1 or level2 format, or Joliet or Romeo in theexpansion format. You can also use a discrecorded in multi session.
ISO 9660 Format
This is the most common internationalstandard for the logical format of files andfolders on a CD-ROM.
There are several specification levels. InLevel 1, file names must be in the 8.3format (no more than eight characters inthe name, no more than three charactersin the extension .MP3 and . WMA) and incapital letters.
Folder names can be no longer than eightcharacters. There can be no more thaneight folder levels (trees). Level 2specifications allow file names up to 31characters long.
Each folder can have up to eight trees.
For Joliet or Romeo in the expansionformat, consider these restrictions whenconfiguring your CD writing software.
Multi Session
This is a recording method that enablesadding of data using the track-at-oncemethod.
Conventional CDs begin at a CD controlarea called the lead-in and end at an areacalled lead-out. A multi session CD is a CDhaving multiple sessions, with eachsegment from lead-in to lead-out regardedas a single session.
CD-Extra: The format that records audio(audio CD data) as tracks on session 1, andrecords data as tracks on session 2.
Mixed CD: In this format, data is recordedas track 1 and audio (audio CD data) isrecorded as track 2.
188Audio System
Page 193 of 256
Downloaded from www.Manualslib.com manuals search engine Track Selection
•Press the seek down button once toreplay the current track. If pressedwithin two seconds of the start of atrack, the previous track will beselected.
•Press the up or down arrow buttons toselect the required track, then pressthe OK button.
The desired track number may be enteredusing the numeric keypad. Dial the requiredtrack number until complete (for example1 then 2 for track 12), or dial the numberand directly press OK.
Fast Forward and Reverse
Press and hold the seek down or upbuttons to search backward or forwardwithin the tracks on the disc.
Shuffle and Random
Random track playback, also known asshuffle, plays all tracks on the CD inrandom order.
Press function button 2.
Note:When an MP3 CD is playing, optionsinclude shuffle for the whole CD, or to playall the tracks in the folder in a random order.Repeat presses of function button 2 willtoggle these options.
Use the seek up or down button to selectthe next track to shuffle if required.
Repeat Compact Disc Tracks
Press function button 1.
When an MP3 or WMA CD is playing,options include REPEAT for the track, orto repeat all the tracks in the folder. Repeatpresses of function button 1 will togglethese options.
Compact Disc Track Scanning
1.Press function button 3.
Note:When an MP3 or WMA CD is playing,options include SCAN for the CD, or just thetracks in the folder. Repeat presses offunction button 3 will toggle these options.
2.Press function button 3 again to stopthe scan mode.
MP3 and WMA File Playback
MP3 (MPEG 1 Audio Layer-3) or WMA(Windows media audio) is a standardtechnology and format for compressingaudio data. This allows a more efficientuse of the media.
You can play MP3 files recorded onCD-ROM, CD-R and CD-RW formats. Thedisc must be in the ISO 9660 level 1 or level2 format, or Joliet or Romeo in theexpansion format. You can also use a discrecorded in multi session.
ISO 9660 Format
This is the most common internationalstandard for the logical format of files andfolders on a CD-ROM.
There are several specification levels. InLevel 1, file names must be in the 8.3format (no more than eight characters inthe name, no more than three charactersin the extension .MP3 and . WMA) and incapital letters.
Folder names can be no longer than eightcharacters. There can be no more thaneight folder levels (trees). Level 2specifications allow file names up to 31characters long.
Each folder can have up to eight trees.
For Joliet or Romeo in the expansionformat, consider these restrictions whenconfiguring your CD writing software.
191Audio System
Page 200 of 256
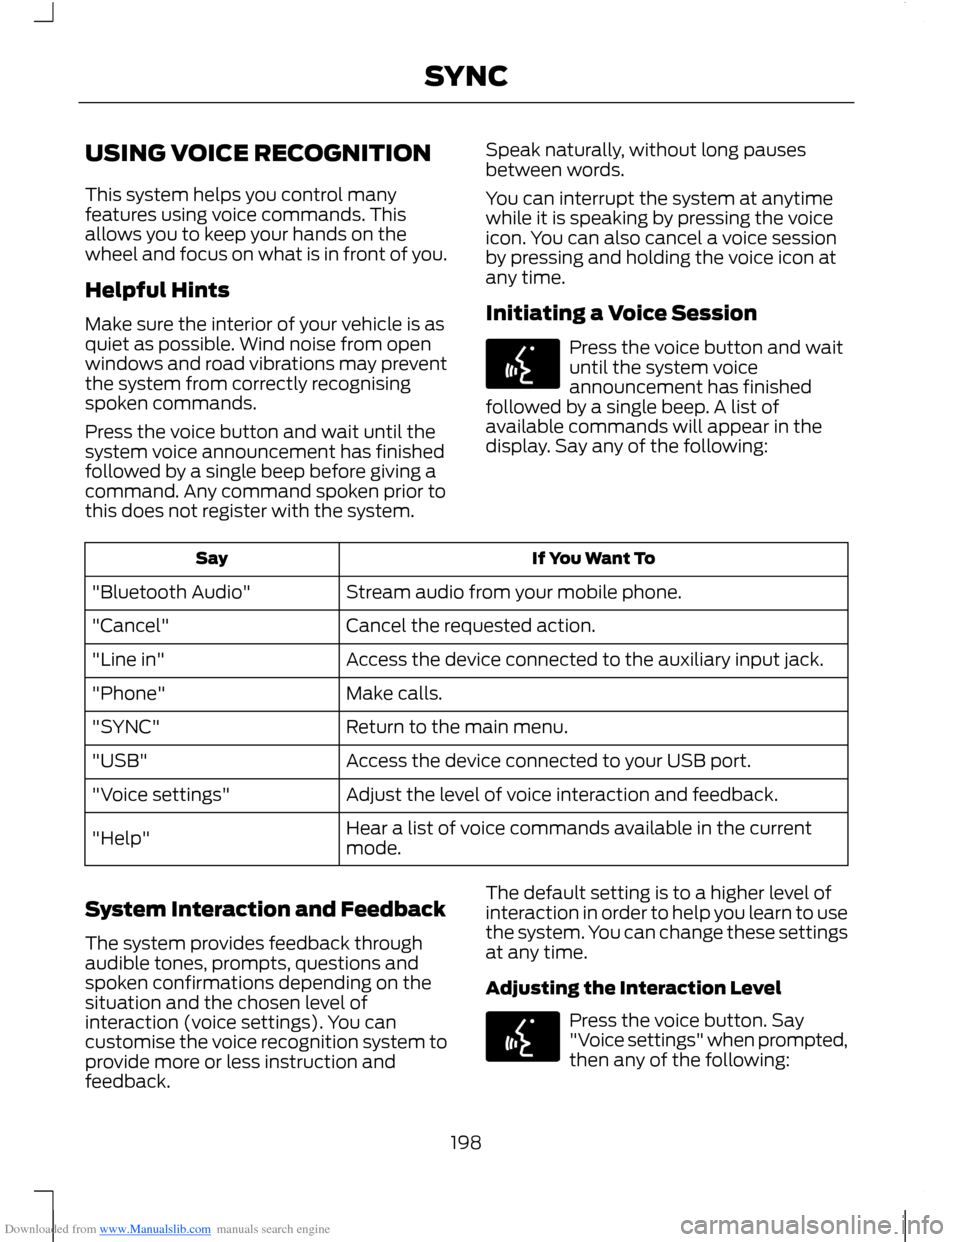
Downloaded from www.Manualslib.com manuals search engine USING VOICE RECOGNITION
This system helps you control manyfeatures using voice commands. Thisallows you to keep your hands on thewheel and focus on what is in front of you.
Helpful Hints
Make sure the interior of your vehicle is asquiet as possible. Wind noise from openwindows and road vibrations may preventthe system from correctly recognisingspoken commands.
Press the voice button and wait until thesystem voice announcement has finishedfollowed by a single beep before giving acommand. Any command spoken prior tothis does not register with the system.
Speak naturally, without long pausesbetween words.
You can interrupt the system at anytimewhile it is speaking by pressing the voiceicon. You can also cancel a voice sessionby pressing and holding the voice icon atany time.
Initiating a Voice Session
Press the voice button and waituntil the system voiceannouncement has finishedfollowed by a single beep. A list ofavailable commands will appear in thedisplay. Say any of the following:
If You Want ToSay
Stream audio from your mobile phone."Bluetooth Audio"
Cancel the requested action."Cancel"
Access the device connected to the auxiliary input jack."Line in"
Make calls."Phone"
Return to the main menu."SYNC"
Access the device connected to your USB port."USB"
Adjust the level of voice interaction and feedback."Voice settings"
Hear a list of voice commands available in the currentmode."Help"
System Interaction and Feedback
The system provides feedback throughaudible tones, prompts, questions andspoken confirmations depending on thesituation and the chosen level ofinteraction (voice settings). You cancustomise the voice recognition system toprovide more or less instruction andfeedback.
The default setting is to a higher level ofinteraction in order to help you learn to usethe system. You can change these settingsat any time.
Adjusting the Interaction Level
Press the voice button. Say"Voice settings" when prompted,then any of the following:
198SYNC
Page 201 of 256
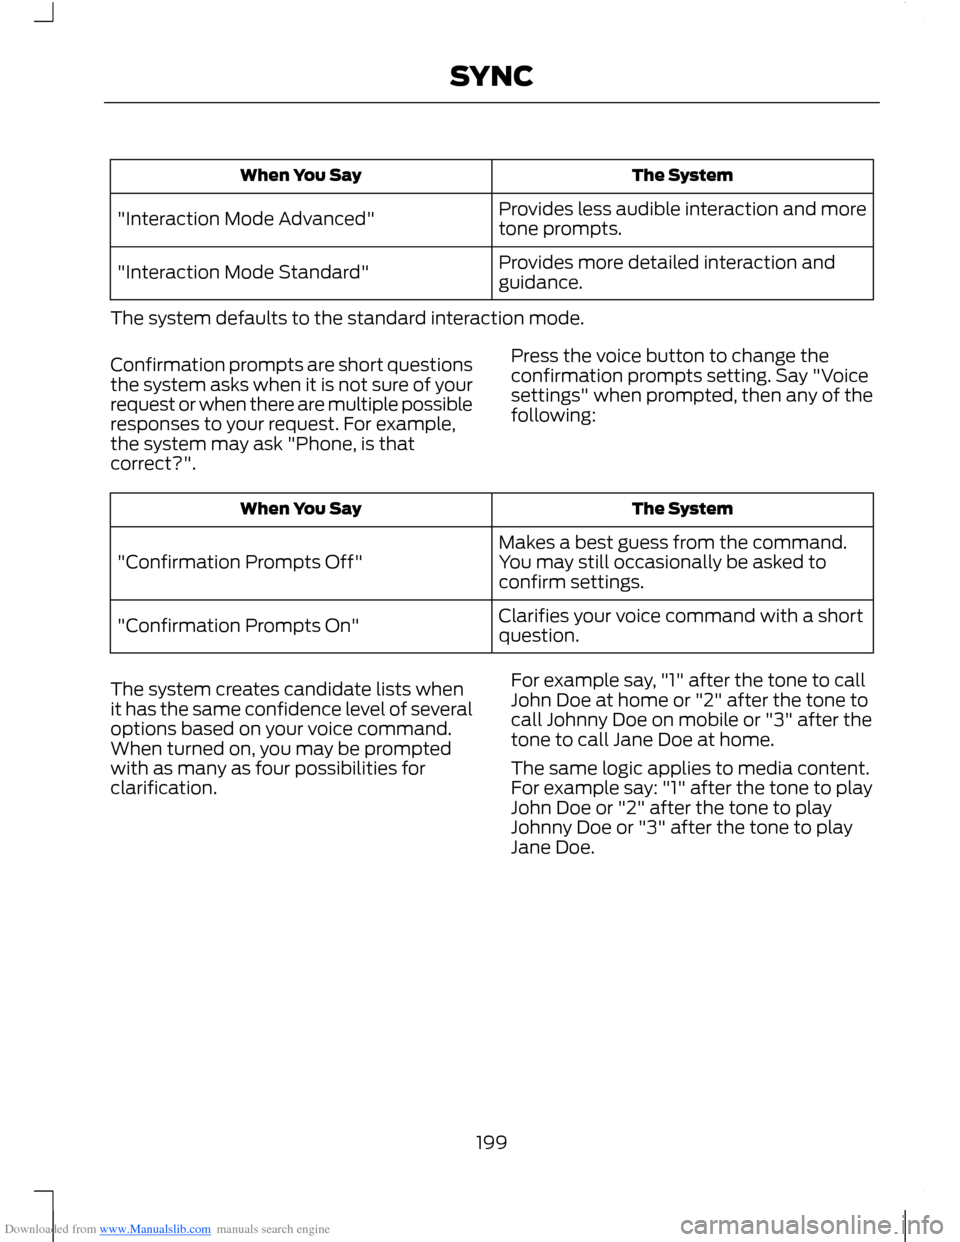
Downloaded from www.Manualslib.com manuals search engine The SystemWhen You Say
Provides less audible interaction and moretone prompts."Interaction Mode Advanced"
Provides more detailed interaction andguidance."Interaction Mode Standard"
The system defaults to the standard interaction mode.
Confirmation prompts are short questionsthe system asks when it is not sure of yourrequest or when there are multiple possibleresponses to your request. For example,the system may ask "Phone, is thatcorrect?".
Press the voice button to change theconfirmation prompts setting. Say "Voicesettings" when prompted, then any of thefollowing:
The SystemWhen You Say
Makes a best guess from the command.You may still occasionally be asked toconfirm settings."Confirmation Prompts Off"
Clarifies your voice command with a shortquestion."Confirmation Prompts On"
The system creates candidate lists whenit has the same confidence level of severaloptions based on your voice command.When turned on, you may be promptedwith as many as four possibilities forclarification.
For example say, "1" after the tone to callJohn Doe at home or "2" after the tone tocall Johnny Doe on mobile or "3" after thetone to call Jane Doe at home.
The same logic applies to media content.For example say: "1" after the tone to playJohn Doe or "2" after the tone to playJohnny Doe or "3" after the tone to playJane Doe.
199SYNC