tow FORD B MAX 2012 1.G User Guide
[x] Cancel search | Manufacturer: FORD, Model Year: 2012, Model line: B MAX, Model: FORD B MAX 2012 1.GPages: 256, PDF Size: 19.67 MB
Page 43 of 256
Downloaded from www.Manualslib.com manuals search engine To reduce smearing we recommend thefollowing:
•Lower the sensitivity of the autowipers.
•Switch to normal or high speed wipe.
•Switch the autowipers off.
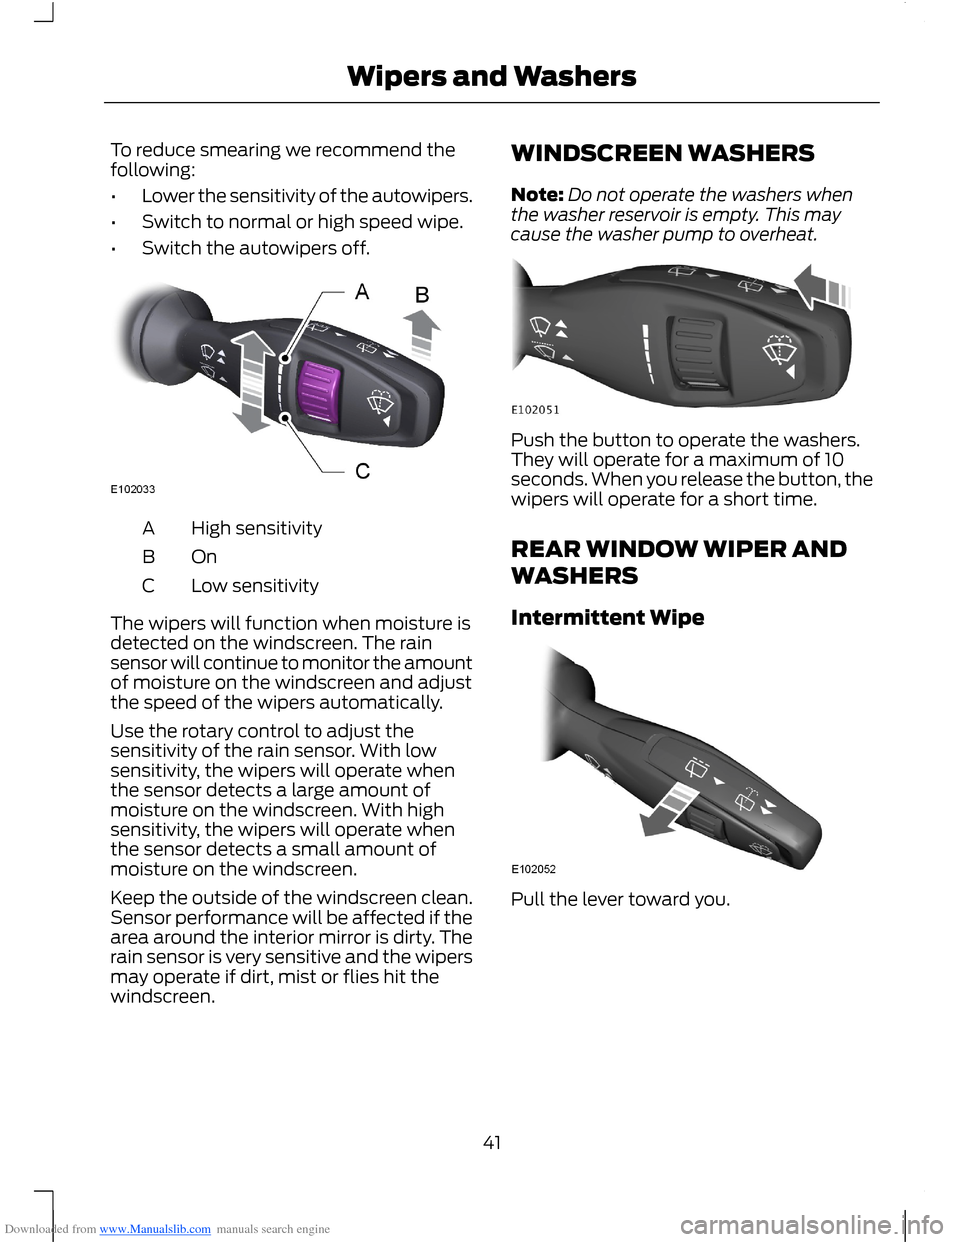
High sensitivityA
OnB
Low sensitivityC
The wipers will function when moisture isdetected on the windscreen. The rainsensor will continue to monitor the amountof moisture on the windscreen and adjustthe speed of the wipers automatically.
Use the rotary control to adjust thesensitivity of the rain sensor. With lowsensitivity, the wipers will operate whenthe sensor detects a large amount ofmoisture on the windscreen. With highsensitivity, the wipers will operate whenthe sensor detects a small amount ofmoisture on the windscreen.
Keep the outside of the windscreen clean.Sensor performance will be affected if thearea around the interior mirror is dirty. Therain sensor is very sensitive and the wipersmay operate if dirt, mist or flies hit thewindscreen.
WINDSCREEN WASHERS
Note:Do not operate the washers whenthe washer reservoir is empty. This maycause the washer pump to overheat.
Push the button to operate the washers.They will operate for a maximum of 10seconds. When you release the button, thewipers will operate for a short time.
REAR WINDOW WIPER AND
WASHERS
Intermittent Wipe
Pull the lever toward you.
41Wipers and Washers
Page 44 of 256
Downloaded from www.Manualslib.com manuals search engine Reverse Gear Wipe
The rear wiper will turn on automaticallywhen selecting reverse gear if:
•the rear wiper is not already switchedon
•the wiper lever is in position A, B, C orD
•the front wiper is operating (when setto position B).
The rear wiper will follow the front wiperinterval (at intermittent or normal speed).
Rear Window Washer
Note:Do not operate the washers whenthe washer reservoir is empty. This maycause the washer pump to overheat.
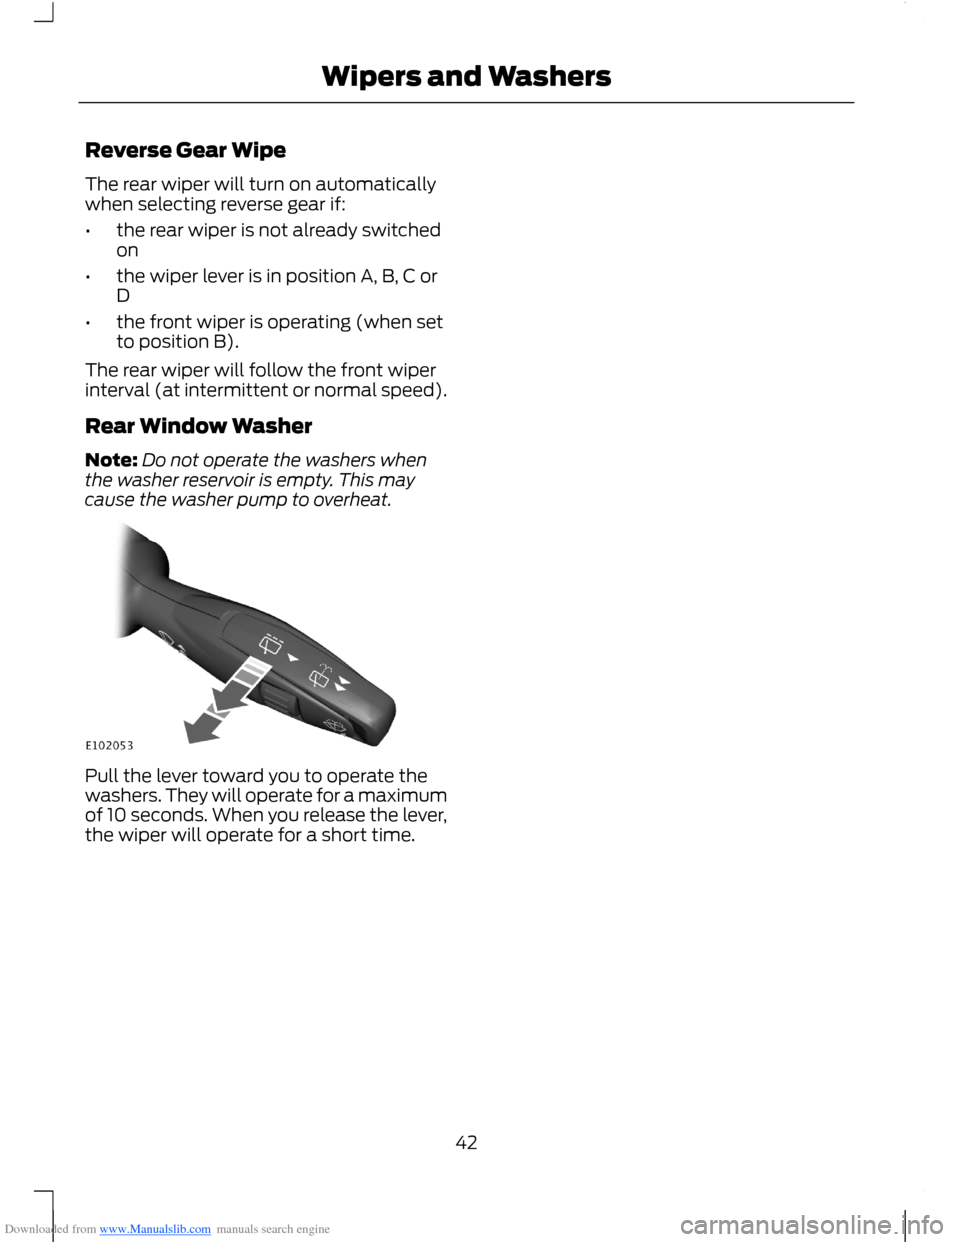
Pull the lever toward you to operate thewashers. They will operate for a maximumof 10 seconds. When you release the lever,the wiper will operate for a short time.
42Wipers and Washers
Page 45 of 256
Downloaded from www.Manualslib.com manuals search engine LIGHTING CONTROL
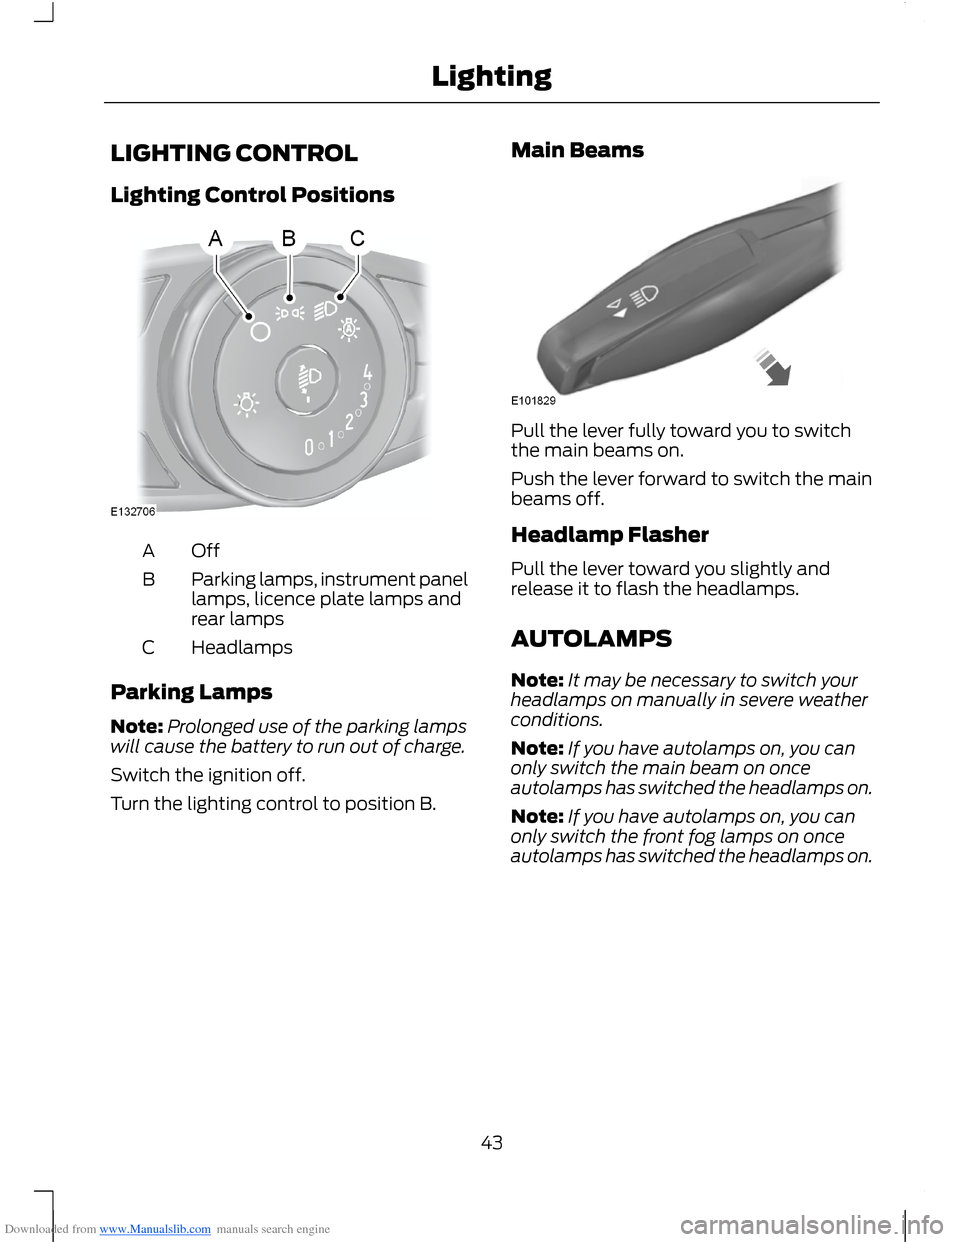
Lighting Control Positions
OffA
Parking lamps, instrument panellamps, licence plate lamps andrear lamps
B
HeadlampsC
Parking Lamps
Note:Prolonged use of the parking lampswill cause the battery to run out of charge.
Switch the ignition off.
Turn the lighting control to position B.
Main Beams
Pull the lever fully toward you to switchthe main beams on.
Push the lever forward to switch the mainbeams off.
Headlamp Flasher
Pull the lever toward you slightly andrelease it to flash the headlamps.
AUTOLAMPS
Note:It may be necessary to switch yourheadlamps on manually in severe weatherconditions.
Note:If you have autolamps on, you canonly switch the main beam on onceautolamps has switched the headlamps on.
Note:If you have autolamps on, you canonly switch the front fog lamps on onceautolamps has switched the headlamps on.
43Lighting
Page 46 of 256
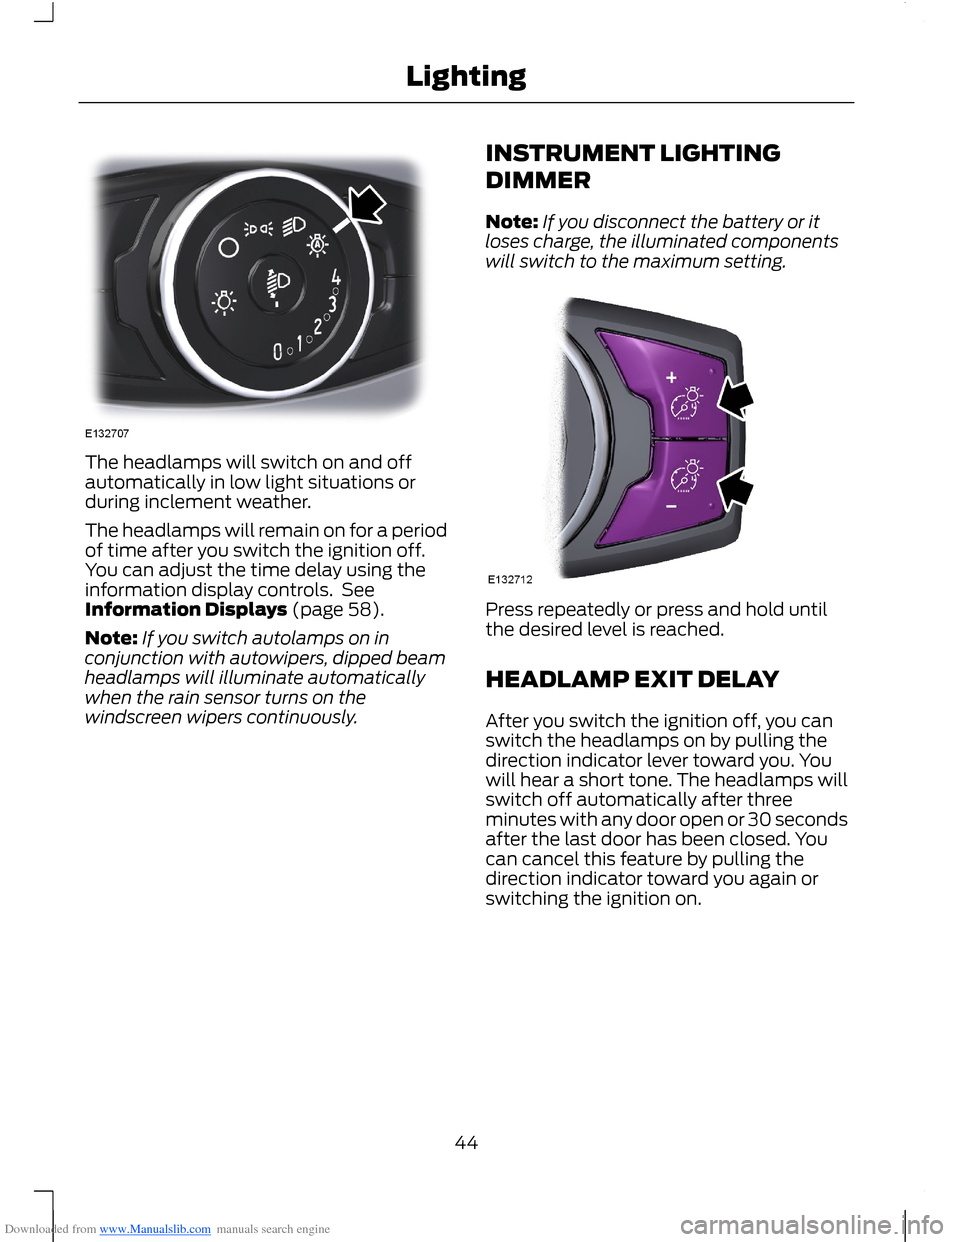
Downloaded from www.Manualslib.com manuals search engine The headlamps will switch on and offautomatically in low light situations orduring inclement weather.
The headlamps will remain on for a periodof time after you switch the ignition off.You can adjust the time delay using theinformation display controls. SeeInformation Displays (page 58).
Note:If you switch autolamps on inconjunction with autowipers, dipped beamheadlamps will illuminate automaticallywhen the rain sensor turns on thewindscreen wipers continuously.
INSTRUMENT LIGHTING
DIMMER
Note:If you disconnect the battery or itloses charge, the illuminated componentswill switch to the maximum setting.
Press repeatedly or press and hold untilthe desired level is reached.
HEADLAMP EXIT DELAY
After you switch the ignition off, you canswitch the headlamps on by pulling thedirection indicator lever toward you. Youwill hear a short tone. The headlamps willswitch off automatically after threeminutes with any door open or 30 secondsafter the last door has been closed. Youcan cancel this feature by pulling thedirection indicator toward you again orswitching the ignition on.
44Lighting
Page 52 of 256
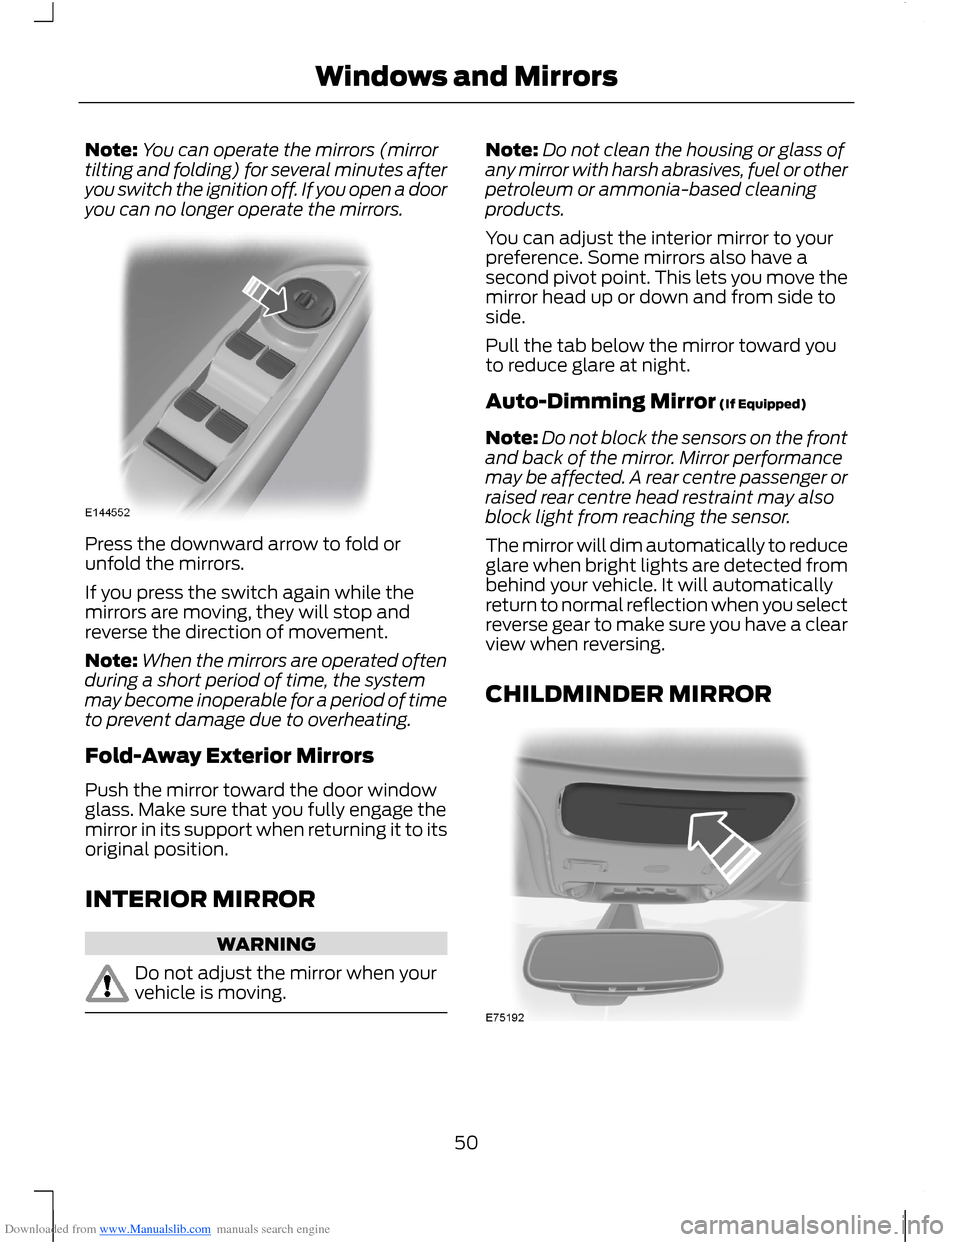
Downloaded from www.Manualslib.com manuals search engine Note:You can operate the mirrors (mirrortilting and folding) for several minutes afteryou switch the ignition off. If you open a dooryou can no longer operate the mirrors.
Press the downward arrow to fold orunfold the mirrors.
If you press the switch again while themirrors are moving, they will stop andreverse the direction of movement.
Note:When the mirrors are operated oftenduring a short period of time, the systemmay become inoperable for a period of timeto prevent damage due to overheating.
Fold-Away Exterior Mirrors
Push the mirror toward the door windowglass. Make sure that you fully engage themirror in its support when returning it to itsoriginal position.
INTERIOR MIRROR
WARNING
Do not adjust the mirror when yourvehicle is moving.
Note:Do not clean the housing or glass ofany mirror with harsh abrasives, fuel or otherpetroleum or ammonia-based cleaningproducts.
You can adjust the interior mirror to yourpreference. Some mirrors also have asecond pivot point. This lets you move themirror head up or down and from side toside.
Pull the tab below the mirror toward youto reduce glare at night.
Auto-Dimming Mirror (If Equipped)
Note:Do not block the sensors on the frontand back of the mirror. Mirror performancemay be affected. A rear centre passenger orraised rear centre head restraint may alsoblock light from reaching the sensor.
The mirror will dim automatically to reduceglare when bright lights are detected frombehind your vehicle. It will automaticallyreturn to normal reflection when you selectreverse gear to make sure you have a clearview when reversing.
CHILDMINDER MIRROR
50Windows and Mirrors
Page 70 of 256
Downloaded from www.Manualslib.com manuals search engine PRINCIPLE OF OPERATION
Outside Air
Keep the air intakes in front of thewindscreen free from obstruction (snow,leaves etc.) to allow the climate controlsystem to function effectively.
Recirculated Air
WARNING
Prolonged use of recirculated air maycause the windows to mist up. If thewindows mist up, follow the settingsfor demisting the windscreen.
The air currently in the passenger'scompartment will be recirculated. Outsideair will not enter your vehicle.
Heating
Heating performance depends on thetemperature of the engine coolant.
Air Conditioning
Note:The air conditioning operates onlywhen the temperature is above 39°F (4°C).
Note:If you use the air conditioning, thefuel consumption of your vehicle will behigher.
Air is directed through the evaporatorwhere it is cooled. Humidity is extractedfrom the air to help keep the windows freeof mist. The resulting condensation isdirected to the outside of your vehicle andit is therefore normal if you see a smallpool of water under your vehicle.
General Information on Controllingthe Interior Climate
Fully close all the windows.
Warming the Interior
Direct the air toward your feet. In cold orhumid weather conditions, direct some ofthe air toward the windscreen and the doorwindows.
Cooling the Interior
Direct the air toward your face.
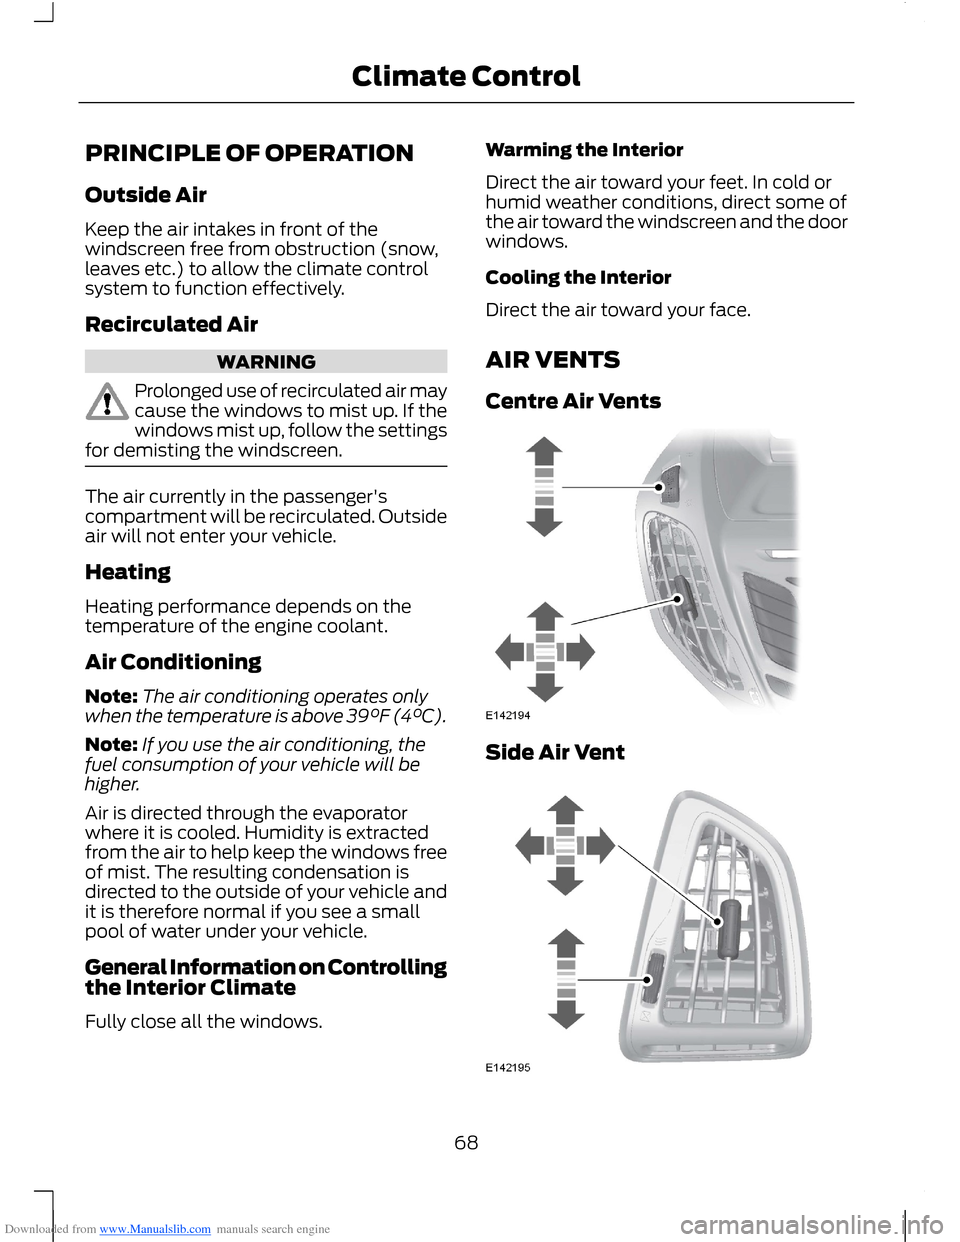
AIR VENTS
Centre Air Vents
Side Air Vent
68Climate Control
Page 74 of 256
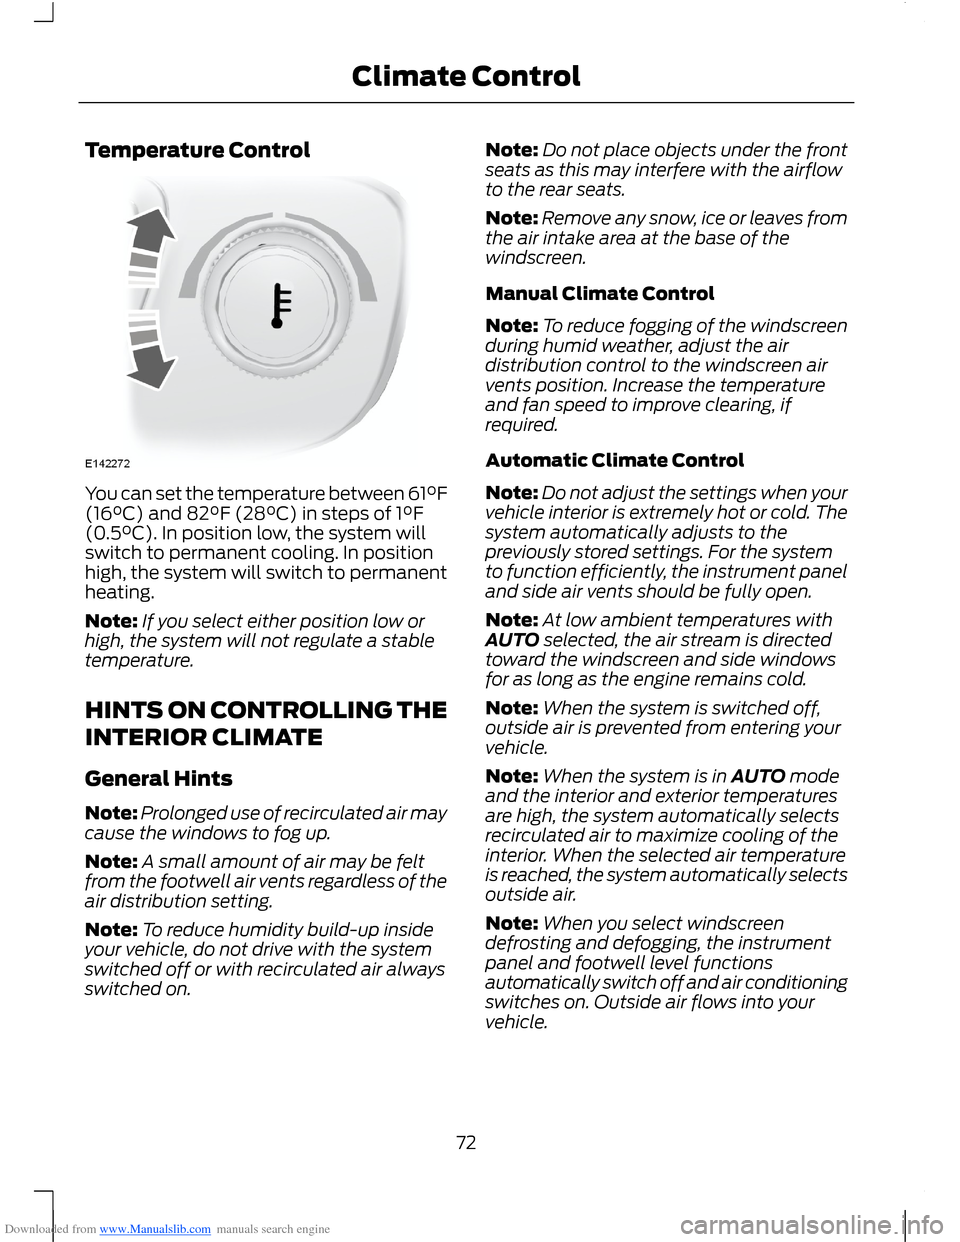
Downloaded from www.Manualslib.com manuals search engine Temperature Control
You can set the temperature between 61°F(16°C) and 82°F (28°C) in steps of 1°F(0.5°C). In position low, the system willswitch to permanent cooling. In positionhigh, the system will switch to permanentheating.
Note:If you select either position low orhigh, the system will not regulate a stabletemperature.
HINTS ON CONTROLLING THE
INTERIOR CLIMATE
General Hints
Note:Prolonged use of recirculated air maycause the windows to fog up.
Note:A small amount of air may be feltfrom the footwell air vents regardless of theair distribution setting.
Note:To reduce humidity build-up insideyour vehicle, do not drive with the systemswitched off or with recirculated air alwaysswitched on.
Note:Do not place objects under the frontseats as this may interfere with the airflowto the rear seats.
Note:Remove any snow, ice or leaves fromthe air intake area at the base of thewindscreen.
Manual Climate Control
Note:To reduce fogging of the windscreenduring humid weather, adjust the airdistribution control to the windscreen airvents position. Increase the temperatureand fan speed to improve clearing, ifrequired.
Automatic Climate Control
Note:Do not adjust the settings when yourvehicle interior is extremely hot or cold. Thesystem automatically adjusts to thepreviously stored settings. For the systemto function efficiently, the instrument paneland side air vents should be fully open.
Note:At low ambient temperatures withAUTO selected, the air stream is directedtoward the windscreen and side windowsfor as long as the engine remains cold.
Note:When the system is switched off,outside air is prevented from entering yourvehicle.
Note:When the system is in AUTO modeand the interior and exterior temperaturesare high, the system automatically selectsrecirculated air to maximize cooling of theinterior. When the selected air temperatureis reached, the system automatically selectsoutside air.
Note:When you select windscreendefrosting and defogging, the instrumentpanel and footwell level functionsautomatically switch off and air conditioningswitches on. Outside air flows into yourvehicle.
72Climate Control
Page 75 of 256
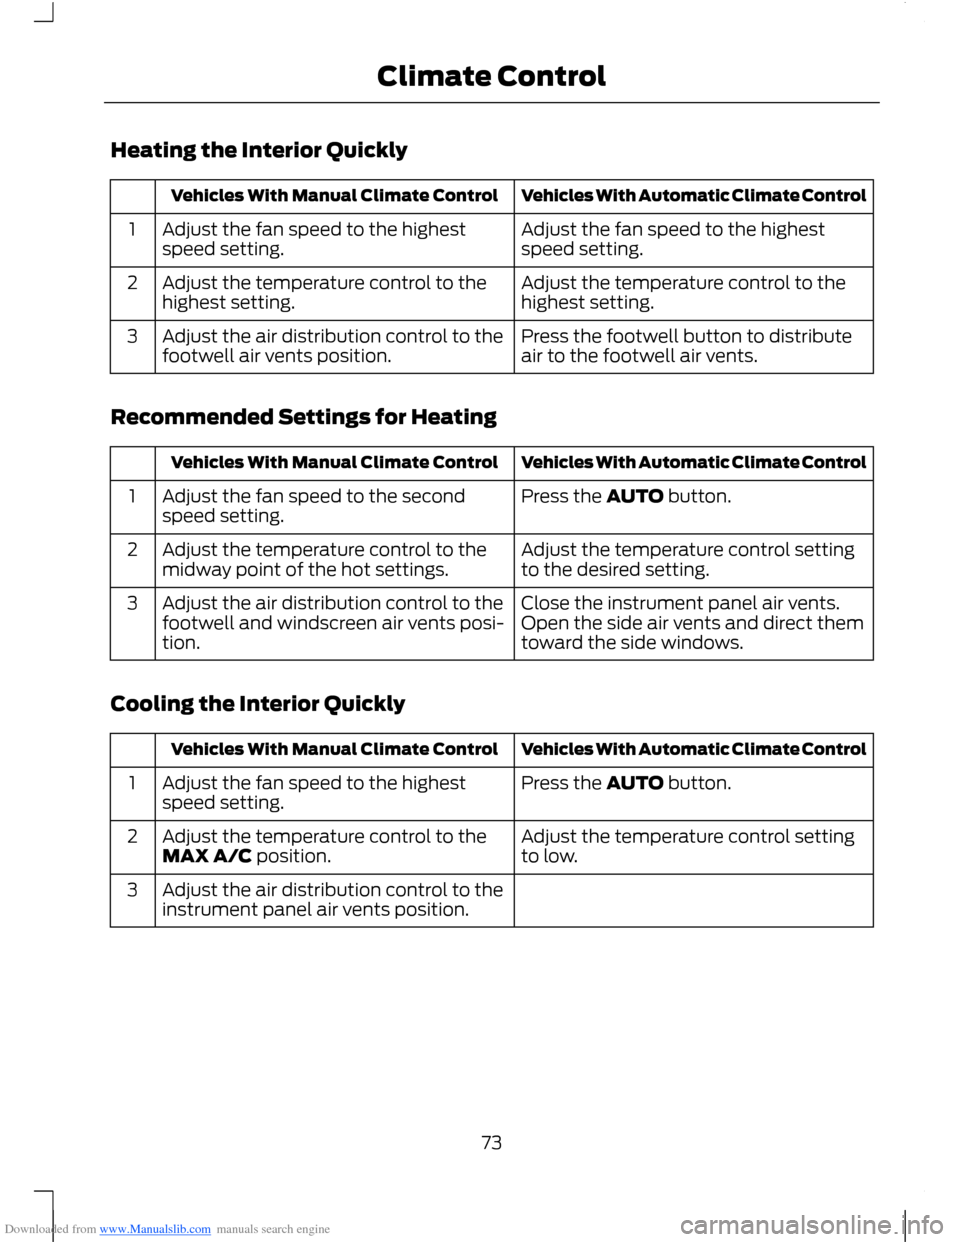
Downloaded from www.Manualslib.com manuals search engine Heating the Interior Quickly
Vehicles With Automatic Climate ControlVehicles With Manual Climate Control
Adjust the fan speed to the highestspeed setting.Adjust the fan speed to the highestspeed setting.1
Adjust the temperature control to thehighest setting.Adjust the temperature control to thehighest setting.2
Press the footwell button to distributeair to the footwell air vents.Adjust the air distribution control to thefootwell air vents position.3
Recommended Settings for Heating
Vehicles With Automatic Climate ControlVehicles With Manual Climate Control
Press the AUTO button.Adjust the fan speed to the secondspeed setting.1
Adjust the temperature control settingto the desired setting.Adjust the temperature control to themidway point of the hot settings.2
Close the instrument panel air vents.Open the side air vents and direct themtoward the side windows.
Adjust the air distribution control to thefootwell and windscreen air vents posi-tion.
3
Cooling the Interior Quickly
Vehicles With Automatic Climate ControlVehicles With Manual Climate Control
Press the AUTO button.Adjust the fan speed to the highestspeed setting.1
Adjust the temperature control settingto low.Adjust the temperature control to theMAX A/C position.2
Adjust the air distribution control to theinstrument panel air vents position.3
73Climate Control
Page 77 of 256
Downloaded from www.Manualslib.com manuals search engine Vehicles With Automatic Climate ControlVehicles With Manual Climate Control
Adjust the fan speed to the highestsetting.4
Direct the instrument panel side air ventstoward the side windows.5
Close the instrument panel vents.6
Maximum Cooling Performance inInstrument Panel or InstrumentPanel and Footwell Positions
1.Adjust the temperature control to thelowest setting.
2.Press the A/C and recirculated airbuttons.
3.Adjust the fan speed to the highestsetting initially and then adjust it to suitthe desired comfort level.
HEATED WINDOWS AND
MIRRORS
Heated Windows
Use the heated windows to defrost ordemist the windscreen or rear window.
Note:The heated windows operate onlywhen the engine is running.
Heated Windscreen
Heated Rear Window
Heated Exterior Mirrors
Electric exterior mirrors have a heatingelement that will defrost or demist themirror glass. They will switch onautomatically when you switch the heatedrear window on.
75Climate Control
Page 95 of 256
Downloaded from www.Manualslib.com manuals search engine Refilling With a Portable FuelContainer
WARNINGS
Do not insert the nozzle of portablefuel containers or aftermarketfunnels into the capless fuel system.This could damage the fuel system and itsseal, and may cause fuel to run onto theground instead of filling the tank, whichcould result in serious personal injury.
Do not try to pry open or push openthe capless fuel system with foreignobjects. This could damage the fuelsystem and its seal and cause injury to youor others.
Note:Do not use aftermarket funnels; theywill not work with the capless fuel systemand can damage it. The included funnel hasbeen specially designed to work safely withyour vehicle.
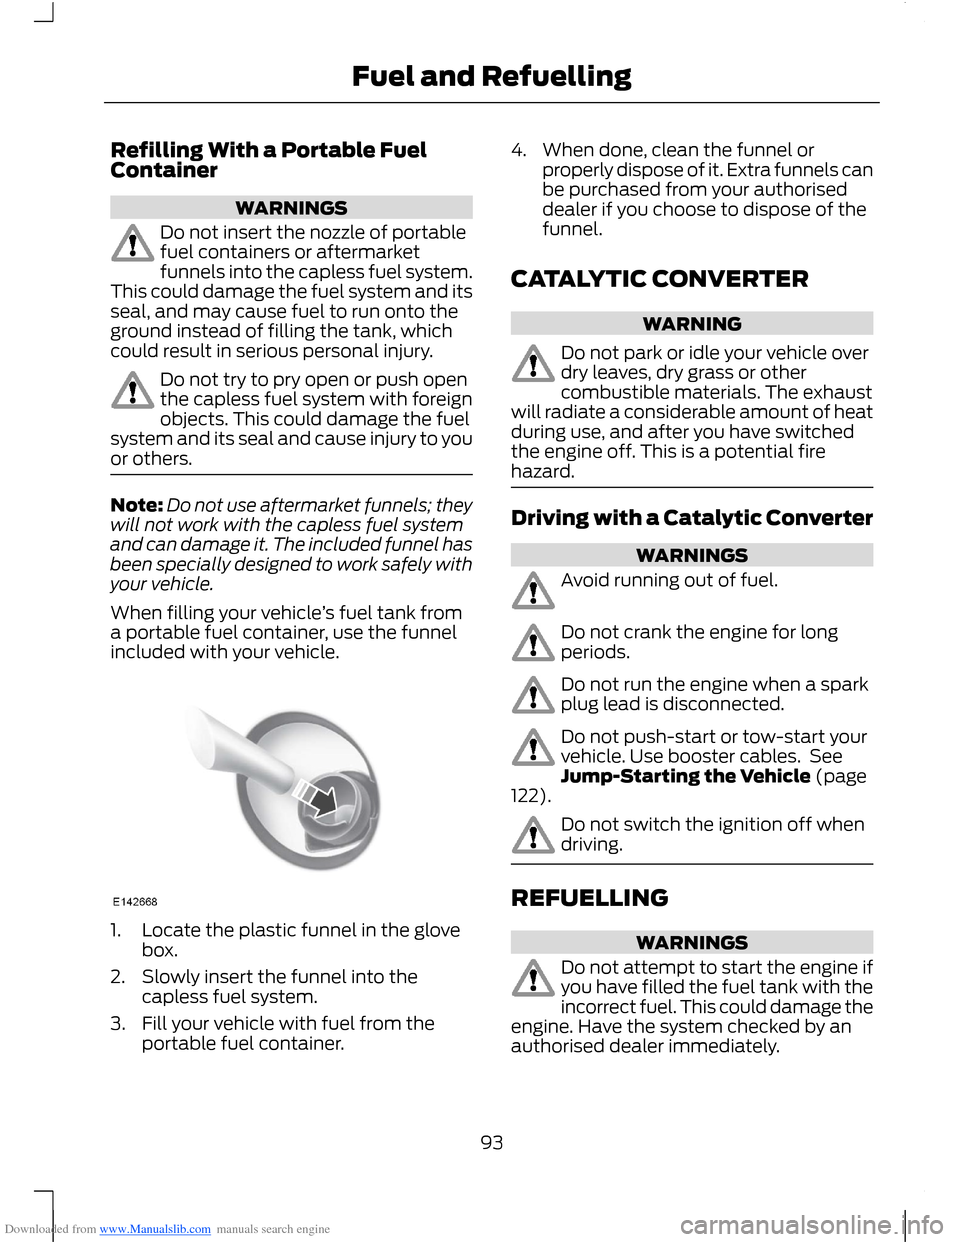
When filling your vehicle’s fuel tank froma portable fuel container, use the funnelincluded with your vehicle.
1.Locate the plastic funnel in the glovebox.
2.Slowly insert the funnel into thecapless fuel system.
3.Fill your vehicle with fuel from theportable fuel container.
4.When done, clean the funnel orproperly dispose of it. Extra funnels canbe purchased from your authoriseddealer if you choose to dispose of thefunnel.
CATALYTIC CONVERTER
WARNING
Do not park or idle your vehicle overdry leaves, dry grass or othercombustible materials. The exhaustwill radiate a considerable amount of heatduring use, and after you have switchedthe engine off. This is a potential firehazard.
Driving with a Catalytic Converter
WARNINGS
Avoid running out of fuel.
Do not crank the engine for longperiods.
Do not run the engine when a sparkplug lead is disconnected.
Do not push-start or tow-start yourvehicle. Use booster cables. SeeJump-Starting the Vehicle (page122).
Do not switch the ignition off whendriving.
REFUELLING
WARNINGS
Do not attempt to start the engine ifyou have filled the fuel tank with theincorrect fuel. This could damage theengine. Have the system checked by anauthorised dealer immediately.
93Fuel and Refuelling