display FORD B MAX 2012 1.G Owner's Manual
[x] Cancel search | Manufacturer: FORD, Model Year: 2012, Model line: B MAX, Model: FORD B MAX 2012 1.GPages: 256, PDF Size: 19.67 MB
Page 100 of 256
Downloaded from www.Manualslib.com manuals search engine Move the transmission selector lever toreverse to allow your vehicle to movebackward.
N (Neutral)
In this position, power is not transmittedto the drive wheels but the transmission isnot locked. You can start the engine withthe transmission selector lever in thisposition.
D (Drive)
Note:A shift will occur only when yourvehicle speed and the engine speed areappropriate.
Note:You may temporarily override thecurrent gear selected using the + and -buttons.
Select drive to shift automatically throughthe forward gears.
The transmission will select theappropriate gear for optimum performancebased on ambient temperature, roadgradient, vehicle load and your input.
Sport Mode and Manual Shifting
Sport Mode
Note:In sport mode the transmissionoperates as normal but gears are selectedmore quickly and at higher engine speeds.
Note:In sport mode S will be shown in theinformation display.
Switch on sport mode by moving thetransmission selector lever to position S.Sport mode will remain on until either youshift manually up or down the gears using+ and - or move the transmission selectorlever to position D.
Manual Shifting
WARNINGS
Do not hold the buttons permanentlyin - or +.
WARNINGS
The transmission will automaticallydownshift when the engine speed istoo low.
Press the - button to shift down and pressthe + button to shift up.
Gears may be skipped by pressing thebuttons repeatedly at short intervals.
Manual mode also provides a kickdownfunction. See Kickdown.
Hints on Driving With anAutomatic Transmission
WARNING
Do not idle the engine for longperiods of time in drive with thebrakes applied.
Moving Off
1.Release the parking brake.
2.Release the brake pedal and press theaccelerator pedal.
Stopping
1.Release the accelerator pedal andpress the brake pedal.
2.Apply the parking brake.
3.Move the transmission selector leverto N or P.
Kickdown
Press the accelerator pedal fully with thetransmission selector lever in the driveposition to select the next lowest gear foroptimum performance. Release theaccelerator pedal when you no longerrequire kickdown.
98Transmission
Page 105 of 256
Downloaded from www.Manualslib.com manuals search engine PRINCIPLE OF OPERATION
Electronic Stability Program
WARNING
The system does not relieve you ofyour responsibility to drive with duecare and attention.
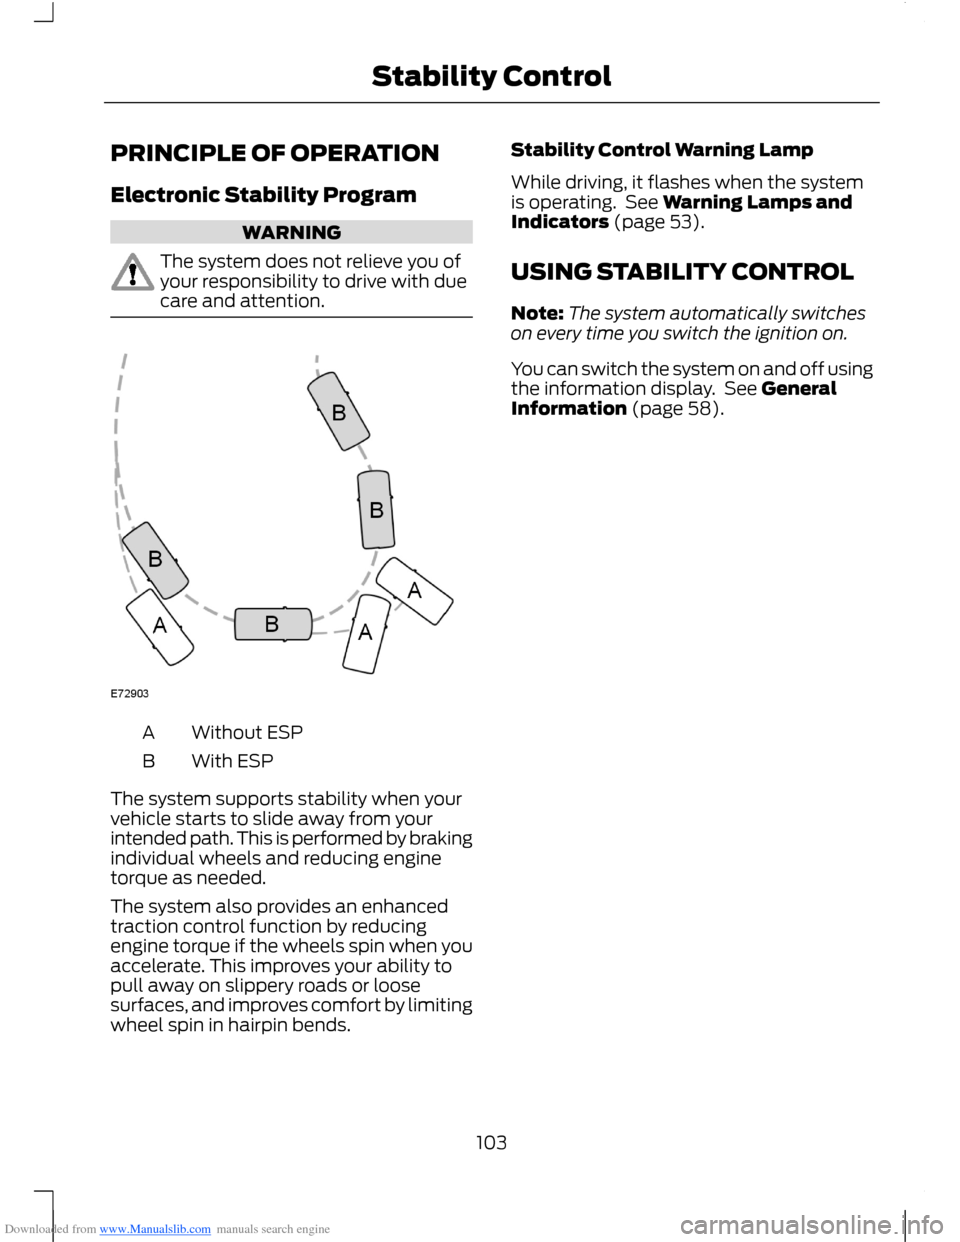
Without ESPA
With ESPB
The system supports stability when yourvehicle starts to slide away from yourintended path. This is performed by brakingindividual wheels and reducing enginetorque as needed.
The system also provides an enhancedtraction control function by reducingengine torque if the wheels spin when youaccelerate. This improves your ability topull away on slippery roads or loosesurfaces, and improves comfort by limitingwheel spin in hairpin bends.
Stability Control Warning Lamp
While driving, it flashes when the systemis operating. See Warning Lamps andIndicators (page 53).
USING STABILITY CONTROL
Note:The system automatically switcheson every time you switch the ignition on.
You can switch the system on and off usingthe information display. See GeneralInformation (page 58).
103Stability Control
Page 107 of 256
Downloaded from www.Manualslib.com manuals search engine Note:If your vehicle sustains damage tothe bumper or fascia, leaving it misalignedor bent, the sensing zone may be alteredcausing inaccurate measurement ofobstacles or false alarms.
The system warns you of obstacles withina certain range of the bumper area.
When receiving a detection warning, theradio volume is reduced to apredetermined level. After the warninggoes away, the radio volume returns to theprevious level.
Rear Sensing System
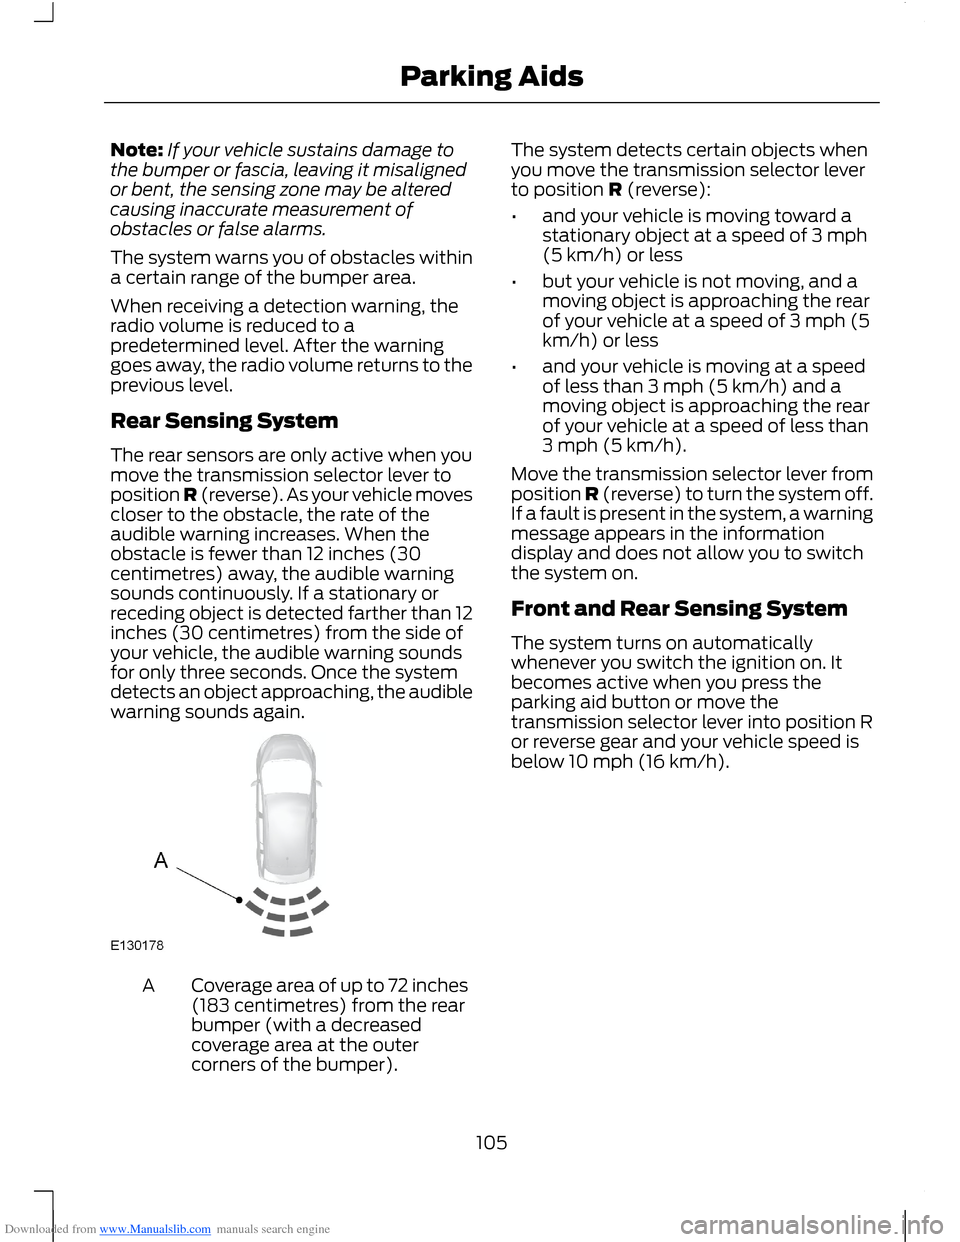
The rear sensors are only active when youmove the transmission selector lever toposition R (reverse). As your vehicle movescloser to the obstacle, the rate of theaudible warning increases. When theobstacle is fewer than 12 inches (30centimetres) away, the audible warningsounds continuously. If a stationary orreceding object is detected farther than 12inches (30 centimetres) from the side ofyour vehicle, the audible warning soundsfor only three seconds. Once the systemdetects an object approaching, the audiblewarning sounds again.
Coverage area of up to 72 inches(183 centimetres) from the rearbumper (with a decreasedcoverage area at the outercorners of the bumper).
A
The system detects certain objects whenyou move the transmission selector leverto position R (reverse):
•and your vehicle is moving toward astationary object at a speed of 3 mph(5 km/h) or less
•but your vehicle is not moving, and amoving object is approaching the rearof your vehicle at a speed of 3 mph (5km/h) or less
•and your vehicle is moving at a speedof less than 3 mph (5 km/h) and amoving object is approaching the rearof your vehicle at a speed of less than3 mph (5 km/h).
Move the transmission selector lever fromposition R (reverse) to turn the system off.If a fault is present in the system, a warningmessage appears in the informationdisplay and does not allow you to switchthe system on.
Front and Rear Sensing System
The system turns on automaticallywhenever you switch the ignition on. Itbecomes active when you press theparking aid button or move thetransmission selector lever into position Ror reverse gear and your vehicle speed isbelow 10 mph (16 km/h).
105Parking Aids
Page 108 of 256
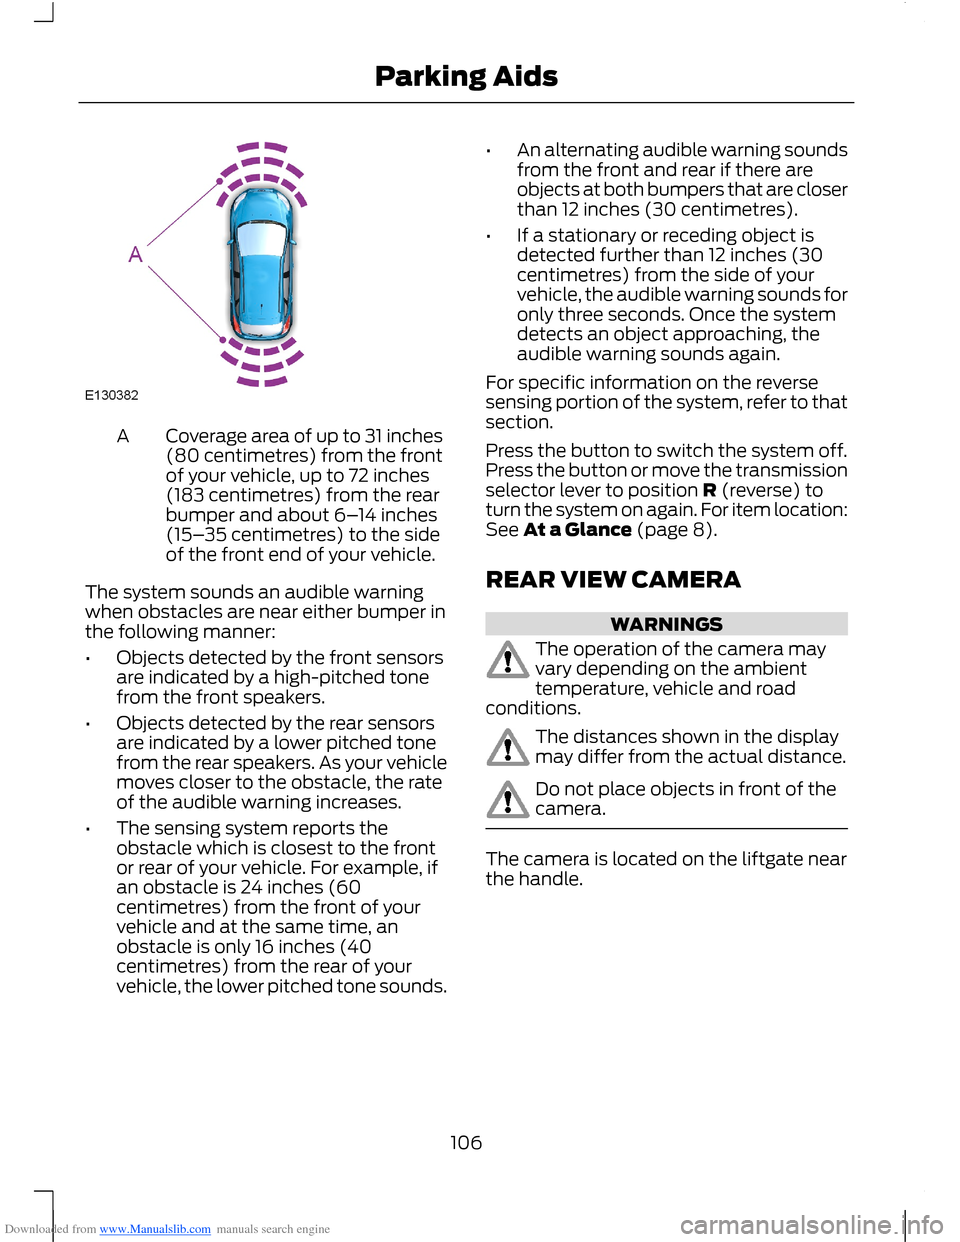
Downloaded from www.Manualslib.com manuals search engine Coverage area of up to 31 inches(80 centimetres) from the frontof your vehicle, up to 72 inches(183 centimetres) from the rearbumper and about 6–14 inches(15–35 centimetres) to the sideof the front end of your vehicle.
A
The system sounds an audible warningwhen obstacles are near either bumper inthe following manner:
•Objects detected by the front sensorsare indicated by a high-pitched tonefrom the front speakers.
•Objects detected by the rear sensorsare indicated by a lower pitched tonefrom the rear speakers. As your vehiclemoves closer to the obstacle, the rateof the audible warning increases.
•The sensing system reports theobstacle which is closest to the frontor rear of your vehicle. For example, ifan obstacle is 24 inches (60centimetres) from the front of yourvehicle and at the same time, anobstacle is only 16 inches (40centimetres) from the rear of yourvehicle, the lower pitched tone sounds.
•An alternating audible warning soundsfrom the front and rear if there areobjects at both bumpers that are closerthan 12 inches (30 centimetres).
•If a stationary or receding object isdetected further than 12 inches (30centimetres) from the side of yourvehicle, the audible warning sounds foronly three seconds. Once the systemdetects an object approaching, theaudible warning sounds again.
For specific information on the reversesensing portion of the system, refer to thatsection.
Press the button to switch the system off.Press the button or move the transmissionselector lever to position R (reverse) toturn the system on again. For item location:See At a Glance (page 8).
REAR VIEW CAMERA
WARNINGS
The operation of the camera mayvary depending on the ambienttemperature, vehicle and roadconditions.
The distances shown in the displaymay differ from the actual distance.
Do not place objects in front of thecamera.
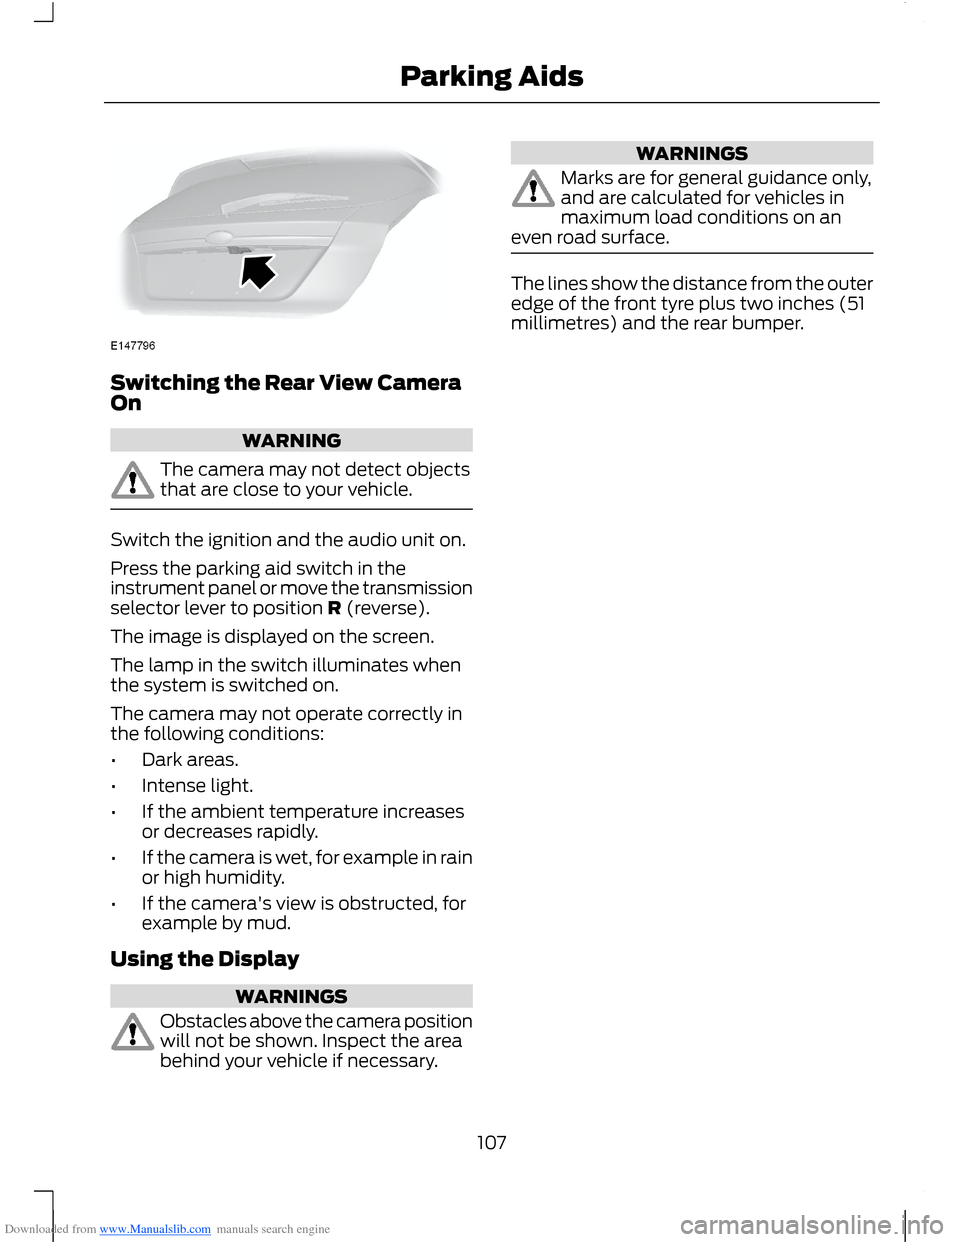
The camera is located on the liftgate nearthe handle.
106Parking Aids
Page 109 of 256
Downloaded from www.Manualslib.com manuals search engine Switching the Rear View CameraOn
WARNING
The camera may not detect objectsthat are close to your vehicle.
Switch the ignition and the audio unit on.
Press the parking aid switch in theinstrument panel or move the transmissionselector lever to position R (reverse).
The image is displayed on the screen.
The lamp in the switch illuminates whenthe system is switched on.
The camera may not operate correctly inthe following conditions:
•Dark areas.
•Intense light.
•If the ambient temperature increasesor decreases rapidly.
•If the camera is wet, for example in rainor high humidity.
•If the camera's view is obstructed, forexample by mud.
Using the Display
WARNINGS
Obstacles above the camera positionwill not be shown. Inspect the areabehind your vehicle if necessary.
WARNINGS
Marks are for general guidance only,and are calculated for vehicles inmaximum load conditions on aneven road surface.
The lines show the distance from the outeredge of the front tyre plus two inches (51millimetres) and the rear bumper.
107Parking Aids
Page 110 of 256
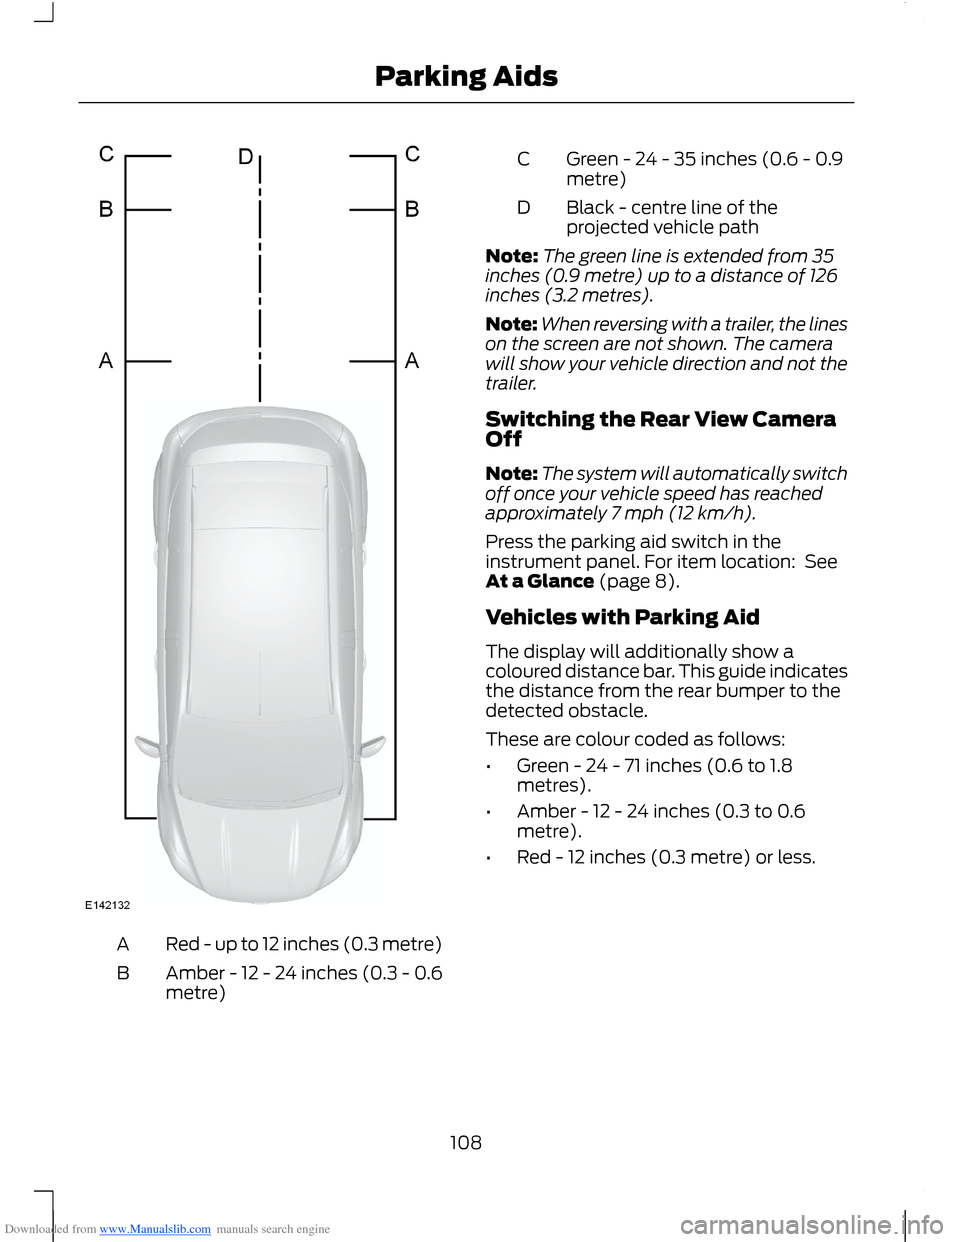
Downloaded from www.Manualslib.com manuals search engine Red - up to 12 inches (0.3 metre)A
Amber - 12 - 24 inches (0.3 - 0.6metre)B
Green - 24 - 35 inches (0.6 - 0.9metre)C
Black - centre line of theprojected vehicle pathD
Note:The green line is extended from 35inches (0.9 metre) up to a distance of 126inches (3.2 metres).
Note:When reversing with a trailer, the lineson the screen are not shown. The camerawill show your vehicle direction and not thetrailer.
Switching the Rear View CameraOff
Note:The system will automatically switchoff once your vehicle speed has reachedapproximately 7 mph (12 km/h).
Press the parking aid switch in theinstrument panel. For item location: SeeAt a Glance (page 8).
Vehicles with Parking Aid
The display will additionally show acoloured distance bar. This guide indicatesthe distance from the rear bumper to thedetected obstacle.
These are colour coded as follows:
•Green - 24 - 71 inches (0.6 to 1.8metres).
•Amber - 12 - 24 inches (0.3 to 0.6metre).
•Red - 12 inches (0.3 metre) or less.
108Parking Aids
Page 113 of 256
Downloaded from www.Manualslib.com manuals search engine ACTIVE CITY STOP
General Information
WARNINGS
The system does not relieve you ofyour responsibility to drive with duecare and attention.
At all times you are responsible forcontrolling your vehicle, supervisingthe system and intervening ifrequired.
Never look directly into the sensorwith any type of object. There is a riskof eye injury.
If the sensor becomes blocked thesystem may not function.
To achieve full system performance,you must bed the braking system in.See Running-In (page 121).
The system performance may varydepending on your vehicle and roadconditions.
The system will not react to vehiclesdriving in a different direction.
The system will not react to bicycles,motorcycles, people or animals.
When the ignition is on the sensorwill constantly transmit a laserbeam.
The system will not operate duringharsh acceleration and steering.
In cold and severe weatherconditions the system may notfunction. Rain, snow, spray and icecan all influence the sensor.
Do not carry out windscreen repairsin the immediate area surroundingthe sensor.
WARNINGS
If you install a windscreen notapproved by us, the system may notfunction correctly.
If the engine stops after the systemhas been switched on, the hazardwarning flashers will turn on.
The system may not function whendriving around sharp bends.
Note:Keep the windscreen free fromobstructions such as bird droppings, insects,snow or ice.
Note:Keep the bonnet free of ice and snow,otherwise the system may not functioncorrectly.
A sensor is mounted behind the interiorrear view mirror. It continuously monitorsconditions to decide when to intervene.
The system is designed to help you reducelow speed collisions into the rear ofanother vehicle. It will also help you reducethe impact damage or potentially avoidthe collision completely.
The system operates at speeds belowapproximately 19 mph (30 km/h) byapplying the brakes when the sensordetects that a collision is likely.
You must depress the brake pedal toobtain full braking force.
When the system is braking or hasautomatically applied the brakes, amessage will be shown in the informationdisplay.
Using Active City Stop
Switching the System Off and On
Note:The system is on by default.
Note:In certain situations, it is advisable todisable the system, for example driving offroad when objects may cover thewindscreen.
111Driving Aids
Page 114 of 256
Downloaded from www.Manualslib.com manuals search engine You can switch the system off and on usingthe information display. See GeneralInformation (page 58).
Active City Stop Relearning Procedure
Note:When you disconnect the battery, thesystem will go through a relearningprocedure. During this time the system willnot be available.
You must drive your vehicle above 31mph(50 km/h) in a straight line for theprocedure to complete. This proceduremay take several minutes.
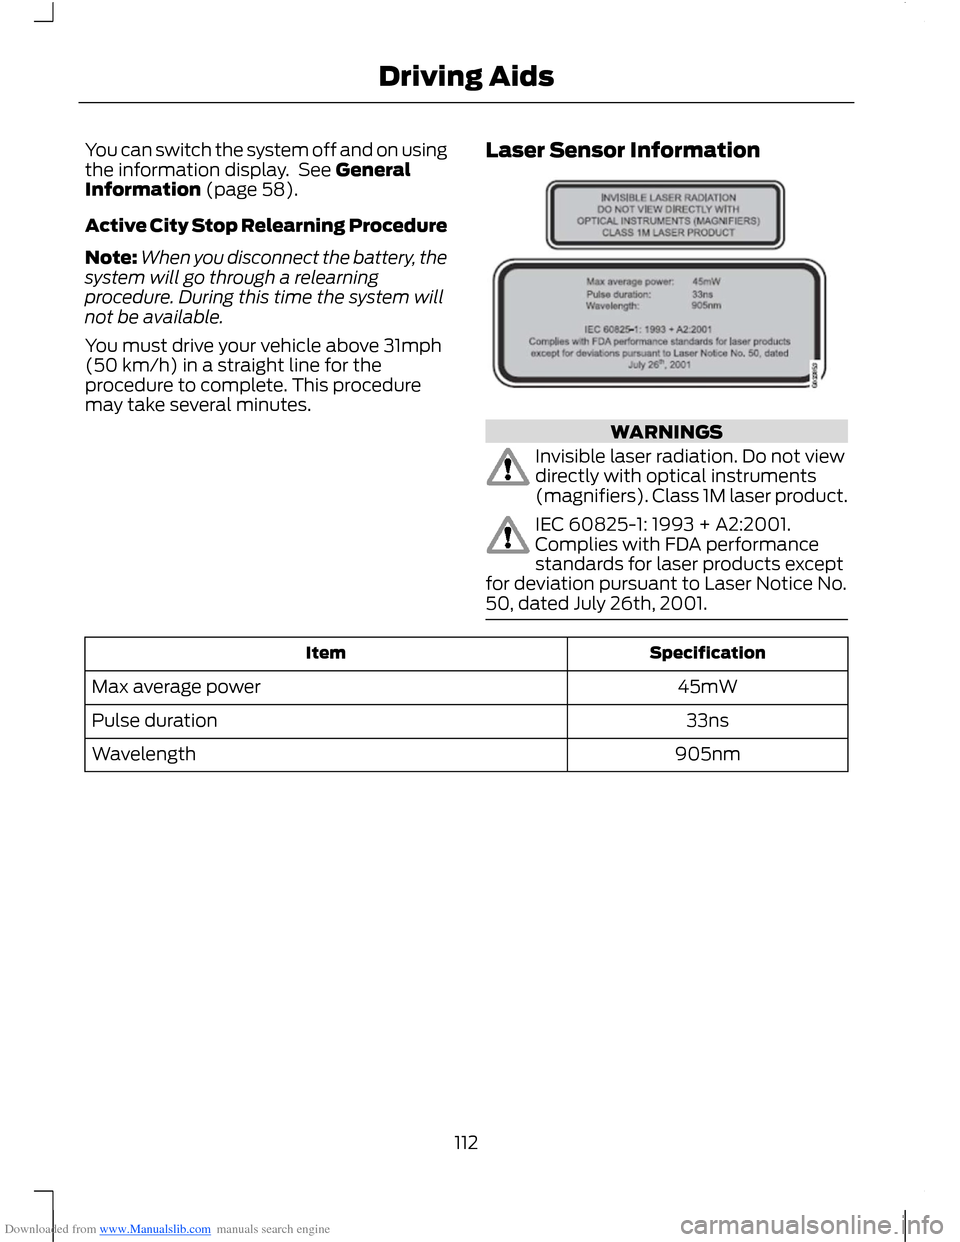
Laser Sensor Information
WARNINGS
Invisible laser radiation. Do not viewdirectly with optical instruments(magnifiers). Class 1M laser product.
IEC 60825-1: 1993 + A2:2001.Complies with FDA performancestandards for laser products exceptfor deviation pursuant to Laser Notice No.50, dated July 26th, 2001.
SpecificationItem
45mWMax average power
33nsPulse duration
905nmWavelength
112Driving Aids
Page 131 of 256
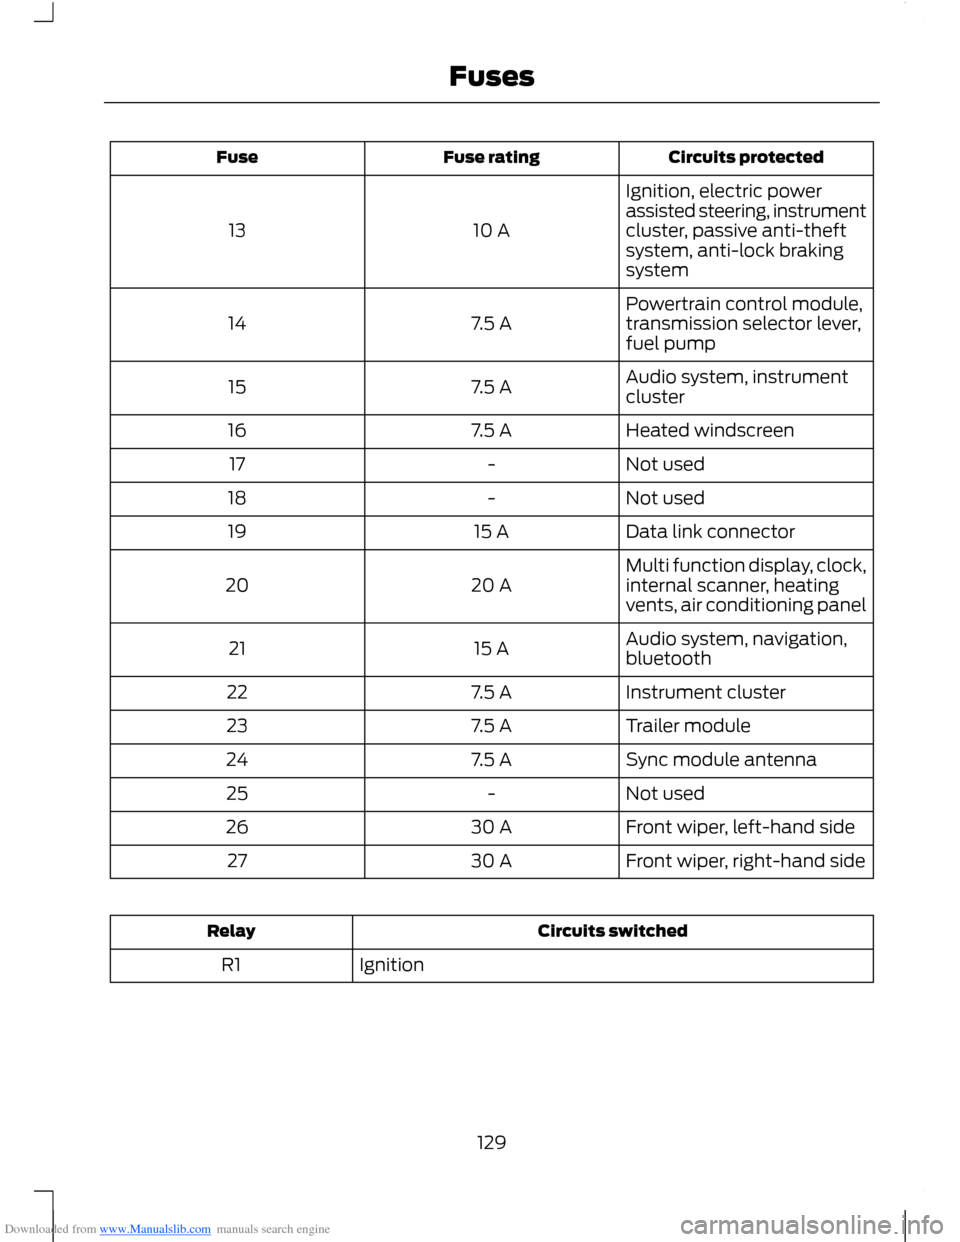
Downloaded from www.Manualslib.com manuals search engine Circuits protectedFuse ratingFuse
Ignition, electric powerassisted steering, instrumentcluster, passive anti-theftsystem, anti-lock brakingsystem
10 A13
Powertrain control module,transmission selector lever,fuel pump7.5 A14
Audio system, instrumentcluster7.5 A15
Heated windscreen7.5 A16
Not used-17
Not used-18
Data link connector15 A19
Multi function display, clock,internal scanner, heatingvents, air conditioning panel20 A20
Audio system, navigation,bluetooth15 A21
Instrument cluster7.5 A22
Trailer module7.5 A23
Sync module antenna7.5 A24
Not used-25
Front wiper, left-hand side30 A26
Front wiper, right-hand side30 A27
Circuits switchedRelay
IgnitionR1
129Fuses
Page 133 of 256
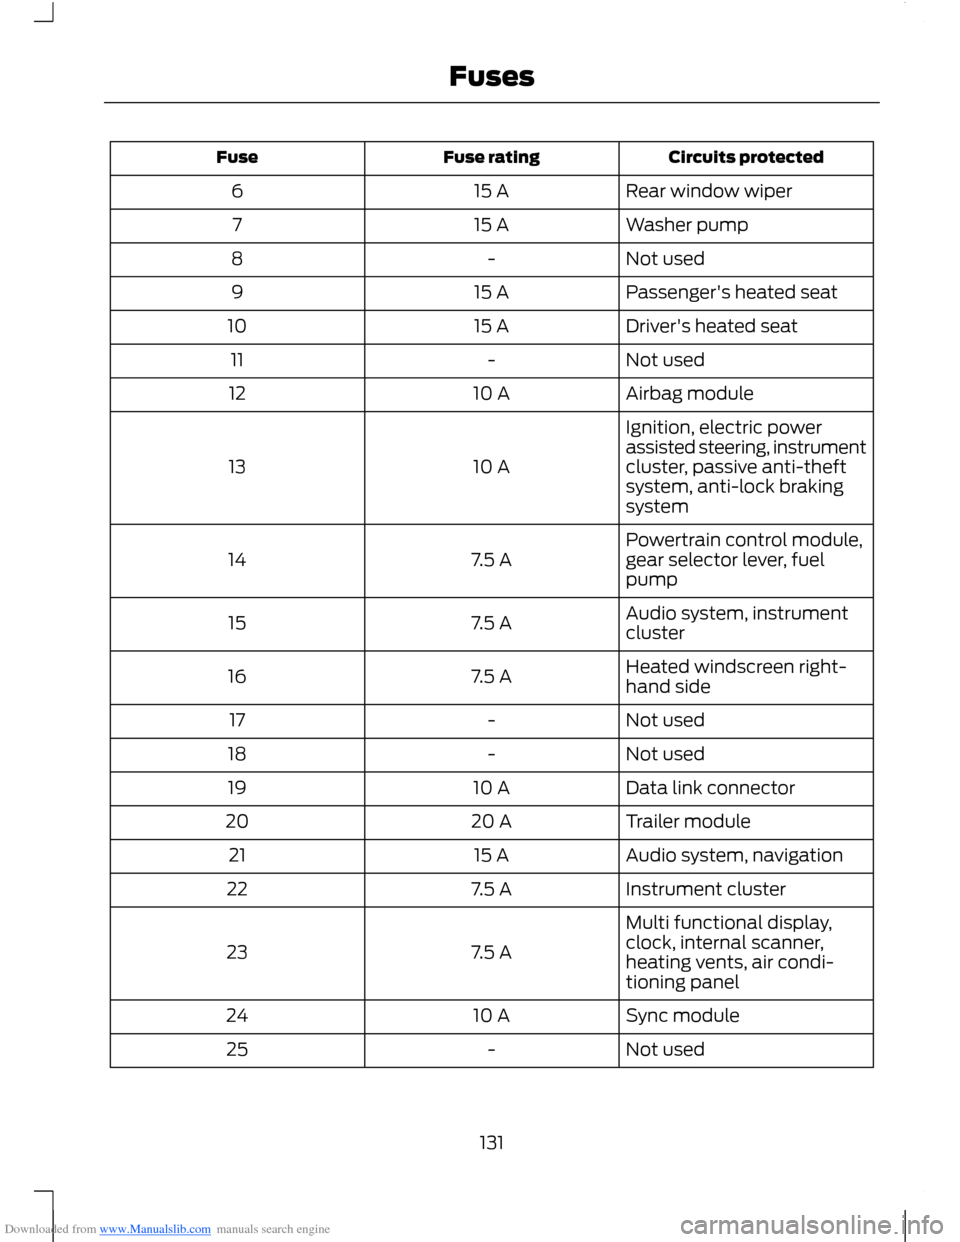
Downloaded from www.Manualslib.com manuals search engine Circuits protectedFuse ratingFuse
Rear window wiper15 A6
Washer pump15 A7
Not used-8
Passenger's heated seat15 A9
Driver's heated seat15 A10
Not used-11
Airbag module10 A12
Ignition, electric powerassisted steering, instrumentcluster, passive anti-theftsystem, anti-lock brakingsystem
10 A13
Powertrain control module,gear selector lever, fuelpump7.5 A14
Audio system, instrumentcluster7.5 A15
Heated windscreen right-hand side7.5 A16
Not used-17
Not used-18
Data link connector10 A19
Trailer module20 A20
Audio system, navigation15 A21
Instrument cluster7.5 A22
Multi functional display,clock, internal scanner,heating vents, air condi-tioning panel
7.5 A23
Sync module10 A24
Not used-25
131Fuses