clock FORD B MAX 2013 1.G User Guide
[x] Cancel search | Manufacturer: FORD, Model Year: 2013, Model line: B MAX, Model: FORD B MAX 2013 1.GPages: 298, PDF Size: 20.63 MB
Page 164 of 298
Downloaded from www.Manualslib.com manuals search engine Note:When fitting the headlamp, makesure that you fully engage the headlamp inthe lower fixing point.
CHANGING A BULB
WARNINGS
Switch the lamps and the ignition off.
Let the bulb cool down beforeremoving it.
Do not touch the glass of the bulb.
Note:Only fit bulbs of the correctspecification.
Note:The following instructions describehow to remove the bulbs. Fit replacementsin the reverse order unless otherwise stated.
Headlamp
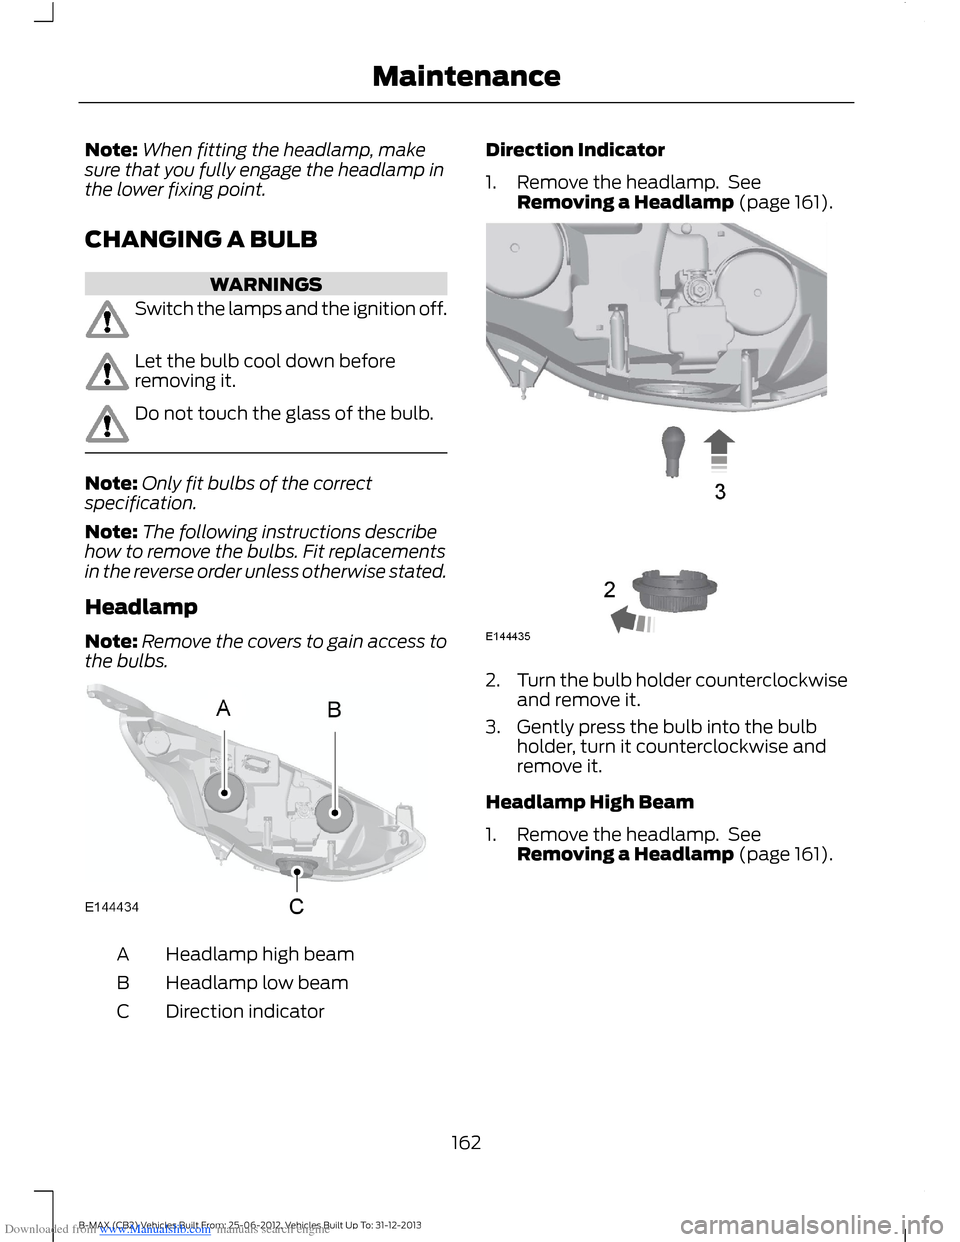
Note:Remove the covers to gain access tothe bulbs.
Headlamp high beamA
Headlamp low beamB
Direction indicatorC
Direction Indicator
1.Remove the headlamp. SeeRemoving a Headlamp (page 161).
2.Turn the bulb holder counterclockwiseand remove it.
3.Gently press the bulb into the bulbholder, turn it counterclockwise andremove it.
Headlamp High Beam
1.Remove the headlamp. SeeRemoving a Headlamp (page 161).
162B-MAX (CB2) Vehicles Built From: 25-06-2012, Vehicles Built Up To: 31-12-2013Maintenance
Page 165 of 298
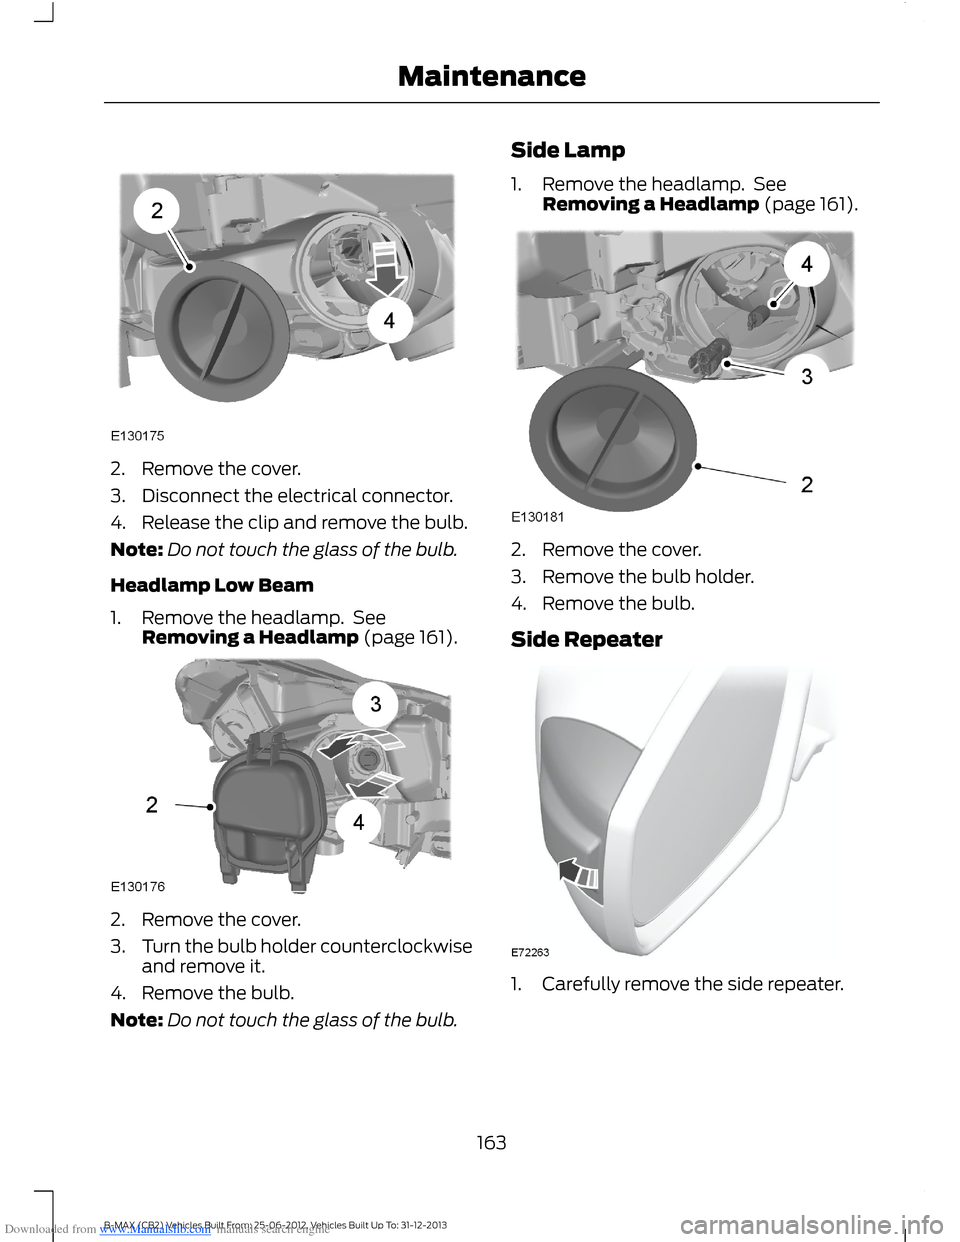
Downloaded from www.Manualslib.com manuals search engine 2.Remove the cover.
3.Disconnect the electrical connector.
4.Release the clip and remove the bulb.
Note:Do not touch the glass of the bulb.
Headlamp Low Beam
1.Remove the headlamp. SeeRemoving a Headlamp (page 161).
2.Remove the cover.
3.Turn the bulb holder counterclockwiseand remove it.
4.Remove the bulb.
Note:Do not touch the glass of the bulb.
Side Lamp
1.Remove the headlamp. SeeRemoving a Headlamp (page 161).
2.Remove the cover.
3.Remove the bulb holder.
4.Remove the bulb.
Side Repeater
1.Carefully remove the side repeater.
163B-MAX (CB2) Vehicles Built From: 25-06-2012, Vehicles Built Up To: 31-12-2013Maintenance
Page 166 of 298
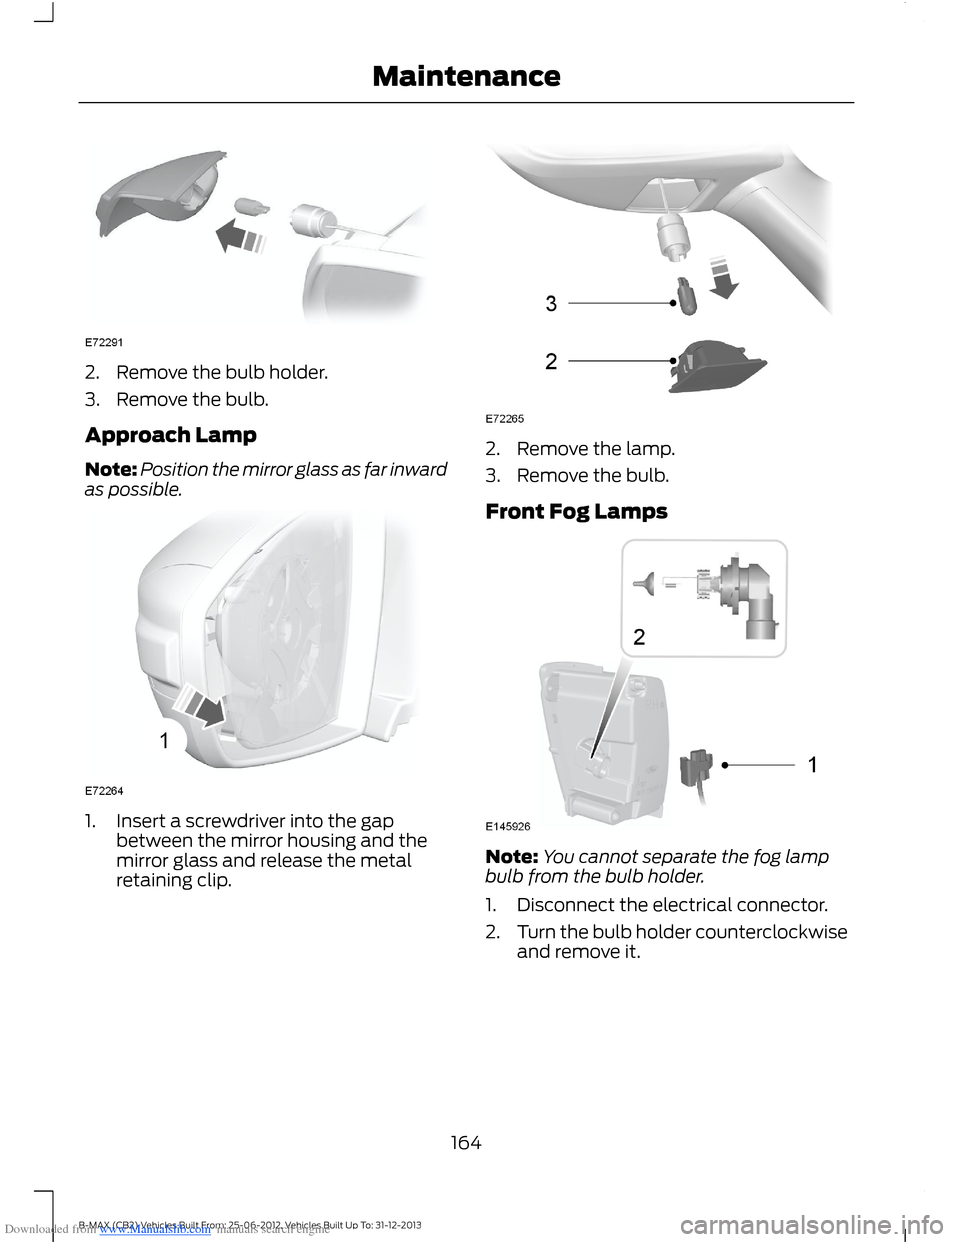
Downloaded from www.Manualslib.com manuals search engine 2.Remove the bulb holder.
3.Remove the bulb.
Approach Lamp
Note:Position the mirror glass as far inwardas possible.
1.Insert a screwdriver into the gapbetween the mirror housing and themirror glass and release the metalretaining clip.
2.Remove the lamp.
3.Remove the bulb.
Front Fog Lamps
Note:You cannot separate the fog lampbulb from the bulb holder.
1.Disconnect the electrical connector.
2.Turn the bulb holder counterclockwiseand remove it.
164B-MAX (CB2) Vehicles Built From: 25-06-2012, Vehicles Built Up To: 31-12-2013Maintenance
Page 167 of 298
Downloaded from www.Manualslib.com manuals search engine Rear Lamps
Direction Indicator, Tail and BrakeLamp
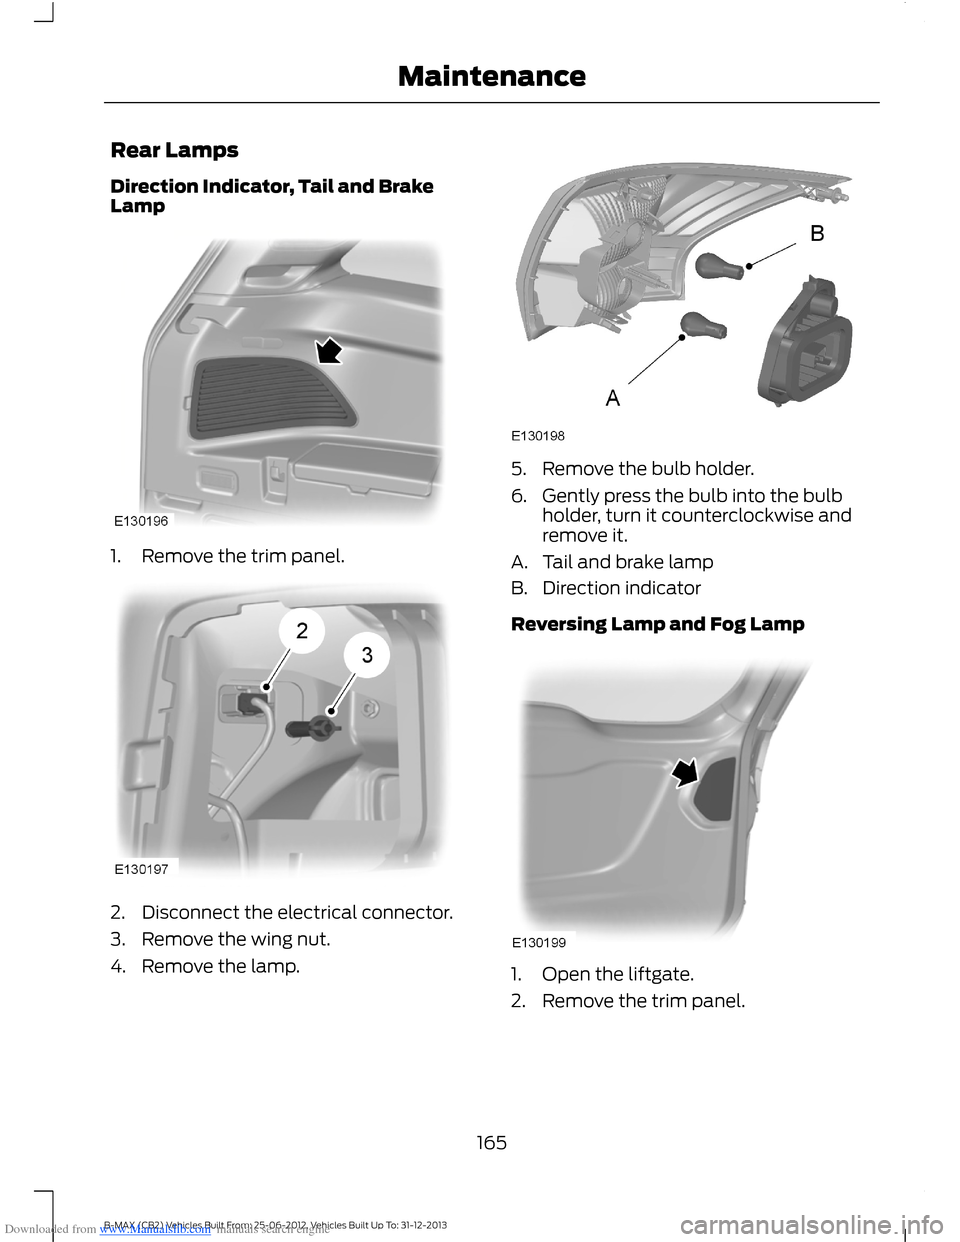
1.Remove the trim panel.
2.Disconnect the electrical connector.
3.Remove the wing nut.
4.Remove the lamp.
5.Remove the bulb holder.
6.Gently press the bulb into the bulbholder, turn it counterclockwise andremove it.
A.Tail and brake lamp
B.Direction indicator
Reversing Lamp and Fog Lamp
1.Open the liftgate.
2.Remove the trim panel.
165B-MAX (CB2) Vehicles Built From: 25-06-2012, Vehicles Built Up To: 31-12-2013Maintenance
Page 168 of 298
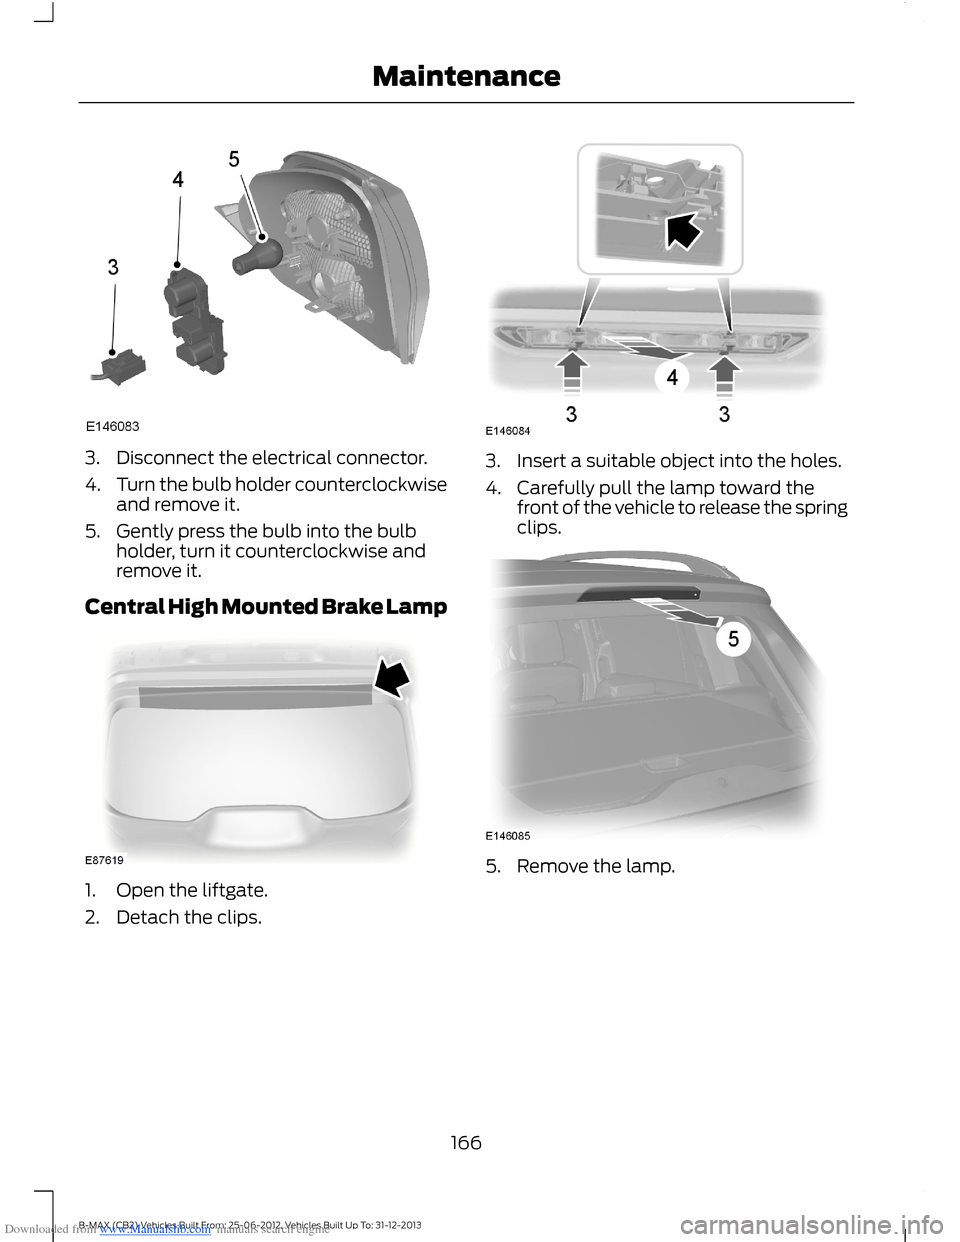
Downloaded from www.Manualslib.com manuals search engine 3.Disconnect the electrical connector.
4.Turn the bulb holder counterclockwiseand remove it.
5.Gently press the bulb into the bulbholder, turn it counterclockwise andremove it.
Central High Mounted Brake Lamp
1.Open the liftgate.
2.Detach the clips.
3.Insert a suitable object into the holes.
4.Carefully pull the lamp toward thefront of the vehicle to release the springclips.
5.Remove the lamp.
166B-MAX (CB2) Vehicles Built From: 25-06-2012, Vehicles Built Up To: 31-12-2013Maintenance
Page 169 of 298
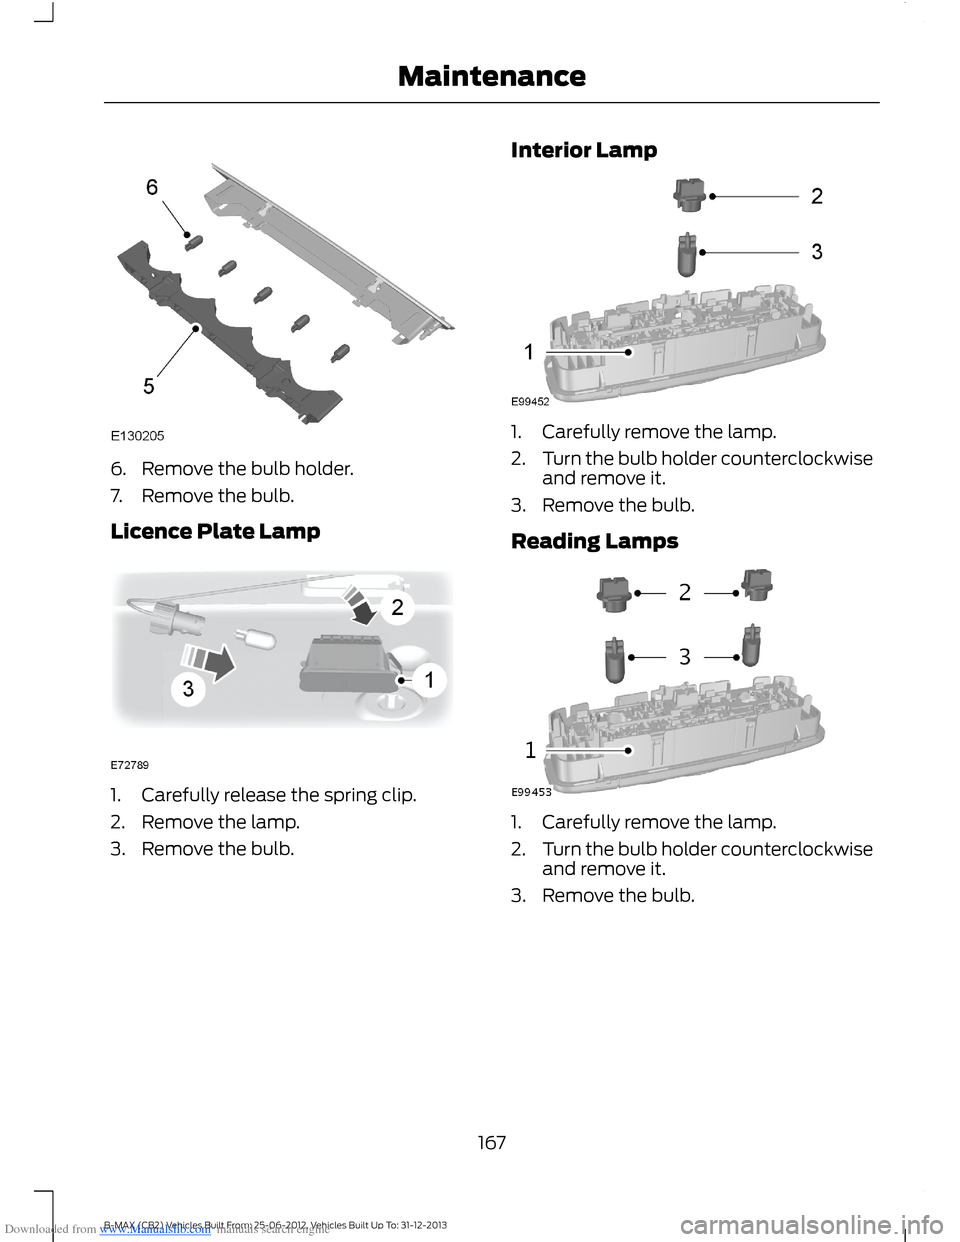
Downloaded from www.Manualslib.com manuals search engine 6.Remove the bulb holder.
7.Remove the bulb.
Licence Plate Lamp
1.Carefully release the spring clip.
2.Remove the lamp.
3.Remove the bulb.
Interior Lamp
1.Carefully remove the lamp.
2.Turn the bulb holder counterclockwiseand remove it.
3.Remove the bulb.
Reading Lamps
1.Carefully remove the lamp.
2.Turn the bulb holder counterclockwiseand remove it.
3.Remove the bulb.
167B-MAX (CB2) Vehicles Built From: 25-06-2012, Vehicles Built Up To: 31-12-2013Maintenance
Page 183 of 298
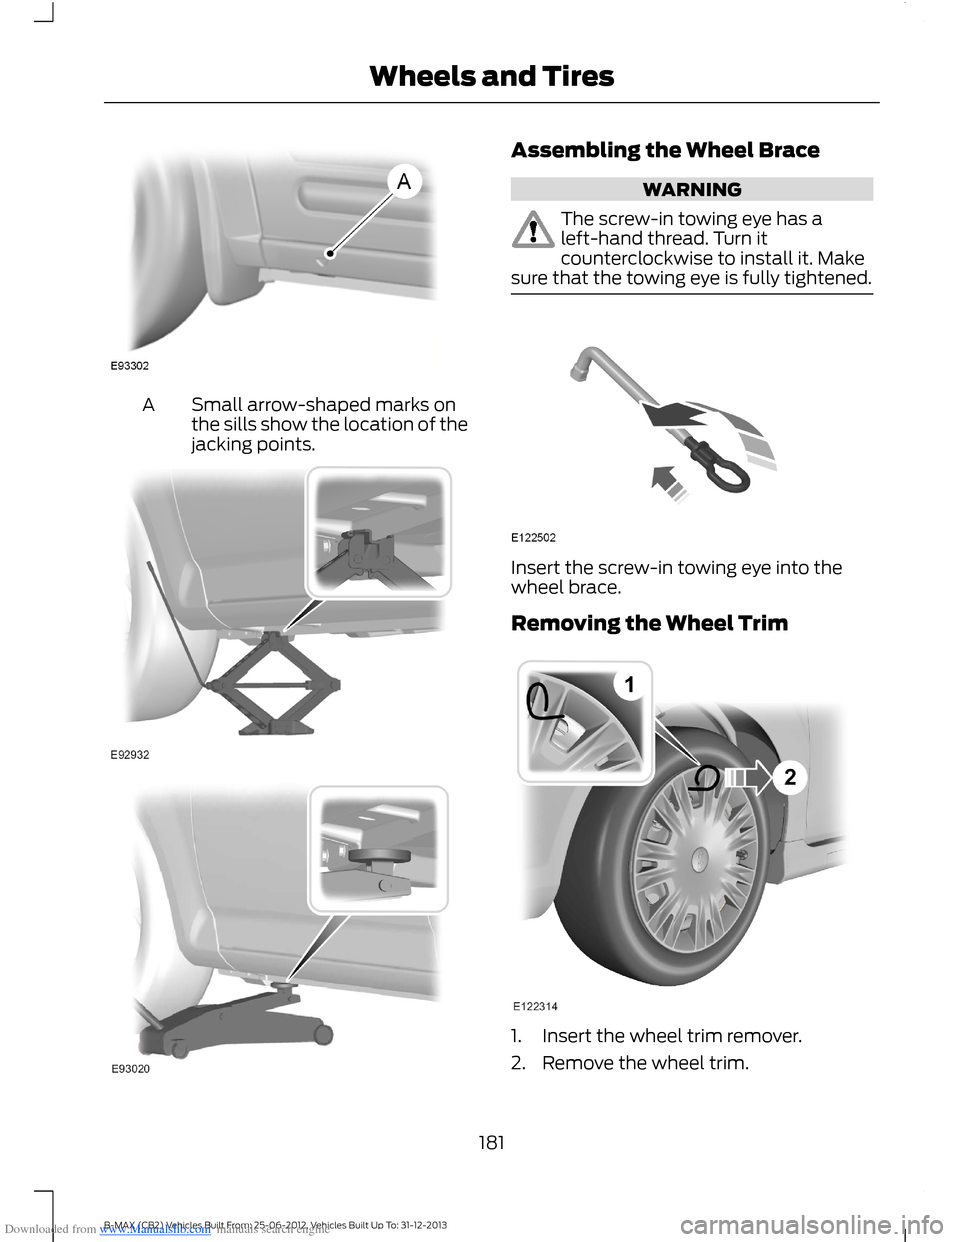
Downloaded from www.Manualslib.com manuals search engine Small arrow-shaped marks onthe sills show the location of thejacking points.
A
Assembling the Wheel Brace
WARNING
The screw-in towing eye has aleft-hand thread. Turn itcounterclockwise to install it. Makesure that the towing eye is fully tightened.
Insert the screw-in towing eye into thewheel brace.
Removing the Wheel Trim
1.Insert the wheel trim remover.
2.Remove the wheel trim.
181B-MAX (CB2) Vehicles Built From: 25-06-2012, Vehicles Built Up To: 31-12-2013Wheels and Tires
Page 211 of 298
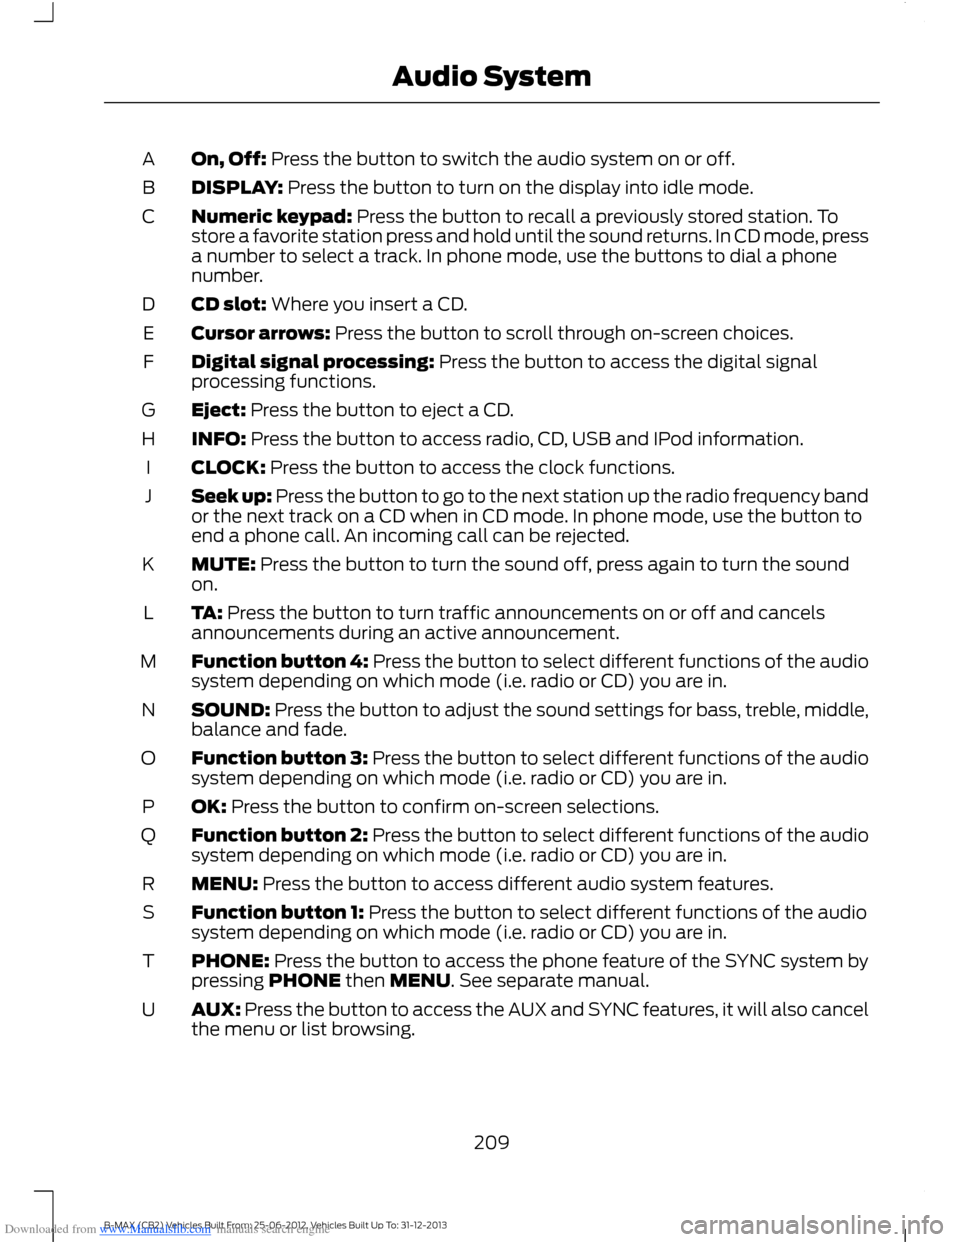
Downloaded from www.Manualslib.com manuals search engine On, Off: Press the button to switch the audio system on or off.A
DISPLAY: Press the button to turn on the display into idle mode.B
Numeric keypad: Press the button to recall a previously stored station. Tostore a favorite station press and hold until the sound returns. In CD mode, pressa number to select a track. In phone mode, use the buttons to dial a phonenumber.
C
CD slot: Where you insert a CD.D
Cursor arrows: Press the button to scroll through on-screen choices.E
Digital signal processing: Press the button to access the digital signalprocessing functions.F
Eject: Press the button to eject a CD.G
INFO: Press the button to access radio, CD, USB and IPod information.H
CLOCK: Press the button to access the clock functions.I
Seek up: Press the button to go to the next station up the radio frequency bandor the next track on a CD when in CD mode. In phone mode, use the button toend a phone call. An incoming call can be rejected.
J
MUTE: Press the button to turn the sound off, press again to turn the soundon.K
TA: Press the button to turn traffic announcements on or off and cancelsannouncements during an active announcement.L
Function button 4: Press the button to select different functions of the audiosystem depending on which mode (i.e. radio or CD) you are in.M
SOUND: Press the button to adjust the sound settings for bass, treble, middle,balance and fade.N
Function button 3: Press the button to select different functions of the audiosystem depending on which mode (i.e. radio or CD) you are in.O
OK: Press the button to confirm on-screen selections.P
Function button 2: Press the button to select different functions of the audiosystem depending on which mode (i.e. radio or CD) you are in.Q
MENU: Press the button to access different audio system features.R
Function button 1: Press the button to select different functions of the audiosystem depending on which mode (i.e. radio or CD) you are in.S
PHONE: Press the button to access the phone feature of the SYNC system bypressing PHONE then MENU. See separate manual.T
AUX: Press the button to access the AUX and SYNC features, it will also cancelthe menu or list browsing.U
209B-MAX (CB2) Vehicles Built From: 25-06-2012, Vehicles Built Up To: 31-12-2013Audio System
Page 217 of 298
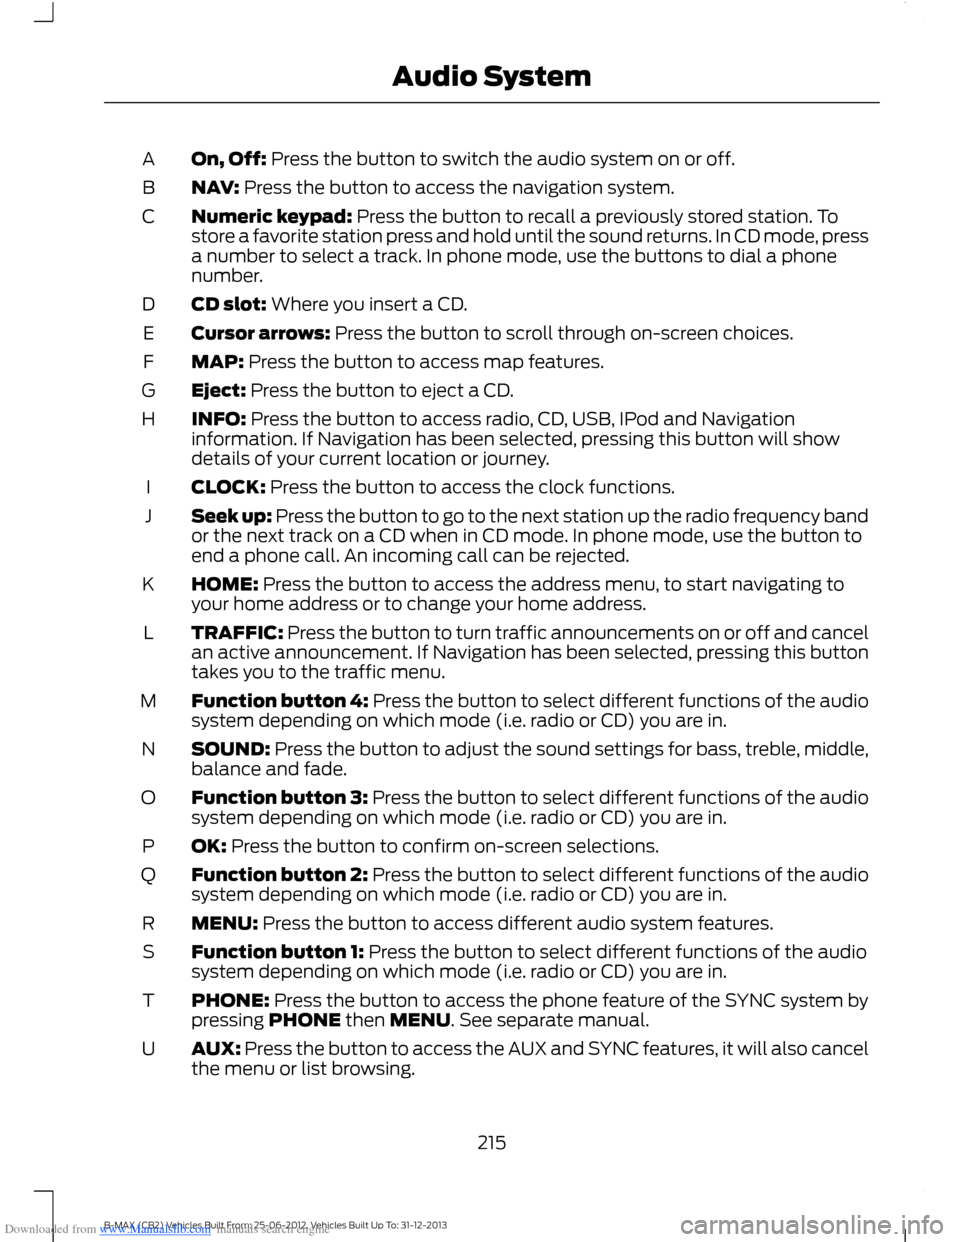
Downloaded from www.Manualslib.com manuals search engine On, Off: Press the button to switch the audio system on or off.A
NAV: Press the button to access the navigation system.B
Numeric keypad: Press the button to recall a previously stored station. Tostore a favorite station press and hold until the sound returns. In CD mode, pressa number to select a track. In phone mode, use the buttons to dial a phonenumber.
C
CD slot: Where you insert a CD.D
Cursor arrows: Press the button to scroll through on-screen choices.E
MAP: Press the button to access map features.F
Eject: Press the button to eject a CD.G
INFO: Press the button to access radio, CD, USB, IPod and Navigationinformation. If Navigation has been selected, pressing this button will showdetails of your current location or journey.
H
CLOCK: Press the button to access the clock functions.I
Seek up: Press the button to go to the next station up the radio frequency bandor the next track on a CD when in CD mode. In phone mode, use the button toend a phone call. An incoming call can be rejected.
J
HOME: Press the button to access the address menu, to start navigating toyour home address or to change your home address.K
TRAFFIC: Press the button to turn traffic announcements on or off and cancelan active announcement. If Navigation has been selected, pressing this buttontakes you to the traffic menu.
L
Function button 4: Press the button to select different functions of the audiosystem depending on which mode (i.e. radio or CD) you are in.M
SOUND: Press the button to adjust the sound settings for bass, treble, middle,balance and fade.N
Function button 3: Press the button to select different functions of the audiosystem depending on which mode (i.e. radio or CD) you are in.O
OK: Press the button to confirm on-screen selections.P
Function button 2: Press the button to select different functions of the audiosystem depending on which mode (i.e. radio or CD) you are in.Q
MENU: Press the button to access different audio system features.R
Function button 1: Press the button to select different functions of the audiosystem depending on which mode (i.e. radio or CD) you are in.S
PHONE: Press the button to access the phone feature of the SYNC system bypressing PHONE then MENU. See separate manual.T
AUX: Press the button to access the AUX and SYNC features, it will also cancelthe menu or list browsing.U
215B-MAX (CB2) Vehicles Built From: 25-06-2012, Vehicles Built Up To: 31-12-2013Audio System
Page 289 of 298
Downloaded from www.Manualslib.com manuals search engine Changing the Wiper Blades.....................160Rear Window Wiper Blade.............................160Windshield Wiper Blades................................160Checking MyKey System Status................31MyKey Distance.....................................................32Number of Admin Keys......................................32Number of MyKeys...............................................32Checking the Wiper Blades......................160Childminder Mirror.........................................56Child Safety.......................................................15Child Safety Locks.........................................20Left-Hand Side.....................................................20Right-Hand Side...................................................20Child Seat Positioning...................................18Cigar Lighter.....................................................88Cleaning the Alloy Wheels.........................173Cleaning the Exterior....................................172Body Paintwork Preservation.........................172Cleaning the Chrome Trim...............................172Cleaning the Headlamps..................................172Cleaning the Rear Window..............................172Cleaning the Interior.....................................172Instrument Cluster Screens, LCD Screensand Radio Screens.........................................173Rear Windows......................................................173Safety Belts...........................................................172Clearing All MyKeys........................................31Climate Control...............................................75Principle of Operation.........................................75Clock...................................................................66Type 1........................................................................66Type 2.......................................................................66Cold Weather Precautions........................130Compact Disc Player - Vehicles With:AM/FM/CD/Bluetooth/SonyAM/FM/CD..................................................224CD Text Display Options..................................227Compact Disc Playback..................................224Compact Disc Track Scanning......................225Ending Compact Disc Playback....................227Fast Forward and Reverse..............................225MP3 and WMA Display Options...................227MP3 and WMA File Playback........................225Repeat Compact Disc Tracks........................225Shuffle and Random........................................225Track Selection...................................................225
Compact Disc Player - Vehicles With:AM/FM/CD...................................................221CD Text Display Options.................................224Compact Disc Playback...................................221Compact Disc Track Scanning.......................221Ending Compact Disc Playback...................224Fast Forward and Reverse...............................221MP3 and WMA Display Options...................224MP3 and WMA File Playback........................222Repeat Compact Disc Tracks.........................221Shuffle and Random.........................................221Track Selection....................................................221Coolant CheckSee: Engine Coolant Check............................158Creating a MyKey...........................................30Vehicles with Keyless Starting.........................31Vehicles without Keyless Starting.................30Cruise Control..................................................43Principle of Operation........................................117Cruise controlSee: Using Cruise Control..................................117Cup Holders.....................................................89
D
Daytime Running Lamps............................49Diesel Particulate Filter................................94Regeneration.........................................................94Digital Audio...................................................219...................................................................................219Direction Indicators........................................51Dog Guard........................................................122DPFSee: Diesel Particulate Filter............................94Driver Airbag.....................................................23.....................................................................................23Driver Knee Airbag.........................................25Driving Aids......................................................119Driving Hints...................................................130Driving Through Water...............................130...................................................................................130DRLSee: Daytime Running Lamps.........................49
E
Electromagnetic compatibility..............268
287B-MAX (CB2) Vehicles Built From: 25-06-2012, Vehicles Built Up To: 31-12-2013Index