stop start FORD B MAX 2013 1.G Owner's Manual
[x] Cancel search | Manufacturer: FORD, Model Year: 2013, Model line: B MAX, Model: FORD B MAX 2013 1.GPages: 298, PDF Size: 20.63 MB
Page 105 of 298
Downloaded from www.Manualslib.com manuals search engine Calculating Fuel Economy
Do not measure fuel economy during thefirst 1000 miles (1600 km) of driving (thisis your engine’s break-in period). A moreaccurate measurement is obtained after2000 - 3000 miles (3200 - 4800 km).Also, fuel expense, frequency of fill ups orfuel gauge readings are not accurate waysto measure fuel economy.
1.Fill the fuel tank completely and recordthe initial odometer reading.
2.Each time you fill the tank, record theamount of fuel added.
3.After at least three to five tank fill ups,fill the fuel tank and record the currentodometer reading.
4.Subtract your initial odometer readingfrom the current odometer reading.
5.Calculate fuel economy by dividingmiles traveled by gallons used (ForMetric: Multiply liters used by 100, thendivide by kilometers traveled).
Keep a record for at least one month andrecord the type of driving (city or freeway).This provides an accurate estimate of yourvehicle’s fuel economy under currentdriving conditions. Additionally, keepingrecords during summer and winter showhow temperature impacts fuel economy.In general, lower temperatures mean lowerfuel economy.
TECHNICAL SPECIFICATIONS
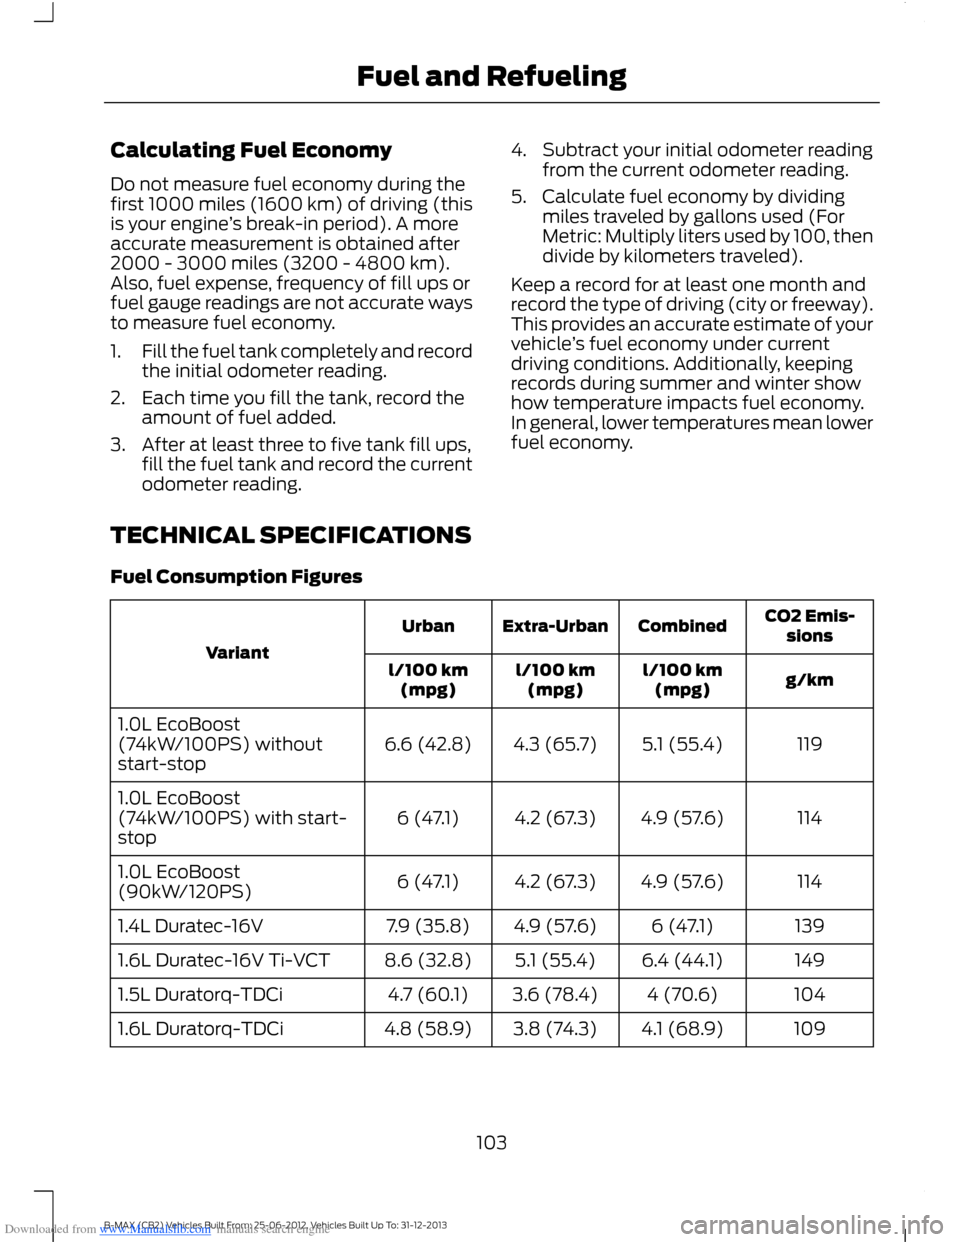
Fuel Consumption Figures
CO2 Emis-sionsCombinedExtra-UrbanUrban
Variant
g/kml/100 km(mpg)l/100 km(mpg)l/100 km(mpg)
1195.1 (55.4)4.3 (65.7)6.6 (42.8)1.0L EcoBoost(74kW/100PS) withoutstart-stop
1144.9 (57.6)4.2 (67.3)6 (47.1)1.0L EcoBoost(74kW/100PS) with start-stop
1144.9 (57.6)4.2 (67.3)6 (47.1)1.0L EcoBoost(90kW/120PS)
1396 (47.1)4.9 (57.6)7.9 (35.8)1.4L Duratec-16V
1496.4 (44.1)5.1 (55.4)8.6 (32.8)1.6L Duratec-16V Ti-VCT
1044 (70.6)3.6 (78.4)4.7 (60.1)1.5L Duratorq-TDCi
1094.1 (68.9)3.8 (74.3)4.8 (58.9)1.6L Duratorq-TDCi
103B-MAX (CB2) Vehicles Built From: 25-06-2012, Vehicles Built Up To: 31-12-2013Fuel and Refueling
Page 107 of 298
Downloaded from www.Manualslib.com manuals search engine WARNINGS
Apply the parking brake and movethe transmission selector lever topark before leaving your vehicle.Make sure that the transmission selectorlever is latched in position.
Note:An audible warning will sound if youopen the driver's door and you have notmoved the transmission selector lever topark.
In this position, power is not transmittedto the drive wheels and the transmissionis locked. You can start the engine with thetransmission selector lever in this position.
R (Reverse)
WARNINGS
Move the transmission selector leverto reverse only when your vehicle isstationary and the engine is at idlespeed.
Always come to a complete stopbefore shifting the transmissionselector lever out of reverse.
Move the transmission selector lever toreverse to allow your vehicle to movebackward.
N (Neutral)
In this position, power is not transmittedto the drive wheels but the transmission isnot locked. You can start the engine withthe transmission selector lever in thisposition.
D (Drive)
Note:A shift will occur only when yourvehicle speed and the engine speed areappropriate.
Note:You may temporarily override thecurrent gear selected using the + and -buttons.
Select drive to shift automatically throughthe forward gears.
The transmission will select theappropriate gear for optimum performancebased on ambient temperature, roadgradient, vehicle load and your input.
Sport Mode and Manual Shifting
Sport Mode
Note:In sport mode the transmissionoperates as normal but gears are selectedmore quickly and at higher engine speeds.
Note:In sport mode S will be shown in theinformation display.
Switch on sport mode by moving thetransmission selector lever to position S.Sport mode will remain on until either youshift manually up or down the gears using+ and - or move the transmission selectorlever to position D.
Manual Shifting
WARNINGS
Do not hold the buttons permanentlyin - or +.
The transmission will automaticallydownshift when the engine speed istoo low.
Press the - button to shift down and pressthe + button to shift up.
Gears may be skipped by pressing thebuttons repeatedly at short intervals.
Manual mode also provides a kickdownfunction. See Kickdown.
105B-MAX (CB2) Vehicles Built From: 25-06-2012, Vehicles Built Up To: 31-12-2013Transmission
Page 152 of 298
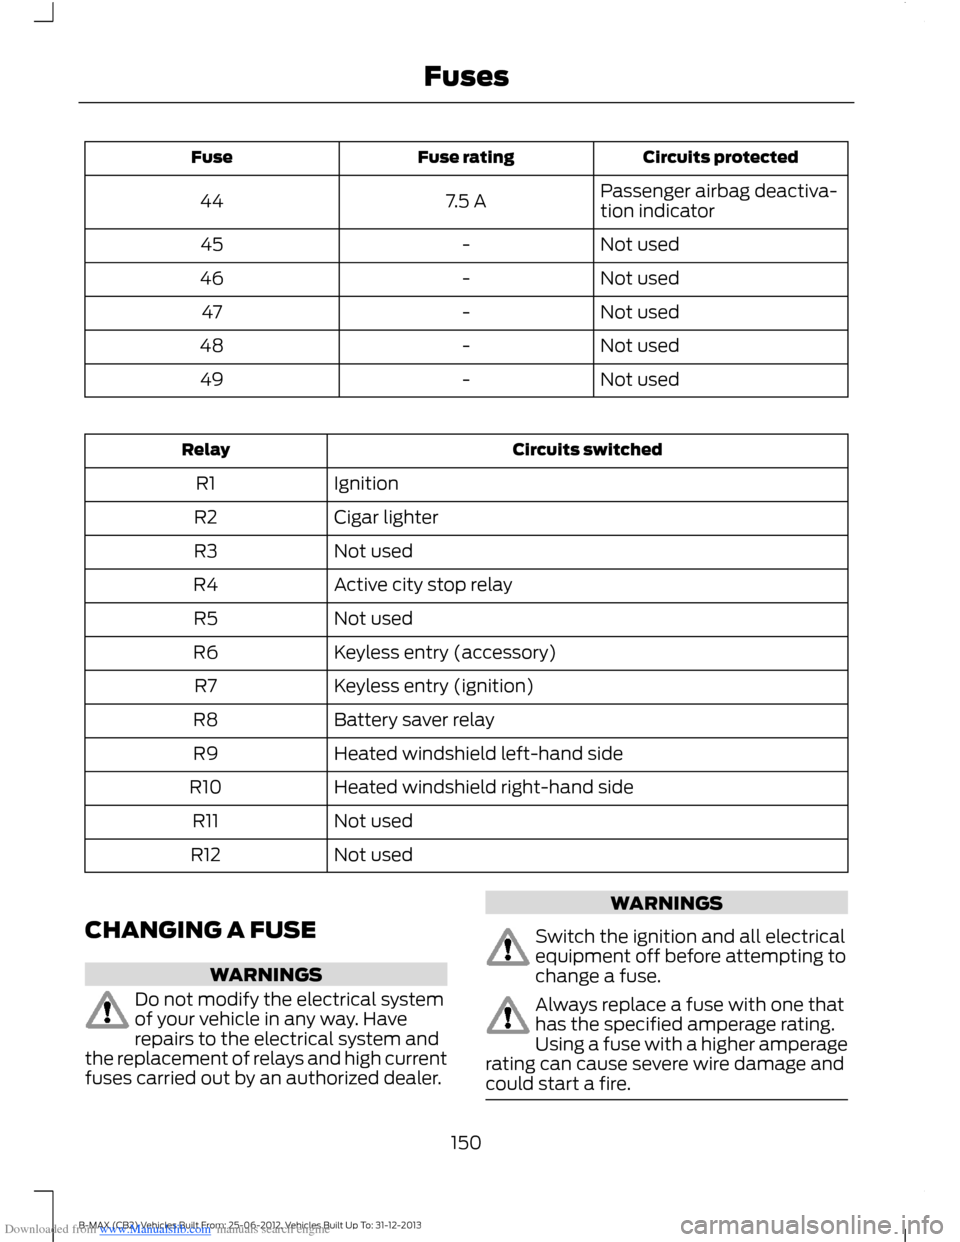
Downloaded from www.Manualslib.com manuals search engine Circuits protectedFuse ratingFuse
Passenger airbag deactiva-tion indicator7.5 A44
Not used-45
Not used-46
Not used-47
Not used-48
Not used-49
Circuits switchedRelay
IgnitionR1
Cigar lighterR2
Not usedR3
Active city stop relayR4
Not usedR5
Keyless entry (accessory)R6
Keyless entry (ignition)R7
Battery saver relayR8
Heated windshield left-hand sideR9
Heated windshield right-hand sideR10
Not usedR11
Not usedR12
CHANGING A FUSE
WARNINGS
Do not modify the electrical systemof your vehicle in any way. Haverepairs to the electrical system andthe replacement of relays and high currentfuses carried out by an authorized dealer.
WARNINGS
Switch the ignition and all electricalequipment off before attempting tochange a fuse.
Always replace a fuse with one thathas the specified amperage rating.Using a fuse with a higher amperagerating can cause severe wire damage andcould start a fire.
150B-MAX (CB2) Vehicles Built From: 25-06-2012, Vehicles Built Up To: 31-12-2013Fuses
Page 161 of 298
Downloaded from www.Manualslib.com manuals search engine BRAKE AND CLUTCH FLUID
CHECK
WARNINGS
Do not use any fluid other than therecommended brake fluid as this willreduce brake efficiency. Use ofincorrect fluid could result in the loss ofvehicle control, serious personal injury ordeath.
Only use brake fluid from a sealedcontainer. Contamination with dirt,water, petroleum products or othermaterials may result in brake systemdamage or failure. Failure to adhere to thiswarning could result in the loss of vehiclecontrol, serious personal injury or death.
Do not allow the fluid to touch yourskin or eyes. This could cause seriouspersonal injury. Rinse the affectedareas immediately with plenty of waterand consult a physician.
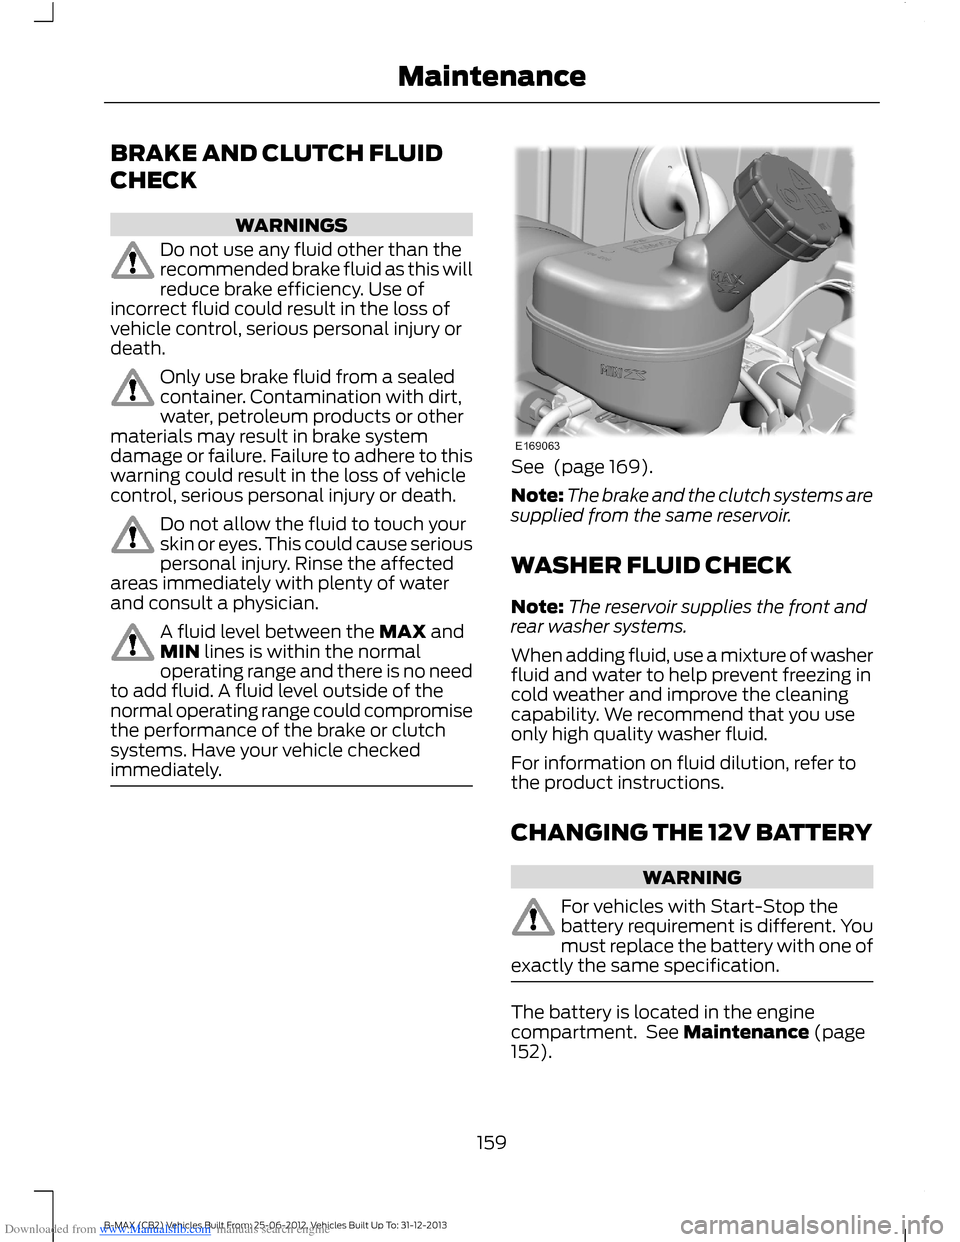
A fluid level between the MAX andMIN lines is within the normaloperating range and there is no needto add fluid. A fluid level outside of thenormal operating range could compromisethe performance of the brake or clutchsystems. Have your vehicle checkedimmediately.
See (page 169).
Note:The brake and the clutch systems aresupplied from the same reservoir.
WASHER FLUID CHECK
Note:The reservoir supplies the front andrear washer systems.
When adding fluid, use a mixture of washerfluid and water to help prevent freezing incold weather and improve the cleaningcapability. We recommend that you useonly high quality washer fluid.
For information on fluid dilution, refer tothe product instructions.
CHANGING THE 12V BATTERY
WARNING
For vehicles with Start-Stop thebattery requirement is different. Youmust replace the battery with one ofexactly the same specification.
The battery is located in the enginecompartment. See Maintenance (page152).
159B-MAX (CB2) Vehicles Built From: 25-06-2012, Vehicles Built Up To: 31-12-2013Maintenance
Page 178 of 298
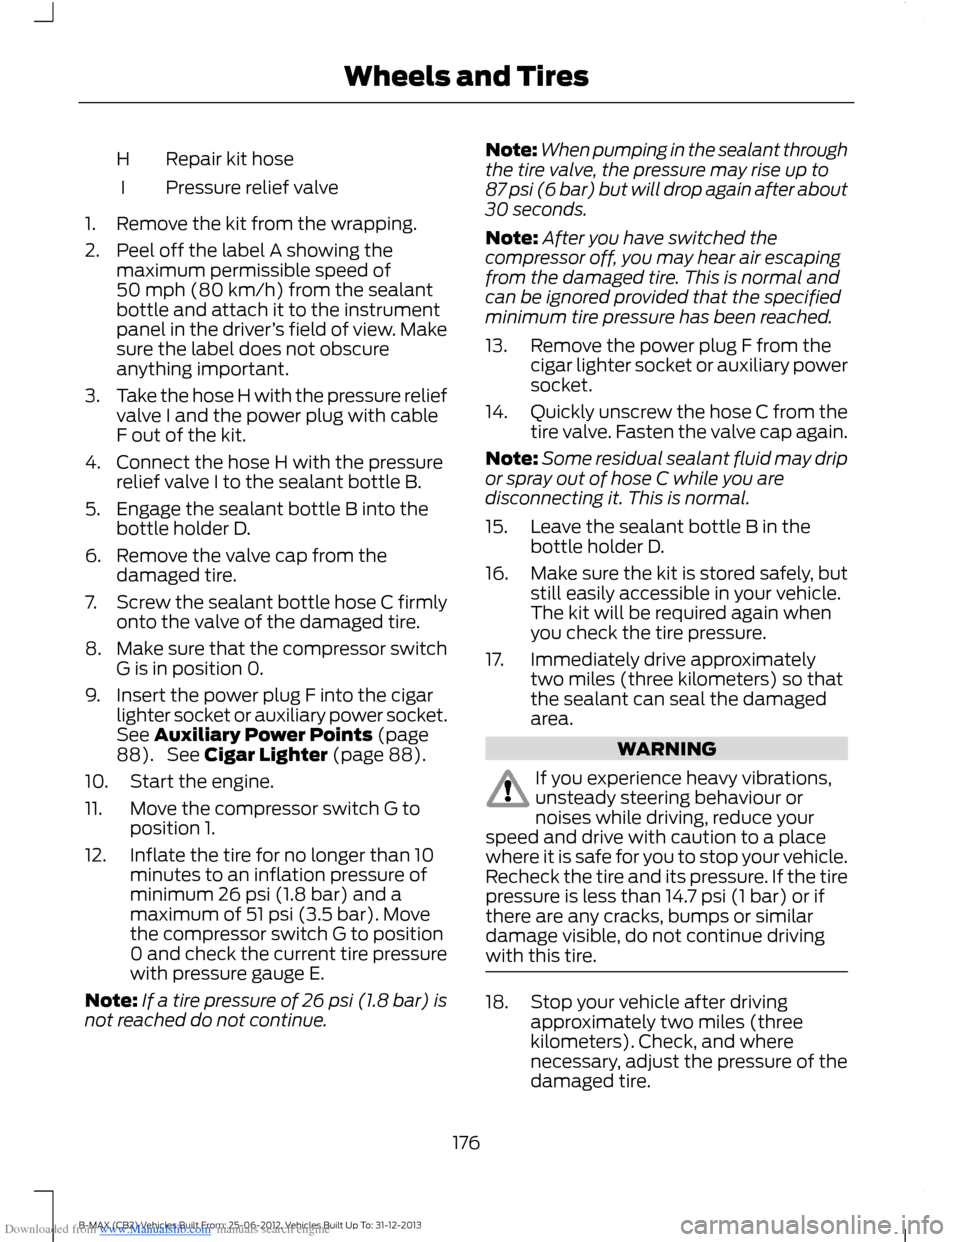
Downloaded from www.Manualslib.com manuals search engine Repair kit hoseH
Pressure relief valveI
1.Remove the kit from the wrapping.
2.Peel off the label A showing themaximum permissible speed of50 mph (80 km/h) from the sealantbottle and attach it to the instrumentpanel in the driver’s field of view. Makesure the label does not obscureanything important.
3.Take the hose H with the pressure reliefvalve I and the power plug with cableF out of the kit.
4.Connect the hose H with the pressurerelief valve I to the sealant bottle B.
5.Engage the sealant bottle B into thebottle holder D.
6.Remove the valve cap from thedamaged tire.
7.Screw the sealant bottle hose C firmlyonto the valve of the damaged tire.
8.Make sure that the compressor switchG is in position 0.
9.Insert the power plug F into the cigarlighter socket or auxiliary power socket.See Auxiliary Power Points (page88). See Cigar Lighter (page 88).
10.Start the engine.
11.Move the compressor switch G toposition 1.
12.Inflate the tire for no longer than 10minutes to an inflation pressure ofminimum 26 psi (1.8 bar) and amaximum of 51 psi (3.5 bar). Movethe compressor switch G to position0 and check the current tire pressurewith pressure gauge E.
Note:If a tire pressure of 26 psi (1.8 bar) isnot reached do not continue.
Note:When pumping in the sealant throughthe tire valve, the pressure may rise up to87 psi (6 bar) but will drop again after about30 seconds.
Note:After you have switched thecompressor off, you may hear air escapingfrom the damaged tire. This is normal andcan be ignored provided that the specifiedminimum tire pressure has been reached.
13.Remove the power plug F from thecigar lighter socket or auxiliary powersocket.
14.Quickly unscrew the hose C from thetire valve. Fasten the valve cap again.
Note:Some residual sealant fluid may dripor spray out of hose C while you aredisconnecting it. This is normal.
15.Leave the sealant bottle B in thebottle holder D.
16.Make sure the kit is stored safely, butstill easily accessible in your vehicle.The kit will be required again whenyou check the tire pressure.
17.Immediately drive approximatelytwo miles (three kilometers) so thatthe sealant can seal the damagedarea.
WARNING
If you experience heavy vibrations,unsteady steering behaviour ornoises while driving, reduce yourspeed and drive with caution to a placewhere it is safe for you to stop your vehicle.Recheck the tire and its pressure. If the tirepressure is less than 14.7 psi (1 bar) or ifthere are any cracks, bumps or similardamage visible, do not continue drivingwith this tire.
18.Stop your vehicle after drivingapproximately two miles (threekilometers). Check, and wherenecessary, adjust the pressure of thedamaged tire.
176B-MAX (CB2) Vehicles Built From: 25-06-2012, Vehicles Built Up To: 31-12-2013Wheels and Tires
Page 224 of 298
Downloaded from www.Manualslib.com manuals search engine Various scan modes are possible,according to the type of CD currentlyplaying.
1.Press the MENU button and select CDMODE.
2.Select SCAN. This enables thefunction to be switched on or off.
Note:When an MP3 or WMA CD is playing,options include SCAN for the CD or just thetracks in the folder.
3.Press the OK button to stop the scanmode.
MP3 and WMA File Playback
MP3 (MPEG 1 Audio Layer-3) or WMA(Windows media audio) is a standardtechnology and format for compressingaudio data. This allows a more efficientuse of the media.
You can play MP3 files recorded onCD-ROM, CD-R and CD-RW formats. Thedisc must be in the ISO 9660 level 1 or level2 format, or Joliet or Romeo in theexpansion format. You can also use a discrecorded in multi session.
ISO 9660 Format
This is the most common internationalstandard for the logical format of files andfolders on a CD-ROM.
There are several specification levels. InLevel 1, file names must be in the 8.3format (no more than eight characters inthe name, no more than three charactersin the extension .MP3 and .WMA) and incapital letters.
Folder names can be no longer than eightcharacters. There can be no more thaneight folder levels (trees). Level 2specifications allow file names up to 31characters long.
Each folder can have up to eight trees.
For Joliet or Romeo in the expansionformat, consider these restrictions whenconfiguring your CD writing software.
Multi Session
This is a recording method that enablesadding of data using the track-at-oncemethod.
Conventional CDs begin at a CD controlarea called the lead-in and end at an areacalled lead-out. A multi session CD is a CDhaving multiple sessions, with eachsegment from lead-in to lead-out regardedas a single session.
CD-Extra: The format that records audio(audio CD data) as tracks on session 1, andrecords data as tracks on session 2.
Mixed CD: In this format, data is recordedas track 1 and audio (audio CD data) isrecorded as track 2.
File Formats
With formats other than ISO 9660 level 1and level 2, folder names or file names maynot be displayed correctly.
When naming, be sure to add the fileextension .MP3 or .WMA to the file name.
If you put the extension .MP3 or .WMA toa file other than MP3 or WMA, the unitcannot recognize the file correctly and willgenerate random noise that could damageyour speakers.
The following discs take a longer time tostart playback.
•A disc recorded with complicated treestructure.
•A disc recorded in multi session.
•A non-finalized disc to which data canbe added.
222B-MAX (CB2) Vehicles Built From: 25-06-2012, Vehicles Built Up To: 31-12-2013Audio System
Page 288 of 298
Downloaded from www.Manualslib.com manuals search engine Audio unit - Vehicles With: NavigationSystem/Sony AM/FM/CD......................214Alternative Frequencies...................................219Automatic Volume Control.............................218Autostore Control................................................217Digital Signal Processing.................................218News Broadcasts................................................218Regional Mode.....................................................219Sound Button.......................................................216Station Preset Buttons......................................217Station Tuning Control.....................................216Traffic Information Control..............................217Waveband Button..............................................216Audio unit - Vehicles With: SonyAM/FM/CD.................................................208Alternative Frequencies....................................213Automatic Volume Control.............................212Autostore Control................................................211Digital Signal Processing..................................212News Broadcasts................................................212Regional Mode.....................................................213Sound Button.......................................................210Station Preset Buttons......................................211Station Tuning Control.....................................210Traffic Information Control...............................211Waveband Button..............................................210Autolamps........................................................48Automatic Climate Control.........................77Temperature Control...........................................79Automatic Transmission...........................104Emergency Park Position ReleaseLever...................................................................106Hints on Driving With an AutomaticTransmission...................................................106Selector Lever Positions..................................104Sport Mode and Manual Shifting.................105Auto-Start-Stop.............................................96To Re-Start the Engine.......................................97To Stop the Engine..............................................96Using Start-Stop..................................................96Autowipers.......................................................44Auxiliary Input Jack.....................................228Auxiliary Power Points.................................8812 Volt DC Power Point......................................88Location...................................................................88
B
Bonnet LockSee: Opening and Closing the Hood...........152Brake and Clutch Fluid Check..................159Brakes...............................................................109General Information..........................................109Breaking-In.....................................................130Brakes and Clutch..............................................130Engine.....................................................................130Tires.........................................................................130Bulb Specification Chart...........................168
C
Capacities and Specifications................186Technical Specifications..................................187Cargo Nets.......................................................122Installing and Removing the Net...................122Car WashSee: Cleaning the Exterior................................172Catalytic Converter.....................................100Driving with a Catalytic Converter...............100Changing a Bulb............................................162Approach Lamp..................................................164Central High Mounted Brake Lamp.............166Front Fog Lamps................................................164Headlamp..............................................................162Interior Lamp........................................................167Licence Plate Lamp............................................167Luggage Compartment Lamp, FootwellLamp and Liftgate Lamp............................168Reading Lamps....................................................167Rear Lamps...........................................................165Side Lamp.............................................................163Side Repeater......................................................163Changing a Fuse...........................................150Changing a Road Wheel............................179Assembling the Wheel Brace.........................181Installing a Road Wheel...................................182Jacking and Lifting Points...............................180Lug Nuts.................................................................179Removing a Road Wheel.................................182Removing the Wheel Trim................................181Vehicle Jack...........................................................179Vehicles With a Spare Wheel.........................179Changing the 12V Battery..........................159
286B-MAX (CB2) Vehicles Built From: 25-06-2012, Vehicles Built Up To: 31-12-2013Index
Page 291 of 298
Downloaded from www.Manualslib.com manuals search engine Hill Start Assist..............................................107Switching the System On and Off................107Using Hill Start Assist........................................107Hints on Controlling the InteriorClimate............................................................79Cooling the Interior Quickly.............................80General Hints.........................................................79Heating the Interior Quickly.............................80Maximum Cooling Performance inInstrument Panel or Instrument Paneland Footwell Positions.................................82Recommended Settings for Cooling ............81Recommended Settings for Heating...........80Side Window Defogging in ColdWeather...............................................................81Vehicle Stationary for Extended PeriodsDuring Extreme High AmbientTemperatures....................................................81Hints on Driving With Anti-LockBrakes............................................................109Hood LockSee: Opening and Closing the Hood...........152
I
Ignition Switch................................................90Information Displays.....................................63General Information............................................63Information Messages..................................67Installing Child Seats.....................................15Attaching a Child Seat with TopTethers..................................................................17Booster Seats.........................................................16Child Seats for Different Mass Groups..........15ISOFIX Anchor Points...........................................17Top Tether Anchor Points...................................17Instrument Cluster........................................58Instrument Lighting Dimmer.....................49.....................................................................................49Interior Lamps..................................................51Courtesy Lamp.......................................................51Reading Lamps.....................................................52Interior Mirror...................................................55Auto-Dimming Mirror..........................................55Introduction........................................................5
J
Jump-Starting the Vehicle.........................132To Connect the Booster Cables.....................132To Start the Engine.............................................133
K
Keyless Entry....................................................36Disabled Keys........................................................38General Information............................................36Locking and Unlocking the Doors with theKey Blade............................................................38Locking Your Vehicle............................................37Passive Key..............................................................37Unlocking Your Vehicle......................................38Keyless Starting.............................................90Failure to Start........................................................91Ignition On...............................................................91Starting a Diesel Engine.....................................91Starting With AutomaticTransmission......................................................91Starting With Manual Transmission..............91Stopping the Engine When Your Vehicle isMoving.................................................................92Stopping the Engine When Your Vehicle isStationary...........................................................92Keys and Remote Controls.........................26
L
Lighting Control...............................................47Headlamp Flasher...............................................48High Beams............................................................48Lighting Control Positions.................................47Parking Lamps.......................................................47Lighting...............................................................47General Information............................................47Load Carrying..................................................121General Information............................................121Locking and Unlocking.................................34Locking and Unlocking the Doors FromInside....................................................................34Locking and Unlocking the Doors With theKey........................................................................34Power Door Locks................................................34Remote Control....................................................34Locks...................................................................34
289B-MAX (CB2) Vehicles Built From: 25-06-2012, Vehicles Built Up To: 31-12-2013Index
Page 293 of 298
Downloaded from www.Manualslib.com manuals search engine Power Door LocksSee: Locking and Unlocking.............................34Power Windows..............................................53Accessory Delay....................................................54Bounce-Back.........................................................53One-Touch Down.................................................53One-Touch Up.......................................................53Window Lock.........................................................53Programming a MyKey..................................31Optional Settings..................................................31
R
Rear Fog Lamps.............................................50Rear Seats........................................................86Folding the Seatback.........................................86Unfolding the Seatback....................................86Rear Under Floor Storage...........................121Adjustable Load Floor........................................121Rear View Camera.........................................114Switching the Rear View Camera Off..........116Switching the Rear View Camera On...........115Using the Display.................................................115Vehicles with Parking Aid.................................116Rear View CameraSee: Rear View Camera.....................................114Rear Window Wiper and Washers...........45Intermittent Wipe.................................................45Rear Window Washer.........................................46Reverse Gear Wipe..............................................46Refueling...........................................................101Remote Control..............................................26Changing the Remote Control Battery.........27Programming a New Remote Control..........26Remote Control With a Folding KeyBlade.....................................................................27Remote Control Without a Folding KeyBlade....................................................................28Reprogramming the UnlockingFunction..............................................................26Removing a Headlamp................................161Repairing Minor Paint Damage................173Replacement PartsRecommendation..........................................7Collision Repairs......................................................7Scheduled Maintenance and MechanicalRepairs....................................................................7Warranty on Replacement Parts......................8
Replacing a Lost Key or RemoteControl.............................................................29Roadside Emergencies...............................132Running-InSee: Breaking-In..................................................130Running Out of Fuel......................................99Refilling With a Portable FuelContainer..........................................................100
S
Safety Belt Minder..........................................22Turning the Safety Belt Minder Off................22Safety Belts.......................................................21Safety Precautions........................................98Seats...................................................................83Security..............................................................39Side Airbags.....................................................24Side Curtain Airbags......................................25Sitting in the Correct Position...................83Sliding Door......................................................35Snow ChainsSee: Using Snow Chains..................................178Speed ControlSee: Cruise Control..............................................117Stability Control..............................................111Principle of Operation.........................................111Starter SwitchSee: Ignition Switch............................................90Starting a Diesel Engine..............................94Cold or Hot Engine...............................................94Failure to Start......................................................94Starting a Gasoline Engine.........................93Cold or Hot Engine...............................................93Engine Idle Speed after Starting....................93Failure to Start.......................................................93Flooded Engine.....................................................93Starting and Stopping the Engine...........90General Information...........................................90Steering Wheel Lock - Vehicles With:Keyless Entry and Push ButtonStart/Push Button Start...........................92Unlocking the Steering Wheel........................93Steering Wheel Lock - Vehicles Without:Keyless Entry and Push ButtonStart/Push Button Start...........................92Steering Wheel................................................42Storage Compartments..............................89
291B-MAX (CB2) Vehicles Built From: 25-06-2012, Vehicles Built Up To: 31-12-2013Index