clock FORD BRONCO 2022 User Guide
[x] Cancel search | Manufacturer: FORD, Model Year: 2022, Model line: BRONCO, Model: FORD BRONCO 2022Pages: 562, PDF Size: 73 MB
Page 301 of 562
Using the Front and RearDifferential Lock
When engaged, the front and reardifferential lock provides additionaltraction to your vehicle by forcing eitherthe two rear wheels or two front wheels toturn at the same speed.
You can activate and deactivate the frontand rear differential lock on the fly withinthe operating speed range. See ElectronicLocking Differential (page 190).
Using Trail Control
The system works in a similar manner tocruise control in off-road conditions. TrailControl provides you the ability tomaneuver the vehicle without using thethrottle and brake pedals.
Trail Control allows you to set a speedbetween 1 mph (1.6 km/h) to 14 mph(23 km/h) in a forward motion and 1 mph(1.6 km/h) to 5 mph (8 km/h) in reverse.The system controls acceleration andbraking in difficult off-road environments,which allows you to focus on steering. SeeTrail Control (page 207).
Trail Control Performance:
•Manages wheel slip to maximizetraction.
•Removes the need for you to use bothfeet when driving in off-road situations.
•Provides braking to maximize tractionin descents.
•Gives you confidence in difficultenvironments.
Using Trail One Pedal Drive
Trail one pedal drive coordinatespropulsive and braking torque through yourapplication of the accelerator pedal tosimulate a two footed driving technique.
Use this when driving over large obstacles,such as rocks or logs, to help maintain aconstant vehicle speed.
In 4H, the system offers lift pedal brakingand auto hill hold functionality. See WhatIs Trail One Pedal Drive (page 208).
Note:Trail one pedal drive is only availablewhen the vehicle is in 4H or 4L.
Using Trail Turn Assist
The feature reduces the turn radius of thevehicle on off-road surfaces.
The system reduces driver effort tonegotiate difficult off-road terrain byallowing the vehicle to make a tight turnin a single maneuver that might otherwiserequire a three point turn. See Trail TurnAssist (page 212).
Note:Trail turn assist is only available whenthe vehicle is in 4H or 4L.
Note:Trail turn assist cannot activate if therear differential is locked.
What Are Rock Rails (If Equipped)
Rock rails protect the rocker and body sidefrom damage and provide a sliding surfaceto allow the vehicle to cross boulders androck ledges.
Rock rails also can act as a pivot point tosharply turn the vehicle in tight spaces withhigh walls or rocks present.
AFTER DRIVING YOUR VEHICLEOFF-ROAD
WARNING: After off-road use,before returning to the road, check thewheels and tires for damage. Off-roaduse may cause damage to your wheelsand tires that can lead to tire failure, lossof vehicle control, serious injury or death.
297
2022 Bronco (TG1) Canada/United States of America, enUSA, Edition date: 202109, First-PrintingDriving Hints
Page 327 of 562
Battery. See Changing the 12V Battery (page 331).G
Air filter assembly. See Changing the Engine Air Filter (page 328).H
ENGINE OIL
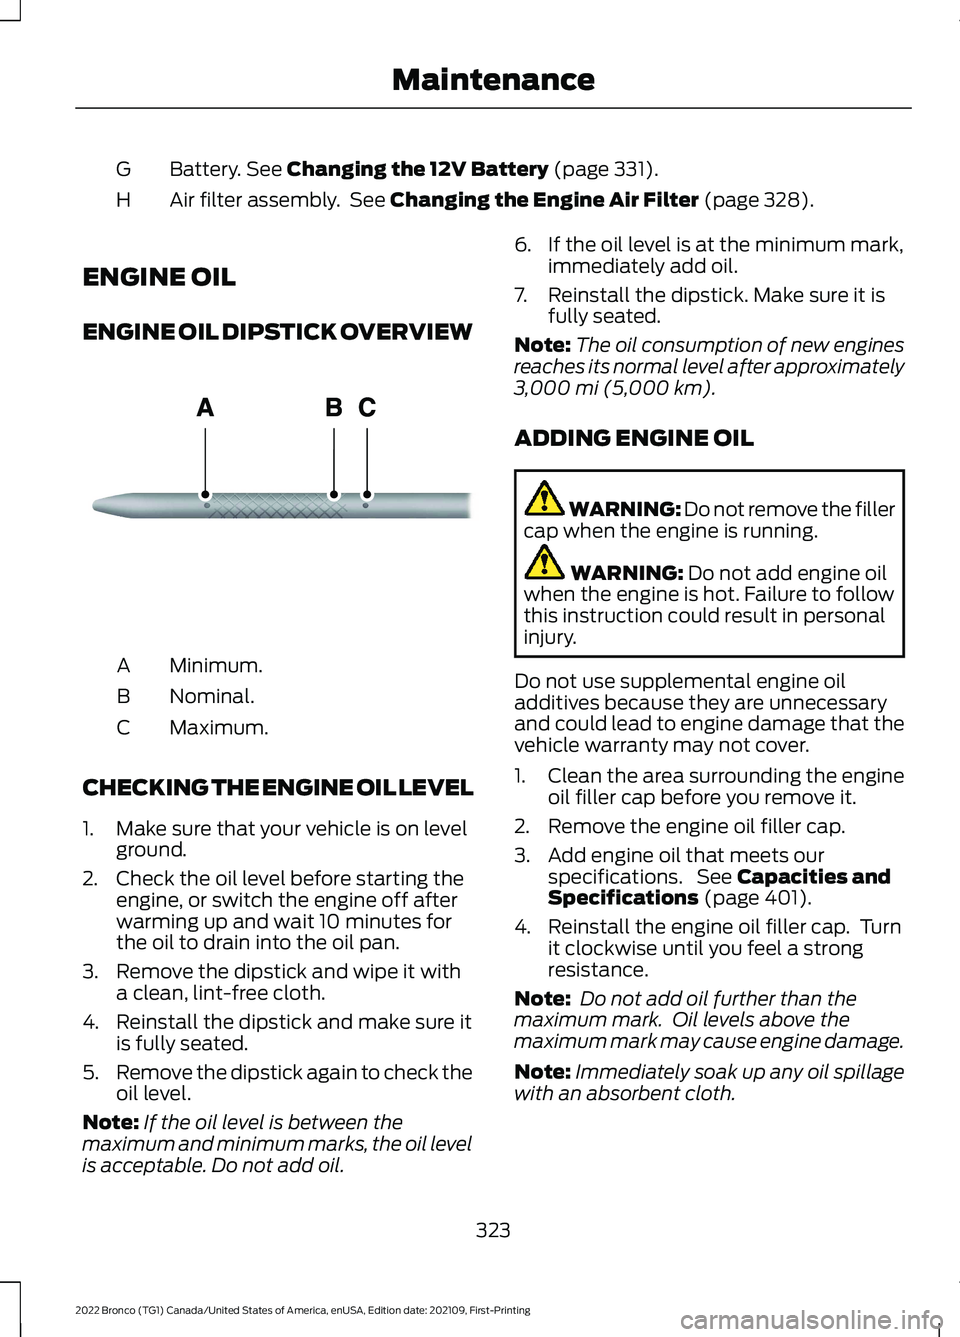
ENGINE OIL DIPSTICK OVERVIEW
Minimum.A
Nominal.B
Maximum.C
CHECKING THE ENGINE OIL LEVEL
1.Make sure that your vehicle is on levelground.
2.Check the oil level before starting theengine, or switch the engine off afterwarming up and wait 10 minutes forthe oil to drain into the oil pan.
3.Remove the dipstick and wipe it witha clean, lint-free cloth.
4.Reinstall the dipstick and make sure itis fully seated.
5.Remove the dipstick again to check theoil level.
Note:If the oil level is between themaximum and minimum marks, the oil levelis acceptable. Do not add oil.
6.If the oil level is at the minimum mark,immediately add oil.
7.Reinstall the dipstick. Make sure it isfully seated.
Note:The oil consumption of new enginesreaches its normal level after approximately3,000 mi (5,000 km).
ADDING ENGINE OIL
WARNING: Do not remove the fillercap when the engine is running.
WARNING: Do not add engine oilwhen the engine is hot. Failure to followthis instruction could result in personalinjury.
Do not use supplemental engine oiladditives because they are unnecessaryand could lead to engine damage that thevehicle warranty may not cover.
1.Clean the area surrounding the engineoil filler cap before you remove it.
2.Remove the engine oil filler cap.
3.Add engine oil that meets ourspecifications. See Capacities andSpecifications (page 401).
4.Reinstall the engine oil filler cap. Turnit clockwise until you feel a strongresistance.
Note: Do not add oil further than themaximum mark. Oil levels above themaximum mark may cause engine damage.
Note:Immediately soak up any oil spillagewith an absorbent cloth.
323
2022 Bronco (TG1) Canada/United States of America, enUSA, Edition date: 202109, First-PrintingMaintenanceE270482
Page 329 of 562
WARNING: Do not remove thecoolant reservoir cap when the engine ison or the cooling system is hot. Wait 10minutes for the cooling system to cooldown. Cover the coolant reservoir capwith a thick cloth to prevent thepossibility of scalding and slowly removethe cap. Failure to follow this instructioncould result in personal injury.
WARNING: Do not add enginecoolant when the engine is on or thecooling system is hot. Failure to followthis instruction could result in personalinjury.
WARNING: Do not add coolantfurther than the MAX mark.
WARNING: Do not put coolant inthe windshield washer reservoir. Ifsprayed on the windshield, coolant couldmake it difficult to see through thewindshield.
WARNING: Do not allow the fluidto touch your skin or eyes. If thishappens, rinse the affected areasimmediately with plenty of water andcontact your physician.
WARNING: Undiluted coolant isflammable and may ignite if spilled on ahot exhaust.
Note: Do not use stop leak pellets, coolingsystem sealants, or non-specified additivesas they can cause damage to the enginecooling or heating systems. Resultingcomponent damage may not be covered bythe vehicle Warranty.
Note:Automotive fluids are notinterchangeable.
It is very important to use predilutedcoolant approved to the correctspecification in order to avoid plugging thesmall passageways in the engine coolingsystem. See Capacities andSpecifications (page 401). Do not mixdifferent colors or types of coolant in yourvehicle. Mixing of engine coolants or usingan incorrect coolant may harm the engineor cooling system components and couldvoid the vehicle Warranty.
Note:If prediluted coolant is not available,use the approved concentrated coolantdiluting it to 50/50 with deionized ordistilled water. See Capacities andSpecifications (page 401). Using water thathas not been deionized may contribute todeposit formation, corrosion and pluggingof the small cooling system passageways.
To top up the coolant level do thefollowing:
1.Unscrew the cap slowly. Any pressureescapes as you unscrew the cap.
2.Add enough prediluted coolant toreach the correct level.
Note:We do not recommend the use ofrecycled coolant.
3.Replace the coolant reservoir cap. Turnthe cap clockwise until it contacts thehard stop.
4.Check the coolant level in the coolantreservoir the next few times you driveyour vehicle. If necessary, repeat step2.
If you have to add more than 1.1 qt (1 L) ofengine coolant per month, have yourvehicle checked as soon as possible.Operating an engine with a low level ofcoolant can result in engine overheatingand possible engine damage.
In case of emergency, you can add a largeamount of water without engine coolantin order to reach a vehicle service location.Service your vehicle as soon as possible.
325
2022 Bronco (TG1) Canada/United States of America, enUSA, Edition date: 202109, First-PrintingMaintenance
Page 336 of 562
We recommend that you disconnect thenegative battery cable terminal from thebattery if you plan to store your vehicle foran extended period.
Note:If you only disconnect the negativebattery cable terminal, make sure it isisolated or placed away from the batteryterminal to avoid unintended connection orarcing.
To maintain correct operation of thebattery management system, if you addany electrical devices to your vehicle, donot connect the ground connection directlyto the negative battery terminal. Aconnection at the negative battery terminalcan cause inaccurate measurements ofthe battery condition and potentialincorrect system operation.
Note:If you add electrical accessories orcomponents to your vehicle this mayadversely affect battery performance,durability and the performance of otherelectrical systems on your vehicle.
If you replace the battery make sure itmatches the electrical requirements ofyour vehicle.
If you disconnect or replace the batteryand your vehicle has an automatictransmission, it must relearn its adaptivestrategy. Because of this, the transmissionmay shift firmly when first driven. This isnormal operation while the transmissionfully updates its operation to optimumshift feel.
Remove and Reinstall the Battery
To disconnect or remove the battery, dothe following:
1.Apply the parking brake and switch theignition off.
2.Switch all electrical equipment off, forexample lights and radio.
3.Wait a minimum of two minutes beforedisconnecting the battery.
Note:The engine management system hasa power hold function and remains poweredfor a period of time after you switch theignition off. This is to allow diagnostic andadaptive tables to be stored. Disconnectingthe battery without waiting can causedamage not covered by the vehicleWarranty.
4.Disconnect the negative battery cableterminal.
5.Disconnect the positive battery cableterminal.
6.Remove the battery securing clamp.
7.Remove the battery.
8.To install, reverse the removalprocedure.
Note:Before reconnecting the battery,make sure the ignition remains switched off.
Note:Make sure the battery cable terminalsare fully tightened.
Note:After cleaning or replacing thebattery, make sure you reinstall the batterycover or shield.
If you disconnect or replace the vehiclebattery, you must reset the followingfeatures:
•Window bounce-back. See Windows(page 103).
•Clock settings.
•Pre-set radio stations.
•Steering angle sensor.
Note:To calibrate the steering anglesensor, drive the vehicle above 30 mph(50 km/h) for a minimum of 1.2 mi (2 km).Make sure to drive straight ahead for aminimum of 30 seconds. Several vehiclefunctions are disabled and a warning lightcould appear until the sensor is calibrated.
332
2022 Bronco (TG1) Canada/United States of America, enUSA, Edition date: 202109, First-PrintingMaintenance
Page 337 of 562
ADJUSTING THE HEADLAMPS
Vertical Aim Adjustment
The headlamps on your vehicle areproperly aimed at the assembly plant. Ifyour vehicle has been in an accident,contact an authorized dealer to check andrealign your headlamps.
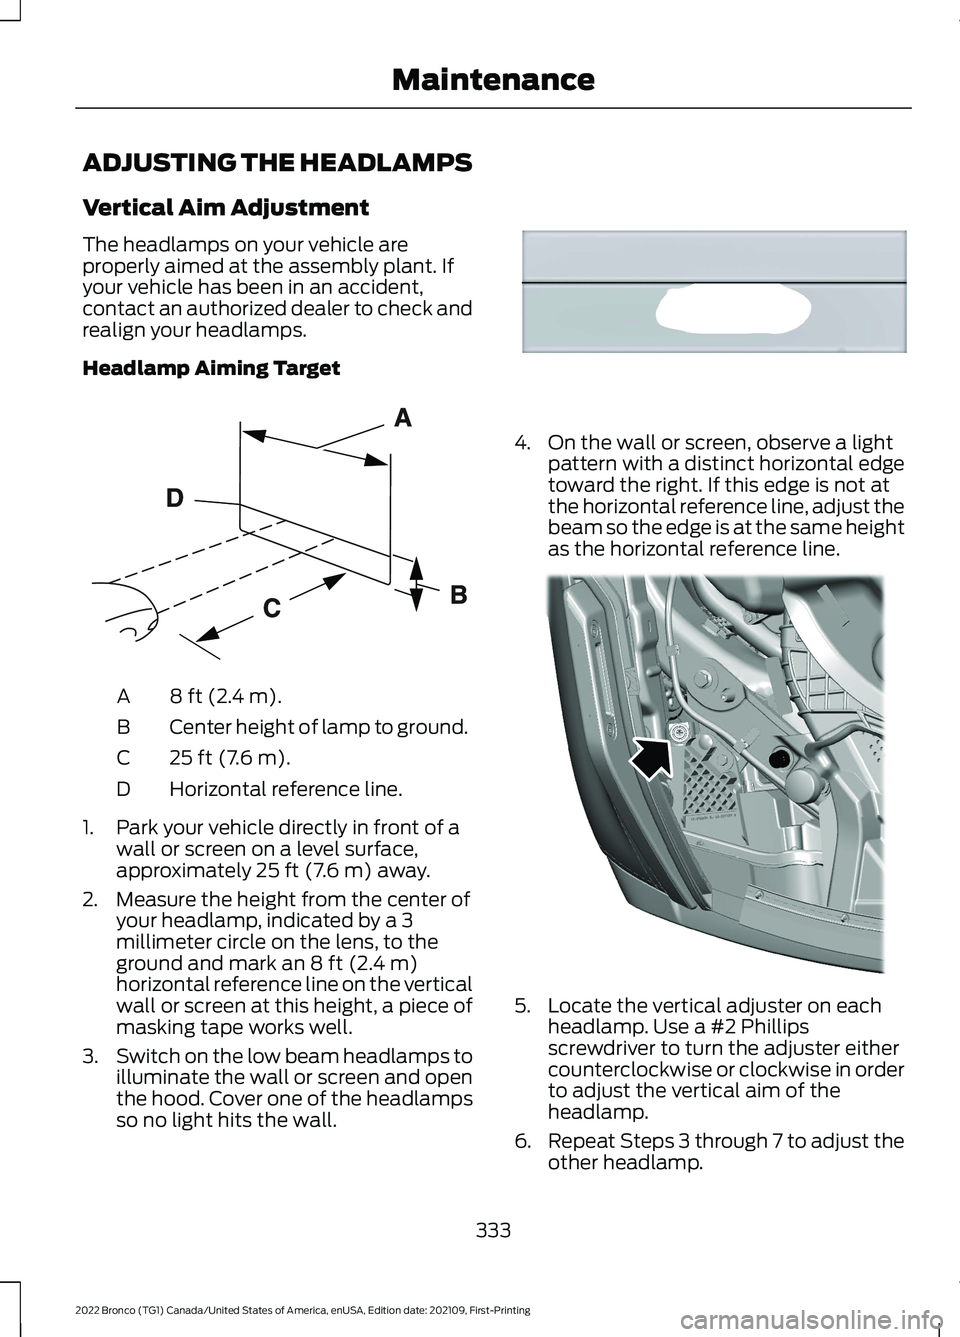
Headlamp Aiming Target
8 ft (2.4 m).A
Center height of lamp to ground.B
25 ft (7.6 m).C
Horizontal reference line.D
1.Park your vehicle directly in front of awall or screen on a level surface,approximately 25 ft (7.6 m) away.
2.Measure the height from the center ofyour headlamp, indicated by a 3millimeter circle on the lens, to theground and mark an 8 ft (2.4 m)horizontal reference line on the verticalwall or screen at this height, a piece ofmasking tape works well.
3.Switch on the low beam headlamps toilluminate the wall or screen and openthe hood. Cover one of the headlampsso no light hits the wall.
4.On the wall or screen, observe a lightpattern with a distinct horizontal edgetoward the right. If this edge is not atthe horizontal reference line, adjust thebeam so the edge is at the same heightas the horizontal reference line.
5.Locate the vertical adjuster on eachheadlamp. Use a #2 Phillipsscrewdriver to turn the adjuster eithercounterclockwise or clockwise in orderto adjust the vertical aim of theheadlamp.
6.Repeat Steps 3 through 7 to adjust theother headlamp.
333
2022 Bronco (TG1) Canada/United States of America, enUSA, Edition date: 202109, First-PrintingMaintenanceE142592 E167358 E339582
Page 340 of 562
7.Remove the three retaining boltssecuring the rear lamp to the body.
Note:Remove and install the retaining boltnear the wheel well before the retainingbolts near the luggage compartment.
8.Pull the rear lamp away from thevehicle and disconnect the electricalconnectors as needed.
9.To install, reverse the removalprocedure.
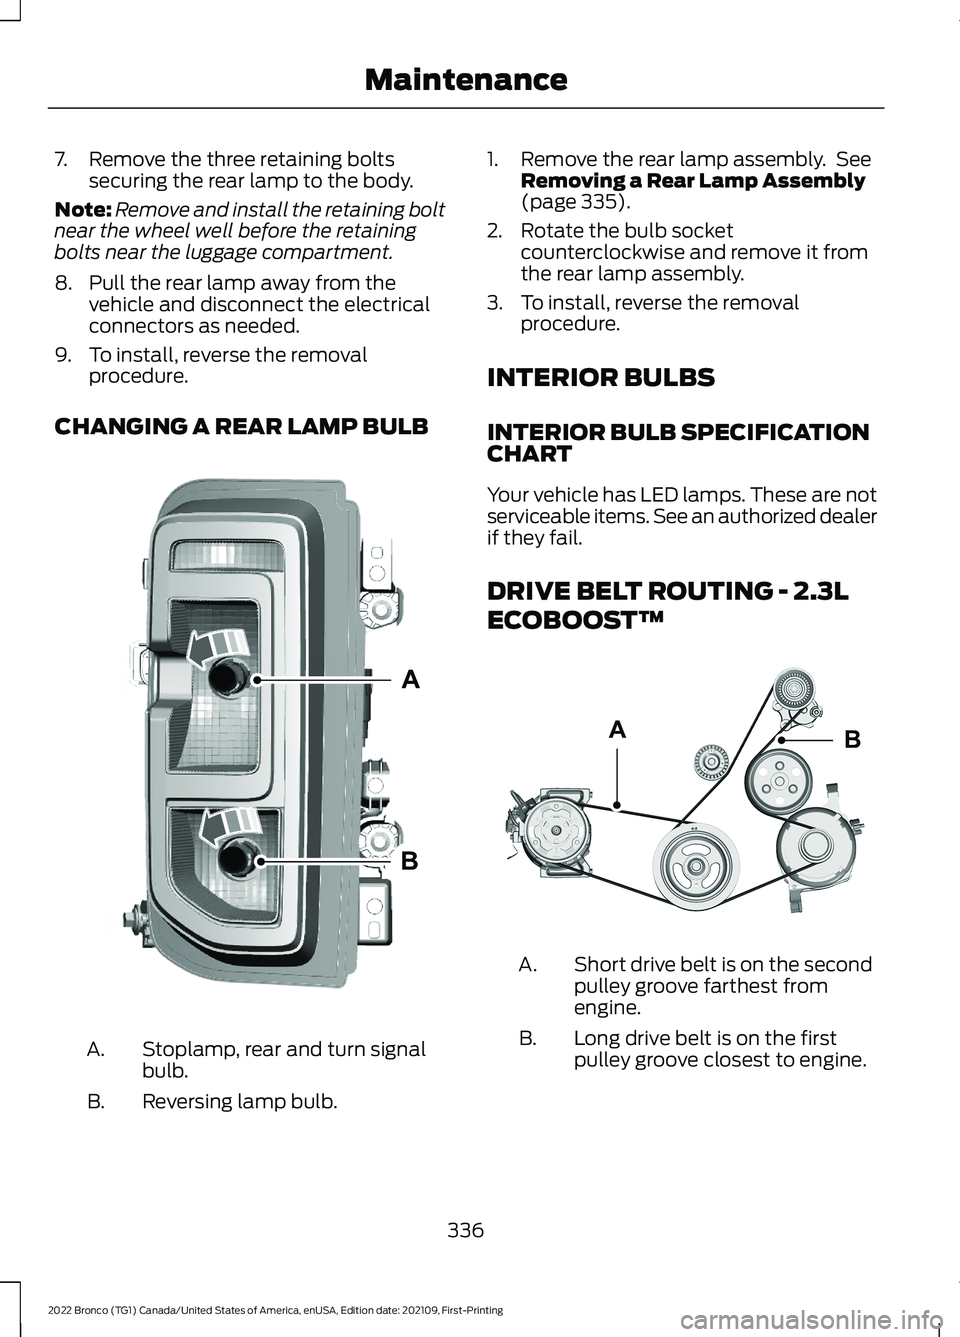
CHANGING A REAR LAMP BULB
Stoplamp, rear and turn signalbulb.A.
Reversing lamp bulb.B.
1.Remove the rear lamp assembly. SeeRemoving a Rear Lamp Assembly(page 335).
2.Rotate the bulb socketcounterclockwise and remove it fromthe rear lamp assembly.
3.To install, reverse the removalprocedure.
INTERIOR BULBS
INTERIOR BULB SPECIFICATIONCHART
Your vehicle has LED lamps. These are notserviceable items. See an authorized dealerif they fail.
DRIVE BELT ROUTING - 2.3L
ECOBOOST™
Short drive belt is on the secondpulley groove farthest fromengine.
A.
Long drive belt is on the firstpulley groove closest to engine.B.
336
2022 Bronco (TG1) Canada/United States of America, enUSA, Edition date: 202109, First-PrintingMaintenanceABE339583 BAE357477
Page 363 of 562
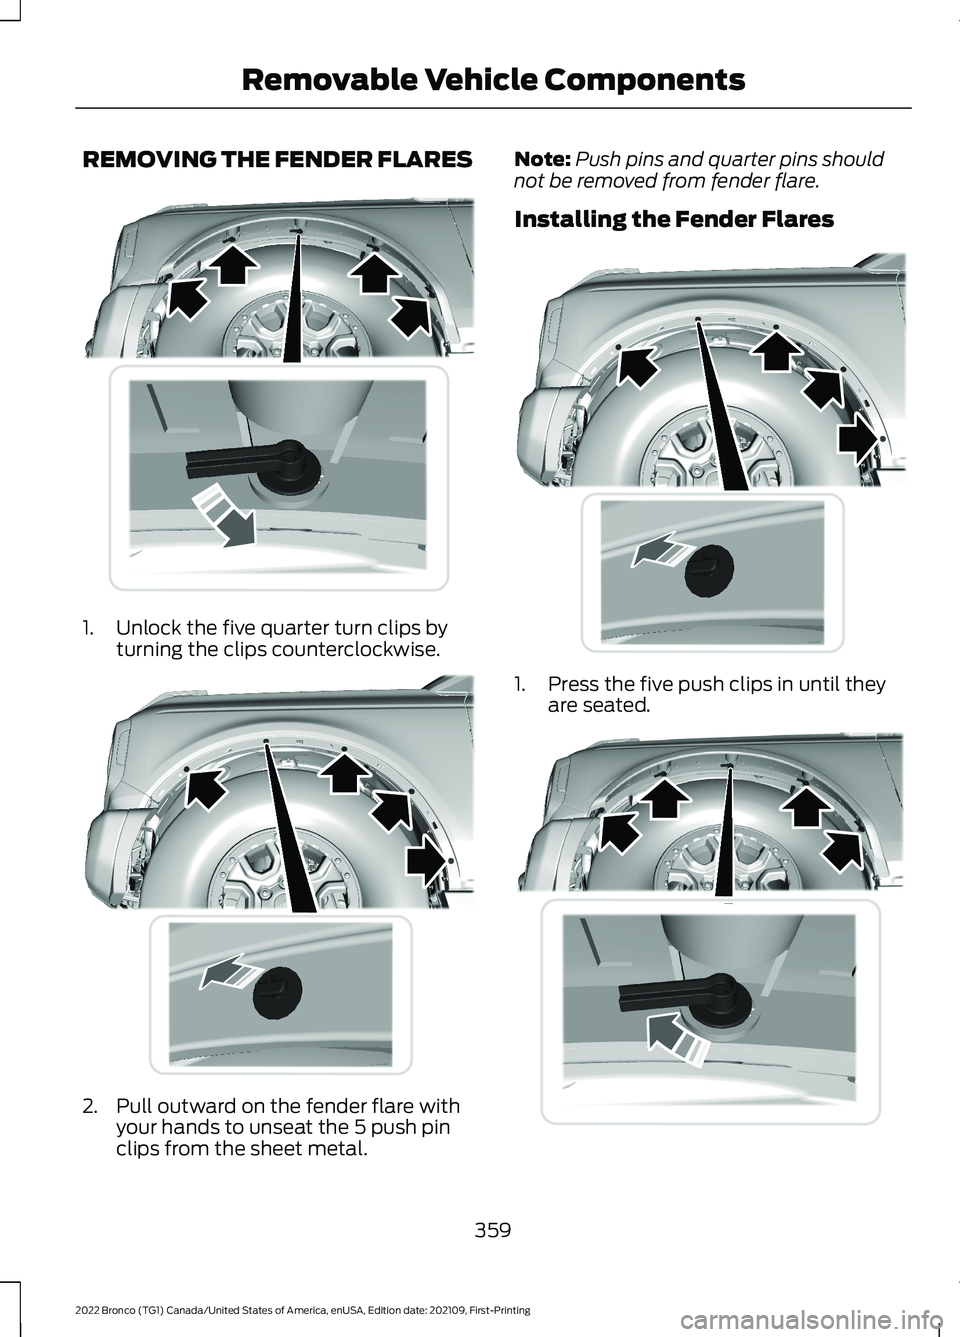
REMOVING THE FENDER FLARES
1.Unlock the five quarter turn clips byturning the clips counterclockwise.
2.Pull outward on the fender flare withyour hands to unseat the 5 push pinclips from the sheet metal.
Note:Push pins and quarter pins shouldnot be removed from fender flare.
Installing the Fender Flares
1.Press the five push clips in until theyare seated.
359
2022 Bronco (TG1) Canada/United States of America, enUSA, Edition date: 202109, First-PrintingRemovable Vehicle ComponentsE334073 E334101 E334101 E342192
Page 364 of 562
2.Lock the five quarter turn clips byturning the clips clockwise.
STORING THE DOORS AND
THE ROOF PANELS - 4-DOOR
(IF EQUIPPED)
WARNING: Do not store removeddoors or roof panels in vehicle withoutusing the Ford onboard storage kit, andverifying they have been secured perinstructions. Failure to follow thisinstruction could result in personal injuryor death.
Note:Cargo can shift under severe vehicleuse, to reduce the risk of damage, avoid highspeed or extreme rock crawl off-roadsituations when storing the doors in thecargo area.
Note:Inspect the bags and harnessperiodically to make sure they are notdamaged. Inspect the door retentionharness straps to make sure there are nonicks, tears or cuts. Replace if necessary.
Note:Clean the roof panels and doors priorto storing them in the bags as dirt maydamage the finish.
Storing the Front Roof Panels
1.Remove the front roof panels. SeeRemoving and Installing the FrontRoof Panel (page 350).
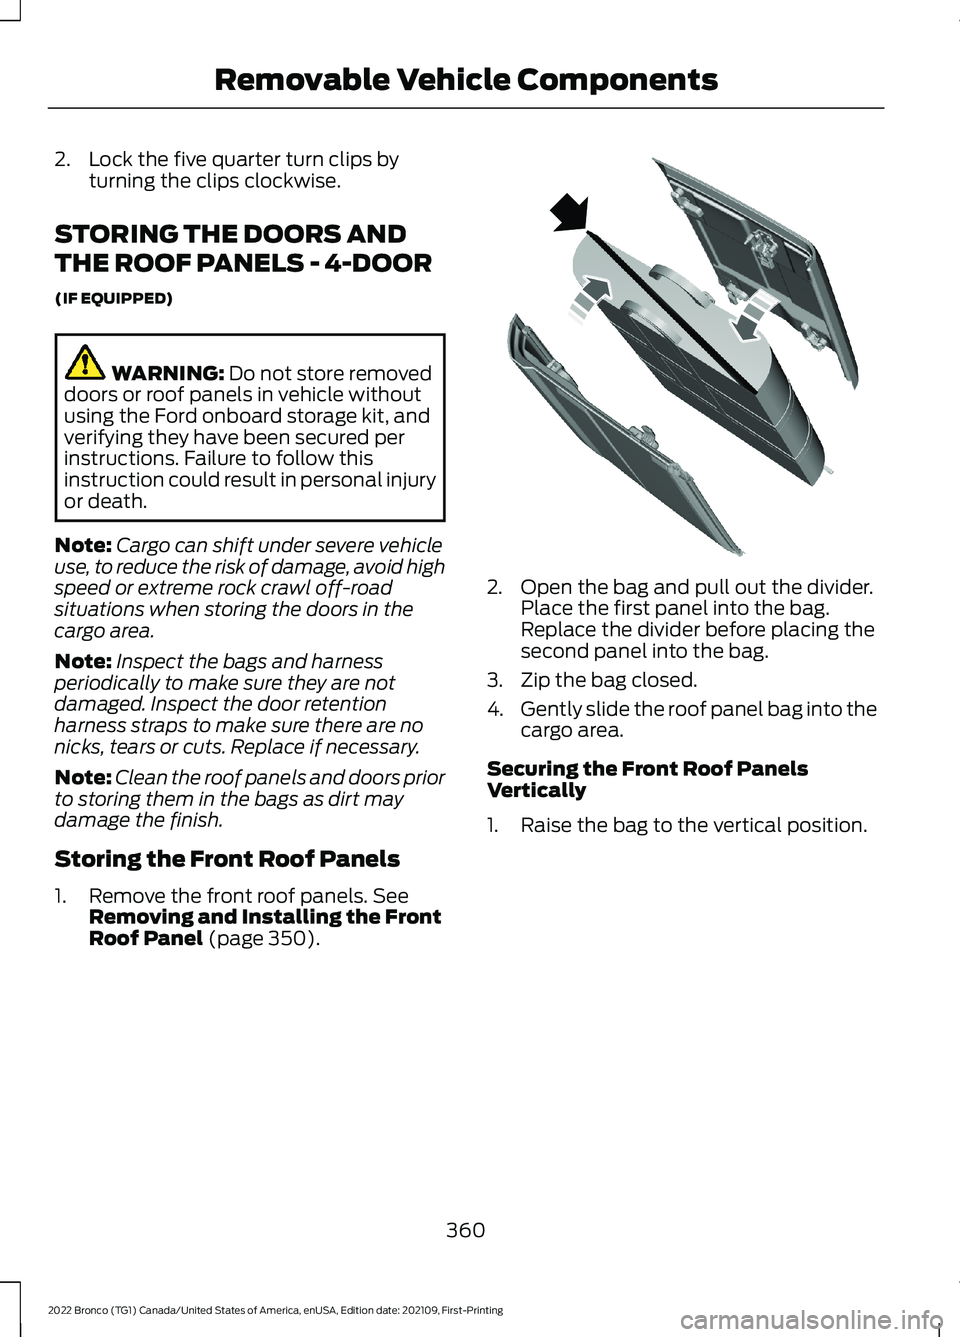
2.Open the bag and pull out the divider.Place the first panel into the bag.Replace the divider before placing thesecond panel into the bag.
3.Zip the bag closed.
4.Gently slide the roof panel bag into thecargo area.
Securing the Front Roof PanelsVertically
1.Raise the bag to the vertical position.
360
2022 Bronco (TG1) Canada/United States of America, enUSA, Edition date: 202109, First-PrintingRemovable Vehicle ComponentsE338782
Page 376 of 562
CLEANING LEATHER AND VINYL
We recommend that you only clean theleather and vinyl surfaces in the followingway:
1.Remove dust and loose dirt with avacuum cleaner.
2.Wipe the surface with a soft, dampcloth and a mild soap and watersolution. Dry the area with a clean, softcloth.
3.Make sure the leather is dry, then applya small amount of conditioner to aclean, dry cloth.
4.Rub the conditioner into the leatheruntil it disappears. Allow theconditioner to dry, then repeat theprocess for the entire interior. If a filmappears, wipe it off with a dry, cleancloth.
5.For additional information andassistance, we recommend that youcontact an authorized dealer.
CLEANING FABRIC SEATS ANDHEADLINERS
WARNING: On vehicles equippedwith seat-mounted airbags, do not usechemical solvents or strong detergents.Such products could contaminate theside airbag system and affectperformance of the side airbag in a crash.
We recommend that you only clean thefabric seats and headliners in the followingway:
1.Remove dust and loose dirt with avacuum cleaner.
2.Wipe the surface with a soft, dampcloth and a mild soap and watersolution. Dry the area with a clean, softcloth.
3.For additional information andassistance, we recommend that youcontact an authorized dealer.
For heavy stains, spot clean the area. If aring forms on the fabric, clean the entirearea immediately, but do not oversaturateor the ring could set.
CLEANING CARPETS AND FLOORMATS
We recommend that you only clean yourcarpets in the following way:
1.Remove dust and loose dirt with avacuum cleaner.
2.Wipe the surface with a soft, dampcloth and a mild soap and watersolution. Dry the area with a clean, softcloth.
3.For additional information andassistance, we recommend that youcontact an authorized dealer.
For heavy stains, spot clean the area. If aring forms on the fabric, clean the entirearea immediately, but do not over-saturateor the ring could set.
We recommend that you only clean yourfloor mats in the following way:
1.Remove dust and loose dirt with avacuum cleaner.
2.Wash rubber floor mats using mildsoap and lukewarm or cold water.
3.Completely dry the floor mat beforeplacing them back in your vehicle.
Cleaning Rubber Floors
1.Remove the floor mats prior to washingout. See Floor Mats (page 299).
Note:Prior to washing out, remove largedebris to prevent clogging the drain.
2.Turn active drain plugs in eachpassenger compartmentcounterclockwise to open.
372
2022 Bronco (TG1) Canada/United States of America, enUSA, Edition date: 202109, First-PrintingVehicle Care
Page 377 of 562
3.Wash out debris using a standardgarden style hose.
Note:Use caution to not spray seats,console, door interior, electrical connections,instrument cluster display and underside ofthe instrument panel on both driver andpassenger sides.
4.Wipe out remaining water or debrisfrom the floor.
5.Install active drain plugs and turnclockwise to close.
6.Reinstall floor mats.
CLEANING SEATBELTS
WARNING: Do not use cleaningsolvents, bleach or dye on the vehicle'sseatbelts, as these actions may weakenthe belt webbing.
1.Wipe the surface with a soft, dampcloth and a mild soap and watersolution. Dry the area with a clean, softcloth.
REPAIRING MINOR PAINT
DAMAGE
Authorized dealers have touch-up paint tomatch your vehicle’s color. Your vehiclecolor code is printed on a sticker on thefront, left-hand side door jamb. Take yourcolor code to your authorized dealer tomake sure you get the correct color.
Before repairing minor paint damage, usea cleaner to remove particles such as birddroppings, tree sap, insect deposits, tarspots, road salt and industrial fallout.
Read the instructions before using cleaningproducts.
WAXING YOUR VEHICLE
Wax the high-gloss painted surface of yourprewashed vehicle once or twice a year.
We recommend that you only use anapproved quality wax that does notcontain abrasives. Follow themanufacturer's instructions to apply andremove the wax. For additional informationand assistance, we recommend that youcontact an authorized dealer.
When washing and waxing, park yourvehicle in a shaded area out of directsunlight.
Note:Avoid waxing unpainted or low-glossblack colored parts, they discolor over time.
373
2022 Bronco (TG1) Canada/United States of America, enUSA, Edition date: 202109, First-PrintingVehicle Care