rear light FORD C MAX 2008 1.G User Guide
[x] Cancel search | Manufacturer: FORD, Model Year: 2008, Model line: C MAX, Model: FORD C MAX 2008 1.GPages: 278, PDF Size: 17.5 MB
Page 68 of 278
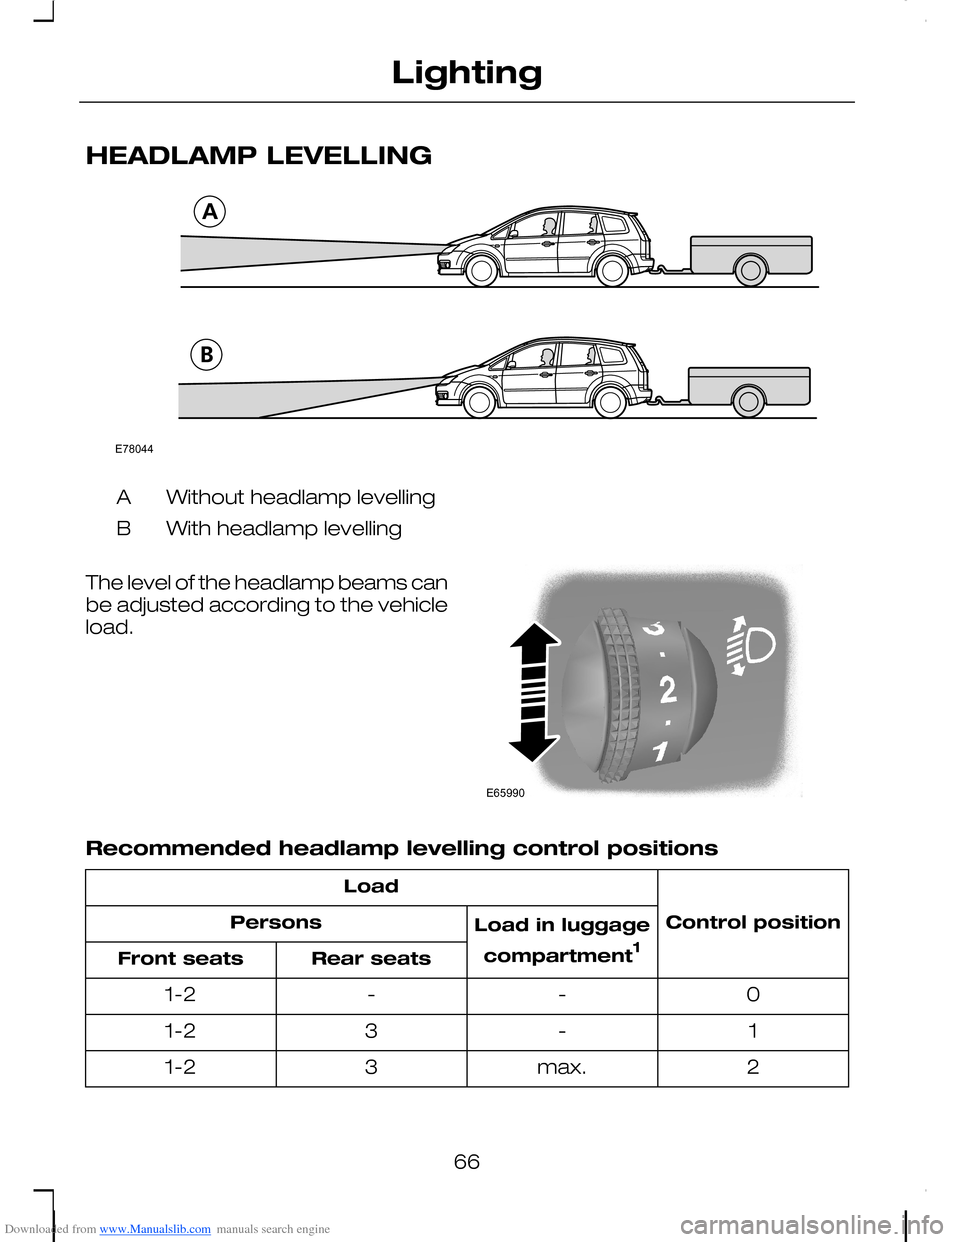
Downloaded from www.Manualslib.com manuals search engine HEADLAMP LEVELLING
Without headlamp levellingA
With headlamp levellingB
The level of the headlamp beams canbe adjusted according to the vehicleload.
Recommended headlamp levelling control positions
Control position
Load
Load in luggage
compartment1
Persons
Rear seatsFront seats
0--1-2
1-31-2
2max.31-2
66
LightingE78044 E65990
Page 69 of 278
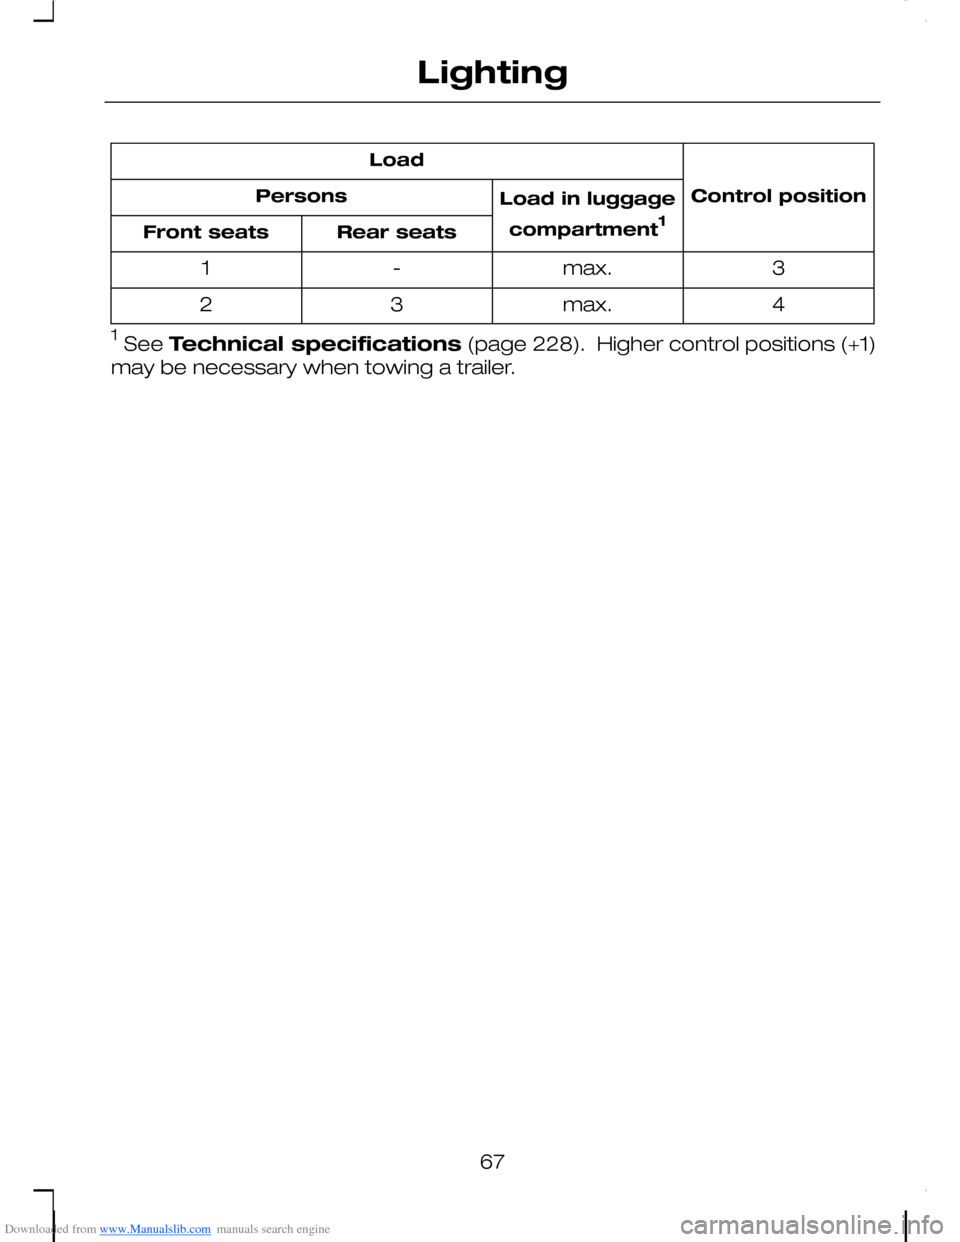
Downloaded from www.Manualslib.com manuals search engine Control position
Load
Load in luggage
compartment1
Persons
Rear seatsFront seats
3max.-1
4max.32
1 See Technical specifications (page 228). Higher control positions (+1)
may be necessary when towing a trailer.
67
Lighting
Page 76 of 278
Downloaded from www.Manualslib.com manuals search engine CHANGING A BULB
WARNINGS
On vehicles fitted with Xenonheadlamps, have the headlampbulbs changed by an expert. Thereis a risk of injury due to high voltage.
During operation, the bulbs andtheir surroundings get hot.Switch off the lights and let the bulbscool down before replacing them.
Always switch off lights and ignitionbefore replacing any bulb.
Never touch the glass of the bulbs.Fit only bulbs having a UV filter.Always replace a faulty bulb with anew one of the same type. Afterreplacing a bulb, check that the lightsoperate correctly.
Headlamps, side lamps,direction indicators
Note:It is necessary to remove theheadlamp assembly to remove anyof the bulbs.
Removing the headlampassembly
Open the bonnet.
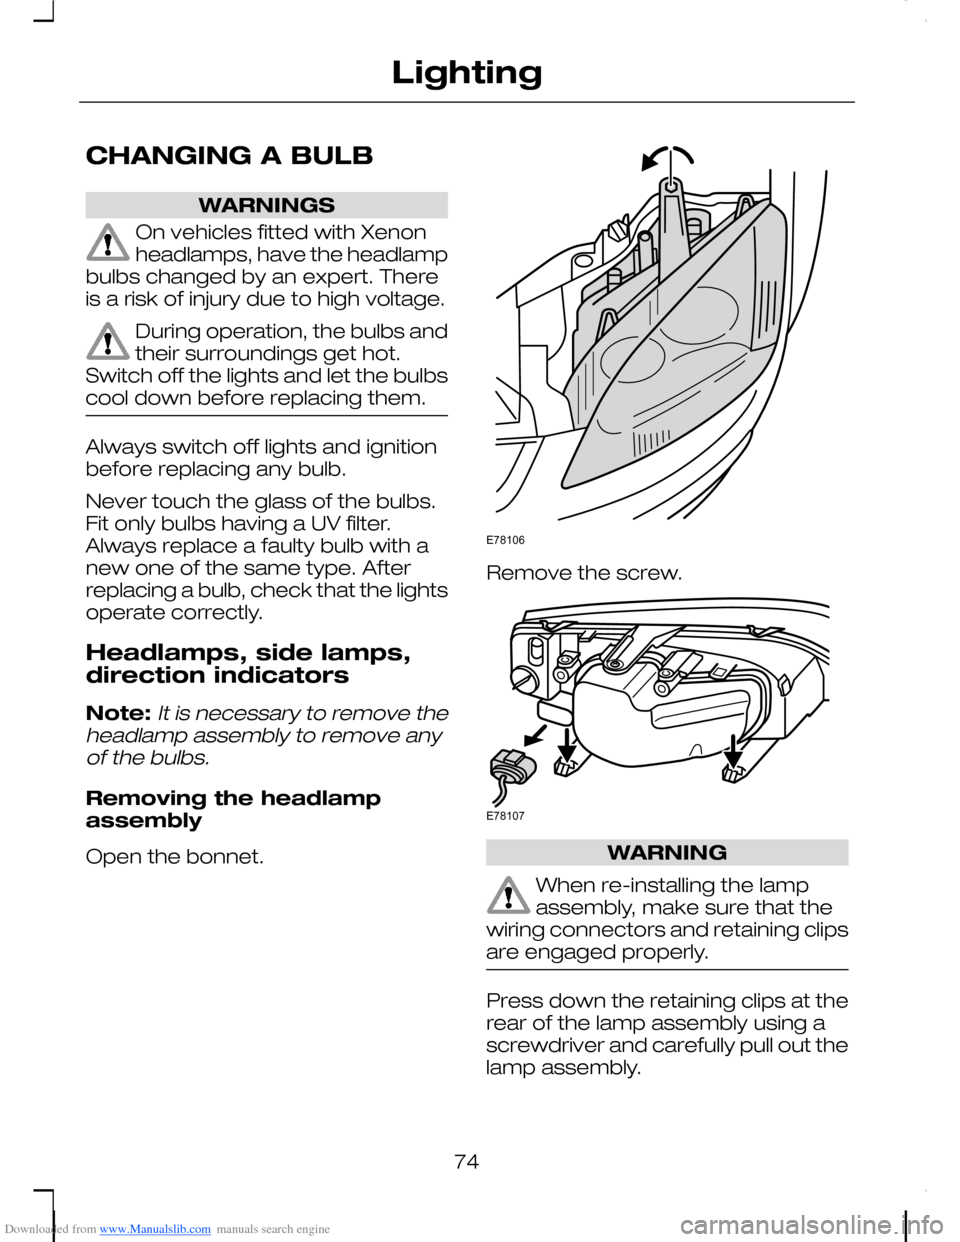
Remove the screw.
WARNING
When re-installing the lampassembly, make sure that thewiring connectors and retaining clipsare engaged properly.
Press down the retaining clips at therear of the lamp assembly using ascrewdriver and carefully pull out thelamp assembly.
74
LightingE78106 E78107
Page 82 of 278
Downloaded from www.Manualslib.com manuals search engine Install in the reverse order.
Rear lamps
Open the tailgate.
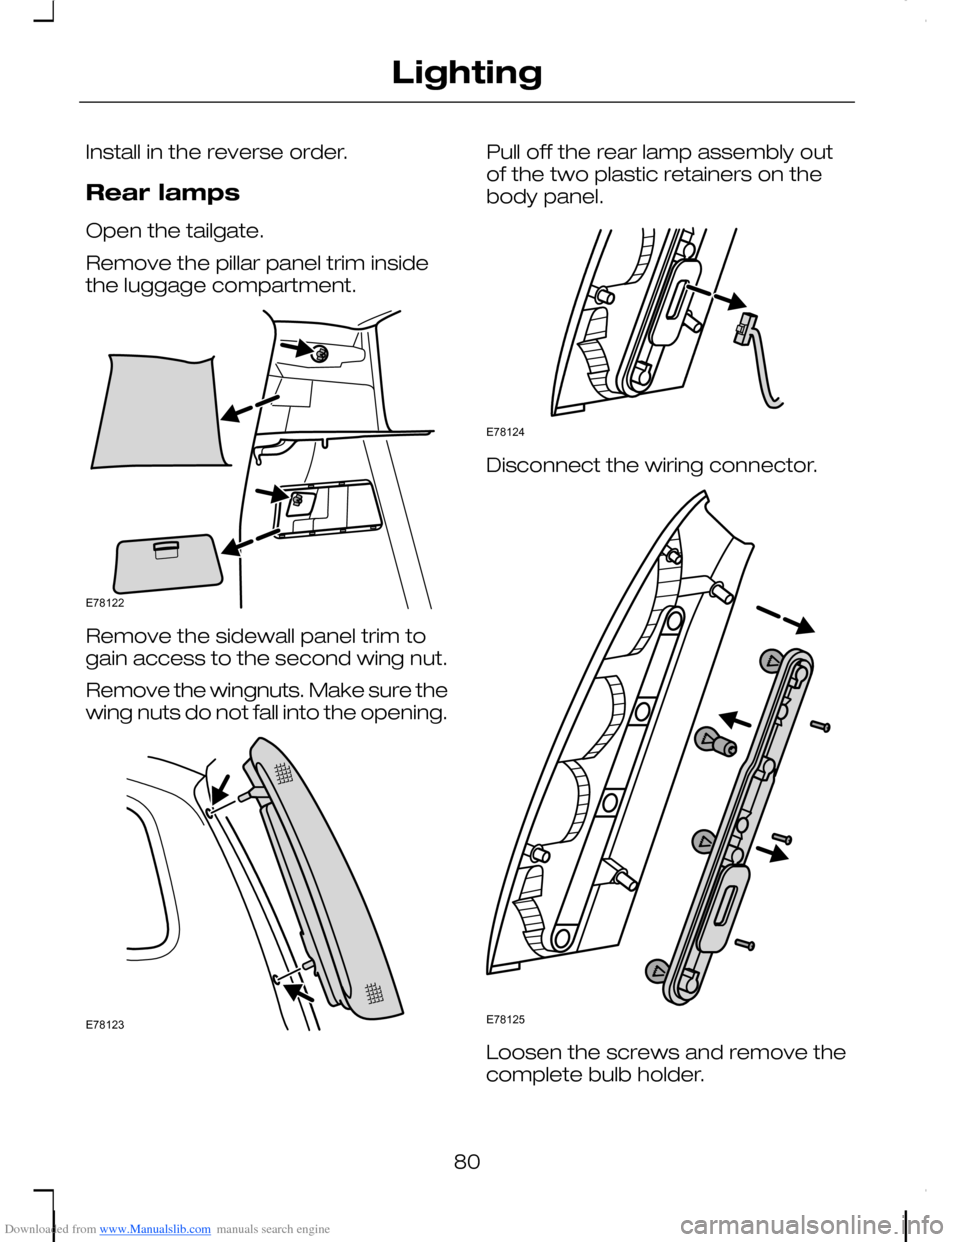
Remove the pillar panel trim insidethe luggage compartment.
Remove the sidewall panel trim togain access to the second wing nut.
Remove the wingnuts. Make sure thewing nuts do not fall into the opening.
Pull off the rear lamp assembly outof the two plastic retainers on thebody panel.
Disconnect the wiring connector.
Loosen the screws and remove thecomplete bulb holder.
80
LightingE78122 E78123 E78124 E78125
Page 83 of 278
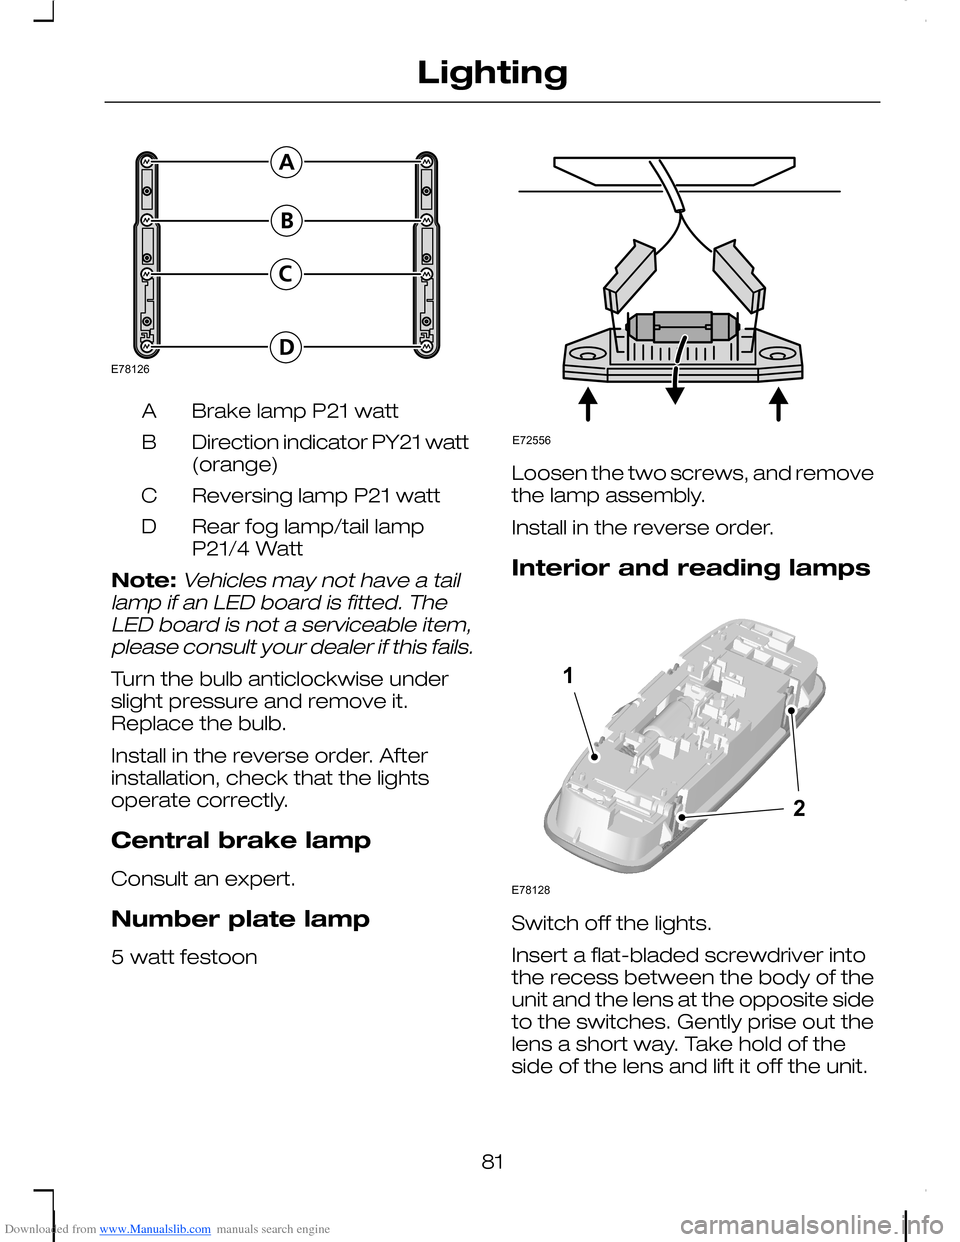
Downloaded from www.Manualslib.com manuals search engine Brake lamp P21 wattA
Direction indicator PY21 watt(orange)B
Reversing lamp P21 wattC
Rear fog lamp/tail lampP21/4 WattD
Note:Vehicles may not have a taillamp if an LED board is fitted. TheLED board is not a serviceable item,please consult your dealer if this fails.
Turn the bulb anticlockwise underslight pressure and remove it.Replace the bulb.
Install in the reverse order. Afterinstallation, check that the lightsoperate correctly.
Central brake lamp
Consult an expert.
Number plate lamp
5 watt festoon
Loosen the two screws, and removethe lamp assembly.
Install in the reverse order.
Interior and reading lamps
Switch off the lights.
Insert a flat-bladed screwdriver intothe recess between the body of theunit and the lens at the opposite sideto the switches. Gently prise out thelens a short way. Take hold of theside of the lens and lift it off the unit.
81
LightingE78126 E72556 E7812812
Page 86 of 278
Downloaded from www.Manualslib.com manuals search engine ELECTRIC WINDOWS
WARNING
Do not operate the electricwindows unless they are freefrom obstruction.
Note:If you operate the switchesoften during a short period of time,the system might become inoperablefor a certain time to prevent damagedue to overheating.
Switch on the ignition to operate theelectric windows.
Global opening and closing
You can also operate the electricwindows with the ignition off via theglobal opening and closing function.See Locks (page 40).
Driver's door switches
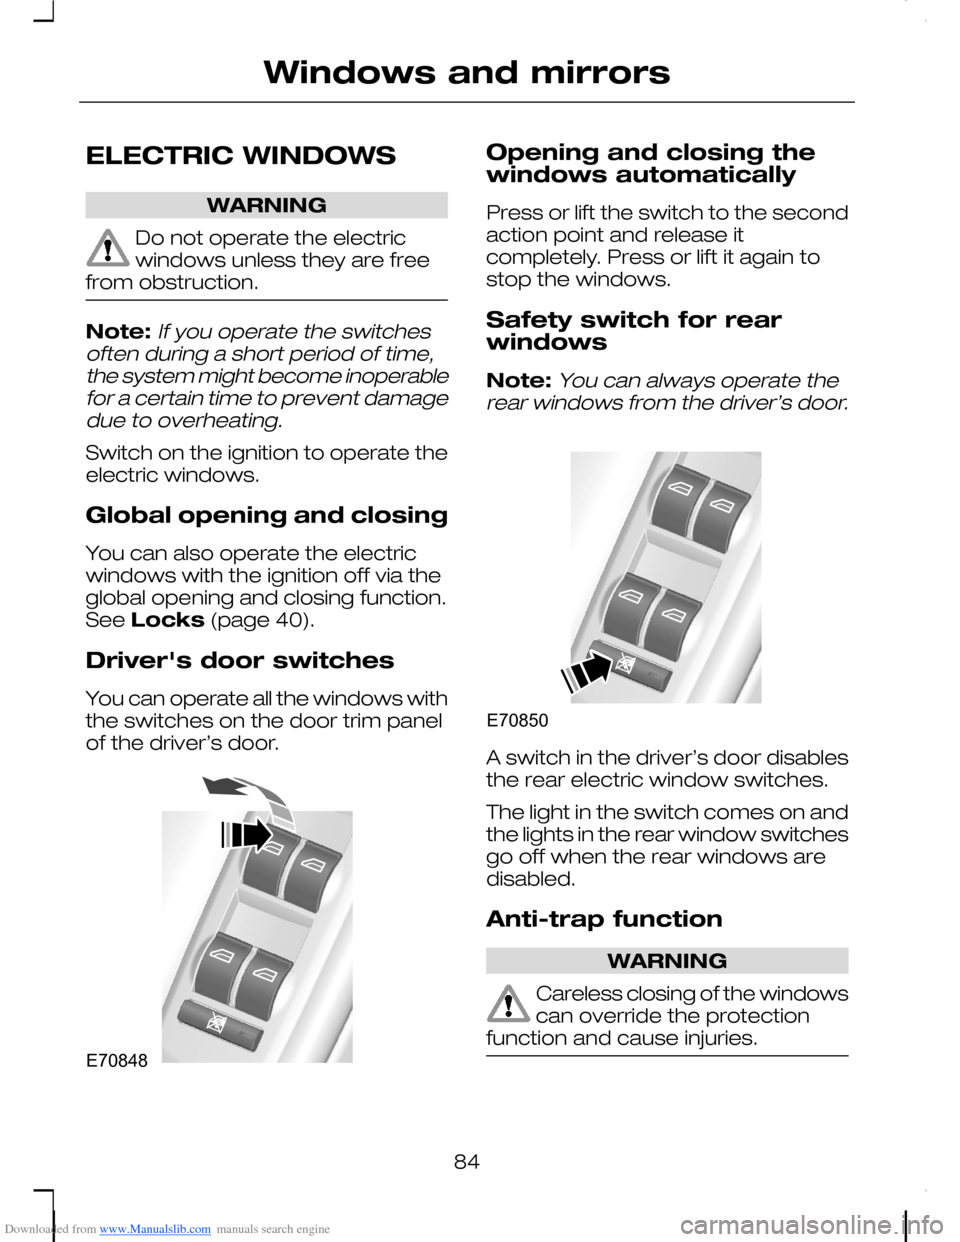
You can operate all the windows withthe switches on the door trim panelof the driver’s door.
Opening and closing thewindows automatically
Press or lift the switch to the secondaction point and release itcompletely. Press or lift it again tostop the windows.
Safety switch for rearwindows
Note:You can always operate therear windows from the driver’s door.
A switch in the driver’s door disablesthe rear electric window switches.
The light in the switch comes on andthe lights in the rear window switchesgo off when the rear windows aredisabled.
Anti-trap function
WARNING
Careless closing of the windowscan override the protectionfunction and cause injuries.
84
Windows and mirrorsE70848 E70850
Page 126 of 278
Downloaded from www.Manualslib.com manuals search engine REAR SEATS
Comfort seat system
WARNING
Make sure that there is nothingin the luggage compartmentwhich could obstruct the movementof the seats or get damaged whenthe seats move rearwards.
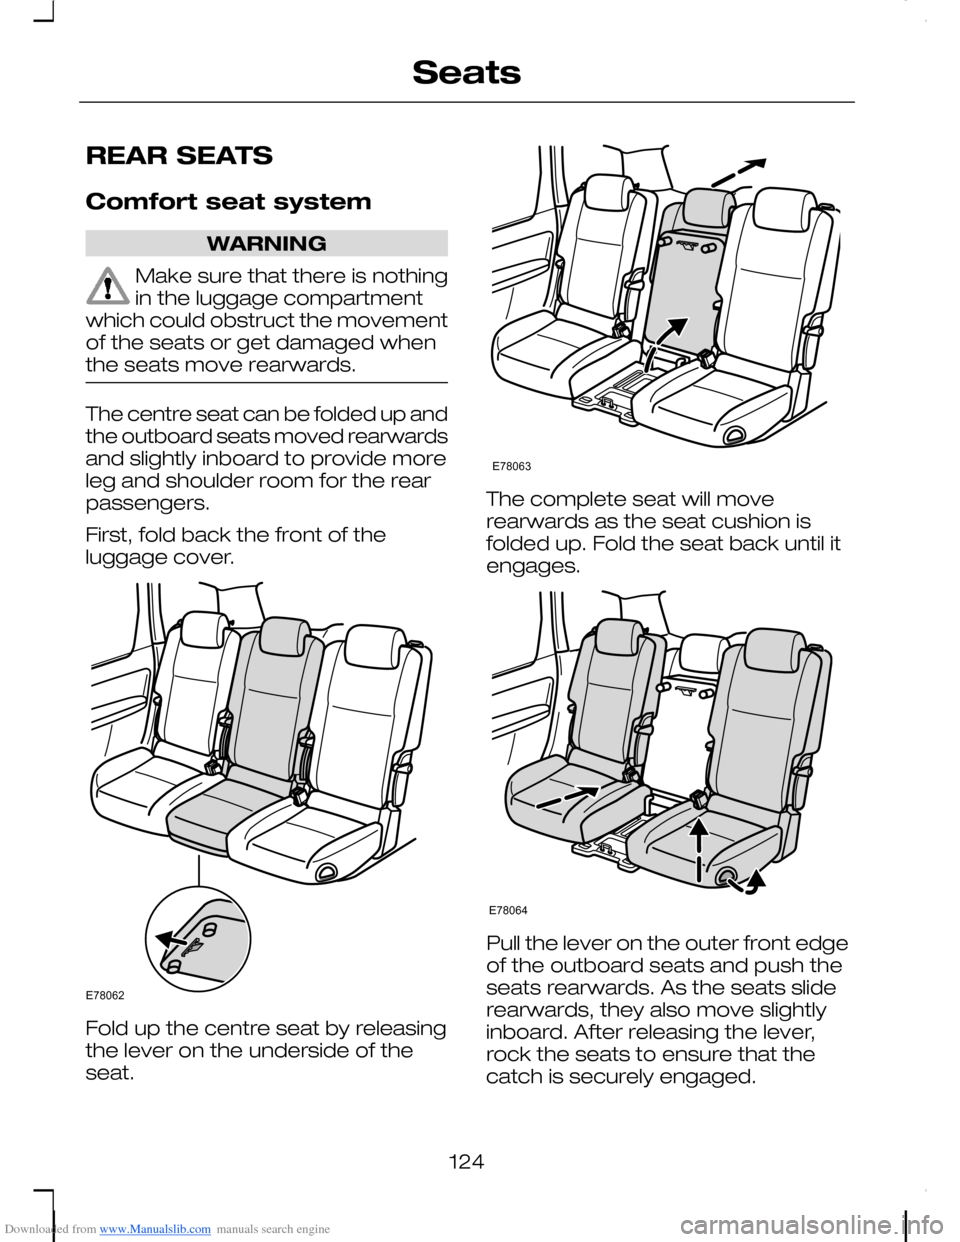
The centre seat can be folded up andthe outboard seats moved rearwardsand slightly inboard to provide moreleg and shoulder room for the rearpassengers.
First, fold back the front of theluggage cover.
Fold up the centre seat by releasingthe lever on the underside of theseat.
The complete seat will moverearwards as the seat cushion isfolded up. Fold the seat back until itengages.
Pull the lever on the outer front edgeof the outboard seats and push theseats rearwards. As the seats sliderearwards, they also move slightlyinboard. After releasing the lever,rock the seats to ensure that thecatch is securely engaged.
124
SeatsE78062 E78063 E78064
Page 135 of 278
Downloaded from www.Manualslib.com manuals search engine SUN VISORS
SUN BLINDS
Side windows
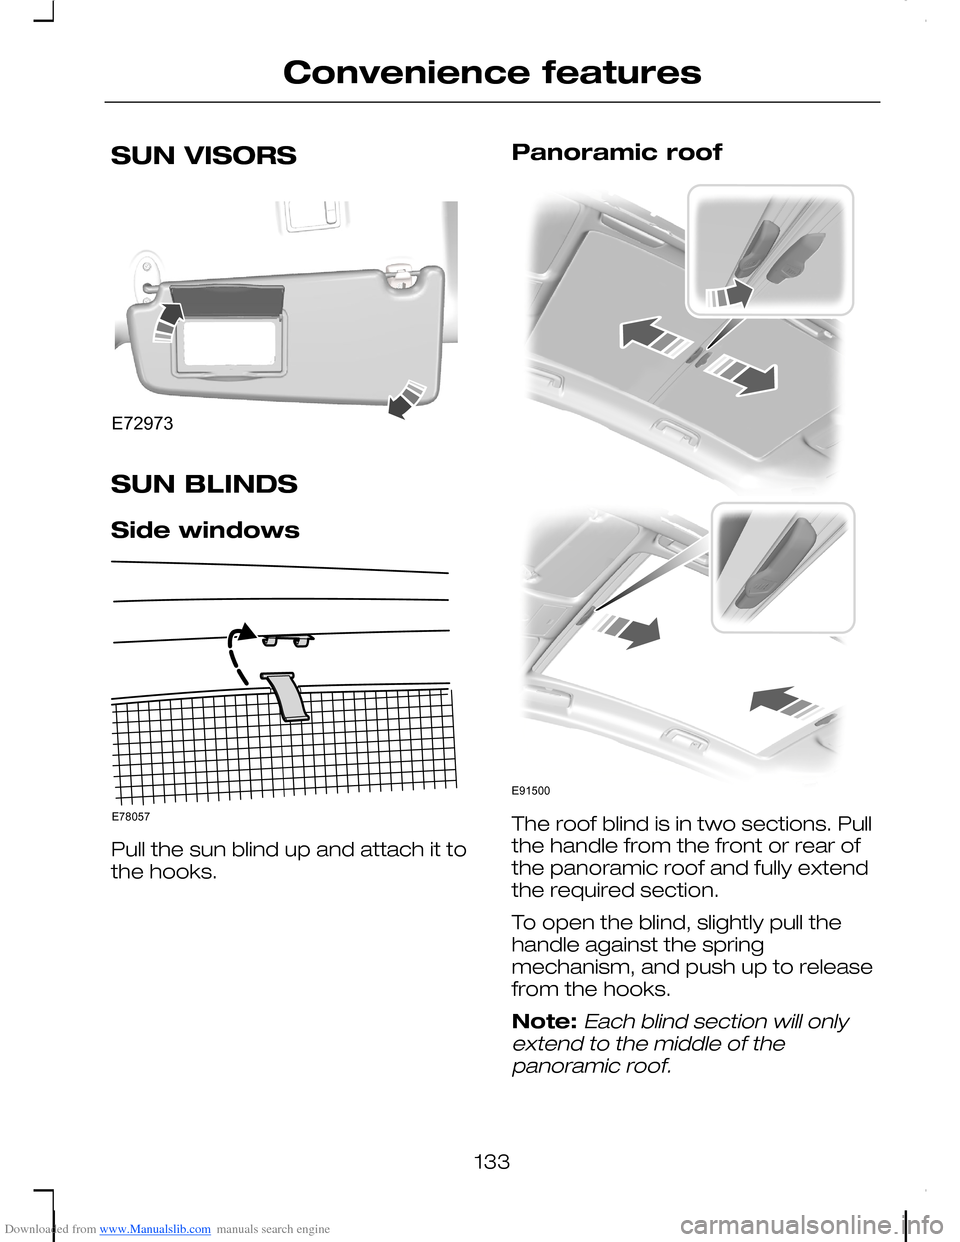
Pull the sun blind up and attach it tothe hooks.
Panoramic roof
The roof blind is in two sections. Pullthe handle from the front or rear ofthe panoramic roof and fully extendthe required section.
To open the blind, slightly pull thehandle against the springmechanism, and push up to releasefrom the hooks.
Note:Each blind section will onlyextend to the middle of thepanoramic roof.
133
Convenience featuresE72973 E78057 E91500
Page 137 of 278
Downloaded from www.Manualslib.com manuals search engine CAUTIONS
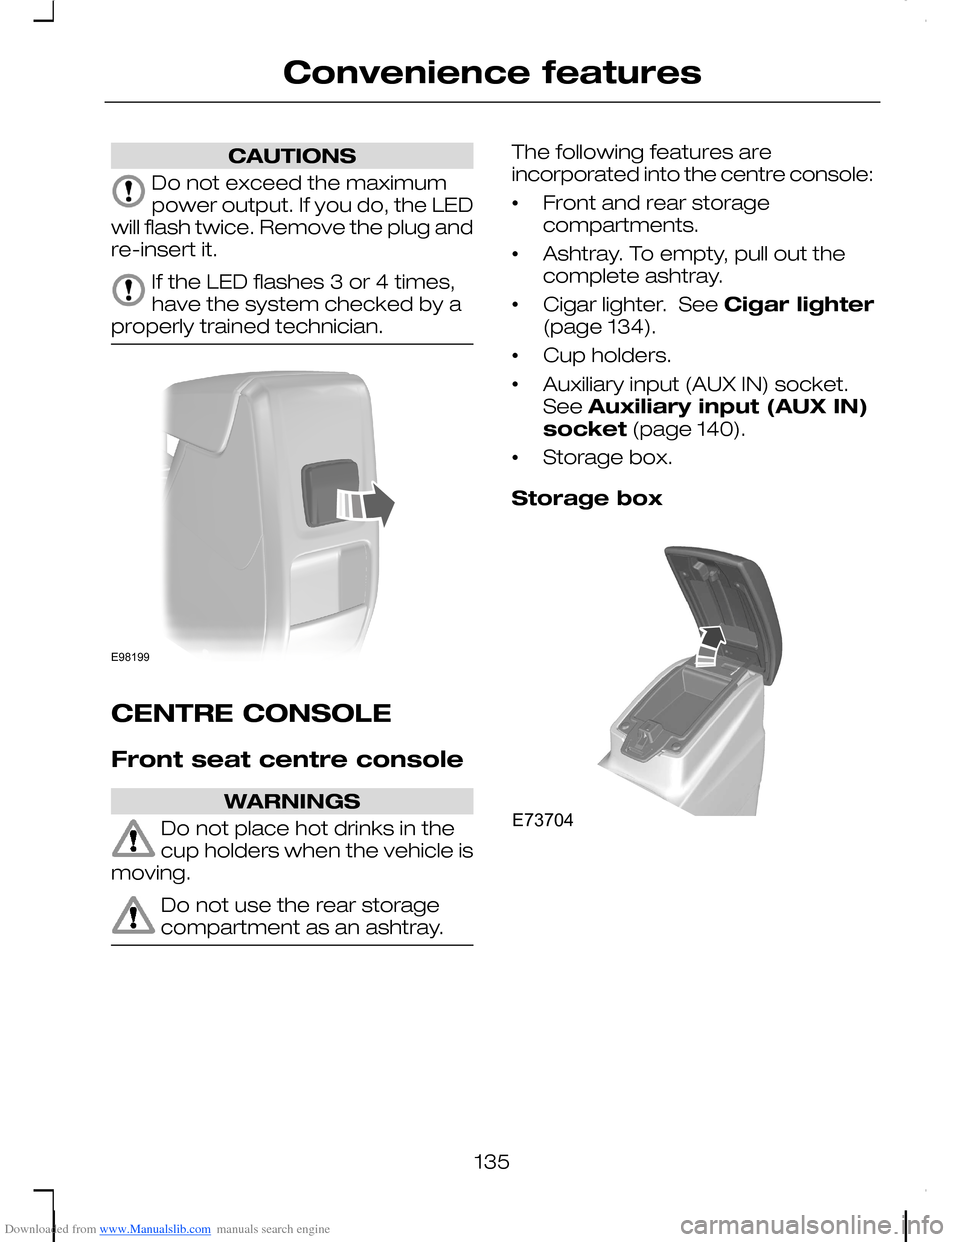
Do not exceed the maximumpower output. If you do, the LEDwill flash twice. Remove the plug andre-insert it.
If the LED flashes 3 or 4 times,have the system checked by aproperly trained technician.
CENTRE CONSOLE
Front seat centre console
WARNINGS
Do not place hot drinks in thecup holders when the vehicle ismoving.
Do not use the rear storagecompartment as an ashtray.
The following features areincorporated into the centre console:
•Front and rear storagecompartments.
•Ashtray. To empty, pull out thecomplete ashtray.
•Cigar lighter. See Cigar lighter(page 134).
•Cup holders.
•Auxiliary input (AUX IN) socket.See Auxiliary input (AUX IN)socket (page 140).
•Storage box.
Storage box
135
Convenience featuresE98199 E73704
Page 164 of 278
Downloaded from www.Manualslib.com manuals search engine PRINCIPLE OF
OPERATION
WARNING
The parking aid does not relieveyou of your responsibility todrive with due care and attention.
CAUTIONS
The sensors may not detectobjects in heavy rain or otherconditions that cause disruptivereflections.
The sensors may not detectobjects with surfaces that absorbultrasonic waves.
The sensors may not detectobjects that are close to thevehicle (approximately 30centimetres [11 inches] to the rearand above or below the sensors).
If you use a high pressure sprayto wash your vehicle, only spraythe sensors briefly from a distancenot less than 20 centimetres (8inches).
Note:The parking aid may emit falsetones if it detects a signal using thesame frequency as the sensors or ifthe vehicle is fully laden.
Note:The outer sensors may detectthe side walls of a garage. If thedistance between the outer sensorand the side wall remains constantfor three seconds, the tone willswitch off. As you continue, the innersensors will detect rearward objects.
USING THE PARKING AID
Note:Keep the sensors free fromdirt, ice and snow. Do not clean withsharp objects.
Switching the parking aidon and off
Note:The parking aid switches offautomatically when you start theengine or when you exceed 16 km/h(10 mph).
Note:Vehicles fitted with a trailertow module not approved by us maynot correctly detect obstacles.
Note:On vehicles fitted with a towball arm, the rear sensors aredeactivated automatically when anytrailer lamps (or lighting boards) areconnected to the 13-pin socket via atrailer tow module we haveapproved. On vehicles fitted with atrailer tow module not approved byus, you have to switch the parkingaid off using the switch.
Note:The front and rear sensors arealways activated or deactivatedtogether.
Note:On vehicles fitted withautomatic transmission, the parkingaid will not operate in position P.
The parking aid is per default off. Toswitch the parking aid on, press theswitch in the instrument panel orselect reverse gear.
The light in the switch illuminateswhen the parking aid is activated.
To turn it off, press the switch again.
162
Parking aid