key FORD C MAX 2008 1.G Service Manual
[x] Cancel search | Manufacturer: FORD, Model Year: 2008, Model line: C MAX, Model: FORD C MAX 2008 1.GPages: 278, PDF Size: 17.5 MB
Page 173 of 278
Downloaded from www.Manualslib.com manuals search engine 1.Insert the tow ball arm verticallyand press it upwards until itengages. Do not hold your handnear the handwheel.
2.To lock: Turn the key clockwiseand remove the key.
Insert the end of the protection capinto the keyhole.
Driving with a trailer
WARNING
If any of the below conditionscannot be met, do not use thetow bar and have it inspected by anexpert.
Before starting your journey, ensurethe tow ball arm is properly locked.Check that:
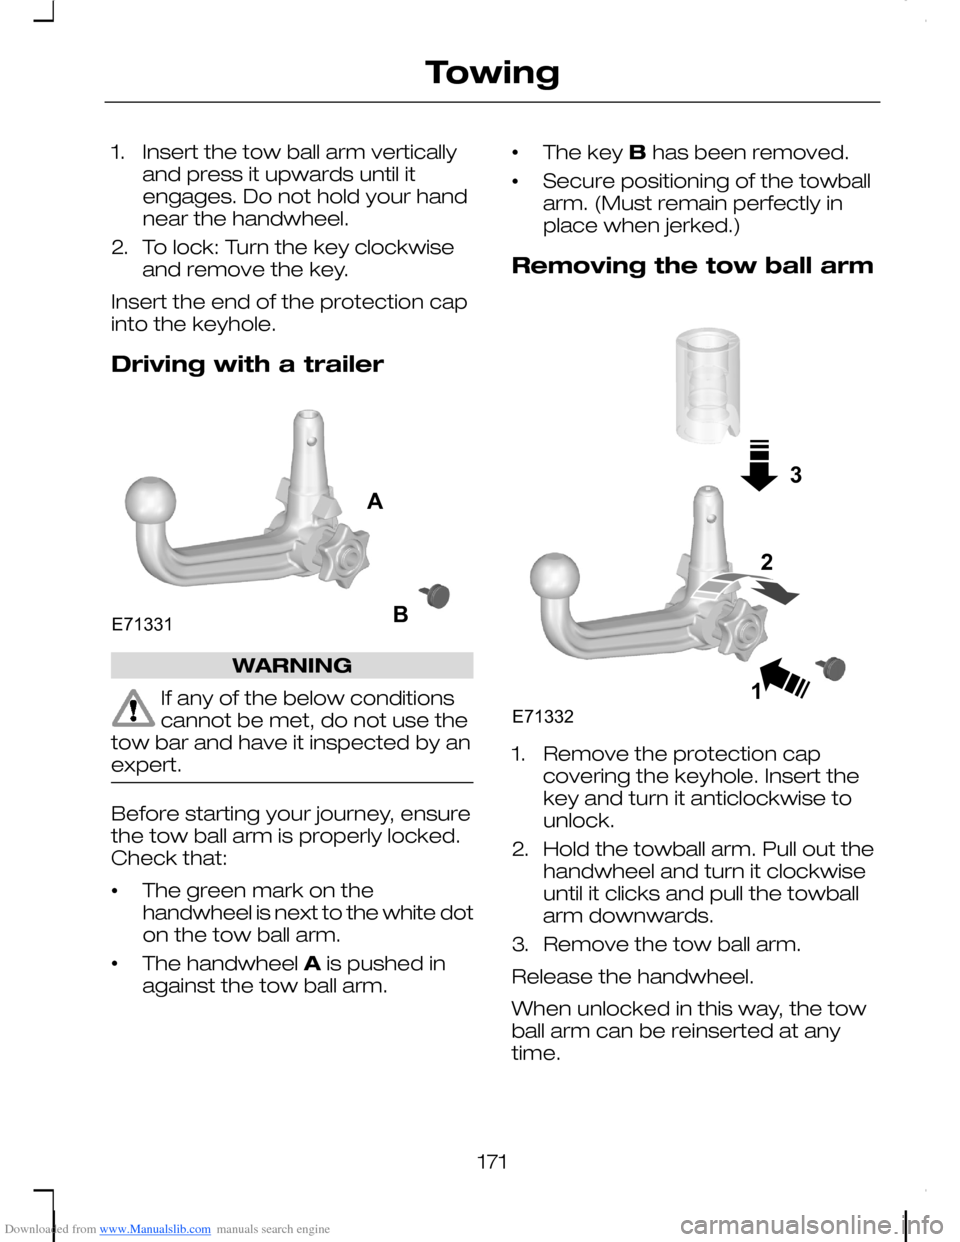
•The green mark on thehandwheel is next to the white doton the tow ball arm.
•The handwheel A is pushed inagainst the tow ball arm.
•The key B has been removed.
•Secure positioning of the towballarm. (Must remain perfectly inplace when jerked.)
Removing the tow ball arm
1.Remove the protection capcovering the keyhole. Insert thekey and turn it anticlockwise tounlock.
2.Hold the towball arm. Pull out thehandwheel and turn it clockwiseuntil it clicks and pull the towballarm downwards.
3.Remove the tow ball arm.
Release the handwheel.
When unlocked in this way, the towball arm can be reinserted at anytime.
171
TowingE71331AB 31E713322
Page 174 of 278
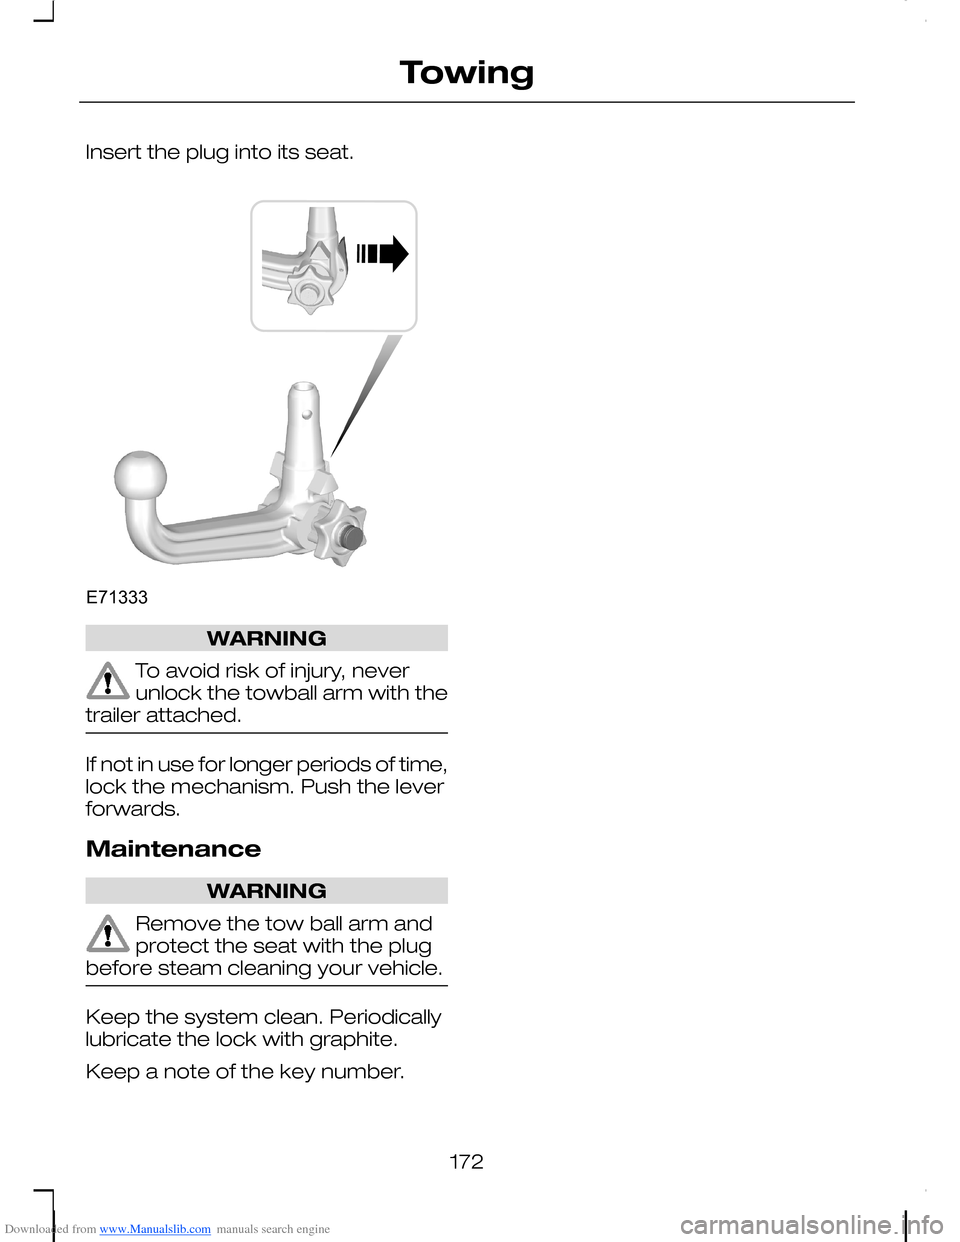
Downloaded from www.Manualslib.com manuals search engine Insert the plug into its seat.
WARNING
To avoid risk of injury, neverunlock the towball arm with thetrailer attached.
If not in use for longer periods of time,lock the mechanism. Push the leverforwards.
Maintenance
WARNING
Remove the tow ball arm andprotect the seat with the plugbefore steam cleaning your vehicle.
Keep the system clean. Periodicallylubricate the lock with graphite.
Keep a note of the key number.
172
TowingE71333
Page 177 of 278
Downloaded from www.Manualslib.com manuals search engine FUEL CUT-OFF SWITCH
Vehicles with a Duratecengine
The fuel supply may be cut off as aresult of an accident or suddenvibrations (e.g. collision whenparking).
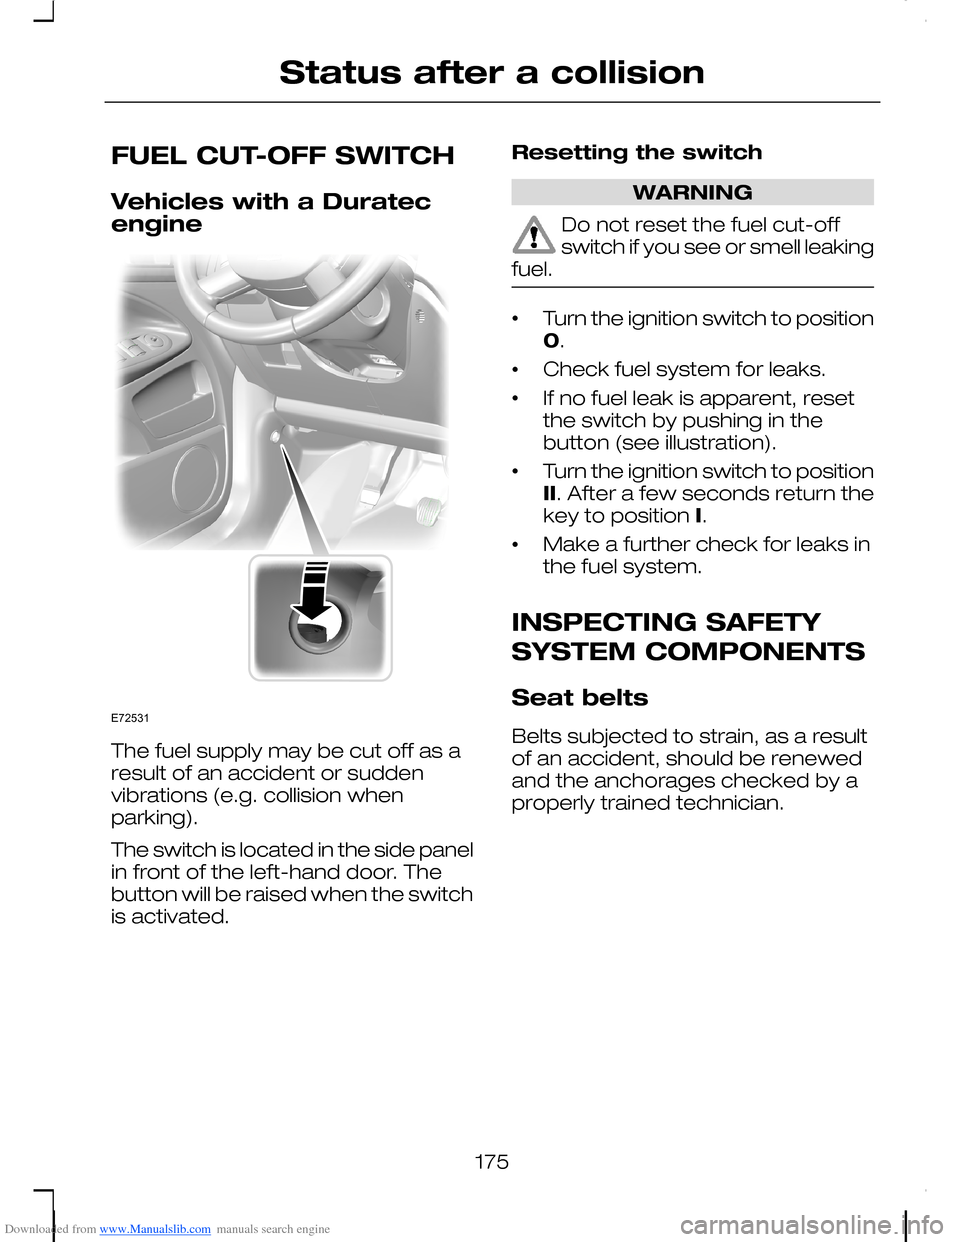
The switch is located in the side panelin front of the left-hand door. Thebutton will be raised when the switchis activated.
Resetting the switch
WARNING
Do not reset the fuel cut-offswitch if you see or smell leakingfuel.
•Turn the ignition switch to position0.
•Check fuel system for leaks.
•If no fuel leak is apparent, resetthe switch by pushing in thebutton (see illustration).
•Turn the ignition switch to positionII. After a few seconds return thekey to position I.
•Make a further check for leaks inthe fuel system.
INSPECTING SAFETY
SYSTEM COMPONENTS
Seat belts
Belts subjected to strain, as a resultof an accident, should be renewedand the anchorages checked by aproperly trained technician.
175
Status after a collisionE72531
Page 185 of 278
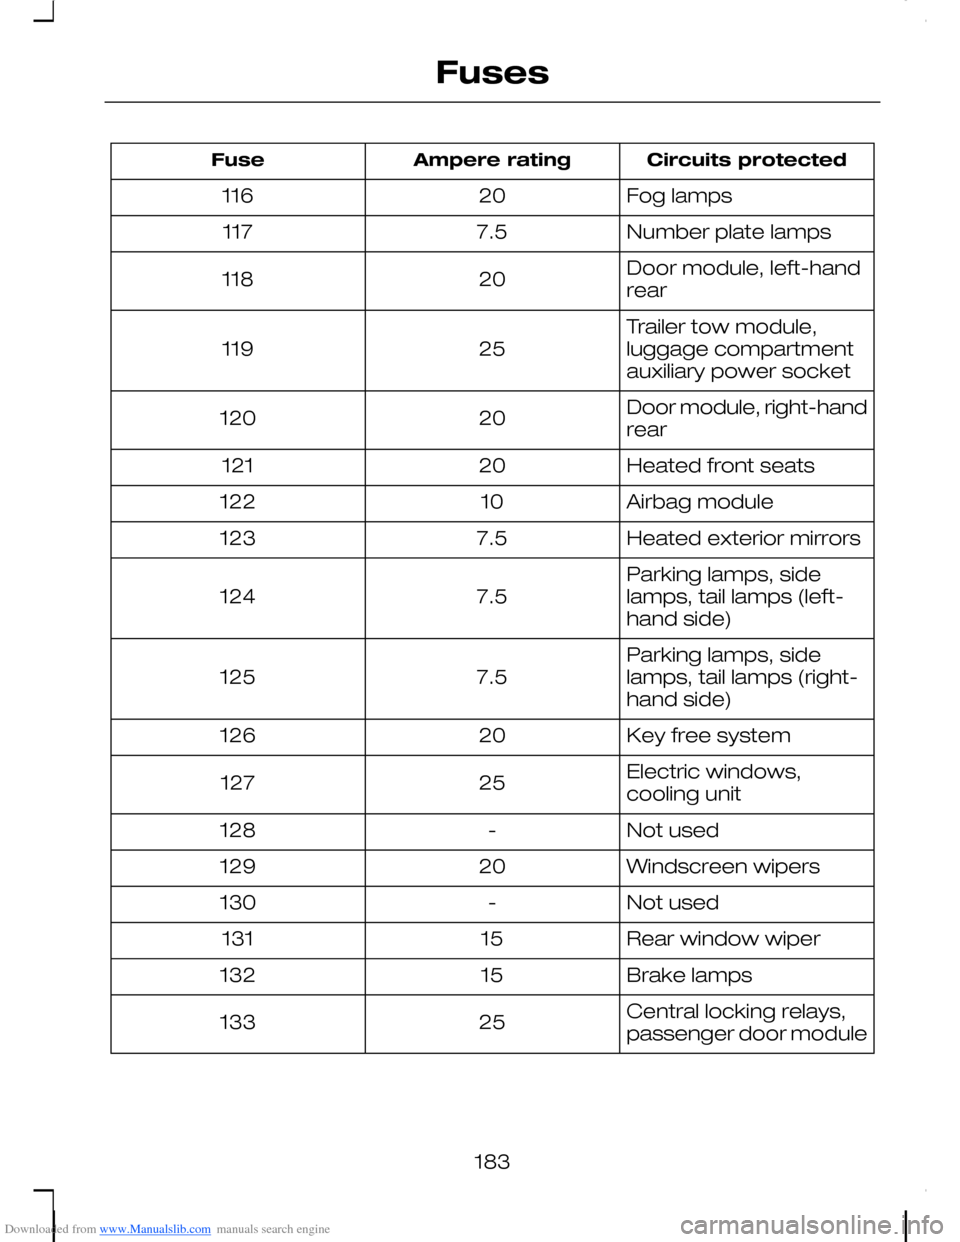
Downloaded from www.Manualslib.com manuals search engine Circuits protectedAmpere ratingFuse
Fog lamps20116
Number plate lamps7.5117
Door module, left-handrear20118
Trailer tow module,luggage compartmentauxiliary power socket25119
Door module, right-handrear20120
Heated front seats20121
Airbag module10122
Heated exterior mirrors7.5123
Parking lamps, sidelamps, tail lamps (left-hand side)7.5124
Parking lamps, sidelamps, tail lamps (right-hand side)7.5125
Key free system20126
Electric windows,cooling unit25127
Not used-128
Windscreen wipers20129
Not used-130
Rear window wiper15131
Brake lamps15132
Central locking relays,passenger door module25133
183
Fuses
Page 191 of 278
Downloaded from www.Manualslib.com manuals search engine OPENING AND CLOSING
THE BONNET
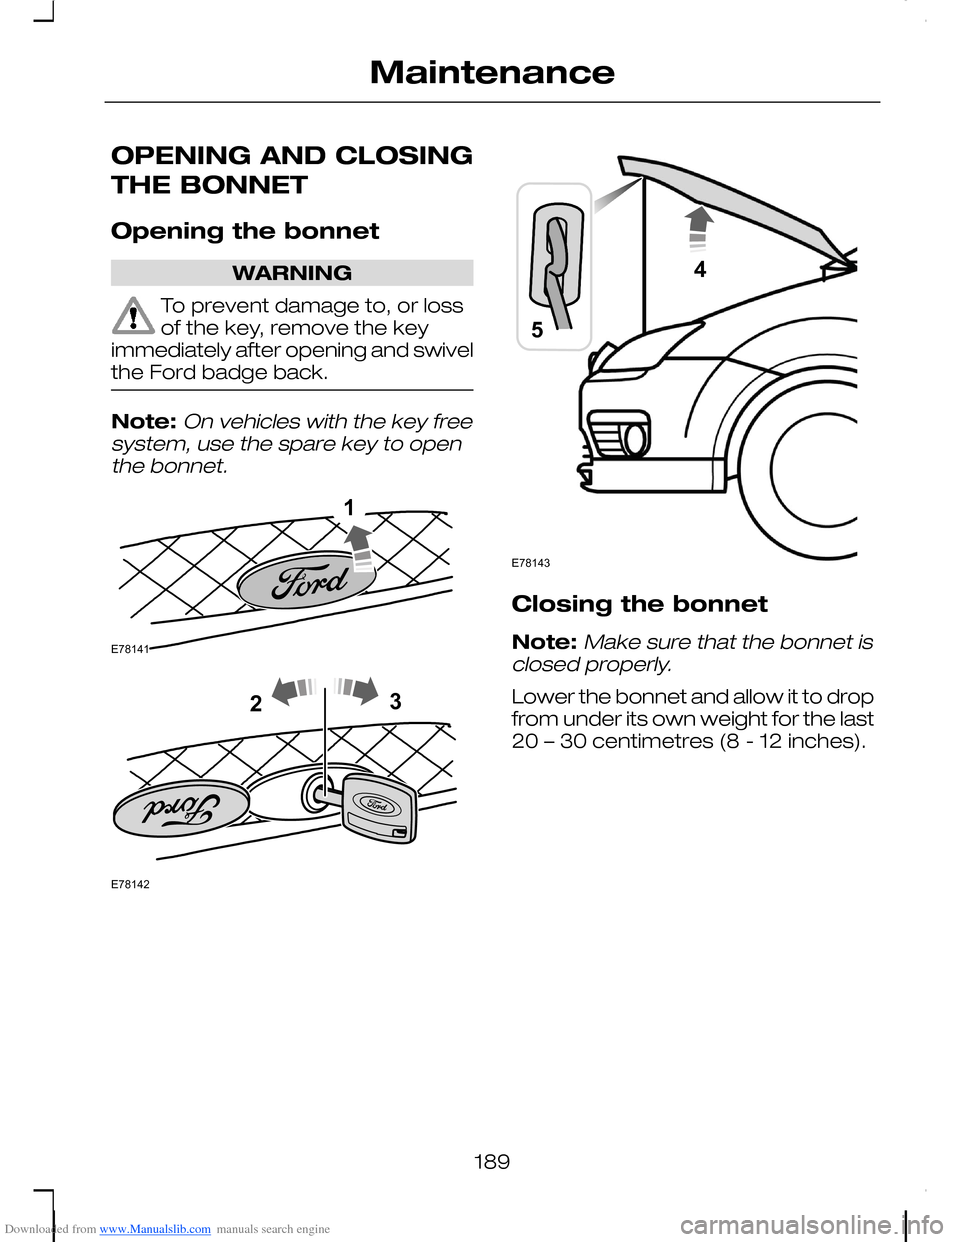
Opening the bonnet
WARNING
To prevent damage to, or lossof the key, remove the keyimmediately after opening and swivelthe Ford badge back.
Note:On vehicles with the key freesystem, use the spare key to openthe bonnet.
Closing the bonnet
Note:Make sure that the bonnet isclosed properly.
Lower the bonnet and allow it to dropfrom under its own weight for the last20 – 30 centimetres (8 - 12 inches).
189
MaintenanceE781411 E7814223 E7814354
Page 218 of 278
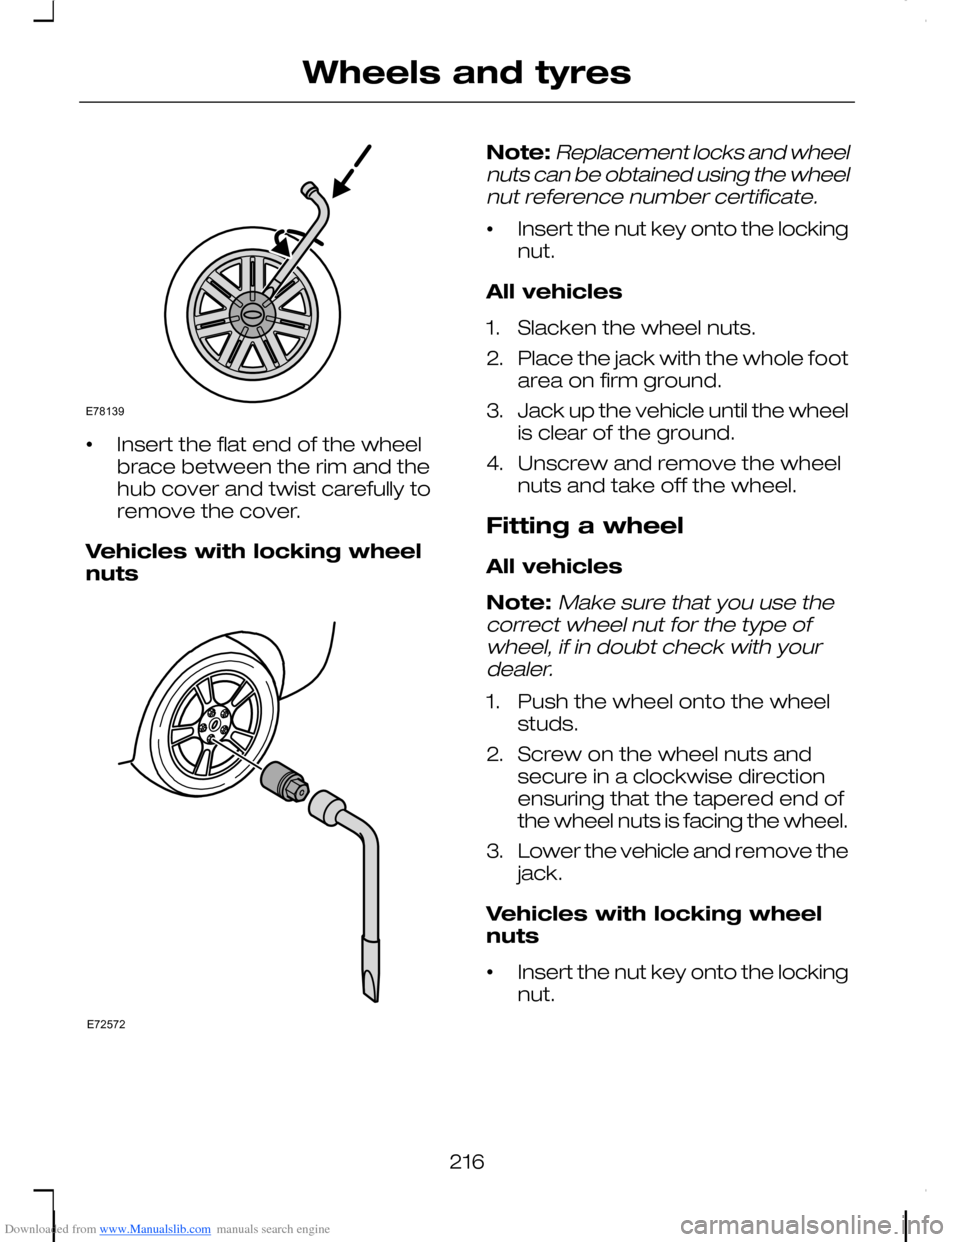
Downloaded from www.Manualslib.com manuals search engine •Insert the flat end of the wheelbrace between the rim and thehub cover and twist carefully toremove the cover.
Vehicles with locking wheelnuts
Note:Replacement locks and wheelnuts can be obtained using the wheelnut reference number certificate.
•Insert the nut key onto the lockingnut.
All vehicles
1.Slacken the wheel nuts.
2.Place the jack with the whole footarea on firm ground.
3.Jack up the vehicle until the wheelis clear of the ground.
4.Unscrew and remove the wheelnuts and take off the wheel.
Fitting a wheel
All vehicles
Note:Make sure that you use thecorrect wheel nut for the type ofwheel, if in doubt check with yourdealer.
1.Push the wheel onto the wheelstuds.
2.Screw on the wheel nuts andsecure in a clockwise directionensuring that the tapered end ofthe wheel nuts is facing the wheel.
3.Lower the vehicle and remove thejack.
Vehicles with locking wheelnuts
•Insert the nut key onto the lockingnut.
216
Wheels and tyresE78139 E72572
Page 233 of 278
Downloaded from www.Manualslib.com manuals search engine GENERAL INFORMATION
This section describes the functionsand features of the Bluetooth mobilephone and voice control system.
The section covers the followingvariations:
•a mobile phone with a mobilephone cradle without voicecontrol
•a Bluetooth and voice controlsystem with a mobile phonecradle
•a Bluetooth and voice controlsystem without a mobile phonecradle.
The Bluetooth mobile phone part ofthe system provides interaction withthe audio or navigation system andyour mobile phone. It allows you touse the audio or navigation systemto make and receive calls withouthaving to use your mobile phone.
The voice control part of the systemcan be used to control:
•mobile phone calls
•audio system functions
•vehicle climate control functions.
Note:The mobile phone does notswitch off immediately after theignition key is turned off: the powerdown delay is preset to 10 minutes.The time period can be adjusted tobetween 0 and 60 minutes. This,depending on your mobile phone,can be achieved by creating aphonebook entry on your mobilephone with the name Timer and therequired delay as it's number.
If the Bluetooth and voice control isused for an extended period of timewhen the vehicle is stationary, makesure that the engine is running toavoid draining the battery
TELEPHONE SETUP
Requirements for cradleconnection
Your phone must be fitted in a mobilephone holder before it can be usedas a cradle phone with yourhandsfree/voice control system. Youwill be able to purchase the correctholder for your phone from yourdealer.
Placing your phone in thecradle
Note:Your phone must be fitted ina mobile phone holder to allow youto connect the phone to the cradle.
Connect your phone to the cradle.
1.Place the base of the phone in thecradle connection.
Note:Make sure that the phone ispushed fully rearwards in the cradle.
231
Telephone
Page 235 of 278
Downloaded from www.Manualslib.com manuals search engine Bond another Bluetoothphone
Note:Before another Bluetoothphone can be bonded, the existingactive Bluetooth connection has tobe deactivated by the mobile phone.
Bond a new Bluetooth phone asdescribed in the requirements for aBluetooth connection.
Phones stored in the system areaccessible by using the phone list onthe audio or navigation unit.
Note:If six (five Bluetooth phonesfor cradle phone system) Bluetoothphones have been bonded, one ofthese has to be deleted in order tobond a new phone.
Cradle phone
With your phone fitted in the mobilephone cradle this does notautomatically become the activephone.
In these cases refer to Changingthe active phone in theappropriate section which describesthe system fitted to your vehicle.
BLUETOOTH SETUP
Before you can use your telephonewith your vehicle it must be bondedto the vehicle telephone system.
Handling of phones
A phone can be connected to thevehicle system by using either acradle connection or a Bluetoothconnection.
On vehicles with a mobile phonecradle, up to five Bluetooth phonescan be bonded to the vehicle system.
On vehicles without a mobile phonecradle, up to six Bluetooth phonescan be bonded to the vehicle system.
Note:If there is an ongoing callwhen the phone in use is selected asthe new active phone, the call istransferred to the vehicle audiosystem.
Note:Even if connected to the carsystem, your phone can still be usedin the usual way.
Requirements for Bluetoothconnection
The following are required before aBluetooth phone connection can bemade.
1.The Bluetooth feature must beactivated on the phone and onthe audio unit. For additionalinformation, refer to your phoneuser guide
2.The private mode must not beactivated on the Bluetooth phone.
3.Search for audio device.
4.Select Ford Audio.
5.The Bluetooth PIN number 0000must be entered on the phonekeypad.
233
Telephone
Page 236 of 278
Downloaded from www.Manualslib.com manuals search engine Note:A phone call will bedisconnected if the audio/navigationsystem is switched off. If the ignitionkey is turned to the off position thephone call will remain in progress.
Compatibility of phones
CAUTION
As no common agreementexists, mobile phonemanufacturers are able to implementa variety of profiles in their Bluetoothdevices. Because of this, anincompatibility can occur betweenthe phone and hands-free system,which in some cases may significantlydegrade the system performance.To avoid this situation, onlyrecommended phones should beused. Please contact your dealer formore details regarding the currentcompatibility list.
Phones with Symbianoperating system
Note:Certain phones require aspecial file to be installed to enablefull phonebook access via Bluetooth.This is referred to as a SIS file and willbe available via the Ford website.Please consult your dealer for fulldetails.
TELEPHONE CONTROLS
Ending or rejecting calls
By pressing one of several functionbuttons on the audio or navigationunit (example: AM/FM,CD/AUX)active calls can be ended or incomingcalls can be rejected.
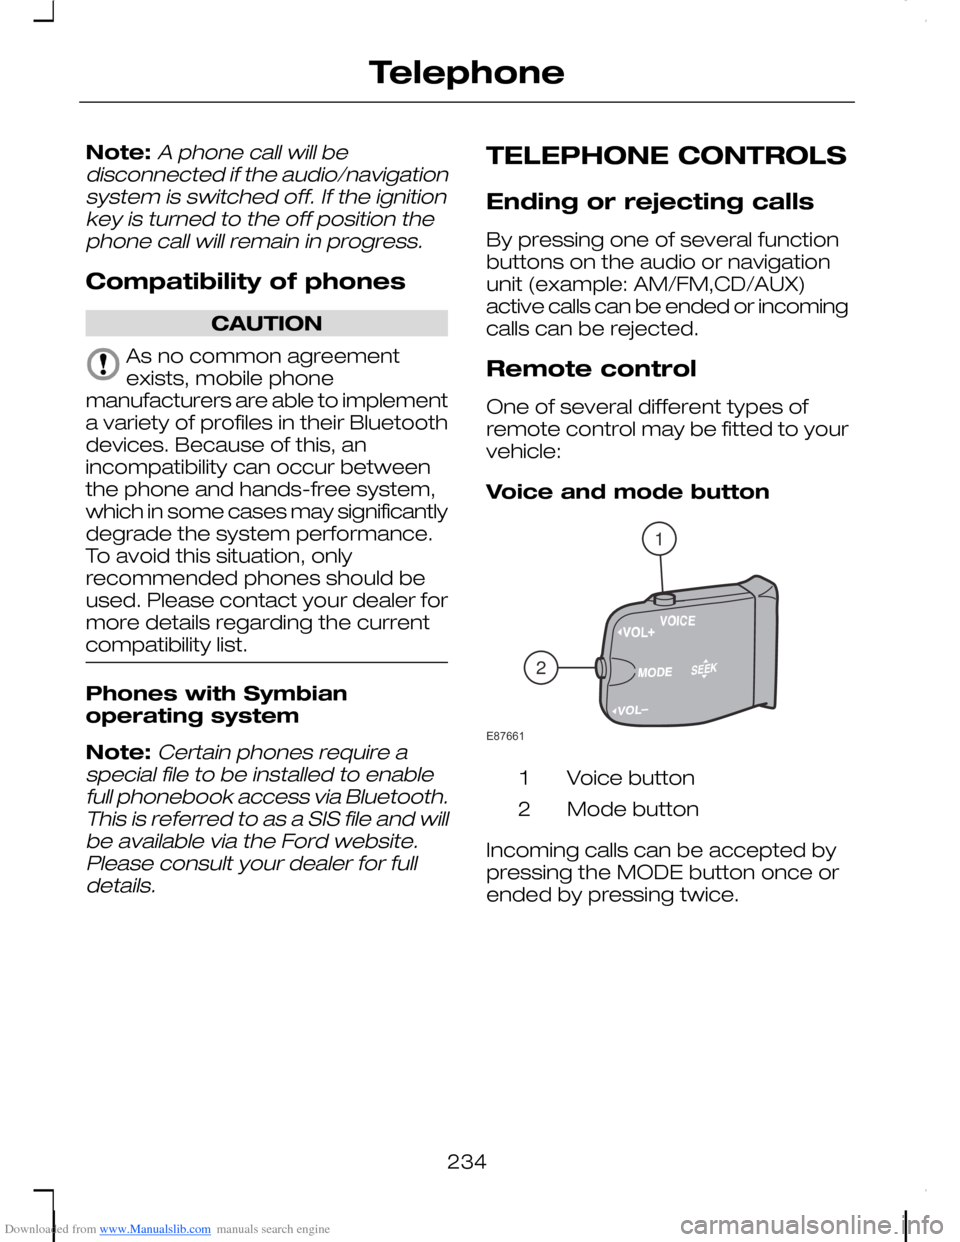
Remote control
One of several different types ofremote control may be fitted to yourvehicle:
Voice and mode button
Voice button1
Mode button2
Incoming calls can be accepted bypressing the MODE button once orended by pressing twice.
234
Telephone12E87661
Page 238 of 278
Downloaded from www.Manualslib.com manuals search engine Making a call
Dialling a number
You can access your phone addressbook either with the phone dockedin the cradle or via Bluetooth. Theentries will appear in the audio unitdisplay.
1.Press the PHONE or the callaccept button.
2.Press the MENU button.
3.Keep pressing the MENU buttonuntil PHONEBOOK appears.
4.Press the seek buttons to selectthe desired phone number.
Note:Press and hold the seekbutton to skip to the next letter in thealphabet.
5.Press the PHONE or the callaccept button to dial the selectedphone number.
If you have an audio unit with atelephone keypad (buttons 0-9, * and#), you can also direct dial by enteringthe number on the radio display viathe keypad and pressing the callaccept button:
1.Press the call accept button.
2.Dial the number using thetelephone keypad on the audiounit.
3.Press the call accept button.
Note:If you enter an incorrect digitwhilst entering a phone number,press the seek down button to erasethe last digit. A long press will erasethe complete string of digits.
Press and hold 0 to enter a + digit.
Ending a call
Calls can be ended by either:
•pressing one of the followingbuttons on the audio unit:PHONE, CD, AM/FM orON/OFF
•pressing the MODE button onthe remote control
•pressing the call reject button.
Note: If you have an audio unit witha telephone keypad you can end acall only with the call reject button.
Redialling a number
1.Press the PHONE or the callaccept button.
2.Press the MENU button.
3.Select the CALL OUT list or theCALL IN list.
Note:If the active phone does notprovide a call out list, the lastoutgoing call number/entry isdisplayed.
4.Press the seek button on theaudio unit.
5.Press the PHONE or the callaccept button to dial the desiredphone number.
Redialling the last diallednumber
Note:This applies to only audio unitswith a telephone keypad
1.Press the call accept button.
236
Telephone