warning FORD C MAX 2008 1.G Workshop Manual
[x] Cancel search | Manufacturer: FORD, Model Year: 2008, Model line: C MAX, Model: FORD C MAX 2008 1.GPages: 278, PDF Size: 17.5 MB
Page 107 of 278
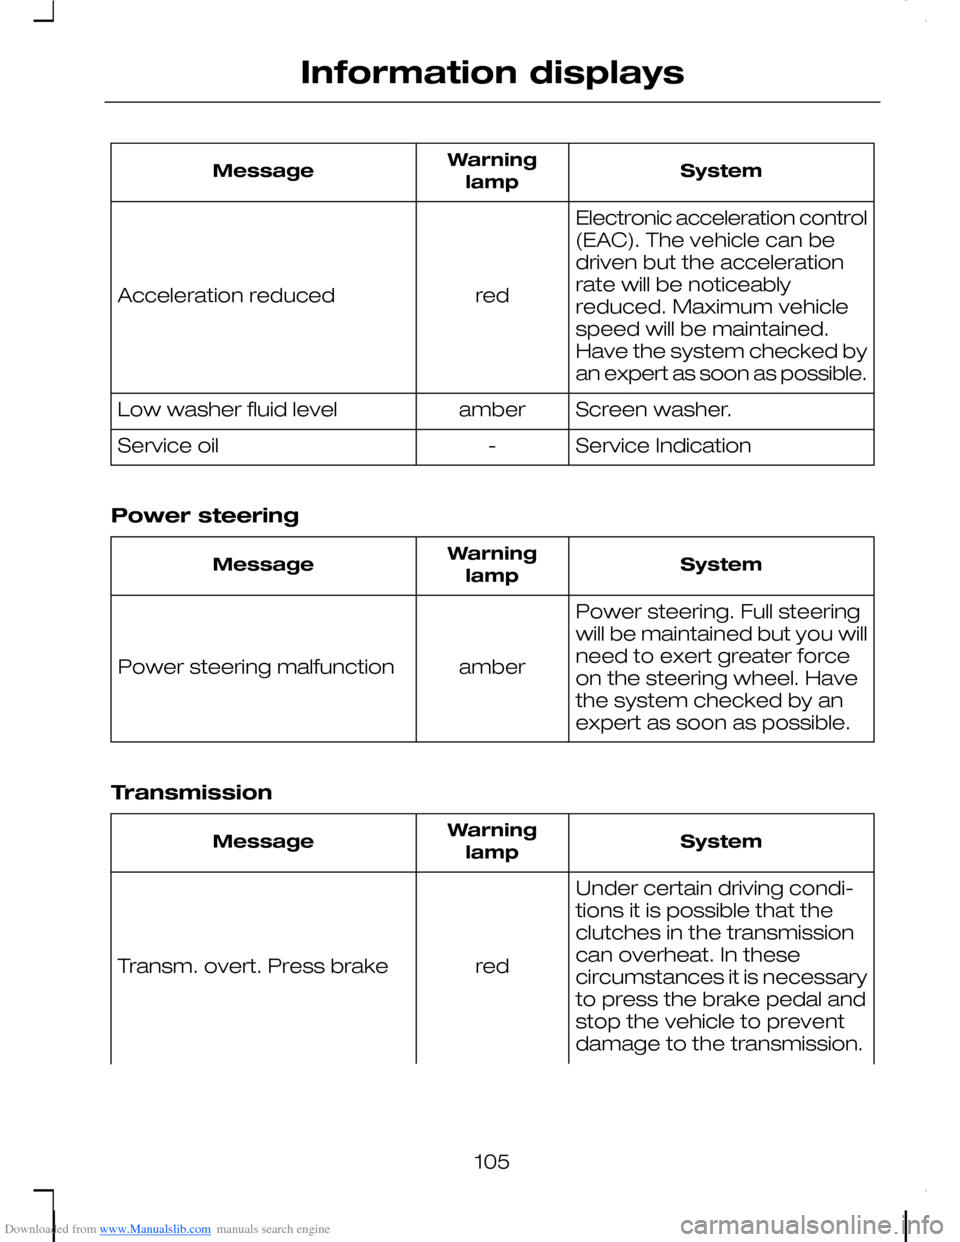
Downloaded from www.Manualslib.com manuals search engine SystemWarninglampMessage
Electronic acceleration control(EAC). The vehicle can bedriven but the accelerationrate will be noticeablyreduced. Maximum vehiclespeed will be maintained.Have the system checked byan expert as soon as possible.
redAcceleration reduced
Screen washer.amberLow washer fluid level
Service Indication-Service oil
Power steering
SystemWarninglampMessage
Power steering. Full steeringwill be maintained but you willneed to exert greater forceon the steering wheel. Havethe system checked by anexpert as soon as possible.
amberPower steering malfunction
Transmission
SystemWarninglampMessage
Under certain driving condi-tions it is possible that theclutches in the transmissioncan overheat. In thesecircumstances it is necessaryto press the brake pedal and
redTransm. overt. Press brake
stop the vehicle to preventdamage to the transmission.
105
Information displays
Page 108 of 278
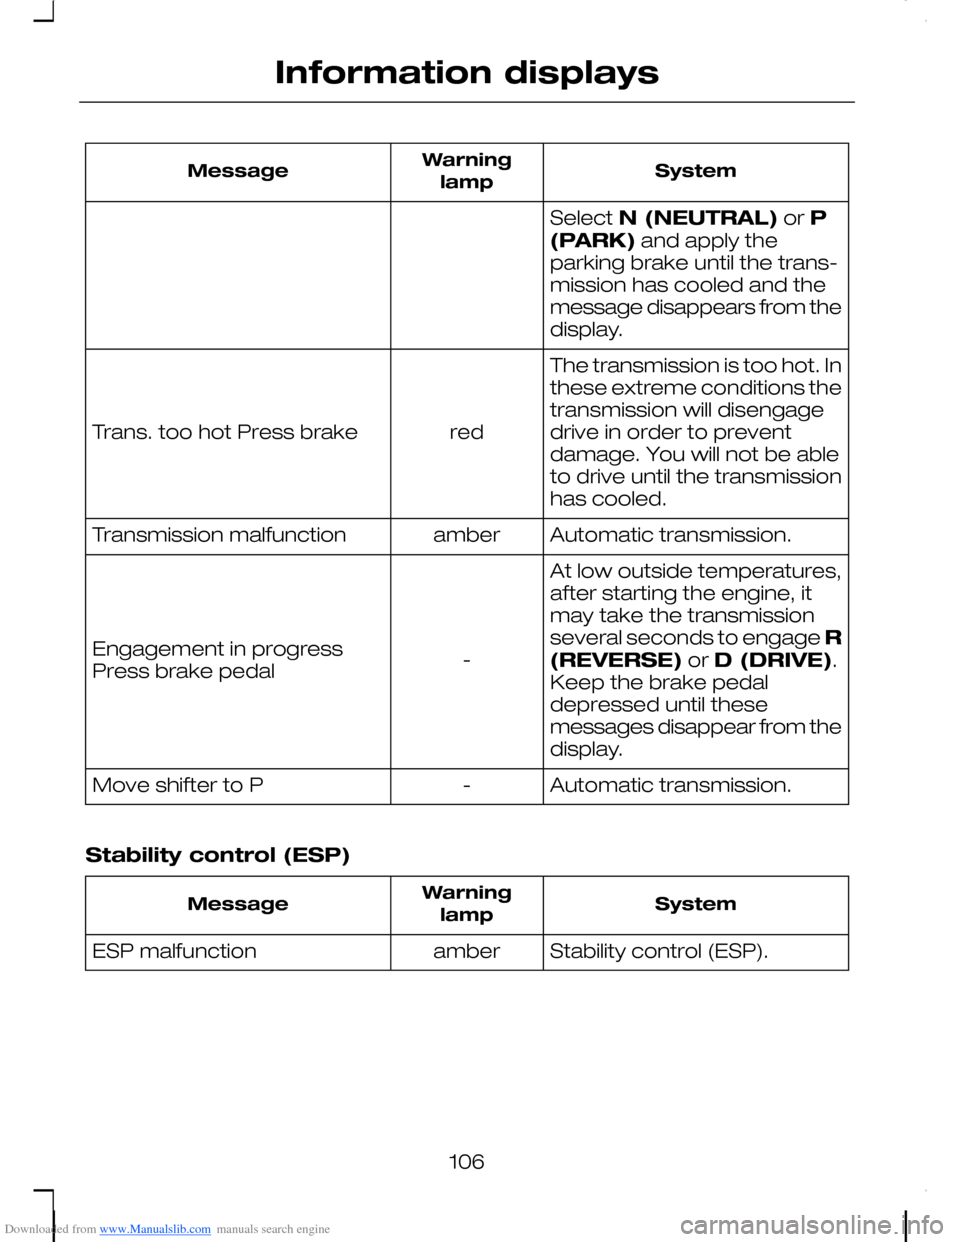
Downloaded from www.Manualslib.com manuals search engine SystemWarninglampMessage
Select N (NEUTRAL) or P(PARK) and apply theparking brake until the trans-mission has cooled and themessage disappears from thedisplay.
The transmission is too hot. Inthese extreme conditions thetransmission will disengagedrive in order to preventdamage. You will not be ableto drive until the transmissionhas cooled.
redTrans. too hot Press brake
Automatic transmission.amberTransmission malfunction
At low outside temperatures,after starting the engine, itmay take the transmissionseveral seconds to engage R(REVERSE) or D (DRIVE).Keep the brake pedaldepressed until thesemessages disappear from thedisplay.
-Engagement in progressPress brake pedal
Automatic transmission.-Move shifter to P
Stability control (ESP)
SystemWarninglampMessage
Stability control (ESP).amberESP malfunction
106
Information displays
Page 116 of 278
Downloaded from www.Manualslib.com manuals search engine When switched off, the heating,ventilation and air conditioningsystem is switched off andrecirculated air is selected.
HEATED WINDOWS AND
MIRRORS
Heated windows
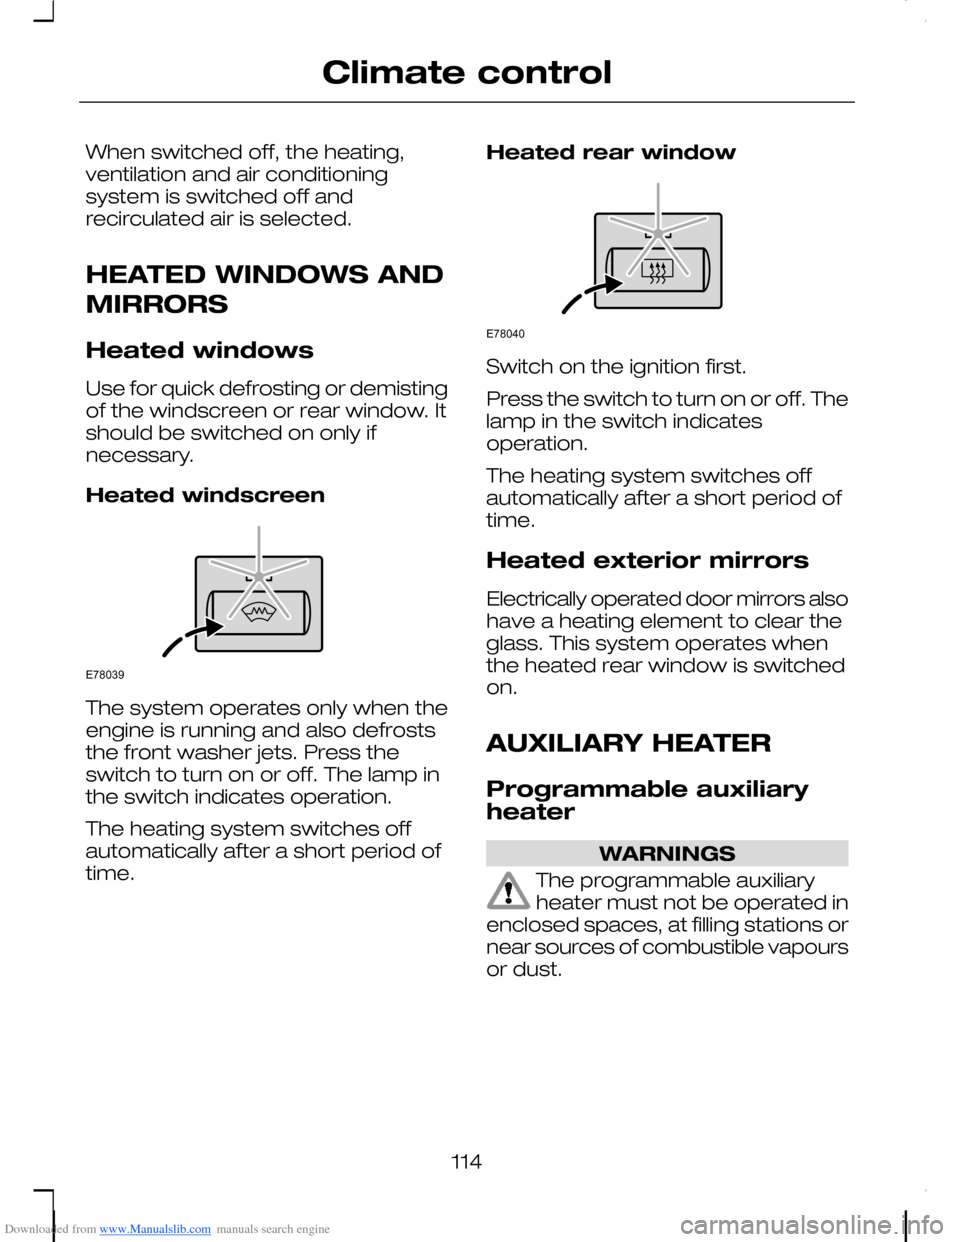
Use for quick defrosting or demistingof the windscreen or rear window. Itshould be switched on only ifnecessary.
Heated windscreen
The system operates only when theengine is running and also defroststhe front washer jets. Press theswitch to turn on or off. The lamp inthe switch indicates operation.
The heating system switches offautomatically after a short period oftime.
Heated rear window
Switch on the ignition first.
Press the switch to turn on or off. Thelamp in the switch indicatesoperation.
The heating system switches offautomatically after a short period oftime.
Heated exterior mirrors
Electrically operated door mirrors alsohave a heating element to clear theglass. This system operates whenthe heated rear window is switchedon.
AUXILIARY HEATER
Programmable auxiliaryheater
WARNINGS
The programmable auxiliaryheater must not be operated inenclosed spaces, at filling stations ornear sources of combustible vapoursor dust.
114
Climate controlE78039 E78040
Page 117 of 278
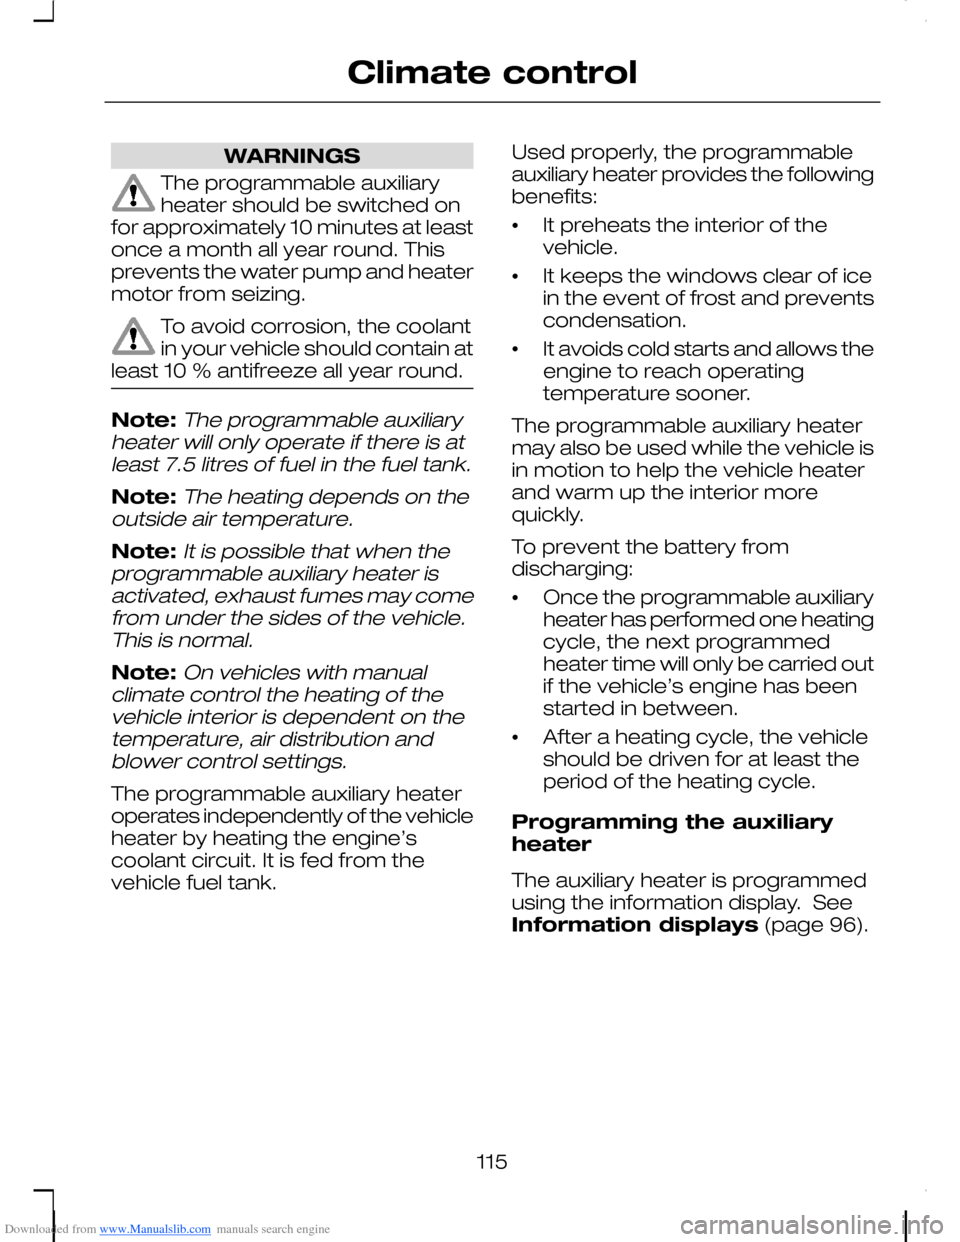
Downloaded from www.Manualslib.com manuals search engine WARNINGS
The programmable auxiliaryheater should be switched onfor approximately 10 minutes at leastonce a month all year round. Thisprevents the water pump and heatermotor from seizing.
To avoid corrosion, the coolantin your vehicle should contain atleast 10 % antifreeze all year round.
Note:The programmable auxiliaryheater will only operate if there is atleast 7.5 litres of fuel in the fuel tank.
Note:The heating depends on theoutside air temperature.
Note:It is possible that when theprogrammable auxiliary heater isactivated, exhaust fumes may comefrom under the sides of the vehicle.This is normal.
Note:On vehicles with manualclimate control the heating of thevehicle interior is dependent on thetemperature, air distribution andblower control settings.
The programmable auxiliary heateroperates independently of the vehicleheater by heating the engine’scoolant circuit. It is fed from thevehicle fuel tank.
Used properly, the programmableauxiliary heater provides the followingbenefits:
•It preheats the interior of thevehicle.
•It keeps the windows clear of icein the event of frost and preventscondensation.
•It avoids cold starts and allows theengine to reach operatingtemperature sooner.
The programmable auxiliary heatermay also be used while the vehicle isin motion to help the vehicle heaterand warm up the interior morequickly.
To prevent the battery fromdischarging:
•Once the programmable auxiliaryheater has performed one heatingcycle, the next programmedheater time will only be carried outif the vehicle’s engine has beenstarted in between.
•After a heating cycle, the vehicleshould be driven for at least theperiod of the heating cycle.
Programming the auxiliaryheater
The auxiliary heater is programmedusing the information display. SeeInformation displays (page 96).
115
Climate control
Page 118 of 278
Downloaded from www.Manualslib.com manuals search engine Auxiliary heater
The diesel auxiliary heater (PTCelectrical heater) aids in warming theengine and the interior compartmenton vehicles with diesel engines. It isautomatically switched on or offdepending on the outsidetemperature, the coolanttemperature and the alternator load.
Fuel operated heater
The fuel operated heater aids inwarming the engine and the interiorcompartment on vehicles with apetrol or diesel engine. It isautomatically switched on or offdepending on the outsidetemperature and the coolanttemperature, unless it has beendeactivated by the driver.
When the fuel operated heater isoperating, a message appears in theinformation display.
The fuel operated heater can bedeactivated using the informationdisplay. See Information displays(page 96).
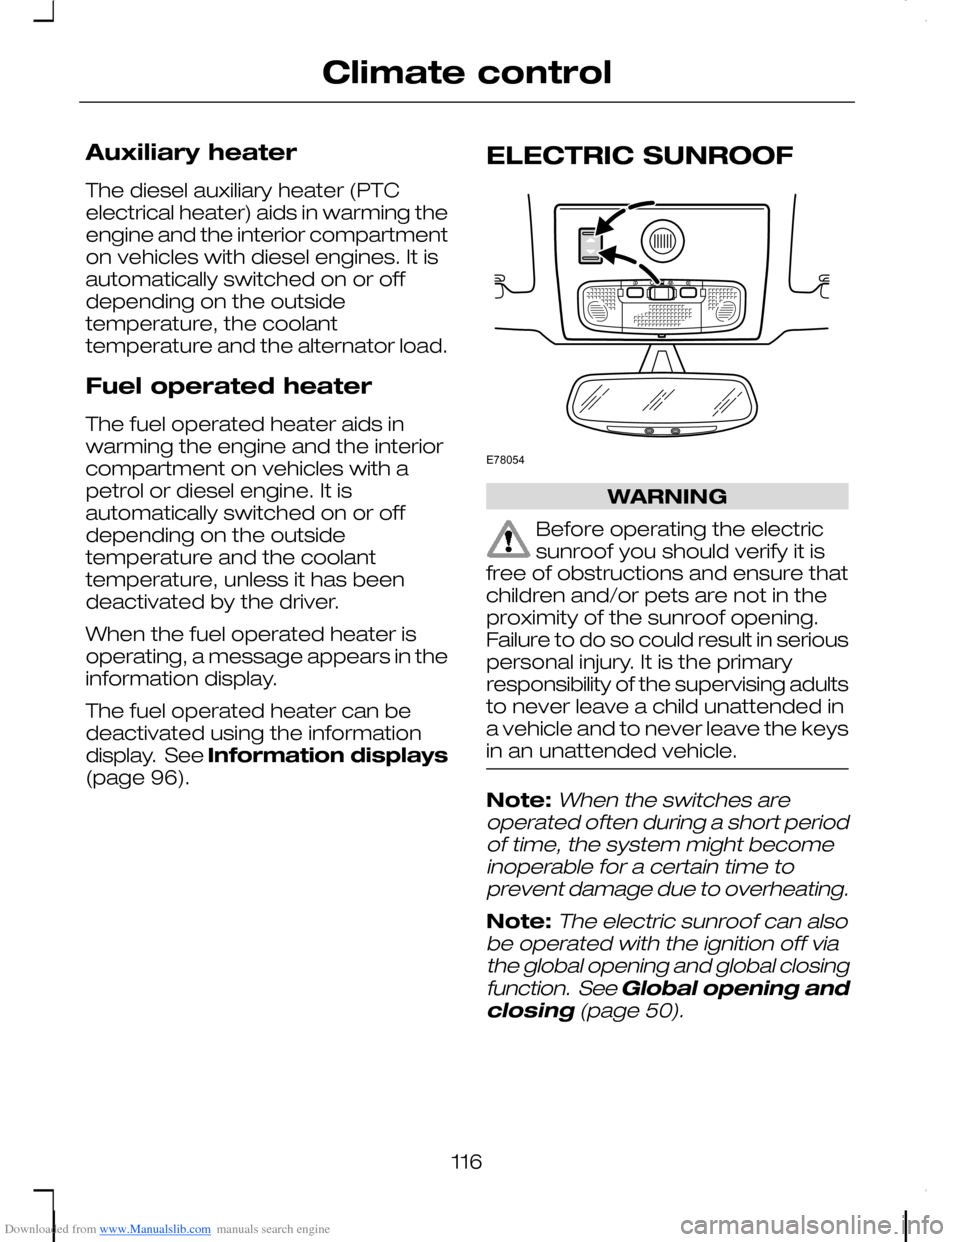
ELECTRIC SUNROOF
WARNING
Before operating the electricsunroof you should verify it isfree of obstructions and ensure thatchildren and/or pets are not in theproximity of the sunroof opening.Failure to do so could result in seriouspersonal injury. It is the primaryresponsibility of the supervising adultsto never leave a child unattended ina vehicle and to never leave the keysin an unattended vehicle.
Note:When the switches areoperated often during a short periodof time, the system might becomeinoperable for a certain time toprevent damage due to overheating.
Note:The electric sunroof can alsobe operated with the ignition off viathe global opening and global closingfunction. See Global opening andclosing (page 50).
116
Climate controlE78054
Page 120 of 278
Downloaded from www.Manualslib.com manuals search engine To open or close the sunroofautomatically press either side of theswitch to the second action point andrelease it completely. Press again tostop.
When the closed position is reached,the sunroof stops automatically.
Sunroof anti-trapprotection
WARNINGS
The anti-trap function isdeactivated until the memoryhas been reset. Careless closing ofthe window can cause injuries.
Careless closing of the electricsunroof can override theanti-trap protection and causeinjuries.
The sunroof will stop automaticallywhile closing and reverse somedistance if there is an obstacle in theway.
To override anti-trap protection whenthere is a resistance, e. g. in thewinter, proceed as follows:
WARNING
While the sunroof is beingclosed for the third time, theanti-trap function is disabled. Makesure there are no obstacles in theway of the closing sunroof.
Close the sunroof a third time to theresistance. The anti-trap function isdisabled and the sunroof cannot beclosed automatically. The sunroof willoverride the resistance and can thenbe closed fully.
If the sunroof does not close after thethird attempt, have it checked by anexpert.
Sunroof safety mode
WARNING
The anti-trap function is notactive during this procedure.Make sure that there are noobstacles in the way of the closingsunroof.
If the system detects a malfunction,it enters a safety mode. The sunroofwill move for only about 0.5 secondsat a time and then stop again. Closethe sunroof by pressing the buttonagain when the sunroof stopsmoving. When the rear of the sunroofis lifted, lift the rear all the way andthen close the sunroof. Have thesystem checked by an expertimmediately.
Sunroof relearning
WARNING
The anti-trap function is notactive during this procedure.Make sure that there are noobstacles in the way of the closingsunroof.
118
Climate control
Page 122 of 278
Downloaded from www.Manualslib.com manuals search engine SITTING IN THE
CORRECT POSITION
WARNINGS
Do not adjust the seats whenthe vehicle is moving.
Only when you use the seat beltproperly, can it hold you in aposition that allows the airbag toachieve its optimum effect.
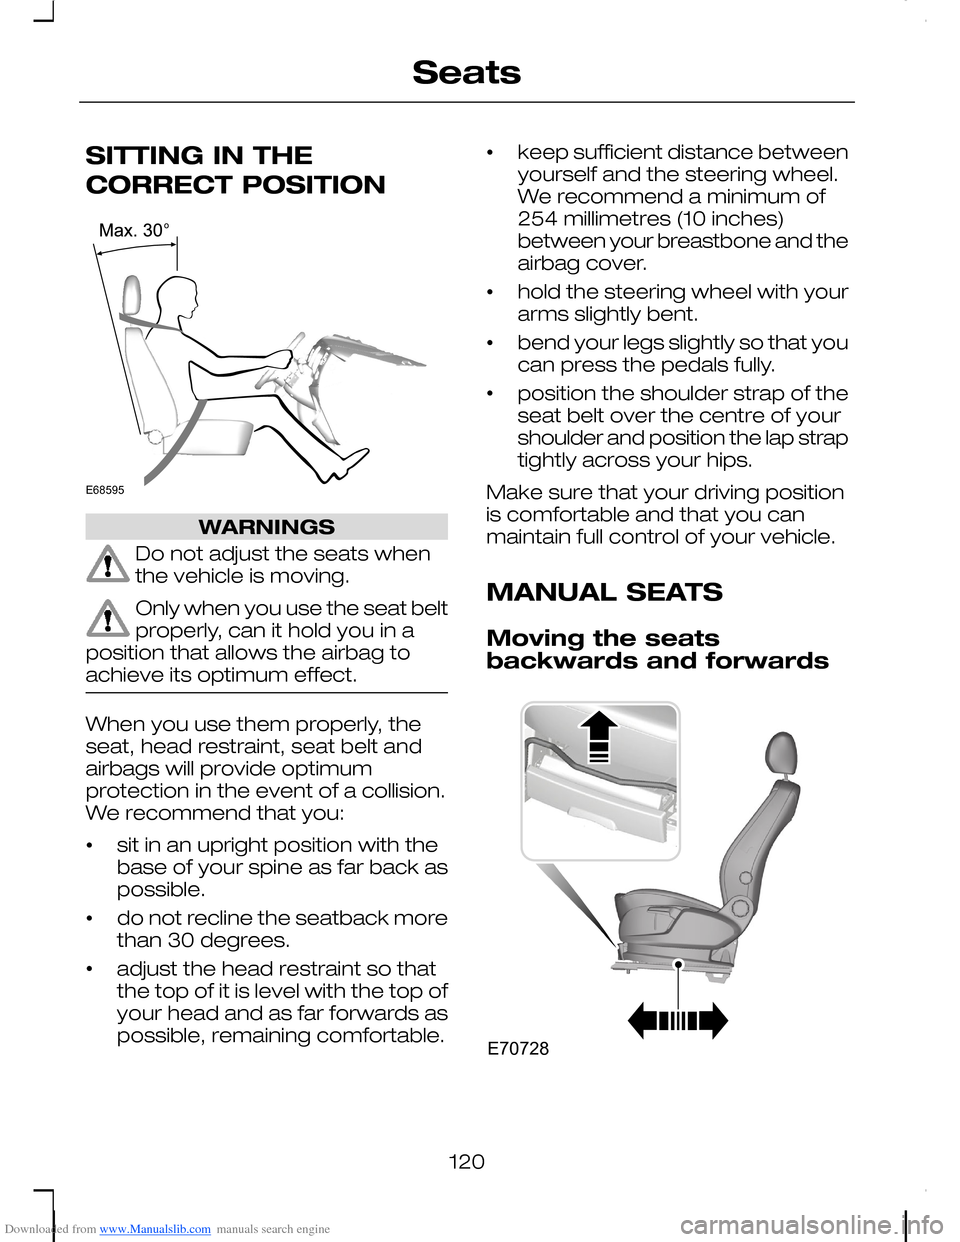
When you use them properly, theseat, head restraint, seat belt andairbags will provide optimumprotection in the event of a collision.We recommend that you:
•sit in an upright position with thebase of your spine as far back aspossible.
•do not recline the seatback morethan 30 degrees.
•adjust the head restraint so thatthe top of it is level with the top ofyour head and as far forwards aspossible, remaining comfortable.
•keep sufficient distance betweenyourself and the steering wheel.We recommend a minimum of254 millimetres (10 inches)between your breastbone and theairbag cover.
•hold the steering wheel with yourarms slightly bent.
•bend your legs slightly so that youcan press the pedals fully.
•position the shoulder strap of theseat belt over the centre of yourshoulder and position the lap straptightly across your hips.
Make sure that your driving positionis comfortable and that you canmaintain full control of your vehicle.
MANUAL SEATS
Moving the seatsbackwards and forwards
120
SeatsE68595 E70728
Page 123 of 278
Downloaded from www.Manualslib.com manuals search engine WARNING
Rock the seat backwards andforwards after releasing thelever to make sure that it is fullyengaged in its catch.
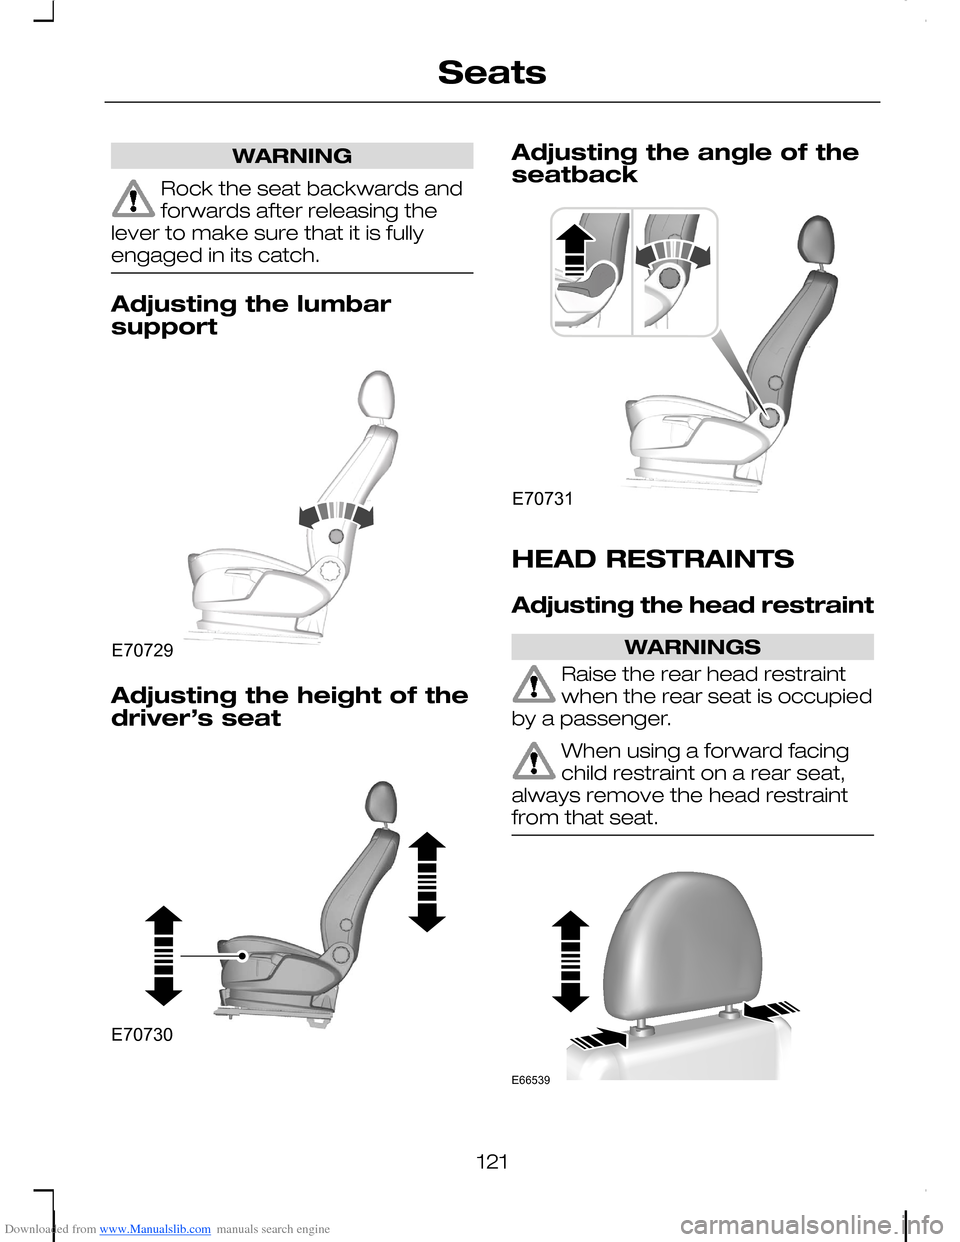
Adjusting the lumbarsupport
Adjusting the height of thedriver’s seat
Adjusting the angle of theseatback
HEAD RESTRAINTS
Adjusting the head restraint
WARNINGS
Raise the rear head restraintwhen the rear seat is occupiedby a passenger.
When using a forward facingchild restraint on a rear seat,always remove the head restraintfrom that seat.
121
SeatsE70729 E70730 E70731 E66539
Page 126 of 278
Downloaded from www.Manualslib.com manuals search engine REAR SEATS
Comfort seat system
WARNING
Make sure that there is nothingin the luggage compartmentwhich could obstruct the movementof the seats or get damaged whenthe seats move rearwards.
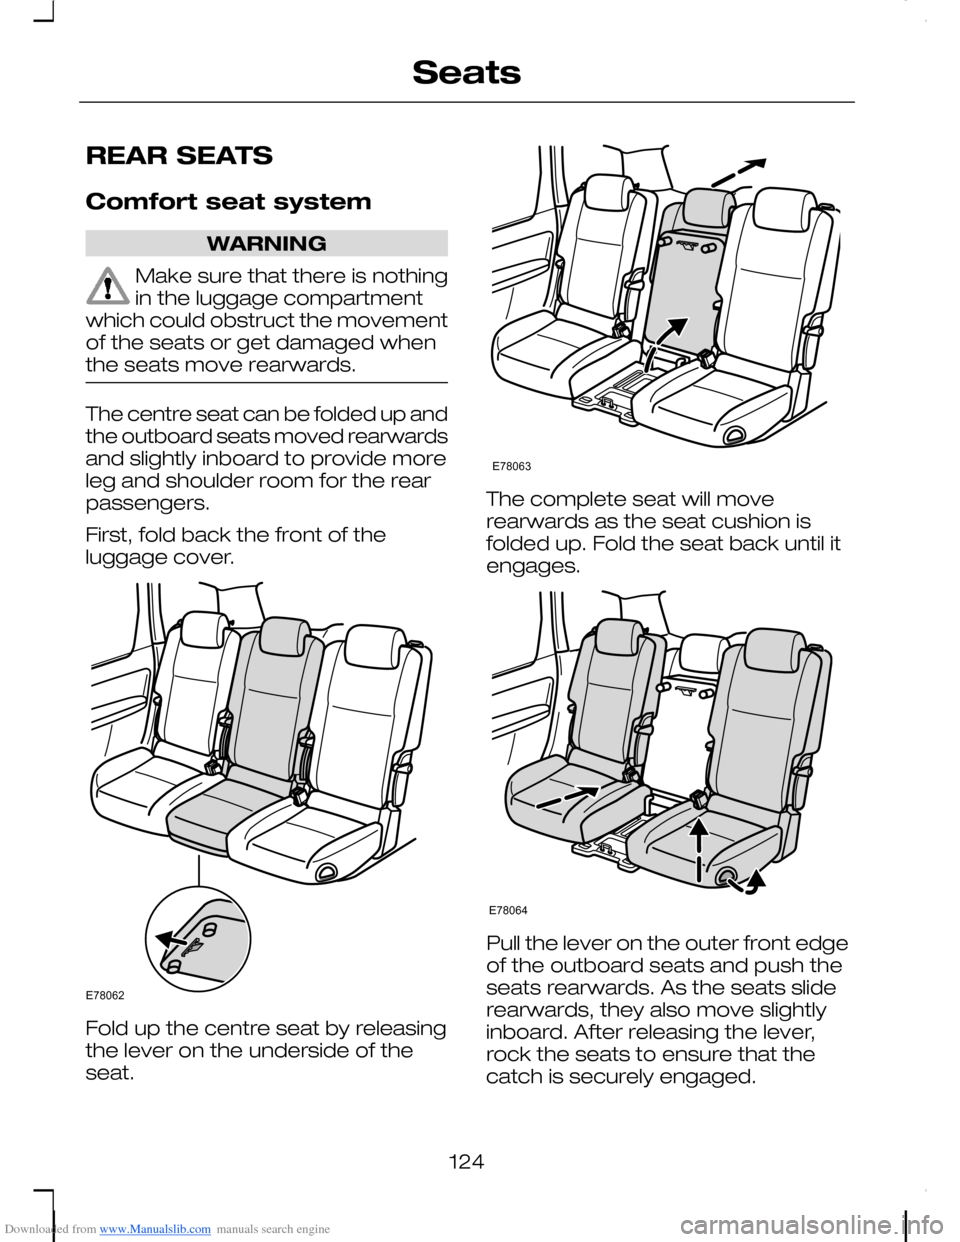
The centre seat can be folded up andthe outboard seats moved rearwardsand slightly inboard to provide moreleg and shoulder room for the rearpassengers.
First, fold back the front of theluggage cover.
Fold up the centre seat by releasingthe lever on the underside of theseat.
The complete seat will moverearwards as the seat cushion isfolded up. Fold the seat back until itengages.
Pull the lever on the outer front edgeof the outboard seats and push theseats rearwards. As the seats sliderearwards, they also move slightlyinboard. After releasing the lever,rock the seats to ensure that thecatch is securely engaged.
124
SeatsE78062 E78063 E78064
Page 127 of 278
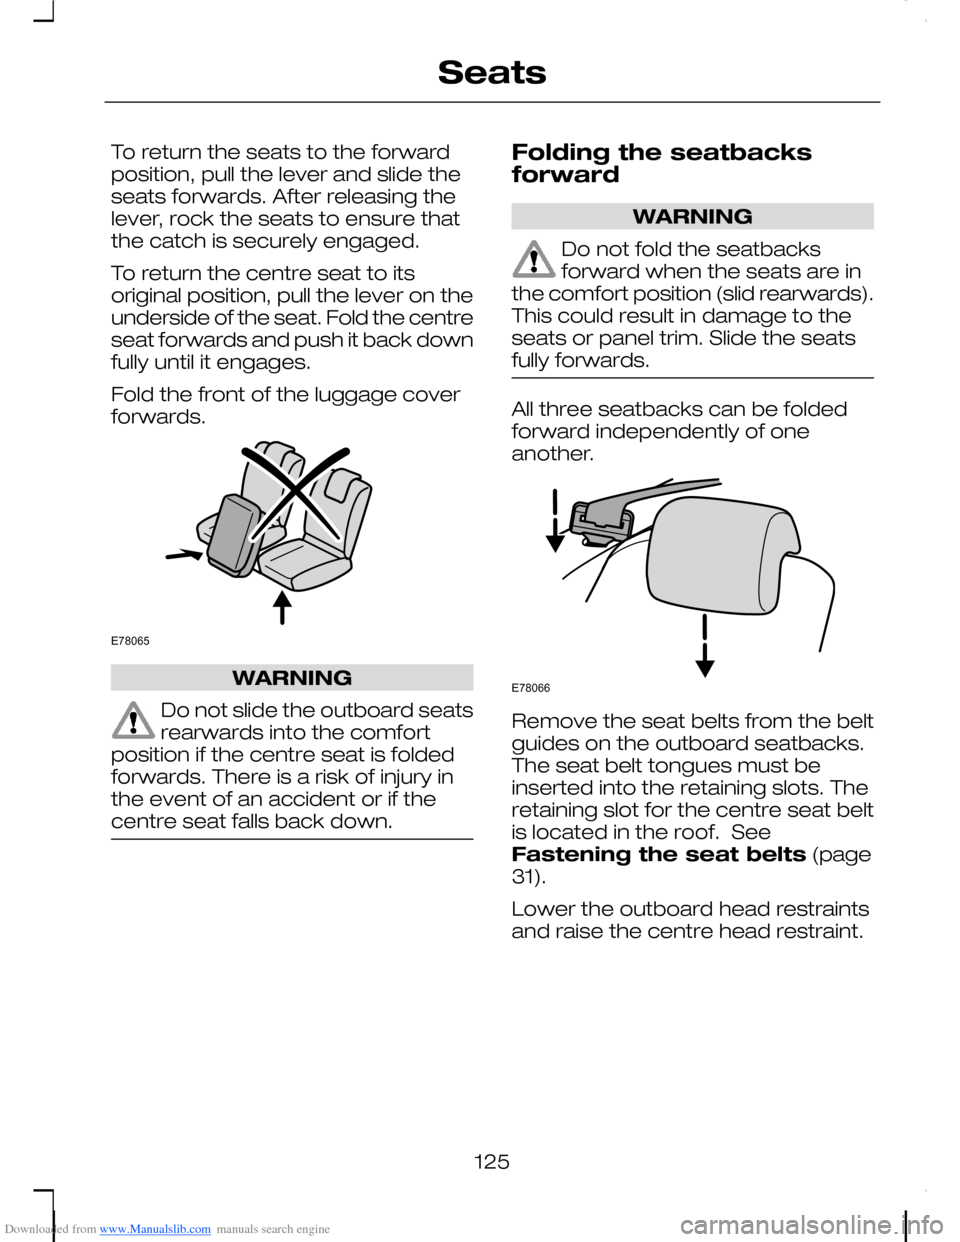
Downloaded from www.Manualslib.com manuals search engine To return the seats to the forwardposition, pull the lever and slide theseats forwards. After releasing thelever, rock the seats to ensure thatthe catch is securely engaged.
To return the centre seat to itsoriginal position, pull the lever on theunderside of the seat. Fold the centreseat forwards and push it back downfully until it engages.
Fold the front of the luggage coverforwards.
WARNING
Do not slide the outboard seatsrearwards into the comfortposition if the centre seat is foldedforwards. There is a risk of injury inthe event of an accident or if thecentre seat falls back down.
Folding the seatbacksforward
WARNING
Do not fold the seatbacksforward when the seats are inthe comfort position (slid rearwards).This could result in damage to theseats or panel trim. Slide the seatsfully forwards.
All three seatbacks can be foldedforward independently of oneanother.
Remove the seat belts from the beltguides on the outboard seatbacks.The seat belt tongues must beinserted into the retaining slots. Theretaining slot for the centre seat beltis located in the roof. SeeFastening the seat belts (page31).
Lower the outboard head restraintsand raise the centre head restraint.
125
SeatsE78065 E78066