check engine FORD C MAX 2011 2.G Owner's Manual
[x] Cancel search | Manufacturer: FORD, Model Year: 2011, Model line: C MAX, Model: FORD C MAX 2011 2.GPages: 296, PDF Size: 7.87 MB
Page 98 of 296
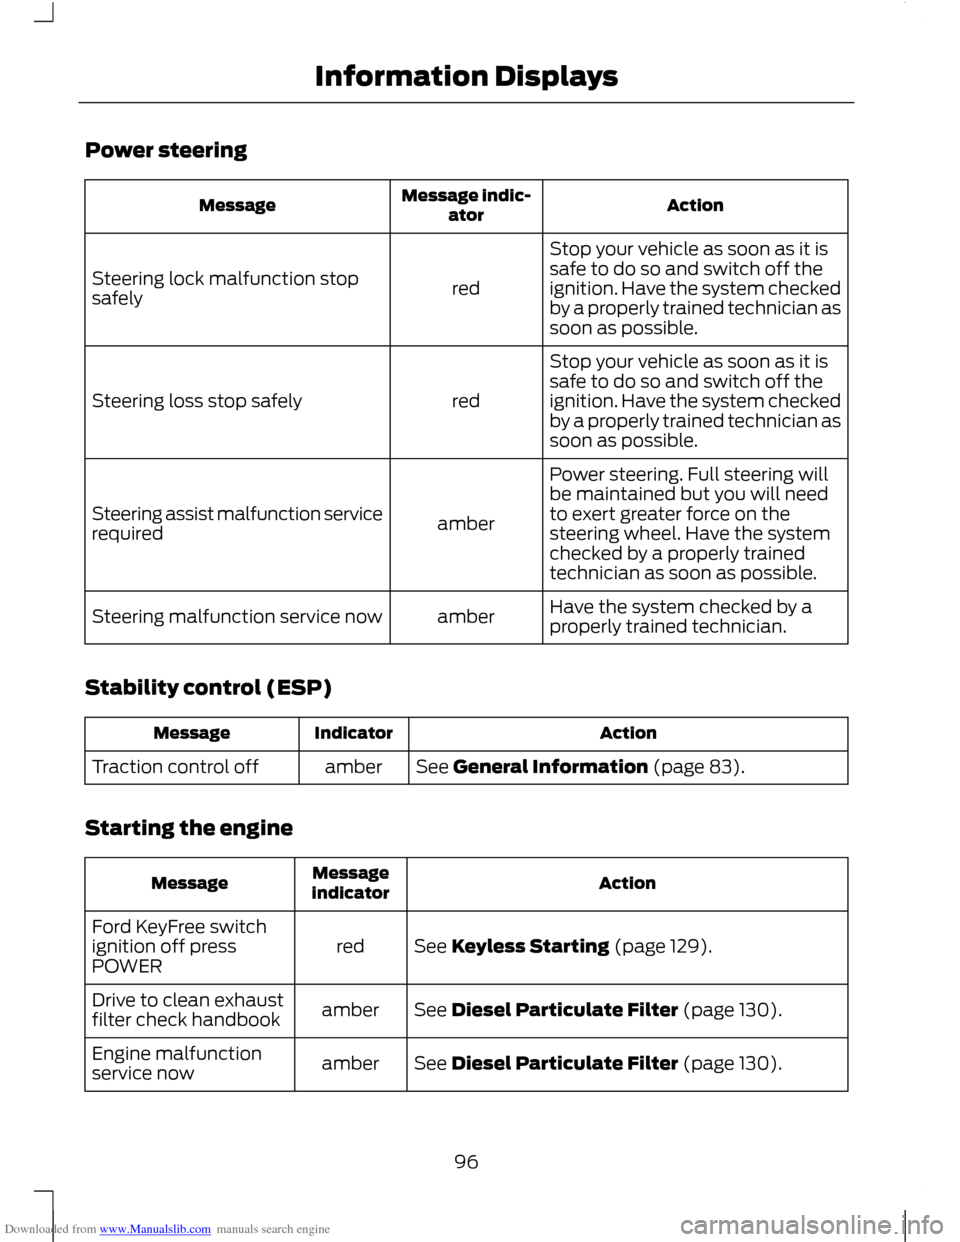
Downloaded from www.Manualslib.com manuals search engine Power steering
Action
Message indic-
ator
Message
Stop your vehicle as soon as it is
safe to do so and switch off the
ignition. Have the system checked
by a properly trained technician as
soon as possible.
red
Steering lock malfunction stop
safely
Stop your vehicle as soon as it is
safe to do so and switch off the
ignition. Have the system checked
by a properly trained technician as
soon as possible.
red
Steering loss stop safely
Power steering. Full steering will
be maintained but you will need
to exert greater force on the
steering wheel. Have the system
checked by a properly trained
technician as soon as possible.
amber
Steering assist malfunction service
required
Have the system checked by a
properly trained technician.
amber
Steering malfunction service now
Stability control (ESP) Action
Indicator
Message
See General Information (page 83).
amber
Traction control off
Starting the engine Action
Message
indicator
Message
See Keyless Starting (page 129).
red
Ford KeyFree switch
ignition off press
POWER
See Diesel Particulate Filter (page 130).
amber
Drive to clean exhaust
filter check handbook
See Diesel Particulate Filter (page 130).
amber
Engine malfunction
service now
96
Information Displays
Page 100 of 296
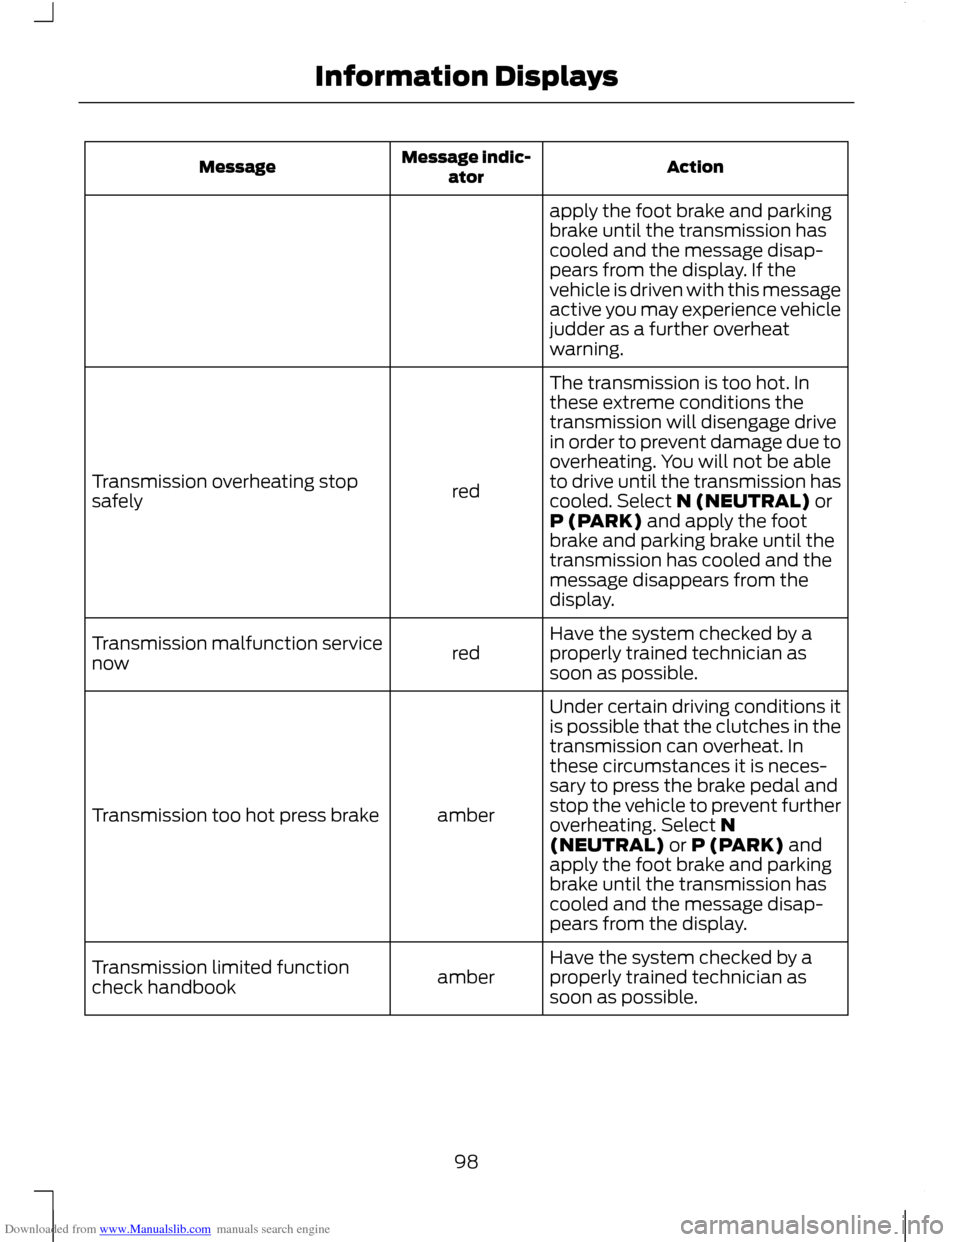
Downloaded from www.Manualslib.com manuals search engine Action
Message indic-
ator
Message
apply the foot brake and parking
brake until the transmission has
cooled and the message disap-
pears from the display. If the
vehicle is driven with this message
active you may experience vehicle
judder as a further overheat
warning.
The transmission is too hot. In
these extreme conditions the
transmission will disengage drive
in order to prevent damage due to
overheating. You will not be able
to drive until the transmission has
red
Transmission overheating stop
safely
cooled. Select N (NEUTRAL) or
P (PARK) and apply the foot
brake and parking brake until the
transmission has cooled and the
message disappears from the
display.
Have the system checked by a
properly trained technician as
soon as possible.
red
Transmission malfunction service
now
Under certain driving conditions it
is possible that the clutches in the
transmission can overheat. In
these circumstances it is neces-
sary to press the brake pedal and
stop the vehicle to prevent further
amber
Transmission too hot press brake
overheating. Select N
(NEUTRAL) or P (PARK) and
apply the foot brake and parking
brake until the transmission has
cooled and the message disap-
pears from the display.
Have the system checked by a
properly trained technician as
soon as possible.
amber
Transmission limited function
check handbook
98
Information Displays
Page 101 of 296
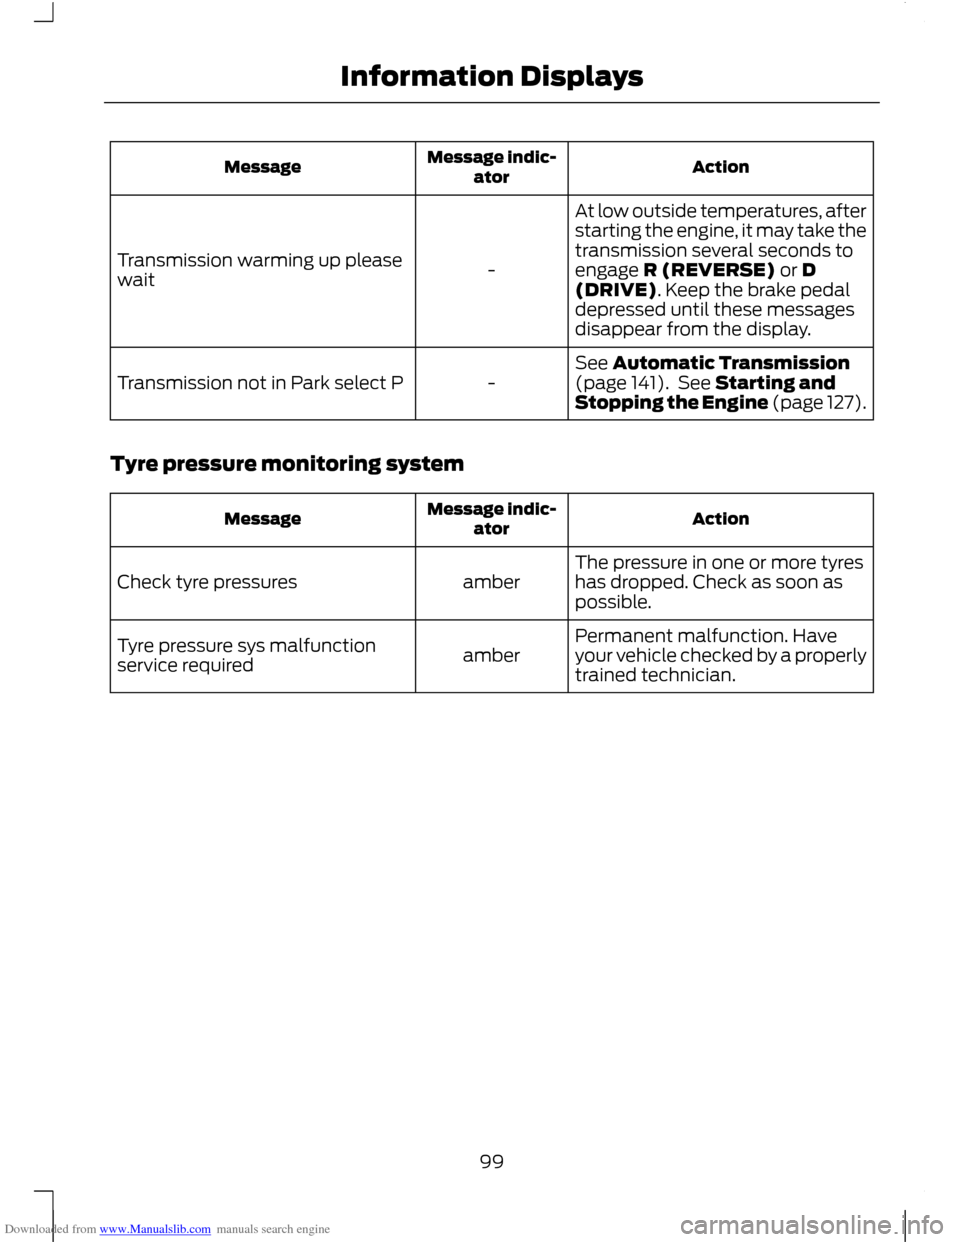
Downloaded from www.Manualslib.com manuals search engine Action
Message indic-
ator
Message
At low outside temperatures, after
starting the engine, it may take the
transmission several seconds to
engage R (REVERSE) or D
(DRIVE). Keep the brake pedal
depressed until these messages
disappear from the display.
-
Transmission warming up please
wait
See Automatic Transmission
(page 141). See Starting and
Stopping the Engine (page 127).
-
Transmission not in Park select P
Tyre pressure monitoring system Action
Message indic-
ator
Message
The pressure in one or more tyres
has dropped. Check as soon as
possible.
amber
Check tyre pressures
Permanent malfunction. Have
your vehicle checked by a properly
trained technician.
amber
Tyre pressure sys malfunction
service required
99
Information Displays
Page 109 of 296
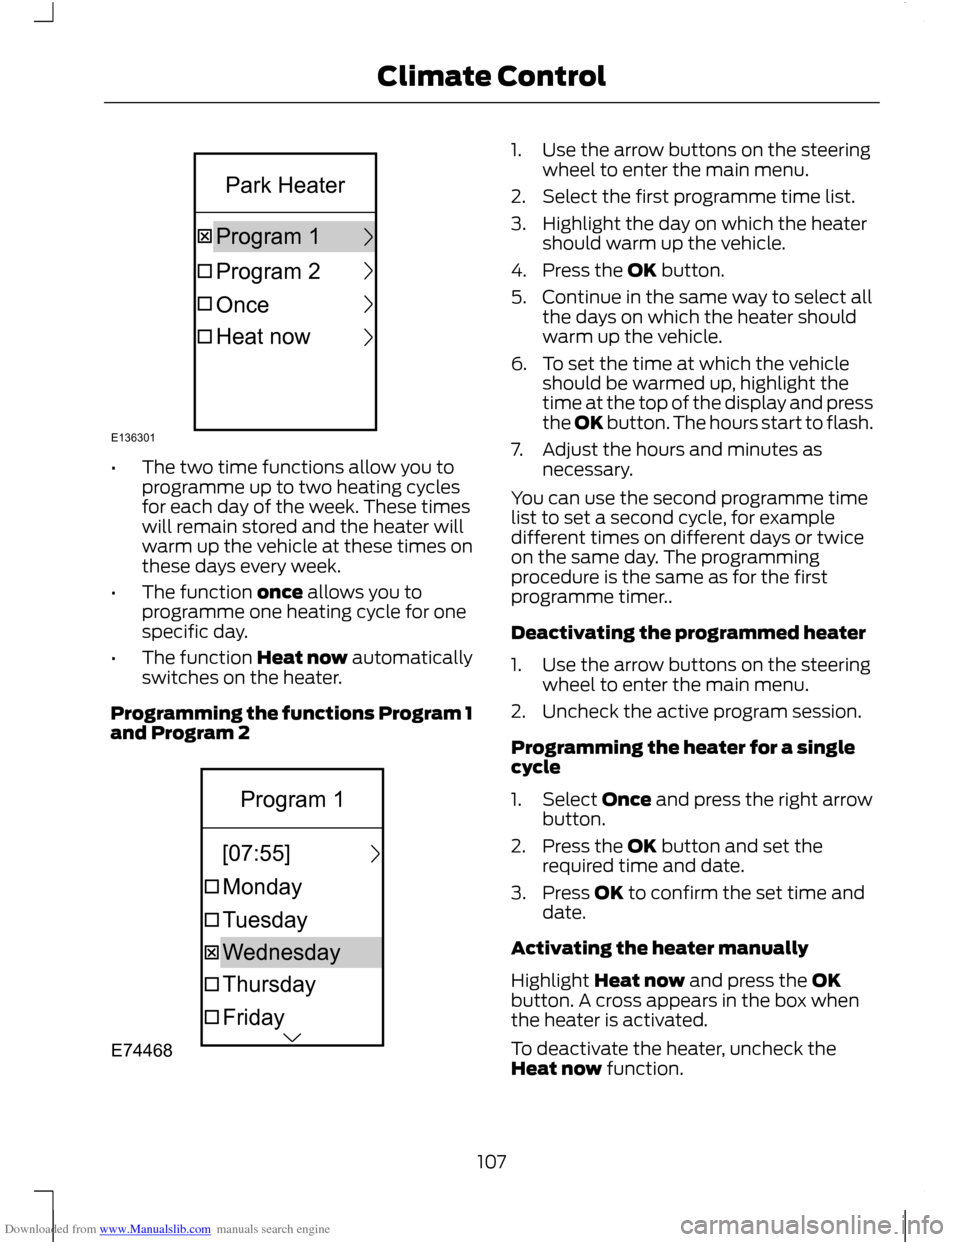
Downloaded from www.Manualslib.com manuals search engine •
The two time functions allow you to
programme up to two heating cycles
for each day of the week. These times
will remain stored and the heater will
warm up the vehicle at these times on
these days every week.
• The function once allows you to
programme one heating cycle for one
specific day.
• The function Heat now automatically
switches on the heater.
Programming the functions Program 1
and Program 2 1. Use the arrow buttons on the steering
wheel to enter the main menu.
2. Select the first programme time list.
3. Highlight the day on which the heater should warm up the vehicle.
4. Press the OK button.
5. Continue in the same way to select all the days on which the heater should
warm up the vehicle.
6. To set the time at which the vehicle should be warmed up, highlight the
time at the top of the display and press
the OK button. The hours start to flash.
7. Adjust the hours and minutes as necessary.
You can use the second programme time
list to set a second cycle, for example
different times on different days or twice
on the same day. The programming
procedure is the same as for the first
programme timer..
Deactivating the programmed heater
1. Use the arrow buttons on the steering wheel to enter the main menu.
2. Uncheck the active program session.
Programming the heater for a single
cycle
1. Select Once and press the right arrow button.
2. Press the OK button and set the required time and date.
3. Press OK to confirm the set time and date.
Activating the heater manually
Highlight Heat now and press the OK
button. A cross appears in the box when
the heater is activated.
To deactivate the heater, uncheck the
Heat now function.
107
Climate ControlE136301OnceProgram1Program2HeatnowParkHeater E74468FridayThursdayTuesdayMondayWednesday[07:55]Program1
Page 117 of 296
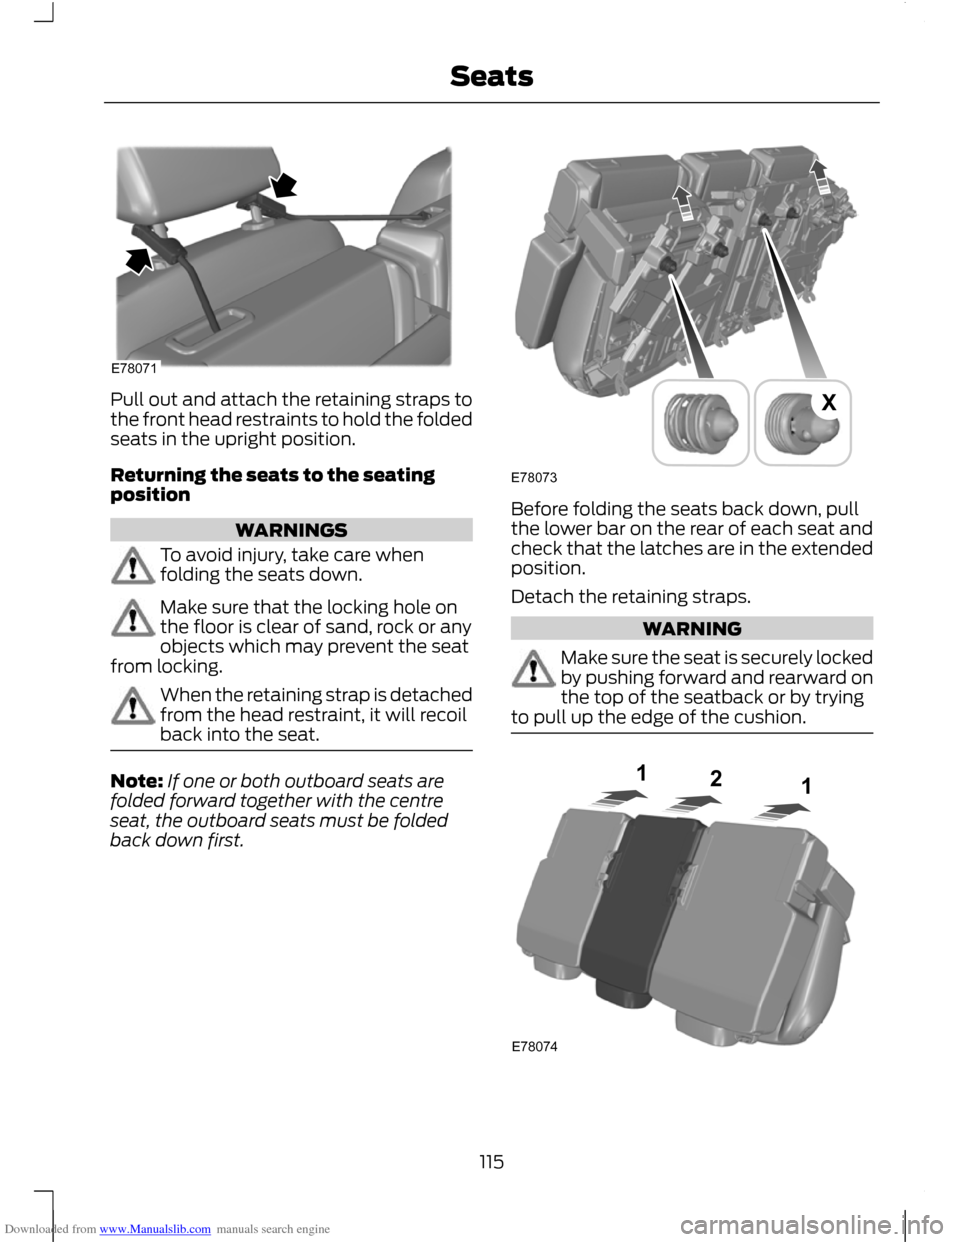
Downloaded from www.Manualslib.com manuals search engine Pull out and attach the retaining straps to
the front head restraints to hold the folded
seats in the upright position.
Returning the seats to the seating
position
WARNINGS
To avoid injury, take care when
folding the seats down.
Make sure that the locking hole on
the floor is clear of sand, rock or any
objects which may prevent the seat
from locking. When the retaining strap is detached
from the head restraint, it will recoil
back into the seat.
Note:
If one or both outboard seats are
folded forward together with the centre
seat, the outboard seats must be folded
back down first. Before folding the seats back down, pull
the lower bar on the rear of each seat and
check that the latches are in the extended
position.
Detach the retaining straps.
WARNING
Make sure the seat is securely locked
by pushing forward and rearward on
the top of the seatback or by trying
to pull up the edge of the cushion. 115
SeatsE78071 E78073X E78074121
Page 119 of 296
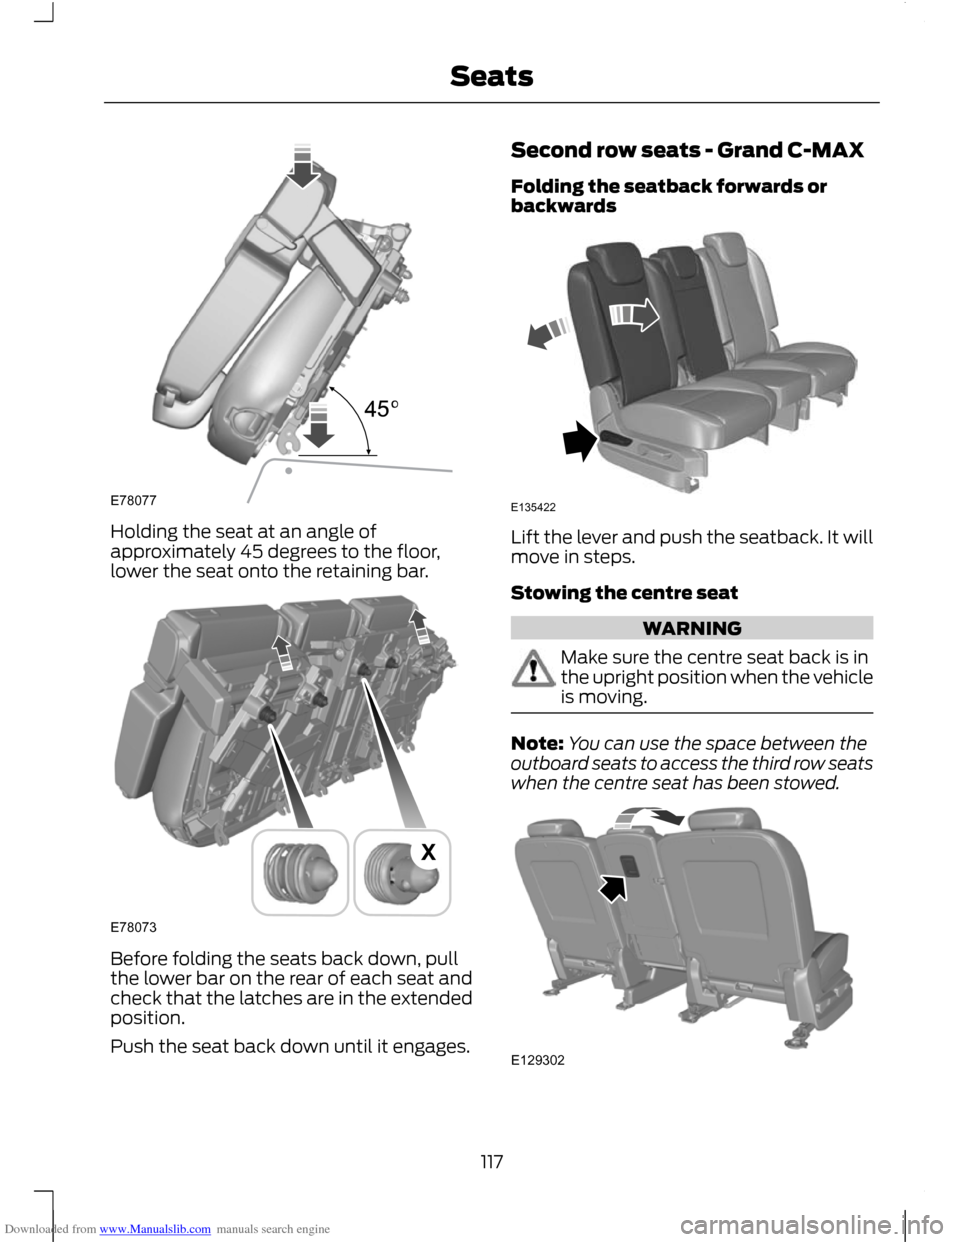
Downloaded from www.Manualslib.com manuals search engine Holding the seat at an angle of
approximately 45 degrees to the floor,
lower the seat onto the retaining bar.
Before folding the seats back down, pull
the lower bar on the rear of each seat and
check that the latches are in the extended
position.
Push the seat back down until it engages. Second row seats - Grand C-MAX
Folding the seatback forwards or
backwards
Lift the lever and push the seatback. It will
move in steps.
Stowing the centre seat
WARNING
Make sure the centre seat back is in
the upright position when the vehicle
is moving.
Note:
You can use the space between the
outboard seats to access the third row seats
when the centre seat has been stowed. 117
SeatsE78077 E78073X E135422 E129302
Page 125 of 296
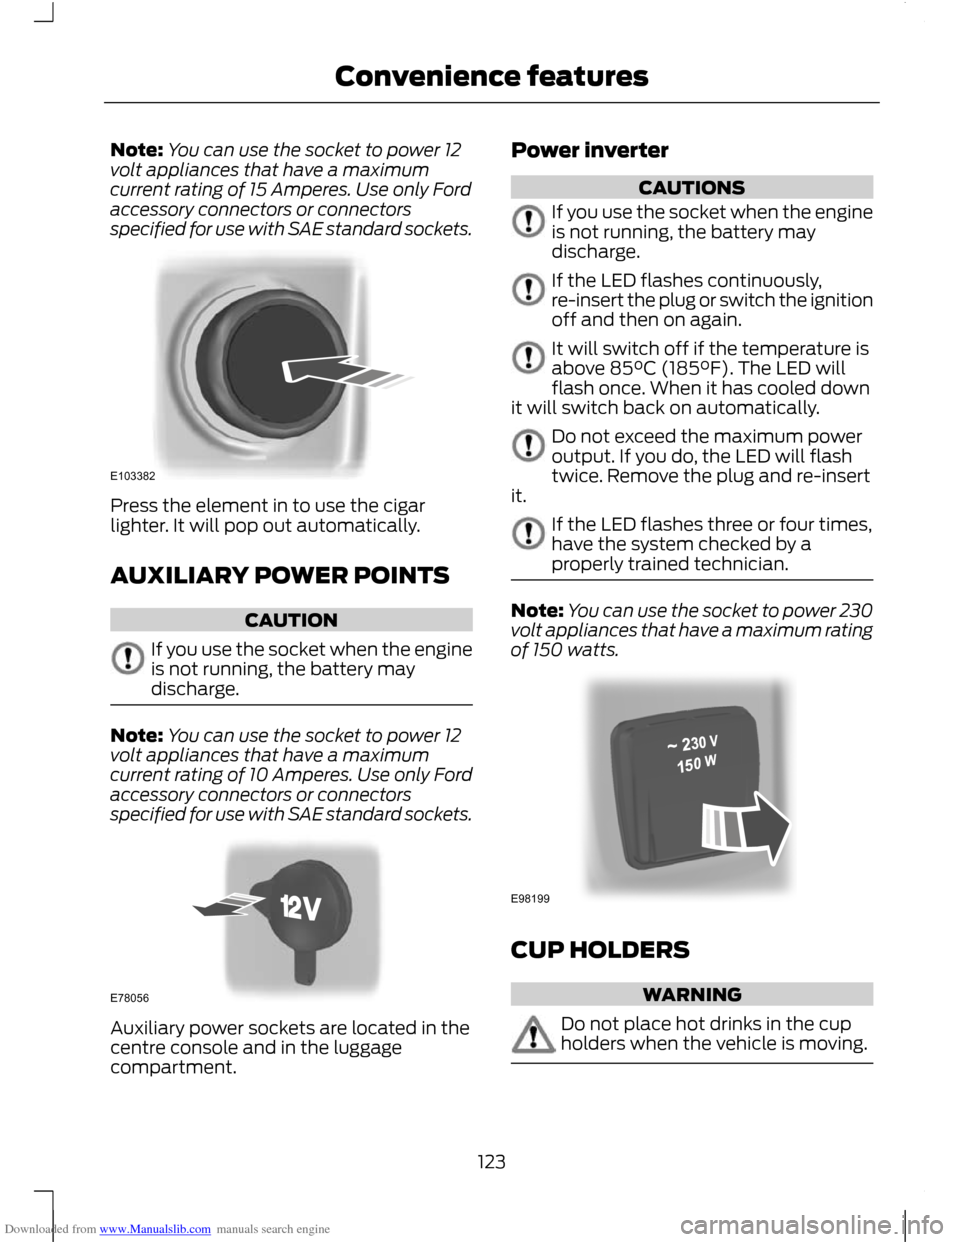
Downloaded from www.Manualslib.com manuals search engine Note:
You can use the socket to power 12
volt appliances that have a maximum
current rating of 15 Amperes. Use only Ford
accessory connectors or connectors
specified for use with SAE standard sockets. Press the element in to use the cigar
lighter. It will pop out automatically.
AUXILIARY POWER POINTS
CAUTION
If you use the socket when the engine
is not running, the battery may
discharge.
Note:
You can use the socket to power 12
volt appliances that have a maximum
current rating of 10 Amperes. Use only Ford
accessory connectors or connectors
specified for use with SAE standard sockets. Auxiliary power sockets are located in the
centre console and in the luggage
compartment. Power inverter CAUTIONS
If you use the socket when the engine
is not running, the battery may
discharge.
If the LED flashes continuously,
re-insert the plug or switch the ignition
off and then on again.
It will switch off if the temperature is
above 85°C (185°F). The LED will
flash once. When it has cooled down
it will switch back on automatically. Do not exceed the maximum power
output. If you do, the LED will flash
twice. Remove the plug and re-insert
it. If the LED flashes three or four times,
have the system checked by a
properly trained technician.
Note:
You can use the socket to power 230
volt appliances that have a maximum rating
of 150 watts. CUP HOLDERS
WARNING
Do not place hot drinks in the cup
holders when the vehicle is moving.
123
Convenience featuresE103382 E78056 E98199
Page 129 of 296
Downloaded from www.Manualslib.com manuals search engine GENERAL INFORMATION
General points on starting
If the battery has been disconnected the
vehicle may exhibit some unusual driving
characteristics for approx. 8 kilometres (5
miles) after reconnecting the battery.
This is because the engine management
system must realign itself with the engine.
Any unusual driving characteristics during
this period may be disregarded.
Starting the engine by towing or
pushing
WARNING
To prevent damage you must not
push or tow start your vehicle. Use
booster cables and a booster battery.
See Jump-Starting the Vehicle (page
197). IGNITION SWITCH
WARNING
Never return the key to position 0 or
I when the vehicle is in motion.
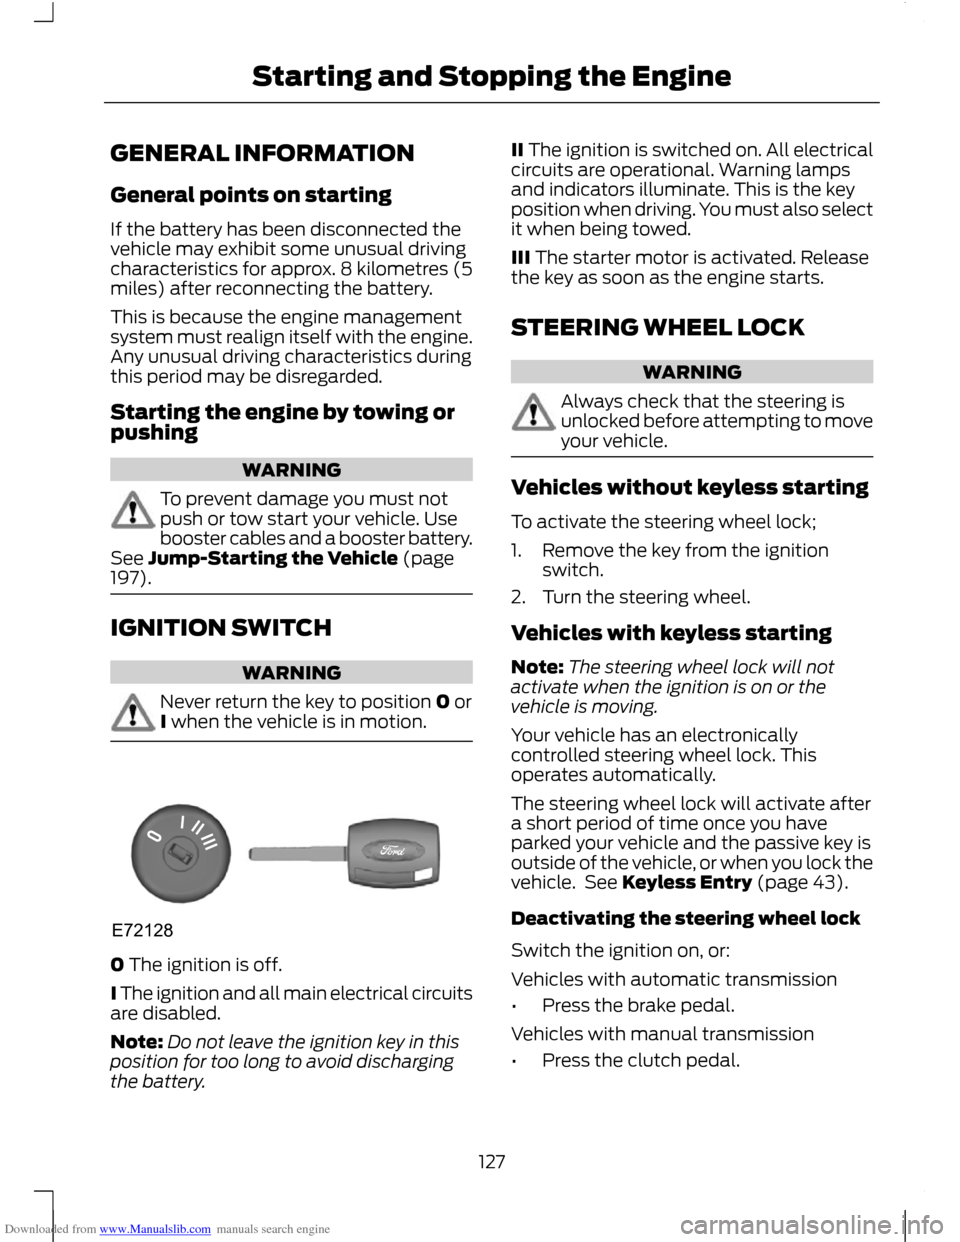
0 The ignition is off.
I The ignition and all main electrical circuits
are disabled.
Note:
Do not leave the ignition key in this
position for too long to avoid discharging
the battery. II The ignition is switched on. All electrical
circuits are operational. Warning lamps
and indicators illuminate. This is the key
position when driving. You must also select
it when being towed.
III The starter motor is activated. Release
the key as soon as the engine starts.
STEERING WHEEL LOCK
WARNING
Always check that the steering is
unlocked before attempting to move
your vehicle.
Vehicles without keyless starting
To activate the steering wheel lock;
1. Remove the key from the ignition
switch.
2. Turn the steering wheel.
Vehicles with keyless starting
Note: The steering wheel lock will not
activate when the ignition is on or the
vehicle is moving.
Your vehicle has an electronically
controlled steering wheel lock. This
operates automatically.
The steering wheel lock will activate after
a short period of time once you have
parked your vehicle and the passive key is
outside of the vehicle, or when you lock the
vehicle. See Keyless Entry (page 43).
Deactivating the steering wheel lock
Switch the ignition on, or:
Vehicles with automatic transmission
• Press the brake pedal.
Vehicles with manual transmission
• Press the clutch pedal.
127
Starting and Stopping the EngineE72128
Page 131 of 296
Downloaded from www.Manualslib.com manuals search engine Note:
Continue cranking the engine until it
starts.
Note: You can only operate the starter for
a maximum of 30 seconds at a time. Switch the ignition on and wait
until the glow plug indicator goes
off.
Vehicles with manual transmission
Note: Do not touch the accelerator pedal.
1. Fully depress the clutch pedal.
2. Start the engine.
Vehicles with automatic transmission
1. Select park or neutral.
2. Fully depress the brake pedal.
3. Start the engine.
KEYLESS STARTING WARNINGS
The keyless starting system may not
function if the key is close to metal
objects or electronic devices such as
mobile phones. Always check that the steering wheel
lock is deactivated before
attempting to move your vehicle.
See Steering Wheel Lock (page 127). Note:
The ignition may automatically
switch off after a period of time if your
vehicle has been left unattended with the
ignition on. This is to prevent the vehicle
battery from discharging.
Note: A valid passive key must be located
inside the vehicle to switch the ignition on
and start the engine.
Note: To start your engine you must also
fully depress the brake or clutch pedal,
depending on the transmission fitted. Ignition on
Press the start button once. All electrical
circuits are operational, warning lamps and
indicators illuminate.
Starting with automatic
transmission
Note:
Releasing the brake pedal during
engine start may stop the engine cranking
and return to ignition on.
1. Make sure the transmission is in P or N.
2. Fully depress the brake pedal.
3. Press the start button.
Starting with manual transmission
Note: Releasing the clutch pedal during
engine start will stop the engine cranking
and return to ignition on.
1. Fully depress the clutch pedal.
2. Press the start button.
Starting a diesel engine
Note: Engine cranking may not commence
until the engine glow plug cycle has been
completed. This may take several seconds
in extremely cold conditions.
Note: Continue to press the clutch or brake
pedal until engine cranking begins.
129
Starting and Stopping the Engine E85766
Page 135 of 296
Downloaded from www.Manualslib.com manuals search engine PRINCIPLE OF OPERATION
CAUTION
For vehicles with Start-stop the
battery requirement is different. It
must be replaced by one of exactly
the same specification as the original. The system reduces fuel consumption and
CO2 emissions by shutting down the
engine when the vehicle is idling, for
example at traffic lights. The engine will
automatically restart when the driver
presses the clutch pedal or when required
by a vehicle system, for example to
recharge the battery.
To obtain maximum benefit from the
system, move the gear lever to the neutral
position and release the clutch pedal
during any stop of longer than three
seconds.
USING START-STOP
WARNINGS
The engine may restart
automatically if required by the
system. See Principle of Operation
(page 133). Switch the ignition off before
opening the bonnet or carrying out
any maintenance.
Always switch the ignition off before
leaving your vehicle, as the system
may have shut down the engine but
the ignition will still be live. Note:
The system only operates when the
engine is warm and the outside temperature
is between 0°C (32°F) and 30°C (86°F). Note:
If you stall the engine, and then
depress the clutch pedal within a couple of
seconds, the system will automatically
restart the engine.
Note: The Start-stop indicator will
illuminate green when the engine shuts
down. See Warning Lamps and Indicators
(page 79).
Note: The Start-stop indicator will flash
amber, requiring you to select neutral or
depress the clutch pedal. In conjunction a
message will be shown in the display.
Note: If the system detects a malfunction,
it is deactivated. Have the system checked
by a properly trained technician.
Note: If you have switched the system off,
the switch will be illuminated.
Note: The system is on by default. To
switch the system off, press the switch in
the instrument panel. The system will only
be de-activated for the current ignition
cycle. To turn it on, press the switch again.
For item location. See At a Glance (page
10). To stop the engine
1. Stop the vehicle.
2. Move the gear lever to the neutral
position.
3. Release the clutch pedal.
4. Release the accelerator pedal.
The system may not shut down the engine
under certain conditions, for example:
• To maintain the interior climate.
• Low battery voltage.
• The outside temperature is too low or
too high.
• The driver's door has been opened.
133
Start-Stop