check engine FORD C MAX 2011 2.G Workshop Manual
[x] Cancel search | Manufacturer: FORD, Model Year: 2011, Model line: C MAX, Model: FORD C MAX 2011 2.GPages: 296, PDF Size: 7.87 MB
Page 208 of 296
Downloaded from www.Manualslib.com manuals search engine Power plug with cable
G
Compressor switch
H
Label
I
Bottle lid
J
Sealant bottle
K
1. Open the lid of the tyre repair kit.
2. Peel off the label I showing the maximum permissible speed of
80 km/h (50 mph) from the casing and
attach it to the instrument panel in the
driver ’s field of view. Make sure the
label does not obscure anything
important.
3. Take the hose C and the power plug with cable G out of the kit.
4. Unscrew the orange cap D and the bottle lid J.
5. Screw the sealant bottle K clockwise into the bottle holder E fully tight.
6. Remove the valve cap from the damaged tyre.
7. Detach the protective cap A from the hose C and screw the hose C firmly
onto the valve of the damaged tyre.
8. Make sure that the compressor switch
H is in position 0.
9. Insert the power plug G into the cigar lighter socket or auxiliary power socket.
See Cigar Lighter (page 122). See
Auxiliary Power Points (page 123).
10. Start the engine.
11. Move the compressor switch H to position 1.
12. Inflate the tyre for no longer than seven minutes to an inflation pressure
of minimum 1.8 bar (26 psi) and a
maximum of 3.5 bar (51 psi). Move
the compressor switch H to position
0 and check the current tyre pressure
with pressure gauge F. 13. Remove the power plug G from the
cigar lighter socket or auxiliary power
socket.
14. Quickly unscrew the hose C from the
tyre valve and replace the protective
cap A. Fasten the valve cap again.
15. Leave the sealant bottle K in the bottle holder E.
16. Make sure the kit, the bottle lid and the orange cap are stored safely, but
still easily accessible in the vehicle.
The kit will be required again when
you check the tyre pressure.
17. Immediately drive approximately three kilometres (two miles) so that
the sealant can seal the damaged
area.
Note: When pumping in the sealant through
the tyre valve, the pressure may rise up to
6 bar (87 psi) but will drop again after about
30 seconds. WARNING
If you experience heavy vibrations,
unsteady steering behaviour or
noises while driving, reduce your
speed and drive with caution to a place
where it is safe for you to stop the vehicle.
Recheck the tyre and its pressure. If the
tyre pressure is less than 1.3 bar (19 psi) or
if there are any cracks, bumps or similar
damage visible, do not continue driving
with this tyre. Checking the tyre pressure
1. Stop the vehicle after driving
approximately three kilometres
(two miles). Check, and where
necessary, adjust the pressure of the
damaged tyre.
2. Attach the kit and read the tyre pressure from the pressure gauge F.
206
Wheels and Tyres
Page 209 of 296
Downloaded from www.Manualslib.com manuals search engine 3.
If the pressure of the sealant-filled tyre
is 1.3 bar (19 psi) or more, adjust it to
the specified pressure. See Technical
Specifications (page 209).
4. Follow the inflation procedure once again to top up the tyre.
5. Check the tyre pressure again from the
pressure gauge F. If the tyre pressure
is too high, deflate the tyre to the
specified pressure using the pressure
relief valve B.
6. Once you have inflated the tyre to its correct tyre pressure, move the
compressor switch H to position 0,
remove the power plug G from the
socket, unscrew the hose C, fasten the
valve cap and replace the protective
cap A.
7. Leave the sealant bottle K in the bottle
holder E and store the kit away safely
in its original location.
8. Drive to the nearest tyre specialist to get the damaged tyre replaced. Before
the tyre is removed from the rim, inform
your tyre dealer that the tyre contains
sealant. Renew the kit as soon as
possible after it has been used once.
Note: Remember that emergency roadside
tyre repair kits only provide temporary
mobility. Regulations concerning tyre repair
after usage of tyre repair kit may differ from
country to country. You should consult a
tyre specialist for advice. WARNING
Before driving, make sure the tyre is
adjusted to the recommended
inflation pressure. See Technical
Specifications (page 209). Monitor the
tyre pressure until the sealed tyre is
replaced. Empty sealant bottles can be disposed of
together with normal household waste.
Return remains of sealant to your dealer
or dispose of it in compliance with local
waste disposal regulations.
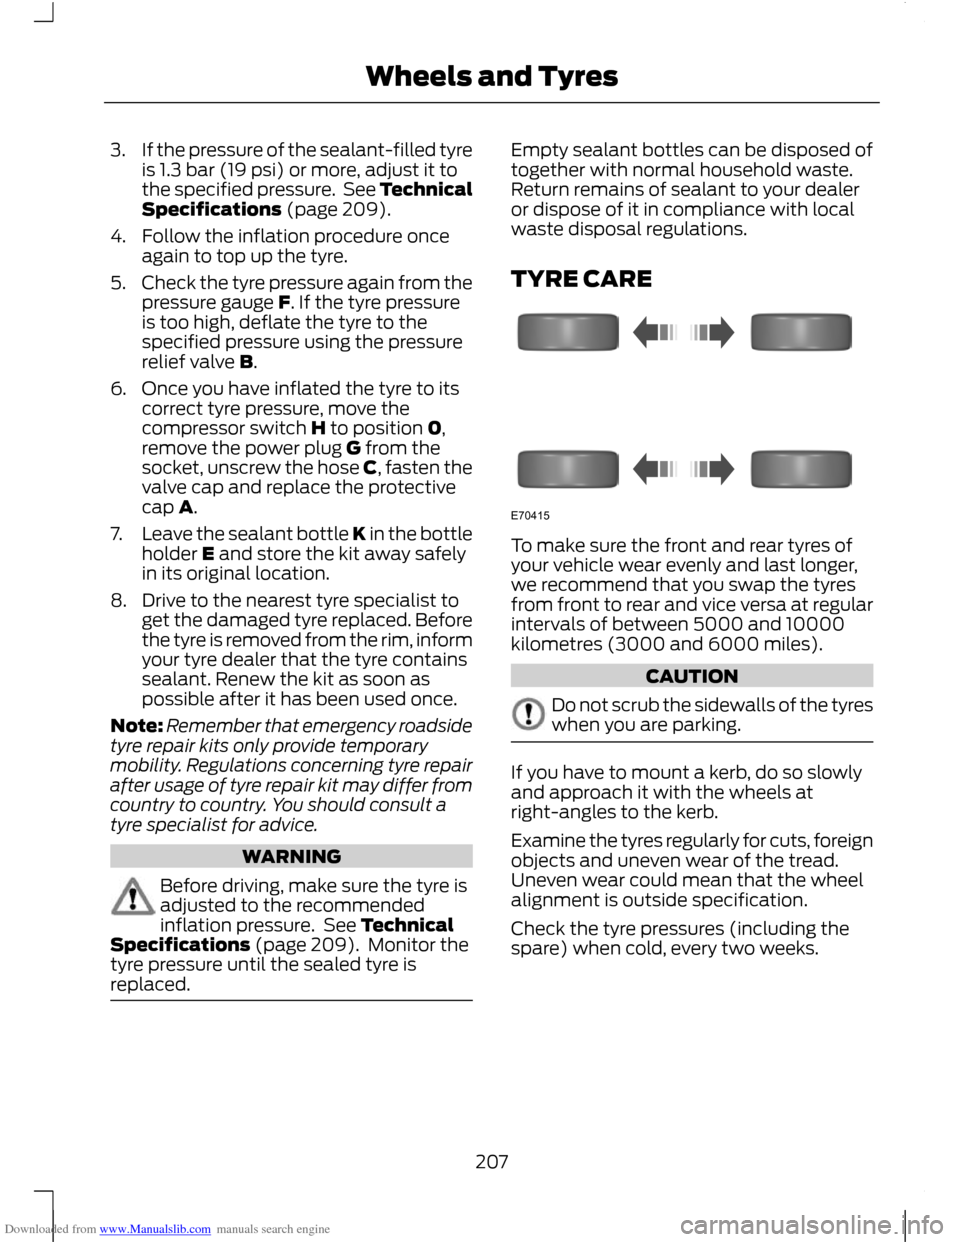
TYRE CARE
To make sure the front and rear tyres of
your vehicle wear evenly and last longer,
we recommend that you swap the tyres
from front to rear and vice versa at regular
intervals of between 5000 and 10000
kilometres (3000 and 6000 miles).
CAUTION
Do not scrub the sidewalls of the tyres
when you are parking.
If you have to mount a kerb, do so slowly
and approach it with the wheels at
right-angles to the kerb.
Examine the tyres regularly for cuts, foreign
objects and uneven wear of the tread.
Uneven wear could mean that the wheel
alignment is outside specification.
Check the tyre pressures (including the
spare) when cold, every two weeks.
207
Wheels and TyresE70415
Page 210 of 296
Downloaded from www.Manualslib.com manuals search engine USING WINTER TYRES
CAUTION
Make sure that you use the correct
wheel nuts for the type of wheel the
winter tyres are fitted to.
If winter tyres are used, make sure that the
tyre pressures are correct. See Technical
Specifications (page 209).
USING SNOW CHAINS
WARNINGS
Do not exceed 50 km/h (30 mph).
Do not use snow chains on snow-free
roads.
Only fit snow chains to specified
tyres. See Technical
Specifications (page 209).
CAUTION
If your vehicle is fitted with wheel
trims, remove them before fitting
snow chains.
Note:
The ABS will continue to operate
normally.
Only use snow chains of 10 millimetre or
smaller.
Only use snow chains on the front wheels.
Vehicles with stability control
(ESP)
Vehicles with stability control (ESP) may
exhibit some unusual driving
characteristics which can be reduced by
switching traction control off. See Using
Stability Control (page 145). TYRE PRESSURE
MONITORING SYSTEM WARNINGS
The system does not relieve you of
your responsibility to regularly check
the tyre pressures.
The system will only provide a low
tyre pressure warning. It will not
inflate the tyres.
Do not drive on significantly
under-inflated tyres. This may cause
the tyres to overheat and fail.
Under-inflation reduces fuel efficiency, tyre
tread life and may also affect your ability
to drive the vehicle safely. CAUTIONS
Do not bend or damage the valves
when you are inflating the tyres.
Have tyres installed by properly
trained technicians.
The Deflation Detection System will alert
you if there is a change of air pressure in
any tyre. It does this by using the ABS
sensors to detect the rolling circumference
of the wheels. When the circumference
changes, this indicates low pressure in a
tyre, a warning message is displayed in the
information display and the message
indicator will illuminate. See Information
Messages (page 90).
If a low pressure warning message is
displayed in the information display, check
the tyre pressures as soon as possible and
inflate them to the recommended
pressure. See Technical Specifications
(page 209).
If this happens frequently, have the cause
determined and rectified as soon as
possible.
208
Wheels and Tyres
Page 228 of 296
Downloaded from www.Manualslib.com manuals search engine SECURITY CODE
Each unit incorporates a unique code that
is linked to the vehicle identification
number (VIN). The system will
automatically check that the audio unit
and vehicle match before allowing
operation.
If a security code message appears, please
see your dealer.
226
Audio system security
Page 232 of 296
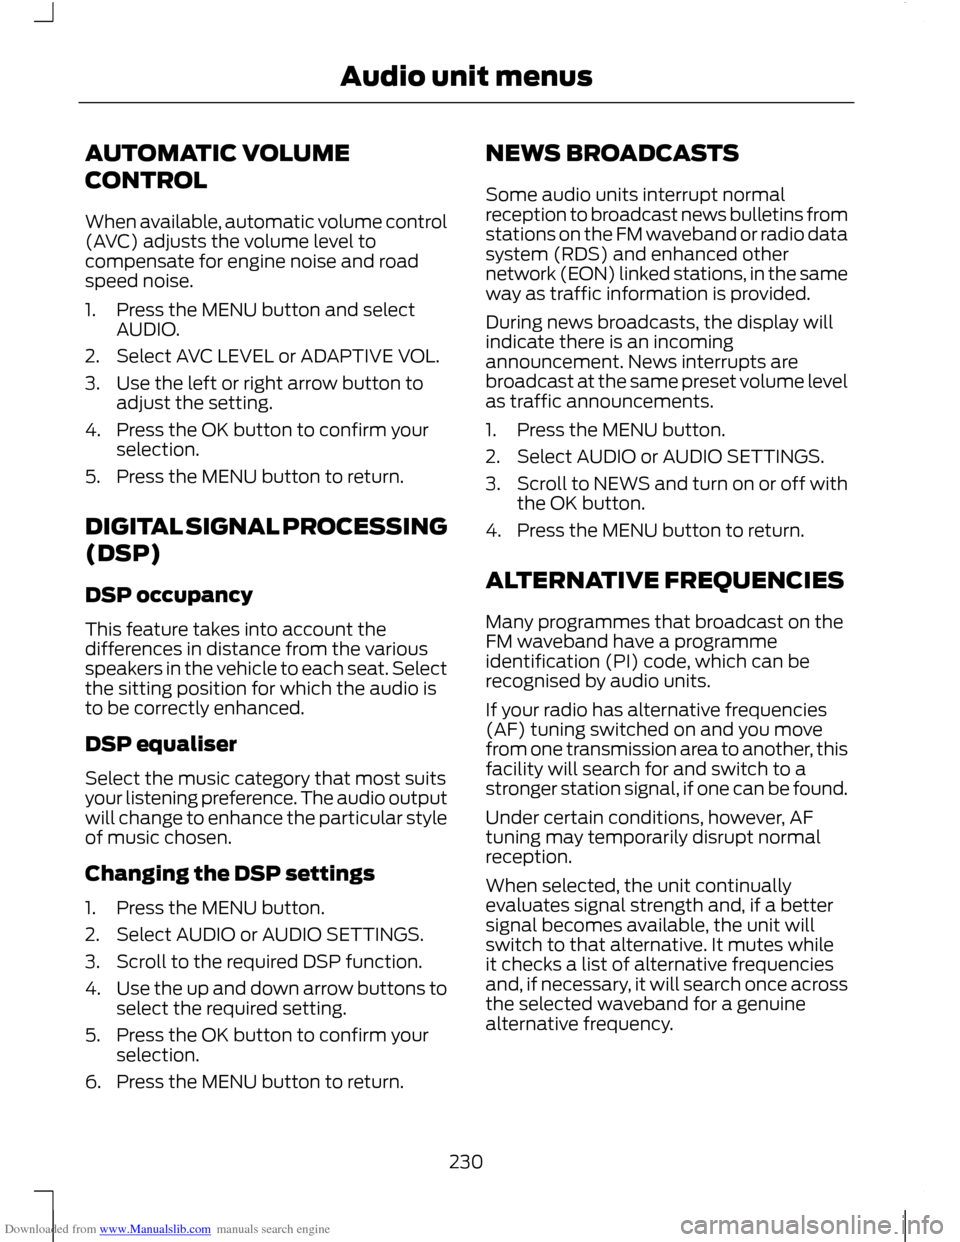
Downloaded from www.Manualslib.com manuals search engine AUTOMATIC VOLUME
CONTROL
When available, automatic volume control
(AVC) adjusts the volume level to
compensate for engine noise and road
speed noise.
1. Press the MENU button and select
AUDIO.
2. Select AVC LEVEL or ADAPTIVE VOL.
3. Use the left or right arrow button to adjust the setting.
4. Press the OK button to confirm your selection.
5. Press the MENU button to return.
DIGITAL SIGNAL PROCESSING
(DSP)
DSP occupancy
This feature takes into account the
differences in distance from the various
speakers in the vehicle to each seat. Select
the sitting position for which the audio is
to be correctly enhanced.
DSP equaliser
Select the music category that most suits
your listening preference. The audio output
will change to enhance the particular style
of music chosen.
Changing the DSP settings
1. Press the MENU button.
2. Select AUDIO or AUDIO SETTINGS.
3. Scroll to the required DSP function.
4. Use the up and down arrow buttons to
select the required setting.
5. Press the OK button to confirm your selection.
6. Press the MENU button to return. NEWS BROADCASTS
Some audio units interrupt normal
reception to broadcast news bulletins from
stations on the FM waveband or radio data
system (RDS) and enhanced other
network (EON) linked stations, in the same
way as traffic information is provided.
During news broadcasts, the display will
indicate there is an incoming
announcement. News interrupts are
broadcast at the same preset volume level
as traffic announcements.
1. Press the MENU button.
2. Select AUDIO or AUDIO SETTINGS.
3.
Scroll to NEWS and turn on or off with
the OK button.
4. Press the MENU button to return.
ALTERNATIVE FREQUENCIES
Many programmes that broadcast on the
FM waveband have a programme
identification (PI) code, which can be
recognised by audio units.
If your radio has alternative frequencies
(AF) tuning switched on and you move
from one transmission area to another, this
facility will search for and switch to a
stronger station signal, if one can be found.
Under certain conditions, however, AF
tuning may temporarily disrupt normal
reception.
When selected, the unit continually
evaluates signal strength and, if a better
signal becomes available, the unit will
switch to that alternative. It mutes while
it checks a list of alternative frequencies
and, if necessary, it will search once across
the selected waveband for a genuine
alternative frequency.
230
Audio unit menus
Page 238 of 296
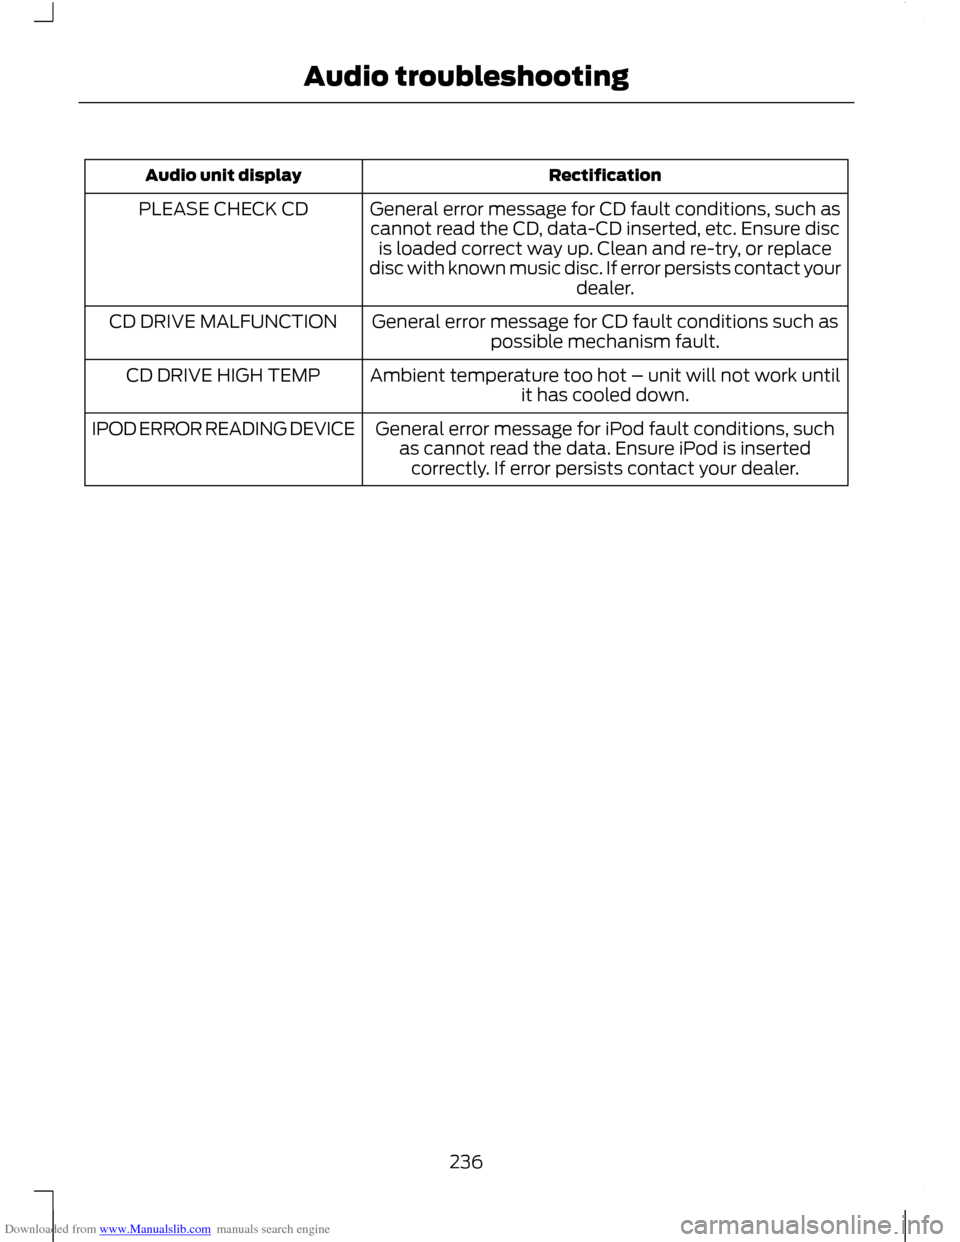
Downloaded from www.Manualslib.com manuals search engine Rectification
Audio unit display
General error message for CD fault conditions, such ascannot read the CD, data-CD inserted, etc. Ensure disc is loaded correct way up. Clean and re-try, or replace
disc with known music disc. If error persists contact your dealer.
PLEASE CHECK CD
General error message for CD fault conditions such aspossible mechanism fault.
CD DRIVE MALFUNCTION
Ambient temperature too hot – unit will not work untilit has cooled down.
CD DRIVE HIGH TEMP
General error message for iPod fault conditions, suchas cannot read the data. Ensure iPod is insertedcorrectly. If error persists contact your dealer.
IPOD ERROR READING DEVICE
236
Audio troubleshooting
Page 284 of 296
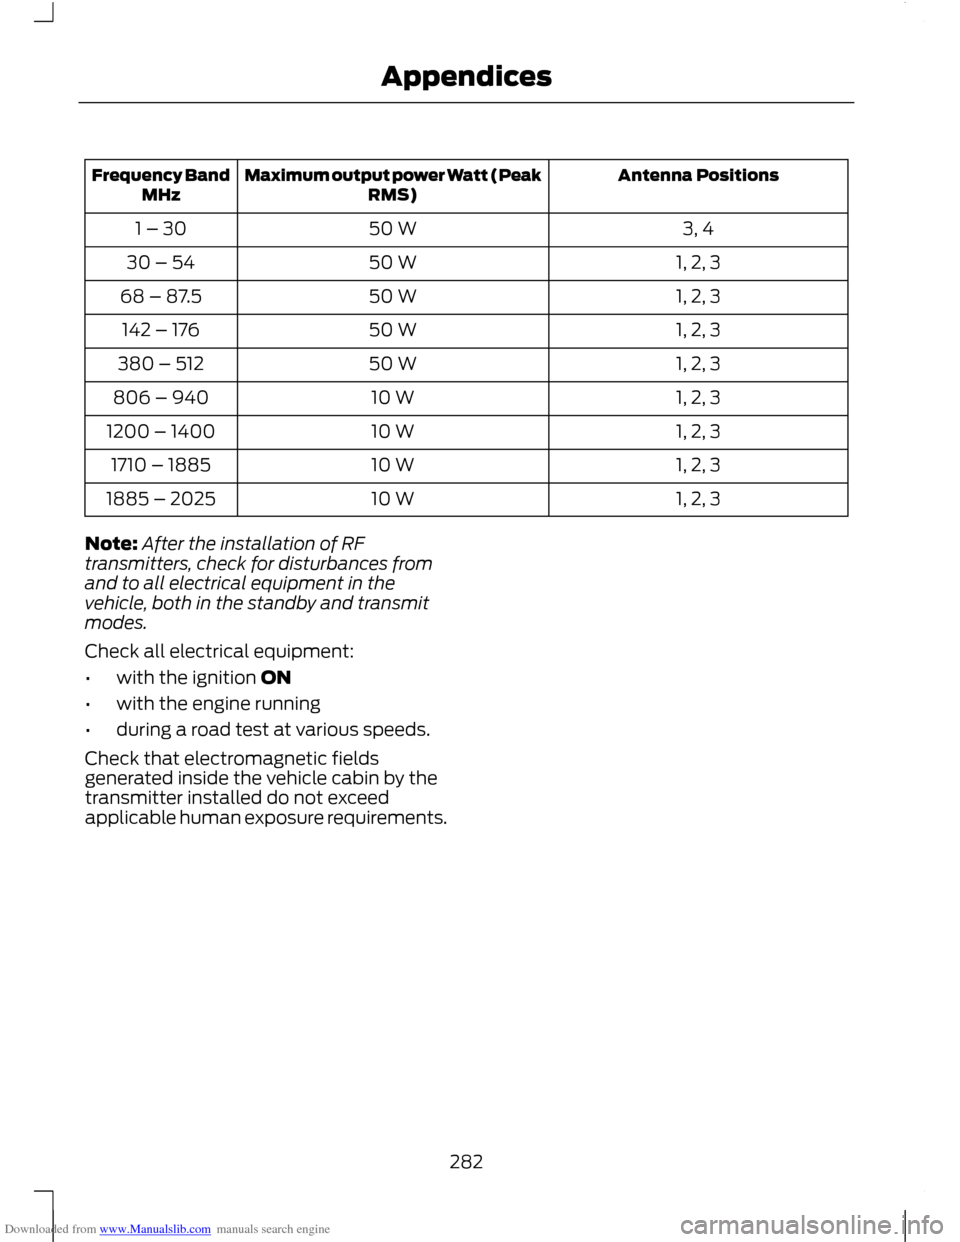
Downloaded from www.Manualslib.com manuals search engine Antenna Positions
Maximum output power Watt (Peak
RMS)
Frequency Band
MHz
3, 4
50 W
1 – 30
1, 2, 3
50 W
30 – 54
1, 2, 3
50 W
68 – 87.5
1, 2, 3
50 W
142 – 176
1, 2, 3
50 W
380 – 512
1, 2, 3
10 W
806 – 940
1, 2, 3
10 W
1200 – 1400
1, 2, 3
10 W
1710 – 1885
1, 2, 3
10 W
1885 – 2025
Note: After the installation of RF
transmitters, check for disturbances from
and to all electrical equipment in the
vehicle, both in the standby and transmit
modes.
Check all electrical equipment:
• with the ignition ON
• with the engine running
• during a road test at various speeds.
Check that electromagnetic fields
generated inside the vehicle cabin by the
transmitter installed do not exceed
applicable human exposure requirements.
282
Appendices
Page 286 of 296
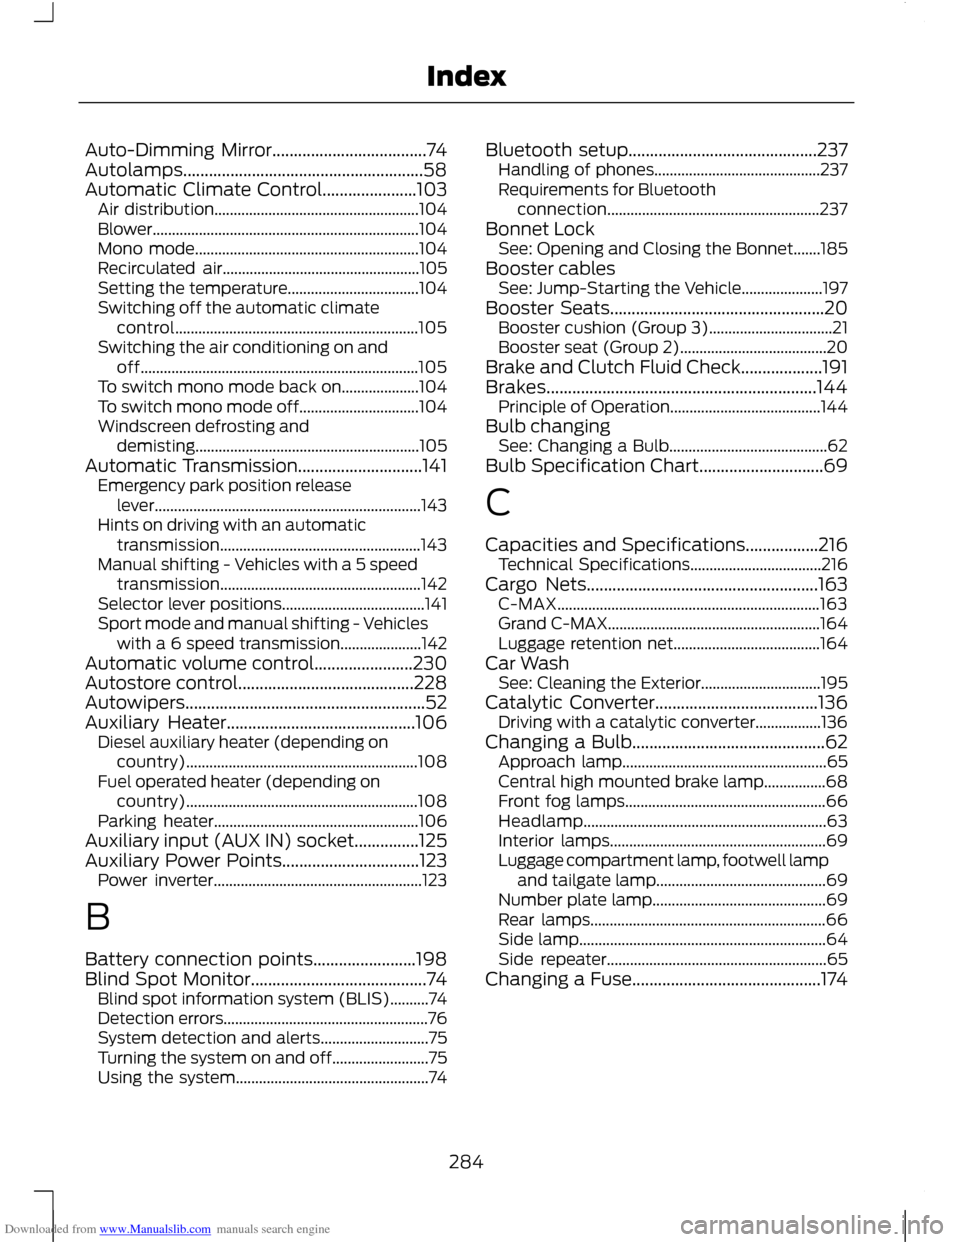
Downloaded from www.Manualslib.com manuals search engine Auto-Dimming Mirror....................................74
Autolamps........................................................58
Automatic Climate Control......................103
Air distribution..................................................... 104
Blower..................................................................... 104
Mono mode.......................................................... 104
Recirculated air................................................... 105
Setting the temperature.................................. 104
Switching off the automatic climate control............................................................... 105
Switching the air conditioning on and off........................................................................\
105
To switch mono mode back on.................... 104
To switch mono mode off............................... 104
Windscreen defrosting and demisting.......................................................... 105
Automatic Transmission.............................141 Emergency park position release
lever..................................................................... 143
Hints on driving with an automatic transmission.................................................... 143
Manual shifting - Vehicles with a 5 speed transmission.................................................... 142
Selector lever positions..................................... 141
Sport mode and manual shifting - Vehicles with a 6 speed transmission..................... 142
Automatic volume control.......................230
Autostore control.........................................228
Autowipers........................................................52
Auxiliary Heater............................................106 Diesel auxiliary heater (depending on
country)............................................................ 108
Fuel operated heater (depending on country)............................................................ 108
Parking heater..................................................... 106
Auxiliary input (AUX IN) socket...............125
Auxiliary Power Points................................123 Power inverter...................................................... 123
B
Battery connection points........................198
Blind Spot Monitor.........................................74 Blind spot information system (BLIS)..........74
Detection errors..................................................... 76
System detection and alerts............................ 75
Turning the system on and off......................... 75
Using the system.................................................. 74Bluetooth setup............................................237
Handling of phones........................................... 237
Requirements for Bluetooth connection....................................................... 237
Bonnet Lock See: Opening and Closing the Bonnet.......185
Booster cables See: Jump-Starting the Vehicle..................... 197
Booster Seats..................................................20 Booster cushion (Group 3)................................ 21
Booster seat (Group 2)...................................... 20
Brake and Clutch Fluid Check...................191
Brakes...............................................................144 Principle of Operation....................................... 144
Bulb changing See: Changing a Bulb......................................... 62
Bulb Specification Chart.............................69
C
Capacities and Specifications.................216 Technical Specifications.................................. 216
Cargo Nets......................................................163 C-MAX.................................................................... 163
Grand C-MAX....................................................... 164
Luggage retention net...................................... 164
Car Wash See: Cleaning the Exterior............................... 195
Catalytic Converter......................................136 Driving with a catalytic converter.................136
Changing a Bulb.............................................62 Approach lamp..................................................... 65
Central high mounted brake lamp................68
Front fog lamps.................................................... 66
Headlamp............................................................... 63
Interior lamps........................................................ 69
Luggage compartment lamp, footwell lamp and tailgate lamp............................................ 69
Number plate lamp............................................. 69
Rear lamps............................................................. 66
Side lamp................................................................ 64
Side repeater......................................................... 65
Changing a Fuse............................................174
284
Index
Page 287 of 296
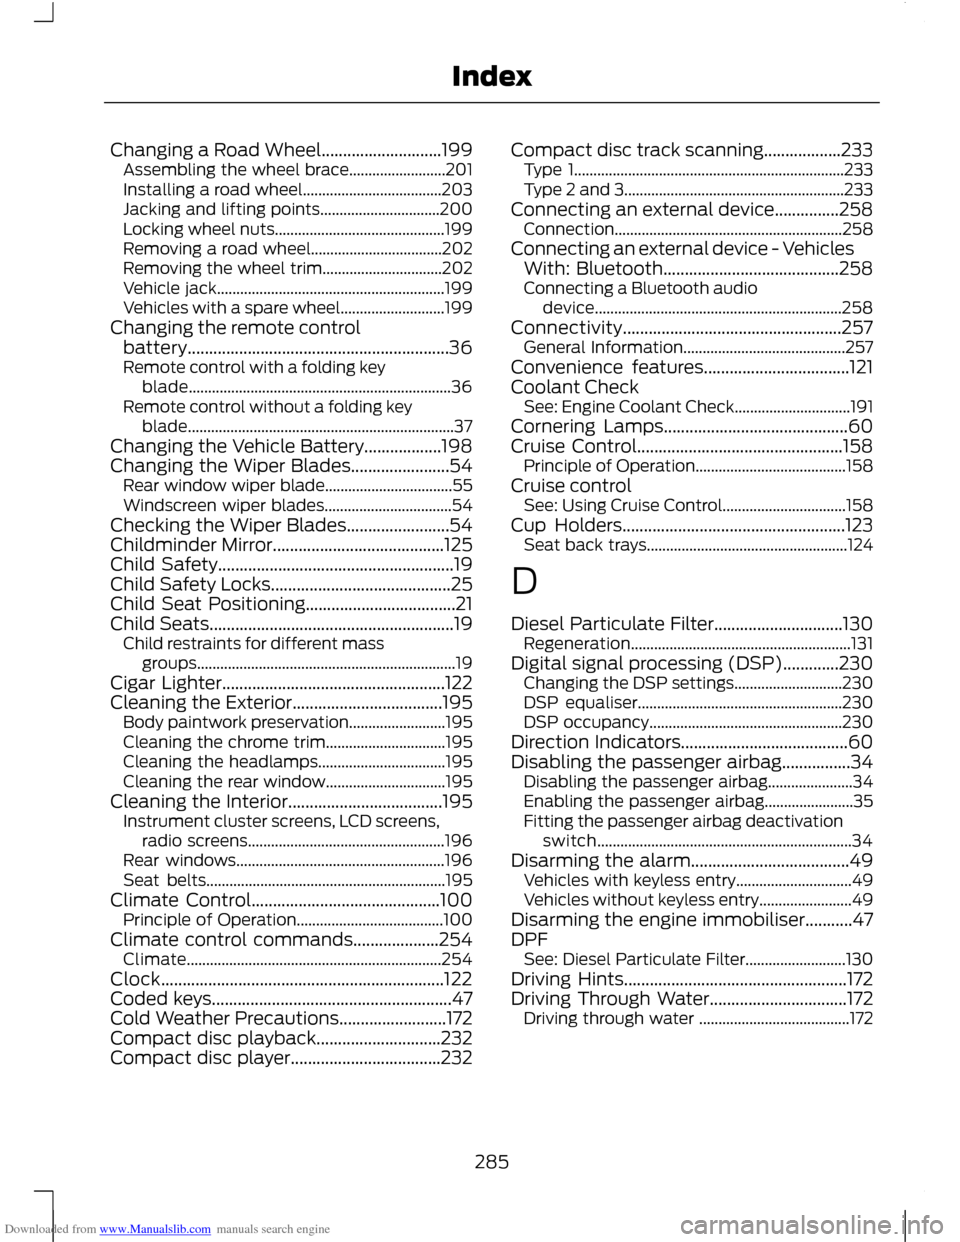
Downloaded from www.Manualslib.com manuals search engine Changing a Road Wheel............................199
Assembling the wheel brace......................... 201
Installing a road wheel.................................... 203
Jacking and lifting points............................... 200
Locking wheel nuts............................................ 199
Removing a road wheel.................................. 202
Removing the wheel trim............................... 202
Vehicle jack........................................................... 199
Vehicles with a spare wheel........................... 199
Changing the remote control battery.............................................................36
Remote control with a folding key blade.................................................................... 36
Remote control without a folding key blade..................................................................... 37
Changing the Vehicle Battery..................198
Changing the Wiper Blades.......................54 Rear window wiper blade................................. 55
Windscreen wiper blades................................. 54
Checking the Wiper Blades........................54
Childminder Mirror........................................125
Child Safety.......................................................19
Child Safety Locks..........................................25
Child Seat Positioning...................................21
Child Seats.........................................................19 Child restraints for different mass
groups................................................................... 19
Cigar Lighter....................................................122
Cleaning the Exterior...................................195 Body paintwork preservation......................... 195
Cleaning the chrome trim............................... 195
Cleaning the headlamps................................. 195
Cleaning the rear window............................... 195
Cleaning the Interior....................................195 Instrument cluster screens, LCD screens,
radio screens................................................... 196
Rear windows...................................................... 196
Seat belts.............................................................. 195
Climate Control............................................100 Principle of Operation...................................... 100
Climate control commands....................254 Climate.................................................................. 254
Clock..................................................................122
Coded keys........................................................47
Cold Weather Precautions.........................172
Compact disc playback.............................232
Compact disc player...................................232 Compact disc track scanning..................233
Type 1...................................................................... 233
Type 2 and 3......................................................... 233
Connecting an external device...............258 Connection........................................................... 258
Connecting an external device - Vehicles With: Bluetooth.........................................258
Connecting a Bluetooth audio device................................................................ 258
Connectivity...................................................257 General Information.......................................... 257
Convenience features..................................121
Coolant Check See: Engine Coolant Check.............................. 191
Cornering Lamps...........................................60
Cruise Control................................................158 Principle of Operation....................................... 158
Cruise control See: Using Cruise Control................................ 158
Cup Holders....................................................123 Seat back trays.................................................... 124
D
Diesel Particulate Filter..............................130 Regeneration......................................................... 131
Digital signal processing (DSP).............230 Changing the DSP settings............................ 230
DSP equaliser..................................................... 230
DSP occupancy.................................................. 230
Direction Indicators.......................................60
Disabling the passenger airbag................34 Disabling the passenger airbag...................... 34
Enabling the passenger airbag....................... 35
Fitting the passenger airbag deactivation switch.................................................................. 34
Disarming the alarm.....................................49 Vehicles with keyless entry.............................. 49
Vehicles without keyless entry........................ 49
Disarming the engine immobiliser...........47
DPF See: Diesel Particulate Filter.......................... 130
Driving Hints....................................................172
Driving Through Water................................172 Driving through water ....................................... 172
285
Index
Page 288 of 296
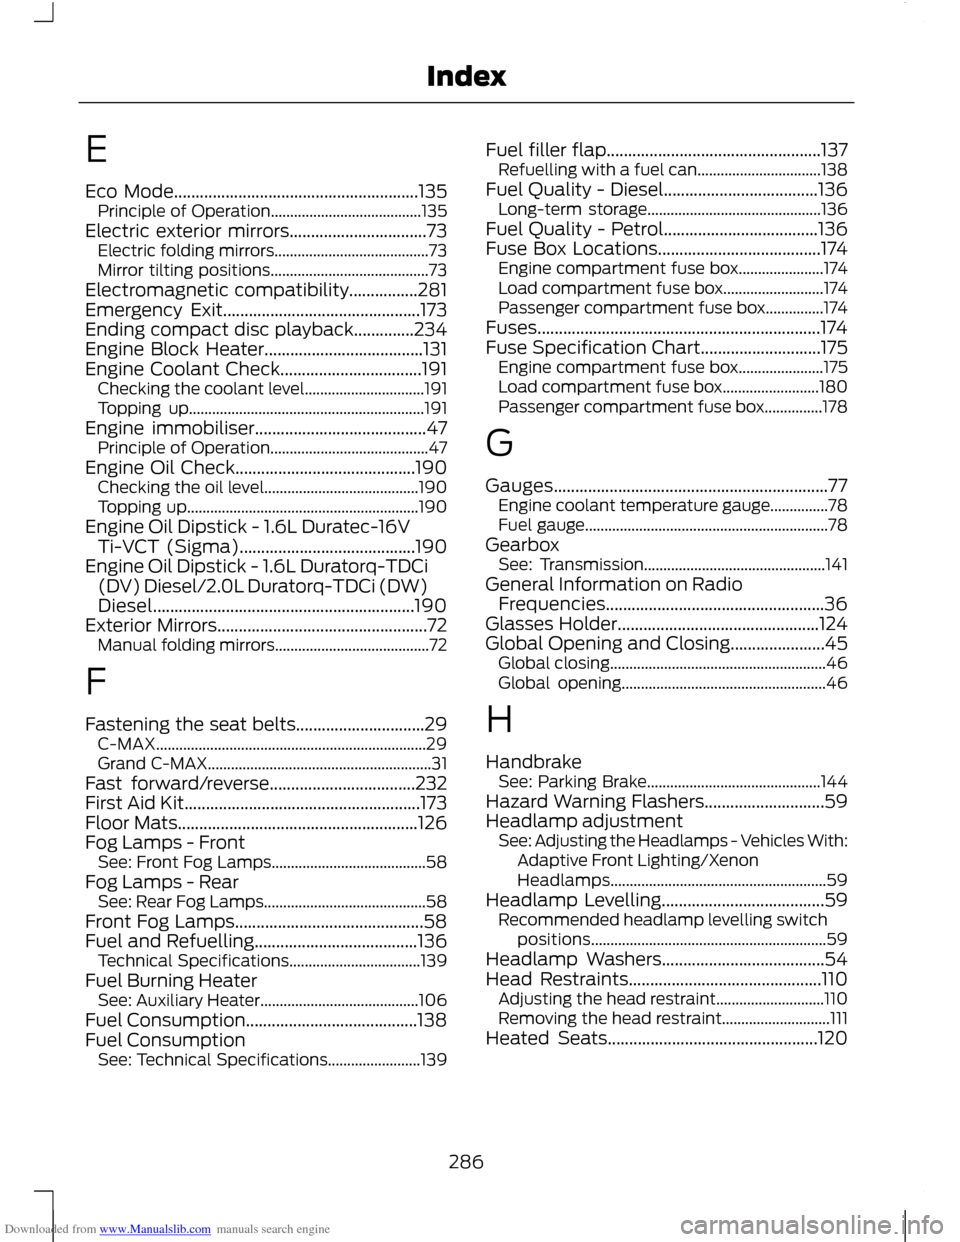
Downloaded from www.Manualslib.com manuals search engine E
Eco Mode.........................................................135
Principle of Operation....................................... 135
Electric exterior mirrors................................73 Electric folding mirrors........................................ 73
Mirror tilting positions......................................... 73
Electromagnetic compatibility................281
Emergency Exit..............................................173
Ending compact disc playback..............234
Engine Block Heater.....................................131
Engine Coolant Check.................................191 Checking the coolant level............................... 191
Topping up............................................................. 191
Engine immobiliser........................................47 Principle of Operation......................................... 47
Engine Oil Check..........................................190 Checking the oil level........................................ 190
Topping up............................................................ 190
Engine Oil Dipstick - 1.6L Duratec-16V Ti-VCT (Sigma).........................................190
Engine Oil Dipstick - 1.6L Duratorq-TDCi (DV) Diesel/2.0L Duratorq-TDCi (DW)
Diesel.............................................................190
Exterior Mirrors.................................................72 Manual folding mirrors........................................ 72
F
Fastening the seat belts..............................29 C-MAX...................................................................... 29
Grand C-MAX.......................................................... 31
Fast forward/reverse..................................232
First Aid Kit.......................................................173
Floor Mats........................................................126
Fog Lamps - Front See: Front Fog Lamps........................................ 58
Fog Lamps - Rear See: Rear Fog Lamps.......................................... 58
Front Fog Lamps............................................58
Fuel and Refuelling......................................136 Technical Specifications.................................. 139
Fuel Burning Heater See: Auxiliary Heater......................................... 106
Fuel Consumption........................................138
Fuel Consumption See: Technical Specifications........................ 139Fuel filler flap..................................................137
Refuelling with a fuel can................................ 138
Fuel Quality - Diesel....................................136 Long-term storage............................................. 136
Fuel Quality - Petrol....................................136
Fuse Box Locations......................................174 Engine compartment fuse box...................... 174
Load compartment fuse box.......................... 174
Passenger compartment fuse box...............174
Fuses..................................................................174
Fuse Specification Chart............................175 Engine compartment fuse box...................... 175
Load compartment fuse box......................... 180
Passenger compartment fuse box...............178
G
Gauges................................................................77 Engine coolant temperature gauge...............78
Fuel gauge............................................................... 78
Gearbox See: Transmission............................................... 141
General Information on Radio Frequencies...................................................36
Glasses Holder...............................................124
Global Opening and Closing......................45 Global closing........................................................ 46
Global opening..................................................... 46
H
Handbrake See: Parking Brake............................................. 144
Hazard Warning Flashers............................59
Headlamp adjustment See: Adjusting the Headlamps - Vehicles With:
Adaptive Front Lighting/Xenon
Headlamps........................................................ 59
Headlamp Levelling......................................59 Recommended headlamp levelling switch
positions............................................................. 59
Headlamp Washers......................................54
Head Restraints.............................................110 Adjusting the head restraint............................ 110
Removing the head restraint............................ 111
Heated Seats.................................................120
286
Index