tow FORD C MAX 2011 2.G Owner's Manual
[x] Cancel search | Manufacturer: FORD, Model Year: 2011, Model line: C MAX, Model: FORD C MAX 2011 2.GPages: 296, PDF Size: 7.87 MB
Page 129 of 296
Downloaded from www.Manualslib.com manuals search engine GENERAL INFORMATION
General points on starting
If the battery has been disconnected the
vehicle may exhibit some unusual driving
characteristics for approx. 8 kilometres (5
miles) after reconnecting the battery.
This is because the engine management
system must realign itself with the engine.
Any unusual driving characteristics during
this period may be disregarded.
Starting the engine by towing or
pushing
WARNING
To prevent damage you must not
push or tow start your vehicle. Use
booster cables and a booster battery.
See Jump-Starting the Vehicle (page
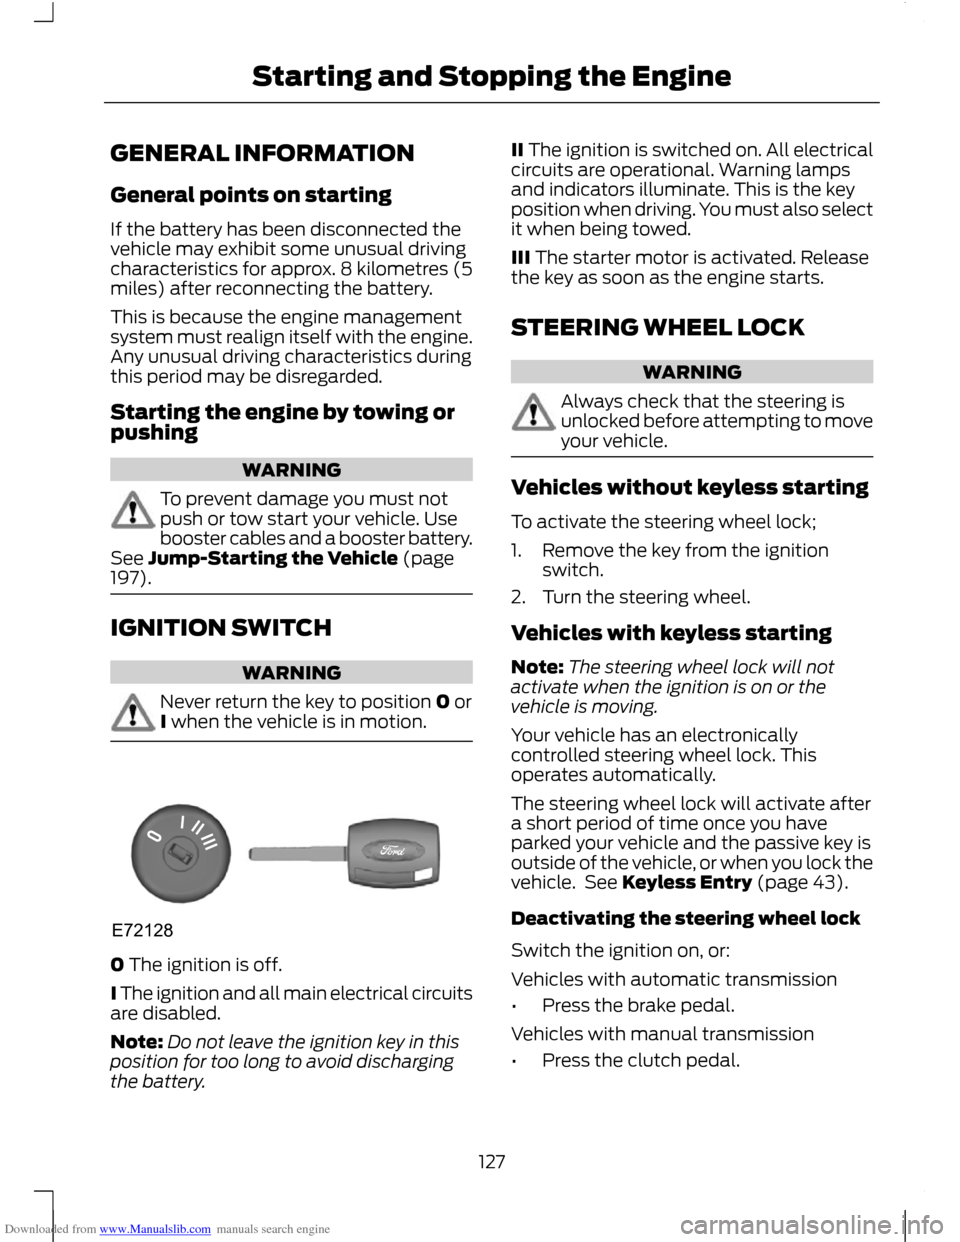
197). IGNITION SWITCH
WARNING
Never return the key to position 0 or
I when the vehicle is in motion.
0 The ignition is off.
I The ignition and all main electrical circuits
are disabled.
Note:
Do not leave the ignition key in this
position for too long to avoid discharging
the battery. II The ignition is switched on. All electrical
circuits are operational. Warning lamps
and indicators illuminate. This is the key
position when driving. You must also select
it when being towed.
III The starter motor is activated. Release
the key as soon as the engine starts.
STEERING WHEEL LOCK
WARNING
Always check that the steering is
unlocked before attempting to move
your vehicle.
Vehicles without keyless starting
To activate the steering wheel lock;
1. Remove the key from the ignition
switch.
2. Turn the steering wheel.
Vehicles with keyless starting
Note: The steering wheel lock will not
activate when the ignition is on or the
vehicle is moving.
Your vehicle has an electronically
controlled steering wheel lock. This
operates automatically.
The steering wheel lock will activate after
a short period of time once you have
parked your vehicle and the passive key is
outside of the vehicle, or when you lock the
vehicle. See Keyless Entry (page 43).
Deactivating the steering wheel lock
Switch the ignition on, or:
Vehicles with automatic transmission
• Press the brake pedal.
Vehicles with manual transmission
• Press the clutch pedal.
127
Starting and Stopping the EngineE72128
Page 139 of 296
Downloaded from www.Manualslib.com manuals search engine CAUTIONS
Do not push-start or tow-start your
vehicle. Use booster cables. See
Jump-Starting the Vehicle (page
197). Do not switch the ignition off when
driving.
FUEL FILLER FLAP
WARNINGS
Take care when refuelling to avoid
spilling any residual fuel from the fuel
nozzle.
Do not use any kind of flames or heat
near the fuel system. The fuel system
is under pressure. There is a risk of
injury if the fuel system is leaking. CAUTION
If you use a high pressure spray to
wash your vehicle, only spray the fuel
filler flap briefly from a distance not
less than 200 millimetres (8 inches). Note:
The sliding door is inhibited from
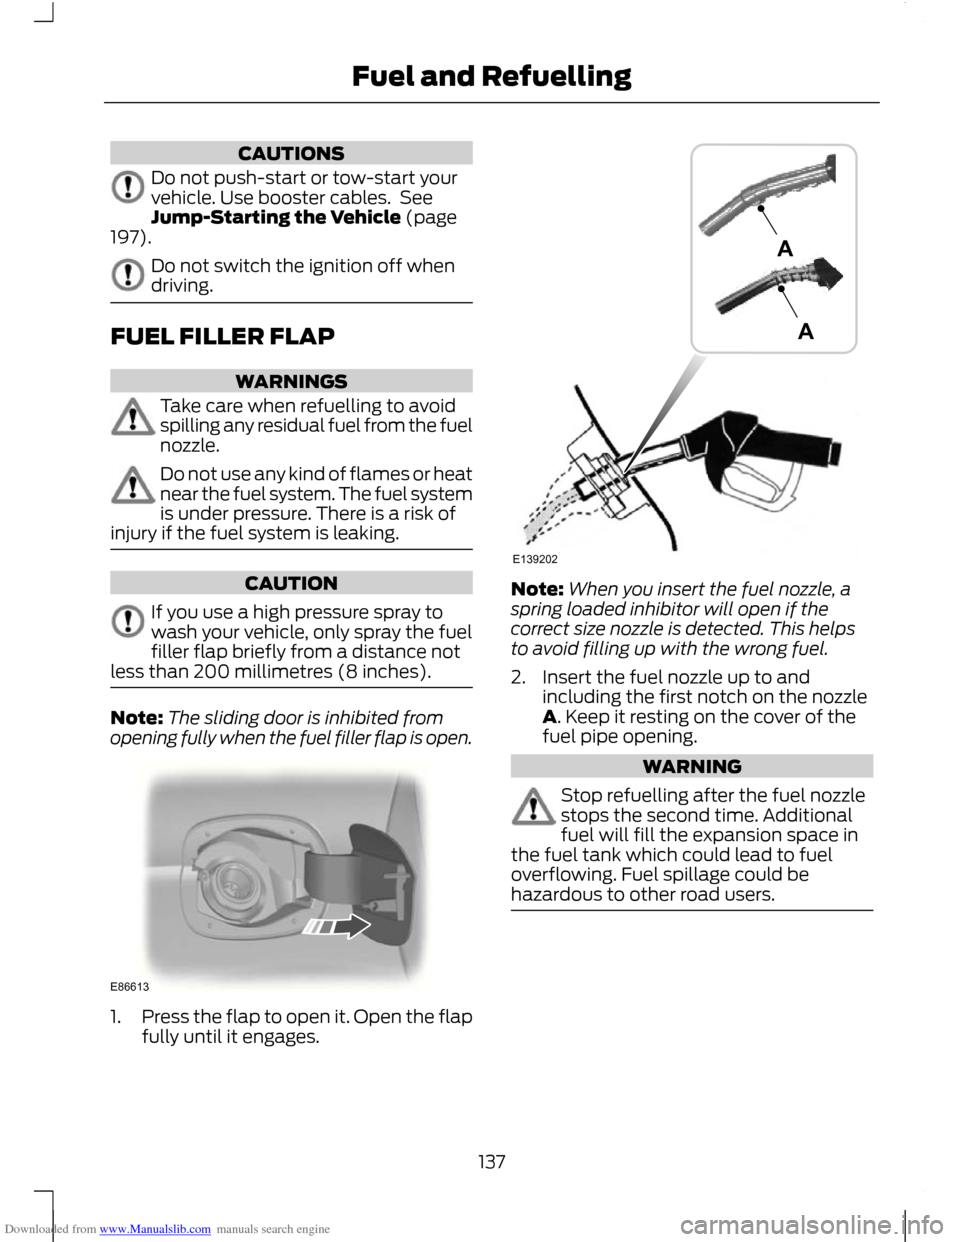
opening fully when the fuel filler flap is open. 1.
Press the flap to open it. Open the flap
fully until it engages. Note:
When you insert the fuel nozzle, a
spring loaded inhibitor will open if the
correct size nozzle is detected. This helps
to avoid filling up with the wrong fuel.
2. Insert the fuel nozzle up to and including the first notch on the nozzle
A. Keep it resting on the cover of the
fuel pipe opening. WARNING
Stop refuelling after the fuel nozzle
stops the second time. Additional
fuel will fill the expansion space in
the fuel tank which could lead to fuel
overflowing. Fuel spillage could be
hazardous to other road users. 137
Fuel and RefuellingE86613 E139202AA
Page 140 of 296
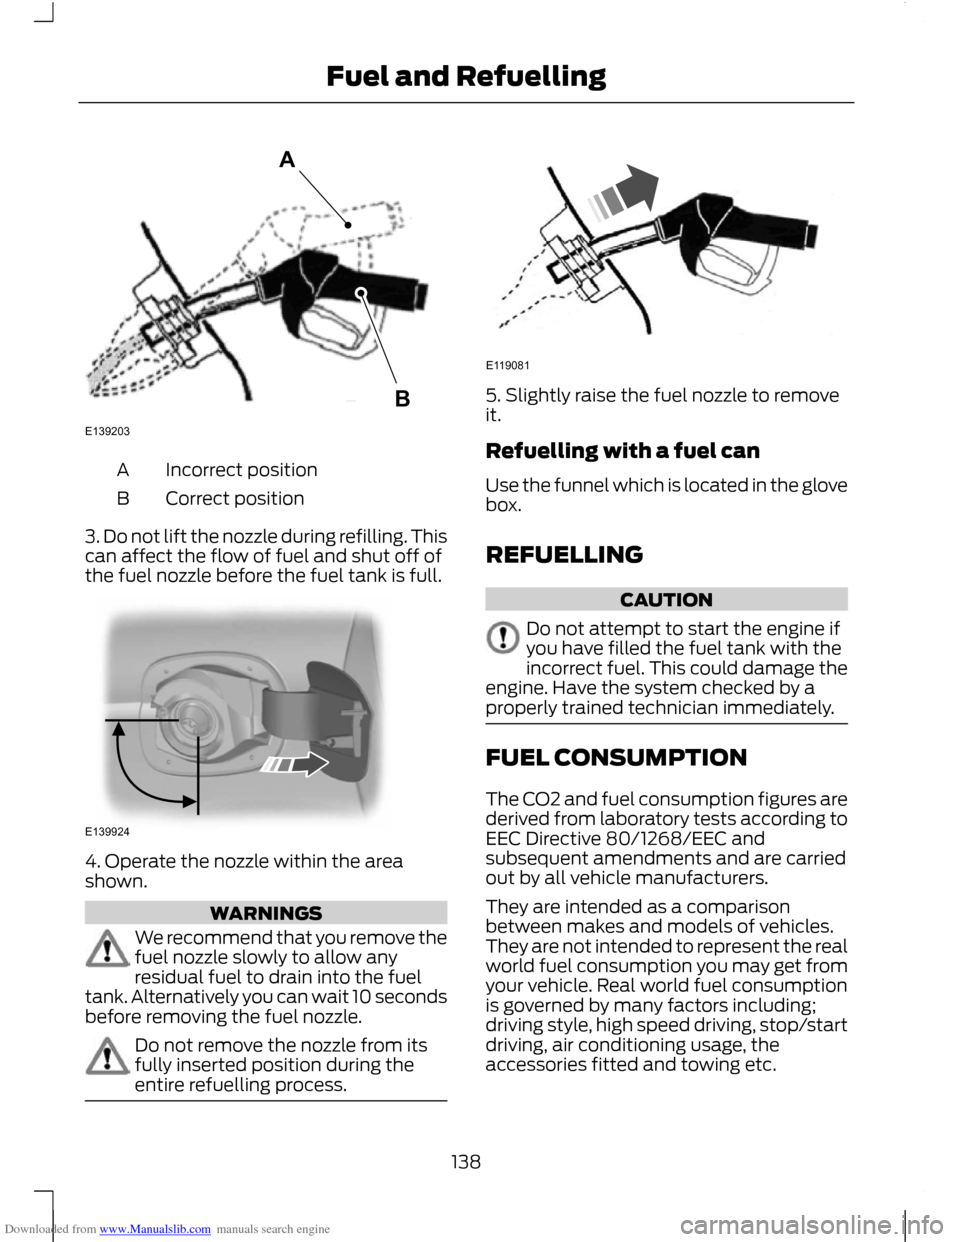
Downloaded from www.Manualslib.com manuals search engine Incorrect position
A
Correct position
B
3. Do not lift the nozzle during refilling. This
can affect the flow of fuel and shut off of
the fuel nozzle before the fuel tank is full. 4. Operate the nozzle within the area
shown.
WARNINGS
We recommend that you remove the
fuel nozzle slowly to allow any
residual fuel to drain into the fuel
tank. Alternatively you can wait 10 seconds
before removing the fuel nozzle. Do not remove the nozzle from its
fully inserted position during the
entire refuelling process. 5. Slightly raise the fuel nozzle to remove
it.
Refuelling with a fuel can
Use the funnel which is located in the glove
box.
REFUELLING
CAUTION
Do not attempt to start the engine if
you have filled the fuel tank with the
incorrect fuel. This could damage the
engine. Have the system checked by a
properly trained technician immediately. FUEL CONSUMPTION
The CO2 and fuel consumption figures are
derived from laboratory tests according to
EEC Directive 80/1268/EEC and
subsequent amendments and are carried
out by all vehicle manufacturers.
They are intended as a comparison
between makes and models of vehicles.
They are not intended to represent the real
world fuel consumption you may get from
your vehicle. Real world fuel consumption
is governed by many factors including;
driving style, high speed driving, stop/start
driving, air conditioning usage, the
accessories fitted and towing etc.
138
Fuel and RefuellingE139203AB E139924 E119081
Page 146 of 296
Downloaded from www.Manualslib.com manuals search engine PRINCIPLE OF OPERATION
Note:
Depending on applicable laws and
regulations in the country for which your
vehicle was originally built, the brake lamps
may flash if you brake heavily.
Note: Occasional brake noise is normal and
often does not indicate a concern. In normal
operation, the system may emit occasional
or intermittent squeal or groan noises when
the brakes are applied. Such noises are
usually caused by environmental conditions
such as cold, heat, moisture, road dust, salt
or mud.
Disc brakes
Wet brake discs result in reduced braking
efficiency. Dab the brake pedal when
driving from a car wash to remove the film
of water.
ABS WARNING
The ABS does not relieve you of your
responsibility to drive with due care
and attention.
The ABS helps you to maintain full steering
and directional stability when you brake
heavily in an emergency, by preventing the
road wheels from locking.
HINTS ON DRIVING WITH
ANTI-LOCK BRAKES
When the ABS is operating, the brake pedal
will pulse. This is normal. Maintain pressure
on the brake pedal.
The ABS will not eliminate the dangers
inherent when:
•
you drive too close to the vehicle in
front of you.
• the vehicle is aquaplaning. •
you take corners too fast.
• the road surface is poor.
PARKING BRAKE WARNING
Vehicles with an automatic
transmission should always be left
with the selector lever in position P
(Park). •
Press the foot brake pedal firmly.
• Pull the parking brake lever up smartly
to its fullest extent.
• Do not press the release button while
pulling the lever up.
• If your vehicle is parked on a hill and
facing uphill, select first gear or P
(Park) and turn the steering wheel
away from the kerb.
• If your vehicle is parked on a hill and
facing downhill, select reverse gear or
P (Park) and turn the steering wheel
towards the kerb.
To release the parking brake, press the
brake pedal firmly, pull the lever up slightly,
depress the release button and push the
lever down.
144
Brakes
Page 147 of 296
Downloaded from www.Manualslib.com manuals search engine PRINCIPLE OF OPERATION
Electronic stability programme
(ESP)
WARNING
ESP does not relieve you of your
responsibility to drive with due care
and attention.
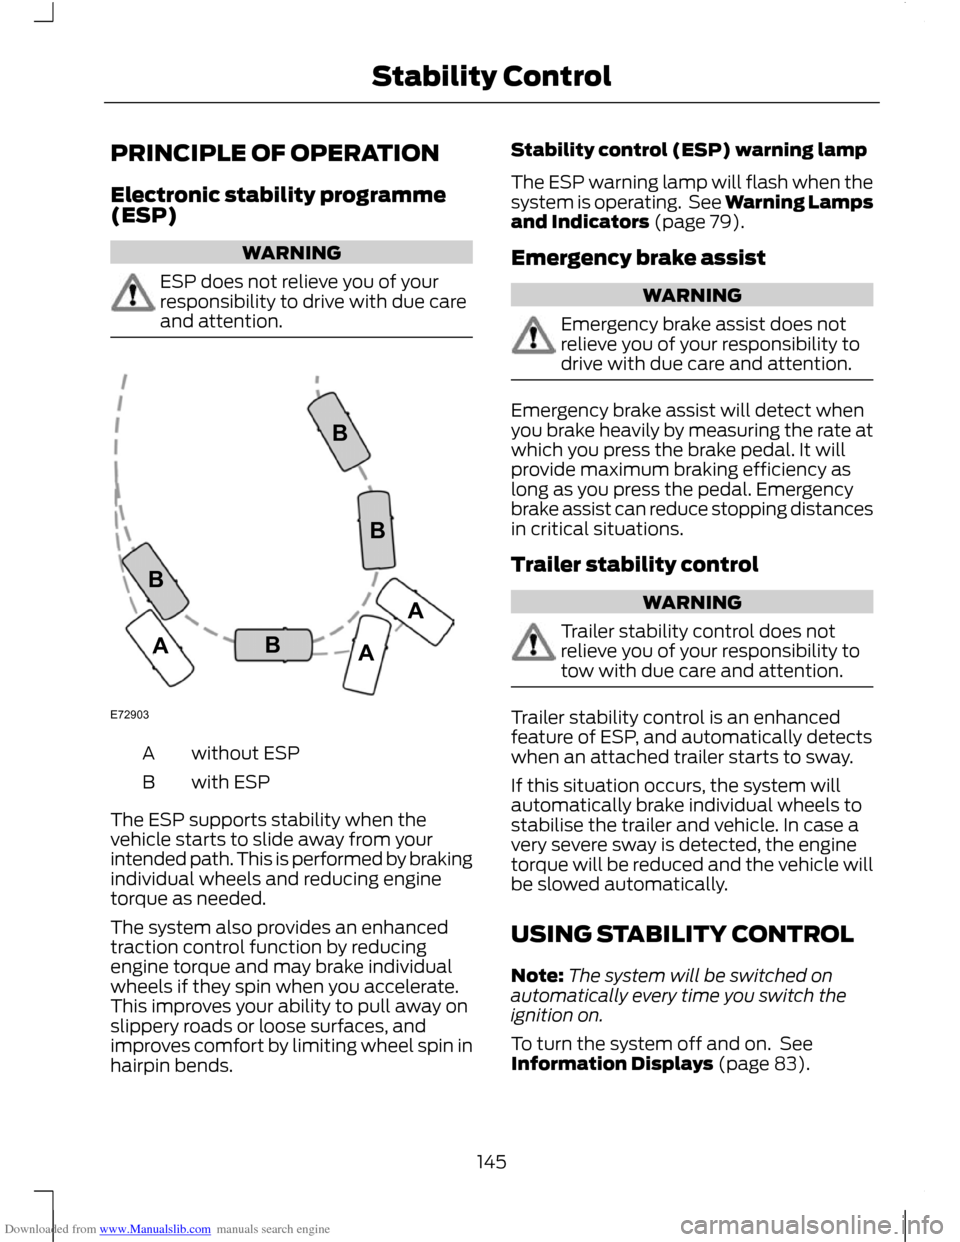
without ESP
A
with ESP
B
The ESP supports stability when the
vehicle starts to slide away from your
intended path. This is performed by braking
individual wheels and reducing engine
torque as needed.
The system also provides an enhanced
traction control function by reducing
engine torque and may brake individual
wheels if they spin when you accelerate.
This improves your ability to pull away on
slippery roads or loose surfaces, and
improves comfort by limiting wheel spin in
hairpin bends. Stability control (ESP) warning lamp
The ESP warning lamp will flash when the
system is operating. See Warning Lamps
and Indicators (page 79).
Emergency brake assist
WARNING
Emergency brake assist does not
relieve you of your responsibility to
drive with due care and attention.
Emergency brake assist will detect when
you brake heavily by measuring the rate at
which you press the brake pedal. It will
provide maximum braking efficiency as
long as you press the pedal. Emergency
brake assist can reduce stopping distances
in critical situations.
Trailer stability control
WARNING
Trailer stability control does not
relieve you of your responsibility to
tow with due care and attention.
Trailer stability control is an enhanced
feature of ESP, and automatically detects
when an attached trailer starts to sway.
If this situation occurs, the system will
automatically brake individual wheels to
stabilise the trailer and vehicle. In case a
very severe sway is detected, the engine
torque will be reduced and the vehicle will
be slowed automatically.
USING STABILITY CONTROL
Note:
The system will be switched on
automatically every time you switch the
ignition on.
To turn the system off and on. See
Information Displays (page 83).
145
Stability ControlE72903AAABBBB
Page 150 of 296
Downloaded from www.Manualslib.com manuals search engine PRINCIPLE OF OPERATION
WARNING
The system does not relieve you of
your responsibility to drive with due
care and attention.
CAUTIONS
Vehicles fitted with a trailer tow
module not approved by us may not
correctly detect obstacles.
The sensors may not detect objects
in heavy rain or other conditions that
cause disruptive reflections.
The sensors may not detect objects
with surfaces that absorb ultrasonic
waves.
The parking aid does not detect
obstacles moving away from the
vehicle. They will only be detected
shortly after they start to move towards
the vehicle again. If you use a high pressure spray to
wash your vehicle, only spray the
sensors briefly from a distance not
less than 20 centimetres (8 inches). Parking aid sends tones via the audio
system fitted and approved by us. If
this is not working the parking aid
system will not work. Note:
On vehicles fitted with a tow ball
arm, the rear parking aid is deactivated
automatically when any trailer lamps (or
lighting boards) are connected to the 13-pin
socket via a trailer tow module we have
approved.
Note: Keep the sensors free from dirt, ice
and snow. Do not clean with sharp objects.
Note: The parking aid may emit false tones
if it detects a signal using the same
frequency as the sensors or if the vehicle is
fully laden. Note:
The outer sensors may detect the
side walls of a garage. If the distance
between the outer sensor and the side wall
remains constant for three seconds, the
tone will switch off. As you continue, the
inner sensors will detect rearward objects.
USING THE PARKING AID -
VEHICLES WITH: REAR
PARKING AID WARNING
The parking aid does not relieve you
of your responsibility to drive with
due care and attention.
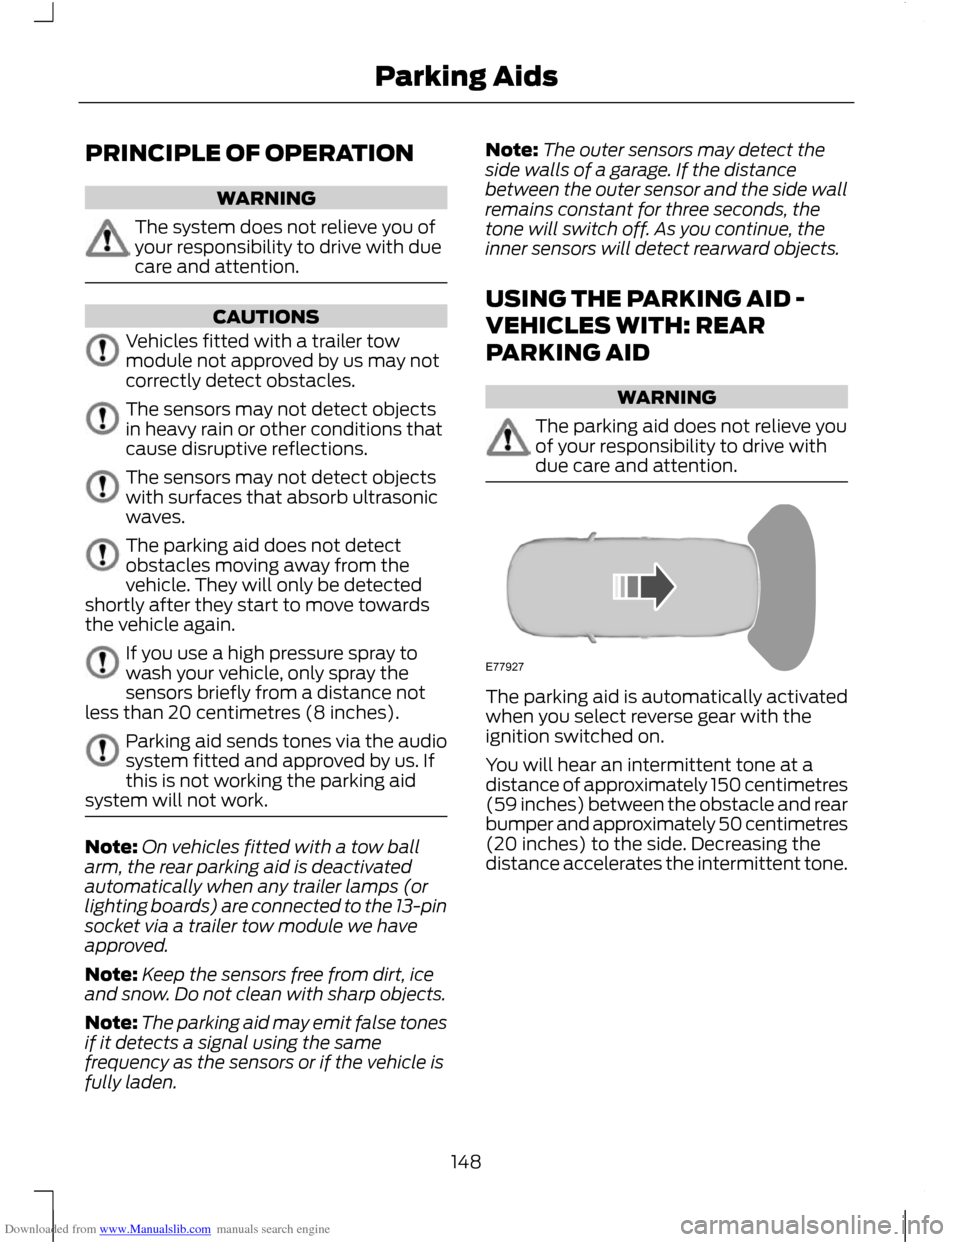
The parking aid is automatically activated
when you select reverse gear with the
ignition switched on.
You will hear an intermittent tone at a
distance of approximately 150 centimetres
(59 inches) between the obstacle and rear
bumper and approximately 50 centimetres
(20 inches) to the side. Decreasing the
distance accelerates the intermittent tone.
148
Parking AidsE77927
Page 151 of 296
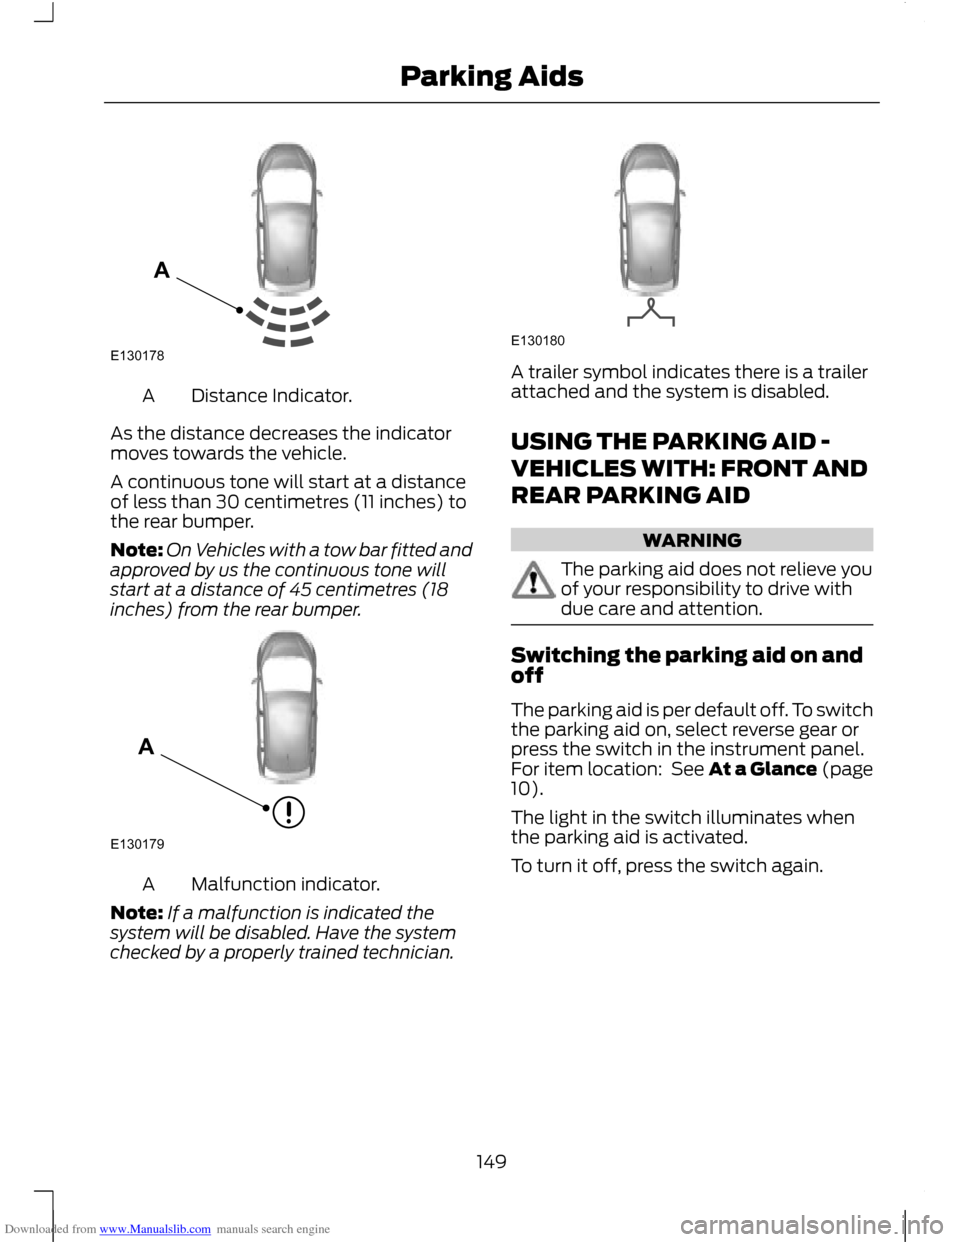
Downloaded from www.Manualslib.com manuals search engine Distance Indicator.
A
As the distance decreases the indicator
moves towards the vehicle.
A continuous tone will start at a distance
of less than 30 centimetres (11 inches) to
the rear bumper.
Note: On Vehicles with a tow bar fitted and
approved by us the continuous tone will
start at a distance of 45 centimetres (18
inches) from the rear bumper. Malfunction indicator.
A
Note: If a malfunction is indicated the
system will be disabled. Have the system
checked by a properly trained technician. A trailer symbol indicates there is a trailer
attached and the system is disabled.
USING THE PARKING AID -
VEHICLES WITH: FRONT AND
REAR PARKING AID
WARNING
The parking aid does not relieve you
of your responsibility to drive with
due care and attention.
Switching the parking aid on and
off
The parking aid is per default off. To switch
the parking aid on, select reverse gear or
press the switch in the instrument panel.
For item location: See At a Glance (page
10).
The light in the switch illuminates when
the parking aid is activated.
To turn it off, press the switch again.
149
Parking AidsE130178A E130179A E130180
Page 152 of 296
Downloaded from www.Manualslib.com manuals search engine Manoeuvring with the parking aid
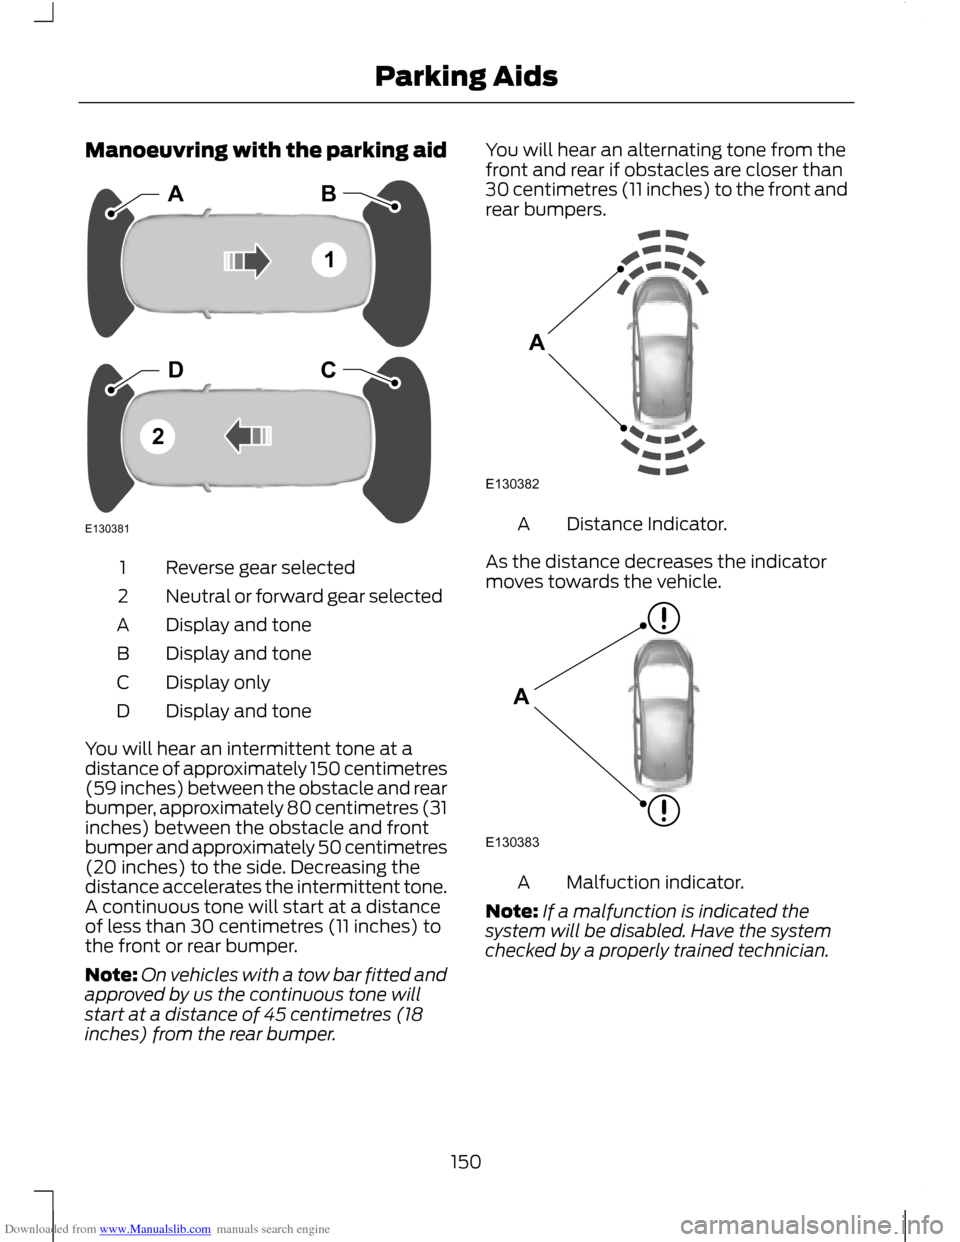
Reverse gear selected
1
Neutral or forward gear selected
2
Display and tone
A
Display and tone
B
Display only
C
Display and tone
D
You will hear an intermittent tone at a
distance of approximately 150 centimetres
(59 inches) between the obstacle and rear
bumper, approximately 80 centimetres (31
inches) between the obstacle and front
bumper and approximately 50 centimetres
(20 inches) to the side. Decreasing the
distance accelerates the intermittent tone.
A continuous tone will start at a distance
of less than 30 centimetres (11 inches) to
the front or rear bumper.
Note: On vehicles with a tow bar fitted and
approved by us the continuous tone will
start at a distance of 45 centimetres (18
inches) from the rear bumper. You will hear an alternating tone from the
front and rear if obstacles are closer than
30 centimetres (11 inches) to the front and
rear bumpers.
Distance Indicator.
A
As the distance decreases the indicator
moves towards the vehicle. Malfuction indicator.
A
Note: If a malfunction is indicated the
system will be disabled. Have the system
checked by a properly trained technician.
150
Parking AidsE130381ABDC12 E130382A E130383A
Page 166 of 296
Downloaded from www.Manualslib.com manuals search engine Grand C-MAX
WARNING
Luggage retention net anchor points
are not fitted behind the first row
seats, but are fitted behind the
second row seats. Luggage retention net
Installing the net
CAUTIONS
Do not move the rear seats when the
cargo net is installed.
Do not use the cargo net if the third
row seats are in use.
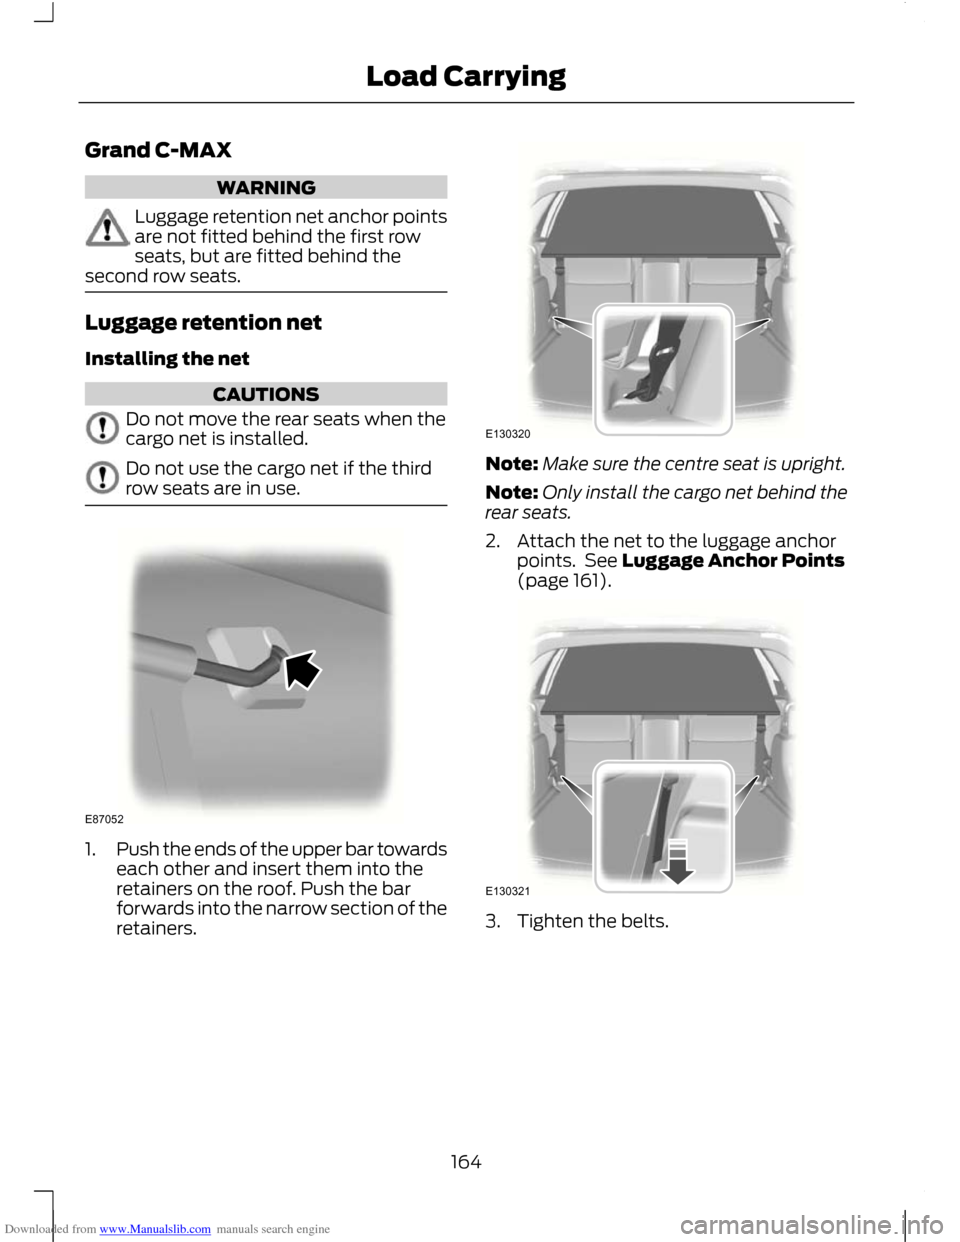
1.
Push the ends of the upper bar towards
each other and insert them into the
retainers on the roof. Push the bar
forwards into the narrow section of the
retainers. Note:
Make sure the centre seat is upright.
Note: Only install the cargo net behind the
rear seats.
2. Attach the net to the luggage anchor points. See Luggage Anchor Points
(page 161). 3. Tighten the belts.
164
Load CarryingE87052 E130320 E130321
Page 170 of 296
Downloaded from www.Manualslib.com manuals search engine TOWING A TRAILER
WARNINGS
Do not exceed 100 km/h (62 mph).
The rear tyre pressures must be
increased by 0.2 bar (3 psi) above
specification. See Technical
Specifications (page 209). Do not exceed the maximum gross
train weight stated on the vehicle
identification plate. See Vehicle
identification (page 214). CAUTION
Do not exceed the maximum
permissible nose weight, i.e. vertical
weight on the tow ball, of 75
kilogrammes (165 pounds). Note:
Not all vehicles are suitable or
approved to have tow bars fitted. Check
with your dealer first.
Place loads as low and central to the
axle(s) of the trailer as possible. If you are
towing with an unladen vehicle, the load
in the trailer should be placed toward the
nose, within the maximum nose load, as
this gives the best stability.
The stability of the vehicle to trailer
combination is very much dependant on
the quality of the trailer.
In high altitude regions above 1000 metres
(3281 feet), the stipulated maximum
permitted gross train weight must be
reduced by 10% for every additional 1000
metres (3281 feet).
Steep gradients WARNING
The overrun brake on a trailer is not
controlled by ABS. Change down a gear before you reach a
steep downhill gradient.
RETRACTABLE TOW BALL
CAUTION
Only move the tow ball arm with your
hand. Never use your foot or auxiliary
tools as damage to the mechanism
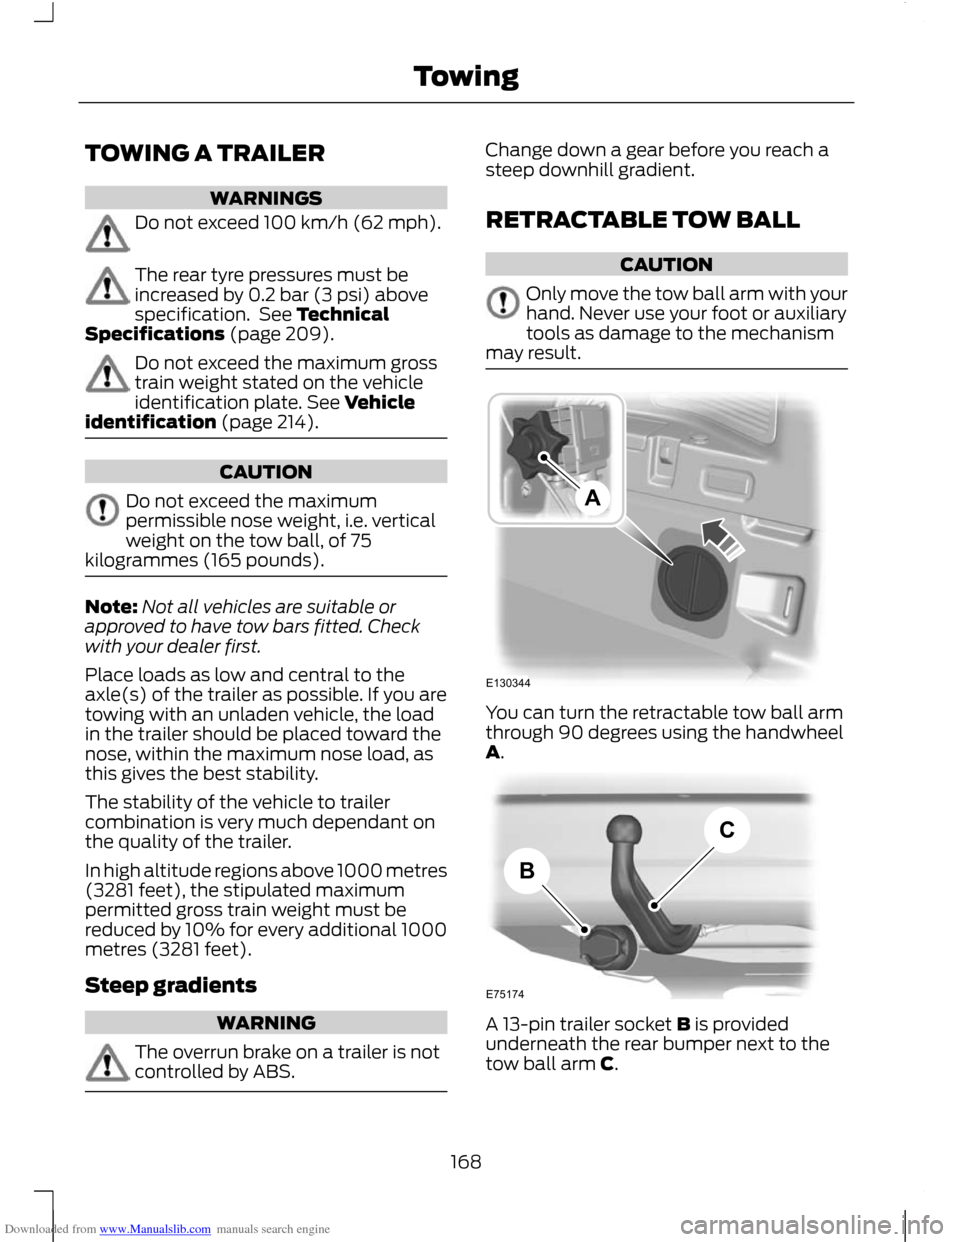
may result. You can turn the retractable tow ball arm
through 90 degrees using the handwheel
A.
A 13-pin trailer socket B is provided
underneath the rear bumper next to the
tow ball arm C.
168
TowingE130344A E75174BC