tow FORD C MAX 2011 2.G User Guide
[x] Cancel search | Manufacturer: FORD, Model Year: 2011, Model line: C MAX, Model: FORD C MAX 2011 2.GPages: 296, PDF Size: 7.87 MB
Page 55 of 296
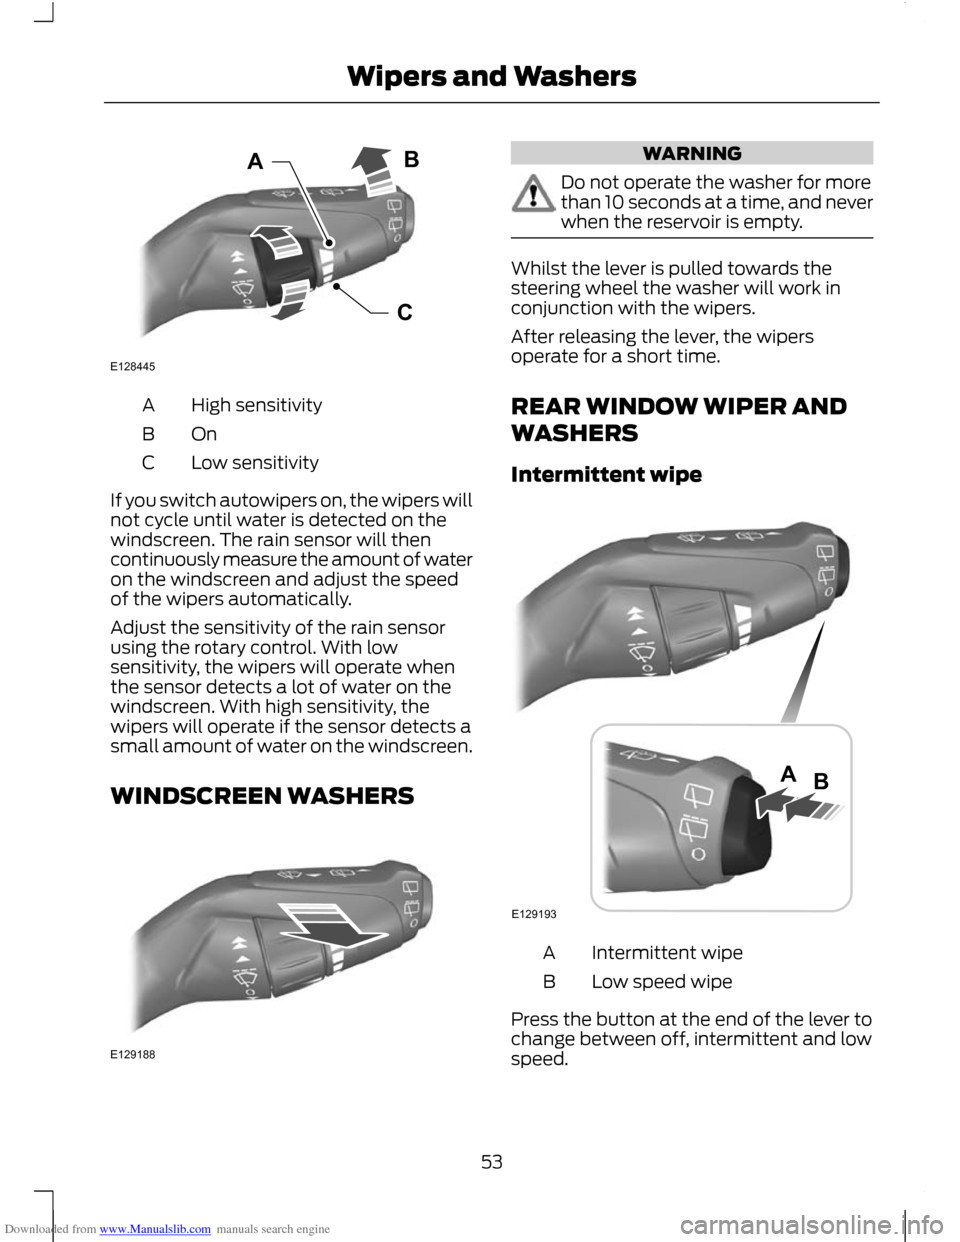
Downloaded from www.Manualslib.com manuals search engine High sensitivity
A
OnB
Low sensitivity
C
If you switch autowipers on, the wipers will
not cycle until water is detected on the
windscreen. The rain sensor will then
continuously measure the amount of water
on the windscreen and adjust the speed
of the wipers automatically.
Adjust the sensitivity of the rain sensor
using the rotary control. With low
sensitivity, the wipers will operate when
the sensor detects a lot of water on the
windscreen. With high sensitivity, the
wipers will operate if the sensor detects a
small amount of water on the windscreen.
WINDSCREEN WASHERS WARNING
Do not operate the washer for more
than 10 seconds at a time, and never
when the reservoir is empty.
Whilst the lever is pulled towards the
steering wheel the washer will work in
conjunction with the wipers.
After releasing the lever, the wipers
operate for a short time.
REAR WINDOW WIPER AND
WASHERS
Intermittent wipe
Intermittent wipe
A
Low speed wipe
B
Press the button at the end of the lever to
change between off, intermittent and low
speed.
53
Wipers and WashersCABE128445 E129188 E129193AB
Page 59 of 296
Downloaded from www.Manualslib.com manuals search engine LIGHTING CONTROL
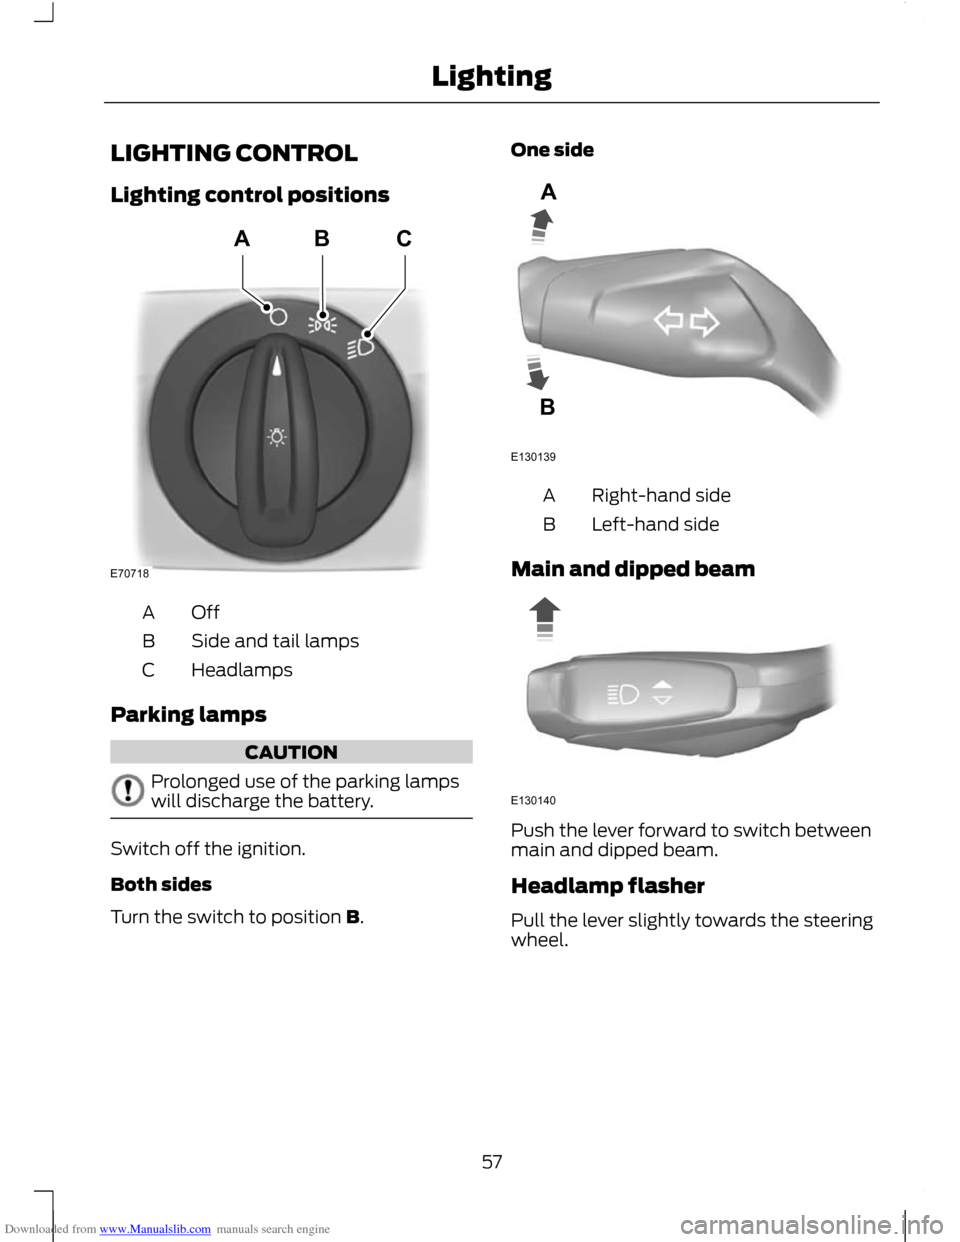
Lighting control positions
OffA
Side and tail lamps
B
Headlamps
C
Parking lamps CAUTION
Prolonged use of the parking lamps
will discharge the battery.
Switch off the ignition.
Both sides
Turn the switch to position B. One side
Right-hand side
A
Left-hand side
B
Main and dipped beam Push the lever forward to switch between
main and dipped beam.
Headlamp flasher
Pull the lever slightly towards the steering
wheel.
57
LightingE70718ABC E130139AB E130140
Page 60 of 296
Downloaded from www.Manualslib.com manuals search engine Home safe lighting
Switch the ignition off and pull the
direction indicator lever towards the
steering wheel to switch the headlamps
on. You will hear a short tone. The
headlamps will go off automatically after
three minutes with any door open, or 30
seconds after the last door has been
closed.
The home safe lights can be cancelled by
either pulling the direction indicator lever
towards the steering wheel again or by
turning the ignition switch ON.
AUTOLAMPS
WARNING
In severe weather conditions, it may
be necessary to switch your
headlamps on manually.
Note:
If you have switched autolamps on,
you can only switch the main beam on when
autolamps has switched the headlamps on.
Note: If autolamps have been switched on
in conjunction with autowipers, dipped
headlamps will illuminate automatically
when the rain sensor activates the
windscreen wipers continuously. The headlamps will come on and go off
automatically depending on the ambient
light.
The headlamps will remain on for a period
of time after you switch the ignition off.
You can adjust the time delay using the
information display. See Information
Displays (page 83).
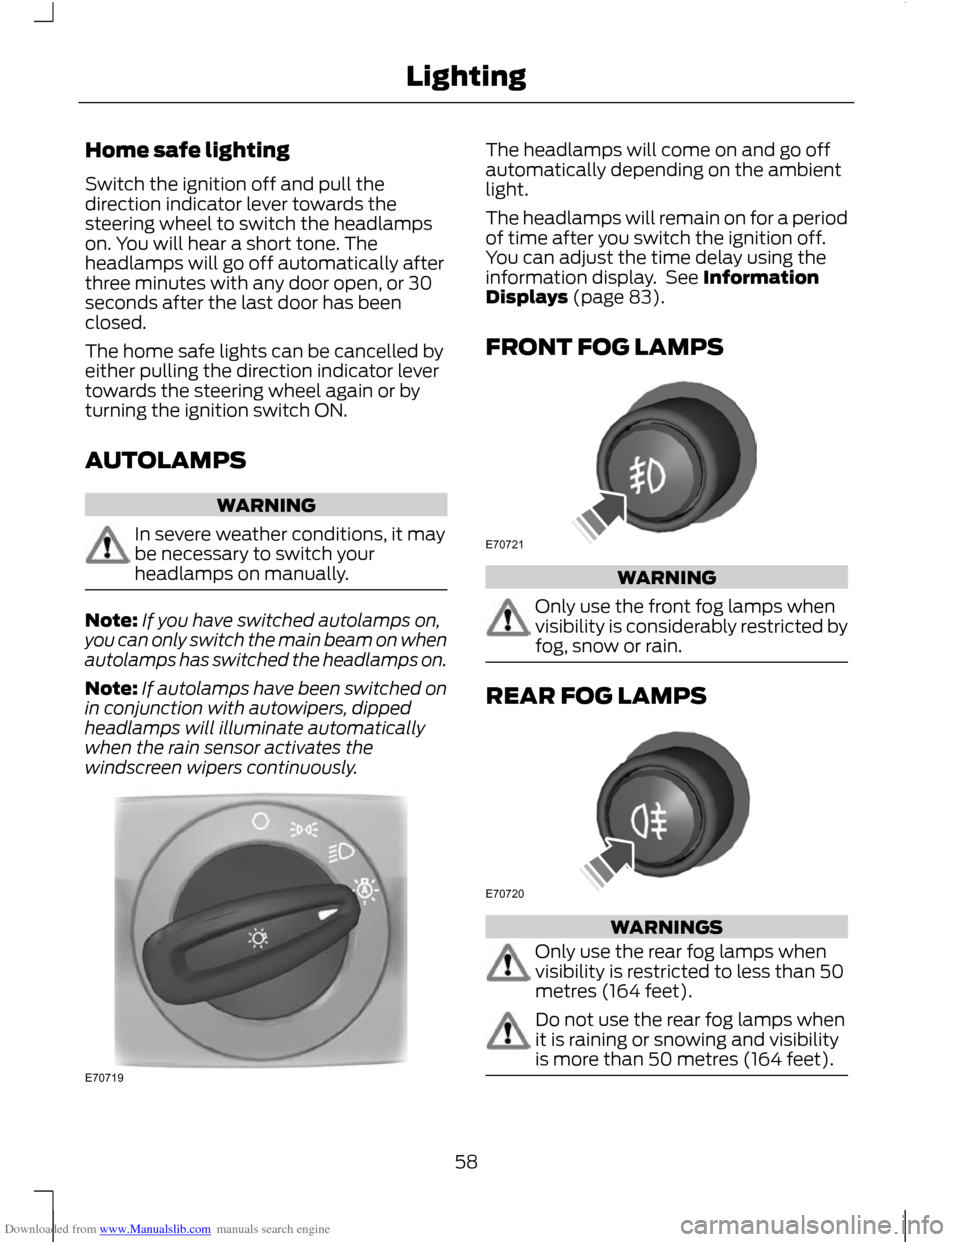
FRONT FOG LAMPS
WARNING
Only use the front fog lamps when
visibility is considerably restricted by
fog, snow or rain.
REAR FOG LAMPS
WARNINGS
Only use the rear fog lamps when
visibility is restricted to less than 50
metres (164 feet).
Do not use the rear fog lamps when
it is raining or snowing and visibility
is more than 50 metres (164 feet).
58
LightingE70719 E70721 E70720
Page 64 of 296
Downloaded from www.Manualslib.com manuals search engine Ambient lighting illuminates several areas,
for example footwells, cup holders and
doors with a single colour and can be
switched on and off using the information
display menu. See General Information
(page 83).
Use the instrument lighting dimmer
switches to adjust to the desired
brightness. See Instrument Lighting
Dimmer (page 122).
REMOVING A HEADLAMP
WARNING
Have Xenon bulbs changed by a
trained technician. There is a risk of
electric shock.
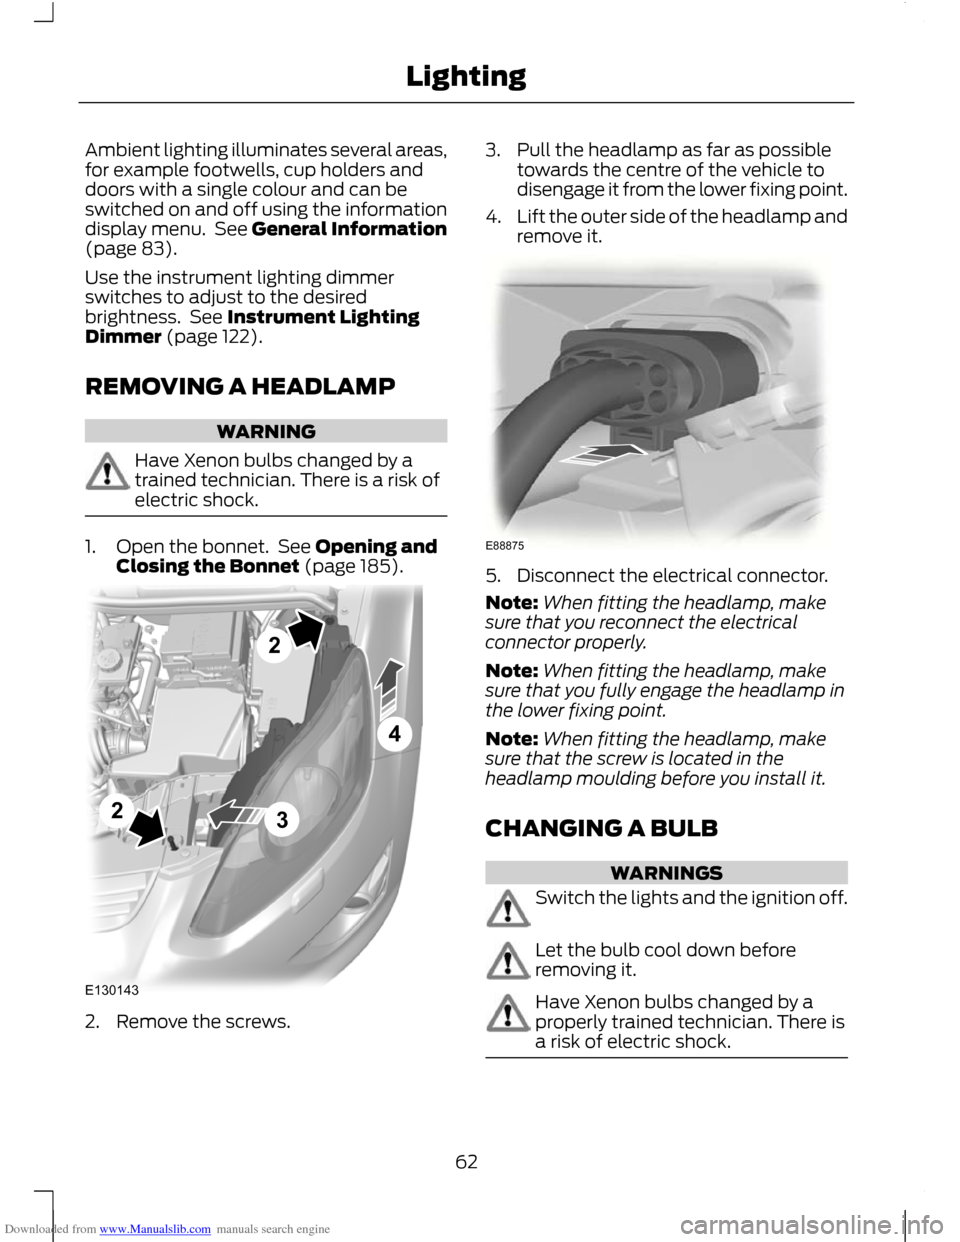
1. Open the bonnet. See Opening and
Closing the Bonnet (page 185). 2. Remove the screws. 3. Pull the headlamp as far as possible
towards the centre of the vehicle to
disengage it from the lower fixing point.
4. Lift the outer side of the headlamp and
remove it. 5. Disconnect the electrical connector.
Note:
When fitting the headlamp, make
sure that you reconnect the electrical
connector properly.
Note: When fitting the headlamp, make
sure that you fully engage the headlamp in
the lower fixing point.
Note: When fitting the headlamp, make
sure that the screw is located in the
headlamp moulding before you install it.
CHANGING A BULB WARNINGS
Switch the lights and the ignition off.
Let the bulb cool down before
removing it.
Have Xenon bulbs changed by a
properly trained technician. There is
a risk of electric shock.
62
LightingE1301432243 E88875
Page 70 of 296
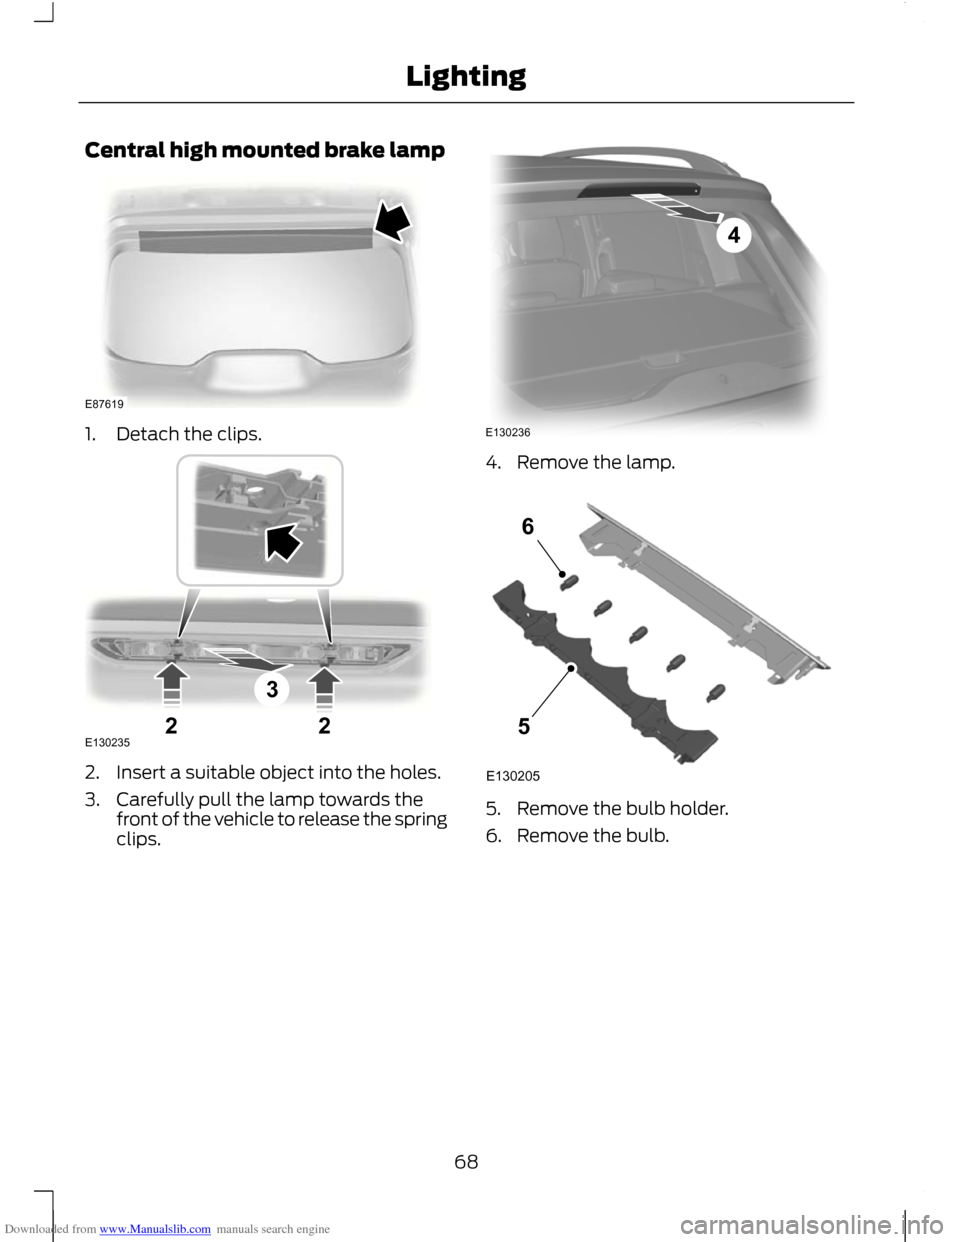
Downloaded from www.Manualslib.com manuals search engine Central high mounted brake lamp
1. Detach the clips.
2. Insert a suitable object into the holes.
3. Carefully pull the lamp towards the
front of the vehicle to release the spring
clips. 4. Remove the lamp.
5. Remove the bulb holder.
6. Remove the bulb.
68
LightingE87619 322E130235 4E130236 E13020556
Page 74 of 296
Downloaded from www.Manualslib.com manuals search engine The electric windows will stop
automatically while closing and reverse
some distance if there is an obstacle in the
way.
Overriding the anti-trap function
WARNING
While you close the window for the
third time, the anti-trap function is
disabled. Make sure there are no
obstacles in the way of the closing window. To override this protection function when
there is a resistance, e.g. in the winter,
proceed as follows:
1.
Close the window twice until it reaches
the resistance and let it reverse.
2. Close the window a third time to the resistance. The anti-trap function is
disabled and you cannot close the
window automatically. The window
will override the resistance and you can
close it fully.
3. If the window does not close after the third attempt, have it checked by an
expert.
Resetting the memory of the
electric windows WARNING
The anti-trap function is deactivated
until you have reset the memory.
After the battery has been disconnected
from the vehicle you must reset the
memory separately for each window:
Note:
On vehicles with a convertible top,
the roof and doors must be fully closed
before carrying out the following procedure.
1. Lift and hold the switch until the window is fully closed.
2. Release the switch. 3. Lift the switch again for one more
second.
4. Push and hold the switch until the window is fully open.
5. Release the switch.
6. Lift and hold the switch until the window is fully closed.
7. Open the window and try to close it automatically.
8. Reset and repeat procedure if the window does not close automatically.
EXTERIOR MIRRORS WARNING
Do not overestimate the distance of
the objects that you see in the
convex mirror. Objects seen in
convex mirrors will appear smaller and
further away than they actually are. Manual folding mirrors
Folding
Push the mirror towards the door window
glass.
Unfolding
Make sure that you fully engage the mirror
in its support when returning it to its
original position.
72
Windows and Mirrors
Page 78 of 296
Downloaded from www.Manualslib.com manuals search engine When you turn the system off no further
alerts will be received. The BLIS warning
indicator will illuminate. See Warning
Lamps and Indicators (page 79).
Detection errors
Note:
The alert indicator in the mirror will
not illuminate.
If the system senses a fault on either
sensor, the system warning symbol will
illuminate and remain on. The information
display will confirm the fault and indicate
whether the left or right side is affected.
Blocked sensor WARNING
Prior to the system recognizing a
blocked condition and issuing a
warning, the number of missed
objects will increase. CAUTION
The sensors may not detect vehicles
in heavy rain or other conditions that
cause disruptive reflections.
Note:
Keep the rear bumper area
surrounding the sensors free from dirt, ice
and snow.
If a sensor becomes blocked the system
performance may degrade. A blocked
sensor message may be displayed.
The system will automatically return to
normal operation once two other vehicles
have been detected on both sides. Trailer towing false alerts CAUTION
Vehicles fitted with a trailer tow
module not approved by us may not
correctly be detected. Switch the
system off to avoid false alerts. See
Information Displays (page 83). If the vehicle is fitted with a trailer tow
module approved by us, the system will
detect a connected trailer and deactivate.
A confirmation message will be shown in
the information display. See Information
Messages (page 90). The BLIS warning
indicator will illuminate. See Warning
Lamps and Indicators (page 79).
76
Windows and Mirrors
Page 102 of 296
Downloaded from www.Manualslib.com manuals search engine PRINCIPLE OF OPERATION
Outside air
Keep the air intakes forward of the
windscreen free from obstruction (snow,
leaves etc.) to allow the climate control
system to function effectively.
Recirculated air
CAUTION
Prolonged use of recirculated air may
cause the windows to mist up. If the
windows mist up, follow the settings
for defrosting and demisting the
windscreen. The air currently in the passenger
compartment will be recirculated. Outside
air will not enter the vehicle.
Heating
Heating performance depends on the
temperature of the engine coolant.
Air conditioning
Note:
The air conditioning operates only
when the temperature is above 4°C (39°F).
Note: If you use the air conditioning, the
fuel consumption of your vehicle will be
higher.
Air is directed through the evaporator
where it is cooled. Humidity is extracted
from the air to help keep the windows free
of mist. The resulting condensation is
directed to the outside of the vehicle and
it is therefore normal if you see a small
pool of water under your vehicle.
General information on controlling
the interior climate
Fully close all the windows. Warming the interior
Direct the air towards your feet. In cold or
humid weather conditions, direct some of
the air towards the windscreen and the
door windows.
Cooling the interior
Direct the air towards your face.
AIR VENTS
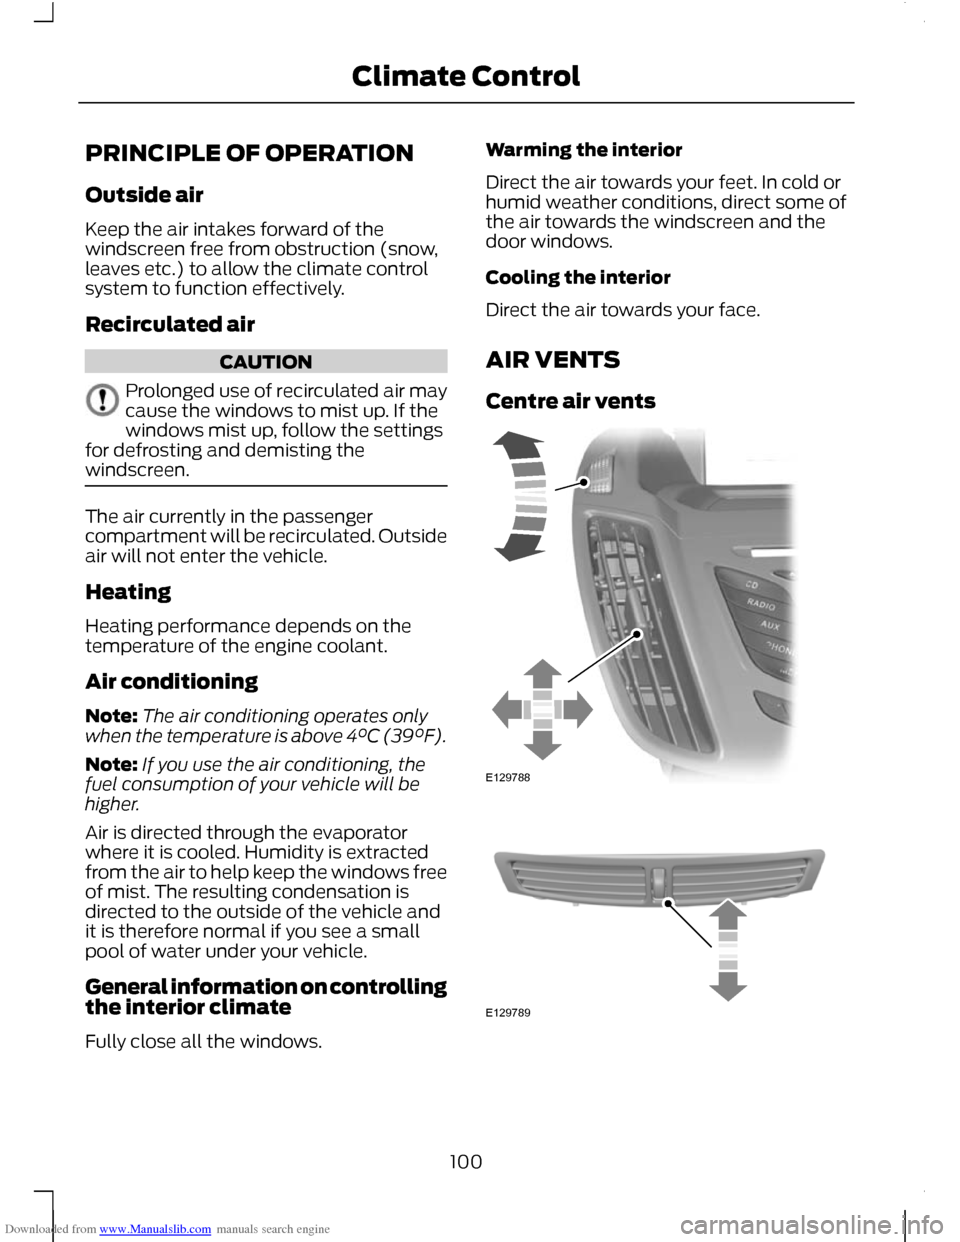
Centre air vents
100
Climate ControlE129788 E129789
Page 119 of 296
Downloaded from www.Manualslib.com manuals search engine Holding the seat at an angle of
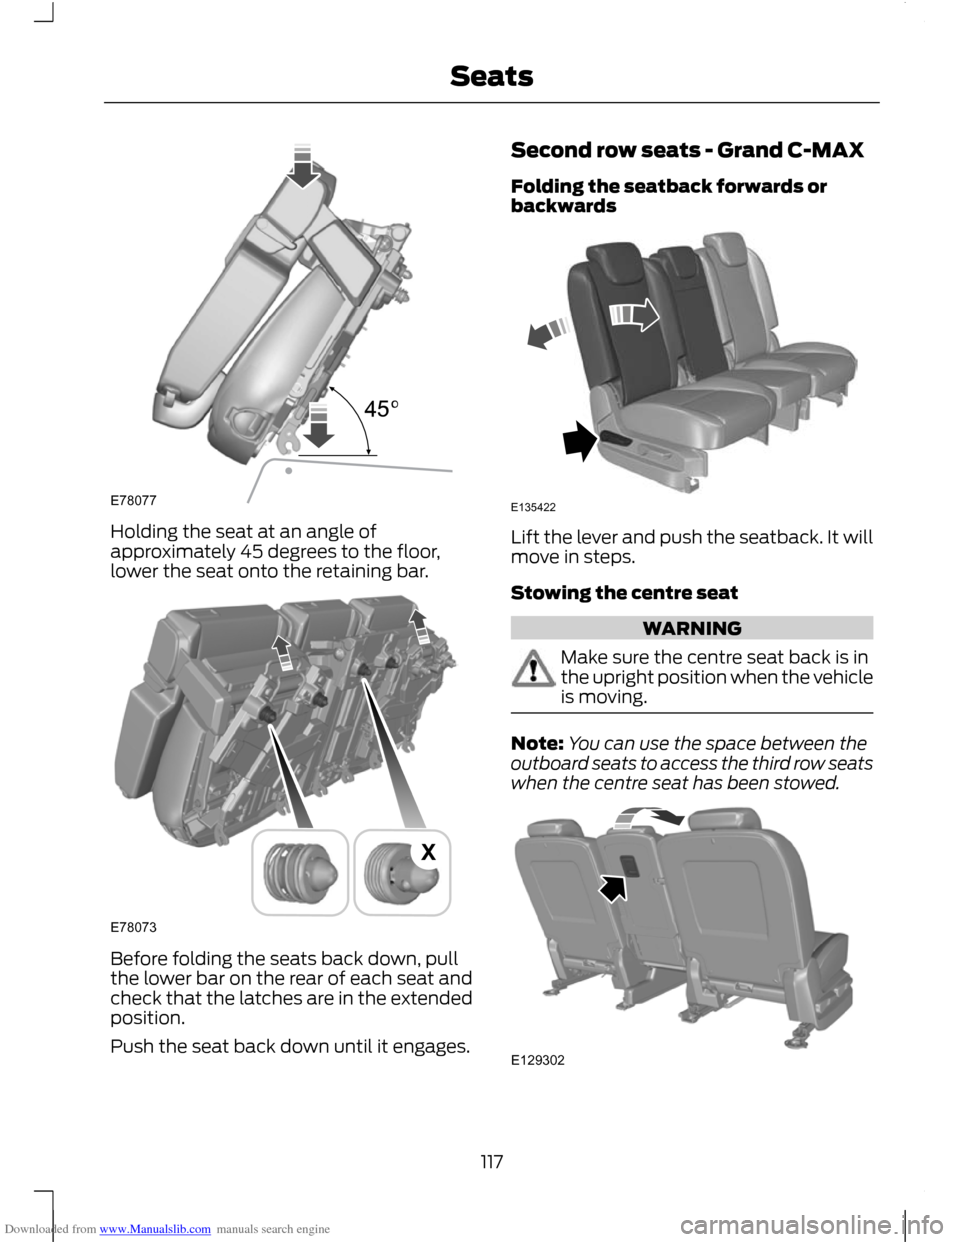
approximately 45 degrees to the floor,
lower the seat onto the retaining bar.
Before folding the seats back down, pull
the lower bar on the rear of each seat and
check that the latches are in the extended
position.
Push the seat back down until it engages. Second row seats - Grand C-MAX
Folding the seatback forwards or
backwards
Lift the lever and push the seatback. It will
move in steps.
Stowing the centre seat
WARNING
Make sure the centre seat back is in
the upright position when the vehicle
is moving.
Note:
You can use the space between the
outboard seats to access the third row seats
when the centre seat has been stowed. 117
SeatsE78077 E78073X E135422 E129302
Page 120 of 296
Downloaded from www.Manualslib.com manuals search engine 1.
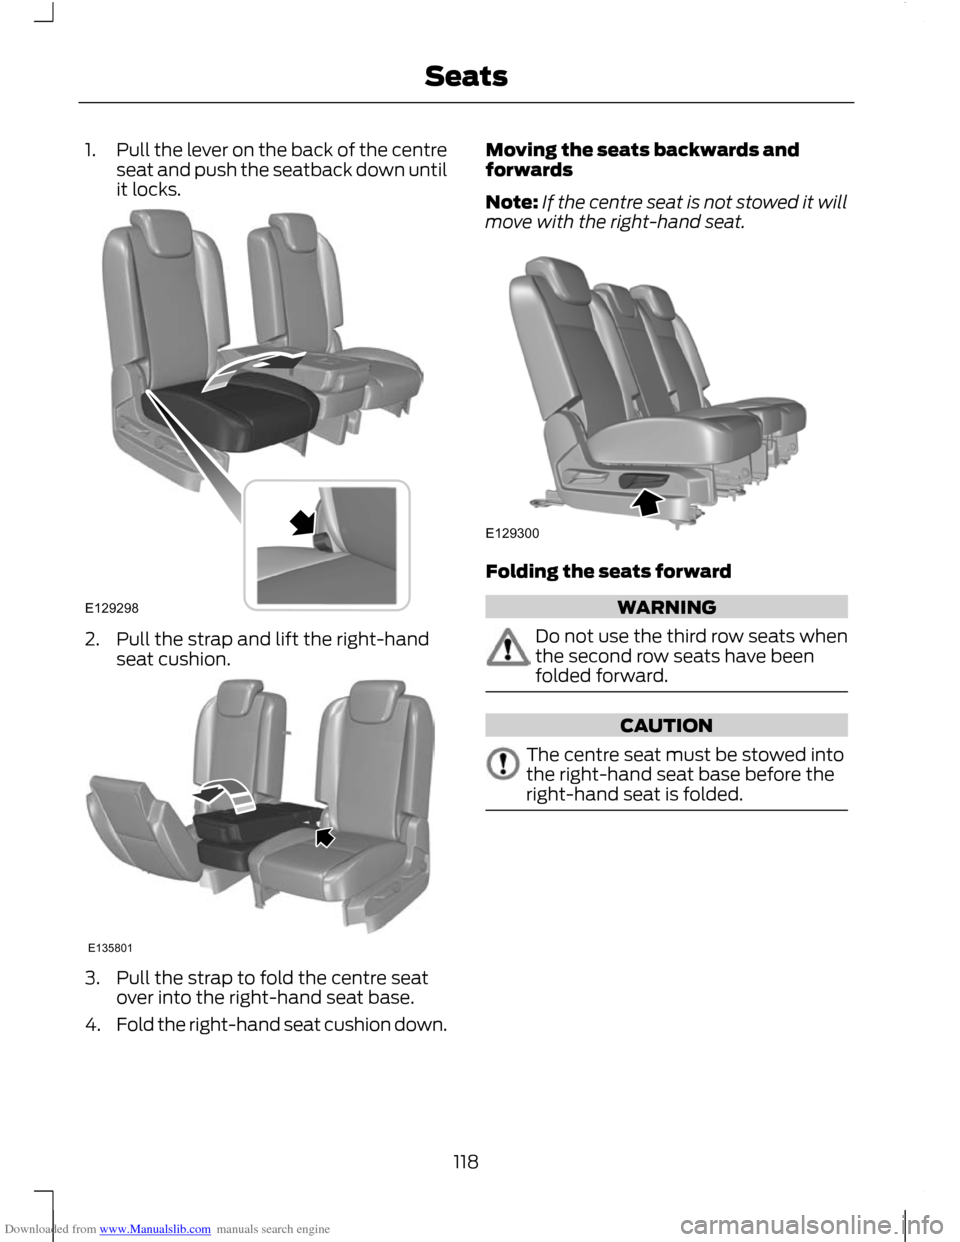
Pull the lever on the back of the centre
seat and push the seatback down until
it locks. 2. Pull the strap and lift the right-hand
seat cushion. 3. Pull the strap to fold the centre seat
over into the right-hand seat base.
4. Fold the right-hand seat cushion down. Moving the seats backwards and
forwards
Note:
If the centre seat is not stowed it will
move with the right-hand seat. Folding the seats forward
WARNING
Do not use the third row seats when
the second row seats have been
folded forward.
CAUTION
The centre seat must be stowed into
the right-hand seat base before the
right-hand seat is folded.
118
SeatsE129298 E135801 E129300