FORD C MAX 2015 Owners Manual
Manufacturer: FORD, Model Year: 2015, Model line: C MAX, Model: FORD C MAX 2015Pages: 469, PDF Size: 6.16 MB
Page 211 of 469
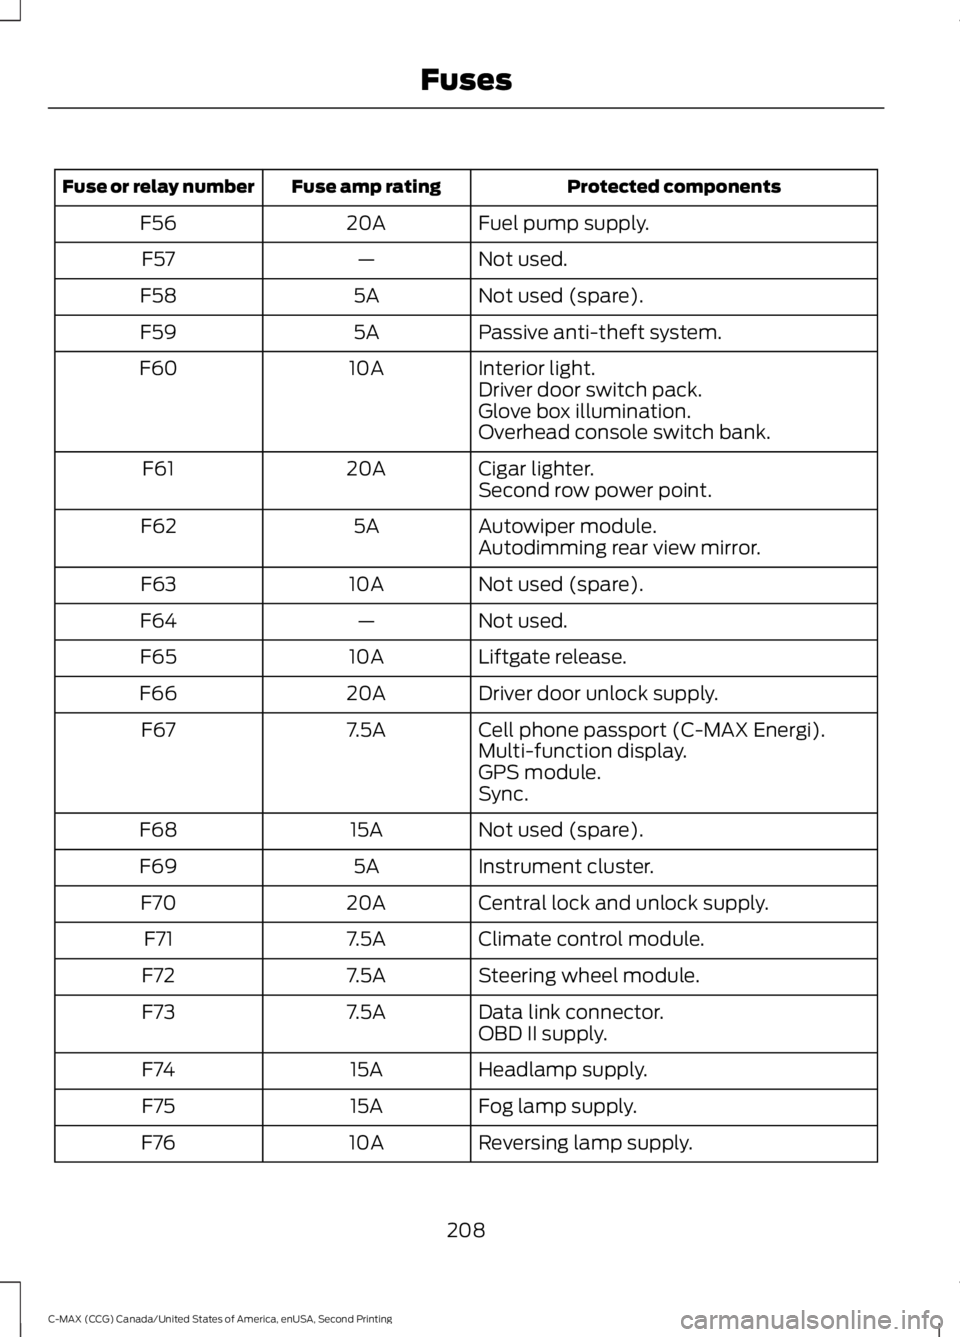
Protected components
Fuse amp rating
Fuse or relay number
Fuel pump supply.
20A
F56
Not used.
—
F57
Not used (spare).
5A
F58
Passive anti-theft system.
5A
F59
Interior light.
10A
F60
Driver door switch pack.
Glove box illumination.
Overhead console switch bank.
Cigar lighter.
20A
F61
Second row power point.
Autowiper module.
5A
F62
Autodimming rear view mirror.
Not used (spare).
10A
F63
Not used.
—
F64
Liftgate release.
10A
F65
Driver door unlock supply.
20A
F66
Cell phone passport (C-MAX Energi).
7.5A
F67
Multi-function display.
GPS module.
Sync.
Not used (spare).
15A
F68
Instrument cluster.
5A
F69
Central lock and unlock supply.
20A
F70
Climate control module.
7.5A
F71
Steering wheel module.
7.5A
F72
Data link connector.
7.5A
F73
OBD II supply.
Headlamp supply.
15A
F74
Fog lamp supply.
15A
F75
Reversing lamp supply.
10A
F76
208
C-MAX (CCG) Canada/United States of America, enUSA, Second Printing Fuses
Page 212 of 469
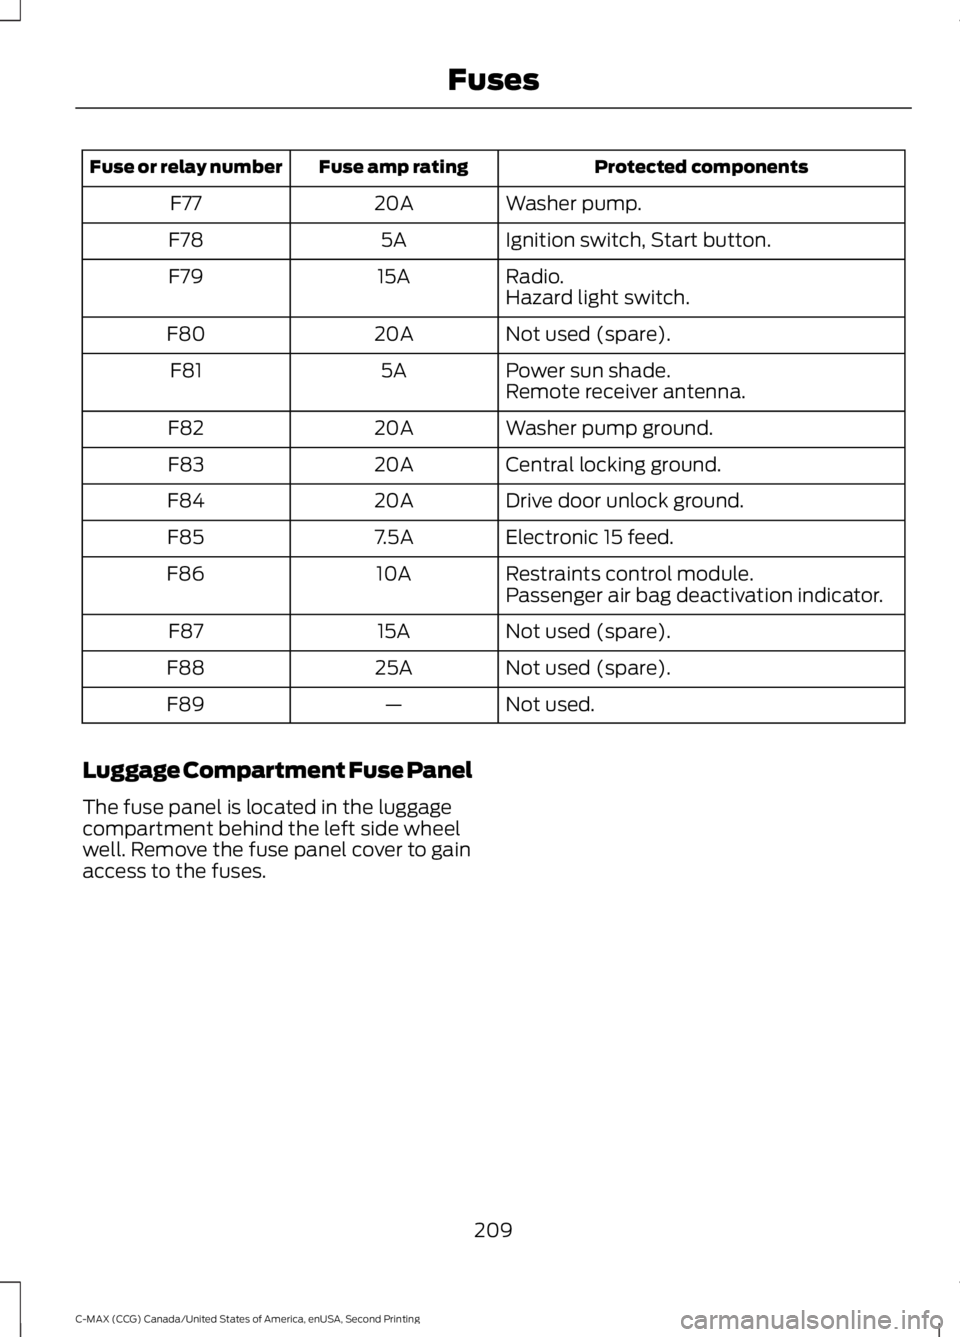
Protected components
Fuse amp rating
Fuse or relay number
Washer pump.
20A
F77
Ignition switch, Start button.
5A
F78
Radio.
15A
F79
Hazard light switch.
Not used (spare).
20A
F80
Power sun shade.
5A
F81
Remote receiver antenna.
Washer pump ground.
20A
F82
Central locking ground.
20A
F83
Drive door unlock ground.
20A
F84
Electronic 15 feed.
7.5A
F85
Restraints control module.
10A
F86
Passenger air bag deactivation indicator.
Not used (spare).
15A
F87
Not used (spare).
25A
F88
Not used.
—
F89
Luggage Compartment Fuse Panel
The fuse panel is located in the luggage
compartment behind the left side wheel
well. Remove the fuse panel cover to gain
access to the fuses.
209
C-MAX (CCG) Canada/United States of America, enUSA, Second Printing Fuses
Page 213 of 469
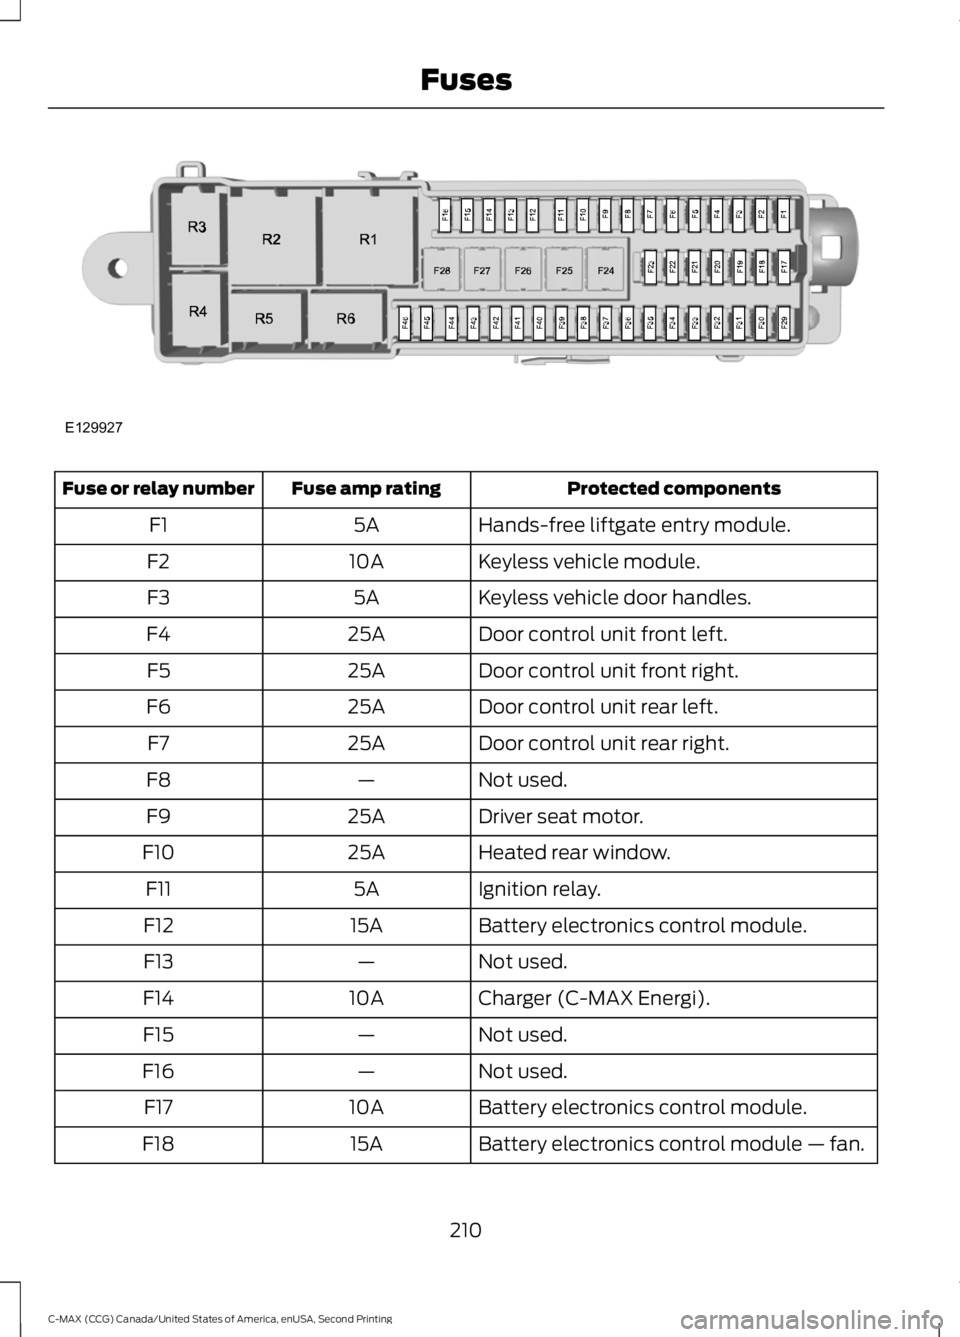
Protected components
Fuse amp rating
Fuse or relay number
Hands-free liftgate entry module.
5A
F1
Keyless vehicle module.
10A
F2
Keyless vehicle door handles.
5A
F3
Door control unit front left.
25A
F4
Door control unit front right.
25A
F5
Door control unit rear left.
25A
F6
Door control unit rear right.
25A
F7
Not used.
—
F8
Driver seat motor.
25A
F9
Heated rear window.
25A
F10
Ignition relay.
5A
F11
Battery electronics control module.
15A
F12
Not used.
—
F13
Charger (C-MAX Energi).
10A
F14
Not used.
—
F15
Not used.
—
F16
Battery electronics control module.
10A
F17
Battery electronics control module — fan.
15A
F18
210
C-MAX (CCG) Canada/United States of America, enUSA, Second Printing FusesE129927
Page 214 of 469
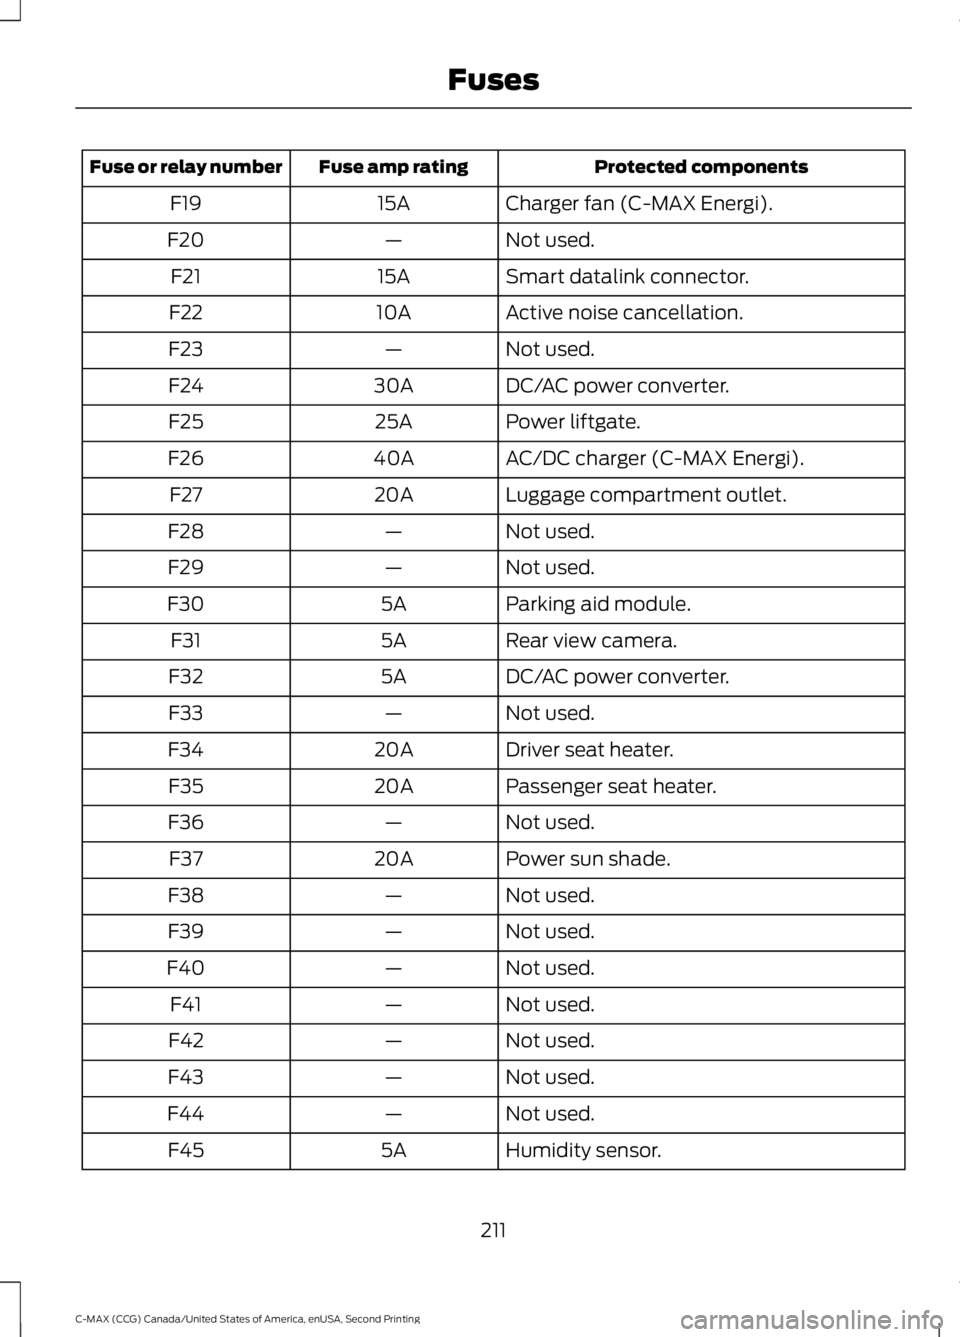
Protected components
Fuse amp rating
Fuse or relay number
Charger fan (C-MAX Energi).
15A
F19
Not used.
—
F20
Smart datalink connector.
15A
F21
Active noise cancellation.
10A
F22
Not used.
—
F23
DC/AC power converter.
30A
F24
Power liftgate.
25A
F25
AC/DC charger (C-MAX Energi).
40A
F26
Luggage compartment outlet.
20A
F27
Not used.
—
F28
Not used.
—
F29
Parking aid module.
5A
F30
Rear view camera.
5A
F31
DC/AC power converter.
5A
F32
Not used.
—
F33
Driver seat heater.
20A
F34
Passenger seat heater.
20A
F35
Not used.
—
F36
Power sun shade.
20A
F37
Not used.
—
F38
Not used.
—
F39
Not used.
—
F40
Not used.
—
F41
Not used.
—
F42
Not used.
—
F43
Not used.
—
F44
Humidity sensor.
5A
F45
211
C-MAX (CCG) Canada/United States of America, enUSA, Second Printing Fuses
Page 215 of 469
Protected components
Fuse amp rating
Fuse or relay number
Fuel system.
10A
F46
Rear 15 relay.
Power relay
R1
Heated rear window.
Mini relay
R2
Fuel door (C-MAX Energi).
Micro relay
R3
Not used.
—
R4
Not used.
—
R5
Rear wiper.
Micro relay
R6
CHANGING A FUSE
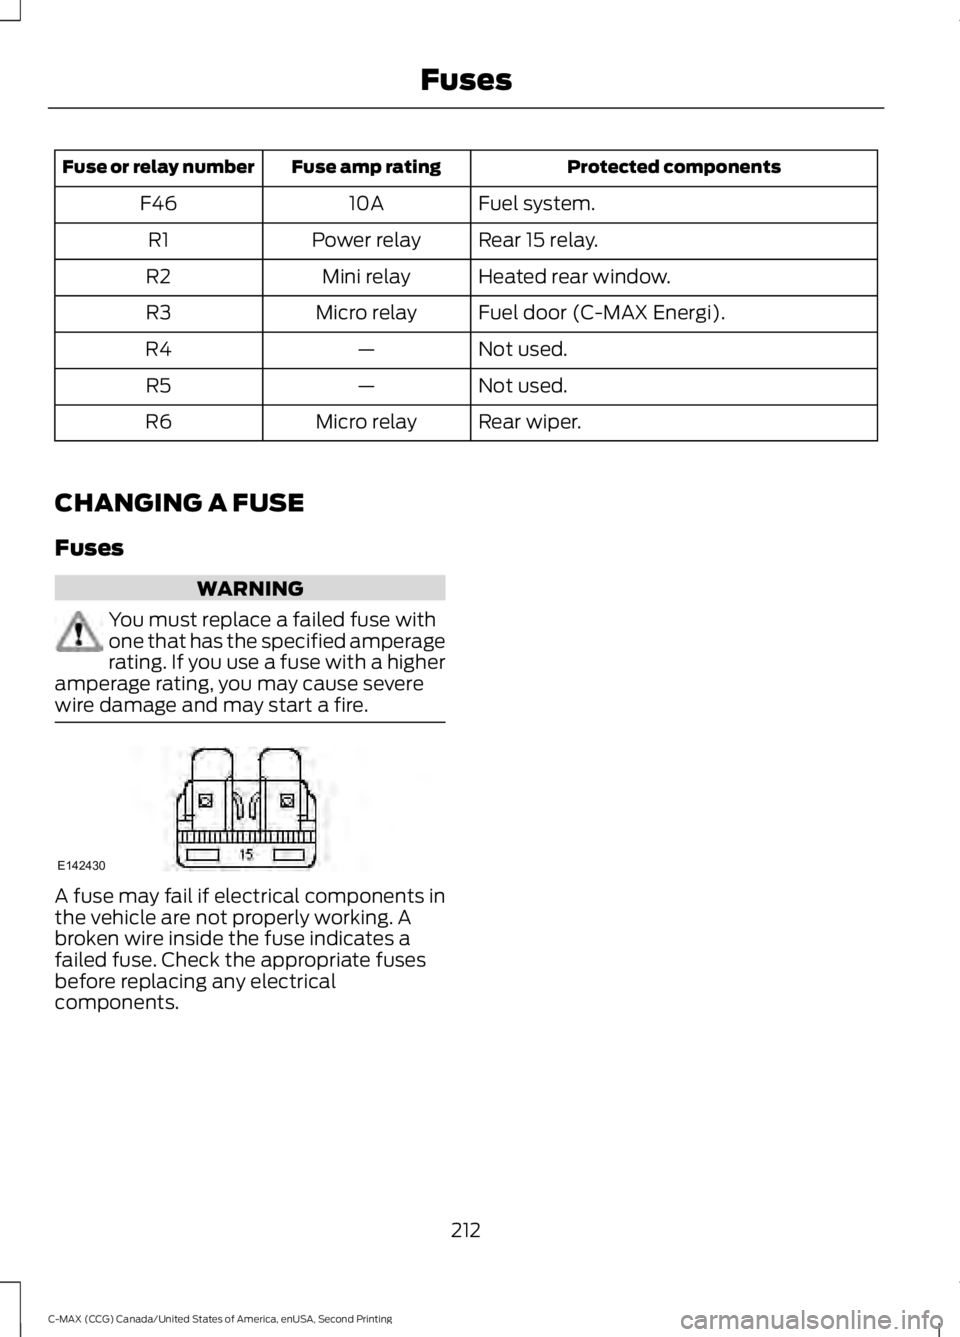
Fuses WARNING
You must replace a failed fuse with
one that has the specified amperage
rating. If you use a fuse with a higher
amperage rating, you may cause severe
wire damage and may start a fire. A fuse may fail if electrical components in
the vehicle are not properly working. A
broken wire inside the fuse indicates a
failed fuse. Check the appropriate fuses
before replacing any electrical
components.
212
C-MAX (CCG) Canada/United States of America, enUSA, Second Printing FusesE142430
Page 216 of 469
GENERAL INFORMATION
Have your vehicle serviced regularly to help
maintain its roadworthiness and resale
value. There is a large network of
authorized dealers that are there to help
you with their professional servicing
expertise. We believe that their specially
trained technicians are best qualified to
service your vehicle properly and expertly.
They are supported by a wide range of
highly specialized tools developed
specifically for servicing your vehicle.
To help you service your vehicle, we
provide scheduled maintenance
information which makes tracking routine
service easy. See Scheduled
Maintenance (page 420).
If your vehicle requires professional service,
an authorized dealer can provide the
necessary parts and service. Check your
warranty information to find out which
parts and services are covered.
Use only recommended fuels, lubricants,
fluids and service parts conforming to
specifications. Motorcraft® parts are
designed and built to provide the best
performance in your vehicle.
Precautions
• Do not work on a hot engine.
• Make sure that nothing gets caught in
moving parts.
• Do not work on a vehicle with the
engine running in an enclosed space,
unless you are sure you have enough
ventilation.
• Keep all open flames and other burning
material (such as cigarettes) away
from the battery and all fuel related
parts. Working with the Engine Off
1.
Set the parking brake and shift to park
(P).
2. Switch off the engine.
3. Block the wheels.
Working with the Engine On WARNING
To reduce the risk of vehicle damage
and/or personal burn injuries, do not
start your engine with the air cleaner
removed and do not remove it while the
engine is running. 1.
Set the parking brake and shift to park
(P).
2. Block the wheels
OPENING AND CLOSING THE
HOOD
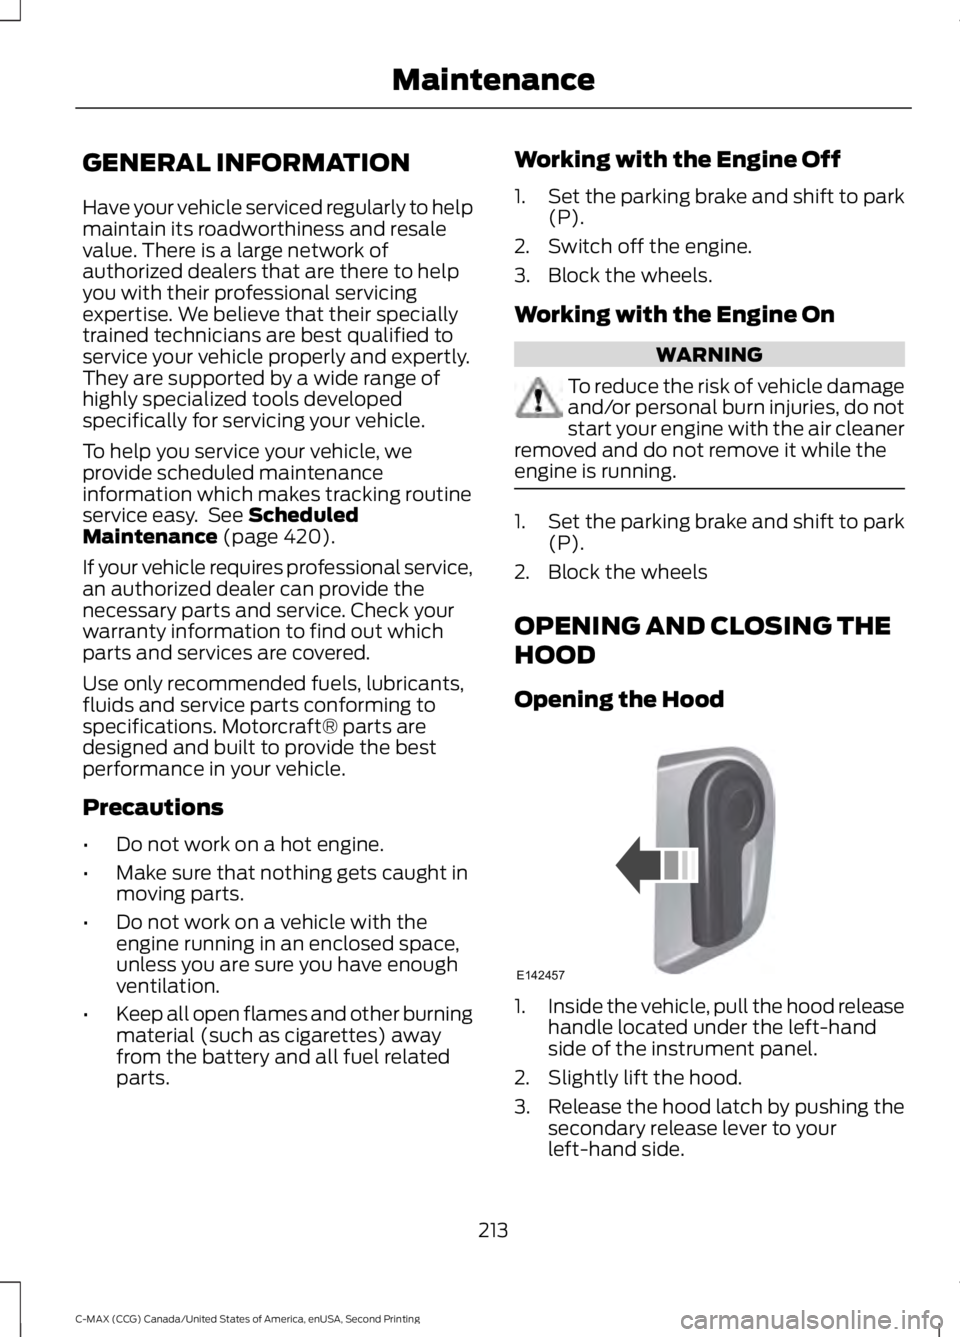
Opening the Hood 1.
Inside the vehicle, pull the hood release
handle located under the left-hand
side of the instrument panel.
2. Slightly lift the hood.
3. Release the hood latch by pushing the secondary release lever to your
left-hand side.
213
C-MAX (CCG) Canada/United States of America, enUSA, Second Printing MaintenanceE142457
Page 217 of 469
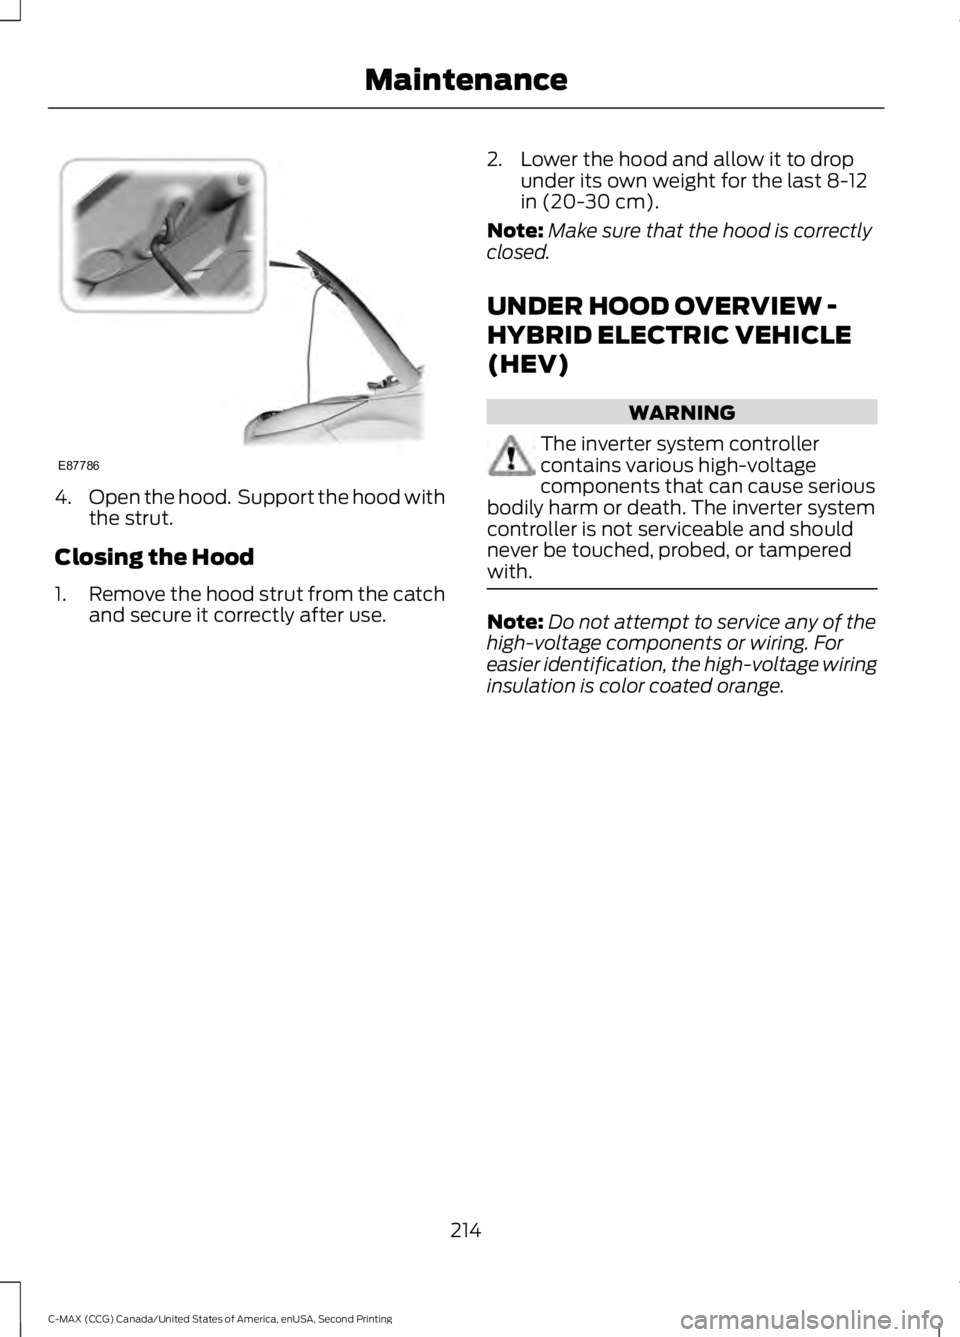
4.
Open the hood. Support the hood with
the strut.
Closing the Hood
1. Remove the hood strut from the catch
and secure it correctly after use. 2. Lower the hood and allow it to drop
under its own weight for the last 8-12
in (20-30 cm).
Note: Make sure that the hood is correctly
closed.
UNDER HOOD OVERVIEW -
HYBRID ELECTRIC VEHICLE
(HEV) WARNING
The inverter system controller
contains various high-voltage
components that can cause serious
bodily harm or death. The inverter system
controller is not serviceable and should
never be touched, probed, or tampered
with. Note:
Do not attempt to service any of the
high-voltage components or wiring. For
easier identification, the high-voltage wiring
insulation is color coated orange.
214
C-MAX (CCG) Canada/United States of America, enUSA, Second Printing MaintenanceE87786
Page 218 of 469
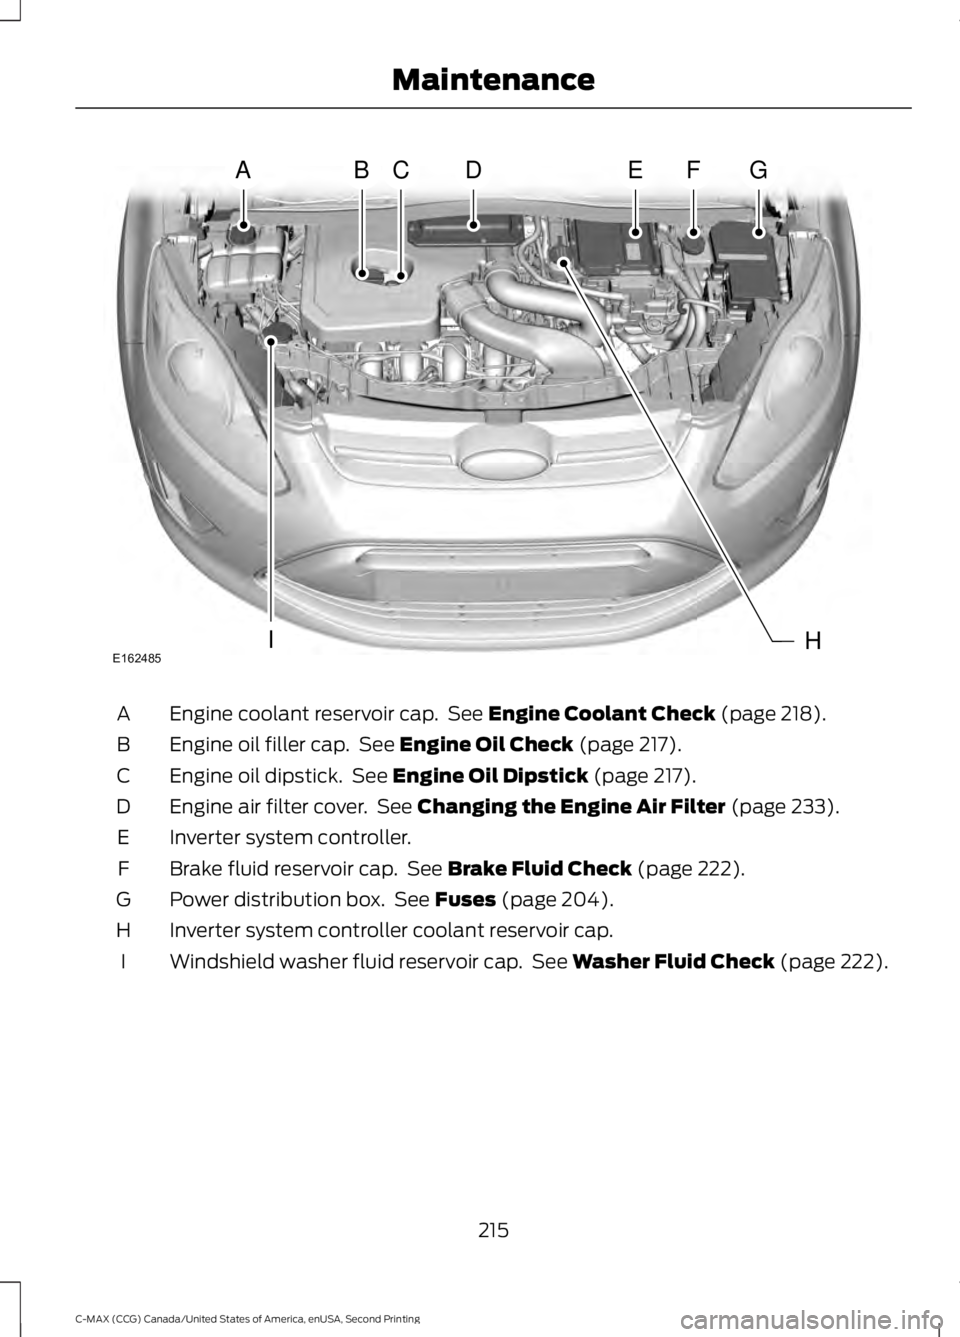
Engine coolant reservoir cap. See Engine Coolant Check (page 218).
A
Engine oil filler cap. See
Engine Oil Check (page 217).
B
Engine oil dipstick. See
Engine Oil Dipstick (page 217).
C
Engine air filter cover. See
Changing the Engine Air Filter (page 233).
D
Inverter system controller.
E
Brake fluid reservoir cap. See
Brake Fluid Check (page 222).
F
Power distribution box. See
Fuses (page 204).
G
Inverter system controller coolant reservoir cap.
H
Windshield washer fluid reservoir cap. See
Washer Fluid Check (page 222).
I
215
C-MAX (CCG) Canada/United States of America, enUSA, Second Printing MaintenanceABCDEFG
HIE162485
Page 219 of 469
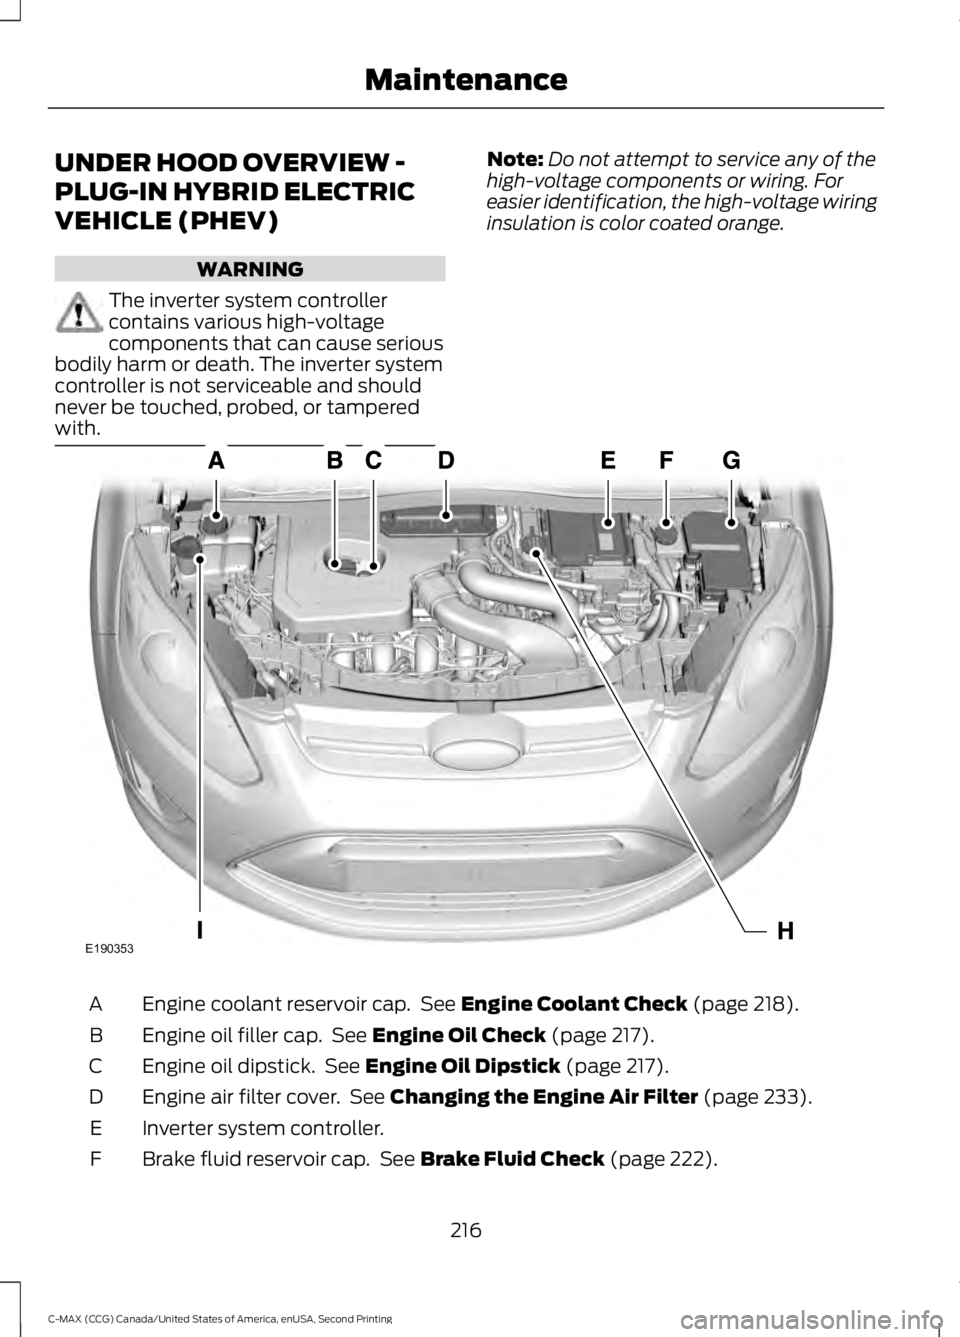
UNDER HOOD OVERVIEW -
PLUG-IN HYBRID ELECTRIC
VEHICLE (PHEV)
WARNING
The inverter system controller
contains various high-voltage
components that can cause serious
bodily harm or death. The inverter system
controller is not serviceable and should
never be touched, probed, or tampered
with. Note:
Do not attempt to service any of the
high-voltage components or wiring. For
easier identification, the high-voltage wiring
insulation is color coated orange. Engine coolant reservoir cap. See Engine Coolant Check (page 218).
A
Engine oil filler cap. See
Engine Oil Check (page 217).
B
Engine oil dipstick. See
Engine Oil Dipstick (page 217).
C
Engine air filter cover. See
Changing the Engine Air Filter (page 233).
D
Inverter system controller.
E
Brake fluid reservoir cap. See
Brake Fluid Check (page 222).
F
216
C-MAX (CCG) Canada/United States of America, enUSA, Second Printing MaintenanceE190353
Page 220 of 469
Power distribution box. See Fuses (page 204).
G
Inverter system controller coolant reservoir cap.
H
Windshield washer fluid reservoir cap. See
Washer Fluid Check (page 222).
I
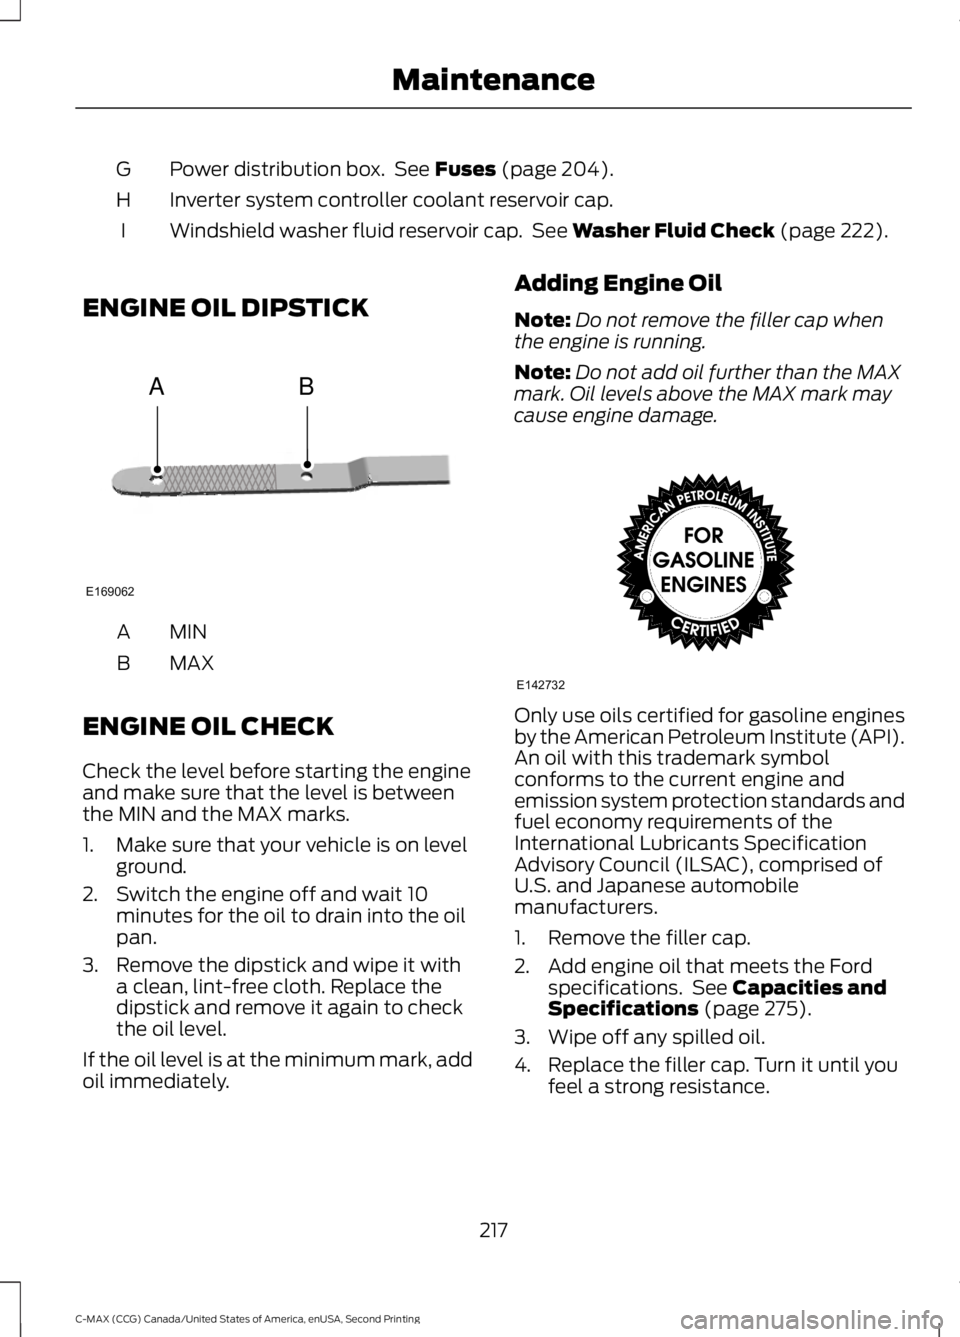
ENGINE OIL DIPSTICK MINA
MAX
B
ENGINE OIL CHECK
Check the level before starting the engine
and make sure that the level is between
the MIN and the MAX marks.
1. Make sure that your vehicle is on level ground.
2. Switch the engine off and wait 10 minutes for the oil to drain into the oil
pan.
3. Remove the dipstick and wipe it with a clean, lint-free cloth. Replace the
dipstick and remove it again to check
the oil level.
If the oil level is at the minimum mark, add
oil immediately. Adding Engine Oil
Note:
Do not remove the filler cap when
the engine is running.
Note: Do not add oil further than the MAX
mark. Oil levels above the MAX mark may
cause engine damage. Only use oils certified for gasoline engines
by the American Petroleum Institute (API).
An oil with this trademark symbol
conforms to the current engine and
emission system protection standards and
fuel economy requirements of the
International Lubricants Specification
Advisory Council (ILSAC), comprised of
U.S. and Japanese automobile
manufacturers.
1. Remove the filler cap.
2. Add engine oil that meets the Ford
specifications. See
Capacities and
Specifications (page 275).
3. Wipe off any spilled oil.
4. Replace the filler cap. Turn it until you feel a strong resistance.
217
C-MAX (CCG) Canada/United States of America, enUSA, Second Printing MaintenanceAB
E169062 E142732