ECO mode FORD C MAX 2015 Service Manual
[x] Cancel search | Manufacturer: FORD, Model Year: 2015, Model line: C MAX, Model: FORD C MAX 2015Pages: 469, PDF Size: 6.16 MB
Page 198 of 469
2. Start the disabled vehicle. Check the
instrument cluster for the Ready to
Drive light as the gasoline engine may
not start, but the electric motor may
be running.
3. Once you start the disabled vehicle, run
both vehicles for an additional three
minutes before disconnecting the
jumper cables.
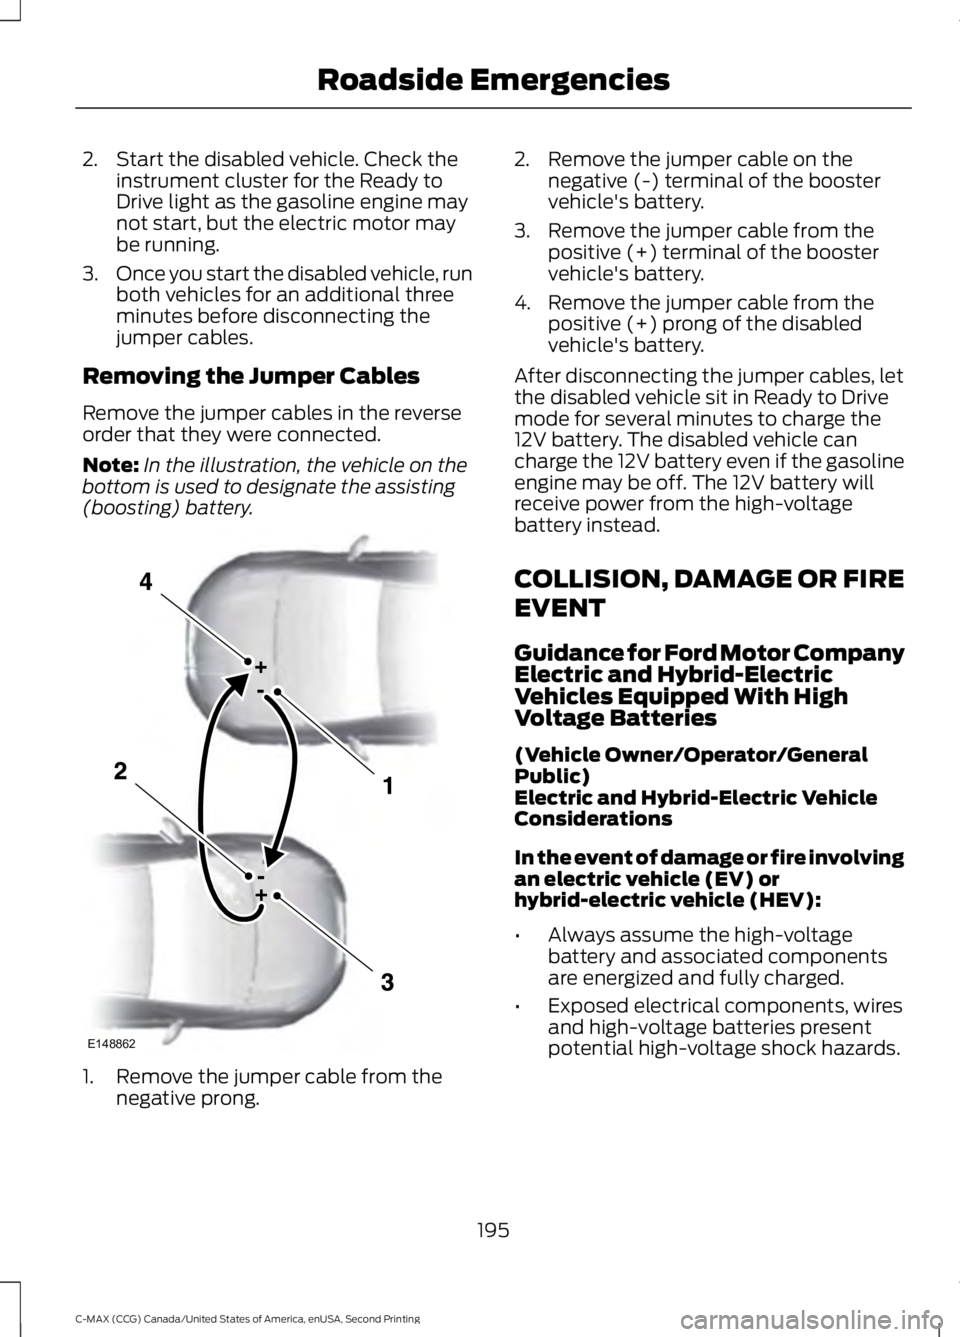
Removing the Jumper Cables
Remove the jumper cables in the reverse
order that they were connected.
Note: In the illustration, the vehicle on the
bottom is used to designate the assisting
(boosting) battery. 1. Remove the jumper cable from the
negative prong. 2. Remove the jumper cable on the
negative (-) terminal of the booster
vehicle's battery.
3. Remove the jumper cable from the positive (+) terminal of the booster
vehicle's battery.
4. Remove the jumper cable from the positive (+) prong of the disabled
vehicle's battery.
After disconnecting the jumper cables, let
the disabled vehicle sit in Ready to Drive
mode for several minutes to charge the
12V battery. The disabled vehicle can
charge the 12V battery even if the gasoline
engine may be off. The 12V battery will
receive power from the high-voltage
battery instead.
COLLISION, DAMAGE OR FIRE
EVENT
Guidance for Ford Motor Company
Electric and Hybrid-Electric
Vehicles Equipped With High
Voltage Batteries
(Vehicle Owner/Operator/General
Public)
Electric and Hybrid-Electric Vehicle
Considerations
In the event of damage or fire involving
an electric vehicle (EV) or
hybrid-electric vehicle (HEV):
• Always assume the high-voltage
battery and associated components
are energized and fully charged.
• Exposed electrical components, wires
and high-voltage batteries present
potential high-voltage shock hazards.
195
C-MAX (CCG) Canada/United States of America, enUSA, Second Printing Roadside EmergenciesE148862
Page 199 of 469
•
Venting/off-gassing high-voltage
battery vapors are potentially toxic and
flammable.
• Physical damage to the vehicle or
high-voltage battery may result in
immediate or delayed release of toxic,
flammable gases and fire.
Vehicle Information and General
Safety Practices
• Know the make and model of your
vehicle.
• Review the owner ’s manual and
become familiar with your vehicle ’s
safety information and recommended
safety practices.
• Do not attempt to repair damaged
electric and hybrid-electric vehicles
yourself. Contact an authorized Ford
Dealer or vehicle manufacturer
representative for service.
Crashes
A crash or impact significant enough to
require an emergency response for
conventional vehicles would also require
the same response for an electric or
hybrid-electric vehicle.
If possible
• Move your car to a safe, nearby
location and remain on the scene.
• Roll down the windows before shutting
your vehicle off.
• Place your vehicle in Park, set the
parking brake, turn off the vehicle,
activate the hazard lights, and move
your key(s) at least 16 feet (5 meters)
away from the vehicle. Always
•
Call 911 if assistance is needed and
advise that an electric or hybrid-electric
vehicle is involved.
• Do not touch exposed electrical
components or the engine
compartment, as a shock hazard may
exist.
• Avoid contact with leaking fluids and
gases, and remain out of the way of
oncoming traffic until emergency
responders arrive.
• When emergency responders arrive,
tell them that the vehicle involved is an
electric vehicle or hybrid vehicle.
Fires
As with any vehicle, call 911 immediately if
you see sparks, smoke or flames coming
from the vehicle.
• Exit the vehicle immediately.
• Advise 911 that an electric or
hybrid-electric vehicle is involved.
• As with any vehicle fire, do not inhale
smoke, vapors or gas from the vehicle,
as they may be hazardous.
• Remain a safe distance from the
vehicle and try to stay clear of the
smoke.
• Stay out of the roadway and stay out
of the way of any oncoming traffic
while awaiting the arrival of emergency
responders.
Post-Incident
• Do not store a severely damaged
vehicle with a lithium-ion battery inside
a structure or within 50 feet (15
meters) of any structure or vehicle.
• Make sure that passenger and cargo
compartments remain ventilated (i.e.
open window, door or trunk).
196
C-MAX (CCG) Canada/United States of America, enUSA, Second Printing Roadside Emergencies
Page 221 of 469
Low Engine Use (If Equipped)
The low engine use mode is equipped on
Energi models only. The low engine use
mode keeps the engine oil quality in good
condition when you drive your vehicle with
limited engine use. If your vehicle is in low
engine use mode when you start the
vehicle, a message appears in the
information display. When your vehicle is
in low engine use mode, your vehicle runs
the engine as necessary.
Selecting EV Now mode when your vehicle
is in the low engine use mode suspends
the low engine use mode for as long as you
continue driving your vehicle. The low
engine use mode resumes the next time
you start your vehicle.
Changing the engine oil and resetting the
oil life monitoring system suspends the low
engine use mode.
ENGINE COOLANT CHECK WARNINGS
Do not add engine coolant when the
engine is hot. Steam and scalding
liquids released from a hot cooling
system can burn you badly. Also, you can
be burned if you spill coolant on hot engine
parts. Do not put engine coolant in the
windshield washer fluid container. If
sprayed on the windshield, engine
coolant could make it difficult to see
through the windshield. To reduce the risk of personal injury,
make sure the engine is cool before
unscrewing the coolant pressure
relief cap. The cooling system is under
pressure; steam and hot liquid can come
out forcefully when the cap is loosened
slightly. Do not add coolant further than the
MAX
mark. Engine Coolant and Inverter
System Controller Coolant
Your vehicle has two separate cooling
systems. One is for cooling the engine and
one is for cooling the inverter system
controller that is specific to the hybrid
operating system. The two systems
operate similarly, with the inverter system
controller cooling system generally
operating at a lower temperature and
pressure.
Checking the Engine Coolant
When the engine is cold, check the
concentration and level of the engine
coolant at the intervals listed in the
scheduled maintenance information. See
Scheduled Maintenance
(page 420).
Note: Make sure that the level is between
the MIN and MAX marks on the engine
coolant reservoir.
Note: Coolant expands when it is hot. The
level may extend beyond the MAX mark.
Note: If the level is at the MIN mark, below
the MIN mark, or empty, add prediluted
coolant immediately. See
Adding Engine
Coolant in this chapter.
Maintain coolant concentration within
48% to 50%, which equates to a freeze
point between -30°F (-34°C) and -34°F
(-37°C).
Note: For best results, coolant
concentration should be tested with a
refractometer such as Robinair® Coolant
and Battery Refractometer 75240. We do
not recommend the use of hydrometers or
coolant test strips for measuring coolant
concentrations.
Note: Automotive fluids are not
interchangeable. Do not use engine coolant
or antifreeze or windshield washer fluid
outside of its specified function and vehicle
location.
218
C-MAX (CCG) Canada/United States of America, enUSA, Second Printing Maintenance
Page 224 of 469
Vehicles driven year-round in non-extreme
climates should use prediluted coolant
meeting the Ford specification for
optimum cooling system and engine
protection.
What You Should Know About Fail-
Safe Cooling
If the engine coolant supply is depleted,
this feature allows the vehicle to be driven
temporarily before incremental component
damage is incurred. The
“fail-safe”
distance depends on ambient
temperatures, vehicle load and terrain.
How Fail-Safe Cooling Works
If the engine begins to overheat, the engine
coolant temperature gauge will move to
the red (hot) area and: The coolant temperature
warning light will illuminate.
The service engine soon
indicator will illuminate.
If the engine reaches a preset
over-temperature condition, the engine
will automatically switch to alternating
cylinder operation. Each disabled cylinder
acts as an air pump and cools the engine.
When this occurs the vehicle will still
operate. However:
• The engine power will be limited.
• The air conditioning system will be
disabled.
Continued operation will increase the
engine temperature and the engine will
completely shut down, causing steering
and braking effort to increase.
Once the engine temperature cools, the
engine can be re-started. Take your vehicle
to an authorized dealer as soon as possible
to minimize engine damage. When Fail-Safe Mode Is Activated WARNINGS
Fail-safe mode is for use during
emergencies only. Operate your
vehicle in fail-safe mode only as long
as necessary to bring your vehicle to rest
in a safe location and seek immediate
repairs. When in fail-safe mode, your
vehicle will have limited power, will not be
able to maintain high-speed operation, and
may completely shut down without
warning, potentially losing engine power,
power steering assist, and power brake
assist, which may increase the possibility
of a crash resulting in serious injury. Never remove the coolant reservoir
cap while the engine is running or hot.
Note:
Driving the vehicle without repairing
the engine problem increases the chance of
engine damage. Take your vehicle to an
authorized dealer as soon as possible.
You have limited engine power when in the
fail-safe mode, so drive the vehicle with
caution. The vehicle will not be able to
maintain high-speed operation and the
engine will run rough. Remember that the
engine is capable of completely shutting
down automatically to prevent engine
damage, therefore:
1. Pull off the road as soon as safely possible and turn off the engine.
2. Arrange for the vehicle to be taken to an authorized dealer.
3. If this is not possible, wait a short period for the engine to cool.
4. Check the coolant level and replenish if low.
5. Re-start the engine and take your vehicle to an authorized dealer.
221
C-MAX (CCG) Canada/United States of America, enUSA, Second Printing Maintenance
Page 227 of 469

presets, are also maintained in memory by
power from the low voltage battery. When
a technician disconnects and connects the
low voltage battery, these settings are
erased. Complete the following procedure
in order to restore the settings:
1. With the vehicle at a complete stop,
set the parking brake.
2. Shift into park (P).
3. Switch off all accessories.
4. Fully press the brake pedal and start the vehicle.
5. Run the engine until it reaches normal operating temperature. While the
engine is warming up, complete the
following: Reset the clock. See Audio
System (page 282). Reset the power
windows bounce-back feature. See
Windows and Mirrors
(page 79).
Reset the radio station presets. See
Audio System
(page 282).
6. Allow the engine to idle for at least one
minute. If the engine turns off, press
the accelerator pedal to start the
engine.
7. While the engine is running, press the brake pedal and shift into neutral (N).
8. Allow the engine to run for at least one
minute by pressing on the accelerator
pedal.
9. Drive the vehicle at least 12 mi (20 km)
to completely relearn the idle and fuel
trim strategy.
Note: If you do not allow the engine to
relearn the idle and fuel trim strategy, the
idle quality of your vehicle may be adversely
affected until the engine computer
eventually relearns the idle trim and fuel
trim strategy.
Make sure that you dispose of old batteries
in an environmentally friendly way. Seek
advice from your local authority about
recycling old batteries. CHECKING THE WIPER
BLADES
Run the tip of your fingers over the edge of
the blade to check for roughness.
Clean the wiper blades with washer fluid
or water applied with a soft sponge or
cloth.
CHANGING THE WIPER
BLADES
Note:
Use the service position in winter to
provide easier access to the front wiper
blades for freeing them from snow and ice.
The front wipers will not return to their
normal position as soon as you switch on
the ignition. The front wipers will stay in the
service position when you switch the ignition
on or start the engine. Switch on the front
wipers to any mode, then switch off the
front wipers to bring the front wipers back
to the park position.
Note: The windshield wiper blades are
different in length. If you install wiper blades
of the wrong length, the wipers may not
work correctly. If equipped with autowipers,
the rain sensor may not work correctly.
Note: Make sure that the wiper blade locks
into place. Lower the wiper arm and blade
back to the windshield. The wiper arms will
automatically return to their normal position
when the ignition is turned on.
Note: Replace wiper blades at least once
per year for optimum performance.
224
C-MAX (CCG) Canada/United States of America, enUSA, Second Printing MaintenanceE142463
Page 280 of 469
VEHICLE IDENTIFICATION
NUMBER
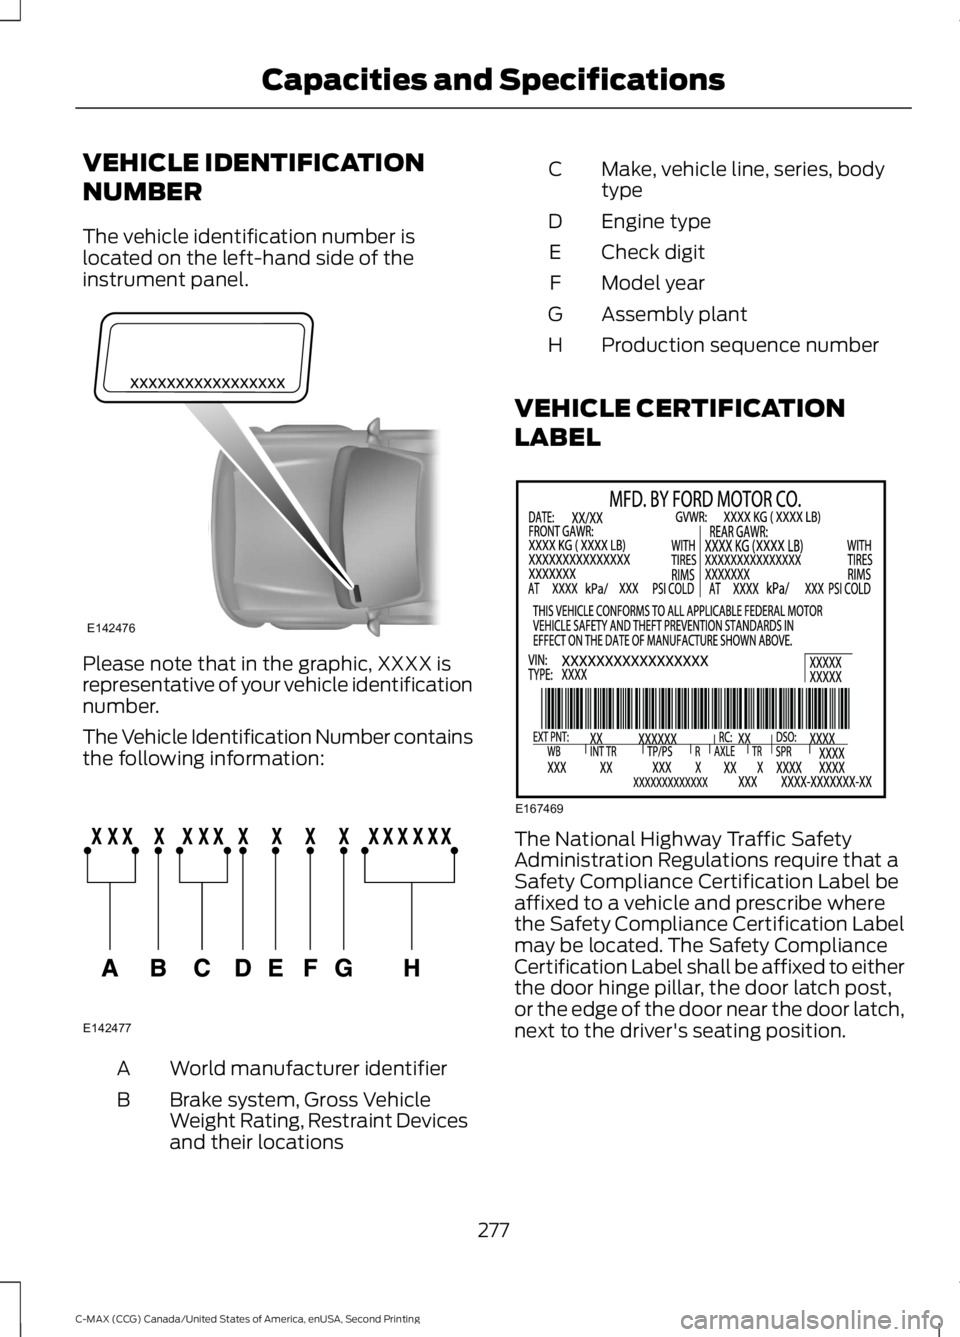
The vehicle identification number is
located on the left-hand side of the
instrument panel.
Please note that in the graphic, XXXX is
representative of your vehicle identification
number.
The Vehicle Identification Number contains
the following information:
World manufacturer identifier
A
Brake system, Gross Vehicle
Weight Rating, Restraint Devices
and their locations
B Make, vehicle line, series, body
type
C
Engine type
D
Check digit
E
Model year
F
Assembly plant
G
Production sequence number
H
VEHICLE CERTIFICATION
LABEL The National Highway Traffic Safety
Administration Regulations require that a
Safety Compliance Certification Label be
affixed to a vehicle and prescribe where
the Safety Compliance Certification Label
may be located. The Safety Compliance
Certification Label shall be affixed to either
the door hinge pillar, the door latch post,
or the edge of the door near the door latch,
next to the driver's seating position.
277
C-MAX (CCG) Canada/United States of America, enUSA, Second Printing Capacities and SpecificationsE142476 E142477 E167469
Page 285 of 469
GENERAL INFORMATION
Radio Frequencies and Reception
Factors
AM and FM frequencies are established by
the Federal Communications Commission
(FCC) and the Canadian Radio and
Telecommunications Commission (CRTC).
Those frequencies are:
•
AM: 530, 540-1700, 1710 kHz
• FM: 87.9-107.7, 107.9 MHz Radio Reception Factors
The further you travel from an AM or FM station, the
weaker the signal and the weaker the reception.
Distance and strength
Hills, mountains, tall buildings, bridges, tunnels, freeway
overpasses, parking garages, dense tree foliage and
thunderstorms can interfere with the reception.
Terrain
When you pass a ground-based broadcast repeating
tower, a stronger signal may overtake a weaker one and
result in the audio system muting.
Station overload
CD and CD Player Information
Note: CD units play commercially pressed
4.75-inch (12 centimeter) audio compact
discs only. Due to technical incompatibility,
certain recordable and re-recordable
compact discs may not function correctly
when used in Ford CD players.
Note: Do not insert CDs with homemade
paper (adhesive) labels into the CD player
as the label may peel and cause the CD to
become jammed. You should use a
permanent felt tip marker rather than
adhesive labels on your homemade CDs.
Ballpoint pens may damage CDs. Please
contact an authorized dealer for further
information.
Note: Do not use any irregularly shaped
discs or discs with a scratch protection film
attached.
Always handle discs by their edges only.
Clean the disc with an approved CD
cleaner only. Wipe it from the center of the
disc toward the edge. Do not clean in a
circular motion. Do not expose discs to direct sunlight or
heat sources for extended periods.
MP3 Track and Folder Structure
Audio systems capable of recognizing and
playing MP3 individual tracks and folder
structures work as follows:
•
There are two different modes for MP3
disc playback: MP3 track mode
(system default) and MP3 folder
mode.
• MP3 track mode ignores any folder
structure on the MP3 disc. The player
numbers each MP3 track on the disc
(noted by the .mp3 file extension) from
T001 to a maximum of T255. The
maximum number of playable MP3
files may be less depending on the
structure of the CD and exact model
of radio present.
282
C-MAX (CCG) Canada/United States of America, enUSA, Second Printing Audio System
Page 286 of 469
•
MP3 folder mode represents a folder
structure consisting of one level of
folders. The CD player numbers all MP3
tracks on the disc (noted by the .mp3
file extension) and all folders
containing MP3 files, from F001
(folder) T001 (track) to F253 T255.
• Creating discs with only one level of
folders helps with navigation through
the disc files.
If you are burning your own MP3 discs, it is
important to understand how the system
reads the structures you create. While
various files may be present, (files with
extensions other than mp3), only files with
the .mp3 extension are played; other files
are ignored by the system. This enables
you to use the same MP3 disc for a variety
of tasks on your work computer, home
computer and your in-vehicle system.
In track mode, the system displays and
plays the structure as if it were only one
level deep (all .mp3 files play, regardless
of being in a specific folder). In folder
mode, the system only plays the .mp3 files
in the current folder. AUDIO UNIT - VEHICLES WITH:
AM/FM/CD/SYNC WARNING
Driving while distracted can result in
loss of vehicle control, crash and
injury. We strongly recommend that
you use extreme caution when using any
device that may take your focus off the
road. Your primary responsibility is the safe
operation of your vehicle. We recommend
against the use of any hand-held device
while driving and encourage the use of
voice-operated systems when possible.
Make sure you are aware of all applicable
local laws that may affect the use of
electronic devices while driving. Note:
You can operate your audio system
for up to one hour after you switch off the
ignition. Press the ON/OFF control to
operate the system with the ignition turned
off. The system automatically turns off after
one hour.
283
C-MAX (CCG) Canada/United States of America, enUSA, Second Printing Audio System
Page 287 of 469
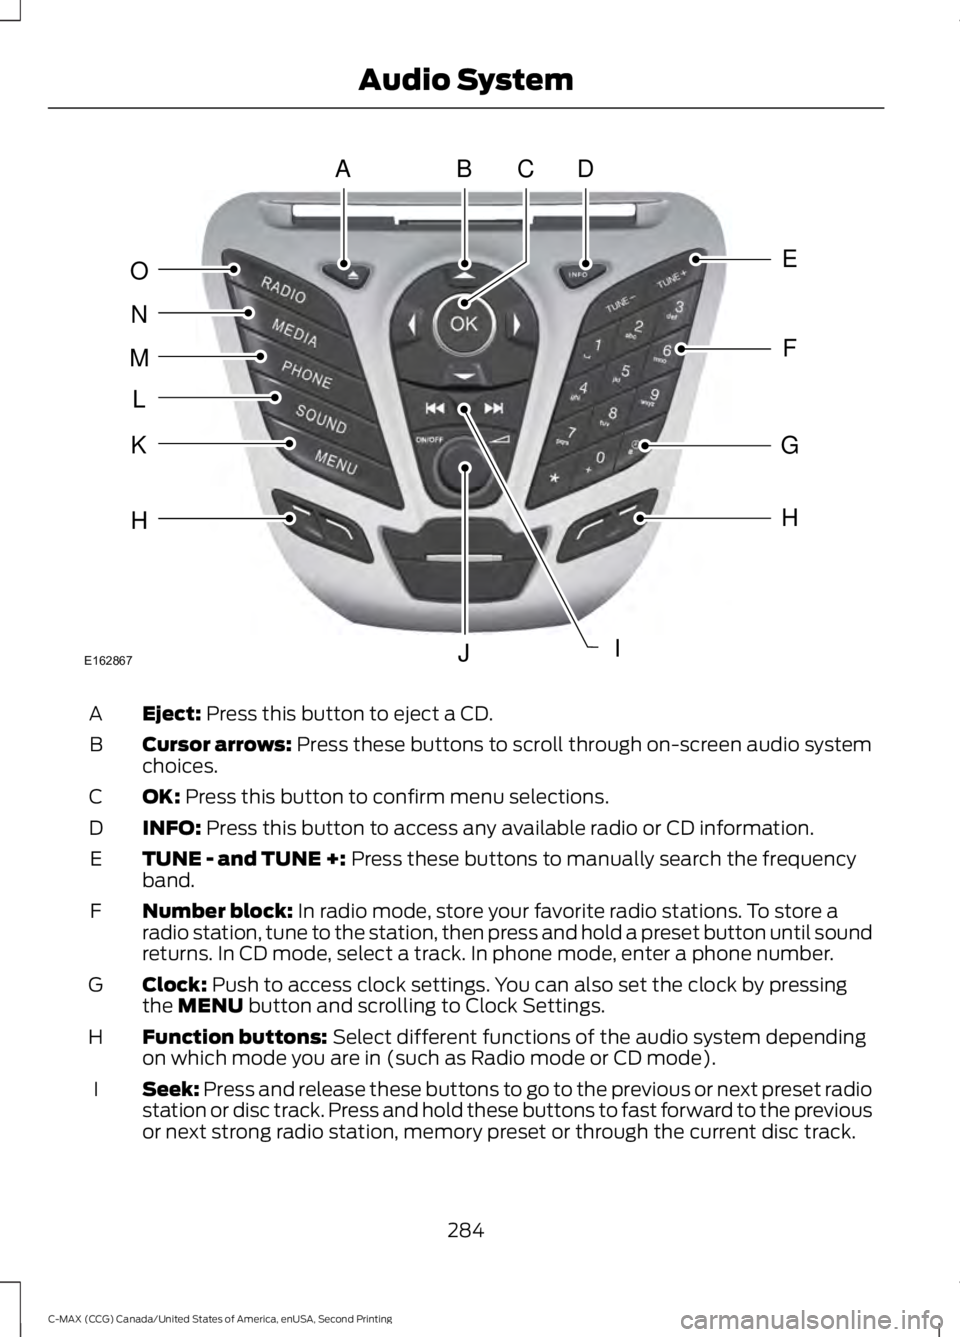
Eject: Press this button to eject a CD.
A
Cursor arrows:
Press these buttons to scroll through on-screen audio system
choices.
B
OK:
Press this button to confirm menu selections.
C
INFO:
Press this button to access any available radio or CD information.
D
TUNE - and TUNE +:
Press these buttons to manually search the frequency
band.
E
Number block:
In radio mode, store your favorite radio stations. To store a
radio station, tune to the station, then press and hold a preset button until sound
returns. In CD mode, select a track. In phone mode, enter a phone number.
F
Clock:
Push to access clock settings. You can also set the clock by pressing
the MENU button and scrolling to Clock Settings.
G
Function buttons:
Select different functions of the audio system depending
on which mode you are in (such as Radio mode or CD mode).
H
Seek:
Press and release these buttons to go to the previous or next preset radio
station or disc track. Press and hold these buttons to fast forward to the previous
or next strong radio station, memory preset or through the current disc track.
I
284
C-MAX (CCG) Canada/United States of America, enUSA, Second Printing Audio SystemABDC
E
F
G
H
IJ
H
K
L
M
N
O
E162867
Page 289 of 469
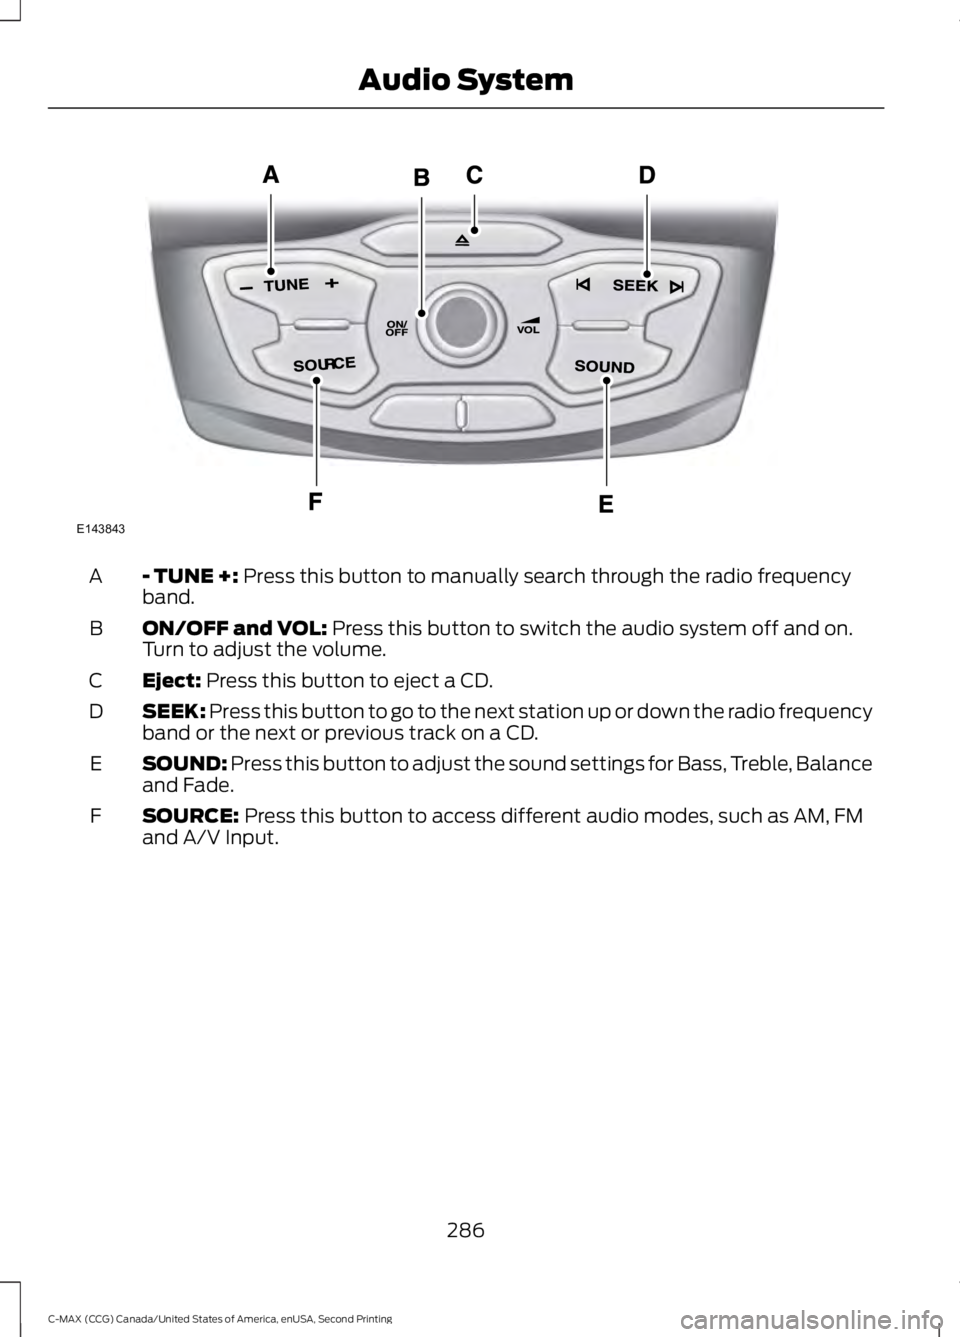
- TUNE +: Press this button to manually search through the radio frequency
band.
A
ON/OFF and VOL:
Press this button to switch the audio system off and on.
Turn to adjust the volume.
B
Eject:
Press this button to eject a CD.
C
SEEK:
Press this button to go to the next station up or down the radio frequency
band or the next or previous track on a CD.
D
SOUND:
Press this button to adjust the sound settings for Bass, Treble, Balance
and Fade.
E
SOURCE:
Press this button to access different audio modes, such as AM, FM
and A/V Input.
F
286
C-MAX (CCG) Canada/United States of America, enUSA, Second Printing Audio SystemE143843