reset FORD C MAX 2016 User Guide
[x] Cancel search | Manufacturer: FORD, Model Year: 2016, Model line: C MAX, Model: FORD C MAX 2016Pages: 395, PDF Size: 5.78 MB
Page 104 of 395
Note:
Fuel Economy will be impacted by
your use of brakes, accelerator and
accessories, as well as environmental
conditions such as hills and weather.
Note: Fuel economy is not always a
measure of appropriate driving behavior. For
example, when driving uphill and
maintaining an appropriate speed, your
instant fuel economy may not be good
(losing leaves) but the Coach may show a
blue bar for Acceleration and Cruising.
Common Displays
Both Average fuel economy and an
instantaneous fuel economy gauge are
included in Engage, Empower, MyView (if
selected) and Fuel Economy (shown in
Hybrid Mode) on the left information
display. They are also included in Fuel
History on the right information display.
Average Fuel Economy
Average Fuel Economy is continuously
averaged since the last reset. You can reset
your average fuel economy by pressing and
holding the OK button on the
corresponding steering wheel controls. For
Energi vehicles both Hybrid and Plug-in
Power mode operation will be included in
the calculation.
Note: Average fuel economy cannot be
reset in MyView.
Instantaneous Fuel Economy
If your instantaneous fuel economy is
greater than the maximum value
displayed, a + sign will be shown next to
the maximum scale number. When your
vehicle is operating on battery power only,
EV will display and the gauge fill will show
in blue. INFORMATION MESSAGES
Note:
Depending on the vehicle options
equipped with your vehicle, not all of the
messages display or are available. Certain
messages may be abbreviated or shortened
depending upon which cluster type you
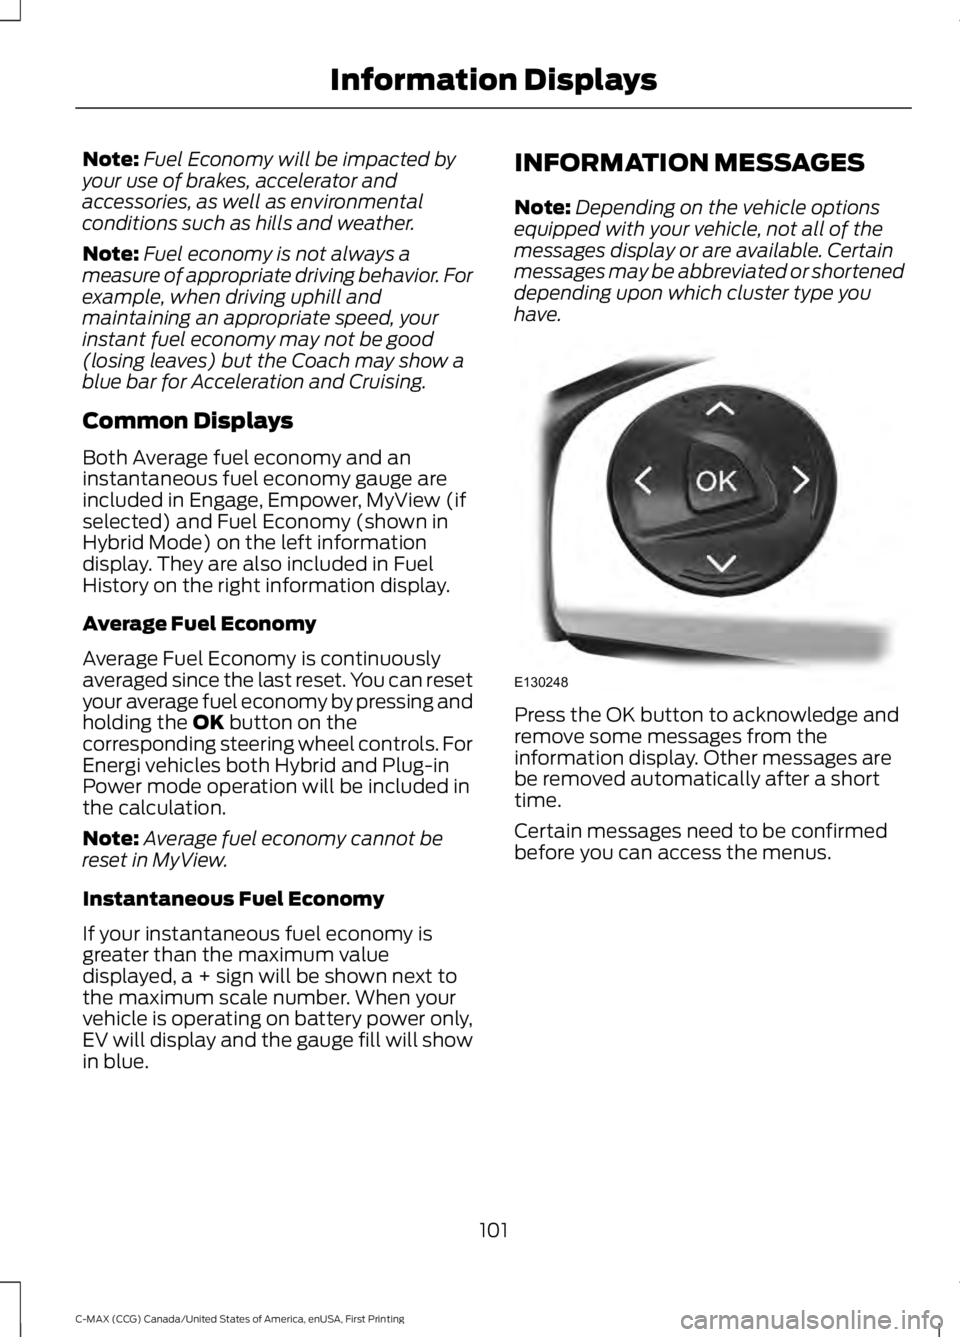
have. Press the OK button to acknowledge and
remove some messages from the
information display. Other messages are
be removed automatically after a short
time.
Certain messages need to be confirmed
before you can access the menus.
101
C-MAX (CCG) Canada/United States of America, enUSA, First Printing Information DisplaysE130248
Page 118 of 395
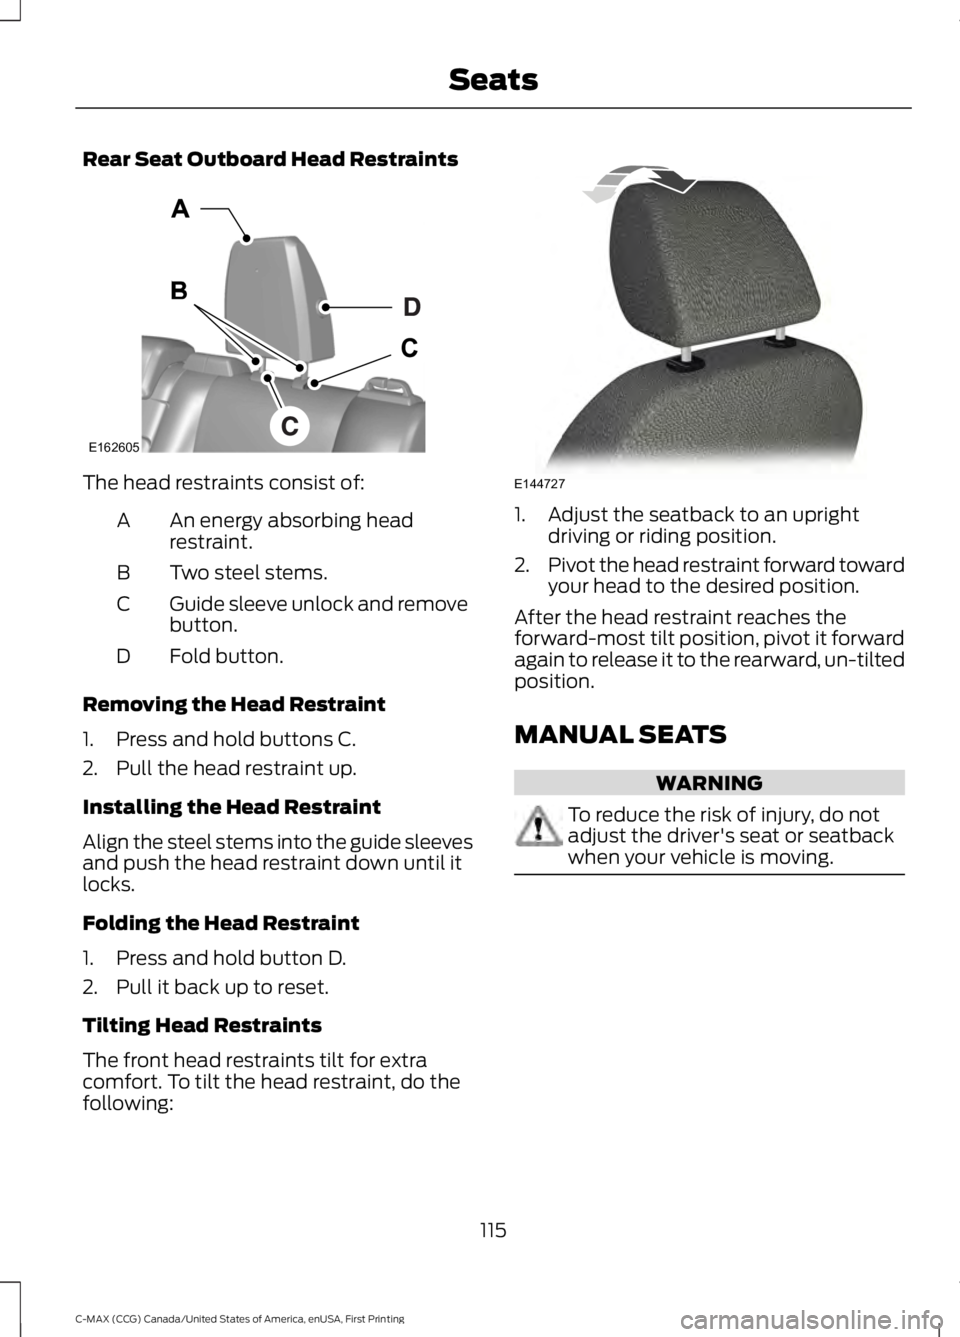
Rear Seat Outboard Head Restraints
The head restraints consist of:
An energy absorbing head
restraint.
A
Two steel stems.
B
Guide sleeve unlock and remove
button.
C
Fold button.
D
Removing the Head Restraint
1. Press and hold buttons C.
2. Pull the head restraint up.
Installing the Head Restraint
Align the steel stems into the guide sleeves
and push the head restraint down until it
locks.
Folding the Head Restraint
1. Press and hold button D.
2. Pull it back up to reset.
Tilting Head Restraints
The front head restraints tilt for extra
comfort. To tilt the head restraint, do the
following: 1. Adjust the seatback to an upright
driving or riding position.
2. Pivot the head restraint forward toward
your head to the desired position.
After the head restraint reaches the
forward-most tilt position, pivot it forward
again to release it to the rearward, un-tilted
position.
MANUAL SEATS WARNING
To reduce the risk of injury, do not
adjust the driver's seat or seatback
when your vehicle is moving.
115
C-MAX (CCG) Canada/United States of America, enUSA, First Printing SeatsE162605 E144727
Page 130 of 395
When the indicator light on the power point
is:
•
On: The power point is working, the
ignition is on and a device is plugged
in.
• Off: The power point is off, the ignition
is off or no device is plugged in.
• Flashing: The power point is in fault
mode.
The power outlet temporarily turns off
power when in fault mode if the device
exceeds the 150 watt limit. Unplug your
device and switch the ignition off. Switch
the ignition back on, but do not plug your
device back in. Let the system cool off and
switch the ignition off to reset the fault
mode. Switch the ignition back on and
make sure the indicator light remains on.
Do not use the power point for certain
electric devices, including:
• Cathode-ray, tube-type televisions.
• Motor loads, such as vacuum cleaners,
electric saws and other electric power
tools or compressor-driven
refrigerators.
• Measuring devices, which process
precise data, such as medical
equipment or measuring equipment.
• Other appliances requiring an
extremely stable power supply such as
microcomputer-controlled electric
blankets or touch-sensor lamps.
127
C-MAX (CCG) Canada/United States of America, enUSA, First Printing Auxiliary Power Points
Page 137 of 395
You can stop the shutdown, or reset the
timer, at any point before the 30-second
countdown has expired by doing any of the
following:
•
Interacting with your vehicle, for
example pressing the brake or
accelerator pedal.
• Disabling the shutdown using the
information display. See Information
Displays (page 93).
• Pressing the
OK or RESET button
during the 30-second countdown.
134
C-MAX (CCG) Canada/United States of America, enUSA, First Printing Starting and Stopping the Engine
Page 140 of 395
•
Keep the tires properly inflated and
only use the recommended size.
• Aggressive driving increases the
amount of energy required to move
your vehicle. In general, you can
achieve better fuel economy with mild
to moderate acceleration and
deceleration. Moderate braking is
particularly important since it allows
you to maximize the energy captured
by the regenerative braking system.
Additional Tips:
• Do not carry extra loads.
• Be mindful of adding external
accessories that may increase
aerodynamic drag.
• Observe posted speed limits.
• Perform all scheduled maintenance.
• There is no need to wait for your engine
to warm up. The vehicle is ready to
drive immediately after starting.
EV+ Mode
Your vehicle will recognize your frequent
destinations and allow for more EV driving
as you approach them. For example, when
nearing your home it should be easier to
stay in electric mode. The EV indicator will
display EV+ when this mode is active. You
should see this approximately 1/8 mile
(200 meters) from a frequent destination.
See Information Displays (page 93).
Note: Frequent destinations are learned by
your vehicle after two to four weeks of use.
To add a destination immediately, perform
the following process: cycle the ignition on
for 2 seconds, but do not start your vehicle,
then off for 2 seconds. Repeat the process
10 times. This location is now programmed
for EV+. You can clear these destinations
with a Driving History reset through the
Settings menu. Note:
You can switch the EV+ feature on
or off through the Driver Assist section of
the Settings menu.
PLUG-IN HYBRID VEHICLE
OPERATION
Plug-in Power Mode and Hybrid
Mode
You must plug in your Energi vehicle
regularly for optimal use of the high
voltage battery's extended range
capability. Charging your vehicle adds
electrical energy. This energy is used to
propel the vehicle in plug-in power mode.
Estimated electric range is shown in blue
next to gasoline range at the bottom of the
right information display. You can also
configure MyView to include detailed
vehicle range information. See
Gauges
(page 85).
The system maximizes the use of
electric-only operation in plug-in power
mode. System conditions may require
engine operation; however, the system
uses plug-in power whenever possible.
When your plug-in power is depleted, the
powertrain system will automatically
switch to hybrid mode. Your battery gauge
will transition to a simple battery graphic
upon entering hybrid mode. Hybrid mode
uses both the gasoline engine and electric
motor to power your vehicle and maximize
fuel economy.
EV Modes Your vehicle contains selectable
EV modes through the EV button
located on the center of the
instrument panel, below the climate
controls.
137
C-MAX (CCG) Canada/United States of America, enUSA, First Printing Unique Driving CharacteristicsE144814
Page 141 of 395
These modes are available when your
vehicle can run under high voltage battery
power. With your vehicle in driving mode,
you can change EV modes with each press
of the EV button. The current mode will be
displayed in the left-hand instrument
cluster screen.
Auto EV
This mode provides an
automatic use of high voltage
battery power during the drive,
staying in electric mode when possible and
running the engine when needed. This
mode will be the only one available if the
plug-in power has been depleted.
EV Now This mode provides an electric
only driving experience. The
left-hand information display
changes to a screen displaying your
average miles or kilometers per charge
along with EV specific tools and functions.
Your vehicle may accelerate more slowly
and the top speed may be lower in EV Now
mode than in Auto EV mode.
You can enable your engine at any time by
using one of the following methods:
1. Press the OK button on the left 5– way
steering wheel control while viewing
the miles or kilometers per charge
screen. Your vehicle will enable the
engine as needed, and will
automatically return to EV Now after
eight seconds or when the engine is no
longer needed.
2. Press the accelerator pedal fully. A pop
up message will appear. Press OK on
the left-hand steering wheel button to
activate as needed. The message will
disappear if you release the accelerator
pedal. 3. Press the EV button. This will change
the mode to EV Later and permit
engine operation.
Your vehicle may automatically enter
Engine Enabled mode if system conditions
require it. A engine enabled message will
display if this occurs. This is normal
function, and your vehicle will return to EV
Now when possible.
Your vehicle may enter Enable Engine
mode if the climate control is in a defrost
mode and the outside temperature is cold.
A engine enabled message will display if
this occurs. If defrost is not needed, select
a different climate control mode to permit
EV Now.
When you enable EV Now, a blue EV icon
displays in the left-hand information
display. If your vehicle is in the Engine
Enabled mode, the EV icon will be yellow.
EV Now will automatically exit when the
Plug in power has been depleted.
EV Later This mode saves most of the
high voltage battery plug in
power for future use (for
example, your initial drive is at high speeds
on open roads, but later your drive will be
at low speeds in an urban area where
plug-in power usage is most efficient).
Your vehicle will run the engine as needed
and keep most of the high voltage battery
plug in power for later use in Auto Mode or
EV Now mode.
When you enable EV Later, a white EV
Later icon appears on the left-hand
information display.
The EV Later mode will automatically reset
to EV Auto mode when you power your
vehicle off. You may press the EV button
twice during the next drive to return to EV
Later mode, if desired.
138
C-MAX (CCG) Canada/United States of America, enUSA, First Printing Unique Driving CharacteristicsE155152 E144814 E151263
Page 142 of 395
ECO Cruise
Note:
ECO Cruise is available as a separate
feature on Energi vehicles only. On non
plug-in vehicles it is included in EcoSelect.
This feature saves vehicle energy by
relaxing acceleration compared to
standard cruise control. For example, your
vehicle may temporarily lose speed when
going uphill. When set to on, ECO appears
in the information display when cruise
control is on.
You can switch it on or off in through the
information display. See General
Information (page 93). Settings
ECO Cruise
Driver Assist
Low Engine Use
The low engine use mode is equipped on
Energi models only. The Low Engine Use
mode maintains proper engine lubrication
at sufficient temperature, and will activate
automatically when you drive your vehicle
with limited engine operation. When your
vehicle is in low engine use mode, your
vehicle will automatically run the engine
as necessary. Note:
If your vehicle is in low engine use
mode when you start your vehicle, a
message will appear in the information
display. See
Information Messages (page
101).
If you select the EV Now mode while the
vehicle is in the low engine use mode, EV
Now mode will be suspended for as long
as you are in low engine use mode. The low
engine use mode will resume the next time
you start your vehicle and will
automatically stop when no longer needed.
Note: Cold temperatures will affect the
engine warm up time and the low engine
use mode may operate more frequently.
Note: An oil change is not required but gives
you the option of not running a low engine
use cycle. Resetting the oil life monitoring
system will suspend the low engine use
mode.
Fuel Freshness
See
Fuel Quality (page 144).
139
C-MAX (CCG) Canada/United States of America, enUSA, First Printing Unique Driving Characteristics
Page 150 of 395
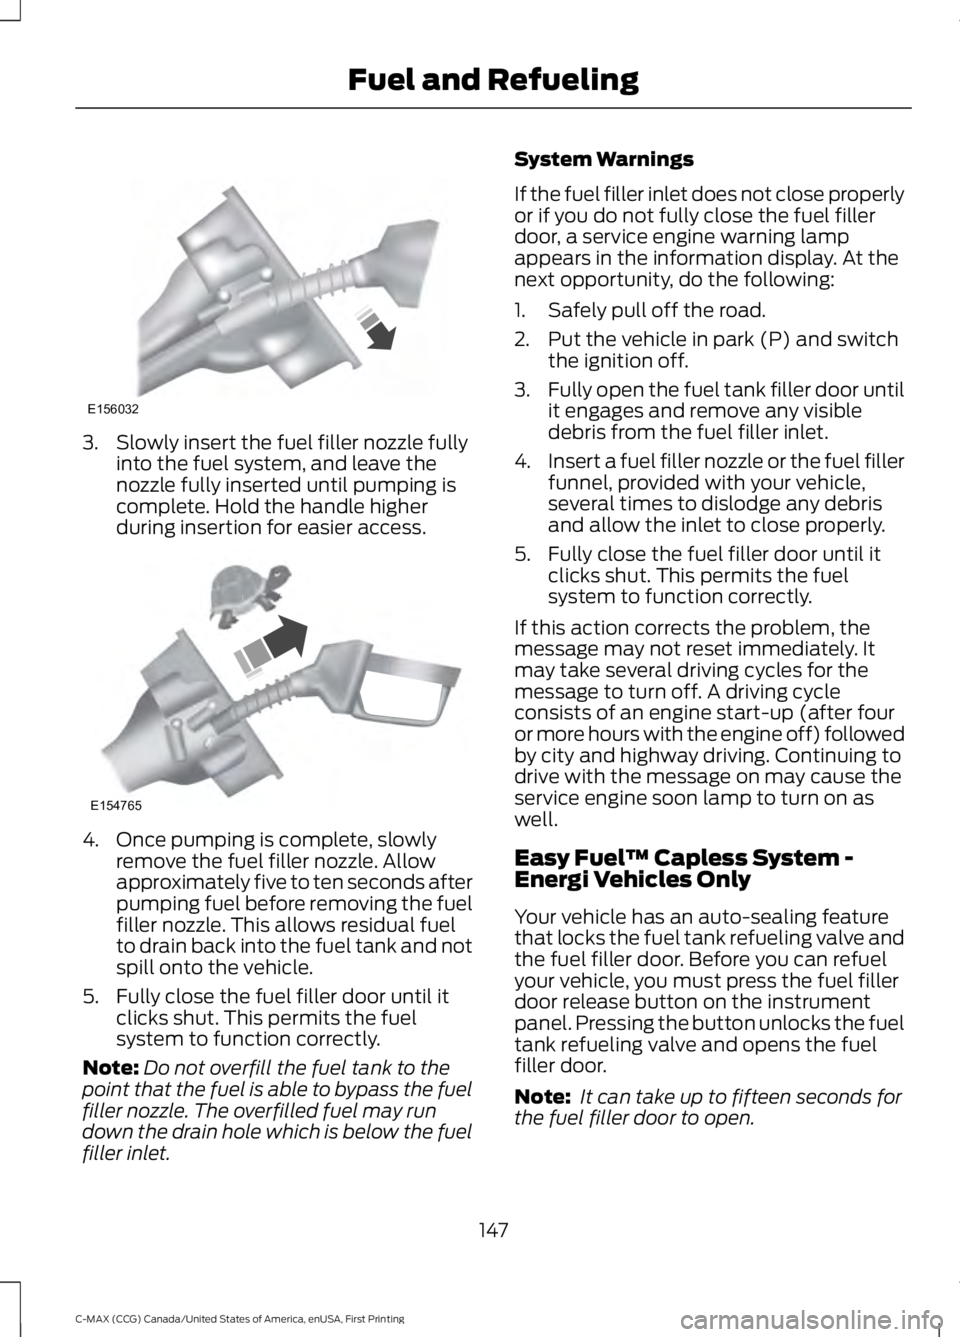
3. Slowly insert the fuel filler nozzle fully
into the fuel system, and leave the
nozzle fully inserted until pumping is
complete. Hold the handle higher
during insertion for easier access. 4. Once pumping is complete, slowly
remove the fuel filler nozzle. Allow
approximately five to ten seconds after
pumping fuel before removing the fuel
filler nozzle. This allows residual fuel
to drain back into the fuel tank and not
spill onto the vehicle.
5. Fully close the fuel filler door until it clicks shut. This permits the fuel
system to function correctly.
Note: Do not overfill the fuel tank to the
point that the fuel is able to bypass the fuel
filler nozzle. The overfilled fuel may run
down the drain hole which is below the fuel
filler inlet. System Warnings
If the fuel filler inlet does not close properly
or if you do not fully close the fuel filler
door, a service engine warning lamp
appears in the information display. At the
next opportunity, do the following:
1. Safely pull off the road.
2. Put the vehicle in park (P) and switch
the ignition off.
3. Fully open the fuel tank filler door until
it engages and remove any visible
debris from the fuel filler inlet.
4. Insert a fuel filler nozzle or the fuel filler
funnel, provided with your vehicle,
several times to dislodge any debris
and allow the inlet to close properly.
5. Fully close the fuel filler door until it clicks shut. This permits the fuel
system to function correctly.
If this action corrects the problem, the
message may not reset immediately. It
may take several driving cycles for the
message to turn off. A driving cycle
consists of an engine start-up (after four
or more hours with the engine off) followed
by city and highway driving. Continuing to
drive with the message on may cause the
service engine soon lamp to turn on as
well.
Easy Fuel ™ Capless System -
Energi Vehicles Only
Your vehicle has an auto-sealing feature
that locks the fuel tank refueling valve and
the fuel filler door. Before you can refuel
your vehicle, you must press the fuel filler
door release button on the instrument
panel. Pressing the button unlocks the fuel
tank refueling valve and opens the fuel
filler door.
Note: It can take up to fifteen seconds for
the fuel filler door to open.
147
C-MAX (CCG) Canada/United States of America, enUSA, First Printing Fuel and RefuelingE156032 E154765
Page 152 of 395
System Warnings
If the fuel filler inlet does not close properly
or if you do not fully close the fuel filler
door, a service engine warning lamp
appears in the information display. At the
next opportunity, do the following:
1. Safely pull off the road.
2. When your vehicle has stopped, shift
into park (P) and switch the ignition
off.
3. Press the refueling button on the center
console.
4. Fully open the fuel tank filler door until
it engages and remove any visible
debris from the fuel filler inlet.
5. Insert a fuel filler nozzle or the fuel filler
funnel, provided with your vehicle,
several times to dislodge any debris
and allow the inlet to close properly.
6. Fully close the fuel filler door until it clicks shut. This permits the fuel
system to function correctly.
If this action corrects the problem, the
message may not reset immediately. It
may take several driving cycles for the
message to turn off. A driving cycle
consists of an engine start-up (after four
or more hours with the engine off) followed
by city and highway driving. Continuing to
drive with the message on may cause the
service engine soon lamp to turn on as
well.
Using the Manual Fuel Filler Door
Release Lever
The manual fuel filler door release lever is
in the luggage compartment on the right
side behind a panel.
When using the manual fuel filler door
release lever to access the fuel filler inlet,
do the following:
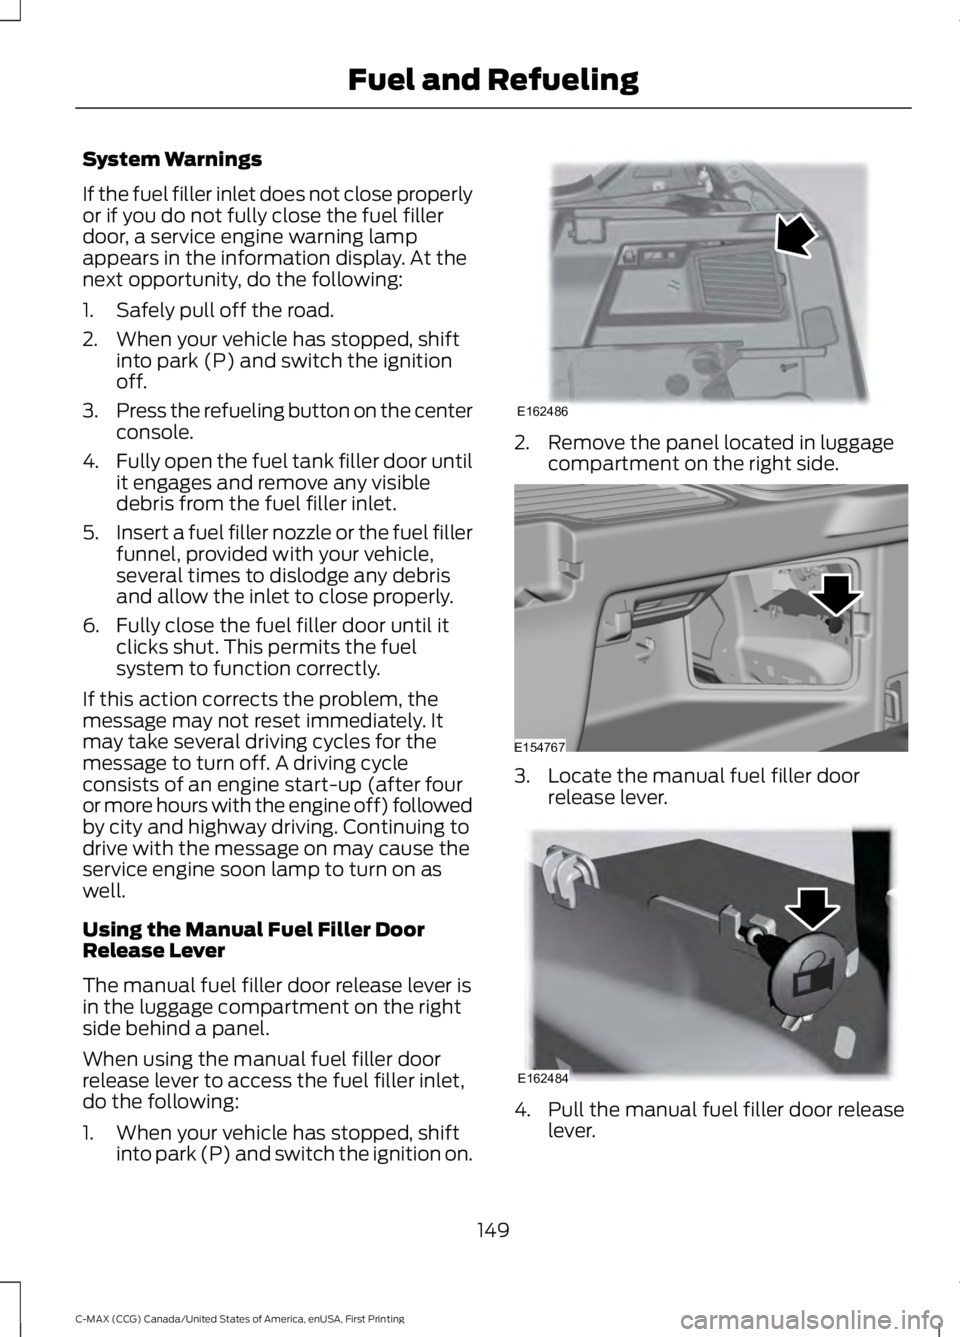
1. When your vehicle has stopped, shift into park (P) and switch the ignition on. 2. Remove the panel located in luggage
compartment on the right side. 3. Locate the manual fuel filler door
release lever. 4. Pull the manual fuel filler door release
lever.
149
C-MAX (CCG) Canada/United States of America, enUSA, First Printing Fuel and RefuelingE162486 E154767 E162484
Page 181 of 395
The fixed and active guidelines fade in and
out depending on the steering wheel
position. The active guidelines are not
shown when the steering wheel position
is straight.
Always use caution while reversing.
Objects in the red zone are closest to your
vehicle and objects in the green zone are
farther away. Objects are getting closer to
your vehicle as they move from the green
zone to the yellow or red zones. Use the
side view mirrors and rear view mirror to
get better coverage on both sides and rear
of your vehicle.
Enhanced Park Aids
Note:
The reverse sensing system is not
effective at speeds above 7 mph (12 km/h)
and may not detect certain angular or
moving objects.
When the sensing system detects an
object, it displays red, yellow and green
highlights at the top of the image. The alert
highlights all objects detected.
Selectable settings for this feature are ON
and OFF.
Manual Zoom WARNING
When manual zoom is on, the full
area behind your vehicle is not
shown. Be aware of your
surroundings when using the manual zoom
feature. Note:
Manual zoom is only available when
the transmission is in reverse (R).
Note: When manual zoom is enabled, only
the centerline is shown. This allows you to get a closer view of an
object behind your vehicle. The zoomed
image keeps the bumper in the image to
provide a reference. The zoom is only
active while the transmission is in reverse
(R). When the transmission is shifted out
of reverse (R), the feature automatically
turns off and must be reset when it is used
again.
Selectable settings for this feature are +
and -. The default setting for the manual
zoom is OFF.
Rear Camera Delay (If Equipped)
When you shift the transmission out of
reverse (R) and into any gear while the rear
camera delay is active, the camera image
displays until:
•
Your vehicle speed sufficiently
increases.
• You shift your vehicle into park (P).
Selectable settings for this feature are ON
and OFF. The default setting for the rear
camera delay is OFF.
178
C-MAX (CCG) Canada/United States of America, enUSA, First Printing Parking Aids