clock FORD C MAX ENERGI 2017 User Guide
[x] Cancel search | Manufacturer: FORD, Model Year: 2017, Model line: C MAX ENERGI, Model: FORD C MAX ENERGI 2017Pages: 497, PDF Size: 7.64 MB
Page 240 of 497
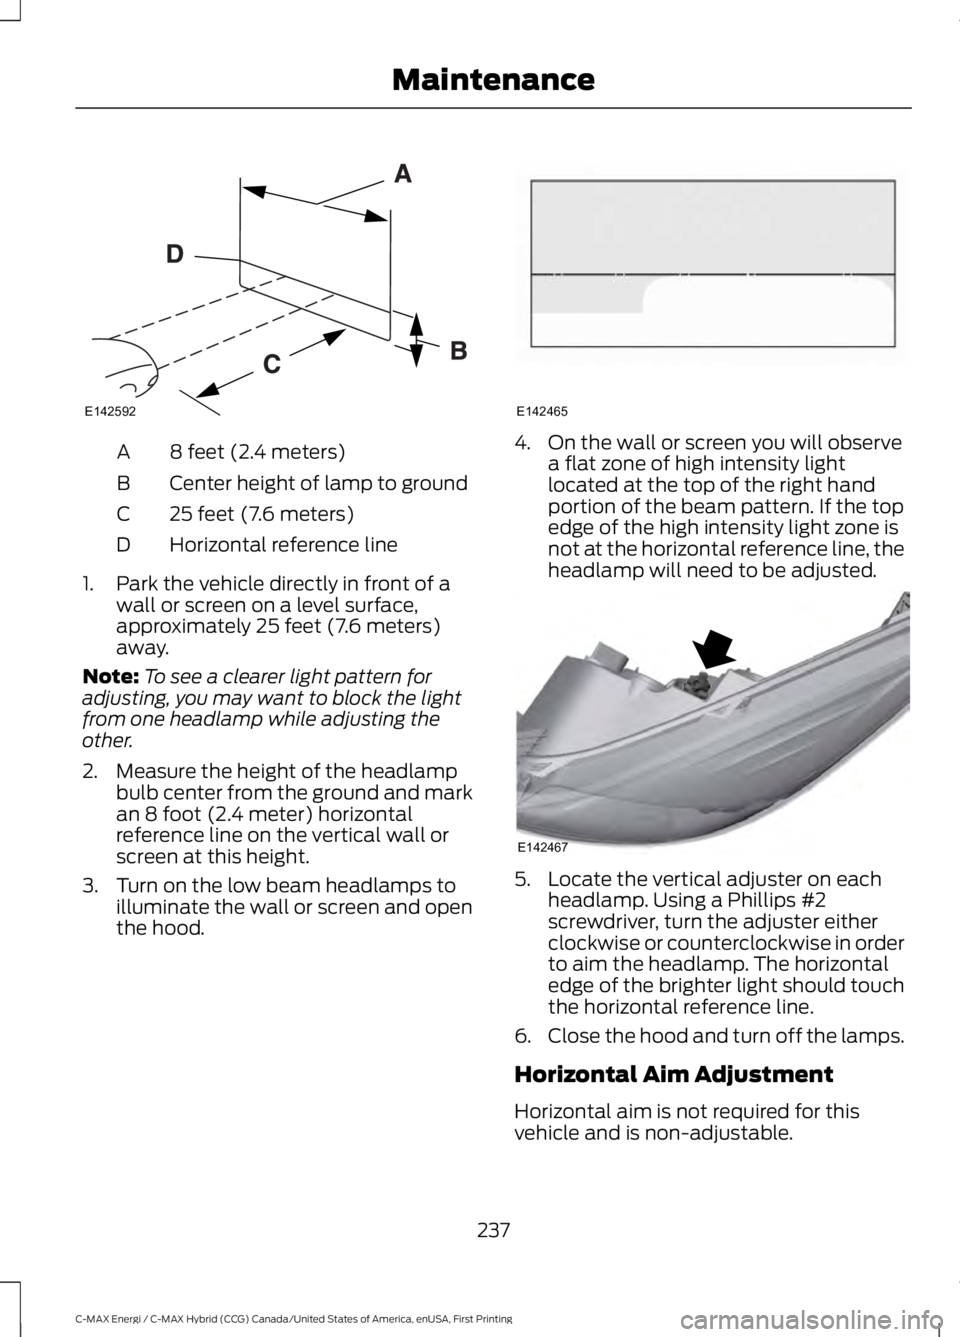
8 feet (2.4 meters)A
Center height of lamp to groundB
25 feet (7.6 meters)C
Horizontal reference lineD
1. Park the vehicle directly in front of awall or screen on a level surface,approximately 25 feet (7.6 meters)away.
Note:To see a clearer light pattern foradjusting, you may want to block the lightfrom one headlamp while adjusting theother.
2. Measure the height of the headlampbulb center from the ground and markan 8 foot (2.4 meter) horizontalreference line on the vertical wall orscreen at this height.
3. Turn on the low beam headlamps toilluminate the wall or screen and openthe hood.
4. On the wall or screen you will observea flat zone of high intensity lightlocated at the top of the right handportion of the beam pattern. If the topedge of the high intensity light zone isnot at the horizontal reference line, theheadlamp will need to be adjusted.
5. Locate the vertical adjuster on eachheadlamp. Using a Phillips #2screwdriver, turn the adjuster eitherclockwise or counterclockwise in orderto aim the headlamp. The horizontaledge of the brighter light should touchthe horizontal reference line.
6.Close the hood and turn off the lamps.
Horizontal Aim Adjustment
Horizontal aim is not required for thisvehicle and is non-adjustable.
237
C-MAX Energi / C-MAX Hybrid (CCG) Canada/United States of America, enUSA, First Printing
MaintenanceE142592 E142465 E142467
Page 241 of 497
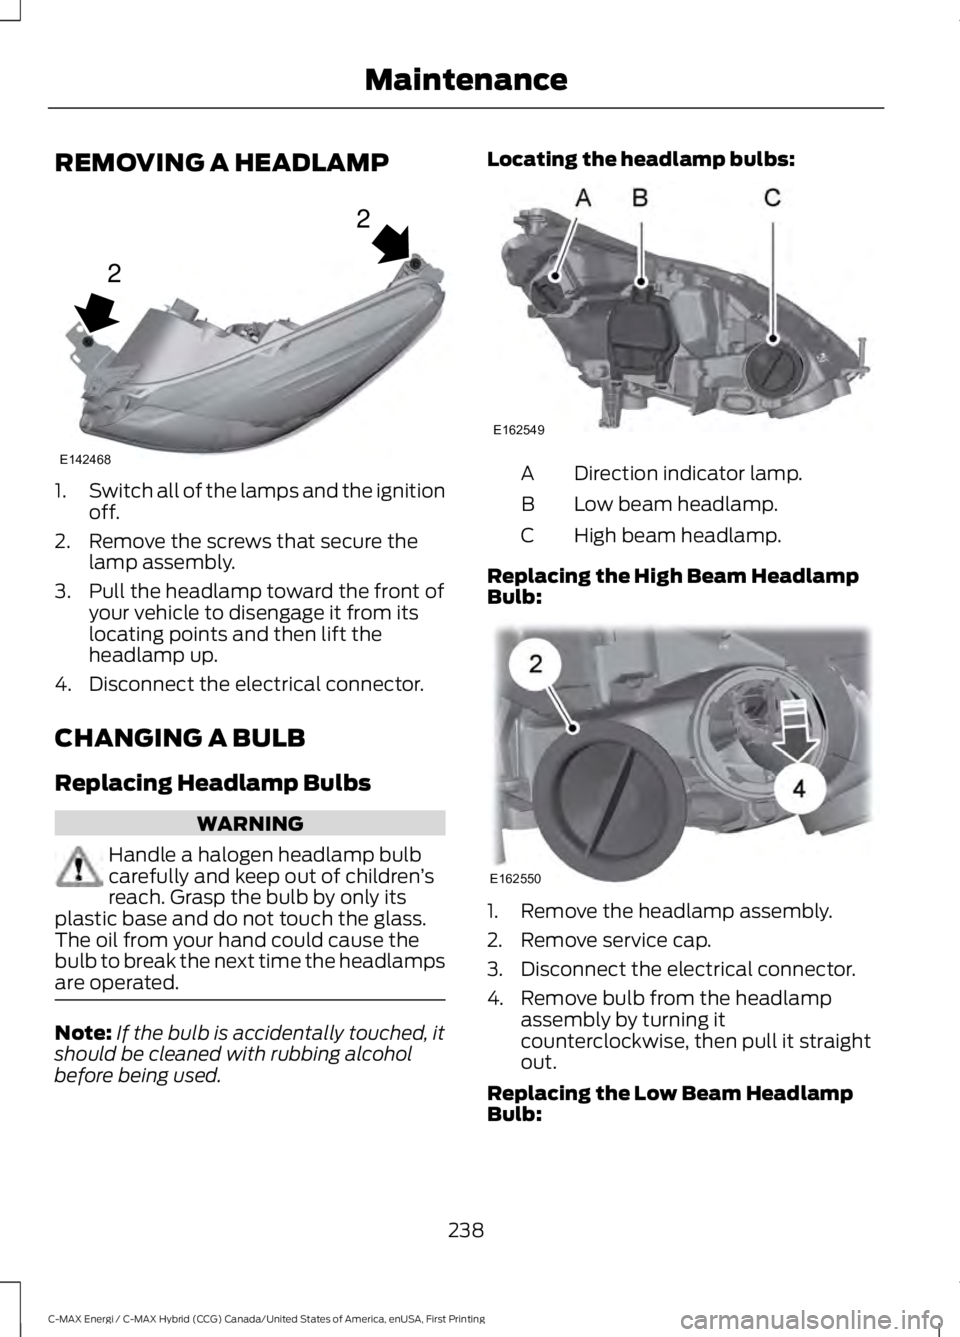
REMOVING A HEADLAMP
1.Switch all of the lamps and the ignitionoff.
2. Remove the screws that secure thelamp assembly.
3. Pull the headlamp toward the front ofyour vehicle to disengage it from itslocating points and then lift theheadlamp up.
4. Disconnect the electrical connector.
CHANGING A BULB
Replacing Headlamp Bulbs
WARNING
Handle a halogen headlamp bulbcarefully and keep out of children’sreach. Grasp the bulb by only itsplastic base and do not touch the glass.The oil from your hand could cause thebulb to break the next time the headlampsare operated.
Note:If the bulb is accidentally touched, itshould be cleaned with rubbing alcoholbefore being used.
Locating the headlamp bulbs:
Direction indicator lamp.A
Low beam headlamp.B
High beam headlamp.C
Replacing the High Beam HeadlampBulb:
1. Remove the headlamp assembly.
2. Remove service cap.
3. Disconnect the electrical connector.
4. Remove bulb from the headlampassembly by turning itcounterclockwise, then pull it straightout.
Replacing the Low Beam HeadlampBulb:
238
C-MAX Energi / C-MAX Hybrid (CCG) Canada/United States of America, enUSA, First Printing
Maintenance2
2
E142468 E162549 E162550
Page 242 of 497
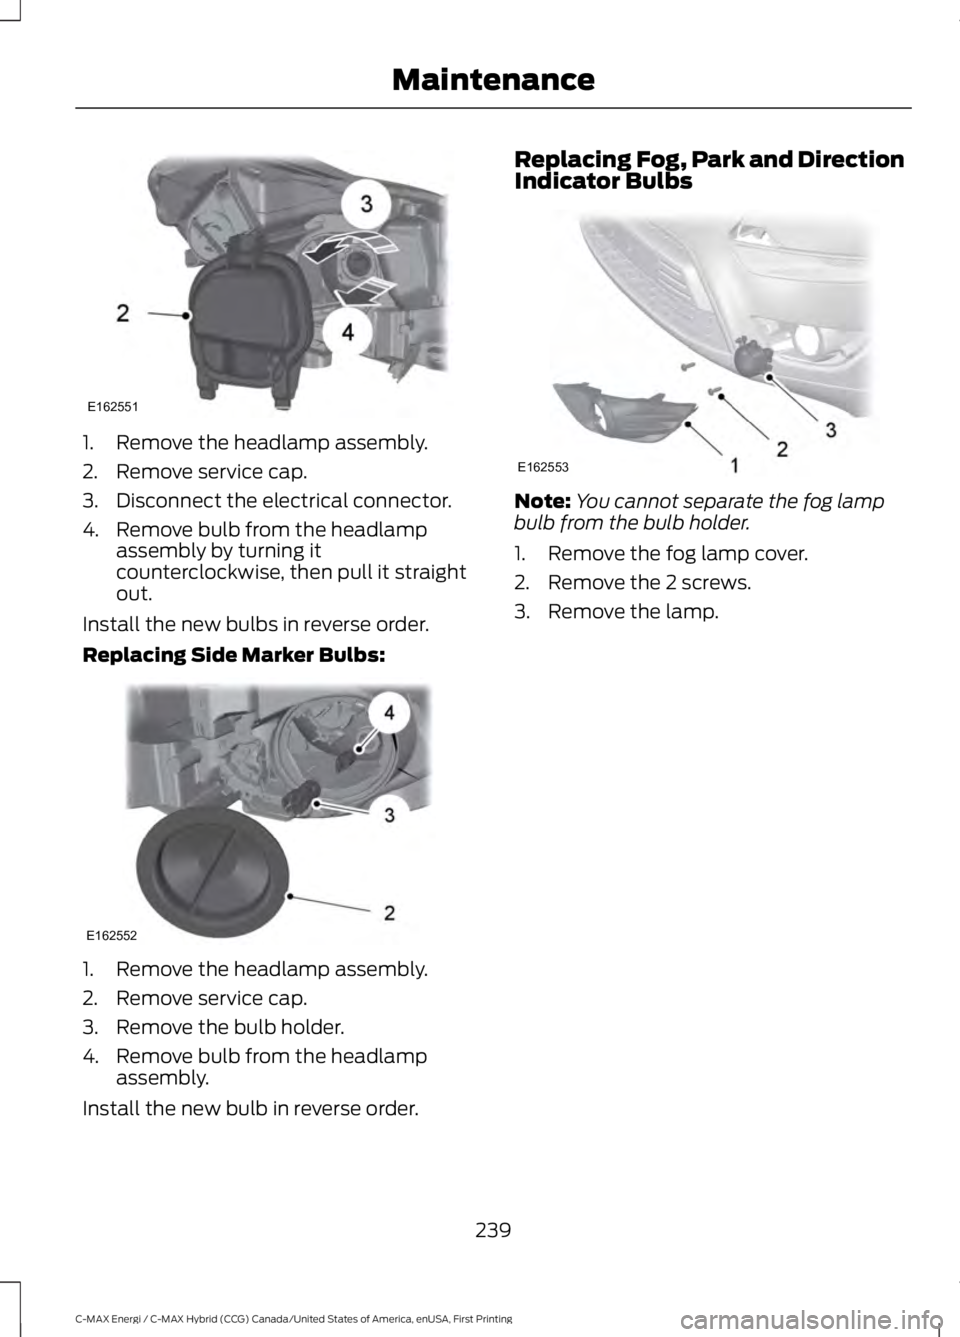
1. Remove the headlamp assembly.
2. Remove service cap.
3. Disconnect the electrical connector.
4. Remove bulb from the headlampassembly by turning itcounterclockwise, then pull it straightout.
Install the new bulbs in reverse order.
Replacing Side Marker Bulbs:
1. Remove the headlamp assembly.
2. Remove service cap.
3. Remove the bulb holder.
4. Remove bulb from the headlampassembly.
Install the new bulb in reverse order.
Replacing Fog, Park and DirectionIndicator Bulbs
Note:You cannot separate the fog lampbulb from the bulb holder.
1. Remove the fog lamp cover.
2. Remove the 2 screws.
3. Remove the lamp.
239
C-MAX Energi / C-MAX Hybrid (CCG) Canada/United States of America, enUSA, First Printing
MaintenanceE162551 E162552 E162553
Page 243 of 497
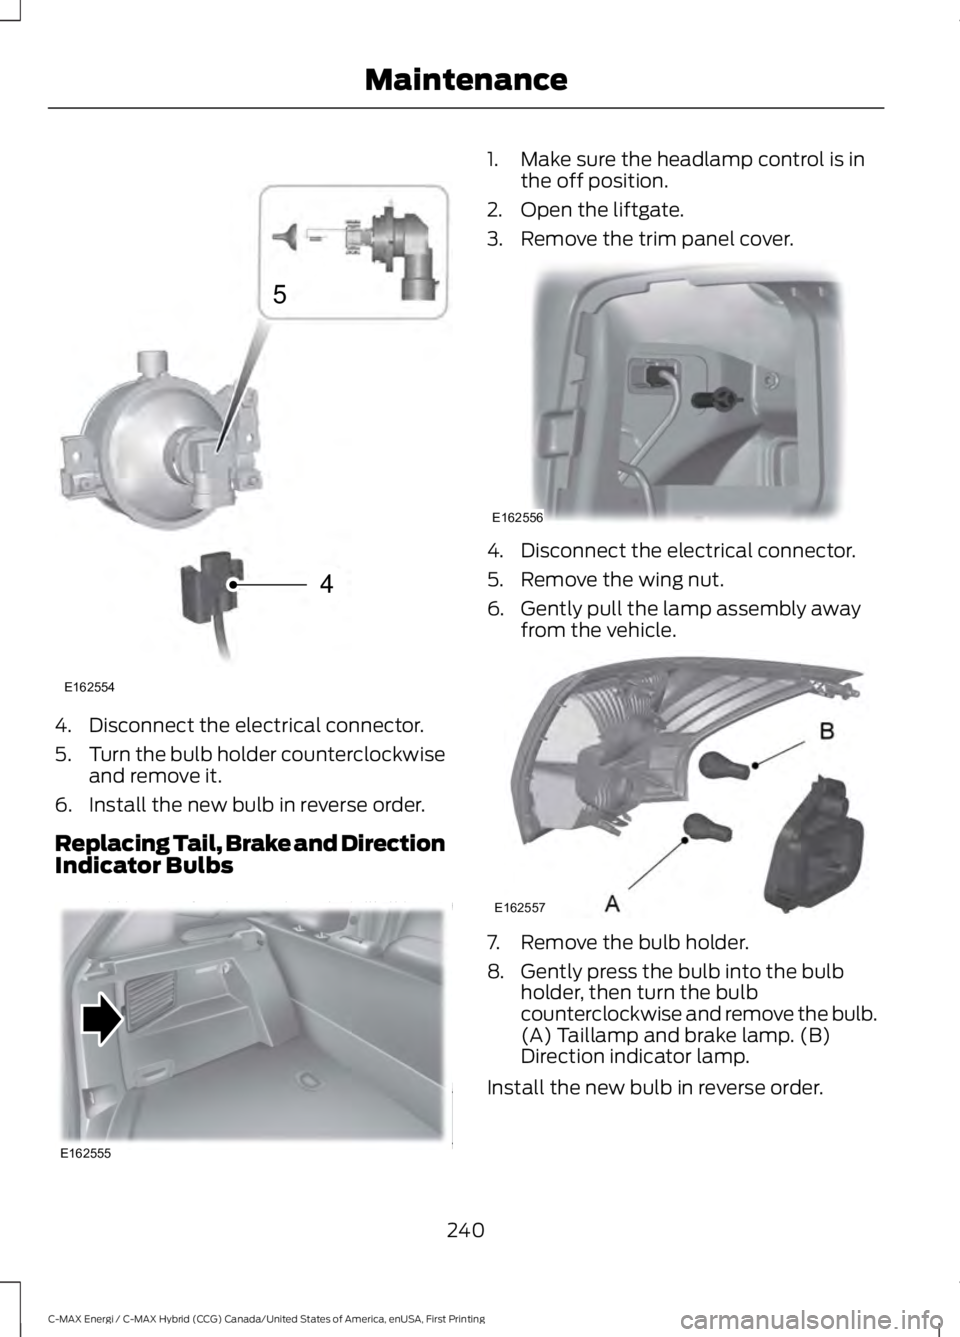
4. Disconnect the electrical connector.
5.Turn the bulb holder counterclockwiseand remove it.
6. Install the new bulb in reverse order.
Replacing Tail, Brake and DirectionIndicator Bulbs
1. Make sure the headlamp control is inthe off position.
2. Open the liftgate.
3. Remove the trim panel cover.
4. Disconnect the electrical connector.
5. Remove the wing nut.
6. Gently pull the lamp assembly awayfrom the vehicle.
7. Remove the bulb holder.
8. Gently press the bulb into the bulbholder, then turn the bulbcounterclockwise and remove the bulb.(A) Taillamp and brake lamp. (B)Direction indicator lamp.
Install the new bulb in reverse order.
240
C-MAX Energi / C-MAX Hybrid (CCG) Canada/United States of America, enUSA, First Printing
Maintenance4
5
E162554 E162555 E162556 E162557
Page 244 of 497
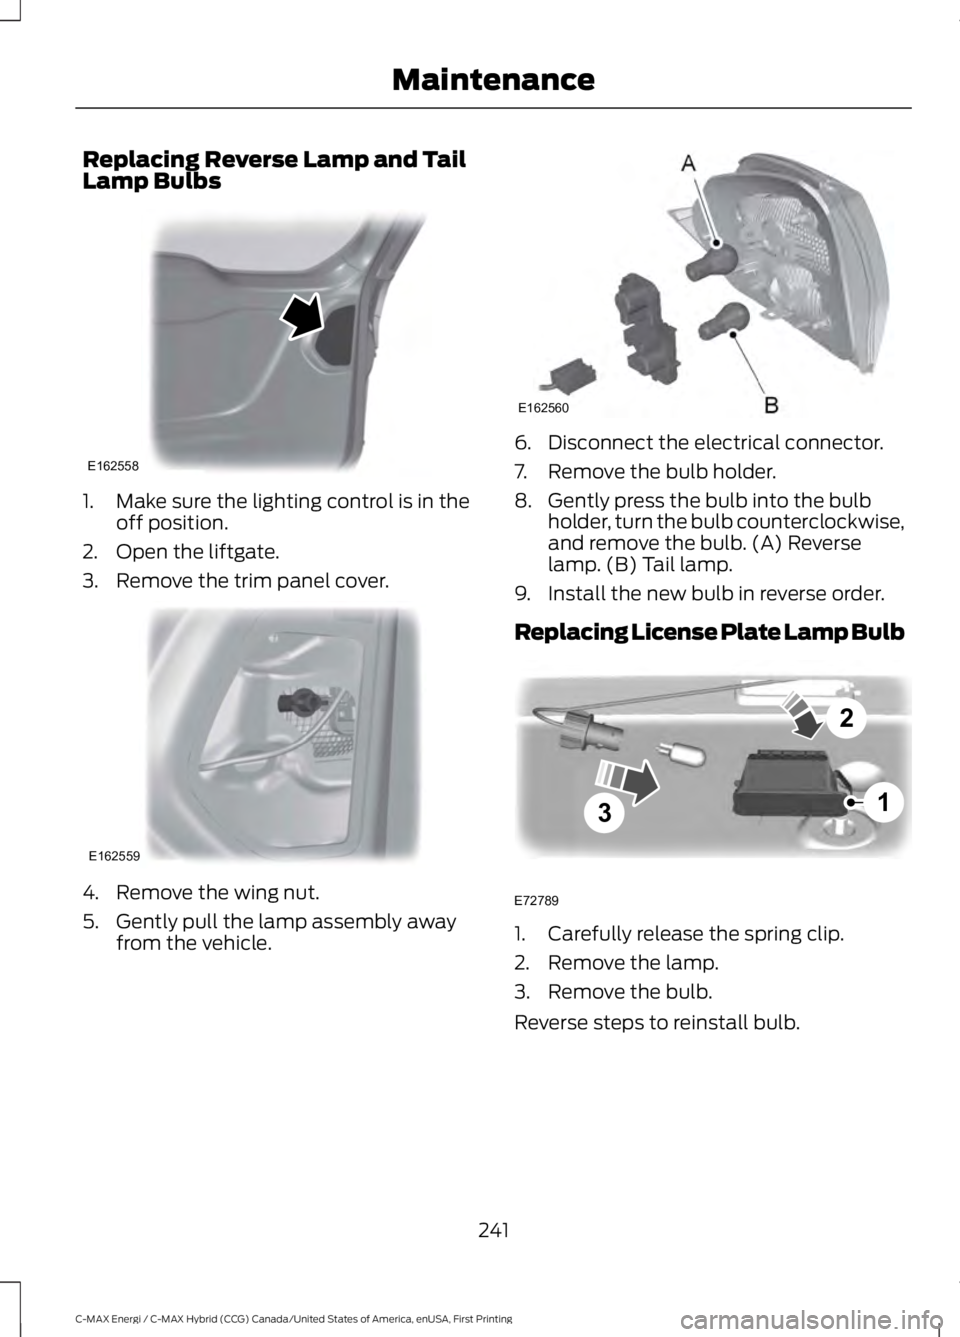
Replacing Reverse Lamp and TailLamp Bulbs
1. Make sure the lighting control is in theoff position.
2. Open the liftgate.
3. Remove the trim panel cover.
4. Remove the wing nut.
5. Gently pull the lamp assembly awayfrom the vehicle.
6. Disconnect the electrical connector.
7. Remove the bulb holder.
8. Gently press the bulb into the bulbholder, turn the bulb counterclockwise,and remove the bulb. (A) Reverselamp. (B) Tail lamp.
9. Install the new bulb in reverse order.
Replacing License Plate Lamp Bulb
1. Carefully release the spring clip.
2. Remove the lamp.
3. Remove the bulb.
Reverse steps to reinstall bulb.
241
C-MAX Energi / C-MAX Hybrid (CCG) Canada/United States of America, enUSA, First Printing
MaintenanceE162558 E162559 E162560 3
2
1
E72789
Page 260 of 497
* When inflation only is requiredfor a tire or other objects, theselector must be in the Airposition.
What to Do When a Tire IsPunctured
Repair a tire puncture within the tire's treadarea in two stages with the kit.
•In the first stage, inflate the tire with asealing compound and air. After youinflate the tire, you will need to drivethe vehicle a short distance (about 4miles [6 kilometers]) to distribute thesealant in the tire.
•In the second stage, check the tirepressure and adjust, if necessary, to thevehicle's specified tire inflationpressure.
First Stage: Inflating the Tire withSealing Compound and Air
WARNINGS
Do not stand directly over the kitwhile inflating the tire. If you noticeany unusual bulges or deformationsin the tire's sidewall during inflation, stopand call roadside assistance.
If the tire does not inflate to therecommended tire pressure within15 minutes, stop and call roadsideassistance.
Do not run the engine during kitoperation unless the vehicle isoutdoors or in a well-ventilated area.
Preparation: Park the vehicle in a safe, leveland secure area, away from moving traffic.
Switch the hazard lights on. Apply theparking brake and switch the engine off.Inspect the flat tire for visible damage.
Sealant compound contains latex. Useappropriate precautions to avoid anyallergic reactions.
Do not remove any foreign object that haspierced the tire. If a puncture is located inthe tire sidewall, stop and call roadsideassistance.
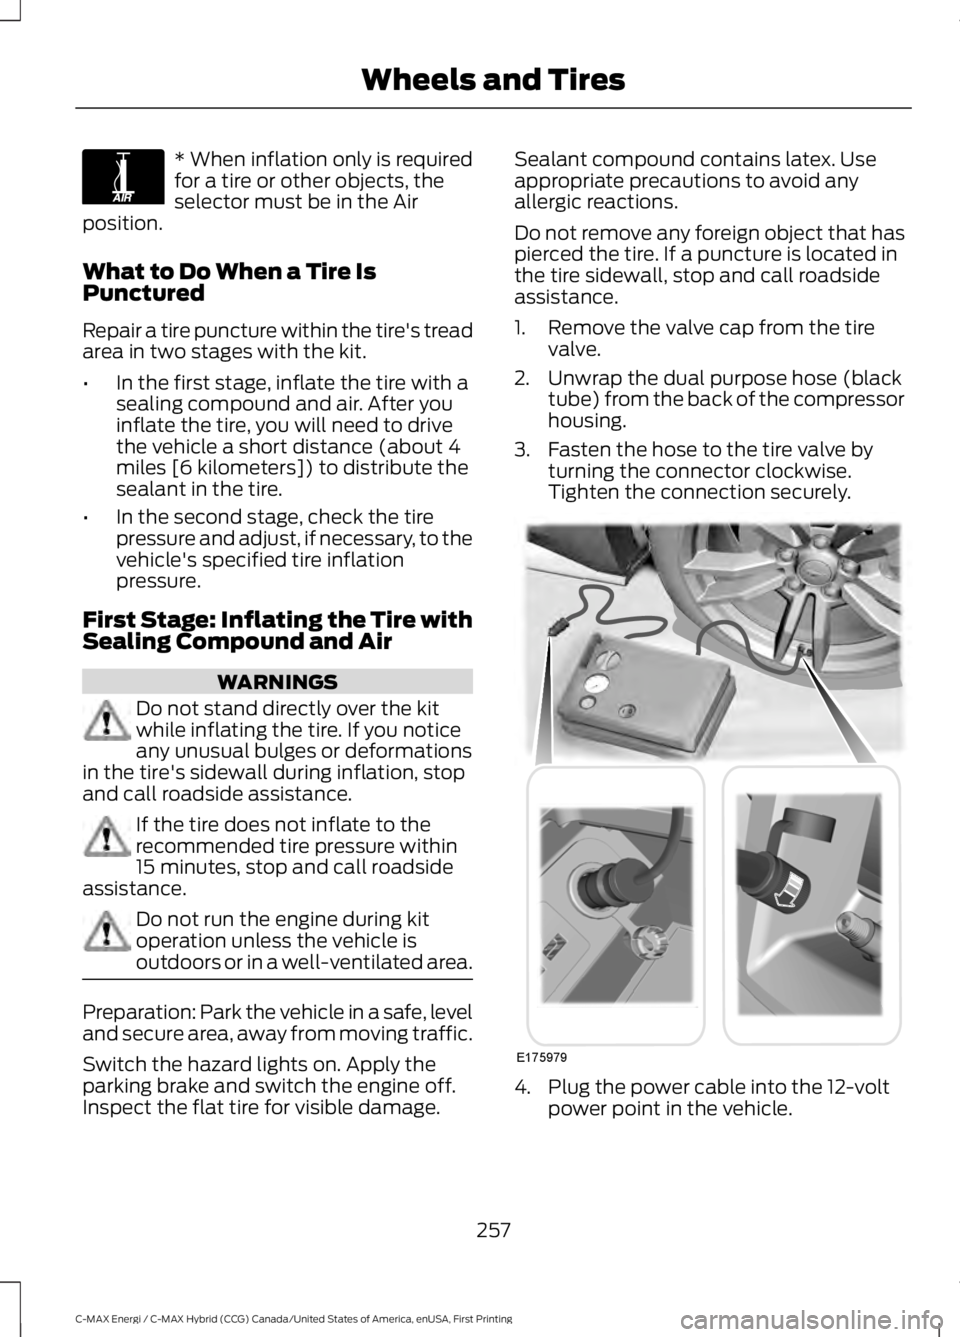
1. Remove the valve cap from the tirevalve.
2. Unwrap the dual purpose hose (blacktube) from the back of the compressorhousing.
3. Fasten the hose to the tire valve byturning the connector clockwise.Tighten the connection securely.
4. Plug the power cable into the 12-voltpower point in the vehicle.
257
C-MAX Energi / C-MAX Hybrid (CCG) Canada/United States of America, enUSA, First Printing
Wheels and TiresE175978 E175979
Page 261 of 497
5. Remove the warning sticker found onthe canister and place it on the top ofthe instrument panel or the center ofthe dash.
6. Start the vehicle and leave the enginerunning so the compressor does notdrain the vehicle’s battery.
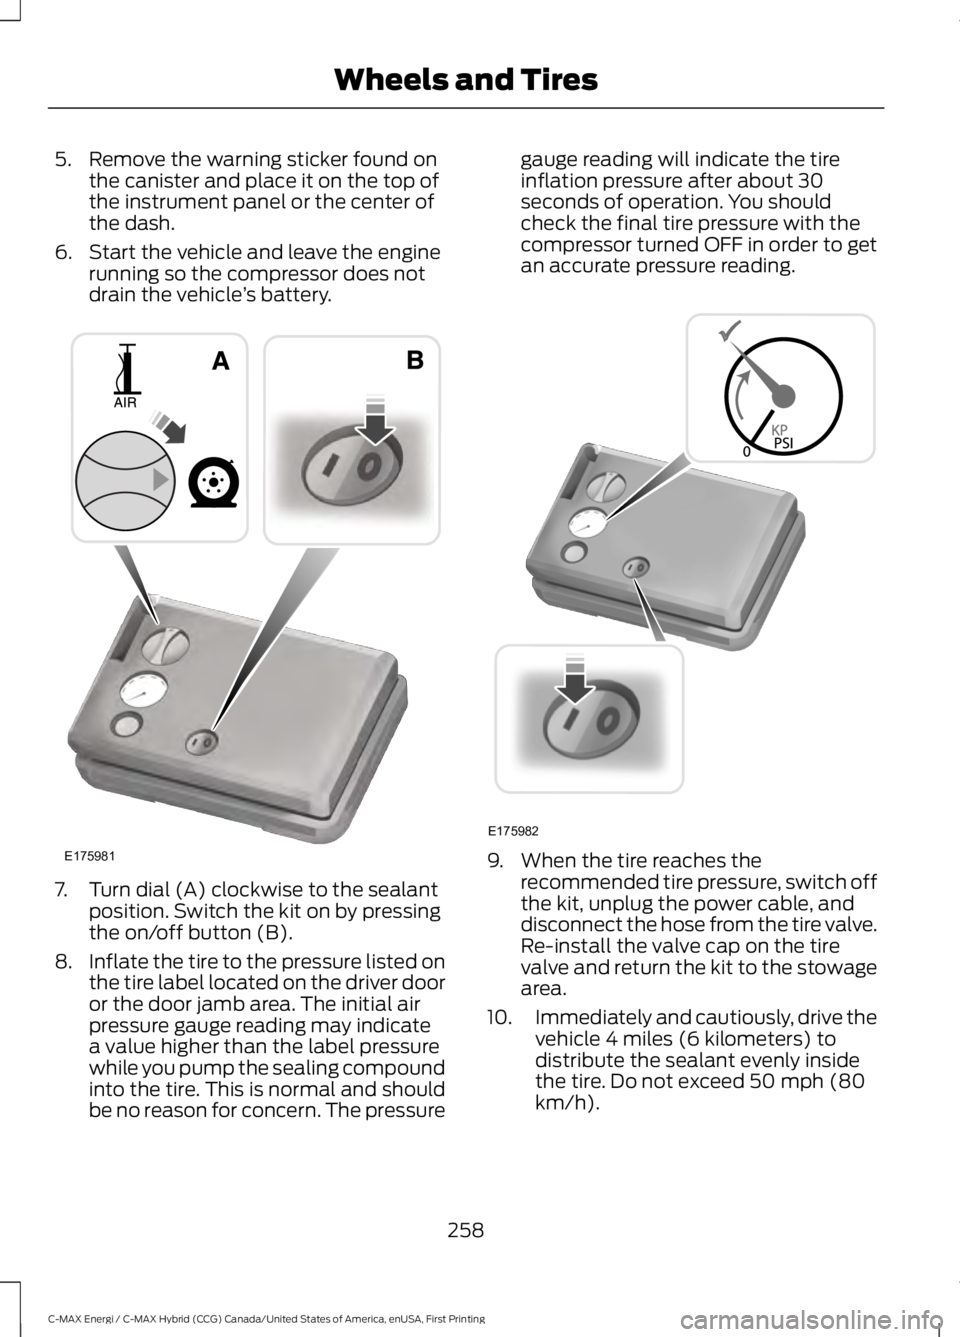
7. Turn dial (A) clockwise to the sealantposition. Switch the kit on by pressingthe on/off button (B).
8.Inflate the tire to the pressure listed onthe tire label located on the driver dooror the door jamb area. The initial airpressure gauge reading may indicatea value higher than the label pressurewhile you pump the sealing compoundinto the tire. This is normal and shouldbe no reason for concern. The pressure
gauge reading will indicate the tireinflation pressure after about 30seconds of operation. You shouldcheck the final tire pressure with thecompressor turned OFF in order to getan accurate pressure reading.
9. When the tire reaches therecommended tire pressure, switch offthe kit, unplug the power cable, anddisconnect the hose from the tire valve.Re-install the valve cap on the tirevalve and return the kit to the stowagearea.
10.Immediately and cautiously, drive thevehicle 4 miles (6 kilometers) todistribute the sealant evenly insidethe tire. Do not exceed 50 mph (80km/h).
258
C-MAX Energi / C-MAX Hybrid (CCG) Canada/United States of America, enUSA, First Printing
Wheels and TiresE175981 E175982
Page 262 of 497
11.After 4 miles (6 kilometers), stop andcheck the tire pressure. See SecondStage: Checking Tire Pressure.
Note:If you experience any unusualvibration, ride disturbance or noise whiledriving, reduce your speed until you cansafely pull off to the side of the road to callfor roadside assistance.
Note:Do not proceed to the second stageof this operation.
Second Stage: Checking TirePressure
WARNINGS
If you are proceeding from the Firststage: Re–inflating the tire withsealing compound and air sectionand have injected sealant in the tire andthe pressure is below 20 psi (1.4 bar), stopand call roadside assistance. If tirepressure is above 20 psi (1.4 bar), continueto the next step.
The power plug may get hot after useand should be handled carefullywhile unplugging.
Check the air pressure of your tires asfollows:
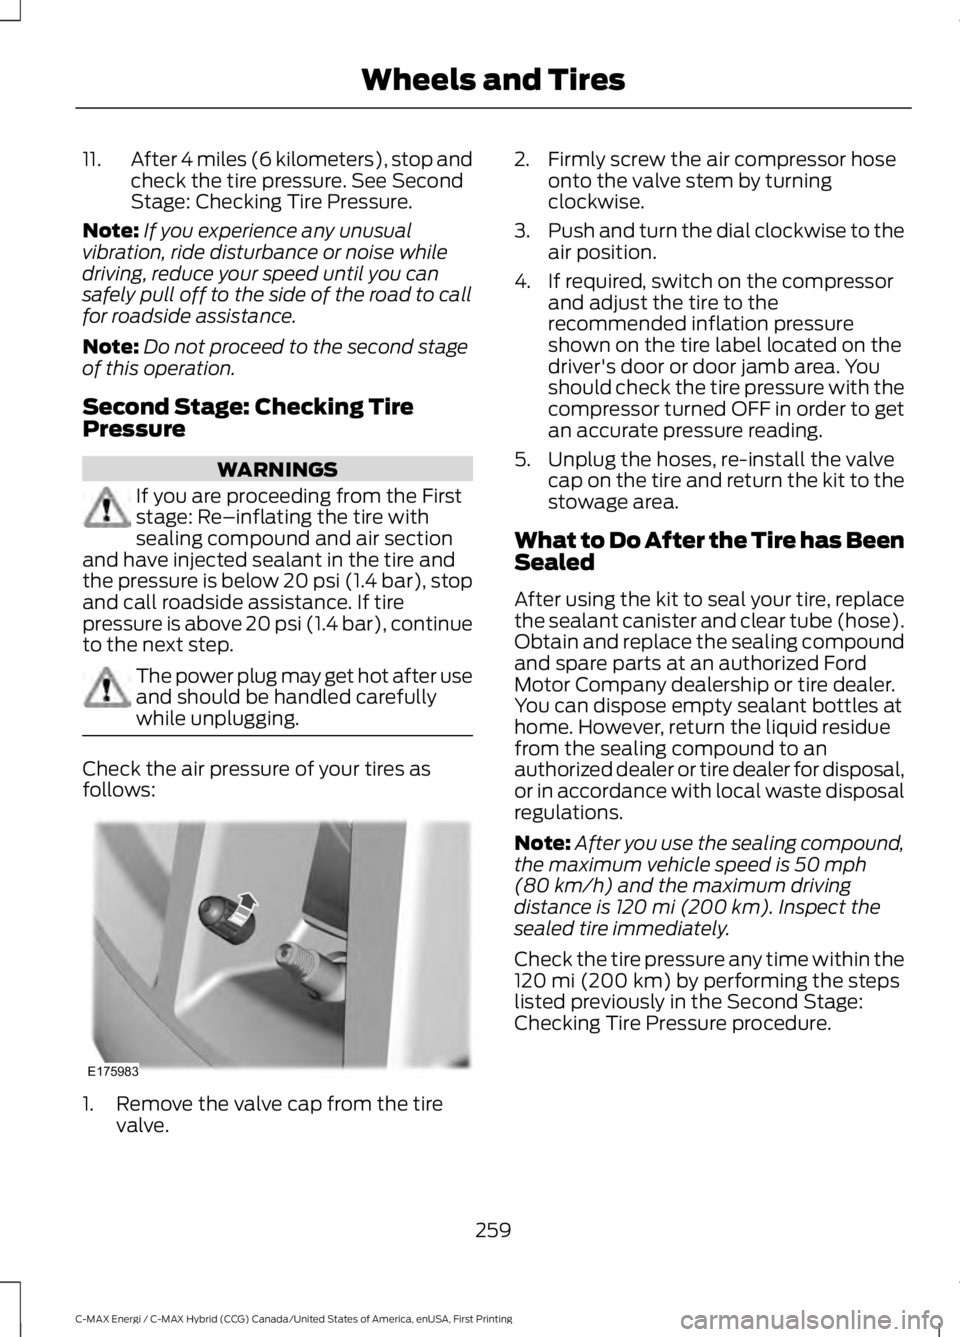
1. Remove the valve cap from the tirevalve.
2. Firmly screw the air compressor hoseonto the valve stem by turningclockwise.
3.Push and turn the dial clockwise to theair position.
4. If required, switch on the compressorand adjust the tire to therecommended inflation pressureshown on the tire label located on thedriver's door or door jamb area. Youshould check the tire pressure with thecompressor turned OFF in order to getan accurate pressure reading.
5. Unplug the hoses, re-install the valvecap on the tire and return the kit to thestowage area.
What to Do After the Tire has BeenSealed
After using the kit to seal your tire, replacethe sealant canister and clear tube (hose).Obtain and replace the sealing compoundand spare parts at an authorized FordMotor Company dealership or tire dealer.You can dispose empty sealant bottles athome. However, return the liquid residuefrom the sealing compound to anauthorized dealer or tire dealer for disposal,or in accordance with local waste disposalregulations.
Note:After you use the sealing compound,the maximum vehicle speed is 50 mph(80 km/h) and the maximum drivingdistance is 120 mi (200 km). Inspect thesealed tire immediately.
Check the tire pressure any time within the120 mi (200 km) by performing the stepslisted previously in the Second Stage:Checking Tire Pressure procedure.
259
C-MAX Energi / C-MAX Hybrid (CCG) Canada/United States of America, enUSA, First Printing
Wheels and TiresE175983
Page 295 of 497
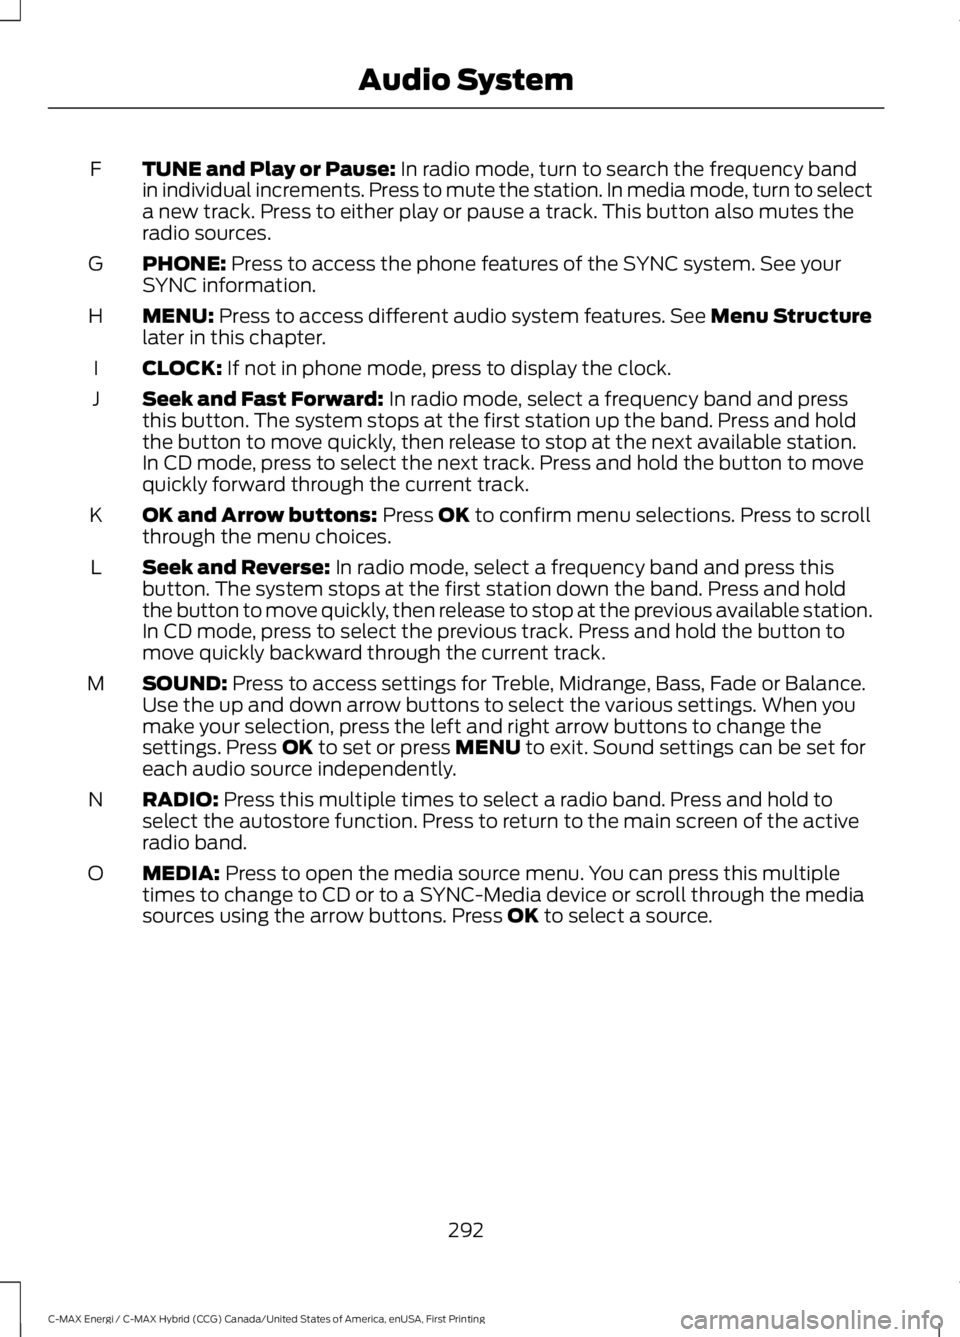
TUNE and Play or Pause: In radio mode, turn to search the frequency bandin individual increments. Press to mute the station. In media mode, turn to selecta new track. Press to either play or pause a track. This button also mutes theradio sources.
F
PHONE: Press to access the phone features of the SYNC system. See yourSYNC information.G
MENU: Press to access different audio system features. See Menu Structurelater in this chapter.H
CLOCK: If not in phone mode, press to display the clock.I
Seek and Fast Forward: In radio mode, select a frequency band and pressthis button. The system stops at the first station up the band. Press and holdthe button to move quickly, then release to stop at the next available station.In CD mode, press to select the next track. Press and hold the button to movequickly forward through the current track.
J
OK and Arrow buttons: Press OK to confirm menu selections. Press to scrollthrough the menu choices.K
Seek and Reverse: In radio mode, select a frequency band and press thisbutton. The system stops at the first station down the band. Press and holdthe button to move quickly, then release to stop at the previous available station.In CD mode, press to select the previous track. Press and hold the button tomove quickly backward through the current track.
L
SOUND: Press to access settings for Treble, Midrange, Bass, Fade or Balance.Use the up and down arrow buttons to select the various settings. When youmake your selection, press the left and right arrow buttons to change thesettings. Press OK to set or press MENU to exit. Sound settings can be set foreach audio source independently.
M
RADIO: Press this multiple times to select a radio band. Press and hold toselect the autostore function. Press to return to the main screen of the activeradio band.
N
MEDIA: Press to open the media source menu. You can press this multipletimes to change to CD or to a SYNC-Media device or scroll through the mediasources using the arrow buttons. Press OK to select a source.
O
292
C-MAX Energi / C-MAX Hybrid (CCG) Canada/United States of America, enUSA, First Printing
Audio System
Page 300 of 497
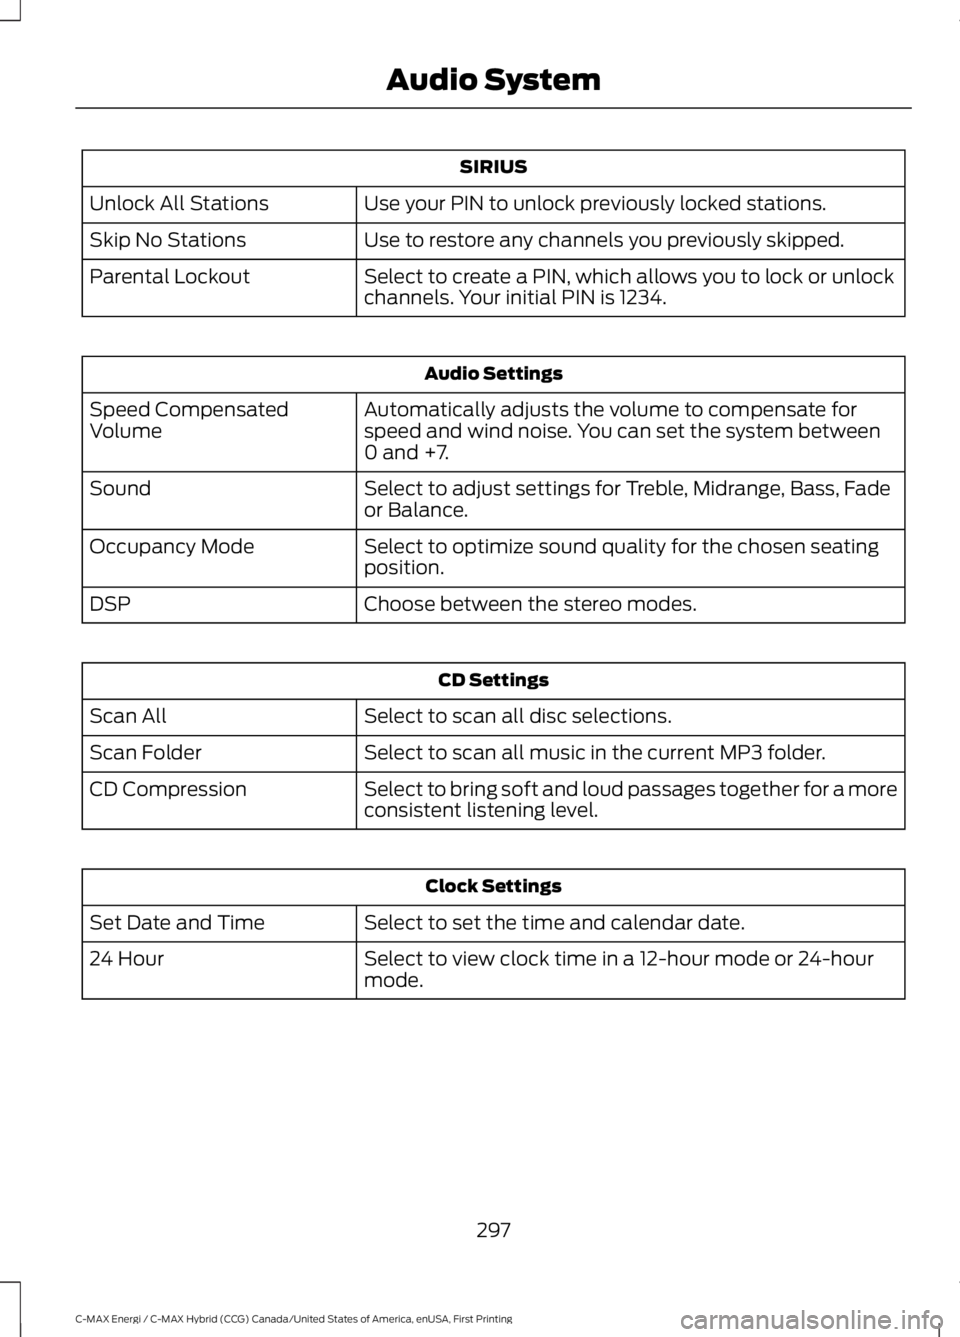
SIRIUS
Use your PIN to unlock previously locked stations.Unlock All Stations
Use to restore any channels you previously skipped.Skip No Stations
Select to create a PIN, which allows you to lock or unlockchannels. Your initial PIN is 1234.Parental Lockout
Audio Settings
Automatically adjusts the volume to compensate forspeed and wind noise. You can set the system between0 and +7.
Speed CompensatedVolume
Select to adjust settings for Treble, Midrange, Bass, Fadeor Balance.Sound
Select to optimize sound quality for the chosen seatingposition.Occupancy Mode
Choose between the stereo modes.DSP
CD Settings
Select to scan all disc selections.Scan All
Select to scan all music in the current MP3 folder.Scan Folder
Select to bring soft and loud passages together for a moreconsistent listening level.CD Compression
Clock Settings
Select to set the time and calendar date.Set Date and Time
Select to view clock time in a 12-hour mode or 24-hourmode.24 Hour
297
C-MAX Energi / C-MAX Hybrid (CCG) Canada/United States of America, enUSA, First Printing
Audio System