clock FORD C MAX HYBRID 2017 2.G User Guide
[x] Cancel search | Manufacturer: FORD, Model Year: 2017, Model line: C MAX HYBRID, Model: FORD C MAX HYBRID 2017 2.GPages: 497, PDF Size: 6.3 MB
Page 244 of 497
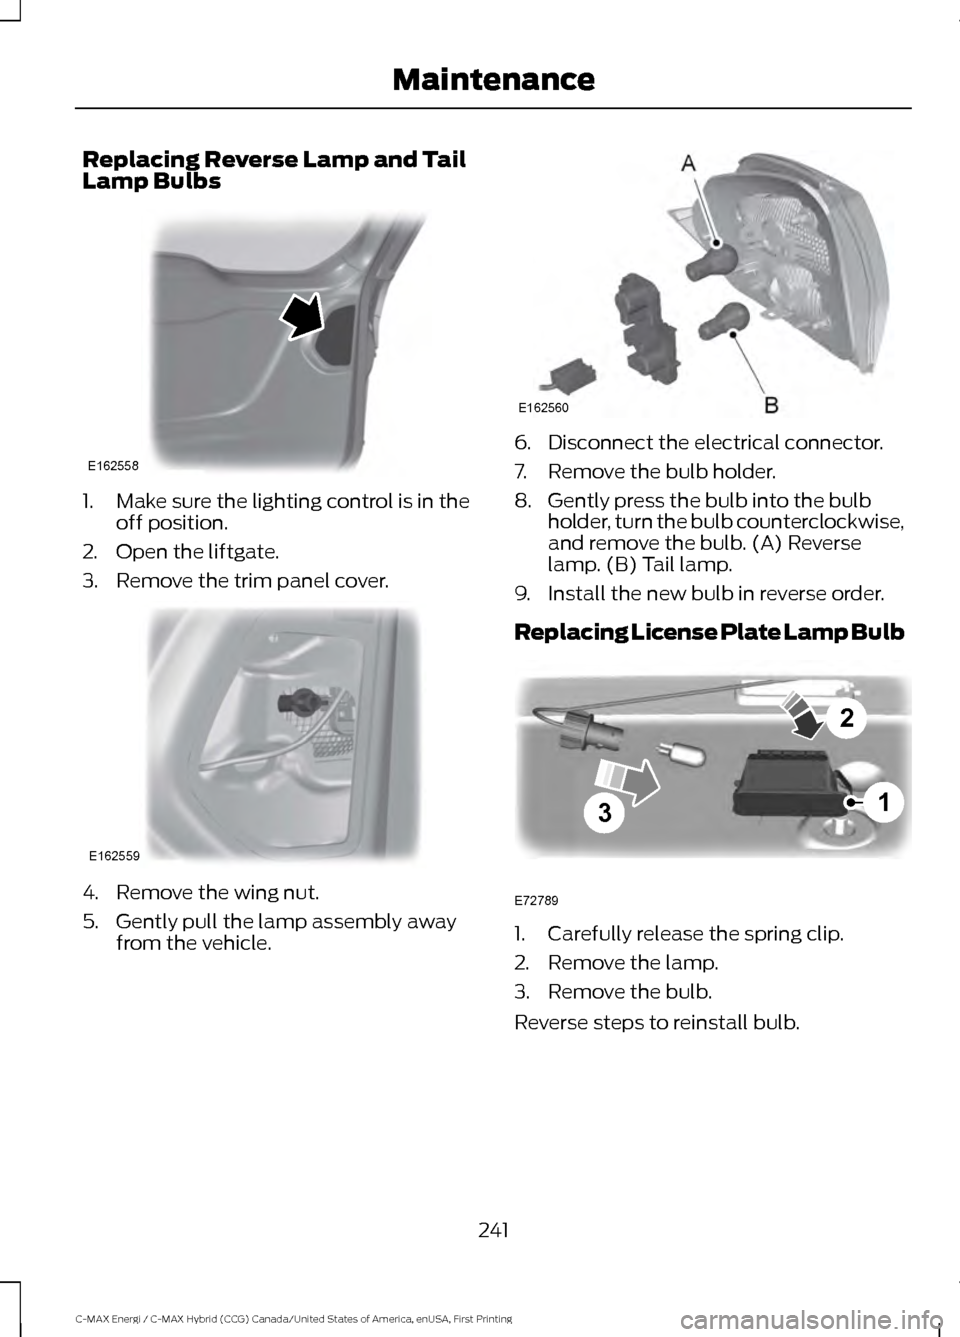
Replacing Reverse Lamp and Tail
Lamp Bulbs
1. Make sure the lighting control is in the
off position.
2. Open the liftgate.
3. Remove the trim panel cover. 4. Remove the wing nut.
5. Gently pull the lamp assembly away
from the vehicle. 6. Disconnect the electrical connector.
7. Remove the bulb holder.
8. Gently press the bulb into the bulb
holder, turn the bulb counterclockwise,
and remove the bulb. (A) Reverse
lamp. (B) Tail lamp.
9. Install the new bulb in reverse order.
Replacing License Plate Lamp Bulb 1. Carefully release the spring clip.
2. Remove the lamp.
3. Remove the bulb.
Reverse steps to reinstall bulb.
241
C-MAX Energi / C-MAX Hybrid (CCG) Canada/United States of America, enUSA, First Printing MaintenanceE162558 E162559 E162560 3
2
1
E72789
Page 260 of 497
* When inflation only is required
for a tire or other objects, the
selector must be in the Air
position.
What to Do When a Tire Is
Punctured
Repair a tire puncture within the tire's tread
area in two stages with the kit.
• In the first stage, inflate the tire with a
sealing compound and air. After you
inflate the tire, you will need to drive
the vehicle a short distance (about 4
miles [6 kilometers]) to distribute the
sealant in the tire.
• In the second stage, check the tire
pressure and adjust, if necessary, to the
vehicle's specified tire inflation
pressure.
First Stage: Inflating the Tire with
Sealing Compound and Air WARNINGS
Do not stand directly over the kit
while inflating the tire. If you notice
any unusual bulges or deformations
in the tire's sidewall during inflation, stop
and call roadside assistance. If the tire does not inflate to the
recommended tire pressure within
15 minutes, stop and call roadside
assistance. Do not run the engine during kit
operation unless the vehicle is
outdoors or in a well-ventilated area.
Preparation: Park the vehicle in a safe, level
and secure area, away from moving traffic.
Switch the hazard lights on. Apply the
parking brake and switch the engine off.
Inspect the flat tire for visible damage. Sealant compound contains latex. Use
appropriate precautions to avoid any
allergic reactions.
Do not remove any foreign object that has
pierced the tire. If a puncture is located in
the tire sidewall, stop and call roadside
assistance.
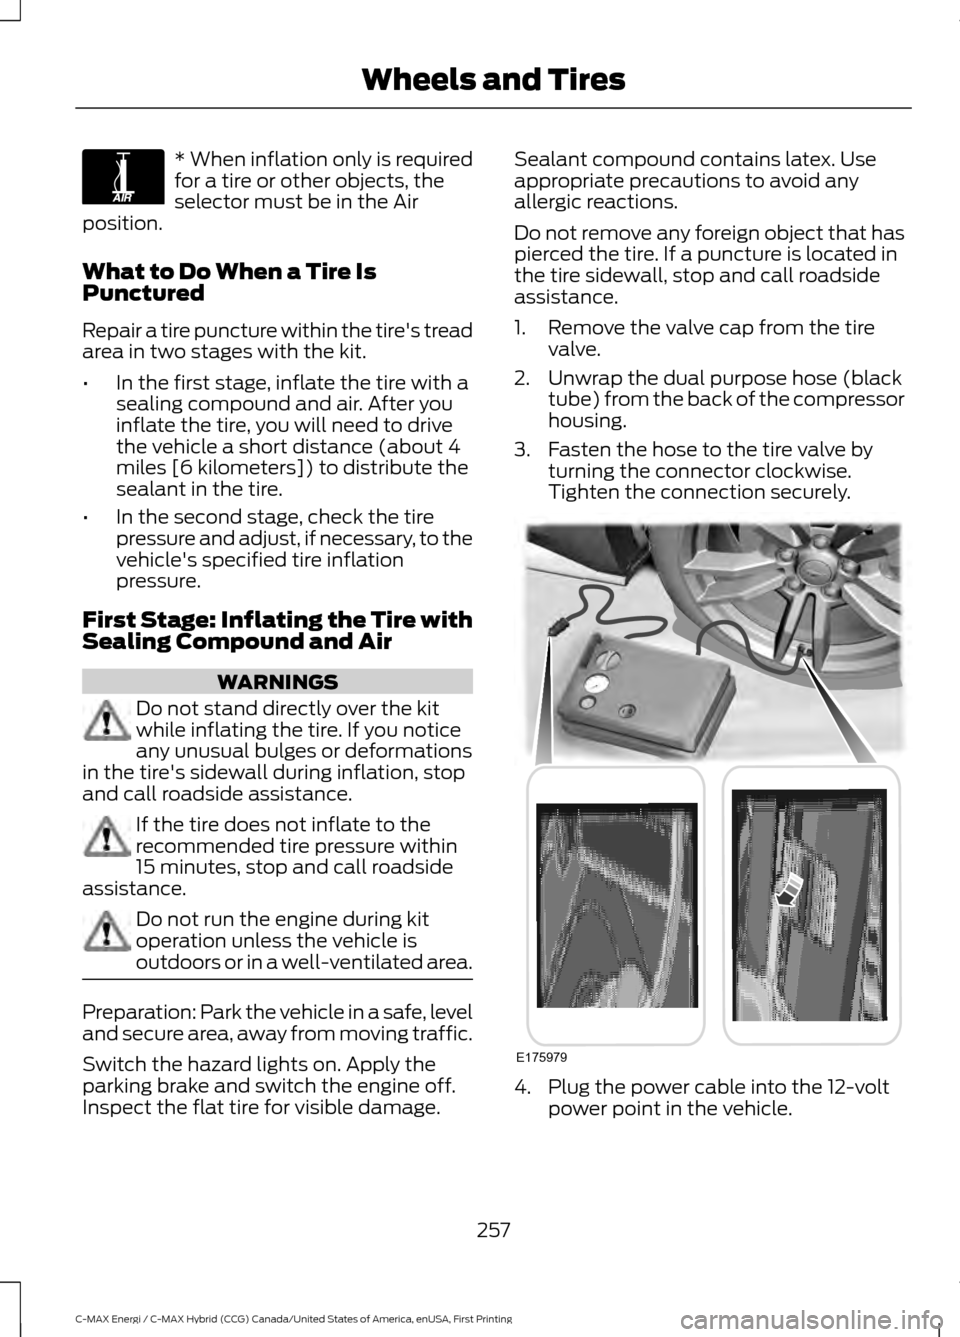
1. Remove the valve cap from the tire
valve.
2. Unwrap the dual purpose hose (black tube) from the back of the compressor
housing.
3. Fasten the hose to the tire valve by turning the connector clockwise.
Tighten the connection securely. 4. Plug the power cable into the 12-volt
power point in the vehicle.
257
C-MAX Energi / C-MAX Hybrid (CCG) Canada/United States of America, enUSA, First Printing Wheels and TiresE175978 E175979
Page 261 of 497
5. Remove the warning sticker found on
the canister and place it on the top of
the instrument panel or the center of
the dash.
6. Start the vehicle and leave the engine running so the compressor does not
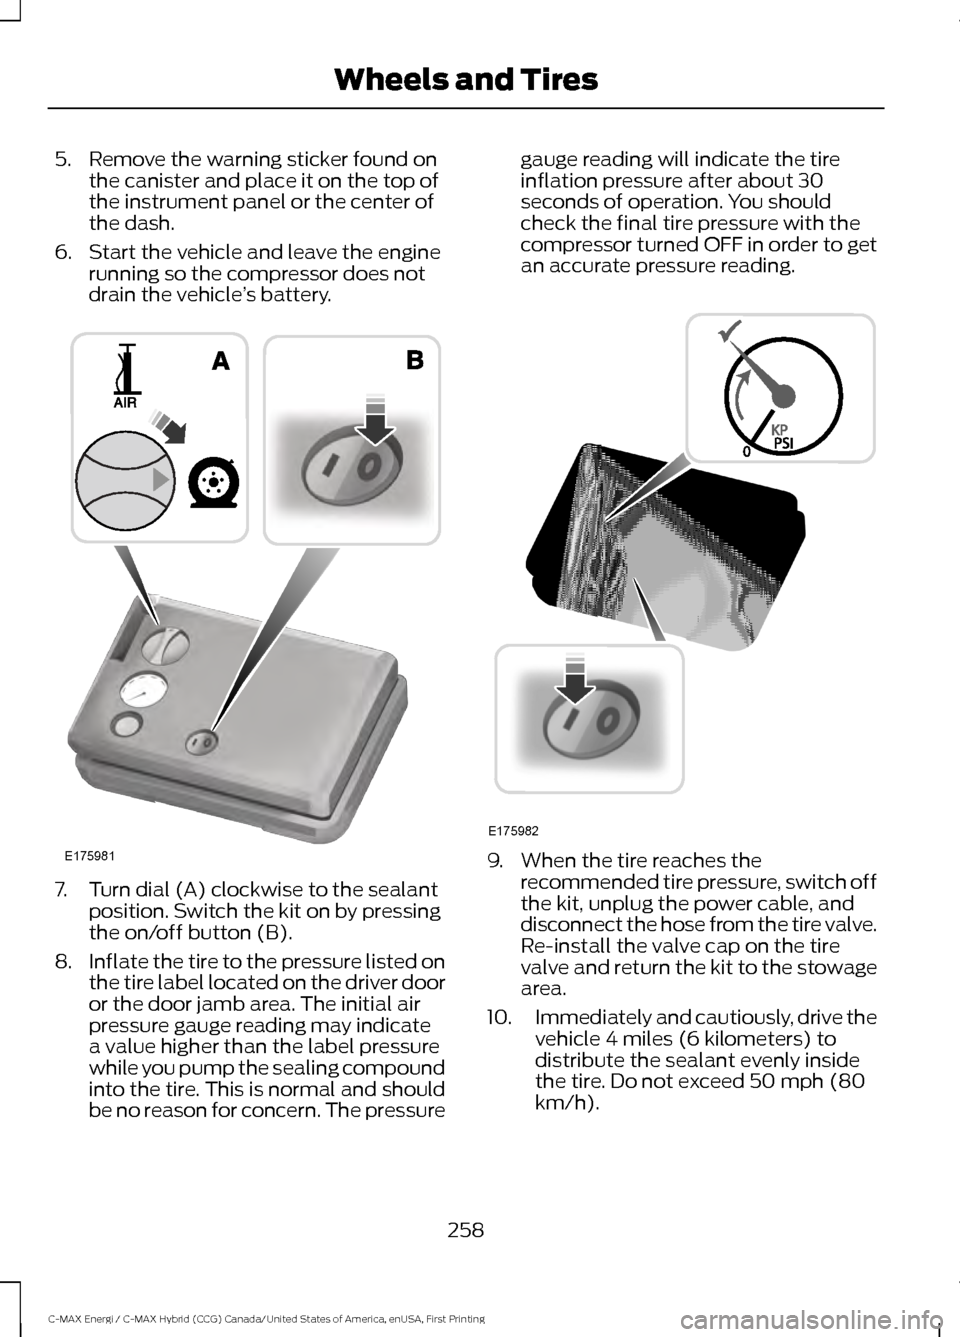
drain the vehicle ’s battery. 7. Turn dial (A) clockwise to the sealant
position. Switch the kit on by pressing
the on/off button (B).
8. Inflate the tire to the pressure listed on
the tire label located on the driver door
or the door jamb area. The initial air
pressure gauge reading may indicate
a value higher than the label pressure
while you pump the sealing compound
into the tire. This is normal and should
be no reason for concern. The pressure gauge reading will indicate the tire
inflation pressure after about 30
seconds of operation. You should
check the final tire pressure with the
compressor turned OFF in order to get
an accurate pressure reading.
9. When the tire reaches the
recommended tire pressure, switch off
the kit, unplug the power cable, and
disconnect the hose from the tire valve.
Re-install the valve cap on the tire
valve and return the kit to the stowage
area.
10. Immediately and cautiously, drive the
vehicle 4 miles (6 kilometers) to
distribute the sealant evenly inside
the tire. Do not exceed 50 mph (80
km/h).
258
C-MAX Energi / C-MAX Hybrid (CCG) Canada/United States of America, enUSA, First Printing Wheels and TiresE175981 E175982
Page 262 of 497
11.
After 4 miles (6 kilometers), stop and
check the tire pressure. See Second
Stage: Checking Tire Pressure.
Note: If you experience any unusual
vibration, ride disturbance or noise while
driving, reduce your speed until you can
safely pull off to the side of the road to call
for roadside assistance.
Note: Do not proceed to the second stage
of this operation.
Second Stage: Checking Tire
Pressure WARNINGS
If you are proceeding from the First
stage: Re–inflating the tire with
sealing compound and air section
and have injected sealant in the tire and
the pressure is below 20 psi (1.4 bar), stop
and call roadside assistance. If tire
pressure is above 20 psi (1.4 bar), continue
to the next step. The power plug may get hot after use
and should be handled carefully
while unplugging.
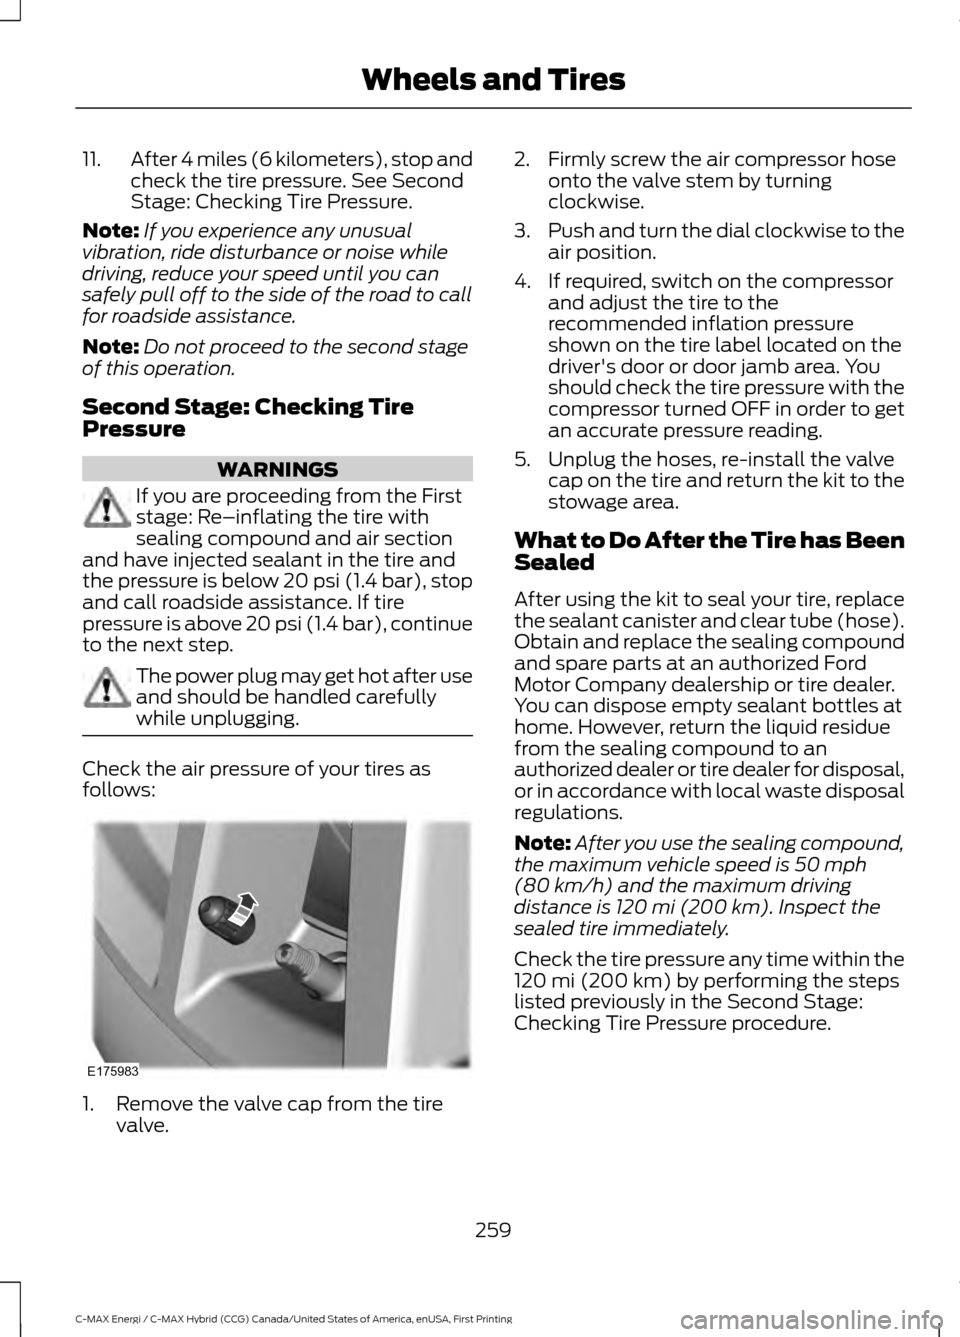
Check the air pressure of your tires as
follows:
1. Remove the valve cap from the tire
valve. 2. Firmly screw the air compressor hose
onto the valve stem by turning
clockwise.
3. Push and turn the dial clockwise to the
air position.
4. If required, switch on the compressor and adjust the tire to the
recommended inflation pressure
shown on the tire label located on the
driver's door or door jamb area. You
should check the tire pressure with the
compressor turned OFF in order to get
an accurate pressure reading.
5. Unplug the hoses, re-install the valve cap on the tire and return the kit to the
stowage area.
What to Do After the Tire has Been
Sealed
After using the kit to seal your tire, replace
the sealant canister and clear tube (hose).
Obtain and replace the sealing compound
and spare parts at an authorized Ford
Motor Company dealership or tire dealer.
You can dispose empty sealant bottles at
home. However, return the liquid residue
from the sealing compound to an
authorized dealer or tire dealer for disposal,
or in accordance with local waste disposal
regulations.
Note: After you use the sealing compound,
the maximum vehicle speed is 50 mph
(80 km/h) and the maximum driving
distance is 120 mi (200 km). Inspect the
sealed tire immediately.
Check the tire pressure any time within the
120 mi (200 km)
by performing the steps
listed previously in the Second Stage:
Checking Tire Pressure procedure.
259
C-MAX Energi / C-MAX Hybrid (CCG) Canada/United States of America, enUSA, First Printing Wheels and TiresE175983
Page 295 of 497
TUNE and Play or Pause: In radio mode, turn to search the frequency band
in individual increments. Press to mute the station. In media mode, turn to select
a new track. Press to either play or pause a track. This button also mutes the
radio sources.
F
PHONE:
Press to access the phone features of the SYNC system. See your
SYNC information.
G
MENU:
Press to access different audio system features. See Menu Structure
later in this chapter.
H
CLOCK:
If not in phone mode, press to display the clock.
I
Seek and Fast Forward:
In radio mode, select a frequency band and press
this button. The system stops at the first station up the band. Press and hold
the button to move quickly, then release to stop at the next available station.
In CD mode, press to select the next track. Press and hold the button to move
quickly forward through the current track.
J
OK and Arrow buttons:
Press OK to confirm menu selections. Press to scroll
through the menu choices.
K
Seek and Reverse:
In radio mode, select a frequency band and press this
button. The system stops at the first station down the band. Press and hold
the button to move quickly, then release to stop at the previous available station.
In CD mode, press to select the previous track. Press and hold the button to
move quickly backward through the current track.
L
SOUND:
Press to access settings for Treble, Midrange, Bass, Fade or Balance.
Use the up and down arrow buttons to select the various settings. When you
make your selection, press the left and right arrow buttons to change the
settings. Press
OK to set or press MENU to exit. Sound settings can be set for
each audio source independently.
M
RADIO:
Press this multiple times to select a radio band. Press and hold to
select the autostore function. Press to return to the main screen of the active
radio band.
N
MEDIA:
Press to open the media source menu. You can press this multiple
times to change to CD or to a SYNC-Media device or scroll through the media
sources using the arrow buttons. Press
OK to select a source.
O
292
C-MAX Energi / C-MAX Hybrid (CCG) Canada/United States of America, enUSA, First Printing Audio System
Page 300 of 497
SIRIUS
Use your PIN to unlock previously locked stations.
Unlock All Stations
Use to restore any channels you previously skipped.
Skip No Stations
Select to create a PIN, which allows you to lock or unlock
channels. Your initial PIN is 1234.
Parental Lockout Audio Settings
Automatically adjusts the volume to compensate for
speed and wind noise. You can set the system between
0 and +7.
Speed Compensated
Volume
Select to adjust settings for Treble, Midrange, Bass, Fade
or Balance.
Sound
Select to optimize sound quality for the chosen seating
position.
Occupancy Mode
Choose between the stereo modes.
DSP CD Settings
Select to scan all disc selections.
Scan All
Select to scan all music in the current MP3 folder.
Scan Folder
Select to bring soft and loud passages together for a more
consistent listening level.
CD Compression Clock Settings
Select to set the time and calendar date.
Set Date and Time
Select to view clock time in a 12-hour mode or 24-hour
mode.
24 Hour
297
C-MAX Energi / C-MAX Hybrid (CCG) Canada/United States of America, enUSA, First Printing Audio System
Page 303 of 497
TUNE and Play or Pause: In radio mode, turn to search the frequency band
in individual increments or jump to the next station of the station list. Press to
mute the station. In media mode, turn to select a new track. Press to either play
or pause a track. This button also mutes the radio sources.
F
CLOCK:
If not in phone mode, press to display the clock.
G
PHONE:
Press to access the phone features of the SYNC system. See your
SYNC information.
H
MENU:
Press to access different audio system features. See Menu Structure
later in this section.
I
SOUND:
Press to access settings for Treble, Midrange, Bass, Fade or Balance.
Use the up and down arrow buttons to select the various settings. When you
make your selection, press the left and right arrow buttons to change the
settings. Press
OK to set or press MENU to exit. Sound settings can be set for
each audio source independently.
J
Seek and Fast Forward:
In radio mode, select a frequency band and press
this button. The system stops at the first station up the band. Press and hold
the button to move quickly, then release to stop at the next available station.
In CD mode, press to select the next track. Press and hold the button to move
quickly forward through the current track.
K
OK and Arrow buttons:
Press OK to confirm menu selections. Press to scroll
through the menu choices.
L
Seek and Reverse:
In radio mode, select a frequency band and press this
button. The system stops at the first station down the band. Press and hold
the button to move quickly, then release to stop at the previous available station.
In CD mode, press to select the previous track. Press and hold the button to
move quickly backward through the current track.
M
SIRIUS:
Press to listen to Sirius satellite radio.
N
RADIO:
Press this multiple times to select a radio band. Press and hold to
select the autostore function. Press to return to the main screen of the active
radio band.
O
MEDIA:
Press to open the media source menu. You can press this multiple
times to change to CD or to a SYNC-Media device or scroll through the media
sources using the arrow buttons. Press
OK to select a source.
P
DIGITAL RADIO
Note: HD Radio broadcasts are not
available in all markets. HD Radio technology is the digital
evolution of analog AM/FM radio. Your
system has a special receiver that allows
it to receive digital broadcasts (where
available) in addition to the analog
broadcasts, it already receives. Digital
broadcasts provide a better sound quality
300
C-MAX Energi / C-MAX Hybrid (CCG) Canada/United States of America, enUSA, First Printing Audio System
Page 348 of 497
Action and Description
Menu Item
Item
This bar displays icons and messages pertaining to current
system activities including climate settings, voice
commands and phone functions such as text messages.
Status Bar
A
This button is available on the main screens. Pressing it
takes you to the home screen view.
Home
B
This shows the current time. You can set the clock manually
or have it controlled by the vehicle's GPS location. See
Settings (page 412).
Clock
C
This displays the current outside temperature.
Outside
Temperature
D
You can touch any of the buttons on this bar to select a
feature.
Feature Bar
E
The touchscreen allows you quick access
to all of your comfort, navigation,
communication and entertainment
options. Using the status and feature bar
you can quickly select the feature you want
to use.
Note: Your system is equipped with a
feature that allows you to access and
control audio features for 10 minutes after
you switch the ignition off (and no doors
open). The Status Bar
Additional icons also display in the status
bar depending on market, vehicle options
and current operation. If a feature is not
active, the icon does not display. Certain
icons may move to the left or right
depending on what options are active.
345
C-MAX Energi / C-MAX Hybrid (CCG) Canada/United States of America, enUSA, First Printing SYNC™ 3
Page 417 of 497
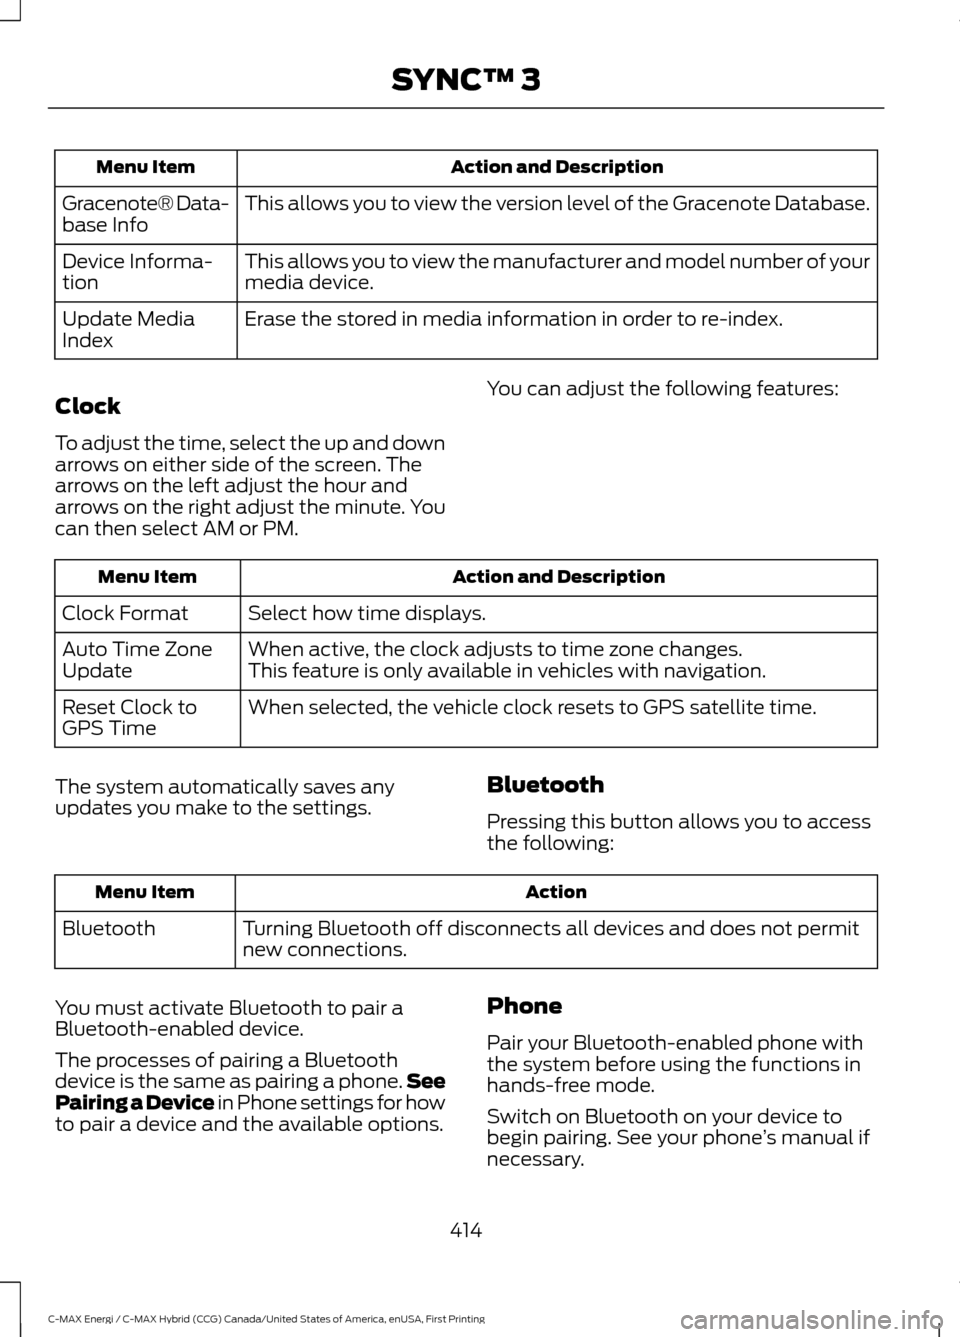
Action and Description
Menu Item
This allows you to view the version level of the Gracenote Database.
Gracenote® Data-
base Info
This allows you to view the manufacturer and model number of your
media device.
Device Informa-
tion
Erase the stored in media information in order to re-index.
Update Media
Index
Clock
To adjust the time, select the up and down
arrows on either side of the screen. The
arrows on the left adjust the hour and
arrows on the right adjust the minute. You
can then select AM or PM. You can adjust the following features:Action and Description
Menu Item
Select how time displays.
Clock Format
When active, the clock adjusts to time zone changes.
Auto Time Zone
Update This feature is only available in vehicles with navigation.
When selected, the vehicle clock resets to GPS satellite time.
Reset Clock to
GPS Time
The system automatically saves any
updates you make to the settings. Bluetooth
Pressing this button allows you to access
the following: Action
Menu Item
Turning Bluetooth off disconnects all devices and does not permit
new connections.
Bluetooth
You must activate Bluetooth to pair a
Bluetooth-enabled device.
The processes of pairing a Bluetooth
device is the same as pairing a phone. See
Pairing a Device in Phone settings for how
to pair a device and the available options. Phone
Pair your Bluetooth-enabled phone with
the system before using the functions in
hands-free mode.
Switch on Bluetooth on your device to
begin pairing. See your phone
’s manual if
necessary.
414
C-MAX Energi / C-MAX Hybrid (CCG) Canada/United States of America, enUSA, First Printing SYNC™ 3
Page 495 of 497
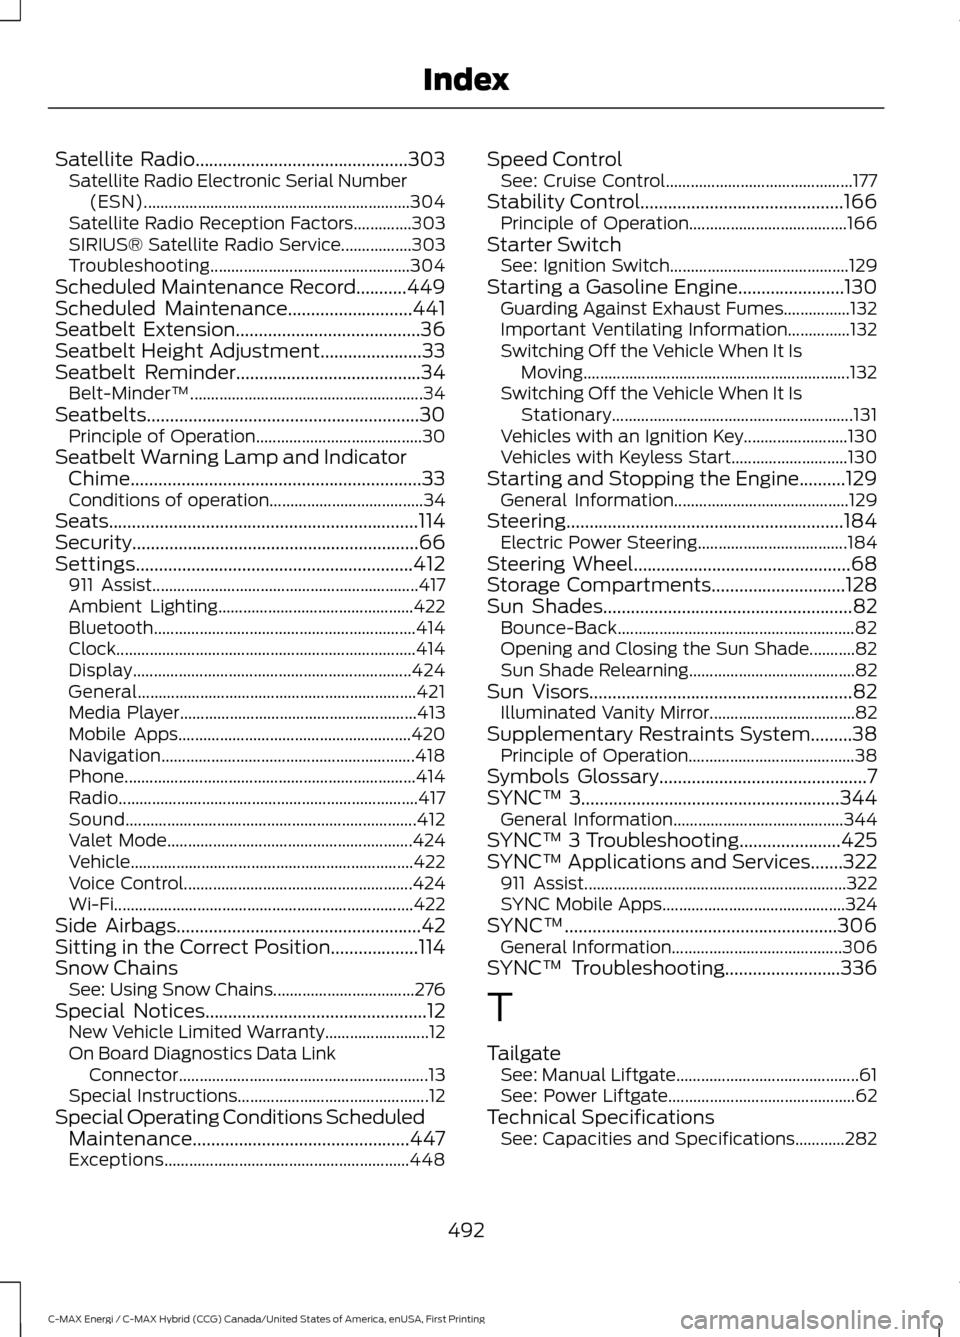
Satellite Radio..............................................303
Satellite Radio Electronic Serial Number
(ESN)................................................................ 304
Satellite Radio Reception Factors..............303
SIRIUS® Satellite Radio Service.................303
Troubleshooting................................................ 304
Scheduled Maintenance Record...........449
Scheduled Maintenance...........................441
Seatbelt Extension........................................36
Seatbelt Height Adjustment
......................33
Seatbelt Reminder........................................34
Belt-Minder™........................................................ 34
Seatbelts...........................................................30 Principle of Operation........................................ 30
Seatbelt Warning Lamp and Indicator Chime...............................................................33
Conditions of operation..................................... 34
Seats
...................................................................114
Security..............................................................66
Settings............................................................412
911 Assist................................................................ 417
Ambient Lighting............................................... 422
Bluetooth............................................................... 414
Clock........................................................................\
414
Display................................................................... 424
General................................................................... 421
Media Player......................................................... 413
Mobile Apps........................................................ 420
Navigation............................................................. 418
Phone...................................................................... 414
Radio........................................................................\
417
Sound...................................................................... 412
Valet Mode........................................................... 424
Vehicle.................................................................... 422
Voice Control....................................................... 424
Wi-Fi........................................................................\
422
Side Airbags.....................................................42
Sitting in the Correct Position...................114
Snow Chains See: Using Snow Chains.................................. 276
Special Notices................................................12 New Vehicle Limited Warranty......................... 12
On Board Diagnostics Data Link Connector............................................................ 13
Special Instructions.............................................. 12
Special Operating Conditions Scheduled Maintenance...............................................447
Exceptions........................................................... 448Speed Control
See: Cruise Control............................................. 177
Stability Control............................................166 Principle of Operation...................................... 166
Starter Switch See: Ignition Switch........................................... 129
Starting a Gasoline Engine.......................130 Guarding Against Exhaust Fumes................132
Important Ventilating Information...............132
Switching Off the Vehicle When It Is
Moving................................................................ 132
Switching Off the Vehicle When It Is Stationary.......................................................... 131
Vehicles with an Ignition Key......................... 130
Vehicles with Keyless Start............................ 130
Starting and Stopping the Engine..........129 General Information.......................................... 129
Steering............................................................184 Electric Power Steering.................................... 184
Steering Wheel...............................................68
Storage Compartments.............................128
Sun Shades
......................................................82
Bounce-Back......................................................... 82
Opening and Closing the Sun Shade...........82
Sun Shade Relearning........................................ 82
Sun Visors
.........................................................82
Illuminated Vanity Mirror................................... 82
Supplementary Restraints System.........38 Principle of Operation........................................ 38
Symbols Glossary
.............................................7
SYNC™ 3........................................................344
General Information......................................... 344
SYNC™ 3 Troubleshooting......................425
SYNC™ Applications and Services.......322 911 Assist............................................................... 322
SYNC Mobile Apps............................................ 324
SYNC™...........................................................306 General Information......................................... 306
SYNC™ Troubleshooting.........................336
T
Tailgate See: Manual Liftgate............................................ 61
See: Power Liftgate............................................. 62
Technical Specifications See: Capacities and Specifications............282
492
C-MAX Energi / C-MAX Hybrid (CCG) Canada/United States of America, enUSA, First Printing Index