tow FORD C MAX HYBRID 2017 2.G User Guide
[x] Cancel search | Manufacturer: FORD, Model Year: 2017, Model line: C MAX HYBRID, Model: FORD C MAX HYBRID 2017 2.GPages: 497, PDF Size: 6.3 MB
Page 74 of 497
WINDSHIELD WIPERS
Note:
Fully defrost the windshield before
you switch the windshield wipers on.
Note: Make sure you switch the windshield
wipers and vehicle power off before using
an automatic car wash.
Note: If streaks or smears appear on the
windshield, clean the windshield and the
wiper blades. See Checking the Wiper
Blades (page 234). If that does not resolve
the issue, install new wiper blades. See
Changing the Wiper Blades
(page 235).
Note: Do not operate the wipers on a dry
windshield. This may scratch the glass,
damage the wiper blades or cause the wiper
motor to burn out. Always use the
windshield washers before wiping a dry
windshield.
Note: When wiping on dry glass, the wipers
may switch to the next lower operating
mode (low-speed or intermittent). The
previous operation mode may resume after
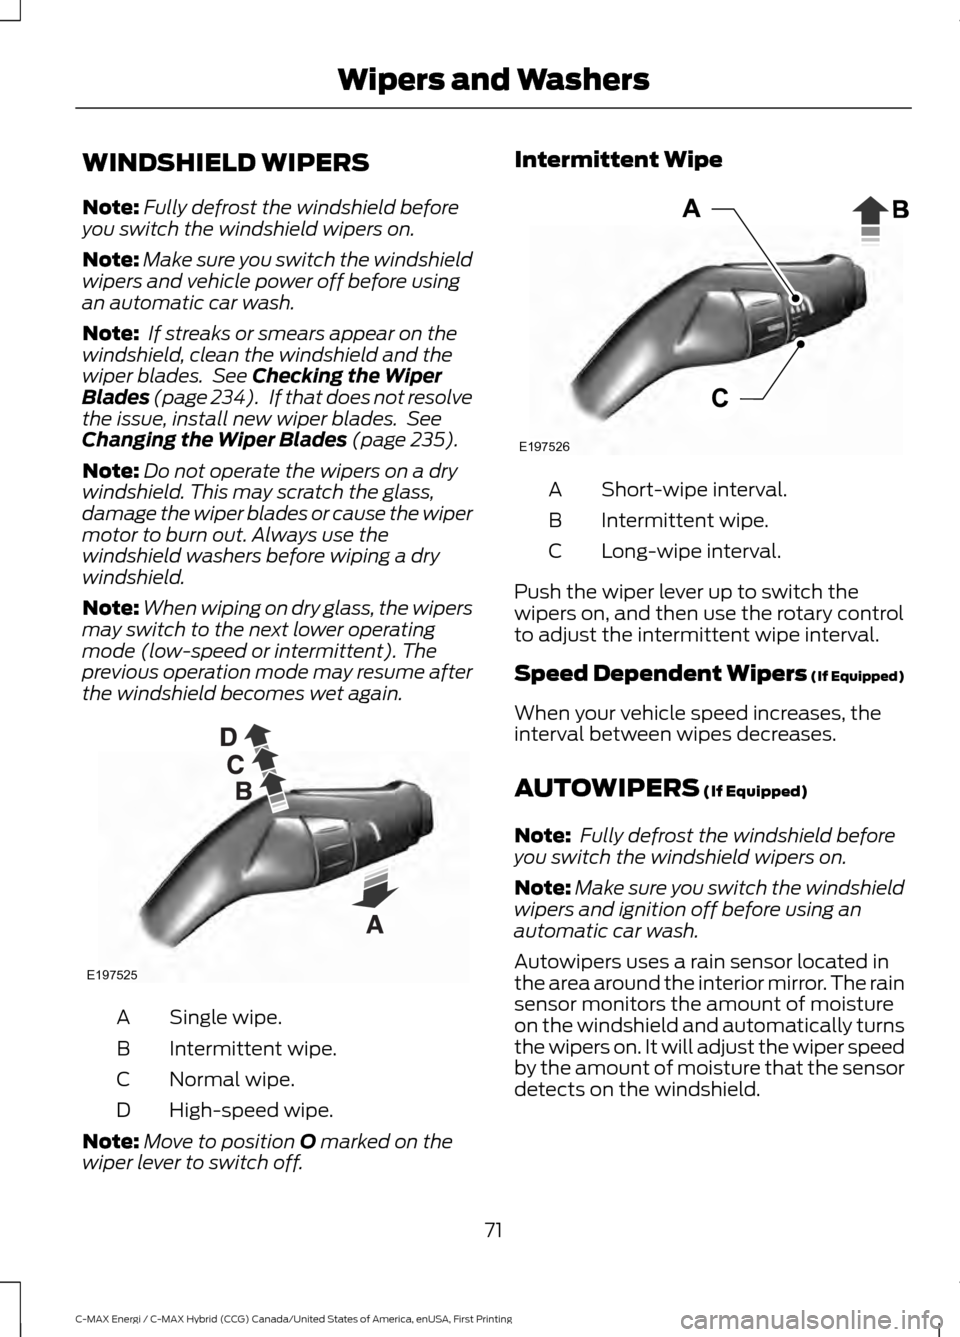
the windshield becomes wet again. Single wipe.
A
Intermittent wipe.
B
Normal wipe.
C
High-speed wipe.
D
Note: Move to position
O marked on the
wiper lever to switch off. Intermittent Wipe
Short-wipe interval.
A
Intermittent wipe.
B
Long-wipe interval.
C
Push the wiper lever up to switch the
wipers on, and then use the rotary control
to adjust the intermittent wipe interval.
Speed Dependent Wipers (If Equipped)
When your vehicle speed increases, the
interval between wipes decreases.
AUTOWIPERS
(If Equipped)
Note: Fully defrost the windshield before
you switch the windshield wipers on.
Note: Make sure you switch the windshield
wipers and ignition off before using an
automatic car wash.
Autowipers uses a rain sensor located in
the area around the interior mirror. The rain
sensor monitors the amount of moisture
on the windshield and automatically turns
the wipers on. It will adjust the wiper speed
by the amount of moisture that the sensor
detects on the windshield.
71
C-MAX Energi / C-MAX Hybrid (CCG) Canada/United States of America, enUSA, First Printing Wipers and WashersE197525 E197526
Page 75 of 497
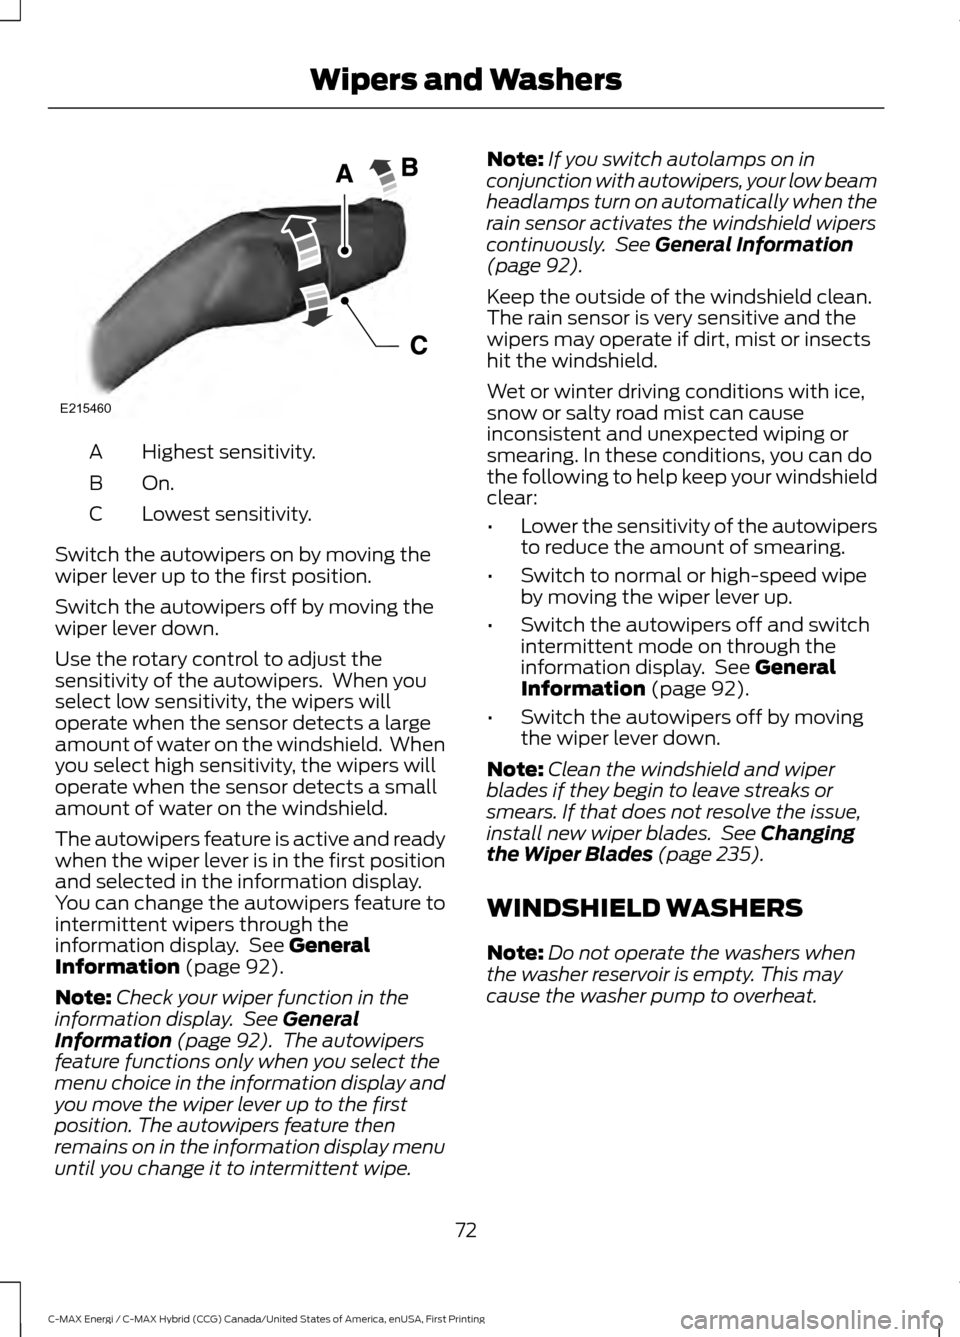
Highest sensitivity.
A
On.B
Lowest sensitivity.
C
Switch the autowipers on by moving the
wiper lever up to the first position.
Switch the autowipers off by moving the
wiper lever down.
Use the rotary control to adjust the
sensitivity of the autowipers. When you
select low sensitivity, the wipers will
operate when the sensor detects a large
amount of water on the windshield. When
you select high sensitivity, the wipers will
operate when the sensor detects a small
amount of water on the windshield.
The autowipers feature is active and ready
when the wiper lever is in the first position
and selected in the information display.
You can change the autowipers feature to
intermittent wipers through the
information display. See General
Information (page 92).
Note: Check your wiper function in the
information display. See
General
Information (page 92). The autowipers
feature functions only when you select the
menu choice in the information display and
you move the wiper lever up to the first
position. The autowipers feature then
remains on in the information display menu
until you change it to intermittent wipe. Note:
If you switch autolamps on in
conjunction with autowipers, your low beam
headlamps turn on automatically when the
rain sensor activates the windshield wipers
continuously. See
General Information
(page 92).
Keep the outside of the windshield clean.
The rain sensor is very sensitive and the
wipers may operate if dirt, mist or insects
hit the windshield.
Wet or winter driving conditions with ice,
snow or salty road mist can cause
inconsistent and unexpected wiping or
smearing. In these conditions, you can do
the following to help keep your windshield
clear:
• Lower the sensitivity of the autowipers
to reduce the amount of smearing.
• Switch to normal or high-speed wipe
by moving the wiper lever up.
• Switch the autowipers off and switch
intermittent mode on through the
information display. See
General
Information (page 92).
• Switch the autowipers off by moving
the wiper lever down.
Note: Clean the windshield and wiper
blades if they begin to leave streaks or
smears. If that does not resolve the issue,
install new wiper blades. See
Changing
the Wiper Blades (page 235).
WINDSHIELD WASHERS
Note: Do not operate the washers when
the washer reservoir is empty. This may
cause the washer pump to overheat.
72
C-MAX Energi / C-MAX Hybrid (CCG) Canada/United States of America, enUSA, First Printing Wipers and WashersE215460
Page 76 of 497
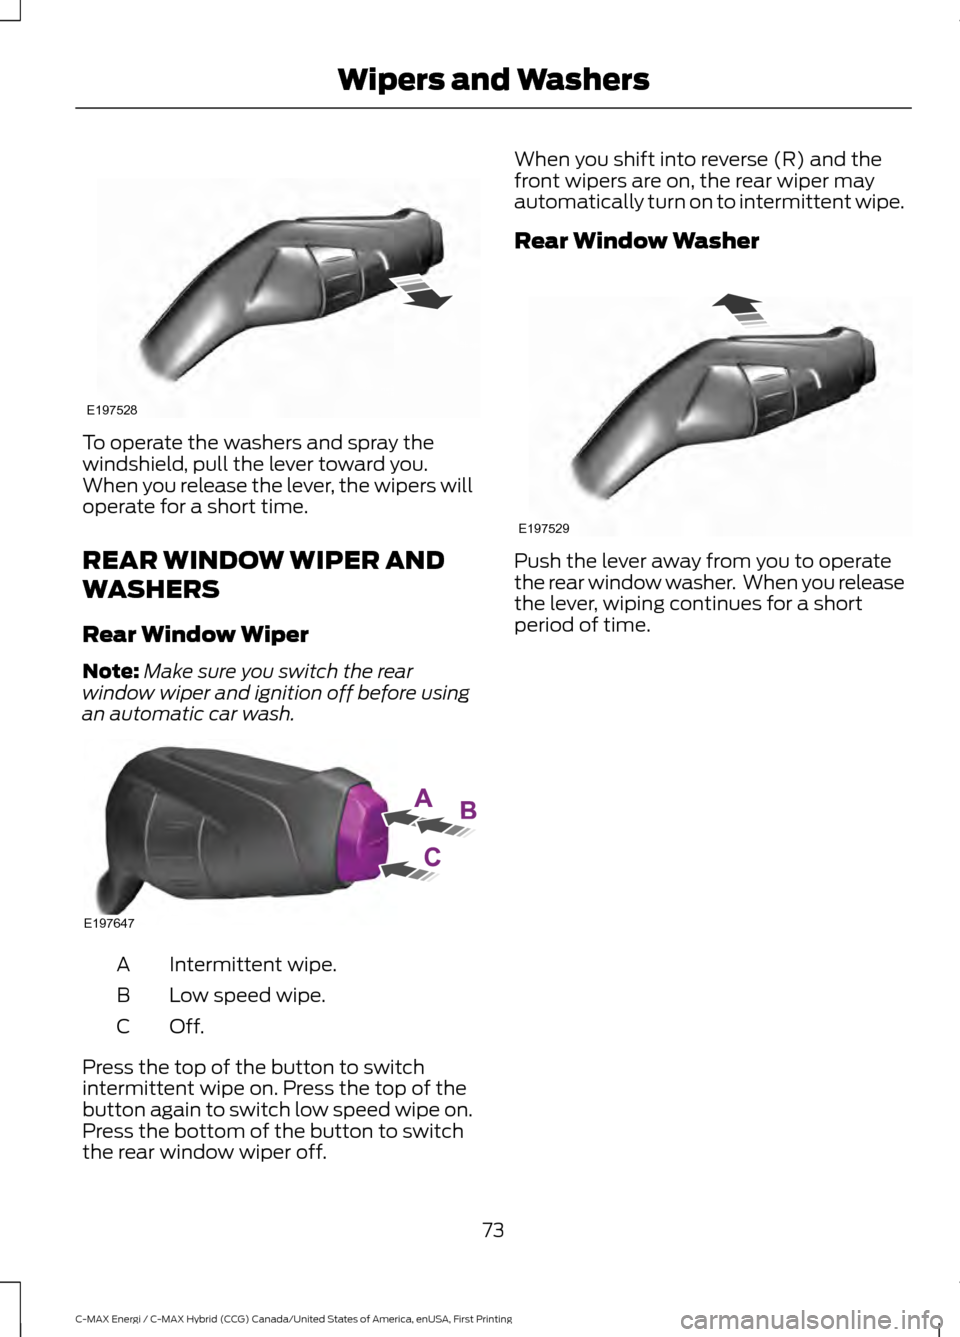
To operate the washers and spray the
windshield, pull the lever toward you.
When you release the lever, the wipers will
operate for a short time.
REAR WINDOW WIPER AND
WASHERS
Rear Window Wiper
Note:
Make sure you switch the rear
window wiper and ignition off before using
an automatic car wash. Intermittent wipe.
A
Low speed wipe.
B
Off.C
Press the top of the button to switch
intermittent wipe on. Press the top of the
button again to switch low speed wipe on.
Press the bottom of the button to switch
the rear window wiper off. When you shift into reverse (R) and the
front wipers are on, the rear wiper may
automatically turn on to intermittent wipe.
Rear Window Washer
Push the lever away from you to operate
the rear window washer. When you release
the lever, wiping continues for a short
period of time.
73
C-MAX Energi / C-MAX Hybrid (CCG) Canada/United States of America, enUSA, First Printing Wipers and WashersE197528 E197647 E197529
Page 77 of 497
LIGHTING CONTROL
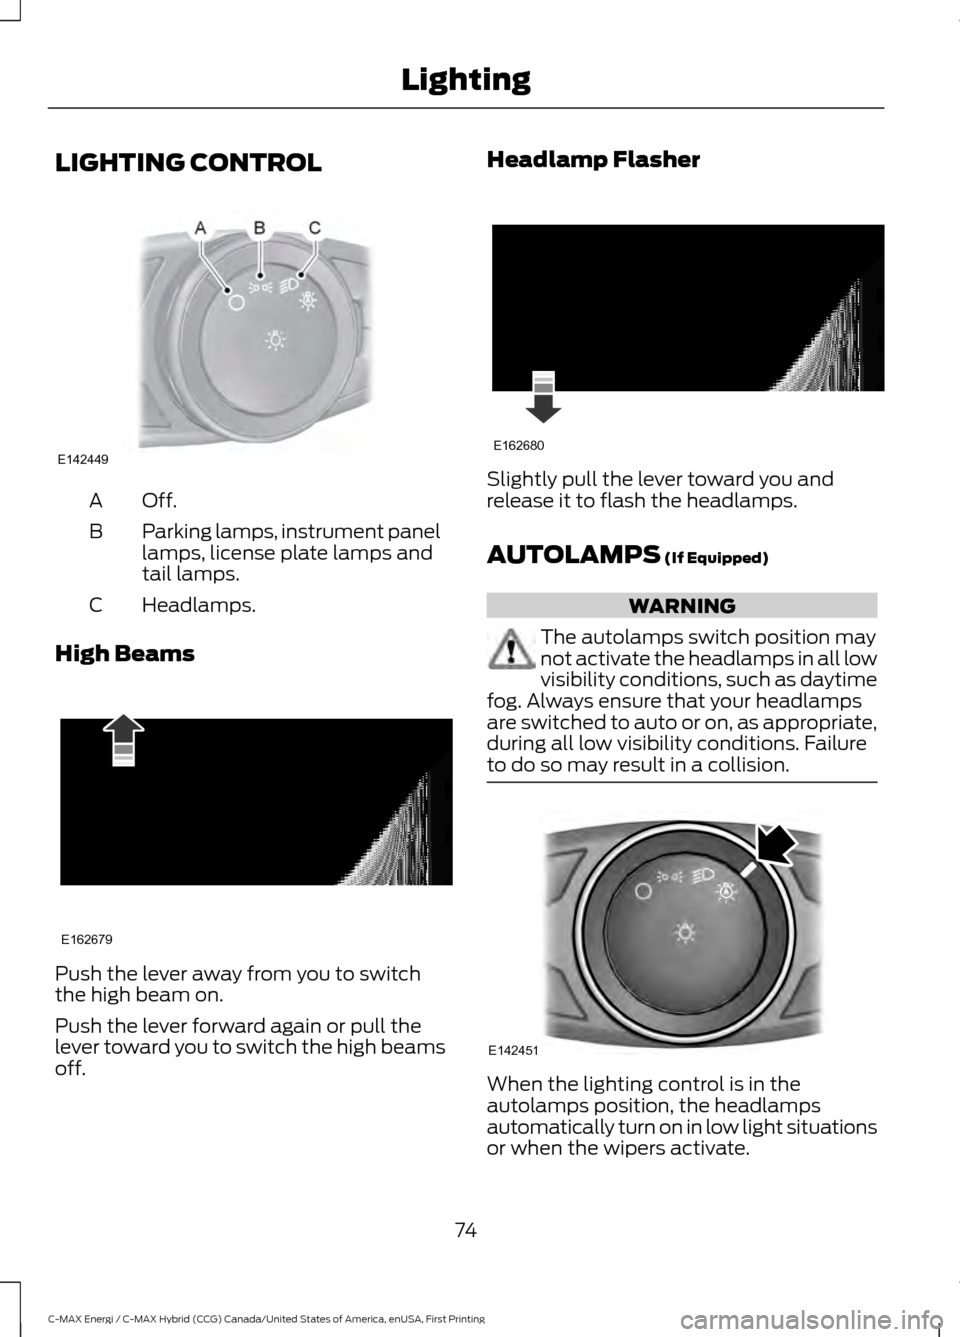
Off.A
Parking lamps, instrument panel
lamps, license plate lamps and
tail lamps.
B
Headlamps.
C
High Beams Push the lever away from you to switch
the high beam on.
Push the lever forward again or pull the
lever toward you to switch the high beams
off. Headlamp Flasher
Slightly pull the lever toward you and
release it to flash the headlamps.
AUTOLAMPS (If Equipped)
WARNING
The autolamps switch position may
not activate the headlamps in all low
visibility conditions, such as daytime
fog. Always ensure that your headlamps
are switched to auto or on, as appropriate,
during all low visibility conditions. Failure
to do so may result in a collision. When the lighting control is in the
autolamps position, the headlamps
automatically turn on in low light situations
or when the wipers activate.
74
C-MAX Energi / C-MAX Hybrid (CCG) Canada/United States of America, enUSA, First Printing LightingE142449 E162679 E162680 E142451
Page 78 of 497
If equipped, the following also activate
when the lighting control is in the
autolamps position and you switch them
on in the information display:
•
Configurable daytime running lamps.
• Automatic high beam control.
• Adaptive headlamp control.
The headlamps remain on for a period of
time after you switch the ignition off. Use
the information display controls to adjust
the period of time that the headlamps
remain on. See Information Displays
(page 92).
Note: With the headlamps in the
autolamps position, you cannot switch the
high beam headlamps on until the
autolamps system turns the low beam
headlamps on.
Windshield Wiper Activated
Headlamps
The windshield wiper activated headlamps
turn on within 10 seconds when you switch
the windshield wipers on and the lighting
control is in the autolamps position. They
turn off approximately 60 seconds after
you switch the windshield wipers off.
The headlamps will not turn on by wiper
activation:
• During a mist wipe.
• When the wipers are on to clear washer
fluid during a wash condition.
• If the wipers are in intermittent mode.
Note: If you switch autolamps and
autowipers on, the headlamps will
automatically turn on when the windshield
wipers continuously operate. INSTRUMENT LIGHTING
DIMMER
Note:
If the battery is disconnected,
discharged, or a new battery is installed, the
dimmer will set the illuminated components
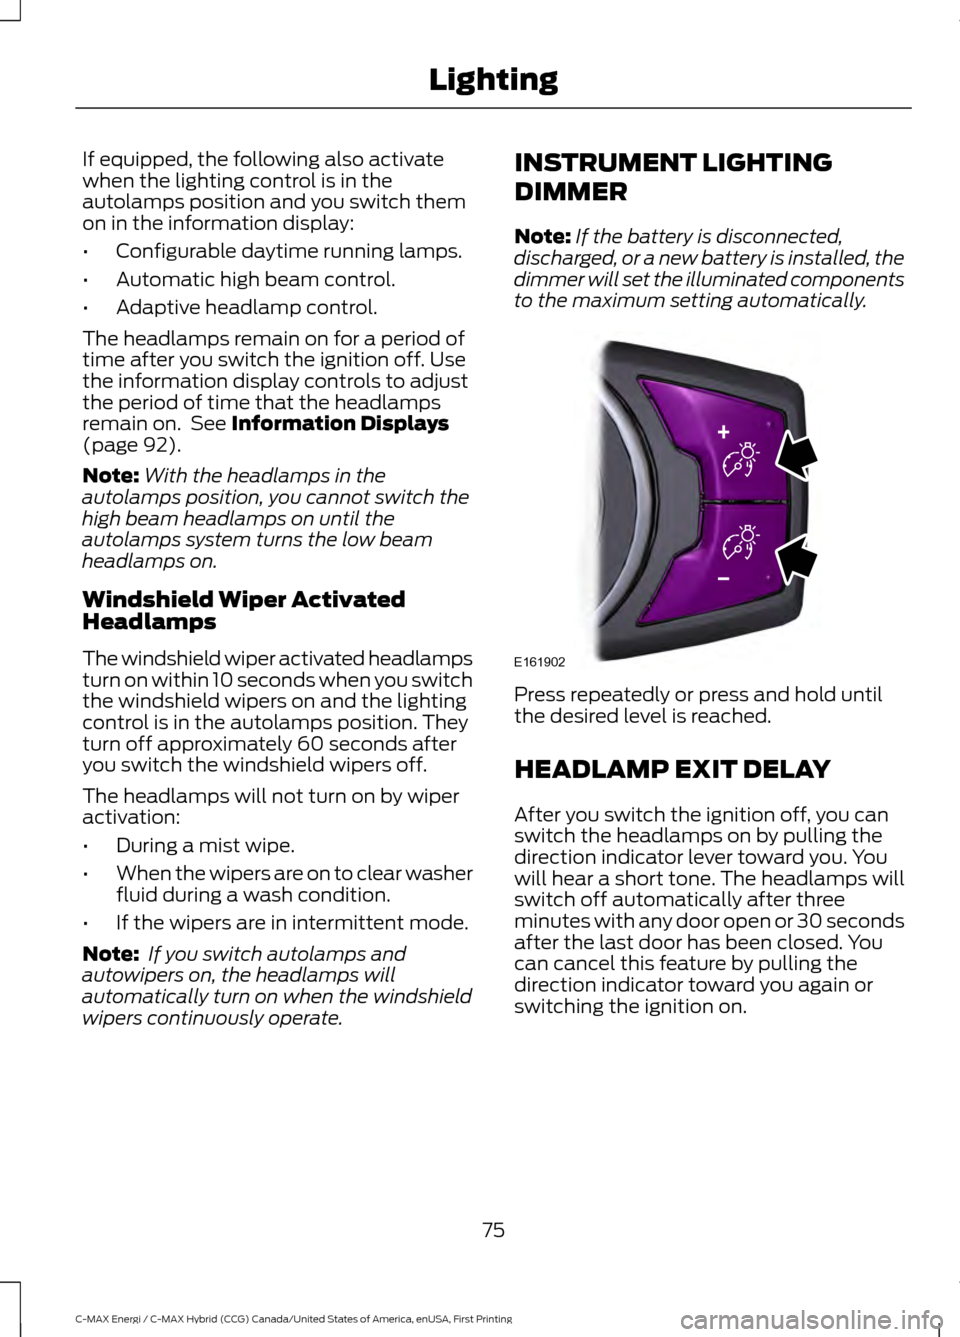
to the maximum setting automatically. Press repeatedly or press and hold until
the desired level is reached.
HEADLAMP EXIT DELAY
After you switch the ignition off, you can
switch the headlamps on by pulling the
direction indicator lever toward you. You
will hear a short tone. The headlamps will
switch off automatically after three
minutes with any door open or 30 seconds
after the last door has been closed. You
can cancel this feature by pulling the
direction indicator toward you again or
switching the ignition on.
75
C-MAX Energi / C-MAX Hybrid (CCG) Canada/United States of America, enUSA, First Printing LightingE161902
Page 83 of 497
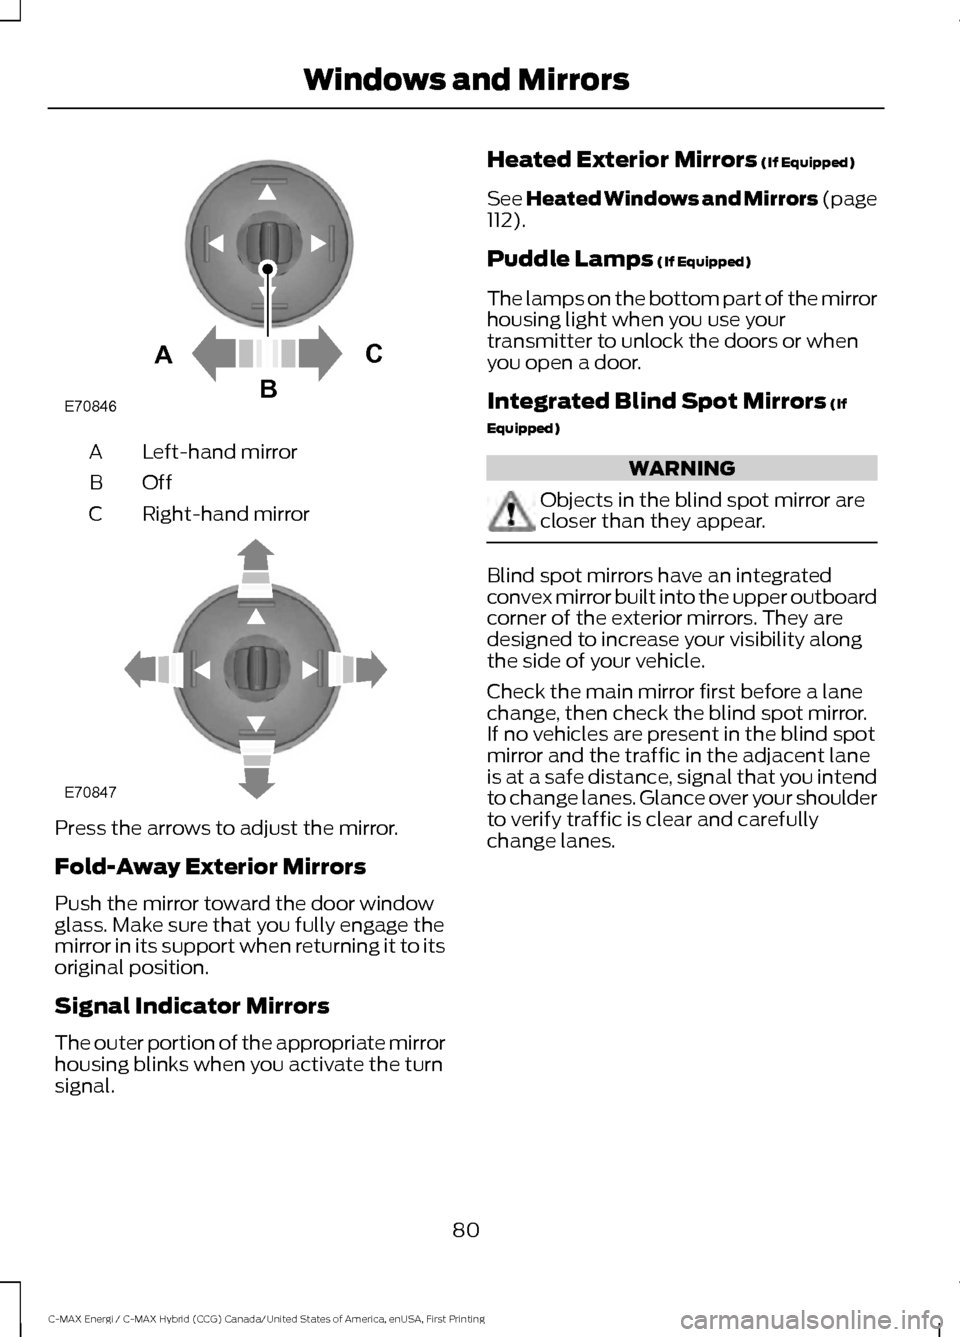
Left-hand mirror
A
OffB
Right-hand mirror
C Press the arrows to adjust the mirror.
Fold-Away Exterior Mirrors
Push the mirror toward the door window
glass. Make sure that you fully engage the
mirror in its support when returning it to its
original position.
Signal Indicator Mirrors
The outer portion of the appropriate mirror
housing blinks when you activate the turn
signal. Heated Exterior Mirrors (If Equipped)
See Heated Windows and Mirrors (page
112
).
Puddle Lamps
(If Equipped)
The lamps on the bottom part of the mirror
housing light when you use your
transmitter to unlock the doors or when
you open a door.
Integrated Blind Spot Mirrors
(If
Equipped) WARNING
Objects in the blind spot mirror are
closer than they appear.
Blind spot mirrors have an integrated
convex mirror built into the upper outboard
corner of the exterior mirrors. They are
designed to increase your visibility along
the side of your vehicle.
Check the main mirror first before a lane
change, then check the blind spot mirror.
If no vehicles are present in the blind spot
mirror and the traffic in the adjacent lane
is at a safe distance, signal that you intend
to change lanes. Glance over your shoulder
to verify traffic is clear and carefully
change lanes.
80
C-MAX Energi / C-MAX Hybrid (CCG) Canada/United States of America, enUSA, First Printing Windows and MirrorsE70846A
C
B E70847
Page 84 of 497
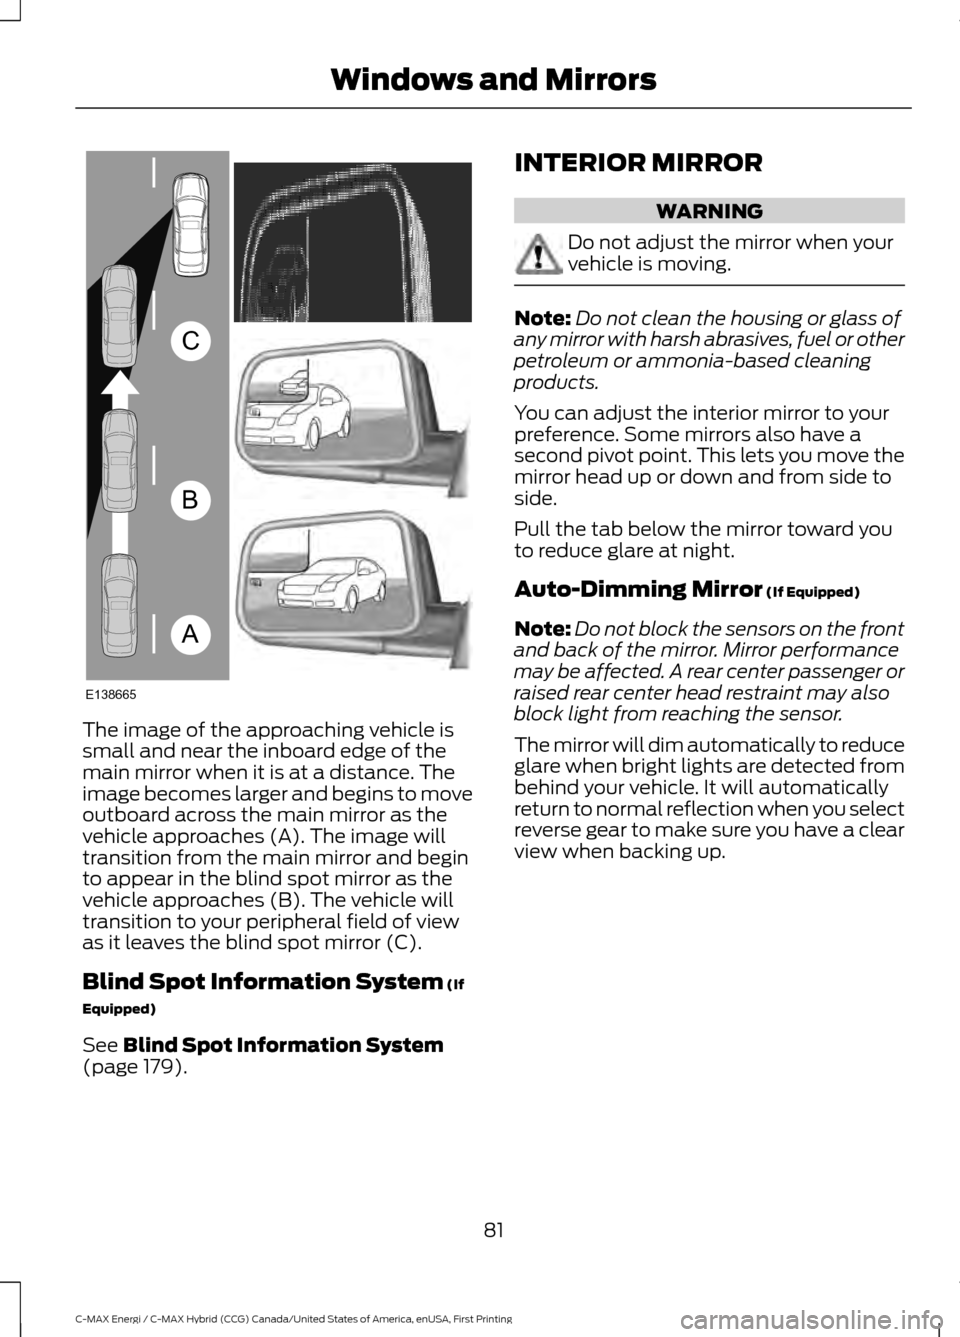
The image of the approaching vehicle is
small and near the inboard edge of the
main mirror when it is at a distance. The
image becomes larger and begins to move
outboard across the main mirror as the
vehicle approaches (A). The image will
transition from the main mirror and begin
to appear in the blind spot mirror as the
vehicle approaches (B). The vehicle will
transition to your peripheral field of view
as it leaves the blind spot mirror (C).
Blind Spot Information System (If
Equipped)
See
Blind Spot Information System
(page 179). INTERIOR MIRROR WARNING
Do not adjust the mirror when your
vehicle is moving.
Note:
Do not clean the housing or glass of
any mirror with harsh abrasives, fuel or other
petroleum or ammonia-based cleaning
products.
You can adjust the interior mirror to your
preference. Some mirrors also have a
second pivot point. This lets you move the
mirror head up or down and from side to
side.
Pull the tab below the mirror toward you
to reduce glare at night.
Auto-Dimming Mirror
(If Equipped)
Note: Do not block the sensors on the front
and back of the mirror. Mirror performance
may be affected. A rear center passenger or
raised rear center head restraint may also
block light from reaching the sensor.
The mirror will dim automatically to reduce
glare when bright lights are detected from
behind your vehicle. It will automatically
return to normal reflection when you select
reverse gear to make sure you have a clear
view when backing up.
81
C-MAX Energi / C-MAX Hybrid (CCG) Canada/United States of America, enUSA, First Printing Windows and MirrorsA
B
C
E138665
Page 88 of 497
Regen Display:
A circular arrow symbol displays when
energy is being recaptured through the
regenerative braking system. You can
switch the Regen Display off in the Settings
menu. See General Information (page
92).
Fuel Gauge:
Note: The fuel gauge may vary slightly
when your vehicle is moving or on a gradient.
Switch the ignition on. The fuel gauge will
indicate approximately how much fuel is
left in the fuel tank. The arrow adjacent to
the fuel pump symbol indicates on which
side of your vehicle the fuel filler door is
located.
The needle should move toward F when
you refuel your vehicle. If the needle points
to E after adding fuel, this indicates your
vehicle needs service soon. After refueling some variability in needle
position is normal:
•
It may take a short time for the needle
to reach F after leaving the gas station.
This is normal and depends upon the
slope of pavement at the gas station.
• The fuel amount dispensed into the
tank is a little less or more than the
gauge indicated. This is normal and
depends upon the slope of pavement
at the gas station.
• If the gas station nozzle shuts off
before the tank is full, try a different
gas pump nozzle.
Low Fuel Reminder
A low fuel reminder triggers when the fuel
gauge needle is at 1/16th.
Variations: Distance-to-empty
Fuel gauge position
Driving type (fuel economy
conditions)
35–80 mi (56–129 km)
1/16th
Highway driving
35 mi (56 km)
1/16th
Severe duty driving (trailer
towing, extended idle)
Vehicle Settings and Personalization
Display/Trip
See
General Information (page 92).
Information
See
General Information (page 92).
Settings
See
General Information (page 92). Brake Coach Display:
The Brake Coach appears after the vehicle
has come to a stop. It coaches you to brake
in a manner which maximizes the amount
of energy returned through the
regenerative braking system. The percent
displayed is an indication of the
regenerative braking efficiency with 100%
representing the maximum amount of
energy recovery.
This feature can be switched on or off in
the information displays settings menu.
See
General Information (page 92).
85
C-MAX Energi / C-MAX Hybrid (CCG) Canada/United States of America, enUSA, First Printing Instrument Cluster
Page 115 of 497
•
Press the recirculated air button so
fresh air enters the vehicle.
• Press the fan button until the fan is at
its lowest setting.
Automatic Climate Control
Note: Adjusting the settings when your
vehicle interior is extremely hot or cold is
not necessary. The system automatically
adjusts to heat or cool the interior to your
selected temperature as quickly as possible.
For the system to function efficiently, the
instrument panel and side air vents should
be fully open.
Note: If you select AUTO during cold
outside temperatures, the system directs
airflow to the windshield and side window
vents. In addition, the fan may run at a
slower speed until the engine warms up.
Note: If you select AUTO during hot outside
temperatures, or when the inside of the
vehicle is hot, the system automatically uses
recirculated air to maximize interior cooling.
When the interior reaches the selected
temperature, the system automatically
switches to using outside air.
Heating the Interior Quickly
1. Press the
AUTO button.
2. Adjust the temperature control to the desired setting.
Defrosting and Defogging the
Windows Quickly
Press the MAX defrost button.
Recommended Settings for
Heating
1. Press the
AUTO button.
2. Adjust the temperature control to the desired setting. Use
72°F (22°C) as a
starting point, then adjust the setting
as necessary. Cooling the Interior Quickly
Press the
MAX A/C button.
Recommended Settings for
Cooling
1. Press the
AUTO button.
2. Adjust the temperature control to the desired setting. Use
72°F (22°C) as a
starting point, then adjust the setting
as necessary.
Side Window Defogging in Cold
Weather
1. Press the defrost and panel buttons.
2. Select
A/C.
3. Adjust the temperature control to the desired setting. Use
72°F (22°C) as a
starting point, then adjust the setting
as necessary.
4. Adjust the fan speed to a high speed setting.
5. Direct the outer instrument panel air vents toward the side windows.
6. To increase the airflow to the outer instrument panel vents, close the air
vents in the middle of the instrument
panel and in the rear of the center
console.
HEATED WINDOWS AND
MIRRORS
Heated Rear Window
Note: Make sure the vehicle is running
before operating the heated windows. Press the button to clear the
heated rear window of thin ice
and fog. The heated rear
window will automatically turn off after a
short period of time.
112
C-MAX Energi / C-MAX Hybrid (CCG) Canada/United States of America, enUSA, First Printing Climate ControlE72507
Page 119 of 497
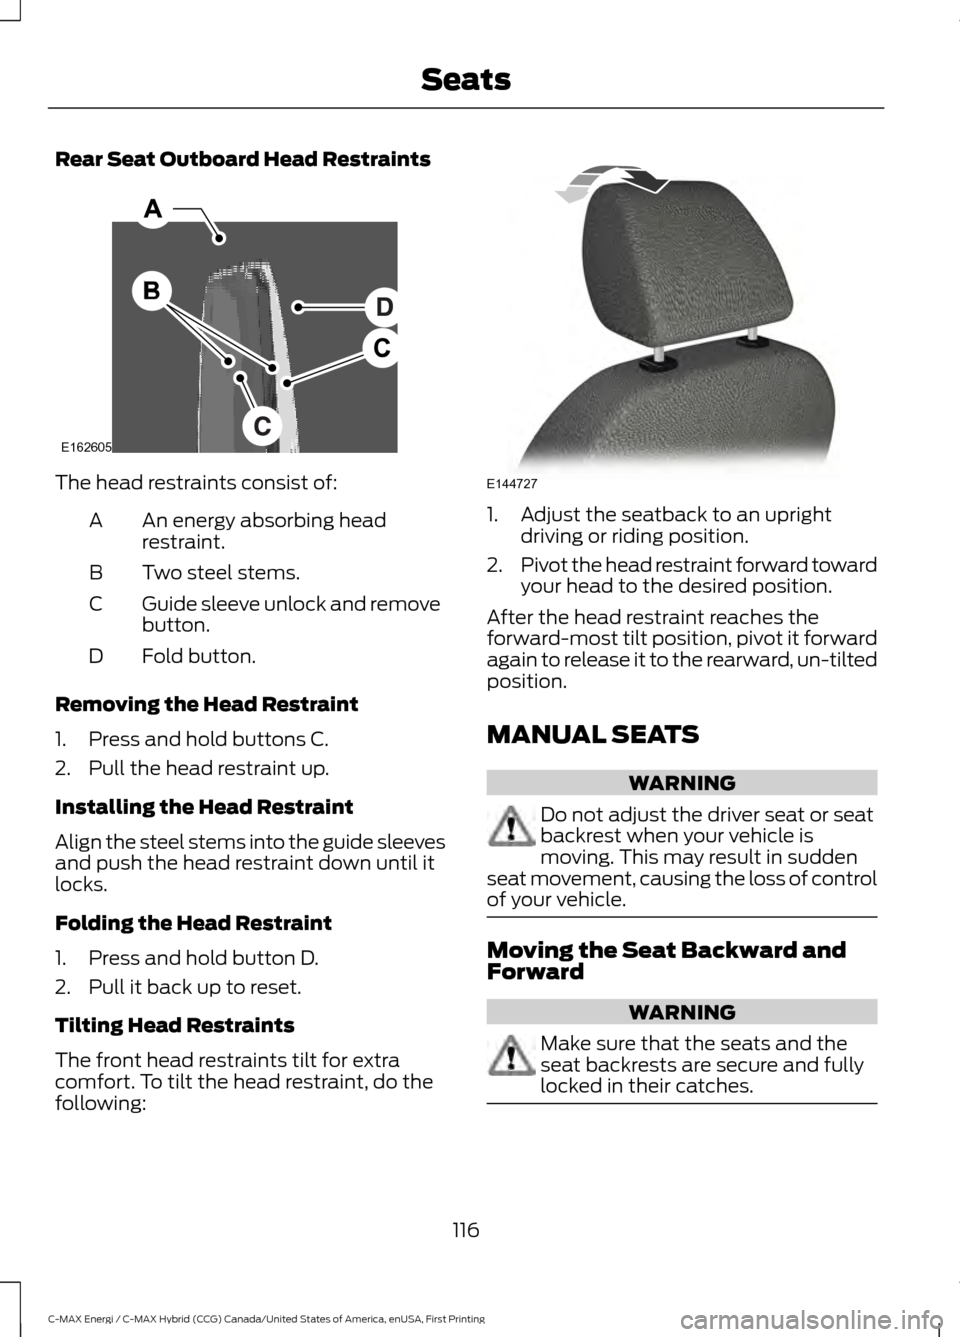
Rear Seat Outboard Head Restraints
The head restraints consist of:
An energy absorbing head
restraint.
A
Two steel stems.
B
Guide sleeve unlock and remove
button.
C
Fold button.
D
Removing the Head Restraint
1. Press and hold buttons C.
2. Pull the head restraint up.
Installing the Head Restraint
Align the steel stems into the guide sleeves
and push the head restraint down until it
locks.
Folding the Head Restraint
1. Press and hold button D.
2. Pull it back up to reset.
Tilting Head Restraints
The front head restraints tilt for extra
comfort. To tilt the head restraint, do the
following: 1. Adjust the seatback to an upright
driving or riding position.
2. Pivot the head restraint forward toward
your head to the desired position.
After the head restraint reaches the
forward-most tilt position, pivot it forward
again to release it to the rearward, un-tilted
position.
MANUAL SEATS WARNING
Do not adjust the driver seat or seat
backrest when your vehicle is
moving. This may result in sudden
seat movement, causing the loss of control
of your vehicle. Moving the Seat Backward and
Forward
WARNING
Make sure that the seats and the
seat backrests are secure and fully
locked in their catches.
116
C-MAX Energi / C-MAX Hybrid (CCG) Canada/United States of America, enUSA, First Printing SeatsE162605 E144727