gearbox FORD CAPRI 1974 User Guide
[x] Cancel search | Manufacturer: FORD, Model Year: 1974, Model line: CAPRI, Model: FORD CAPRI 1974Pages: 205, PDF Size: 43.75 MB
Page 110 of 205
Chapter 6 M anual gearbo x and autom atic transmission 109
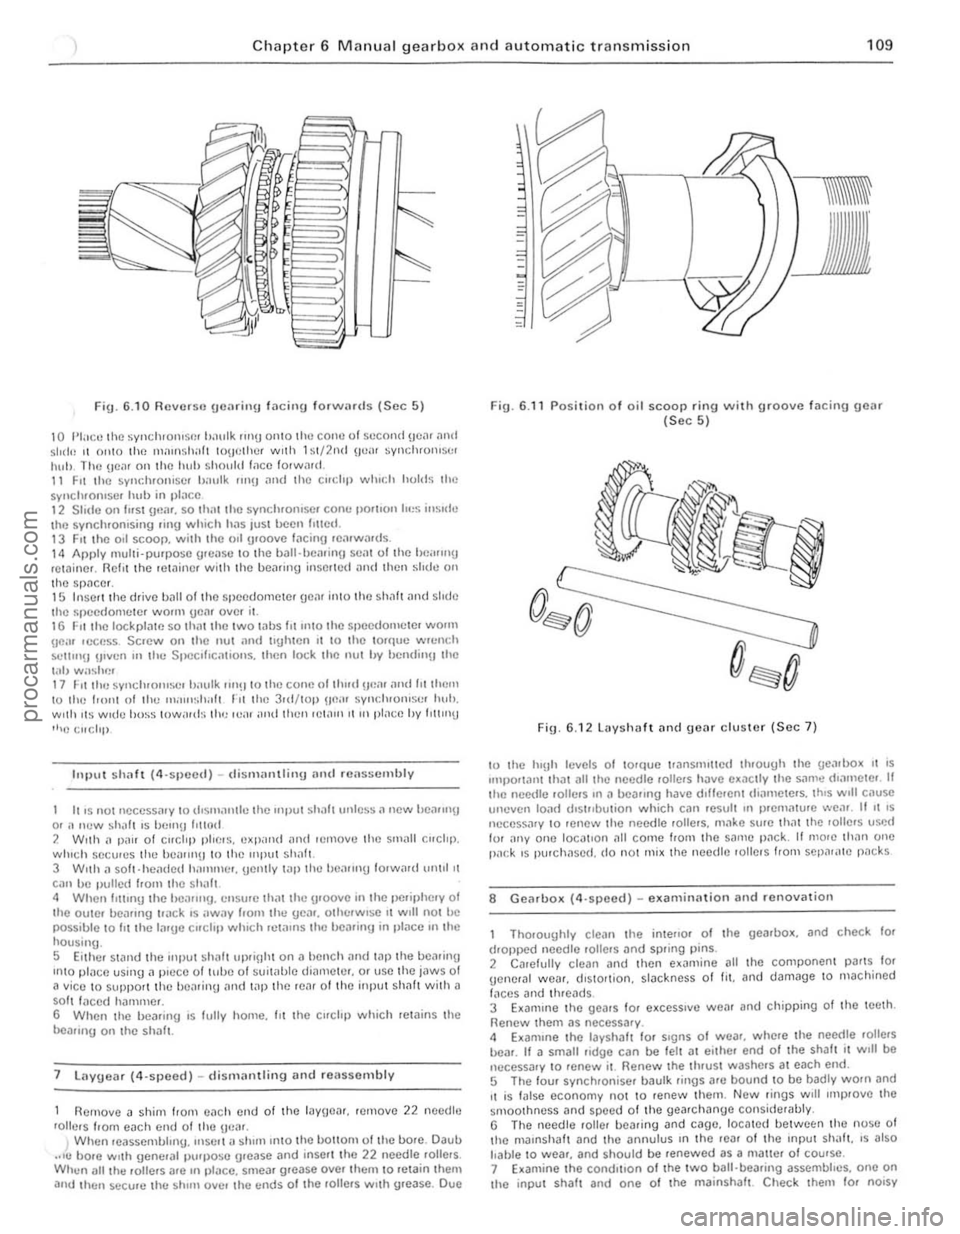
Fig. 6.10 Rcvcrsu [JC>lrill[J '"cill[J fo rwMd s (Scc 5)
10 l'I:IClllhl} syllchlonl~!"!! t,,1nlk "n[J onlO Ihe COl It! 01 second !Je,'. ,1n(1 511110 11 onl0 I he Ill:H(\sili,l t tOIJlHiler wltil h t/2nd lIe,,, wnclHOlliStH iluh. Thn \In", on Ilw huh should Iilcn 100war d. 11 Fit Ihe sync hronise, lJ;oulk WI(I >llld the c"clop ""Iudl holds th n
sV"ch'Olllser hub in ,)I;lCC 12 Slide on hisl Ulli". so th>ltthe sync hronise. conI.' pO"'Oll 10,,5 ins ide the synch'Onlsing .i"U which ha s lust ~en f'IlC(1. 13 Fit thc oil scoop. wilh the all [JIOOVC lilCinU .e;lfwa.ds. 14 Apply !11ulii-pu'l)oSC [Jrf:ilse to thc billl·hciI.il1!J seilt 01 the ilc,,,,"U rctaine •. flellt the lelllinCf with the be>lll"g insCrtll(1 >llId Ihell slldll on lhe sr)acer. 15 Insetlthe d.ive hall 01 rh e speedo meler geM inl0 rhe sh"lt >lnd shue the spcedomete. wo.1lI ueM over i\. 1 6 1: ,1 I h e loc kpl>lte so thm the twO wbs ht II1tO rhe speedolllelC. wOlin \lCi" I(.'C'"SS Soew all t he not alld tl{.lhlen II to the to.que wICnch
SCllln!) !/,vun III the SI)()Clhcallotls. Ihen lock Ihe IIUt hy bendi"" th C
I"IJ w;osh!"!! 11 Fit lhu synchltJIu~r iJ,IlIlk 1II'!110 thll COliC 01 thUd !Jea. ;lIId lit them to Ihu 1,0'11 01 Ihu I"al,,~,h,,1t ,"It the 3.d/wp !W~. sYlldllOliiSC' huh.
With Its Wide ho~s IOWiUd~ Ihe le,u illid (illlil leWII) I( III pl;lce hy IIlllll!)
"'e t.:llchp
11I1)ut shaft (4·slleed) -dism 'Hlllillg and reasscmbly
It IS
not nccessa.y to (los",,,,lIlc Ihe Input sh
7 lilY!Joa r (4·speed) _ dis milnlling and reassembly
R e
move iI shim Irol11 cilc h end of t he layUMr. ,elllove 22 needle
rolle.s hom each enu of tha \JC
ig .
6.1 1 Position o f oil scoop ring with groove facing gcar (Sec 5)
Fi ". 6. 12lDyshDIt and !Je>lr cluste r (Sec 7)
10 Ihe h'!Jh levels of corque lfanSllulled th.ough the gealbo~ " IS ,mllo.tilnt Ih;)t all the needle rolle.s have exac lly Ihe s,1me dlamele. II Ihe n eed le .ollers ,n iI be,ulng have dlffe.ent (liamelc,s. thiS Will cause
t HIeve" IOile! dls urbu!ion which call .e sul t In prelll;)lu.e we
ThO.oughly cleall the inle"Or of the gearbox. and check lor d.oppcd needle . olle.s ilnd spr ing pins.
2 Ca.elully clean ilnd thcn e xamine all the component pa.ts fOf gene,al wea •. d,stOltion, slilckncss of f it . and damage to IlIac hi ned
I"ces and th.ead s. 3 E~alllllle the gea,s for e xccsslve wear and chipping of the teeth. Renew them as necessa.y .
smOOlhness
procarmanuals.com
Page 111 of 205
~10 Chap ter 6 Manual gearbo)( an d automatic transm iss io n
operlltlon. looseness between the inner ;mel oulC. ';)ces. imd 10f genera' wear. NOfIll.llly they should be .enewed on a gearbox lh<11 IS being .ebuil l. 8 II Clther 0' the synchrOnise. unllS ;nc WOUl II w Ill be ncccssmy 10 buy" complete assembly as the Pill ts ,lIC not sold individually. Also check the sliding keys 10' we;'!. 9 Examine tho ends 0' IhO scl(!C I(ll' lor ks where they rub "g.1In51 the channels in the peJiphery of the synchrOntSfl f units_If I)()Ss,ble cOIllp.."e the sclecw. lorks with new Units to hell) dC1Crminc the weill lh,,1 h,IS occtJUcd Renew thelll " worn. 10 If the bCilring bUSh ,n Ihe CXI(mSlon is b;uliy worn II,s OOS110 [
When any hOlt screws "110 a throuUh hor". JOllll11\!J COlllpnulI/t Should hc nj)lllted to I he lhwads 011l11! holl helorc It ," InS/"h~1 2 Fit Ihe /cve.so Idle. He"r WIlli Ihc It,oolle on the !le;1I tuw;IId,. Ih,' lenr.lnsel! Ihe .dle, s h ah nnll dlllle 11111 with .1 pla~t.c·IIIl:IIIt].1 h;""""" unllllhc OOltOnl ollhe Slel) on the end ollhe shalt.s IIIIsh WIth lhl! ,,11.1 0 1 the gCJloox. Thc mIlled "
FlU. 6 13 Apply 101ll1lng compoullll to the threilds 0 1 Ihe bolts. lIl~e
0,1
the new IIlput sh,ll! ncedle rollel heilrlllg ilnd push I t 11)10 tllC oJorc 01 the input sha ft Slide the lOP gC(lr synchroniser baulk IInu on to the cone olthe IIlJ)u I sha h 8 FIt the extension houSll19 gnske!. lhen InSerl the ,1s~",hlcd mainsha/t into Ihe rca. 01 the box anll (frille II III untIl the nose 01 Ihe Illalnsh~h is fully engaucd in I he II1PUI shilh necdle l>c,l11nU 9 Carefully lu.n the ge;ubox upSIde down. so thilt the layshalt \}e,lr elusler dIOI)S mto engJgelllenl with the malnshillt Jnd IIlpIII shalt Check thilt the gear and the two lluust wilshe.s il.e III line and then c,l.elully push in the layshalt from thc leal. If necessary till) Ihe S h ,ll! In with the p lasuc·headed IHI/llmer. bllt take grC;lI CJre not to dlslodUe Ihe thruSI washels or needle .olle.s . When fully home. the h Ollom of Ihe slep on the .dlel shalt shOuld be In hnc with Ihe face 01 the box and Ihe mIlled flats should be in IIno wllh the Idler shalt oo.e. 10 Turn the geilrbo~ the lighl w;ly UI) Jnd align the hole in the 1>.111 bemll1g SUpj)Orl WIth the dowcl on Ihc cxtcnsion housing. Fit the eXlenSlon housing. Apply jOlllllnu coml)ound to the ttlle<1ds of Ihe bolts. InSClt them and tightcn 10 thO torQuc wrench seHlng gillen In the SpeCll l
C3tions . 11 1/ a new cxtension bush has been fllle(1. check Ih~t the notch 01 011 groolle III II ilhgns wllh lhe o ll,elurn grOOlle In thoJ extension housing. If thc now exlension housinU 011 senl hilS not illready been filled. slide It Ollel the extension Shill t and enrelully tap it in wilh n h~nllller and n
b lock 01 wood.
1 2 FIt J ncw O ·ring to the spcedomeler pll110n assembly. relit the ~Sembly and f it the C llcli l) to socure i1. ,3 Inser t the r(,lIerse gear interlock plungel. ball and spring. Fllihe boll with aloek plate and lIl$crl tI,c l.Iol t. TIghten the boll and bend Ihe lock plilles to seCure ,to
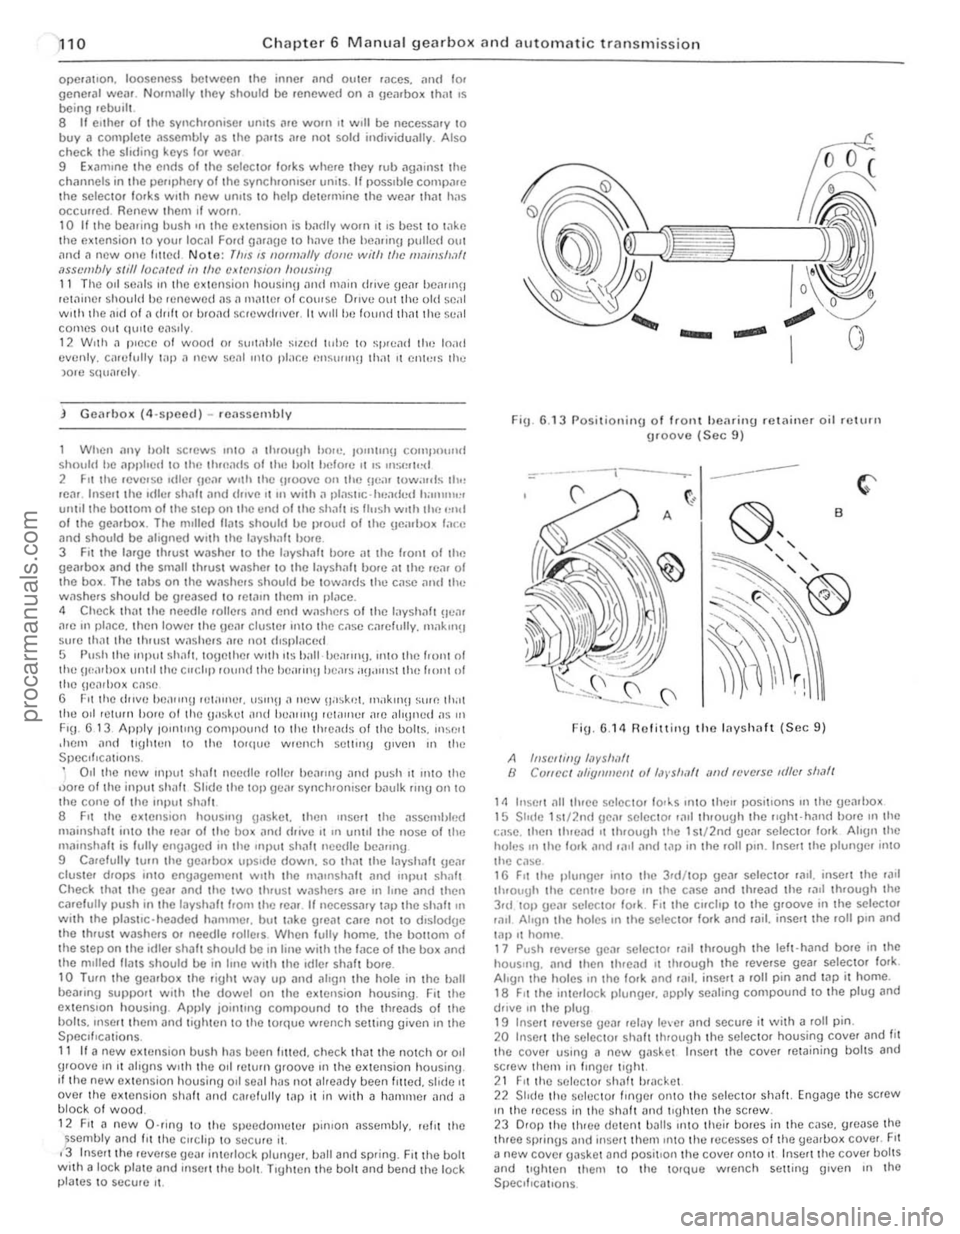
Fig. 6.1 3 Posilionin g of Iront hearin\} .e lainer oil return \}Ioove (Sec 9)
=-*.------t---.---- ---
FiU . 6.14 R olitting the Inyshaft (Sec 9 )
A hlSC//ing /,1vs/!I!f/ B ClJflec / lIi1:qlll!!efl/ of /,J)'$/I,III illld 'fJve.se IdlfJf sl!,lfl
1/1 Insert ~II Ihrce selecto, 10l~s Into Ihcn I)ositlons 111 lhe gearl)o~ 15 Shllc 1~1/2n(1 \le,1r selector ,,111 through Ihe r,ghl-hilll(1 bo.e mille
I:ilse. Ihell tluead ,t through the 1 S I/2nd gCM selector lo.k Align Ihe holes 111 tile lo.k and r~11 ,111(/ t<1l) in the 101l1)ln. Insert the plunUe/ into thc c,lse 16 FIt Ihe pltlllgc/ '1110 Iho 3rd /lOI) ge,ll selecto. lad. inscrt lhe 'illl
t h .ough Ihe ccnHe hore III the C,lse ;lnd Ihread the raIl Ihrough Ihe 3rd 101) gea. sel()(: tor lo.k. Fit the clfchp to Ihe groolle ;n the se lecta' lilll Ahon Ihe holcS III the selectol 100k and ,;lil. insert the loll pIn and lal) .t home. 17 PUSh lellerSC gc,'1 seleelo, r;llt Ih/ough Ihe lelt·hand bore in the hou$"'g. and then thread 11 through the rellerse gear seleclol fork. Align Ihe holes III Iho IOrk and 101.1. inserl a roll pin and tap it home. 18 FIt Ihe interlock plungC/< apply sealing compound to the plug and dfille In Ihe plug 19 Inse!! ICllerSe ueJI ,clay lever and secu/c it wilh a roll pin. 20 Inse't thO sCleCtOr shalt ItHough the selcctol housing COllel and fit the co~er using a new gaskel Insert the COlier rewining bolts and screw them in Iingel lIghl. 21 FII the sel/lCIO' sh:lh b'lIcket 22 Shdo lhe S(lIOClOr flnge. onto the selec tol shalt. Eng~gc the strew III the ,ece~~ in th O shaft ~nd tIghten the sc rew. 23 0101) lhe Ihloo dctent ba lls 1I1tO thcir bores in t he casc. g1Case the thleo sprinus alld Ilise rt thcm Into the recesses 01 tile yeJ.1>ox COllel. FII
a new COlier gasket and positIon Ihe COllcr onto II Insert the COllel holtS and tlghtcn Ihem to tho 10Ique wrench suiting (Jillen III lhO SpeClf,callons
procarmanuals.com
Page 112 of 205
Chapter 6 Manual gearbox and automatic transmiss ion 111
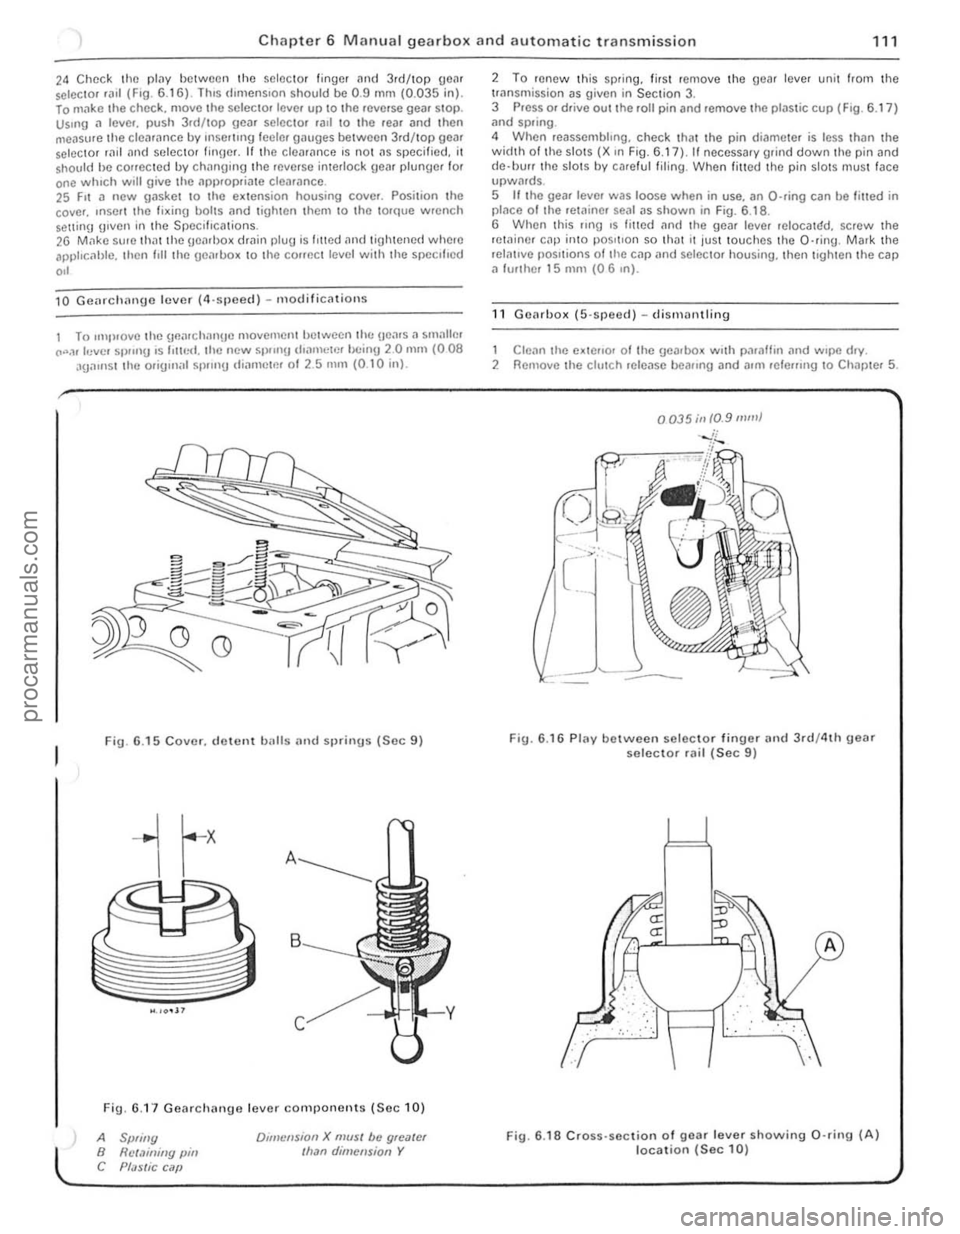
24 Chec k the plilY between the selector finger and 3.d/top geM selC{;lOr .a,1 (F,O. 6 .1 6) . lh,s d,mens,on shou ld be 0.9 mm (0.035 in). lo m"ke t he chec k. move the selec to. leve. up to the .everse gea. SlOp. Us.ng a lever. push 3.d/top gear selector .all \0 the rear and then
measure th e clea .ance by rnsel1lng leeler gauges betwee n 3rd/top gear selector rild "nd seleClOr finger. If th e cleM,mce 's no t ns specified. it shou ld he conecled by chnnging lhe .everse interlock geM plunger for one whIch will give the ,'PI).opria te clearance. 25 F,t a new gasket 10 the e~lension housing cover. Posilion the
cove •. ,nSOI I the fi~ing bolts nnd lighten Ihem 10 Ihe torque wrench Solt1inlJ g,ven in the Specifications. 26 M,1kc su, e th atthe geMl>o~ dmin plug is I,tted and tigh tened where apphc, 1hlc. then I,ll the uenlbo~ 10 the COffect level with the specl l'ed
,,'
10 Gcnrchnnge lever (4,sjleccl ) - m odificnlions
1 To ,mp,ovelhe \]flnr ch nngc movemcntlJctwecn lh(: Hea.s. , smallm CO".,r levcl Sl)!"'g ,s 1'lIr,<:I. the new 51)/,nU d,amclr'!' bc inU 20 mill (008 aga,nst the orig,n;r l sp.,n!) IIiarllctm 01 2.5 nUll (0 .1 0 inl.
Fig. 6 .15 Cover. d ewnt balls and sprinus (Sec 9)
Fig. 6.1 7 Gearchange lever components (Se c 10)
A Spliny B Rct.1illiny pin C Pf;JSlic C ilP
Dlillcnsion X mUSI be gloater Ilran dimension Y
2 To renew Ihis sp.ing. lir sl remove the gear lever unit from the trnnsmission as given in Section 3. 3 Press or drive out the roll pin and remove the plastic cup (F ig . 6.17 ) ;rnd spring .
4 When reassembhng. check that the pin di('!meter is less thiln the width 01 th e slots (X ,n Fig. 6.17), II necessary grind down the pin and
d e·llUrr the slots by ca.e ful filing . When filled the pin slotS mus t face upwMds. 5 If the gear leve. was loose when in use. an O-ring can be filled in placo o f Ihe retainer sOill as shown in Fig. 6.1 8 .
6 When this flng ,s fmed an(I the gear leve. reIOCalr:!d. screw the retainer cap inlO pos,tlon so th ilt It jus t touches th e O·ring . Mark the relntlve pOSitions of tile cap
1 Clean the e~tello. 01 Ihe gearbox w.th paraffin .,nd w.pe d.y. 2 Remove the clutch release beallng and allli lele",ng 10 Chapter 5.
0035;11 10.9 mill}
Fig. 6.16 Plav between selec to r finuer and 3rd/4th geM selector rail (Sec 9)
.. : . :,'. :", .
fLJ
··· ..
A
Fig. 6 .18 Cross· section of gear lever showing 0 ·rin9 (A) location (Sec 10)
i
i
procarmanuals.com
Page 113 of 205
Chapter 6 Manual gearbox and automatic transmission
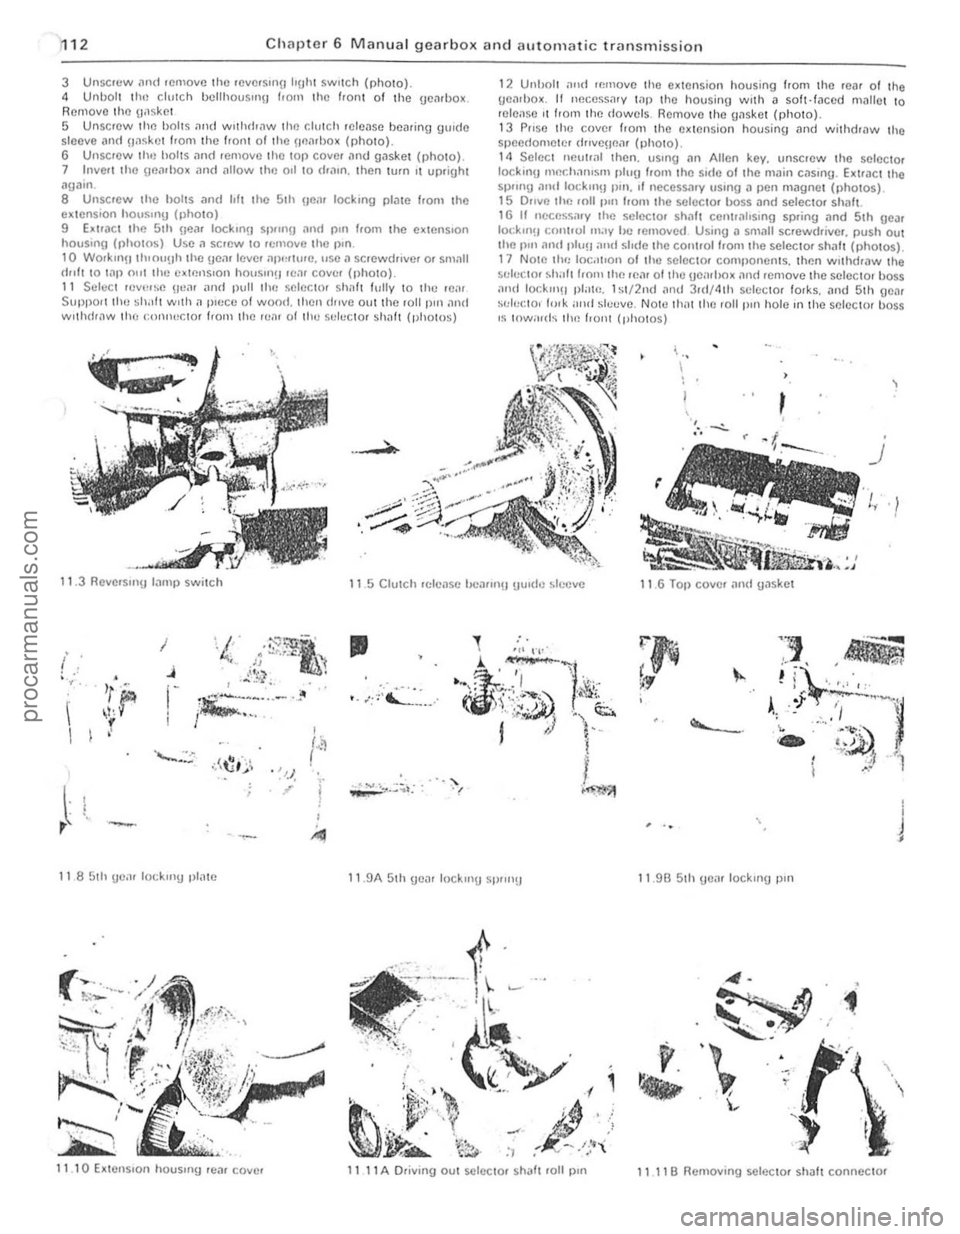
3 Unscr(lw .1ml remove Ihe reversrnu IrUtli SWilch (rhOIO). 4 UnbO lt the clulch bellhousrrl\J f,om the /,onl of the ge~rbox. Removo Iho gaske t 5 Unscrew tllo bolts .111<1 w,thdr
7 Inve,1 the UflilrllO x
I I Select revct~e !Ica,
12 Unholl and removc Iho extension housing Irom the ,ea, of Ihe
!)en,box . t1 nece5snrv lilP tho housing wrth a soft·/aced mallet to releilse ,I t,om 1he dowels. Removo tho gnske ! {photo}.
13 P"se Ihe cove, from th e ex 1ension housing Dnd withcfrnw the speedome1e, d"vc\Jenr (photo). 14 Selec i neut,
)
r
I
~~ . '
~~~,.,::
11.3 Revc,sm!t lilmp switch 1 1.5 Clutch rdense 1.K.'111"'!1 gu,dc sl(:cve 11.6 Tal) cover and tPske
I
( j • , .
'r" i'
I ,,J'" , i
I I
Ji;:;:~"'-'--·ft ; . -. '" . I
•
.-~:~'':''-'',:.-.,
I .-. " J
11 85th \)e;II lockrrlU plilte 1 1.9A 5th eil' lock"' SP""!t 11.9B 51h !)C
11 1 1 B Ilemovong scle<:tor shaft connector
c
procarmanuals.com
Page 119 of 205
18 Chapter 6 Manual gearbox
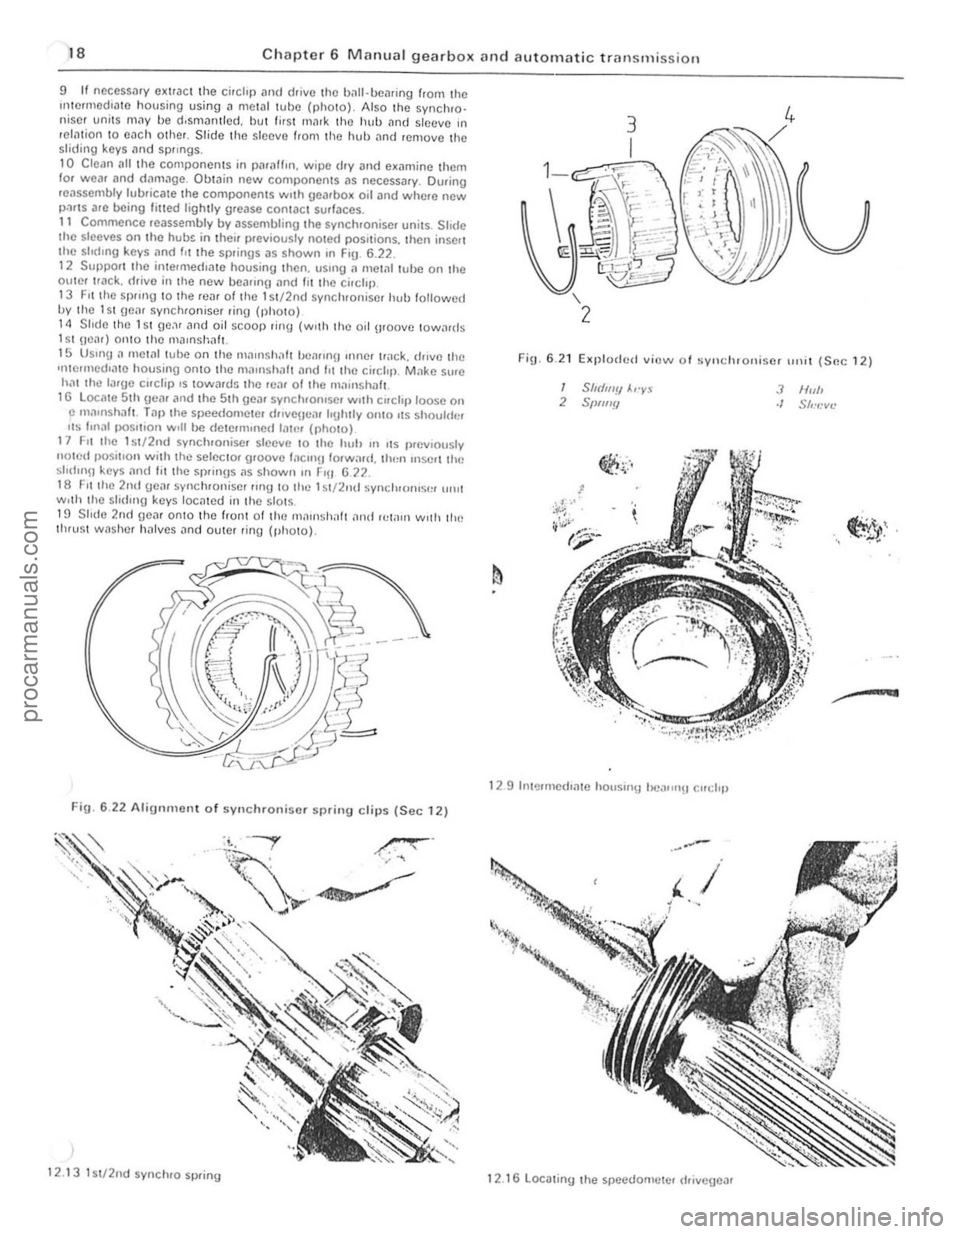
reassembly lubriC31C the components WIth geJrbox oir and where new p.).I$ alc ooing lilled ligh tly grease contact sullaces. 11 Commence reassembly by assemb ling the synchroni se. units. Sh(IC the sleeves on lhe h ubs in the ir previously noted positions, t hen insert
the slodmg keys .-mel f" Ihe springs as Shown on Frg 6 .22 .
12 SUllPOrl th e inte.rneelrate housing then. USrrlg a mewltube on the oute, I rack. drive in the new l.loarrngllnd lit I he cirelrp 13 F it Ihe sprrng 1 0 th e rea, 01 tho 1 sI,2nd s yn chroniser hull followed by the 1 Sl gear synchronise, 'ing (phOIO) 1 4 Sl ide Ihe 1 S l go., r and oil SCOOp rin g (wilh the oil uroove 10 w ,lIds 151 \lear) \"lniO tho mllmshafl. 15 Us,ng a metal lube on th o maonsh.11t he"rnl{) 'nner Ir ,lck. drive th e 'rlle,med,.-Ite housing Onto the ma'llshllh nnd 1'1 Ihe circl'll. Make sure hm Ihe larg e c"clip.s IOwards the rc." ollhe m,'"ls haf .. 1 G l ocate 51h gear ilrld the 51h goa, synchronrse . wilh Crrchjlloose on p m,llllshilft . Taplhe speedometel drrvenco1l Iogh.,y omo ,ts shoulder "~S lon"l j.lOsOIOon w,1I be de lerm,ned filter (,11\0\0) 17 F, . the 1 stJ2nd synchronisc r s'eeve 1 0 Ihe huh on 1\5 prell'ously n Olod posit,on wit h the selce ,ol groove 'ilCmU 10 rw,lrd. Ih,,,, mscrl the sl'd'nU keys ,1n(l lilt"O sp,ings as shown "' r-,U 672. 18 FIl the 2nd ueil' sync hronisc! ling to the 1 sl/2ml synch't"lIS'" "'HI wolh the shtllnu keys located in the slol~. HJ Slid e 2nd ge<"ll onl0 Ihe front 01 th e (ll ",n Sh;lh <"Iml rC1
""'=~~ ';e:o/l -~ &;J -~;V
Fig. 6 .22 Alignment of syn chroniser spring clips (Sec 12)
12 .1 3 lSI/2nd synchro sp ring
FiU · 6.2 1 E~plodcd lIi(!w oJ sylldllOlli s(!r ,,,,,I (Soc 12)
/ Sh(llIJiJ A,·y.~ 2 SPIIJIY
,
I!l1. '. ~~':;.'
1 2 9 Illt!lHnelhme hOllsm!j he ... ",,!) Cllt:i,p
1 2.1
6locatiny the speedometer Ifrillegellr
3 N,,1> ./ S","cv~'
dfO:. , . ""lJ' . ., ..
~~-.••
procarmanuals.com
Page 120 of 205
) Chapter 6 Manual gearbox and automatic transmission 119
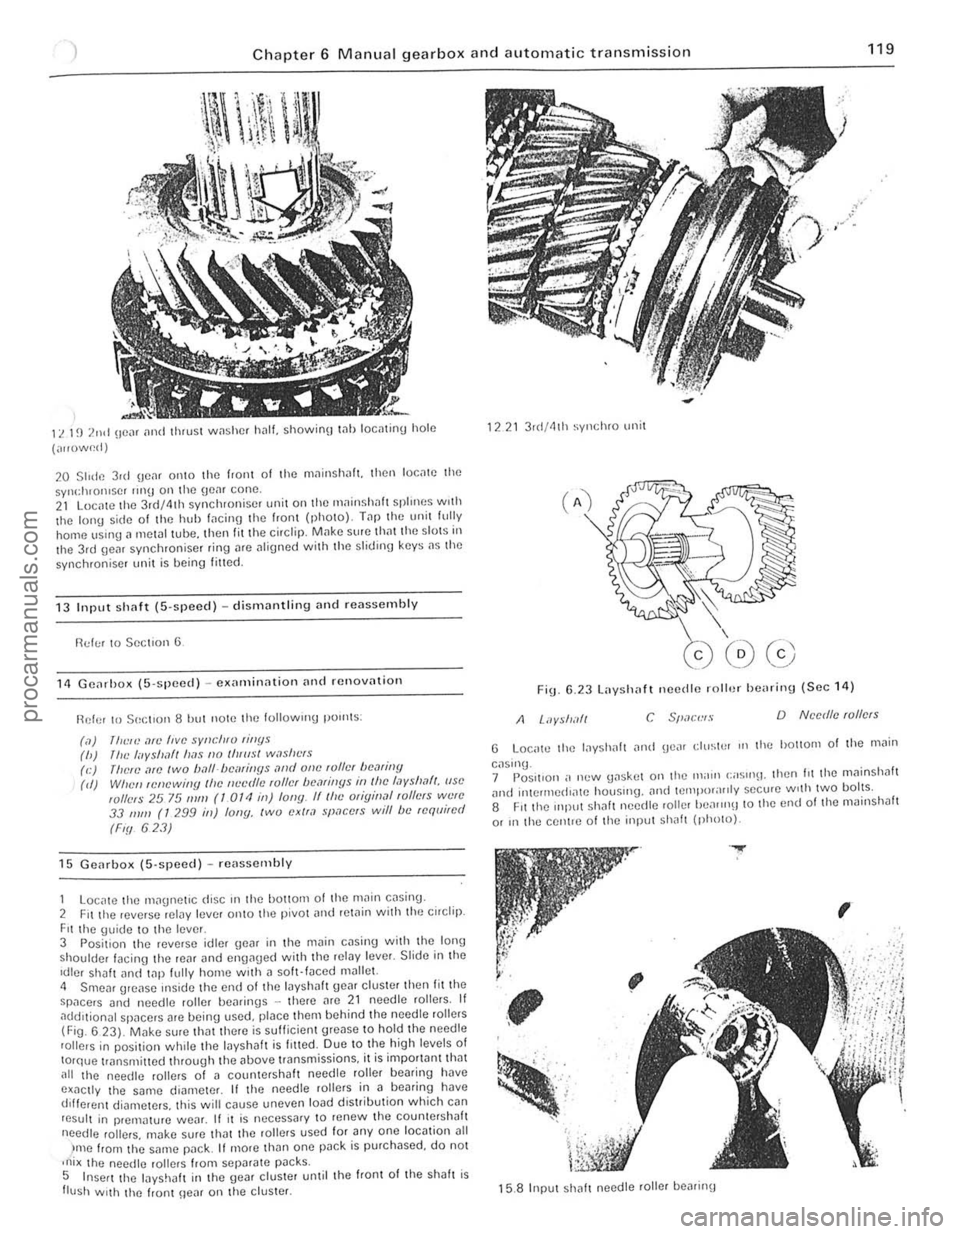
11. 1~) 2nd (Ie", [Inti thrust w,1shcf h.1l1. showioO t .. llloctltinu hole
(",,()w~d)
20 Slide 3ul \jC,lf 01110 the f,aiH 01 the mninsh
13 Input sh(lf( (S·speed) -dismantling Dnd reassembly
!'ld!;! to Section 6
11 GCil,ho)l ([i·spced) -C)lamin,lIion [In(1 rcnov[ltioll
Ref or 10501:[ '0 118 hut now the lollowlng pOllltS :
(,1)
111<:,,) ,1fI! five sYllcll,v rillYs (h) /IlL' I"yshlft lI[1s 110 IIIlIIsl w,lsllt"s (e) (lielL',1ro IWO ball-/)cmiIJYs ,lrId olle ,01lcI hCMiny (d) Wile" ,cnewi"y Ihc IIL'cr/lL' ,01lcI /)(1,1/ill[lS ill I!lc I,Jyslml/, (ISO wllels 25 75 111111 (1 OTt! ill) fony. IIlhc Oligin,ll ,ollers W{!lC 33 111/11 (T 299 ill) lony, two exll,l space's will be requi,ed
(Fiy 623)
15 Gcarbox (5'SI}Cc(l) -rC
Fit the \juidc to the leve r 3 Posit ion the reverse idler \Je~r in the m~in cDsill\j with the Ion,) shoulder facing the reill and en{lllued with thc ,eiDy Icver. Slide ill thc Idler shalt lInci t
)me from t he SMne l"JilCk It more than one pDck is purchased, do not ,ni x lho needlc rol lers from sepilrate p~cks. 5 Insert the layshJlI in the gear cluster unlil the front of Ihe shah is flush With the frunt \Ie~r on lhe cluster.
1221 3 r(I/41h syl1chro unit
Fig 6.23 Layshaft necdle roll.)/ he
G Loc,.tc the lilyshah iln!! gCilr ell/stP' III tho hOllom of the .11il;n
caslnu_ 7 Pos.1I0n ,. n(.'w \Jaskot on the Ill;nll (;;05"'11. Ihen hi the mllinshah ilnt! inlCrll1ed"l\C houslIlg. and IClllpor;I"ly secu.e w,th twO bolts. 8 Fit the mll"t Shilh needte roller heilrrn\J to the end 01 lhe mainshJlt
or In the centle 01 lho input Shilh (photo).
.....
,
~
; , .. '-; . '. ~, .
,
15.8 Input sh
i 1 ,1
I
procarmanuals.com
Page 121 of 205
)20 Chapter 6 M anual gearbox and automatic transmissio n
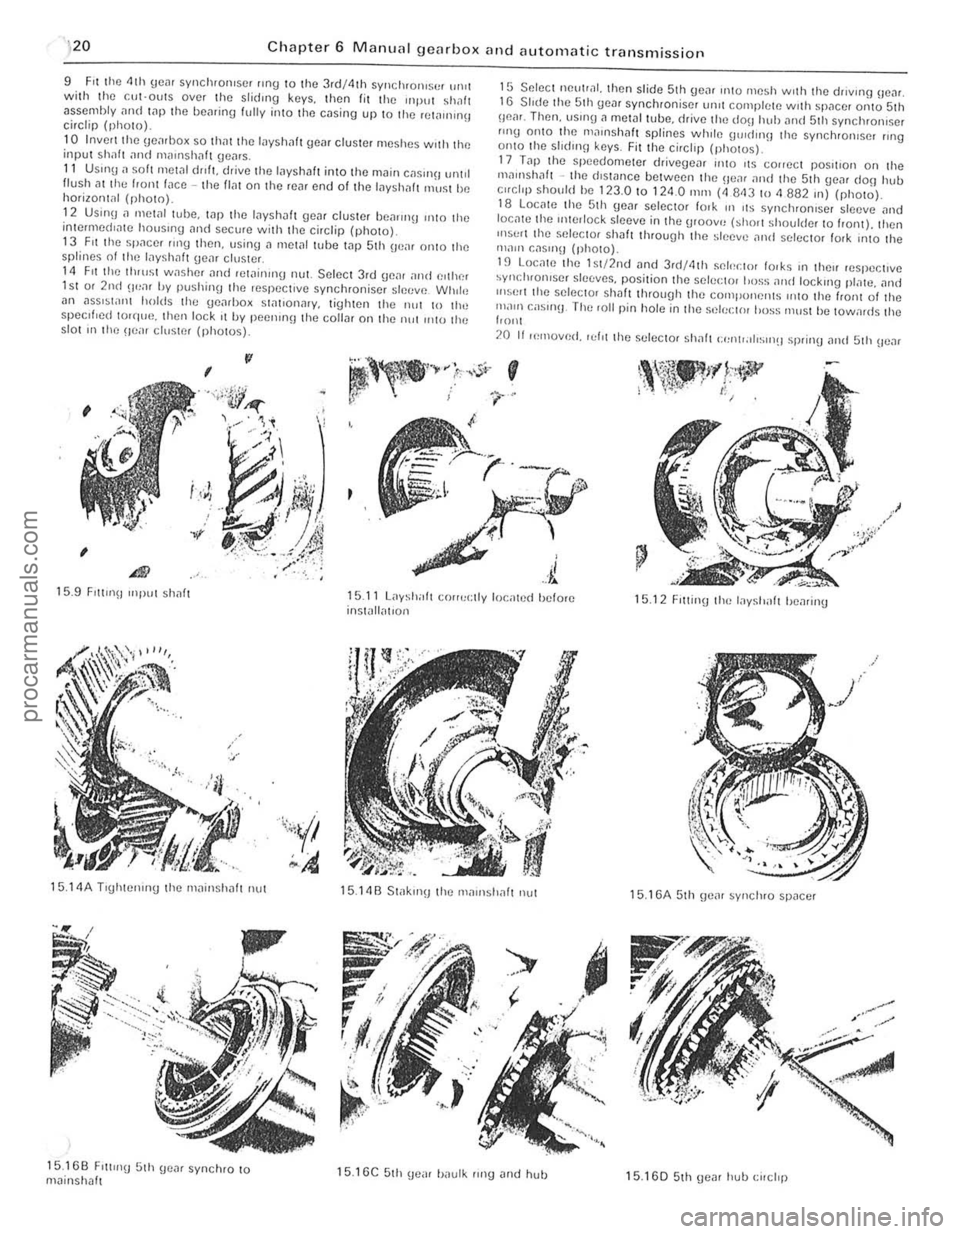
9 F it the 4th gCill syncluolliser "n9 to the 3rd/4lh sym;luOI"s(1f 'HUI with lhe c:ul-outs over the slidlllg k(lYs. then fit the UlPUl shalt asscnlhly i]n(l lilP the bearing fully into tho casing up 10 the rclo1llunu circtip (photo).
10 Invert Ihe \jCo1rilox so Ihil! the l
12 Us;n!).1 mel,lilllbe. lilfl the Inyshaf gear cluster be,IIPI'!J 11110 the inlcrmcd'
15 Seleci neulrnl. then slide 5th ge", IlItO mesh WIth the driVing Be",. 16 Slide the 51h gem synchroniser unll complete with sp"ce[ Onto 51h Oll"r. Then. usrng.l metal tube, drive Ihe dO\1 huh "lid 51h synchronlser flng OnlO Ihe 1ll",nsh,,11 splines whIle UlOld"l!) the synchronIse! 111111 onto Ihe shdlll[J keys. Fit the circhp (pholUs).
17
T"p Ihe sp eedometer drivegeilr "HO ItS COrreCI poslilon on Ihe mollllsh"ft -the dlsWllce belwoon Ihe HeM 'Illd the 5th gO,l[ dOll hub c"cllp should be 123.0 to 1 24 .0 111m (4 843 10 <1 882 Ill) (nhoto). lB Loc"le Ihc 5th He", selector fOlk In liS syn ch ronlSN sleeve "nd loc"le Ihe Interlock sleeve in Ihe uroov", hhol! Shollider 10 front). then InSurt the seleClor sh~1t through the sleeve ,1nd SeleCIOr fOlk InlO the "'aOll r.,lsll1\J (photo).
19 LocnlC the lSI/2nd "nd 3rd/4th Sf)I'~rIOr IOlks 1(1 Ihell respecllve ~Yllcillonlser sleeves. posilion the selectOl !ross
20 If If!rnoverl. 'ef'l Ihe seleCIOr sh,,11 (:"nlr,, 11~1I1!1 sprinU ",ui 51h \Ie",
.' /
15.9 FI1l1I1\1 Inpul shnl1 15.11 L;,ysh;r!t corruc tly located hefore inst,111,11101l 15.12 F,ltintllile Inysllilft hearing
15. 14A Tlghtelllng thc rn"insha fl nut
15.16B F'lllI'\) 5th genr synchlO to m~inshalt
15.148 Slak,n\1 the rH.lloslrall nul
15.16C 5th \le,,, haulk flng Jod hull
15.16A 5th gem synchro spacer
15. 160 51h gear hub {:ilchp
procarmanuals.com
Page 122 of 205
) Chapter 6 Manual gearbox and automatic transmissio n
121
"
i
...,
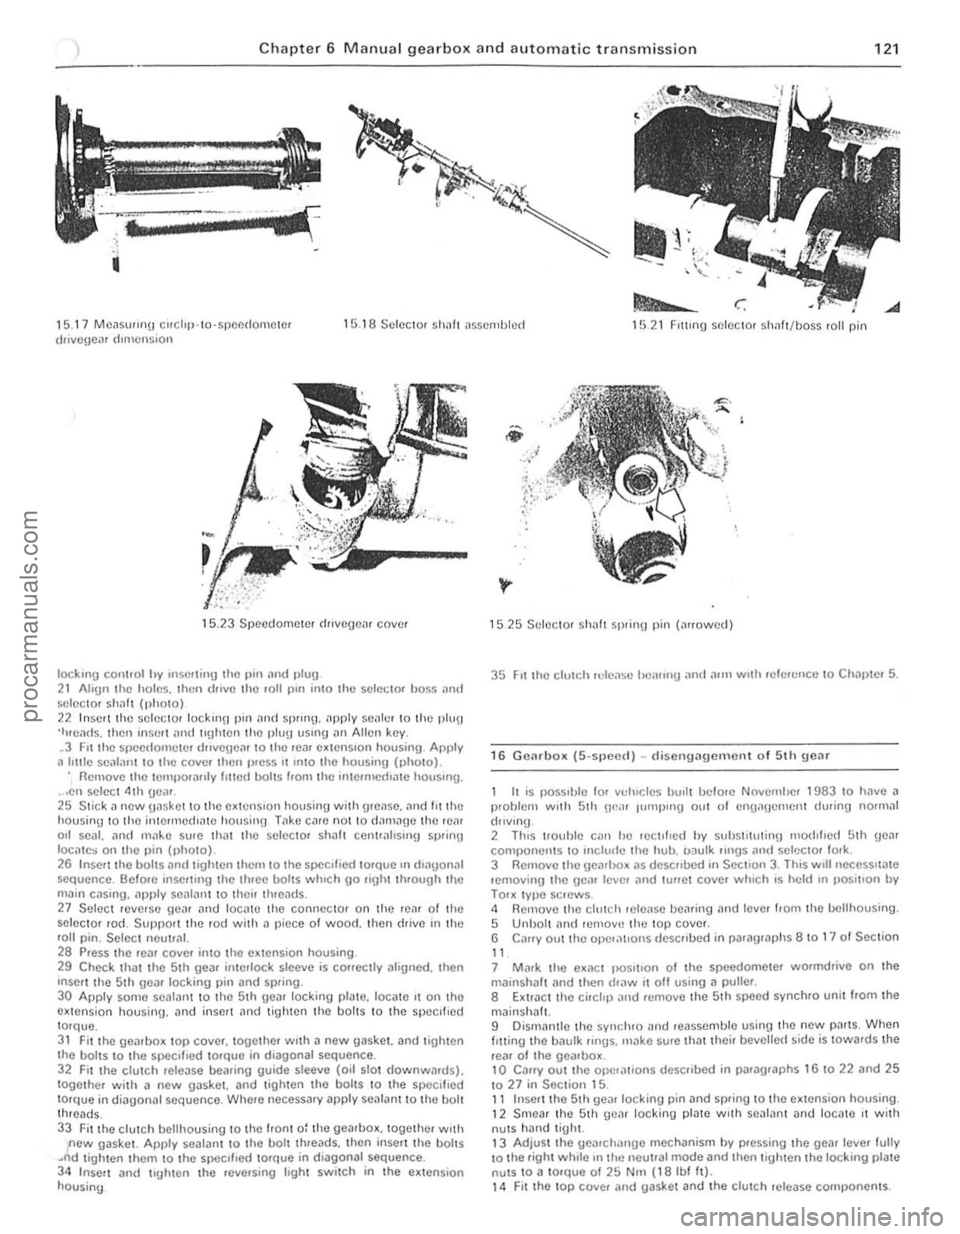
1 5. 17 MC~Sll"nu corchp· 10·SPCI1(lOIllClcr drivcgc,l' dImension 1 5 .1 8 Sc lcCl0f Sholl! t1sscmlJ lcct 1521 FIlling selector sh1lft/boss fall pin
15.23 Speedome ter dJlvcgcn, cove.
IOCkmg cOI1l,ol hy Inserl;"y the 1)111 ;lnd 1>lu9 2 1 Ahgn the holes. then (lillie Ihe roll pin il1lo the sc lcCIOf boss ;111\1 SI~ICC1Of s h
main c .. sing ... pply se
29 Check that the 5th gea. interlock slceve is corrcctly .11ognoo. then 'nscrt thc Sth geil' locking pin and spring.
30 Appl y some scalallt to the 5th geilr locking plate. 10Cilte It on thO extensio n housing. an d inselt nnd t igh ten th e bolts to I h e specIfIed torque. 31 Fit the Ueilrbo~ top covcr. together WIth a new gas\(et. and lighten
the boilS to t he sf1eclf.ed tOfQue in diagonal sequence. 32 F u the clulC h relCilSe bearing guide sleeve (oil slot dow nwllfd s). together with a new gilsket. and lighlen th o boi lS to the specillt~d torque in d;ilgon;11 sequence. Where neceSS;1ry apply seal,.nt to the bolt threads_ 33 Fitthe clutch bell housing to the Iron t 0: the gearhox. together woth new gaske t. Apply sealant to the bolt threads. thcn inse n the boilS .~d tigh ten them to Ihe SIXlcllled 10rQue in diagonal sequence. 34 Inscrt and trgh le n the .ev(usinl.l Ioght switch in Ihe ex tensio n housing
1525 Selec tor sh aft spring pin (arrowed)
35 FIt the clutch reLease l"l'lIIng and a.1Il wuh .efercnce 10 Chnl)\ el 5.
16 G e(lr box (5-spee{l) -d isellg i:lgem enl of 5th gear
I I
is possI ble 'or vducles hu,l t bclo.e NovcmiJer 1983 to have i:l p.oblem WIth 5th ne". Illillplllg Ollt of cnuanClllcn t during normal
(hlv lnu
2 ThiS 1I0uhle Cilll he rcc tl',cd hy suhstitutinu nlod,hc
3 Rem ove Ihe gearbo_ "s de$("bed in SectIon 3. This wrll nCCCSSlla te lemov ing the ge(l' Icvcr "nd lu"C I cove. whIch is held In ,)OSltlo n by TOOK typc sClews . 4 Removo the clutch Hlleilse bearing and tevcl 110m the bclthousing . 5 Unbolt ami lemovc the lOP covel. 6 C"ory out the opel,1t'0"S dcsc llbed in par "graphs 8 10 1" 01 Seclion
" 7 M"r\( Ihe ex.1Ct IIOS""o n of t he speedometcl wormdrive on the milinshil lt (lnd then draw it off using a pulter .
8 Extr"ct the ci. et,p "nd H)move the 5 th sp(lcd sync hro unil/rom Ihe
mJinsh"lt. 9 Dismanlle the synr.hro "nd reasscmble using the new p" rts, When I Itting t he b"ulk lings. m"ko sure that theil bevelle( 1 side is tOwa.ds the
re,,' o f Iho ge",box. 10 Caffy out the ope,,,,,ons desCfibed in jh"lfilgraphs 16 to 22 and 25 1027 in Section 15. 11 Inser t the 5 th ge
procarmanuals.com
Page 123 of 205
, 22 Chapter 6 Manual gearbox and automatic tran smissio n
17 Fllult dingllosis -IlH IIlU
Weak or in effec tive synch romesh
Jumps out of gem
Excessive noise
Exces~ivo difficliity III enonU ing (]0,11
P ART 2: AUTOMATIC TRANSMISS IO N
18 Gen eral description
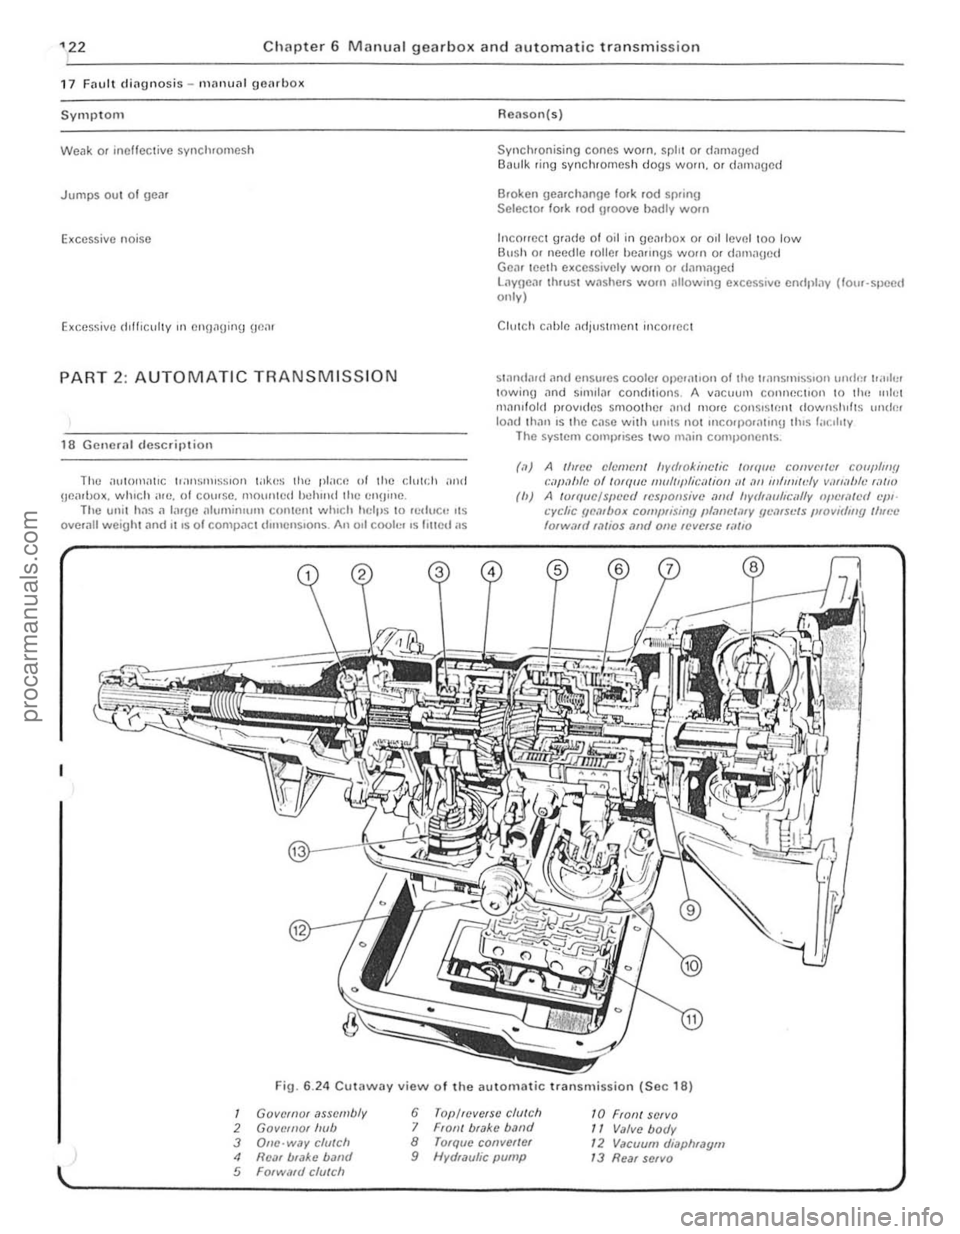
Thc aulOma llC l,an~nHss'on ,;rkl:~ lhe JlI"Ct~ uf the clutch and Hcmhox. wh,ch ,"c. of cow se . mounte(1 heh,nd lhe enu;ne . The unil has a 1"'{lO nluminl"'" content which helps to .elluc" liS
overall weinhl and 11 IS o f compact dimenSions. All 0,1 coole. 's filled ,IS
Reilson (s )
Sy nchronising cones worn, spilt Of dmnaU ed O~ulk rin g sy nch romes h dogs worn, or dmnagcr!
Broken gcarc h,lnUC fOfk rod spring Selector fo rk rod !IIOOye h.ldly worn
Inen!!cc! 9(,1(10 of oil in gc,llhox 0' 0,1 level 100 low Bu sh or ncc(tie roller hC
l;'lync:u 1hru st W;'\ShCfS w or n ililowing excessive cndplilV (folll,spC
Sliln da.d .. nd ensules cooler OI)(lI.lI1Qn of the \.,lnSUlISSlon lind!)! l.a>l." lowinU ;lnd sunlla. conrll1i0l15 . A VaClIl,Hll conncctlon 10 lhe IIII~I manifold p,ovldes smoO lh cr anrl morc conSI$1r.1l1 clownstlll,S IIndc. load than IS the case Wilh IIn,lS nOl !IlcOlI)Or.11U1IJ lh,s f,,(:Illly The sysle m cotlllJltses lWO tIl.lin com(lonenrs.
(.1) A /"ree e/c'mcnl "v,/lokinc/ic IOUIIIII I:Ollvcrler cOII/,lmy 1:;'I'.1h1(.' o f /orqu c 1II1I!lIplicii /iorr ;, 1 .1/1 irr"mldv Villl;,hle r.1/1O (h) A /unluC/Sln'cd respOlIsiv~ .md IWdwlllrI:illlv IIIIL'f.1lCr! cp'· qL"fie f/c.1rbox COIIII}liSIilf/ pl.wel.l/V m:.lISII/S /IIovidmy tlllf:C forw.l/d 1.1/ios "llff OIlC Icvcrsc ril/'O
Fig . 6.24 C utllw ay view of th e a utomatic transmission (Sec 18)
1 GovelllUi ,'ssemblv 6 rop/leve/sc clu/e h 10 FlOn/ SCIVO 2 GOVlIIJI OI IIlIb 7 FIOIII blilkc bil/Jd /I Valve botlV 3 Olle ·w/lV cfalclt 8 rorquc convenor 1 2 V/lcuum diaplu/lym 4 IlCill bfiJ~C baml 9 Hvdraufic pump 1 J Re/ll servo 6 Forwlllfl cia/eli
procarmanuals.com
Page 124 of 205
Chapter 6 Manual gearbox and automatic transmission 123
When towing a vehic le wIth automl11ic uansmission it is impoltllllt to observe the precautIons gIven til ,he 'Jading and Towing' se<:,ion at the Iront 01 the manual. Due to the complexity of the au'oma',c tran smission unit. If performance IS not up 10 s tandard, or overhaul is necessary, it IS impera tive that this be left to the locallllain agents who will have the special equipment for fault diagnosis and rectiflcallon. The content of the following sections is thereforc confined to supplying gener", Informl11ion 1'Ind any service information and ins t.uc tion tha i cnn be used by the owner.
19 Routine Illilinte,wno
At the i!lle.vnls SI)CClfiecllll Iho ROllllne Milintennnce seCIlOll in the I.onl 01 th e Illanllal cnllY Oul Ihe follOWIng p'ocp.dwe
Luuricow selector link'1[}() , Applv the h;rrldh.,lke th(:n J,lck \lp the front of Ihc Cill ,'lid Support
,n nxle Slnnds
2 Orlthe Irnkn!JCs at cndl end 01 Ihe genrsh ,h rml on the Icfl·hnnd "le 01 Ihe Iransnll~s,on lowel the cnr \0 Iho wound,
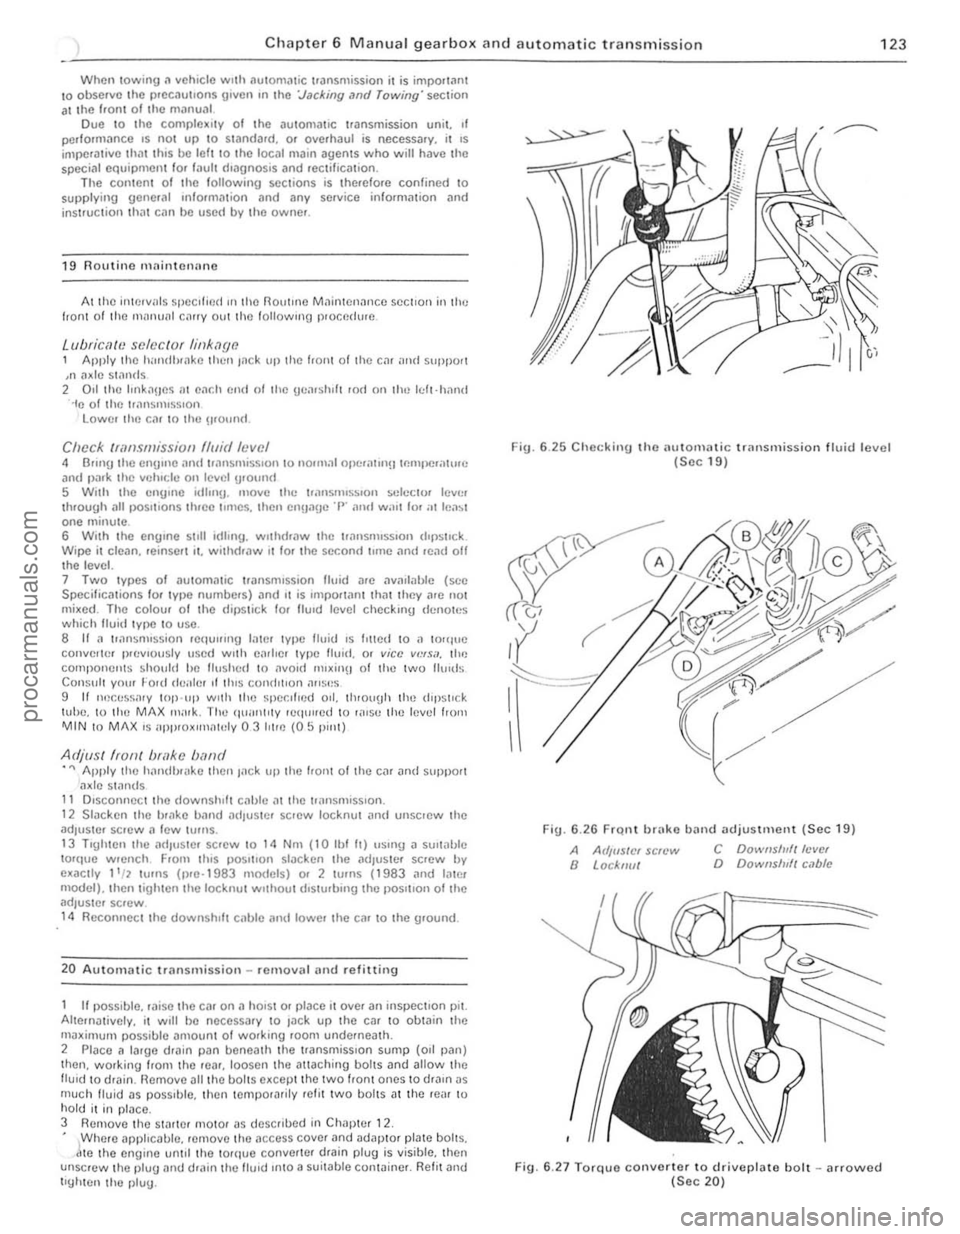
Check /mn.Wllissioll fluid level 4 Elrlll!! the engIne and trnnsnllSSlon to nOllllal ope.IlIUl!IIp.llIperillllfe
and I)alk tho vehlchl on le vel grOllnd 5 Wi,h Ihe engIne idllll(l. move tht: 1.,lnsnllSj"on St:leclt>r lev!]r through ill! pOSlllons 1!lIee lImes. Ihen onuaue '1" ,11111 wall for ;rt lea~t one minute. 6 With ,he engine 51111 idling, wllhd.ilW Ihe lr.1nSnllSSIOll d,psllck.
Wipe it dean, reinsert II, wilhd •• 1W 11 for Ihe second !line nnd read off the levol. 7 Two tv pes 01 automatic transnllssion fluid a.e nvarlilblc (sec SpccifiCiltions 10' tv,>c numbe.s) .1nd It is ImpO,I,ln , Ihilt IheV 'lIe nOI mixed. The colour 01 the dipstick. 10' flUId level checklllg denotes which fluid tvpe to use , 8 If a tlr1nsnllssion requlII"U 1,1ter tvpe fluid IS I'lled 10 " to'
adjus'or screw n lew h,fIlS . 13 Tlghlolllhe adJuslo, sOcw to 14 Nm (10 Ihl II) IISIilU a SUItable lo,que wrcnch From Ih,s poSlllon slaCken the adJusle r screw bv exact Iv I'll \Urns (pre·1983 models) or 2 Iwns ( 1983 and late,
model), Ihen tighten Ihe locknut Wllhoul diSlUrblllg Ihe pOsition of Ihe adjuster sc,ow .
14 R econnec t the downshift cable and lowe' Ihe car 10 Ihe ground.
20 Automalic transmission -removal (HId refining
If l)Osslble, ,aise the car on a hOlsl o. place it over an inspectIon pit. Alternatively, it WIll ho necessary 10 Jack up Ihe car to obtain the Illaximum possible amount of wOlking room undernealh. 2 Place a large d.ain pan benealh the transmiss.on sump (011 pan)
Ihen. working horll the ,car, loosen the a!laching boilS and allow ,he lIuld to drain. nemove all thO bohs excep t tho two I.onl ones to draIn as mIlch fluid as pOSSIble, th on temporarilV .efit Iwo bolls at th e re,1I 10 hold it in place . 3 Remove tho Slilrte. moto. as desc.ibed in Chapter 12 . • jWhero apphcable, rernove the access cover Dnd ad3pto, plale bolts,
Ie the engine untrl the to.qu e converter drain plug is visible, then
unsc.ew Iho plug and d.ain Iho Ihud Into a suit3ble con winer. Refl! and l'Uh ten Iho plug.
Fig. 6 .25 Checkill{J tho au tomatic transmission lIuid lovel (Soc 19)
Fig. 6.2 6 FrQ,1 bn'ko band adjustment (Sec 19)
A Arllf/SICI sc/t'w a Locknut
C Downslu/t Icvel D Downs/u/t c.lblc
Fig. 6.27 Torquo convorter to driveplato boll -arrowod (Sec 20)
'I
.' i
!
,
{ ,
I , .::
.1 , I, , i:
i 'i; ; I
:1
procarmanuals.com