display FORD E SERIES 2002 4.G User Guide
[x] Cancel search | Manufacturer: FORD, Model Year: 2002, Model line: E SERIES, Model: FORD E SERIES 2002 4.GPages: 272, PDF Size: 2.6 MB
Page 47 of 272
Do not insert any promotional (odd shaped or sized) discs, or
discs with removable labels into the CD player as jamming may
occur.
Display description
Six circles are always lit in the digital display. These signify the six CD
slots in the audio system. When a disc is loaded into a particular slot
(1±6), the number inside that specific circle lights. If the circle is empty,
there is no CD in that particular slot.
Rewind
The rewind control works in CD
modes.
Press and hold the REW control
until the desired selection is
reached. If the beginning of the disc is reached, the CD will begin play at
the first track. Release the control to disengage rewind mode.
When in rewind mode, your audio system will automatically lower the
volume level of the playing media.
Fast forward
The fast forward control works in
CD modes.
Press and hold the FF control until
the desired selection is reached. If
the end of the disc is reached, the CD will return to the first track.
Release the control to disengage fast forward mode.
When in fast forward mode, your audio system will automatically lower
the volume level of the playing media.
Load
The load feature allows you to load
single CDs into the player internal
to the radio.
This six disc CD player is equipped with a CD door. Compact
discs should only be inserted into the player after the door has
been opened by the player. Do not attempt to force the door
Entertainment systems
47
Page 48 of 272
open. Compact discs should only be loaded by pressing the LOAD
control.
Press the LOAD control. (You can choose which slot will be loaded by
pressing the desired preset number. If you do not choose a slot, the
system will choose the next available one.) Wait until the CD door opens.
Load the CD into the player. LOADING CD# is displayed. When the CD
has been loaded, the door will close and the CD will begin to play. For
example, to load a CD into slot 2, press the LOAD control and then press
preset 2.
Auto load
This feature allows you to autoload
up to 6 discs into the multi disc CD
player internal to the radio.
Press and hold the LOAD control until AUTOLOAD # is displayed. The
CD door will open. Load the desired disc, one at a time. The CD is
loaded into position and the audio system will display CD#. Each time
the CD door opens, INSERT CD# is displayed. The door will close and
the player will move to the next slot after each disc has been loaded.
The process is repeated until all 6 slots are full. The audio system plays
the last CD loaded and the display is updated. If some slots are already
full and autoload is activated, the system will fill all empty slots.
Eject
Press the EJ control to stop and
eject a CD. You can choose which
CD will be ejected by pressing the
EJ control and the desired preset
number (1±6). For example, to eject CD 2, press the EJ control and then
press the preset 2 control. If you do not choose a specific CD, the player
will eject the current CD.
If a CD is ejected and not removed from the door of the CD player, the
player will automatically reload the CD. This feature may be used when
the ignition is ON or OFF.
Entertainment systems
48
Page 49 of 272
Auto eject
Press and momentarily hold the EJ
control to engage auto eject. All CDs
which are present in the player will
be ejected one at a time. If a CD is
ejected and not removed from the door of the CD player, the player will
automatically reload the CD. This feature may be used when the ignition
is ON or OFF.
Shuffle feature
Press the SHUF control until the
desired shuffle mode is displayed.
The audio system will then engage
the desired shuffle mode.
When engaged, the shuffle feature has two different modes: SHUFFLE
DISC and SHUFFLE TRK.
SHUFFLE DISC randomly plays tracks from all the discs presently in the
audio system.
SHUFFLE TRK plays all the tracks on the current disc in random order.
Compression feature
The compression feature operates in CD mode and brings soft and loud
CD passages together for a more consistent listening level.
Press the COMP control until COMP
ON is displayed.
Entertainment systems
49
Page 50 of 272
Menu mode
The MENU control allows you to
access many different features
within your audio system. There are
three sets of menus available
depending upon which mode or
feature is activated.
While in FM mode, two menus are
available.If RDS is turned OFF,
you can access the following:
²SELECT HOURS Ð Refer toSetting the clock.
²SELECT MINUTES Ð Refer toSetting the clock.
²RDS OFF Ð Refer toRadio data system feature.
If RDS is turned ON, you can access the following:
²TRAFFIC ON/OFF-Refer toTraffic announcements.
²FIND type-Refer toProgram type.
²SHOW (NAME, TYPE, NONE)- Refer toRadio data system feature.
²RDS ONÐ Refer toRadio data system feature.
²SELECT HOURS Ð Refer toSetting the clock.
²SELECT MINUTES ÐRefer toSetting the clock.
When in CD mode, you can access: SELECT HOURS, SELECT MINUTES
or COMP ON/OFF.
SELECT HOURS, SELECT MINUTESÐ Allows you to adjust the hours
and minutes. Refer toSetting the clock.
TRAFFIC ON/OFFÐ Traffic announcements can be programmed as local
or distant. Refer toTraffic announcements.
RDS ON/OFFÐ This feature allows your audio system to receive text
information from RDS-equipped FM radio stations. Refer toRadio Data
System feature.
FIND type Ð Allows you to select your desired FM program type and
search for that selection.
SHOW Ð Allows you to select from NAME (displays the name of the
radio station), TYPE (displays the RDS program type: rock, jazz, etc.), or
NONE (deactivates the RDS display).
MENU
Entertainment systems
50
Page 51 of 272
Radio data system (RDS) feature
This feature allows your audio
system to receive text information
from RDS-equipped FM radio
stations.
To activate RDS:
²When in FM mode, press the MENU control until RDS OFF displays.
²Press the SEL control to engage this feature (RDS ON).
RDS features:
Once the RDS feature is on, press the MENU control to scroll through
the following selections:
Traffic announcements
This feature allows you to hear traffic announcements while in CD mode.
These announcements are broadcast by traffic capable RDS stations.
When in this mode, traffic announcements will interrupt radio and CD
play.
²Press the MENU control until TRAFFIC is displayed.
²Press the SEL control to engage the feature. The display will read
TRAFFIC ON.
This feature also allows you to control the volume of traffic
announcements. With the display reading TRAFFIC ON, adjust the
volume using the volume control to the desired level. The volume level
will show at the bottom of the display. Interrupting traffic
announcements will be at the selected volume level.
To disengage the feature, press the MENU control until TRAFFIC ON
displays. Press the SEL control. The display will read TRAFFIC OFF.
Traffic announcements are not available in most U.S. markets.
Program type
This feature allows you to search for RDS stations selectively by their
program type.
SEL+MENU
Entertainment systems
51
Page 52 of 272
Press the MENU control until FIND
program type is displayed.
Use the SEL control to select the
program type. With the feature on,
use the SEEK or SCAN control to
find the desired program type from the following selections:
²Classic
²Country
²Info
²Jazz
²Oldies
²R&B
²Religious
²Rock
²Soft
²To p 4 0
Show
This feature allows you to select the
type of RDS broadcast information
the radio will regularly show in the
display.
With RDS activated, press the
MENU control until SHOW is
displayed.
Use the SEL control to select TYPE
(displays the RDS program type:
rock, jazz, etc), NAME (displays the name of the radio station) or NONE
(deactivates the RDS display).
Mute mode
Press the control to mute the
playing media. Press the control
again to return to the playing media.
SEL+MENU
SEL
+MENU
SEL
+MENU
Entertainment systems
52
Page 55 of 272
Do not attempt to service, repair or modify the AutoVisiontSystem. See
your Ford or Lincoln Mercury dealer.
Do not insert foreign objects into the videocassette player (VCP) tape
cassette compartment.
The front glass on the liquid crystal display may break when hit
with a hard surface. If the glass breaks, do not touch the liquid
crystalline material. In case of contact with skin, wash immediately
with soap and water.
The driver must not attempt to operate any function of the floor
console mounted VCP while the vehicle is in motion. Give full
attention to driving and to the road. Pull off the road and park in a
safe place before inserting or extracting video tapes from the VCP. A
remote control is included in the system to allow the rear seat
occupants to operate the VCP functions without distracting the driver.
Be sure to review User Manuals for video games and video game
equipment when used as auxiliary inputs for your AutoVisiontSystem.
Do not operate video games or video equipment if the power cords
and/or cables are broken, split or damaged. Carefully place cords and/or
cables where they will not be stepped on or interfere with the operation
of seats and/or compartments.
Disconnect video games and video equipment power cords and/or cables
when not in use.
Avoid touching auxiliary input jacks with your fingers. Do not blow on
them or allow them to get wet or dirty.
Do not clean any part of the AutoVisiontsystem with benzene, paint
thinner or any other solvent.
Federal Communication Commission (FCC) Compliance
Changes or modifications not approved by Ford Lincoln Mercury could
void user's authority to operate the equipment. This equipment has been
tested and found to comply with the limits for a Class B digital device,
pursuant to Part 15 of the FCC Rules. These limits are designed to
provide reasonable protection against harmful interference in a
residential installation. This equipment generates, uses and can radiate
radio frequency energy and, if not installed and used in accordance with
Entertainment systems
55
Page 58 of 272
AutoVisionTsystem
Features
²2±head hi-fi playback
²AutoPlay feature
²Digital auto tracking
²Dual stereo headphone with electric volume control
²Self docking connection for easy mobile installation
²Latching system for secure safety
²Carrying handle for portability
²Water resistant tape door
²On screen display
²Protection circuits
Playback and format
²The videocassette player of your AutoVisiontsystem can only be used
in the ªplaybackº mode. You are not able to record with your system.
²The system plays standard videocassettes marked ªVHSº (or ªS-VHS).
VCP protection circuits
Tape protection circuit
²When the system is in PAUSE mode, the tape mechanism will
continue to create tension on the tape.
²When the VCP is in still playback, FFWD (fast forward) or REW
(reverse) mode for more than five minutes, the tape protection circuit
automatically returns the system to PLAY mode to avoid damage to
the tape.
Your AutoVision System is also equipped with a Dew sensor circuit and a
High/low temperature sensor circuit. For more information on these
circuits, please refer toHumidity and moisture condensationand
Temperature extremesin the Introduction chapter.
Entertainment systems
58
Page 59 of 272
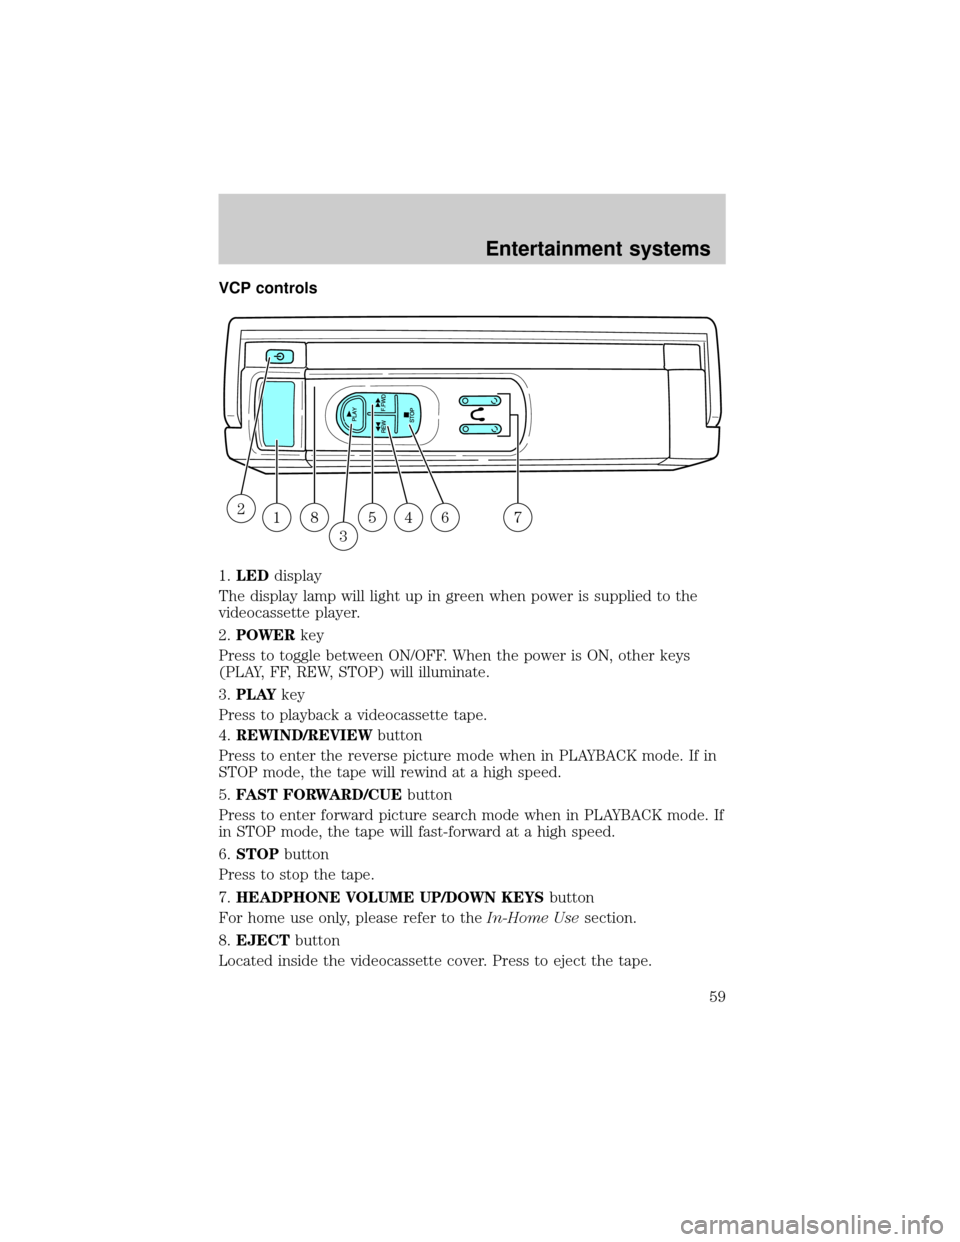
VCP controls
1.LEDdisplay
The display lamp will light up in green when power is supplied to the
videocassette player.
2.POWERkey
Press to toggle between ON/OFF. When the power is ON, other keys
(PLAY, FF, REW, STOP) will illuminate.
3.PLAYkey
Press to playback a videocassette tape.
4.REWIND/REVIEWbutton
Press to enter the reverse picture mode when in PLAYBACK mode. If in
STOP mode, the tape will rewind at a high speed.
5.FAST FORWARD/CUEbutton
Press to enter forward picture search mode when in PLAYBACK mode. If
in STOP mode, the tape will fast-forward at a high speed.
6.STOPbutton
Press to stop the tape.
7.HEADPHONE VOLUME UP/DOWN KEYSbutton
For home use only, please refer to theIn-Home Usesection.
8.EJECTbutton
Located inside the videocassette cover. Press to eject the tape.
18
3
54672
Entertainment systems
59
Page 62 of 272
The remote control unit uses two AAA batteries.
The need for battery replacement is usually indicated if the remote
control only functions at extremely close distances to the entertainment
center or not at all.
When replacing batteries, use two new batteries (alkaline recommended)
and install with correct orientation (+ and þ polarities). Ensure that you
use only new batteries of the same brand.
If you will not be using the remote control for a considerably long time,
remove the batteries.
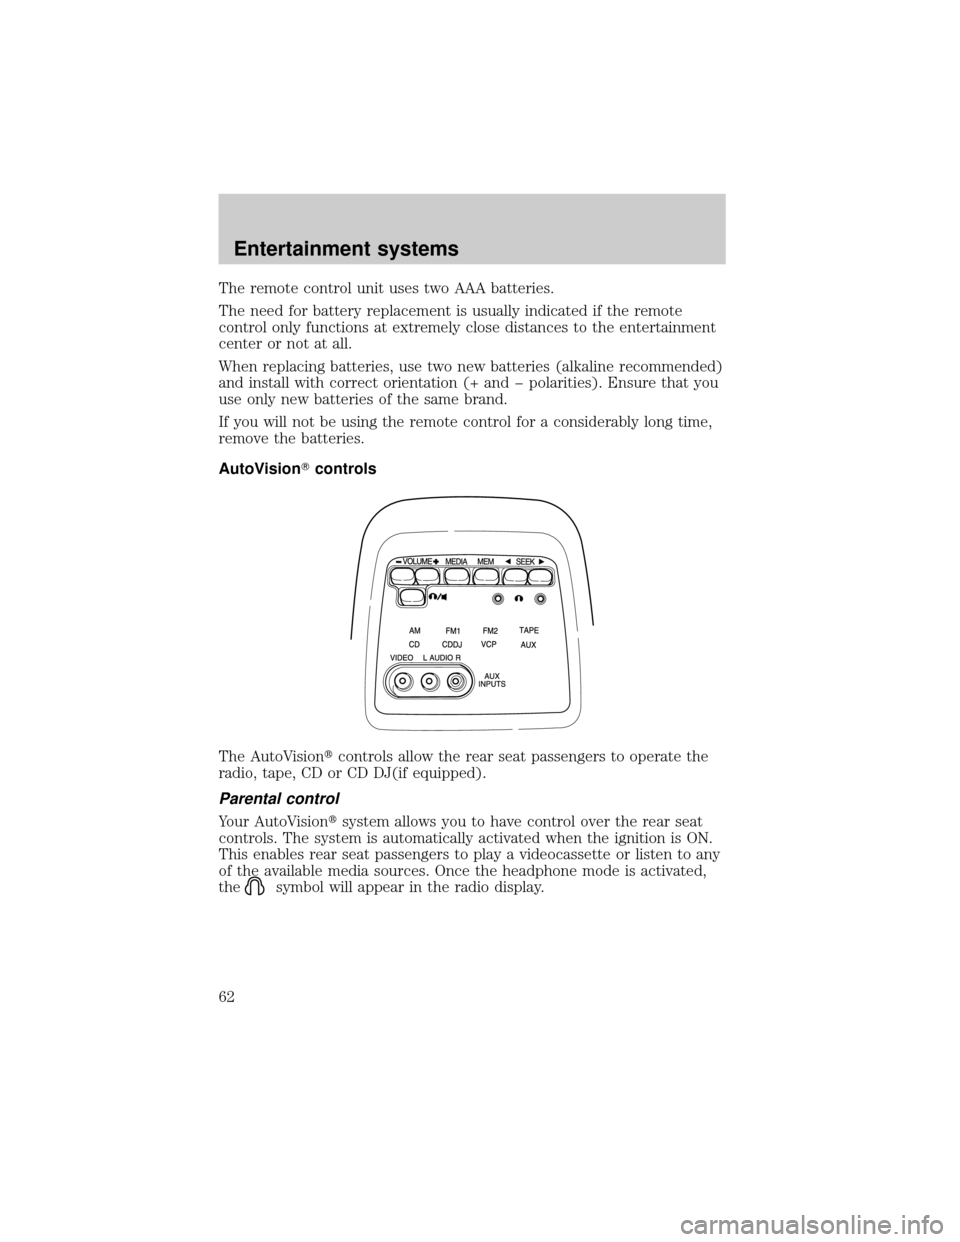
AutoVisionTcontrols
The AutoVisiontcontrols allow the rear seat passengers to operate the
radio, tape, CD or CD DJ(if equipped).
Parental control
Your AutoVisiontsystem allows you to have control over the rear seat
controls. The system is automatically activated when the ignition is ON.
This enables rear seat passengers to play a videocassette or listen to any
of the available media sources. Once the headphone mode is activated,
the
symbol will appear in the radio display.
Entertainment systems
62