maintenance schedule FORD E SERIES 2002 4.G User Guide
[x] Cancel search | Manufacturer: FORD, Model Year: 2002, Model line: E SERIES, Model: FORD E SERIES 2002 4.GPages: 272, PDF Size: 2.6 MB
Page 241 of 272
²Adding certain accessories to your vehicle (for example bug
deflectors, rollbars/light bars, running boards, ski/luggage racks) may
reduce fuel economy.
²Using fuel blended with alcohol may lower fuel economy.
²Fuel economy may decrease with lower temperatures during the first
12±16 km (8±10 miles) of driving.
²Driving on flat terrain offers improved fuel economy as compared to
driving on hilly terrain.
²Transmissions give their best fuel economy when operated in the top
cruise gear and with steady pressure on the gas pedal.
²Close windows for high speed driving.
EPA window sticker
Every new vehicle should have the EPA window sticker. Contact your
dealer if the window sticker is not supplied with your vehicle. The EPA
window sticker should be your guide for the fuel economy comparisons
with other vehicles.
It is important to note the box in the lower left corner of the window
sticker. These numbers represent the Range of L/100 km (MPG)
expected on the vehicle under optimum conditions. Your fuel economy
may vary depending upon the method of operation and conditions.
EMISSION CONTROL SYSTEM
Your vehicle is equipped with various emission control components and a
catalytic converter which will enable your vehicle to comply with
applicable exhaust emission standards. To make sure that the catalytic
converter and other emission control components continue to work
properly:
²Use only the specified fuel listed.
²Avoid running out of fuel.
²Do not turn off the ignition while your vehicle is moving, especially at
high speeds.
²Have the items listed in your scheduled maintenance guide performed
according to the specified schedule.
The scheduled maintenance items listed in the scheduled maintenance
guide are essential to the life and performance of your vehicle and to its
emissions system.
Maintenance and specifications
241
Page 243 of 272
²Next, at least 20 minutes driving in stop-and-go, city-type traffic with
at least four idle periods.
Allow the vehicle to sit for at least eight hours without starting the
engine. Then, start the engine and complete the above driving cycle. The
engine must warm up to its normal operating temperature. Once started,
do not turn off the engine until the above driving cycle is complete.
CHECKING AND ADDING POWER STEERING FLUID
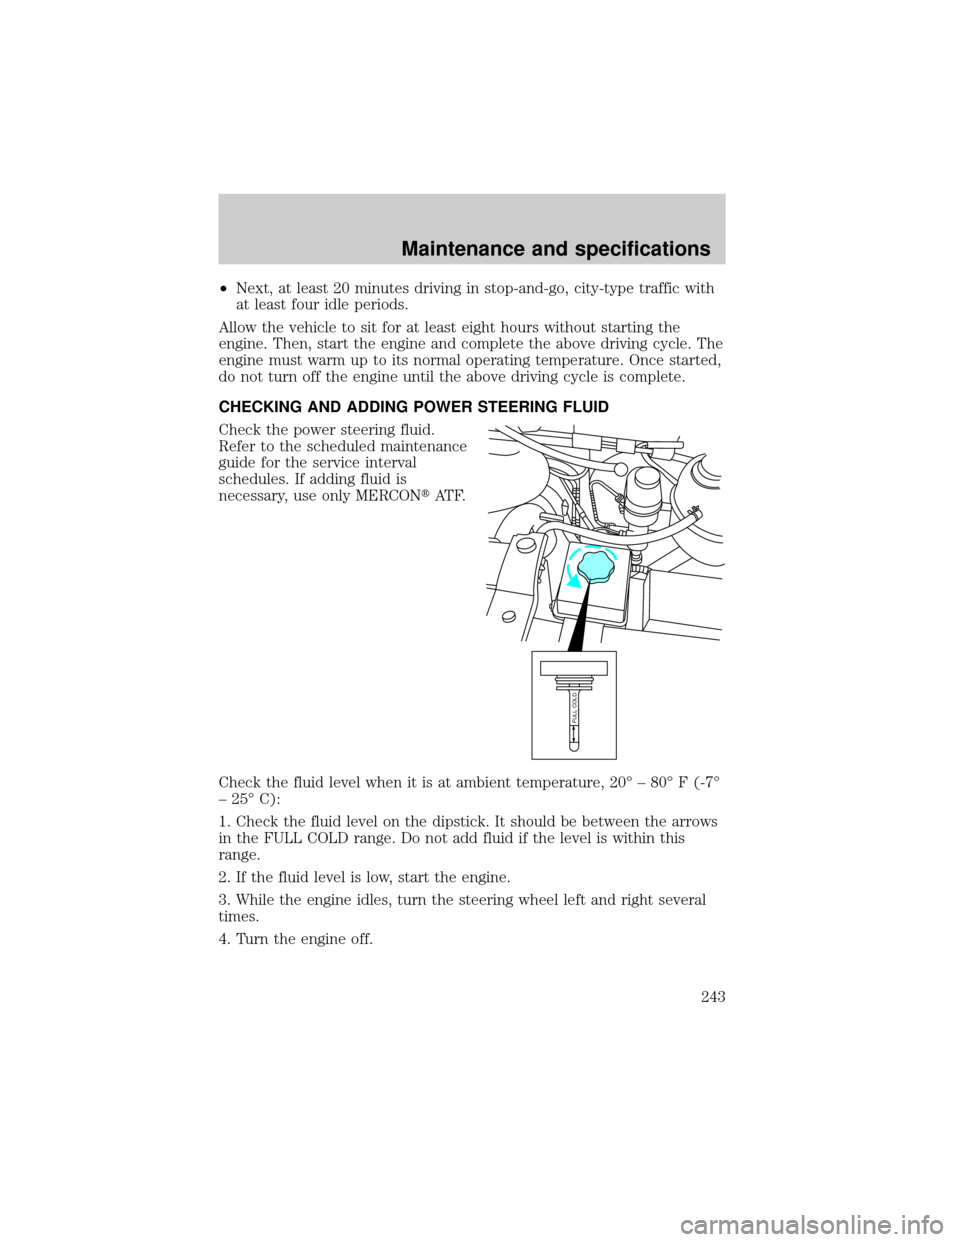
Check the power steering fluid.
Refer to the scheduled maintenance
guide for the service interval
schedules. If adding fluid is
necessary, use only MERCONtAT F.
Check the fluid level when it is at ambient temperature, 20É ± 80É F (-7É
± 25É C):
1. Check the fluid level on the dipstick. It should be between the arrows
in the FULL COLD range. Do not add fluid if the level is within this
range.
2. If the fluid level is low, start the engine.
3. While the engine idles, turn the steering wheel left and right several
times.
4. Turn the engine off.
FULL COLD
Maintenance and specifications
243
Page 244 of 272
For E-SuperDuty vehicles with the Hydro-Boost Brake System,
do not press the brake pedal after the engine has been turned
off.
5. Recheck the fluid level on the dipstick. Do not add fluid if the level is
between the arrows in the FULL COLD range.
6. If the fluid is low, add fluid in small amounts, continuously checking
the level until it reaches the FULL COLD range. Be sure to put the
dipstick back in the reservoir.
BRAKE FLUID
Checking and adding brake fluid
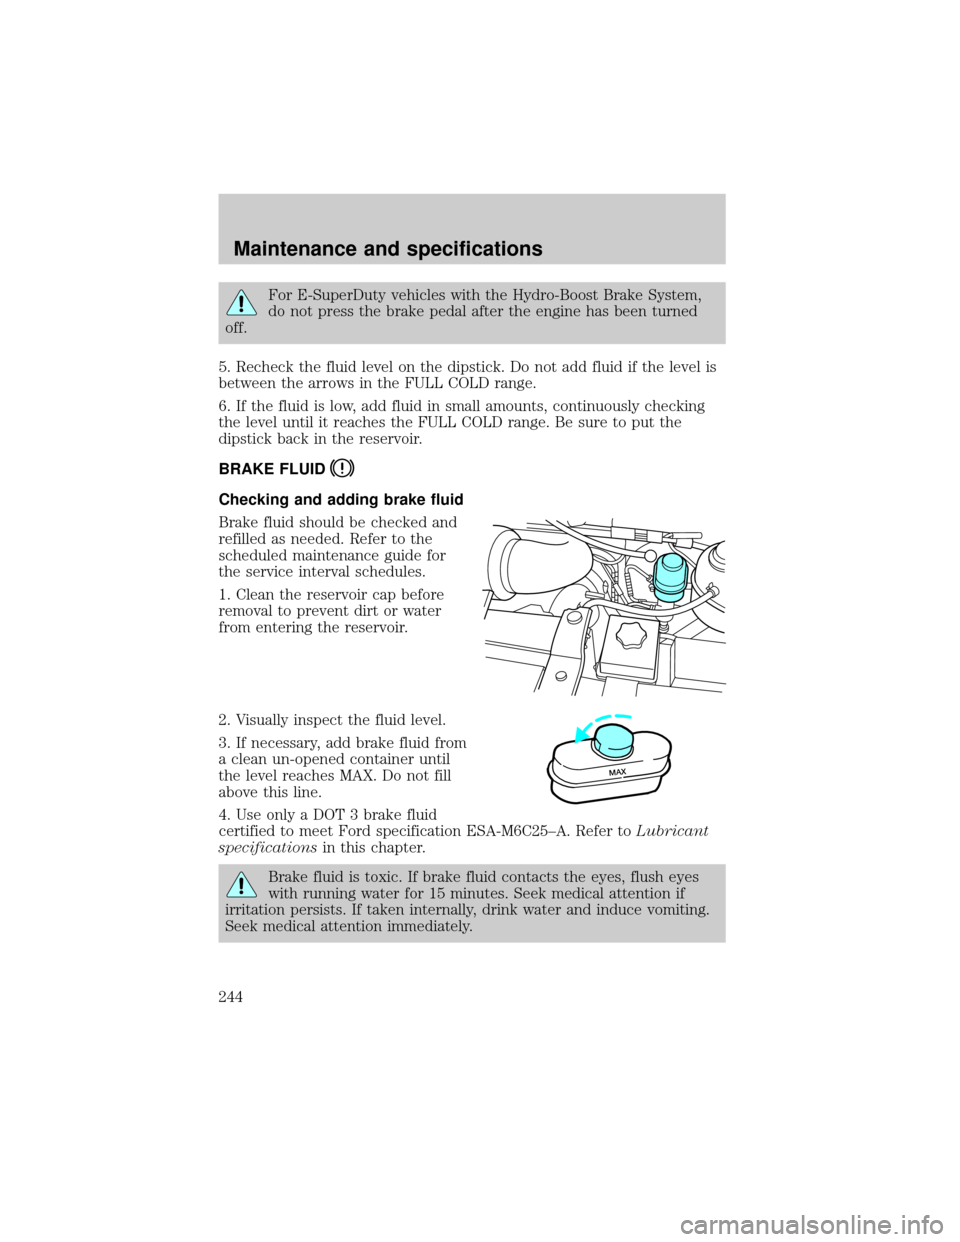
Brake fluid should be checked and
refilled as needed. Refer to the
scheduled maintenance guide for
the service interval schedules.
1. Clean the reservoir cap before
removal to prevent dirt or water
from entering the reservoir.
2. Visually inspect the fluid level.
3. If necessary, add brake fluid from
a clean un-opened container until
the level reaches MAX. Do not fill
above this line.
4. Use only a DOT 3 brake fluid
certified to meet Ford specification ESA-M6C25±A. Refer toLubricant
specificationsin this chapter.
Brake fluid is toxic. If brake fluid contacts the eyes, flush eyes
with running water for 15 minutes. Seek medical attention if
irritation persists. If taken internally, drink water and induce vomiting.
Seek medical attention immediately.
MAX
Maintenance and specifications
244
Page 245 of 272
If you use a brake fluid that is not DOT 3, you will cause
permanent damage to your brakes.
Do not let the reservoir for the master cylinder run dry. This
may cause the brakes to fail.
DRIVELINE UNIVERSAL JOINT AND SLIP YOKE
Your vehicle may be equipped with universal joints that require
lubrication. Refer to the scheduled maintenance guide for maintenance
intervals. If the original universal joints are replaced with universal joints
equipped with grease fittings, lubrication will also be necessary.
TRANSMISSION FLUID
Checking automatic transmission fluid (if equipped)
Refer to your scheduled maintenance guide for scheduled intervals for
fluid checks and changes. Your transmission does not consume fluid.
However, the fluid level should be checked if the transmission is not
working properly, i.e., if the transmission slips or shifts slowly or if you
notice some sign of fluid leakage.
Automatic transmission fluid expands when warmed. To obtain an
accurate fluid check, drive the vehicle until it is at normal operating
temperature (approximately 30 km [20 miles]). If your vehicle has been
operated for an extended period at high speeds, in city traffic during hot
weather or pulling a trailer, the vehicle should be turned off for about
30 minutes to allow fluid to cool before checking.
1. Drive the vehicle 30 km (20 miles) or until it reaches normal operating
temperature.
2. Park the vehicle on a level surface and engage the parking brake.
3. With the parking brake engaged and your foot on the brake pedal,
start the engine and move the gearshift lever through all of the gear
ranges. Allow sufficient time for each gear to engage.
4. Latch the gearshift lever in P (Park) and leave the engine running.
5. Remove the dipstick, wiping it clean with a clean, dry lint free rag. If
necessary, refer toIdentifying components in the engine compartment
in this chapter for the location of the dipstick.
Maintenance and specifications
245
Page 247 of 272
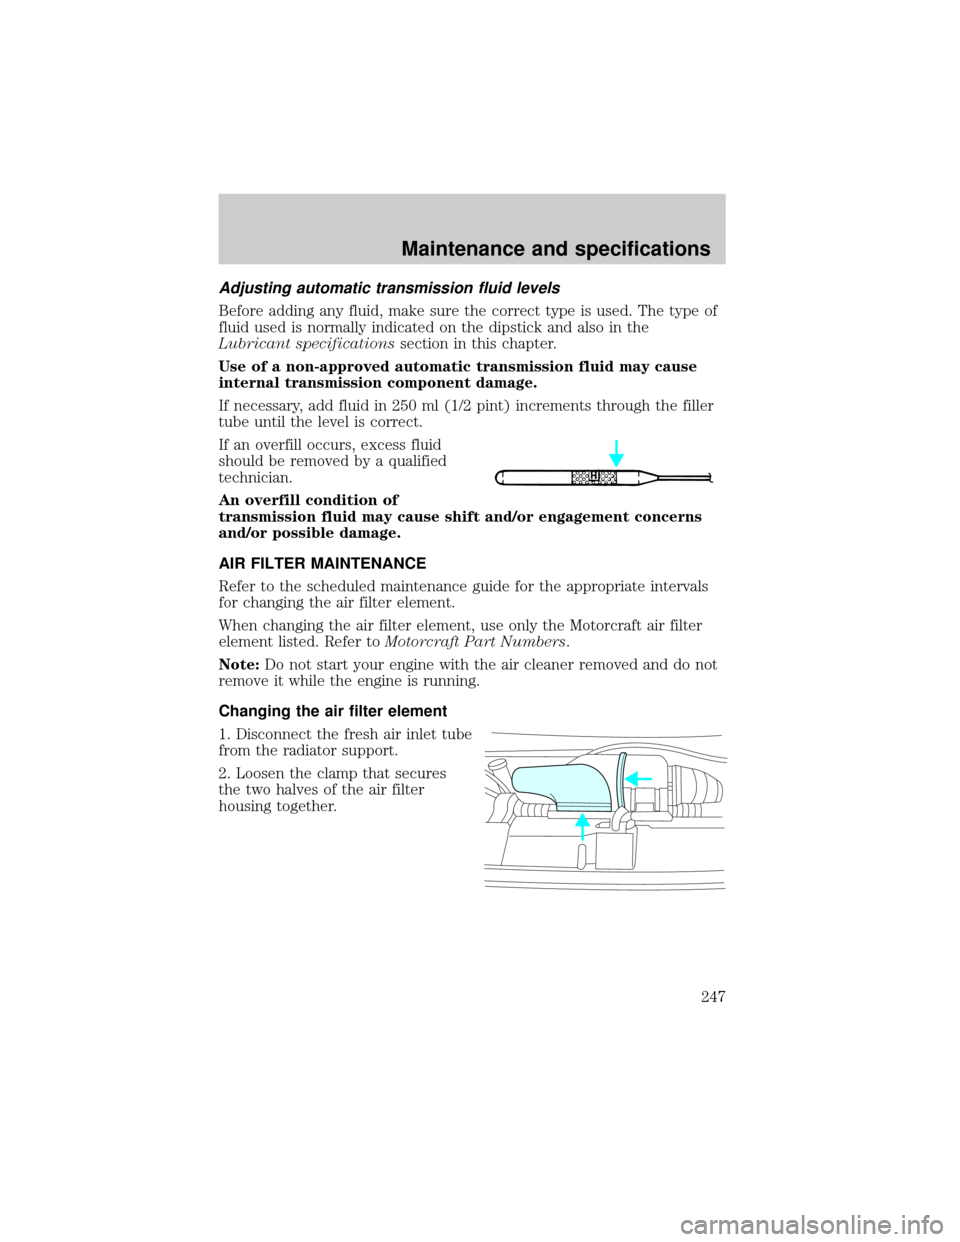
Adjusting automatic transmission fluid levels
Before adding any fluid, make sure the correct type is used. The type of
fluid used is normally indicated on the dipstick and also in the
Lubricant specificationssection in this chapter.
Use of a non-approved automatic transmission fluid may cause
internal transmission component damage.
If necessary, add fluid in 250 ml (1/2 pint) increments through the filler
tube until the level is correct.
If an overfill occurs, excess fluid
should be removed by a qualified
technician.
An overfill condition of
transmission fluid may cause shift and/or engagement concerns
and/or possible damage.
AIR FILTER MAINTENANCE
Refer to the scheduled maintenance guide for the appropriate intervals
for changing the air filter element.
When changing the air filter element, use only the Motorcraft air filter
element listed. Refer toMotorcraft Part Numbers.
Note:Do not start your engine with the air cleaner removed and do not
remove it while the engine is running.
Changing the air filter element
1. Disconnect the fresh air inlet tube
from the radiator support.
2. Loosen the clamp that secures
the two halves of the air filter
housing together.
Maintenance and specifications
247
Page 250 of 272
SERVICING YOUR TIRES
Checking the tire pressure
²Use an accurate tire pressure gauge.
²Check the tire pressure when tires are cold, after the vehicle has been
parked for at least one hour or has been driven less than 5 km
(3 miles).
²Adjust tire pressure to recommended specifications found on the
Certification Label. Tire pressure information can also be found on the
Tire Information label located on the inside of the fuel filler door.
Improperly inflated tires can affect vehicle handling and can fail
suddenly, possibly resulting in loss of vehicle control.
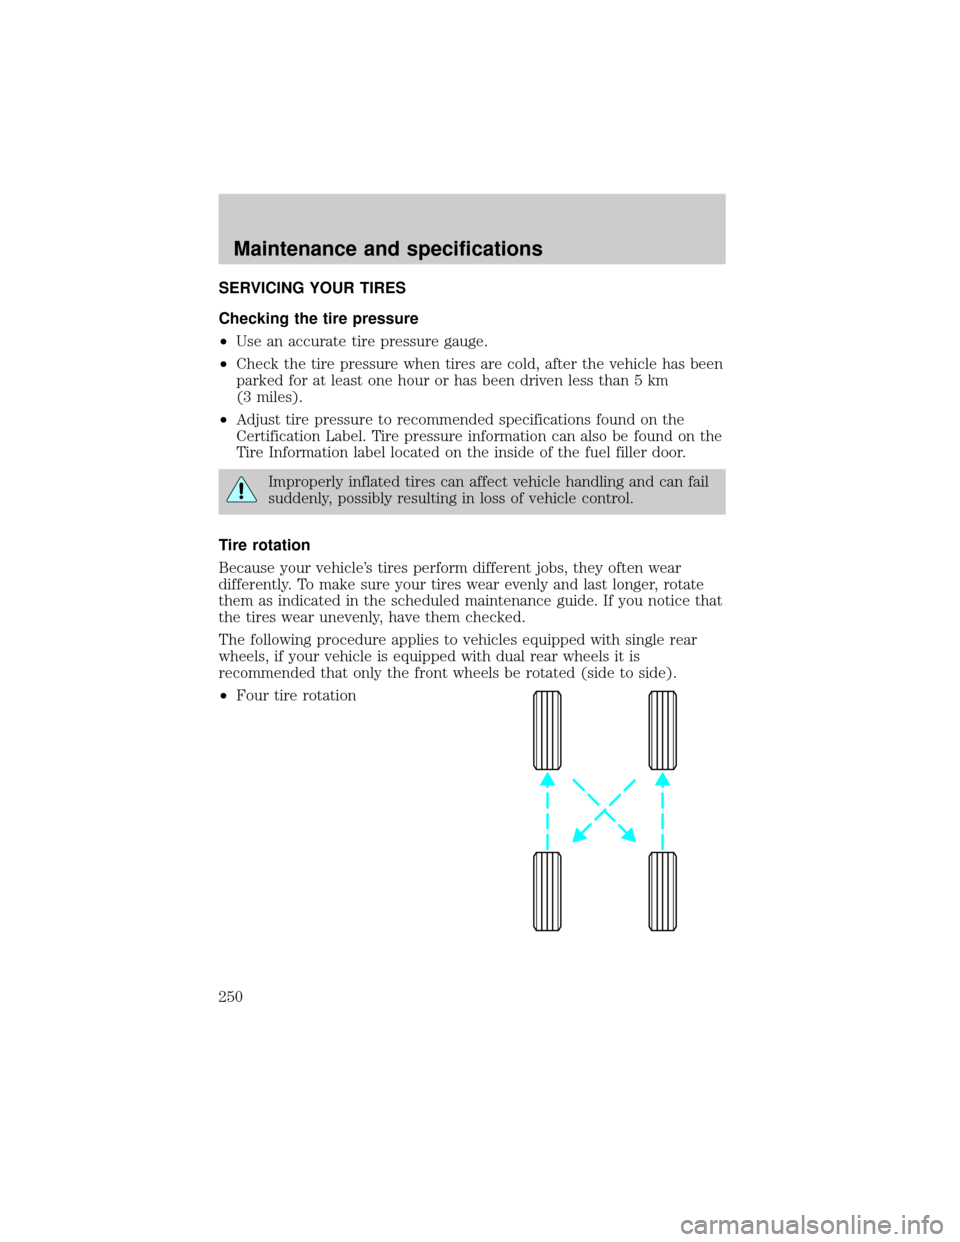
Tire rotation
Because your vehicle's tires perform different jobs, they often wear
differently. To make sure your tires wear evenly and last longer, rotate
them as indicated in the scheduled maintenance guide. If you notice that
the tires wear unevenly, have them checked.
The following procedure applies to vehicles equipped with single rear
wheels, if your vehicle is equipped with dual rear wheels it is
recommended that only the front wheels be rotated (side to side).
²Four tire rotation
Maintenance and specifications
250
Page 257 of 272
2If your vehicle's rear axle is filled with a synthetic rear axle lubricant it
is considered lubricated for life. These lubricants do not need to be
checked or changed unless a leak is suspected, service is required or the
axle assembly has been submerged in water. The axle lubricant should
be changed any time the rear axle has been submerged in water.
Fill 6 mm to 14 mm (1/4 inch to 9/16 inch) below bottom of fill hole.
Add 118 ml (4 oz.) of Additive Friction Modifier C8AZ-19B546-A or
equivalent meeting Ford specification EST-M2C118±A, for complete refill
of 8.8 inch and 9.75 inch Traction-Lok axles.
3Fill Dana rear axles to 6 mm to 19 mm (1/4 inch to 3/4 inch) below
bottom of fill hole.
4Visteon conventional and Traction-Lok axles require 118 ml (4 oz.) of
Additive Friction Modifier C8AZ-19B546-A or equivalent meeting Ford
specification EST-M2C118±A. Dana conventional and limited-slip axles
(E250/350/450) require 237ml (8 oz.) of Additive Friction Modifier
C8AZ-19B546-A or equivalent meeting Ford specification EST-M2C118-A.
5Optional fuel tank 208L (55 gallon).
6Ensure the correct automatic transmission fluid is used. Transmission
fluid requirements are indicated on the dipstick or on the dipstick
handle. Check the container to verify the fluid being added is of the
correct type. Refer to your scheduled maintenance guide to determine
the correct service interval.
Some transmission fluids may be labeled as dual usage, such as
MERCONtand MERCONtV. These dual usage fluids are not to be used
in an automatic transmission that requires use of the MERCONttype
fluid. However, these dual usage fluids may be used in transmissions that
require the MERCONtV type fluid.
MERCONtand MERCONtV type fluids are not interchangeable.
DO NOT mix MERCONtand MERCONtV. Use of a transmission
fluid that indicates dual usage (MERCONtand MERCONtV) in
an automatic transmission application requiring MERCONtmay
cause transmission damage. Use of any fluid other than the
recommended fluid may cause transmission damage.
7Approximate dry fill capacity including transmission fluid cooling
system, actual refill capacities will vary based on vehicle application and
transmission fluid cooling system (i.e. coolers size, cooling lines. auxiliary
cooler capacities). The amount of transmission fluid and fluid level
should be set by the indication on the dipstick's normal operating range.
Maintenance and specifications
257
Page 260 of 272
correct type. Refer to your scheduled maintenance guide to determine
the correct service interval.
Some transmission fluids may be labeled as dual usage, such as
MERCONtand MERCONtV. These dual usage fluids are not to be used
in an automatic transmission that requires use of the MERCONttype
fluid. However, these dual usage fluids may be used in transmissions that
require the MERCONtV type fluid.
MERCONtand MERCONtV type fluids are not interchangeable.
DO NOT mix MERCONtand MERCONtV. Use of a transmission
fluid that indicates dual usage (MERCONtand MERCONtV) in
an automatic transmission application requiring MERCONtmay
cause transmission damage. Use of any fluid other than the
recommended fluid may cause transmission damage.
2Add 118 ml (4 oz.) of Additive Friction Modifier C8AZ-19B546-A or
equivalent meeting Ford specification EST-M2C118-A for complete refill
of Visteon Traction-Lok rear axles.
3Add 237 ml (8 oz.) of Additive Friction Modifier C8AZ-19B546-A or
equivalent meeting Ford specification EST-M2C118-A for complete refill
of Dana Traction-Lok rear axles.
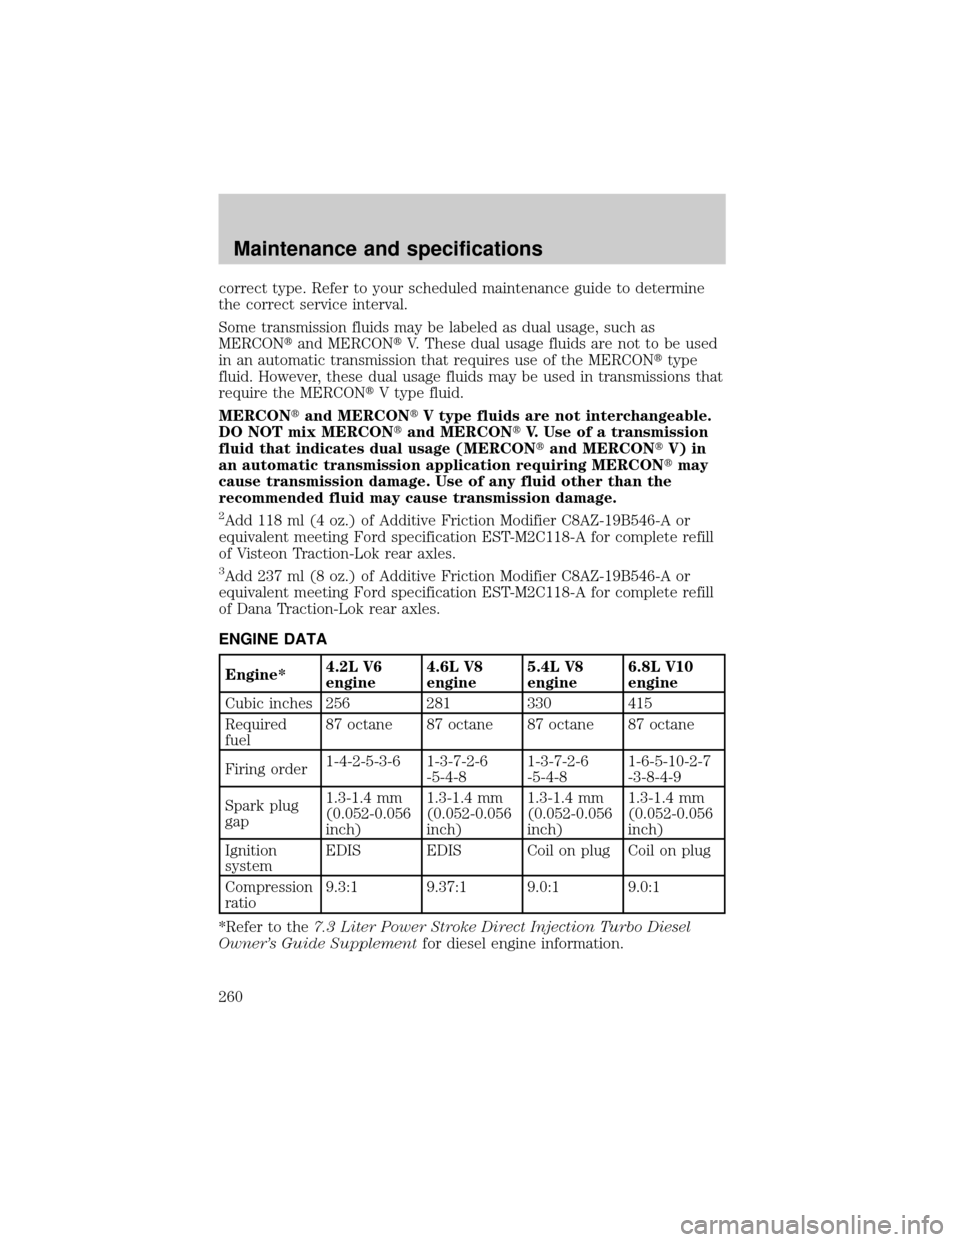
ENGINE DATA
Engine*4.2L V6
engine4.6L V8
engine5.4L V8
engine6.8L V10
engine
Cubic inches 256 281 330 415
Required
fuel87 octane 87 octane 87 octane 87 octane
Firing order1-4-2-5-3-6 1-3-7-2-6
-5-4-81-3-7-2-6
-5-4-81-6-5-10-2-7
-3-8-4-9
Spark plug
gap1.3-1.4 mm
(0.052-0.056
inch)1.3-1.4 mm
(0.052-0.056
inch)1.3-1.4 mm
(0.052-0.056
inch)1.3-1.4 mm
(0.052-0.056
inch)
Ignition
systemEDIS EDIS Coil on plug Coil on plug
Compression
ratio9.3:1 9.37:1 9.0:1 9.0:1
*Refer to the7.3 Liter Power Stroke Direct Injection Turbo Diesel
Owner's Guide Supplementfor diesel engine information.
Maintenance and specifications
260