steering FORD E SERIES 2002 4.G User Guide
[x] Cancel search | Manufacturer: FORD, Model Year: 2002, Model line: E SERIES, Model: FORD E SERIES 2002 4.GPages: 272, PDF Size: 2.6 MB
Page 180 of 272
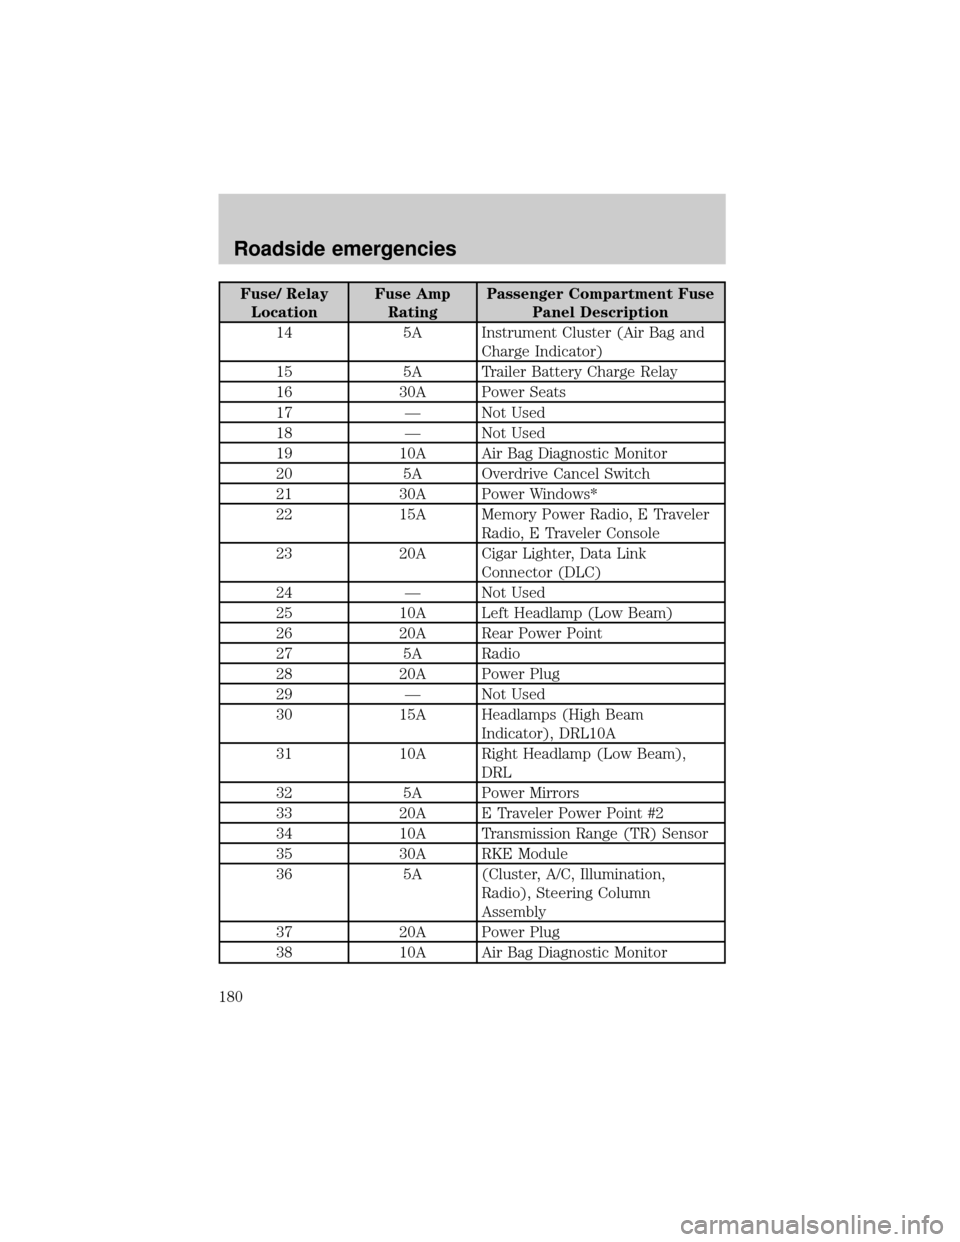
Fuse/ Relay
LocationFuse Amp
RatingPassenger Compartment Fuse
Panel Description
14 5A Instrument Cluster (Air Bag and
Charge Indicator)
15 5A Trailer Battery Charge Relay
16 30A Power Seats
17 Ð Not Used
18 Ð Not Used
19 10A Air Bag Diagnostic Monitor
20 5A Overdrive Cancel Switch
21 30A Power Windows*
22 15A Memory Power Radio, E Traveler
Radio, E Traveler Console
23 20A Cigar Lighter, Data Link
Connector (DLC)
24 Ð Not Used
25 10A Left Headlamp (Low Beam)
26 20A Rear Power Point
27 5A Radio
28 20A Power Plug
29 Ð Not Used
30 15A Headlamps (High Beam
Indicator), DRL10A
31 10A Right Headlamp (Low Beam),
DRL
32 5A Power Mirrors
33 20A E Traveler Power Point #2
34 10A Transmission Range (TR) Sensor
35 30A RKE Module
36 5A (Cluster, A/C, Illumination,
Radio), Steering Column
Assembly
37 20A Power Plug
38 10A Air Bag Diagnostic Monitor
Roadside emergencies
180
Page 184 of 272
Fuse/Relay
LocationFuse Amp
RatingPower Distribution Box
Description
H Ð Blower Motor Relay
J Ð Horn Relay
K Ð Fuel Pump Relay
* Mini Fuses ** Maxi Fuses
Relays
Relays are located in the power distribution box and should be replaced
by qualified technicians.
CHANGING THE TIRES
If you get a flat tire while driving, do not apply the brake heavily.
Instead, gradually decrease your speed. Hold the steering wheel firmly
and slowly move to a safe place on the side of the road.
Spare tire information
The spare tire for your vehicle is stowed under the rear of your vehicle
(except cutaway and stripped chassis models).
To remove the spare tire:
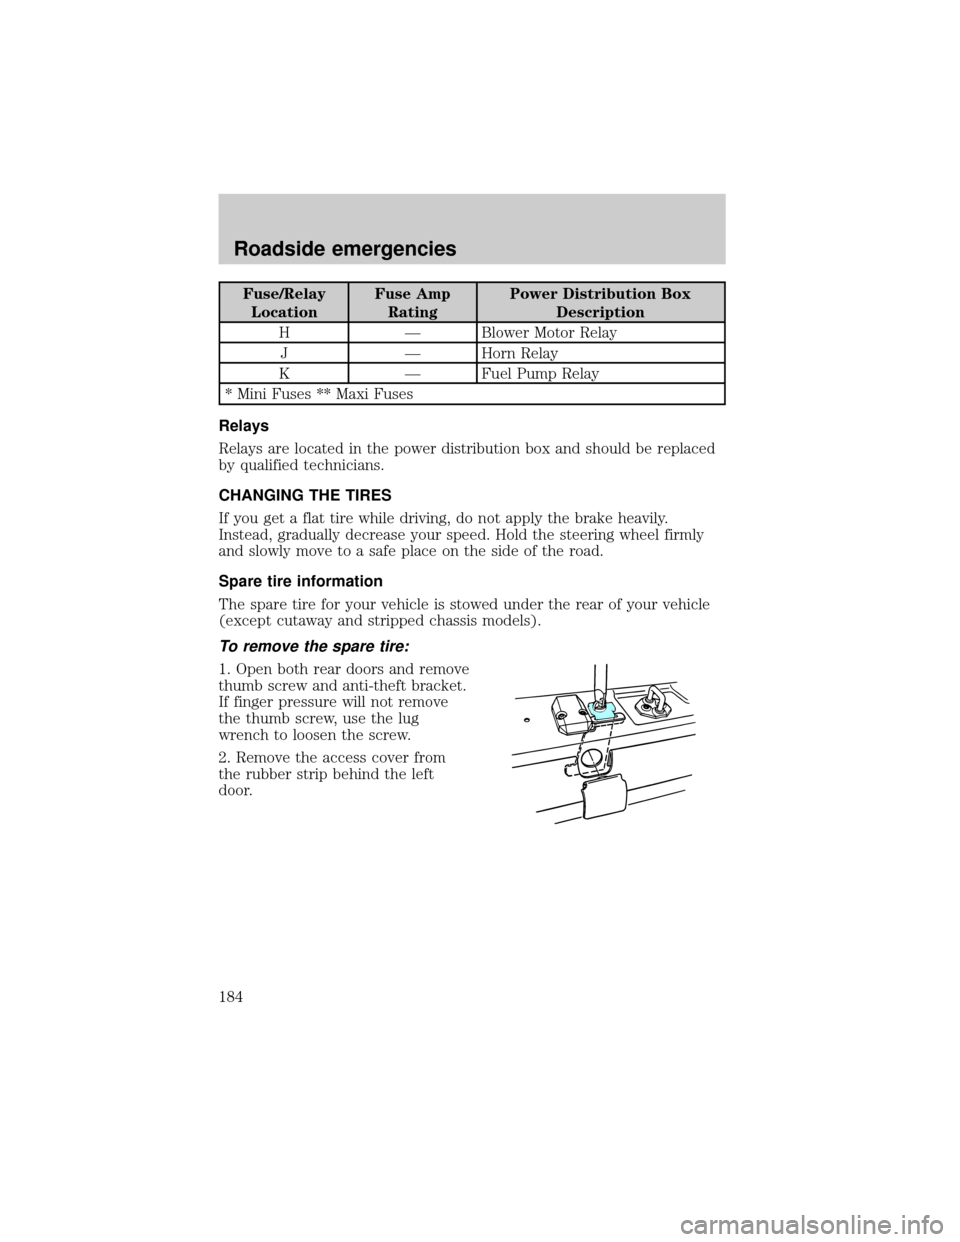
1. Open both rear doors and remove
thumb screw and anti-theft bracket.
If finger pressure will not remove
the thumb screw, use the lug
wrench to loosen the screw.
2. Remove the access cover from
the rubber strip behind the left
door.
Roadside emergencies
184
Page 189 of 272
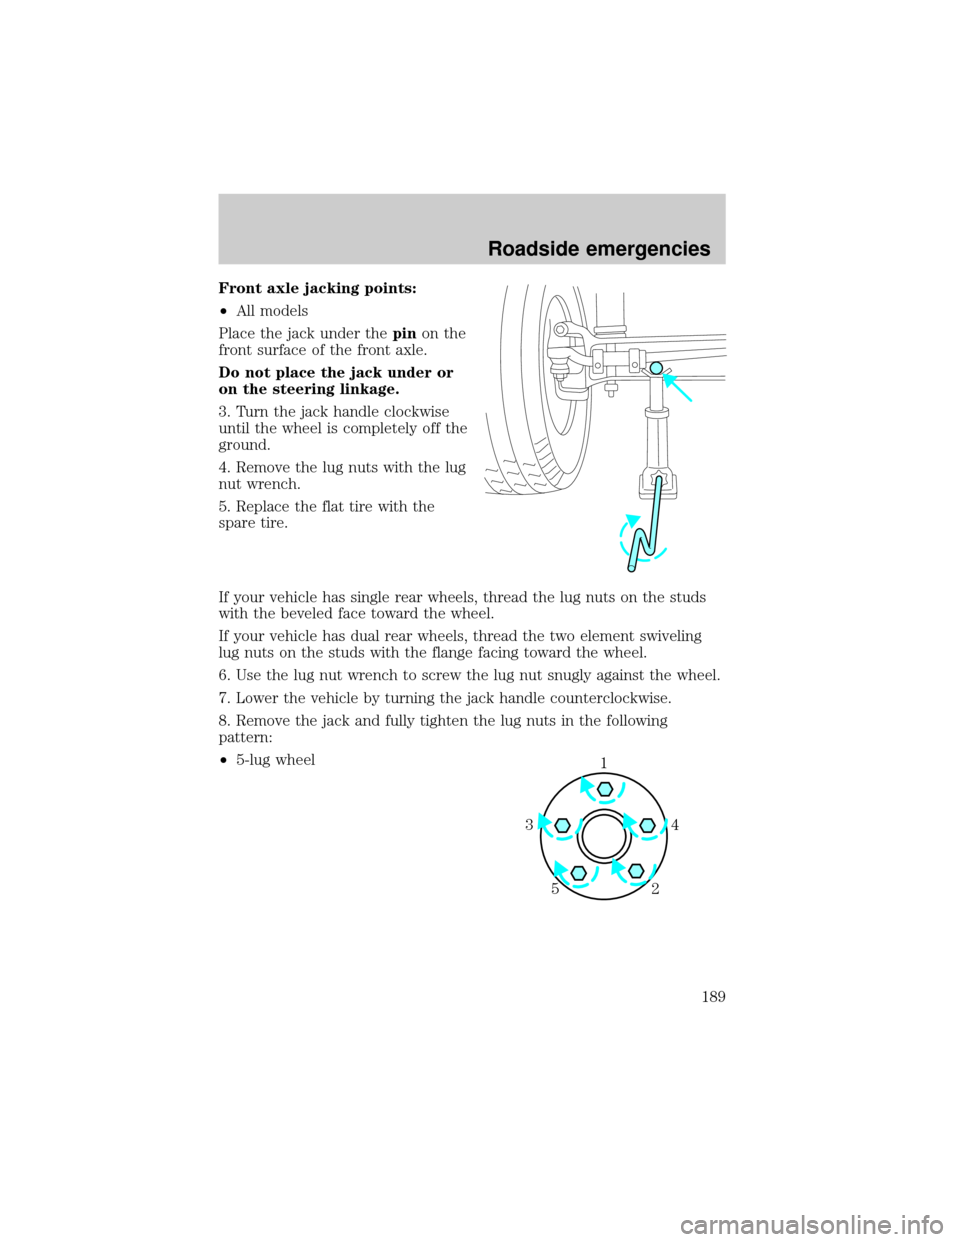
Front axle jacking points:
²All models
Place the jack under thepinon the
front surface of the front axle.
Do not place the jack under or
on the steering linkage.
3. Turn the jack handle clockwise
until the wheel is completely off the
ground.
4. Remove the lug nuts with the lug
nut wrench.
5. Replace the flat tire with the
spare tire.
If your vehicle has single rear wheels, thread the lug nuts on the studs
with the beveled face toward the wheel.
If your vehicle has dual rear wheels, thread the two element swiveling
lug nuts on the studs with the flange facing toward the wheel.
6. Use the lug nut wrench to screw the lug nut snugly against the wheel.
7. Lower the vehicle by turning the jack handle counterclockwise.
8. Remove the jack and fully tighten the lug nuts in the following
pattern:
²5-lug wheel
1
4 3
2 5
Roadside emergencies
189
Page 211 of 272
CLEANING THE INSTRUMENT PANEL
Clean the instrument panel with a damp cloth, then dry with a dry cloth.
Avoid cleaners or polish that increase the gloss of the upper portion of
the instrument panel. The dull finish in this area helps protect the driver
from undesirable windshield reflection.
Do not use chemical solvents or strong detergents when cleaning
the steering wheel or instrument panel to avoid contamination of
the air bag system.
Cleaning the instrument cluster lens
Wipe the cluster area with a soft, damp cotton towel. Dry the area with a
clean, dry towel.
CLEANING THE INTERIOR FABRIC, CARPETS AND CLOTH SEATS
Remove dust and loose dirt with a vacuum cleaner. Remove light stains
and soil with Extra Strength Upholstery Cleaner (E8AZ-19523±AA).
Never saturate the seat covers with cleaning solution.
Do not use household cleaning products or glass cleaners, which
can stain and discolor the fabric and affect the flame retardent
abilities of the seat materials.
If grease or tar is present on the material, spot-clean the area first with
Spot and Stain Remover (F3AZ-19521±WA). Follow up by recleaning the
area with Extra Strength Upholstery Cleaner (E8AZ-19523±AA).
CLEANING LEATHER SEATS (IF EQUIPPED)
All Ford, Lincoln and Mercury vehicles with leather seating surfaces have
a clear, protective coating over the leather.
To clean the leather seats, simply use a soft cloth with Deluxe Leather
and Vinyl Cleaner (F2AZ-19521±WA). Dry the area with a soft cloth.
It is recommended that you use the Deluxe Leather Care Kit
(F8AZ-19G253±AA), available from your authorized Ford, Lincoln or
Mercury dealer. The mild cleaner and special pad available in the kit
cleans the leather and maintains its natural beauty. For best results,
follow the instructions printed on the cleaner label. Regular cleaning of
your leather upholstery helps maintain its resiliency and color.
Cleaning
211
Page 216 of 272
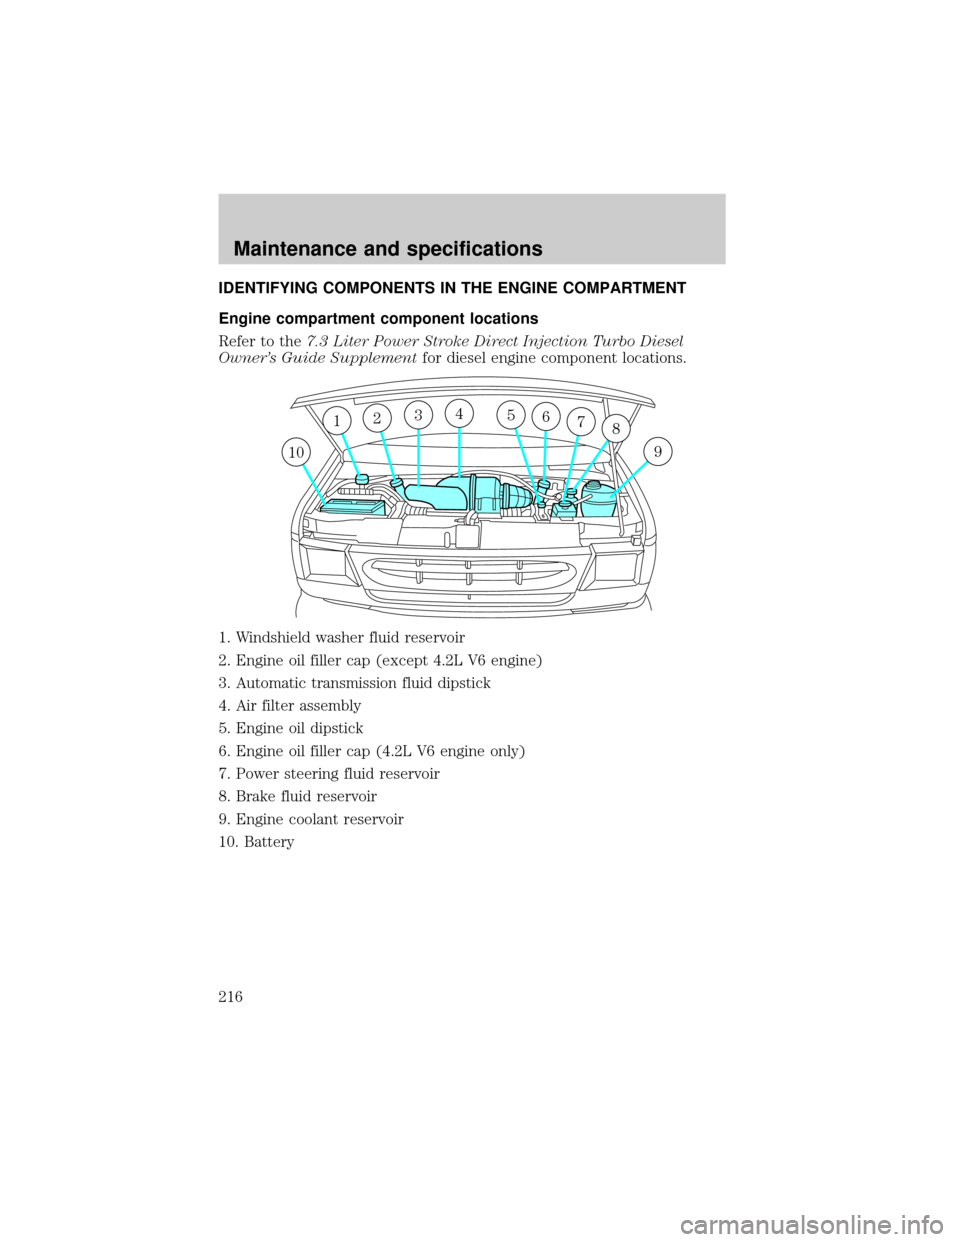
IDENTIFYING COMPONENTS IN THE ENGINE COMPARTMENT
Engine compartment component locations
Refer to the7.3 Liter Power Stroke Direct Injection Turbo Diesel
Owner's Guide Supplementfor diesel engine component locations.
1. Windshield washer fluid reservoir
2. Engine oil filler cap (except 4.2L V6 engine)
3. Automatic transmission fluid dipstick
4. Air filter assembly
5. Engine oil dipstick
6. Engine oil filler cap (4.2L V6 engine only)
7. Power steering fluid reservoir
8. Brake fluid reservoir
9. Engine coolant reservoir
10. Battery
12345678
910
Maintenance and specifications
216
Page 232 of 272
When this occurs the vehicle will still operate. However:
²The engine power will be limited.
²The air conditioning system will be disabled.
Continued operation will increase the engine temperature and the engine
will completely shut down, causing steering and braking effort to
increase.
Once the engine temperature cools, the engine can be re-started. Take
your vehicle to a service facility as soon as possible to minimize engine
damage.
When fail-safe mode is activated
You have limited engine power when in the fail-safe mode, so drive the
vehicle with caution. The vehicle will not be able to maintain high-speed
operation and the engine will run rough. Remember that the engine is
capable of completely shutting down automatically to prevent engine
damage, therefore:
1. Pull off the road as soon as safely possible and turn off the engine.
2. Arrange for the vehicle to be taken to a service facility.
3. If this is not possible, wait a short period for the engine to cool.
4. Check the coolant level and replenish if low.
Never remove the coolant reservoir cap while the engine is
running or hot.
5. Re-start the engine and take your vehicle to a service facility.
Driving the vehicle without repairing the engine problem
increases the chance of engine damage. Take your vehicle to a
service facility as soon as possible.
Maintenance and specifications
232
Page 243 of 272
²Next, at least 20 minutes driving in stop-and-go, city-type traffic with
at least four idle periods.
Allow the vehicle to sit for at least eight hours without starting the
engine. Then, start the engine and complete the above driving cycle. The
engine must warm up to its normal operating temperature. Once started,
do not turn off the engine until the above driving cycle is complete.
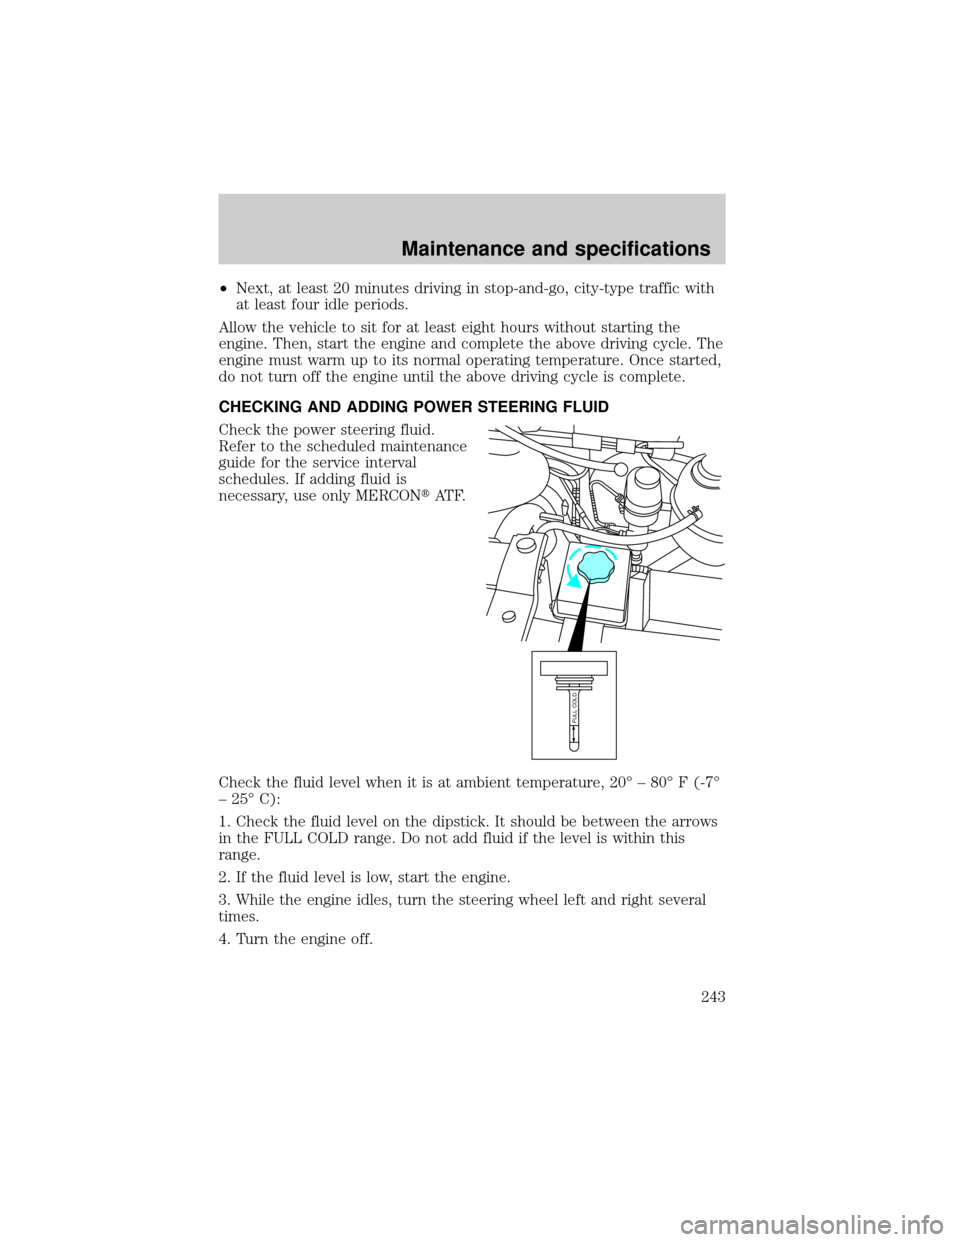
CHECKING AND ADDING POWER STEERING FLUID
Check the power steering fluid.
Refer to the scheduled maintenance
guide for the service interval
schedules. If adding fluid is
necessary, use only MERCONtAT F.
Check the fluid level when it is at ambient temperature, 20É ± 80É F (-7É
± 25É C):
1. Check the fluid level on the dipstick. It should be between the arrows
in the FULL COLD range. Do not add fluid if the level is within this
range.
2. If the fluid level is low, start the engine.
3. While the engine idles, turn the steering wheel left and right several
times.
4. Turn the engine off.
FULL COLD
Maintenance and specifications
243
Page 255 of 272
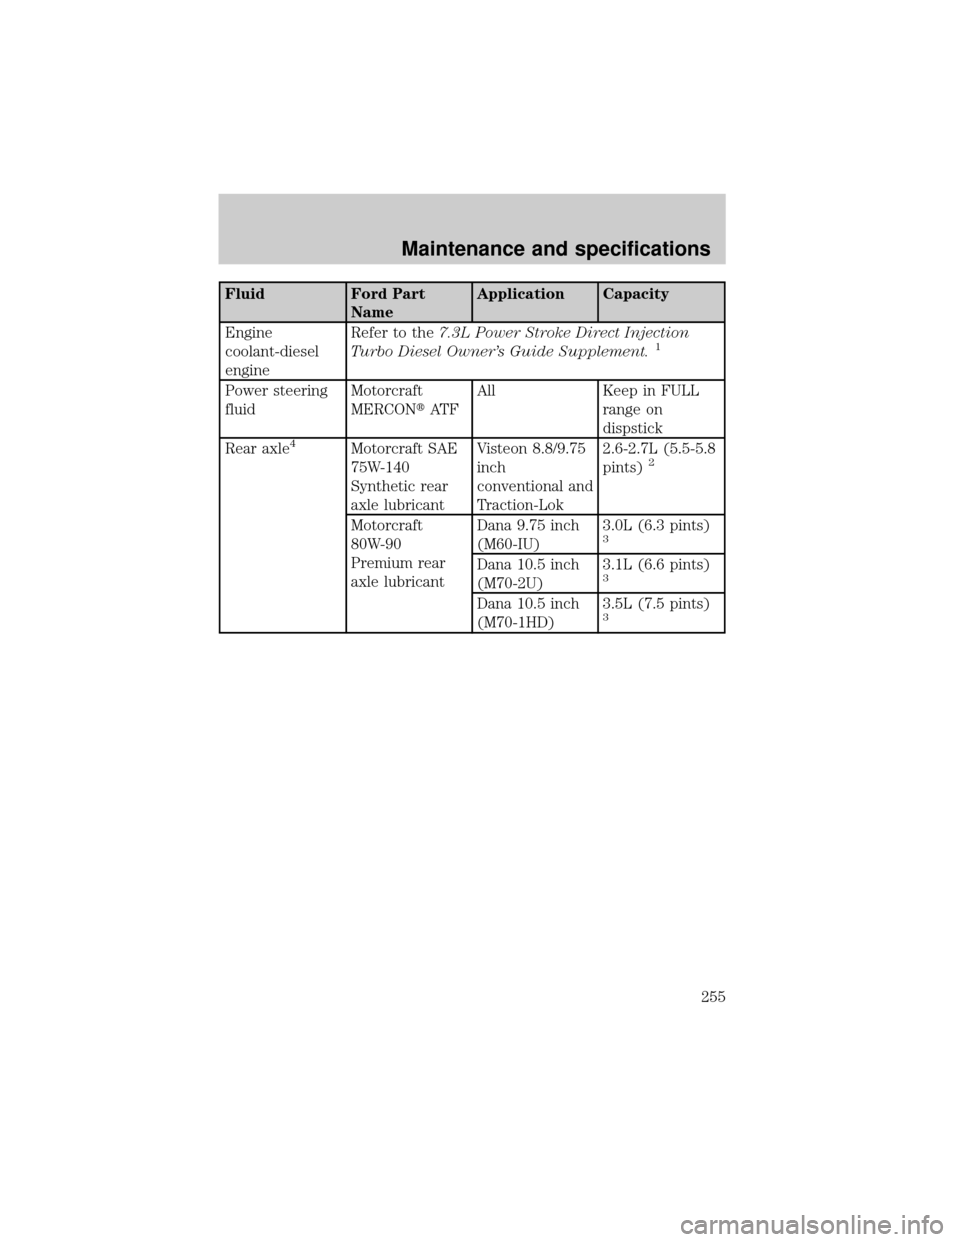
Fluid Ford Part
NameApplication Capacity
Engine
coolant-diesel
engineRefer to the7.3L Power Stroke Direct Injection
Turbo Diesel Owner's Guide Supplement.
1
Power steering
fluidMotorcraft
MERCONtAT FAll Keep in FULL
range on
dispstick
Rear axle
4Motorcraft SAE
75W-140
Synthetic rear
axle lubricantVisteon 8.8/9.75
inch
conventional and
Traction-Lok2.6-2.7L (5.5-5.8
pints)2
Motorcraft
80W-90
Premium rear
axle lubricantDana 9.75 inch
(M60-IU)3.0L (6.3 pints)3
Dana 10.5 inch
(M70-2U)3.1L (6.6 pints)3
Dana 10.5 inch
(M70-1HD)3.5L (7.5 pints)3
Maintenance and specifications
255
Page 258 of 272
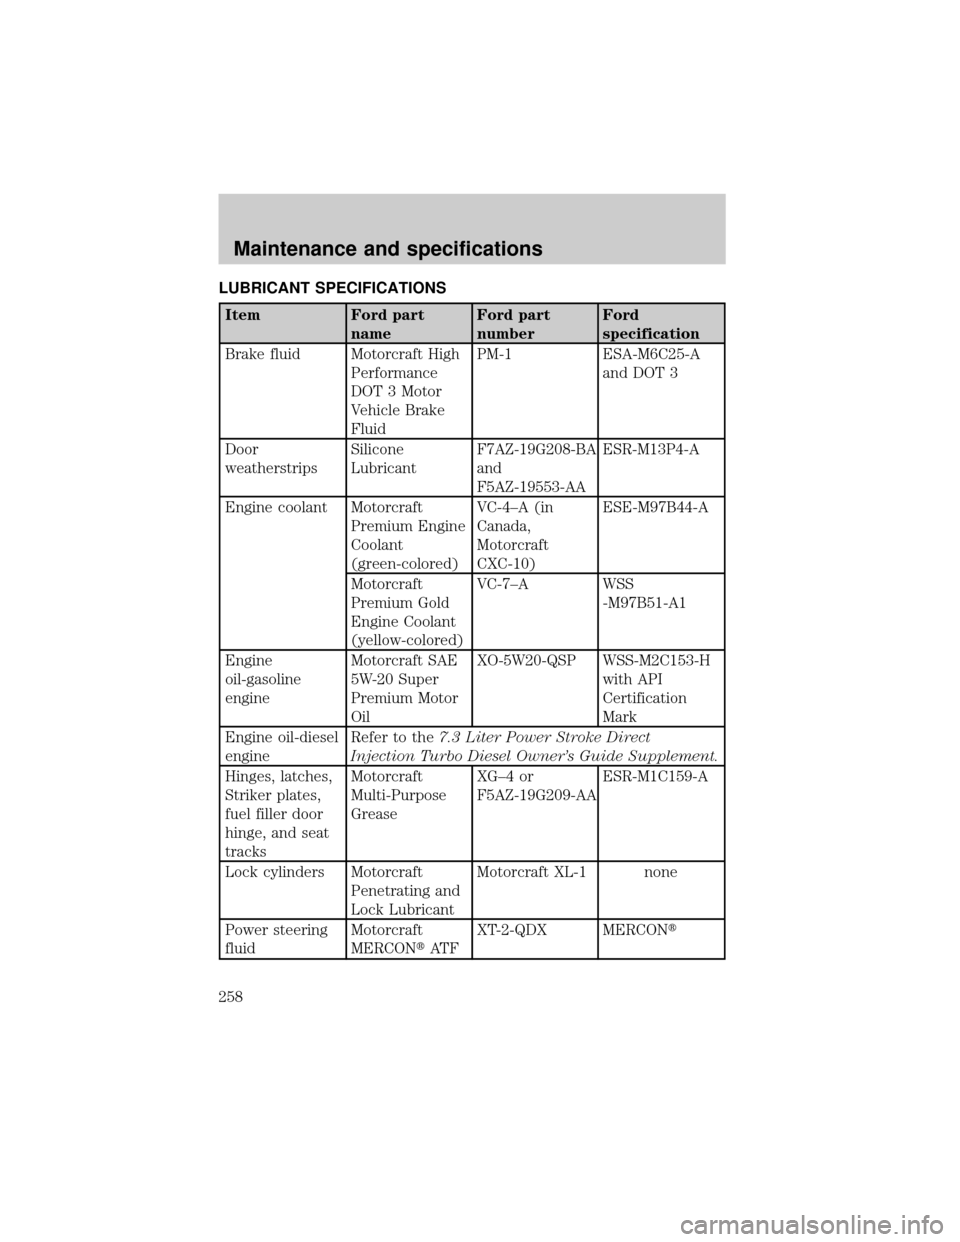
LUBRICANT SPECIFICATIONS
Item Ford part
nameFord part
numberFord
specification
Brake fluid Motorcraft High
Performance
DOT 3 Motor
Vehicle Brake
FluidPM-1 ESA-M6C25-A
and DOT 3
Door
weatherstripsSilicone
LubricantF7AZ-19G208-BA
and
F5AZ-19553-AAESR-M13P4-A
Engine coolant Motorcraft
Premium Engine
Coolant
(green-colored)VC-4±A (in
Canada,
Motorcraft
CXC-10)ESE-M97B44-A
Motorcraft
Premium Gold
Engine Coolant
(yellow-colored)VC-7±A WSS
-M97B51-A1
Engine
oil-gasoline
engineMotorcraft SAE
5W-20 Super
Premium Motor
OilXO-5W20-QSP WSS-M2C153-H
with API
Certification
Mark
Engine oil-diesel
engineRefer to the7.3 Liter Power Stroke Direct
Injection Turbo Diesel Owner's Guide Supplement.
Hinges, latches,
Striker plates,
fuel filler door
hinge, and seat
tracksMotorcraft
Multi-Purpose
GreaseXG±4 or
F5AZ-19G209-AAESR-M1C159-A
Lock cylinders Motorcraft
Penetrating and
Lock LubricantMotorcraft XL-1 none
Power steering
fluidMotorcraft
MERCONtAT FXT-2-QDX MERCONt
Maintenance and specifications
258
Page 271 of 272

P
Panic alarm feature, remote
entry system ..............................110
Parking brake ............................154
Parts (see Motorcraft parts) ....253
Power distribution box (see
Fuses) ........................................181
Power door locks ......................108
Power steering ..........................155
fluid, checking and adding ....243
fluid, refill capacity ................254
fluid, specifications .........258, 260
Preparing to drive your
vehicle ........................................156
R
Radio ............................................20
Relays ................................177, 184
Remote entry system .......109±110
illuminated entry ....................112
locking/unlocking
doors ................................108±110
panic alarm .............................110
replacement/additional
transmitters .............................111
replacing the batteries ...........110
S
Safety belts (see Safety
restraints) ....................16, 121±125
Safety defects, reporting ..........206
Safety restraints ................121±125
belt minder .............................127
cleaning the safety
belts .................................131, 212extension assembly ................131
for adults .........................122±124
for children .....................137±138
lap belt ....................................125
warning light and
chime ...................13, 15, 126±127
Safety seats for children ..........139
Seat belts (see Safety
restraints) ..................................121
Seats ..........................................113
child safety seats ....................139
Servicing your vehicle ..............214
Spark plugs,
specifications .............253, 260±261
Special notice
ambulance conversions ..............7
diesel-powered vehicles .............6
utility-type vehicles ....................7
Specification chart,
lubricants ...........................258, 260
Speed control ..............................98
Speedometer ...............................18
Starting your vehicle ........148±150
jump starting ..........................191
Steering wheel
controls ................................95, 98
tilting .........................................95
T
Temperature control (see
Climate control) ..........................78
Tires ...........................184, 248±250
changing ..........................184, 186
checking the pressure ............250
replacing ..........................187, 251
rotating ....................................250
Index
271